Sign In
Upload
Manuals
Brands
Otto Bock Manuals
Mobility Aid
C1000 DS
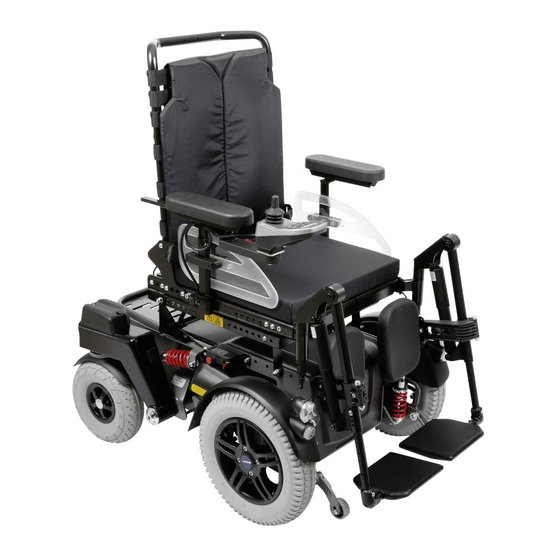
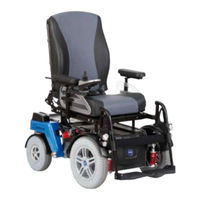
Otto Bock C1000 DS Manuals
Manuals and User Guides for Otto Bock C1000 DS. We have
3
Otto Bock C1000 DS manuals available for free PDF download: Instructions For Use Manual, Service Instructions Manual
Otto Bock C1000 DS Instructions For Use Manual (240 pages)
Brand:
Otto Bock
| Category:
Wheelchair
| Size: 4 MB
Table of Contents
Deutsch
5
Table of Contents
5
Allgemeine Informationen
10
Vorwort
10
Verwendungszweck
10
Anwendungsgebiet
11
Service
12
Sicherheitshinweise
12
Bedeutung der Symbolik
12
Normen und Richtlinien
13
Allgemeine Sicherheitshinweise
13
Sicherheitsanforderungen für Transport, Lagerung und Montage
14
Sicherheitsanforderungen für den Betrieb
17
Sicherheitsanforderungen an Pflege, Wartung und Entsorgung
24
Anforderungen an den Benutzer
25
Sicherheitsfunktionen
26
Warn- und Typenschilder
27
Produktbeschreibung
29
Anlieferung und Herstellung der Gebrauchsfähigkeit
30
Anlieferung
30
Abb. 1 Hauptkomponenten
30
Einstellungen
31
Inbetriebnahme
31
Abb. 2 Kippschutz
31
Abb. 3 Sicherung
32
Transport und Lagerung
33
Transport IM BTW
33
Abb. 4 Querbolzen in Halterung Einlegen, Verriegelter Querbolzen
33
Abb. 4
33
Notwendiges Zubehör
34
Transport des Elektrorollstuhls
34
Transportösen Vorn, Transportösen Hinten
35
Transportvorbereitung
36
Abb. 6 Rückenlehne Umklappen
36
Abb. 7 Packmaß
36
Lagerung
37
Bedienung
38
Einstellmöglichkeiten
38
Rückenlehne
39
Gepäckträger Einstellen
39
Abb. 8 Entriegelungsgurt Rückenlehne
39
Seitenteil mit Armauflage
40
Abb. 9 Gepäckträger Einstellen
40
Abb. 10 Flügelschraube zur Abnahme des
41
Seitenteils mit Armauflage Lösen
41
Abb. 11 Armauflage an Oberarmlänge Anpassen
41
Bedienpult
42
Abb. 12 Armauflagen an Unterarmlänge Anpassen
42
Fußrasten
43
Abb. 13 Anpassen des Bedienpults
43
Abb. 14 Arretierung der Fußraste
44
Abb. 15 Unterschenkellänge Einstellen
44
Ein- und Aussteigen
45
Von/Nach der Seite
45
Von/Nach Vorn
45
Steuerung
46
Bedienpult
46
Abb. 16 Fußrasten Hochgeklappt
46
Abb. 17 Fußrasten Demontiert
46
Abb. 18 Bedienpult
47
Abb. 19 Bedienpult Anschlüsse auf der Unterseite
47
Abb. 20 LCD-Anzeigefeld mit allen Symbolen
48
Separater LCD-Monitor
49
Ein- und Ausschalten
49
Fahrfunktion
49
Anzeige „Ladezustand
51
Reichweite
53
Steuerung Elektrischer Zusatzfunktionen
53
Wegfahrsperre
55
Abb. 21 Informationsfenster Wegfahrsperre
56
Lenksperre
57
Beleuchtung
58
Abb. 22 Frontleuchten
58
Bremsentriegelung und -Verriegelung
59
Abb. 23 Heckbeleuchtung, Rückstrahler
59
Abb. 24 Bremse Entriegeln
61
Batterien
62
Laden
63
Ladegerät
64
Batterieabdeckung Abnehmen
66
Abb. 25 Ladebuchse
66
Abb. 26 Batterieabdeckung Abnehmen
66
Batterien Tauschen
67
Abb. 27 Batteriefach Entriegeln und Schiene Abnehmen
67
Abb. 28 Batterien an den Tragegriffen Entnehmen
68
Abb. 29 Anschlagwinkel für die Batterie
68
Einbauposition der Batterien Ändern
69
Abb. 30 Entriegelungsbolzen Eingerastet
69
Abb. 31 Anschlagwinkel für die Batterie
70
Zubehör
71
Elektrische Sitzfunktionen
71
Sicherheitshinweise
71
Elektrische Sitzhöhenverstellung
73
Elektrische Sitzkantelung
75
Kriechganges
75
Abb. 33 Ausgefahrene Sitzhöhenverstellung
75
Elektrische Rückenwinkelverstellung
76
Abb. 34 Elektrische Sitzkantelung
76
Abb. 35 Elektrische Rückenwinkelverstellung
77
Abb. 36 Querbolzen in Halterung Verriegeln
77
Elektrische Fußrasten
78
Mechanische Sitzfunktionen
78
Sicherheitshinweise
78
Abb. 37 Fußraste Hochgeschwenkt
78
Mechanisch Hochschwenkbare Fußraste
79
Steuerungszubehör
79
Sondersteuerungen
79
Abb. 38 Mechanisch Hochschwenkbare Fußraste
79
Begleitpersonensteuerung
80
Abb. 39 Begleitpersonensteuerung
80
Abb. 40 Übersicht Begleitpersonensteuerung
80
Separater LCD-Monitor mit Infrarot
83
Abb. 41 LCD-Modul mit Infrarot
83
Externer Kilometerzähler
85
Tastenmodul
85
Abb. 42 Kilometerzähler
85
2-Fach Adapterkabel für Piko-Button
87
Abb. 43 Tastenmodul
87
Weitere Optionen
88
Recaro-Sitz
88
Abb. 44 Rückenwinkel am Recaro-Sitz Einstellen
88
Abb. 45 Darstellung der Druckpunkte
89
Bedienpulthalter
90
Abb. 46 Entriegeln/Verriegeln des Recaro-Sitzes
90
Beckengurt
91
Abb. 47 Höhenverstellung Bedienpulthalter
91
Abb. 48 Bedienpulthalter Wegschwenkbar
91
Abb. 49 Beckengurt Einstellen
92
Hosenträgergurt/Brustgurt (nur für Recaro®-Sitze)
93
Adapter für Kopfstützenbefestigung (Standardsitz, Contour-Sitz)
94
Weitere Optionale Anbauteile
94
Abb. 50 Adapter für Montageset zur
94
Kopfstützenbefestigung
94
Störung/Störungsbeseitigung
95
Warnung
96
Fehler
96
Fehleranzeige: Bedienpult/Lcd-Monitor
97
Fehleranzeige Begleitpersonensteuerung
100
Defekt/Versagen
103
Wartung, Reinigung und Desinfektion
103
Wartungsintervalle
103
Sicherung Wechseln
106
Rad Wechseln
106
Abb. 51 Sicherungshalter
106
Abb. 52 Wagenheber
107
Lenkrad Wechseln
108
Abb. 53 Lenkrad Demontieren
108
Antriebsrad Wechseln
109
Raddecke Und/Oder Schlauch bei Luftbereifung Wechseln
109
Abb. 54 Antriebsrad Demontieren
109
Abb. 55 Raddecke Ausbauen
110
Defekte Beleuchtung Wechseln
111
Frontbeleuchtung am Spritzschutz
111
Frontbeleuchtung am
111
Abb. 56 Frontbeleuchtung
111
Heckbeleuchtung
112
Abb. 57 Wechsel der Birne des Frontblinkers
112
Abb. 58 Befestigung der Heckbeleuchtung
113
An der Lenkradschwinge
113
Abb. 59 Heckbeleuchtung Entnehmen
113
Abb. 60 Verbindungsstecker Heckbeleuchtung
113
Reinigung und Pflege
114
Desinfektion
115
Entsorgung
115
Hinweise zur Entsorgung
115
Hinweise zum Wiedereinsatz
116
Rechtliche Hinweise
117
Nutzungsdauer
117
Haftung
117
CE-Konformität
117
Garantiebedingungen
118
Markenzeichen
118
Technische Daten
119
Instructions for Use
124
English
125
General Information
130
Foreword
130
Intended Use
130
Field of Application
131
Service
132
Safety Instructions
132
Explanation of Symbols
132
Standards and Directives
133
General Safety Information
133
Safety Requirements for Transportation, Storage and Assembly
134
Safety Requirements for Operation
137
Safety Requirements for Care, Maintenance and Disposal
144
Requirements for the User
145
Safety Functions
146
Warning Symbols and Type Plates
147
Product Description
149
Delivery and Preparation for Use
150
Delivery
150
Figure 1 Main Components
150
Settings
151
Initial Operation
151
Figure 2 Anti-Tipper
151
Figure 3 Fuse
152
Transportation and Storage
153
Transportation in a Wheelchair Accessible Vehicle
153
Figure 4 Inserting the Cross Bolt into the Holder
153
Required Accessories
154
Transport of the Power Wheelchair
154
Figure 5 Eyebolts Front, Eyebolts Rear
155
Preparing for Transportation
156
Figure 6 Folding the Back Rest
156
Figure 7 Folding Size
156
Storage
157
Operation
158
Adjustment Possibilities
158
Back Rest
158
Adjusting the Luggage Carrier
159
Figure 8 Release Strap for the Back Rest
159
Figure 9 Adjusting the Luggage Carrier
159
Side Panel with Arm Rest
160
Figure 10 Loosening the Thumb Screw for Removal of the Side Panel with Arm Rest
160
Figure 11 Adapting the Arm Rest to the Upper
161
Figure 12 Adapting the Arm Rests to the Forearm Length
161
Control Panel
162
Figure 13 Adapting the Control Panel
162
Footrests
163
Figure 14 Footrest Locking Mechanism
163
Getting into and out of the Power Wheelchair
164
From/To the Side
164
Figure 15 Adjusting the Lower Leg Length
164
From / to the Front
165
Figure 16 Footrests Folded up
165
Figure 17 Footrests Removed
165
Control Unit
166
Control Panel
166
Figure 18 Control Panel
166
Figure 19 Control Panel Connections on the Underside
167
Separate LCD Monitor
168
Switching on and off
168
Figure 20 LCD Monitor with All Symbols
168
Driving Function
169
Battery Charge Level" Indicator
171
Range
172
Controlling Additional Electrical Functions
172
Drive-Away Lock
174
Figure 21 Information Window with Drive-Away Lock
175
Steering Lock
176
Lighting
177
Figure 22 Front Lights
177
Releasing and Engaging the Wheel Lock
178
Figure 23 Rear Lights, Reflectors
178
Batteries
180
Figure 24 Releasing the Wheel Lock
180
Charging the Batteries
182
Charger
183
Figure 25 Charging Receptacle
184
Removing the Battery Cover
185
Replacing the Batteries
185
Figure 26 Removing the Battery Cover
185
Figure 27 Unlocking the Battery Drawer and Removing the Track
186
Figure 28 Removing the Batteries by the Handles
186
Changing the Battery Installation Position
187
Figure 29 Battery Stop
187
Figure 30 Release Bolt Engaged
187
Figure 31 Battery Stop
188
Accessories
189
Electric Seat Functions
189
Safety Instructions
189
Electric Seat Height Adjustment
191
Electric Seat Tilt
192
Figure 32 Snail Symbol Indicating Creep Speed
192
Figure 33 Extended Seat Height Adjustment
192
Electric Back Angle Adjustment
193
Figure 34 Electric Seat Tilt
193
Figure 35 Electric Back Angle Adjustment
194
Figure 36 Locking the Cross Bolt in the Holder
194
Electrically Footrests
195
Manual Seat Functions
195
Safety Instructions
195
Figure 37 Elevated Footrest
195
Mechanically Elevating Footrest
196
Control Unit Accessories
196
Special Controls
196
Figure 38 Mechanically Elevating Footrest
196
Attendant Control
197
Figure 39 Attendant Control
197
Figure 40 Attendant Control Overview
197
Separate LCD Monitor with Infrared
200
Figure 41 LCD Module with Infrared
200
External Kilometre Indicator
202
Push Button Module
202
Figure 42 Kilometre Indicator
202
Figure 43 Push Button Module
203
Adapter Cable for Piko Button
204
Additional Options
204
Recaro Seat
204
Figure 44 Adjusting the Recaro Seat Angle
205
Figure 45 Illustration of Pressure Points
206
Control Panel Holder
207
Figure 46 Releasing/Locking the Recaro Seat
207
Figure 47 Height Adjustment of Control Panel Holder
207
Lap Belt
208
Figure 48 Swing-Away Control Panel Holder
208
Four-Way Chest Strap/Chest Belt (for Recaro® Seats Only)
209
Figure 49 Adjusting the Lap Belt
209
Headrest Mounting Adapter (Standard Seat, Contour Seat)
210
Other Optional Add-On Components
210
Figure 50 Adapter for Headrest Installation Kit
210
Malfunctions / Troubleshooting
211
Warning
212
Error
212
Error Indication: Control Panel / LCD Monitor
214
Error Indication: Attendant Control
217
Defect/Failure
219
Maintenance, Cleaning and Disinfection
219
Maintenance Intervals
219
Changing the Fuse
222
Wheel Replacement
222
Figure 51 Fuse Holder
222
Figure 52 Jack
223
Steering Caster Replacement
224
Figure 53 Removing the Steering Caster
224
Drive Wheel Replacement
225
Replacing the Casing And/Or Tube for Pneumatic Tyres
225
Figure 54 Removing the Drive Wheel
225
Figure 55 Removing the Casing
226
Changing Defective Lights
227
Front Lights on Splash Guard
227
Front Lights on the Side Panel
227
Figure 56 Front Lights
227
Rear Lights
228
Figure 57 Replacing the Front Direction Indicator Bulb
228
Figure 58 Attaching the Rear Light to the Steering
229
Figure 59 Removing the Rear Light
229
Figure 60 Rear Light Connector Plug
229
Cleaning and Care
230
Disinfection
230
Disposal
231
Disposal Information
231
Information on Re-Use
231
Legal Information
232
Service Life
232
Liability
232
CE Conformity
232
Warranty Terms
233
Trademarks
233
Technical Data
234
Advertisement
Otto Bock C1000 DS Service Instructions Manual (124 pages)
Brand:
Otto Bock
| Category:
Mobility Aid
| Size: 3 MB
Table of Contents
Table of Contents
3
Foreword
7
Support
7
General Information
7
Explanation of Symbols
7
General Safety Information
7
Safety
7
Safety Instructions for the Use of Tools and Accessories
8
Safety Instructions for Service and Maintenance Tasks
9
S Afety Standards for Maintenance Tasks on Electrical Components
11
Safety Functions
13
Safety Instructions for Controller Configuration
13
Safety Instructions for Disposal
13
Transportation
14
Folding for Transportation
15
Folding the Back Rest
15
Folding the Back Rest with Electric Back Angle Adjustment
16
Transportation and Storage
14
Storage
17
Required Tools and Accessories
18
Information Display
19
Service and Maintenance
21
Inspecting the General Condition
21
Fuse Replacement
21
Batteries
22
Charging the Batteries
22
Removing the Battery Cover
25
Replacing the Batteries
26
Changing the Battery Installation Position
27
Reinstalling the Battery Cable
28
Replacing the Charging Receptacle
29
Luggage Carrier
30
Replacing the Luggage Carrier
30
Adjusting the Luggage Carrier
31
Replacing the Controller
31
Replacing the Seat Module
33
Wheels
34
Inspecting the General Condition
34
Removing the Drive Wheel
34
Removing the Steering Caster
35
Changing Tyres
36
Replacing the Casing and / or Tube
36
Removing the Splash Guard for the Drive Wheel
37
Removing the Holder for the Drive Wheel Splash Guard
38
Removing the Splash Guard for the Steering Caster
39
Replacing the Wheel Flange
39
Removing the Spring, Adjusting the Spring Power
39
Removing the Drive Wheel Spring
40
Removing the Steering Rocker Spring
41
Adjusting the Spring Power
41
Steering
42
Replacing the Steering Potentiometer
42
Replacing the Steering Motor
43
Replacing the Steering Rocker
48
Wheel Lock and Wheel Lock Release
49
Replacing the Wheel Lock Release and Bowden Cables
49
Setting / Adjusting the Wheel Lock Release
50
Performing a Function Check of the Wheel Lock Settings
52
Anti-Tipper
53
Removing the Anti-Tipper Holder
53
Removing the Anti-Tipper Wheel
53
Lighting
54
Removing the Front Lights
54
Removing the Rear Lights
55
Seat
56
Standard Seat: Removing the Seat Cushion and Back Pad
57
Standard Seat: Replacing / Adjusting the Back Upholstery
57
Replacing the Bearing Plate (Standard and Contour Seat)
57
Standard Seat: Replacing the Seat Plate
58
Standard and Contour Seat: Replacing the Seat Frame
59
Standard and Contour Seat: Adjusting the Seat Height
60
Standard and Contour Seat: Adjusting the Seat Angle
61
Standard and Contour Seat: Adjusting the Seat Depth
62
Remove the Side Panel
63
Adjusting / Replacing the Arm Rest
63
Adapting / Replacing the Clothing Protector
64
Standard and Contour Seat: Replacing / Adjusting the Side Panel Attachment Device
65
Retrofitting the Four-Way Chest Strap (Option for Recaro® Seat Only)
66
Lap Belt
67
Retrofitting Arm Straps
68
Installing the Contour Seat (Option)
69
Installing the Recaro® Seat (Option)
69
Adapting / Replacing the Footrests
71
Replacing the Footplate
74
Electric Seat Functions
75
Retrofitting the Electric Back Angle Adjustment (Option)
75
Retrofitting the Electric Seat Tilt (Option)
76
Retrofitting the Seat Height Adjustment (Option)
77
Retrofitting the Combination Seat Height Adjustment / Seat Tilt (Option)
78
Retrofitting Electric Footrests (Option)
78
Retrofitting a Seat Module
79
Removing the Seat Tilt Actuator
80
Removing the Back Angle Adjustment Actuator
81
Removing the Seat Height Adjustment Actuator
82
Removing the Drive Motor
83
Removing the Drive Motor with Oscillating Crank
84
Removing the Drive Unit Sustainer
85
Replacing / Retrofitting Control Elements
85
Mounting an LCD Monitor
85
Replacing the Control Panel
87
Replacing the Control Panel Holder
87
Retrofitting the Removable or Swing-Away Control Panel
88
Retrofitting the Height-Adjustable Control Panel Holder
89
Retrofitting Attendant Controls
90
Installing Joystick Accessories
91
Push Button Module
92
Preparing the Push Button Module (Attaching the Icons)
92
Turning Switches on / off
93
Installing the Push Button Module
94
Connecting External Switches
96
Accessories
96
Retrofitting the Headrest Adapter and Installation Kit
96
Retrofitting the Signal Panel Installation Kit
97
Retrofitting Rear View Mirrors
98
Other Optional Add-On Components
98
Diagnostic Steps
99
Enable50 Wheelchair Controller - Installation and Programming
102
Diagnostics
99
Overview
102
Controller
103
Wiring the Controller
104
Technical Data, Connections
104
Actuator Outputs
104
Seat Module
105
Wiring the Seat Module
106
Electrical Specifications
107
Programming Device
108
Handheld Programming Device
108
PC Programming Station (PCPS)
110
Programmable Parameters
110
Main Parameters
111
Driving" Parameter Settings
115
Joystick" Parameter Settings
119
Maintenance and Service Plan C1000 DS
121
Otto Bock C1000 DS Instructions For Use Manual (80 pages)
Brand:
Otto Bock
| Category:
Wheelchair
| Size: 10 MB
Table of Contents
Table of Contents
3
Foreword
6
Product Description
6
Function
6
Product Overview
7
Intended Use
8
Indications for Use
8
Indications
8
Contraindications
8
Absolute Contraindications
8
Relative Contraindications
8
Qualification
8
Safety
9
Explanation of Warning Symbols
9
Safety Instructions for Assembly and Adjustments
9
Safety Instructions for Use
9
Side Effects
10
Effects of Electromagnetic Interference on the Product and on the User
10
Further Information
11
Nameplate and Warning Labels
11
Signage on the Product
11
Nameplate
11
Warning Labels
12
Delivery
12
Scope of Delivery
12
Accessories
12
Accessories from Other Manufacturers
13
Storage
13
Storage During Daily Use
13
Storage During Extended Disuse
13
Preparing the Product for Use
14
Safety Instructions
14
Initial Operation
14
Settings
14
Adjustments by Qualified Personnel
14
Safety Instructions
15
Adjusting the Standard Seat
16
Adjusting the Side Panels
16
Adjusting the Back Support Upholstery
16
Inserting Foam Elements
17
Adjusting the Belt Length
17
Adjusting the Control Device
18
Wheelchair Control Options
18
Attendant Control
18
Push-Button Module
18
Adjustments by the User
18
Delivery
19
Final Inspection
19
Transport to the Customer
19
Handing over the Product
19
Use
19
Circuit Breaker
19
Side Panels
20
Removing/Installing the Side Panels
20
Adjusting the Side Panels
20
Legrests
21
Removing/Installing the Leg Supports
21
Adjusting the Leg Supports
22
Backrest
23
Folding the Back Support Up/Down
23
Adjusting the Back Support Angle
24
Getting in and Transferring
24
Control Unit
25
Control Panel
25
Buttons and Display Functions
26
Driving Functions
28
Safety Instructions
28
Driving Notes
30
Switching on and off
31
Selecting the Speed Levels
31
Driving
32
Range
32
Anti-Tipper
33
Drive-Away Lock
33
Steering Lock
34
Adapting the Driving Characteristics
34
Enabling/Disabling the Brakes
35
Batteries/Charging Process
36
Safety Instructions
36
General
36
Battery Charging Information
36
Battery Charger
37
Charging the Batteries
37
Seat
38
Safety Instructions
38
Seat Type
39
Contoured Pads
39
Detaching/Attaching the Covers
39
Cleaning the Covers
40
Recaro® Seat
40
Settings
41
Use
41
Headrest
42
Power Seat Functions
42
Safety Instructions
43
Power Seat Height Adjustment
44
Power Seat Tilt
44
Combined Seat Height Adjustment/Seat Tilt
45
Power Back Angle Adjustment
45
Power Legrests
46
Controlling Power Seat Functions
46
Joystick Functions
47
Manual Seat Functions
47
Safety Instructions
47
Manually Elevating Legrests
48
Lap Belt
48
Adaptation
48
Use
49
Control Unit Accessories
50
Separate LCD Monitor
50
Wireless Environmental Control
55
Attendant Control
55
Push-Button Module
57
Special Controls
58
Adapter Cable for Piko Button
59
Additional Options
59
Control Panel Holder
59
Adjusting the Control Panel Position
59
Lighting
60
Belts/Belt Systems
60
Adaptation
61
Use
61
Luggage Carrier
63
Overview of Other Options
63
Disassembly and Transport
64
Safety Instructions
64
Reducing the Transportation Size
64
Preparing for Transport
65
Use in Vehicles for Transporting Persons with Reduced Mobility
65
Required Accessories
66
Using the Product in a Vehicle
66
Restrictions for Use
68
Care
69
Safety Instructions
69
Cleaning
69
Disinfection
69
Maintenance and Repair
69
Maintenance
69
Maintenance Intervals
70
Repair
71
Replacing Defective Lights
71
Replacing the Battery
71
Troubleshooting
71
Types of Notifications
71
Procedure for Warnings and Error Messages
72
Wheelchair Control Unit Error Overview
72
Attendant Control Error Overview
73
Behaviour in Case of Breakdowns
74
Disposal
74
Safety Instructions
74
Disposal Information
74
Information on Re-Use
74
Legal Information
74
Liability
75
Warranty
75
Privacy Notice
75
Service Life
75
Technical Data
75
Appendices
77
Threshold Values for Wheelchairs Transportable by Train
77
Required Tools
78
Torque Values of the Screw Connections
78
Sound Emission Information
78
Advertisement
Advertisement
Related Products
Otto Bock C1000
Otto Bock C1000 SF
Otto Bock C-Leg compact
Otto Bock C-Leg
Otto Bock Caleo
Otto Bock Complete Leg Orthosis
Otto Bock C-Leg 4
Otto Bock C-Leg Protector 4X860 Series
Otto Bock C-Leg Prosthetic System
Otto Bock C-Brace KAFO 17KO1 Series
Otto Bock Categories
Medical Equipment
Wheelchair
Personal Care Products
Mobility Aid
Adapter
More Otto Bock Manuals
Login
Sign In
OR
Sign in with Facebook
Sign in with Google
Upload manual
Upload from disk
Upload from URL