Table of Contents
Advertisement
Quick Links
Advertisement
Chapters
Table of Contents
Troubleshooting

Related Manuals for Agilent Technologies 86038A


Summary of Contents for Agilent Technologies 86038A
- Page 1 Agilent 86038A Optical Dispersion Analyzer User's Guide Agilent Technologies...
- Page 2 Buyer's sole and exclusive remedies. formed or adhered to, could result Agilent Technologies shall not be liable This Agilent Technologies instrument in damage to the product or loss of for any direct, indirect, special, product is warranted against defects in important data.
- Page 3 WARN IN G Never look directly into the end of a fiber or a connector, unless you are absolutely certain that there is no signal in the fiber. Agilent 86038A Optical Dispersion Analyzer, Third Edition...
- Page 4 Agilent Technologies Sales and Service Offices For more information about Agilent Technologies test and measurement products, applications, services, and for a current sales office listing, viesit our web site: http://www.agilent.com/comms/lightwave You can also contact one of the following centers and ask for a test and measurement sales representative.
-
Page 5: Table Of Contents
Quick Setup Measurement Process Flexible Measurement Process Setup Parameters and What They Do Choosing Setup Parameters for Your Device Narrowband Filter Measurement Fiber Measurement Function Reference Introduction File Menu View Menu System Menu Agilent 86038A Optical Dispersion Analyzer, Third Edition... - Page 6 Troubleshooting Startup Problems Troubleshooting GPIB Communications Problems Troubleshooting Problems with Remote Programming Troubleshooting Sweep and Normalization Problems Troubleshooting Incorrect Data Troubleshooting the TLS Solving Measurement Problems Software Upgrade Procedure Hard Drive Backup and Recovery Agilent 86038A Optical Dispersion Analyzer, Third Edition...
- Page 7 Cleaning Connections for Accurate Measurements Returning the Instrument for Service Specifications and Regulatory Information Introduction Angled Connector Specifications Specifications Regulatory Information Declaration of Conformity Glossary Dispersion Terminology Index Agilent 86038A Optical Dispersion Analyzer, Third Edition...
- Page 8 Agilent 86038A Optical Dispersion Analyzer, Third Edition...
- Page 9 Setting Up the Optical Dispersion Analyzer ... . 16 Agilent 86038A Front and Rear Panels ....18 Performance Verification .
-
Page 10: Getting Started
Getting Started Introduction Introduction The 86038A optical dispersion analyzer (ODA) is designed to take you into the future of optical dispersion measurements. It is designed specifically for the development of a wide range of devices including DWDM components, dispersion compensating gratings, optical fiber, amplifiers, and systems. -
Page 11: General Safety Considerations
Do not proceed beyond a warning sign until the indicated conditions are fully understood and met. Agilent 86038A Optical Dispersion Analyzer, Third Edition... - Page 12 The CSA mark is a registered trademark of the Canadian Standards Association. The C-Tick mark is a registered trademark of the Australian Spectrum Management Agency. This text denotes the instrument is an Industrial Scientific and ISM1-A Medical Group 1 Class A product. Agilent 86038A Optical Dispersion Analyzer, Third Edition...
- Page 13 This product complies with overvoltage Category II and Pollution CAU T ION Degree 2. Do not use too much liquid in cleaning the Optical Spectrum CAU T ION Analyzer. Water can enter the front-panel keyboard, damaging sensitive electronic components. Agilent 86038A Optical Dispersion Analyzer, Third Edition...
- Page 14 CAU T ION supply voltage is within the specified range. Use of controls or adjustment or performance of procedures other CAU T ION than those specified herein may result in hazardous radiation exposure. Agilent 86038A Optical Dispersion Analyzer, Third Edition...
- Page 15 Do not enable the laser unless fiber or an equivalent device is attached to the optical output connector. Use of controls or adjustments or performance of procedures other CAU T ION than those specified herein can result in hazardous radiation exposure. Agilent 86038A Optical Dispersion Analyzer, Third Edition...
-
Page 16: Setting Up The Optical Dispersion Analyzer
Setting Up the Optical Dispersion Analyzer Setting Up the Optical Dispersion Analyzer Depending on the options ordered, the 86038A ODA will be shipped in either four or five boxes. The contents of each box is: Fiberglass Case: • Performance Network Analyzer/Test Set •... - Page 17 11 On the 86122A, press Setup > GPIB Setup and set the address to 10. 12 Connect a patchcord from the 86122A Optical Input to TLS Output 1. 13 Continue with “Performance Verification” on page 20. Agilent 86038A Optical Dispersion Analyzer, Third Edition...
-
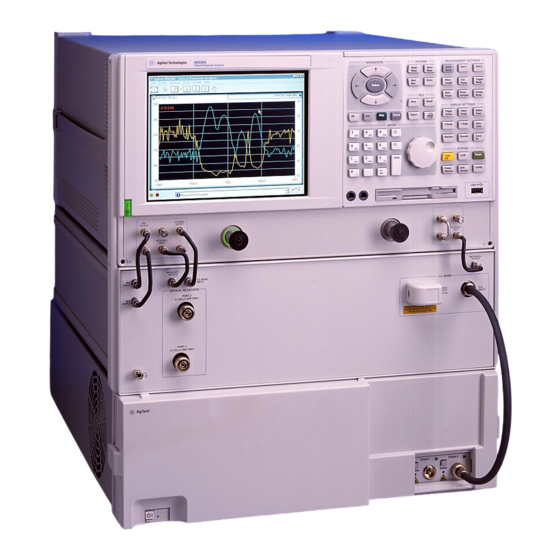
Page 18: Agilent 86038A Front And Rear Panels
Getting Started Setting Up the Optical Dispersion Analyzer Agilent 86038A Front and Rear Panels Figure 1 Front Panel Agilent 86038A Optical Dispersion Analyzer, Third Edition... - Page 19 Setting Up the Optical Dispersion Analyzer Getting Started Figure 2 Rear Panel Agilent 86038A Optical Dispersion Analyzer, Third Edition...
-
Page 20: Performance Verification
It has an approximately quadratic group delay curve, which when differentiated gives a linear chromatic dispersion curve. Using a quadratic curve fit for the measured group delay, the 86038A estimates the wavelength for which the chromatic dispersion curve passes through zero or, zero-dispersion wavelength. - Page 21 Setup > Sens/Res > Sensitivity > IF Bandwidth Samples/Point Setup > Sens/Res > Sensitivity > Samples/Point 2 Connect the ODA Source Output Port to ODA Optical Input Port 1 via the insulated 2-meter patch cord that shipped with your ODA. Agilent 86038A Optical Dispersion Analyzer, Third Edition...
- Page 22 The f’’(min) number in the Equation window is the stepped Dispersion Slope at Lambda-Zero. Compare this number to the result measured at the factory. The result should match within ±0.075 ps/nm of the factory measured value. Agilent 86038A Optical Dispersion Analyzer, Third Edition...
- Page 23 Zero. Compare this number to the result measured at the factory. 10 Compare the Dispersion slope at Lambda-Zero to the value provided by the factory: a Press Next Trace until the right measurement window is selected. Agilent 86038A Optical Dispersion Analyzer, Third Edition...
- Page 24 (measured On-Site) – 0.03 nm x (Temp: On-Site – Temp: Factory) Dispersion Slope at Lambda-Zero The dispersion slope at the zero-dispersion wavelength, expressed in ps/nm , is approximately constant with temperature. Thus no temperature correction is necessary. Agilent 86038A Optical Dispersion Analyzer, Third Edition...
-
Page 25: Navigating The Front Panel Functions
For example, the Setup group of front panel keys has the exact same functions as the Setup menu on the menu bar. Either access method can be used alone or in combination for any measurement. Agilent 86038A Optical Dispersion Analyzer, Third Edition... - Page 26 Getting Started Navigating the Front Panel Functions Figure 3 86038A User Interface Agilent 86038A Optical Dispersion Analyzer, Third Edition...
-
Page 27: Defining Traces
• Use the navigation keys (arrow keys) to move from field to field. • When a text box is highlighted, you can enter a new value using the RPG knob or the numeric key pad. Agilent 86038A Optical Dispersion Analyzer, Third Edition... - Page 28 • When a drop-down list box is highlighted, press Select to open the list. Then, us the navigation keys to select the value. Press Select to choose the function. The Select navigation key works the same way as a mouse click. Tip: Agilent 86038A Optical Dispersion Analyzer, Third Edition...
-
Page 29: Quick Setup Procedure
• Connect the DUT. • Begin the Measurement. • View the data and manipulate the display and markers. • Smooth or curve fit the data as desired. • Save the measurement and/or export the data. Agilent 86038A Optical Dispersion Analyzer, Third Edition... - Page 30 Getting Started Quick Setup Procedure Agilent 86038A Optical Dispersion Analyzer, Third Edition...
- Page 31 Fiber length ......... . . 40 Description of the 86038A ......41 Measurement Method .
-
Page 32: Introduction
Measurements”, and Chapter 4, “Function Reference”. These three chapters cover the linkages between the different measurements that can be made, specific devices being measured, and the setup parameters used to make the measurements. Agilent 86038A Optical Dispersion Analyzer, Third Edition... -
Page 33: Understanding The Attributes Being Measured
Understanding the Attributes Being Measured Measurement Concepts Understanding the Attributes Being Measured The 86038A optical dispersion analyzer allows you to measure the following attributes: • Gain/Loss • Group Delay (GD) • Chromatic Dispersion (CD) • Differential Group Delay (DGD) • Polarization Dependant Loss (PDL) •... -
Page 34: Gain/Loss
Raman. The 86038A displays loss and gain within a single trace by representing loss with a positive sign and gain with a negative sign. This convention was selected because historically, the majority of the measurement applications have involved passive devices and fibers. -
Page 35: Group Delay/Chromatic Dispersion
By contrast, the phase delay is the time required for a point on the unmodulated optical carrier wave to travel the length of the optical path. The 86038A measures the group delay, not the phase delay. - Page 36 • The combination of moderate smoothing of both the GD trace and the CD trace may lower the CD trace noise and preserve the CD wavelength resolution better than smoothing the CD trace alone. Refer to “Smooth” on page 118. Agilent 86038A Optical Dispersion Analyzer, Third Edition...
-
Page 37: Polarization Mode Dispersion/Differential Group Delay
(TLS output, test set loss, receiver sensitivity, and so on). In other wavelength regions the noise correction may be less exact. Agilent 86038A Optical Dispersion Analyzer, Third Edition... - Page 38 • PDL and DGD may indicate negative values, which are clearly not possible. This results from noise in the measurement. Negative values are useful when smoothing across wavelength sample points to obtain an unbiased estimate of the average DGD or average PDL. Agilent 86038A Optical Dispersion Analyzer, Third Edition...
-
Page 39: Polarization Dependent Loss (Pdl)
The 86038A does not provide a function for measuring these higher order polarization dependencies. Tips on Measuring Polarization Dependent Loss (PDL) •... -
Page 40: Fiber Length
The optical length measurement uncertainty is below 5x10 for fibre lenghts >15km. The calculation requires the user to enter the value of the index of refraction; any error in the index of refraction directly impacts the length measurement. Agilent 86038A Optical Dispersion Analyzer, Third Edition... -
Page 41: Description Of The 86038A
Description of the 86038A Measurement Concepts Description of the 86038A The Agilent 86038A employs the modulation phase shift (MPS) method for all of its measurements. A block diagram of the system is shown in Figure 4. Light from the tunable laser is amplitude modulated by passing the light through a balanced Lithium Niobate Mach-Zehnder modulator that is driven by an RF source. -
Page 42: Measurement Method
RF cycles in length. This increase is more rapid when the test device is long. This is the basis for the length measurement performed by the 86038A. The wavelength is fixed and the stimulus is the RF modulation frequency. -
Page 43: Choosing Setup Parameters
Background The Agilent 86038A employs the modulation phase shift method. Light is intensity modulated with an RF tone and applied to the device under test. The transmitted (or reflected) signal is detected to recover the modulation envelope, and the envelope phase is measured relative to the RF source. - Page 44 • Resolution of spectrally narrow group delay features • Avoidance of phase wrapping when measuring highly dispersive devices. • Avoidance of aliasing when measuring ripple. Equation 5 warns us not to reduce modulation frequency more than necessary. Agilent 86038A Optical Dispersion Analyzer, Third Edition...
- Page 45 The phase detectors used in the Agilent 86038A have a range of ±180-degrees. Exceeding the range of the phase detector causes a phase wrapping error.
- Page 46 If the wavelength increment is so large that less than two samples per period are measured, the result will be aliased to an Agilent 86038A Optical Dispersion Analyzer, Third Edition...
- Page 47 Again there is an implication of the performance between the sampled points. Even if the wavelength increment is arbitrarily small, the RF modulation sideband separation must be small compared to the wavelength range over which Agilent 86038A Optical Dispersion Analyzer, Third Edition...
- Page 48 One attenuation effect is caused by not sampling the phenomena at its extremes. To reduce this effect, use a smaller wavelength increment. Agilent 86038A Optical Dispersion Analyzer, Third Edition...
- Page 49 1.5, 2.5, and so on, the ripple may appear to vanish. However, it is interesting to note the ripple FSR will not be aliased to a false ripple rate in this condition (provided the wavelength increment is less than half the ripple period) Agilent 86038A Optical Dispersion Analyzer, Third Edition...
- Page 50 For example, to over-sample, then post-smooth the data to reduce trace noise. The 86038A provides built-in smoothing functions for this purpose. Agilent 86038A Optical Dispersion Analyzer, Third Edition...
- Page 51 Description of the 86038A Measurement Concepts Figure 8 Selecting Wavelength Step and Modulation Frequency for GD Ripple Agilent 86038A Optical Dispersion Analyzer, Third Edition...
- Page 52 The simplest approach is to use the 86038A's Quick Setup feature, which provides two slider-type controls that in turn adjust a variety of setup parameters.
- Page 53 Fiber Optic Test and Measurement (Derickson Ed.) T.Niemi et al., “Limitations of the phase shift method in measuring dense group delay ripple in fiber Bragg gratings", IEEE Photonics Technology Leltters, vol.13, no.12, p.1334, December 2001. Agilent 86038A Optical Dispersion Analyzer, Third Edition...
-
Page 54: Dut Setup Configurations
Description of the 86038A DUT Setup Configurations The 86038A's dual receivers allow extra measurement flexibility. The number of inputs and outputs of the DUT are expressed in the form NxM, where N is the number of inputs and M the number of outputs. -
Page 55: Normalization And Test
RF power level causes an apparent (erroneous) change in RF phase. The PDA error is highest at very high and very low RF power levels. The 86038A reduces the impact of the PDA error by means of a user Agilent 86038A Optical Dispersion Analyzer, Third Edition... - Page 56 86122A is connected. Five wavelength points are measured and the average offset is applied. For more information, refer to “Normalization Range” on page 100 and to “Begin Normalization” on page 107. Agilent 86038A Optical Dispersion Analyzer, Third Edition...
-
Page 57: Swept And Stepped Measurement Modes
Measurement Concepts Swept and Stepped Measurement Modes The measurements performed by the 86038A involve tuning the laser source while observing changes in the recovered RF amplitude and phase. The wavelength can be changed in either a stepped or a swept mode. The stepped mode offers the best wavelength accuracy resolution and sensitivity, while the swept mode offers the highest measurement speed. - Page 58 Implicit in this process is a wavelength resolution associated with the wavelength increment between adjacent samples. As in the case of the stepped measurement, wavelength resolution is also affected by the modulation frequency, discussed elsewhere. Agilent 86038A Optical Dispersion Analyzer, Third Edition...
- Page 59 Fiber Measurement ....... . 77 Agilent 86038A Optical Dispersion Analyzer, Third Edition...
-
Page 60: Introduction
Measurements”, and Chapter 4, “Function Reference”. These three chapters cover the linkages between the different measurements that can be made, specific devices being measured, and the setup parameters used to make the measurements. Agilent 86038A Optical Dispersion Analyzer, Third Edition... -
Page 61: Quick Setup Measurement Process
• Connect the DUT. • Begin the Measurement. • View the data and manipulate the display and markers. • Smooth or curve fit the data as desired. • Save the measurement and/or export the data. Agilent 86038A Optical Dispersion Analyzer, Third Edition... -
Page 62: Flexible Measurement Process
• Set Trigger to Single or Repeat Sweep. • Begin the Measurement. • View the data and manipulate the display and markers. • Smooth or curve fit the data as desired. • Save the measurement and/or export the data. Agilent 86038A Optical Dispersion Analyzer, Third Edition... -
Page 63: Setup Parameters And What They Do
Making Measurements Setup Parameters and What They Do A family of setup parameters allow the user to optimize 86038A performance for a wide variety of measurement applications. Following is a brief description of the setup parameters. For a complete description of each parameter, refer to “Function Reference”... - Page 64 TLS specification. At higher TLS power levels, Amplitude Dynamic Range and Group Delay Noise is improved, but phase dynamic accuracy (PDA) effects are more pronounced. After changing the TLS power, normalization (without PDA) is required. Agilent 86038A Optical Dispersion Analyzer, Third Edition...
-
Page 65: Choosing Setup Parameters For Your Device
The relatively smooth and analytic behavior of the group delay of this device makes it possible to use larger wavelength increments and lower modulation frequency without loss of wavelength resolution. The following discussion provides setup parameter information specific to each device. Agilent 86038A Optical Dispersion Analyzer, Third Edition... - Page 66 2000 MHz modulation frequency may require the selection of a low wavelength increment to avoid aliasing. This increases test time. To reduce test time, lower the modulation frequency and increase the wavelength increment. Agilent 86038A Optical Dispersion Analyzer, Third Edition...
- Page 67 Use it when the entire trace is to be fitted and the group delay ripple is required. Export the data to a spreadsheet and subtract the fitted straight line from the measurement data to obtain the group delay ripple. Agilent 86038A Optical Dispersion Analyzer, Third Edition...
- Page 68 However, the step mode allows taking and averaging a large number of samples at each wavelength, also reducing the noise. Try both modes to find the best trade-off of accuracy and measurement speed. Agilent 86038A Optical Dispersion Analyzer, Third Edition...
- Page 69 However, the step mode allows taking and averaging a large number of samples at each wavelength, also reducing the noise. Try both modes to find the best trade-off of accuracy and measurement speed. Agilent 86038A Optical Dispersion Analyzer, Third Edition...
- Page 70 Set the modulation frequency to 2000 MHz to achieve best signal to noise at the expense of wavelength resolution. Experiment with lower mod- ulation frequency values and correspondingly smaller wavelength increments to reveal fine structure in the DGD response. Agilent 86038A Optical Dispersion Analyzer, Third Edition...
- Page 71 • If you use the smoothing function to reduce trace noise, you may need to in- crease the number of trace points. (for example, reduce the wavelength incre- ment) to avoid loss of resolution. Agilent 86038A Optical Dispersion Analyzer, Third Edition...
-
Page 72: Narrowband Filter Measurement
(DUT), and the ODA. Use cotton swabs and alcohol to clean the connectors, and then blow the connector surface dry with compressed air. For more information, refer to “Cleaning Connections for Accurate Measurements” on page 272. Agilent 86038A Optical Dispersion Analyzer, Third Edition... - Page 73 Set Trace Points to 1601 b Set RF Mod Freq to 500 MHz c Select an IF Bandwidth of 300 Hz Lower values of IF bandwidth reduce the noise but increase the measurement time. Agilent 86038A Optical Dispersion Analyzer, Third Edition...
- Page 74 The normalization will take approximately 8 minutes. The majority of this time is used for the phase dynamic accuracy correction. While normalization is running, data is plotted to the Normalization Viewer graphs. The completed normalization is shown below. Agilent 86038A Optical Dispersion Analyzer, Third Edition...
- Page 75 18 Insert the filter into the normalized test path. It is best practice to include the normalized fiber in the path with the test device, as its small dispersion contribution was captured in the normalization data. Agilent 86038A Optical Dispersion Analyzer, Third Edition...
- Page 76 19 From the Measurement menu, press Begin Meas to start the measurement process. When the measurement is complete, a trace is displayed for Port 1 GD (group delay), Port 1 Gain/Loss, and Port 1 CD (chromatic dispersion). Agilent 86038A Optical Dispersion Analyzer, Third Edition...
-
Page 77: Fiber Measurement
“Cleaning Connections for Accurate Measurements” on page 272. Swept Measurement 1 On the analyzer press Preset to set the instrument to a known state. 2 From the Setup menu, press CD/PMD and select GD/CD Swept. Agilent 86038A Optical Dispersion Analyzer, Third Edition... - Page 78 Lower values of IF bandwidth reduce the noise but increase the measurement time. 6 From the Display menu, press Auto Scale and set the Offset GD trace to zero at: option to Minimum Point. Agilent 86038A Optical Dispersion Analyzer, Third Edition...
- Page 79 The normalization will take approximately 8 minutes. The majority of this time is used for the phase dynamic accuracy correction. While normalization is running, data is plotted to the Normalization Viewer graphs. The completed normalization is shown below. Agilent 86038A Optical Dispersion Analyzer, Third Edition...
- Page 80 10 Insert the filter into the normalized test path. It is best practice to include the normalized fiber in the path with the test device, as its small dispersion contribution was captured in the normalization data. Agilent 86038A Optical Dispersion Analyzer, Third Edition...
- Page 81 11 From the Measurement menu, press Begin Meas to start the measurement process. When the measurement is complete, a trace is displayed for Port 1 GD (group delay), Port 1 Loss, and Port 1 CD (chromatic dispersion). Agilent 86038A Optical Dispersion Analyzer, Third Edition...
- Page 82 Select Auto Modulation Frequency b Select Dynamic Drift Reduction Dynamic drift reduction should be used when the temperature is gradually changing. A best practice is to use dynamic drift reduction for all fiber mea surements. Agilent 86038A Optical Dispersion Analyzer, Third Edition...
- Page 83 While normalization is running, data is plotted to the Normalization Viewer graphs. The completed normalization is shown below. 6 When the normalization is complete, select Close on the Normalization Viewer. 7 Insert the filter into the normalized test path. Agilent 86038A Optical Dispersion Analyzer, Third Edition...
- Page 84 8 From the Measurement menu, press Begin Meas to start the measurement process. When the measurement is complete, a trace is displayed for Port 1 GD (group delay), Port 1 Loss, and Port 1 CD (chromatic dispersion). Agilent 86038A Optical Dispersion Analyzer, Third Edition...
- Page 85 Adjust the Window slide bar to optimize smoothing of the GD trace You will want to add enough smoothing to remove the noise from the trace but not too much as to distort the response shape of the filter. Agilent 86038A Optical Dispersion Analyzer, Third Edition...
- Page 86 Making Measurements Fiber Measurement Agilent 86038A Optical Dispersion Analyzer, Third Edition...
- Page 87 Toolbar Functions ......122 Agilent 86038A Optical Dispersion Analyzer, Third Edition...
-
Page 88: Introduction
Measurements”, and Chapter 4, “Function Reference”. These three chapters cover the linkages between the different measurements that can be made, specific devices being measured, and the setup parameters used to make the measurements. Agilent 86038A Optical Dispersion Analyzer, Third Edition... -
Page 89: File Menu
Image file format that contains a screen capture of the ODA application. The benefit of this format is that the file size is small and the image quality is high. This format is not supported by some applications. Agilent 86038A Optical Dispersion Analyzer, Third Edition... -
Page 90: View Menu
Exits the ODA application. To log on to the ODA, you will need to enter the following user name and password. User Name: ODA_User Password: agilentoda View Menu The View menu is used to access the desktop screen. Minimize Application Minimizes the ODA application window. Agilent 86038A Optical Dispersion Analyzer, Third Edition... -
Page 91: System Menu
Laser On Turns the laser on at the TLS output. Local Returns local front-panel control. Remote programming can prevent the ODA from responding to front-panel key presses. Pressing Local will reestablish front-panel control. Agilent 86038A Optical Dispersion Analyzer, Third Edition... - Page 92 TLS during the Normalization process. To use this function, the Low SSE output of the TLS must be connected to the 86122A during normalization. The wavelength meter is used only during normalization and not before or during actual measurements. Agilent 86038A Optical Dispersion Analyzer, Third Edition...
- Page 93 Show Low Power Warnings When enabled, the instrument will place warning messages in the status log when the detected power is too low. This is helpful for fiber manufactures but is not ideal for filter manufactures. Agilent 86038A Optical Dispersion Analyzer, Third Edition...
- Page 94 For less demanding applications, such as ±250 fs of RGD accuracy, usual good practice in making optical connections provides adequate results without using the Real-Time Port Monitor. resets the measurements and clears the graph data. Clear Plots Agilent 86038A Optical Dispersion Analyzer, Third Edition...
- Page 95 System Menu Function Reference Figure 10 Example of Fiber Movement Agilent 86038A Optical Dispersion Analyzer, Third Edition...
- Page 96 Function Reference System Menu Figure 11 Example of a Dirty Connector Agilent 86038A Optical Dispersion Analyzer, Third Edition...
- Page 97 PDL and DGD values that are too low. A higher IF Bandwidth will give more noise. Fewer samples will also give more noise. Refer to “Sensitivi ty/Resolution” on page 101 for more information on these settings. Agilent 86038A Optical Dispersion Analyzer, Third Edition...
- Page 98 Accuracy is slightly degraded if it falls near the edge of the wavelength range, and is significantly degraded if it falls far outside, for example, in the 1300 nm window. Agilent 86038A Optical Dispersion Analyzer, Third Edition...
- Page 99 Sets the stop wavelength. This setting is independent of the settings specified for the X Scale Display which affect the viewable range only. Copy From Selected Graph Sets the start and stop wavelength to the displayed endpoints of the selected graph. Agilent 86038A Optical Dispersion Analyzer, Third Edition...
- Page 100 Allows you to specify Start and Stop Wavelength, Trace Points, and Increment independent from the settings specified for the measurement. shortcut accesses the Begin Normalization panel. Begin Normalization For more information on performing a normalization, refer to “Begin Normalization” on page 107. Agilent 86038A Optical Dispersion Analyzer, Third Edition...
- Page 101 • Changing the modulation frequency between normalization and device meas- urements causes a loss/gain offset due to the frequency response details of the optical receiver and the network analyzer RF circuitry. This point is true even when PDA correction is not selected. Agilent 86038A Optical Dispersion Analyzer, Third Edition...
- Page 102 For example, a 500 MHz modulation frequency could be used to explore ripple with 10 GHz FSR (or about an 80 pm period) with an attenuation of about 5% of the ripple peak-to-peak value. Agilent 86038A Optical Dispersion Analyzer, Third Edition...
- Page 103 Automatic adjustment of the modulation frequency ensures that the per- wavelength-step phase change is always less than ±180 degrees on port 1 only. Use auto mode if the approximate group delay/dispersion Tip: characteristics are not known in advance. Agilent 86038A Optical Dispersion Analyzer, Third Edition...
- Page 104 DGD and PDL. Note that a large number of samples increases susceptibility to drift. Tips on Number of Samples • In stepped mode, use a larger number of samples to improve signal to noise. Ex- Agilent 86038A Optical Dispersion Analyzer, Third Edition...
- Page 105 Alternatively, the TLS power can be increased to move the artifacts away from the region of interest. Refer to “If you see errors in Group Delay measurements but no error is visible in Gain/Loss” on page 268 for an example. Agilent 86038A Optical Dispersion Analyzer, Third Edition...
- Page 106 A TLS Settling can be initiated by right clicking the icon and selecting Settle TLS Now. Trigger Mode Single Sweep In swept measurement mode, this function initiates one sweep of the measurement range. Agilent 86038A Optical Dispersion Analyzer, Third Edition...
- Page 107 That is, when Setup > CD/PMD > is set to one of the two stepped measurement modes. Wavelength correction is always performed if an 86122A is connected. Five wavelength points are measured and the average offset is applied. Agilent 86038A Optical Dispersion Analyzer, Third Edition...
- Page 108 GD errors of 18 ps/dB when PDA corrections are off. Ports Port 1 measures Port 1 only. Port 2 measures Port 2 only. All Ports Simultaneously measures Port 1 and Port 2 at the same time. Agilent 86038A Optical Dispersion Analyzer, Third Edition...
- Page 109 * last used last used Change IF bandwidth last used last used + last used last used last used TLS Settling last used last used + last used last used last used + Agilent 86038A Optical Dispersion Analyzer, Third Edition...
- Page 110 Normalization. For more information on the modulator bias routine, refer to “Begin Normalization” on page 107 and to “Optical Modulator Bias Adjust” on page Cancel Operation Stops the measurement, normalization, or length measurement whichever one is currently in progress. Agilent 86038A Optical Dispersion Analyzer, Third Edition...
- Page 111 This is useful when you want to keep the units in an easy to calculate form. Clear Snap Enable when you need precision tuning of a portion of the graph where the exact units are important. Agilent 86038A Optical Dispersion Analyzer, Third Edition...
- Page 112 Centers the graph around the response. This function is useful after using the zoom functions. Selected Trace Performs an auto scale for the selected trace on the selected graph only. Selected Graph Performs an auto scale for the selected graph only. Agilent 86038A Optical Dispersion Analyzer, Third Edition...
- Page 113 , an auto scale is performed on all graphs at the For Swept measurements end of a measurement. , an autoscale on all graphs is performed at the For Stepped measurements end of each wavelength increment as specified in the Sens/Res setup panel. Agilent 86038A Optical Dispersion Analyzer, Third Edition...
- Page 114 Next Up places the marker on the next highest peak or pit amplitude of the current marker position. Highest places the marker on the highest peak or pit amplitude on the trace. Agilent 86038A Optical Dispersion Analyzer, Third Edition...
- Page 115 Setting the value too high will result in failure to include the smaller responses. Setting the value too low will cause all spectral components to be accepted. Marker Function Shortcut accesses the Marker Function panel. Marker Search Shortcut accesses the Marker Search panel. Agilent 86038A Optical Dispersion Analyzer, Third Edition...
- Page 116 Also see “Offset GD trace to zero at:” on page 113. Marker Setup Shortcut accesses the Marker Setup panel. Marker Function Shortcut accesses the Marker Function panel. Agilent 86038A Optical Dispersion Analyzer, Third Edition...
- Page 117 By default, the CD trace is calculated using the slope of the actual GD trace. If a GD trace has been smoothed or curve fitted, selecting that trace as the GD Source may provide a lower noise CD trace. Agilent 86038A Optical Dispersion Analyzer, Third Edition...
- Page 118 CD trace noise and preserve the CD wavelength resolution better than smoothing the CD trace alone. • Refer to “Apply Smoothing to Remove Noise” on page 85 for more information. Agilent 86038A Optical Dispersion Analyzer, Third Edition...
- Page 119 (at the center of the Window). The smoothing process is repeated centered on each trace point. Hide Original Trace Removes the original trace from the graph so that only the smoothed trace is visible. Agilent 86038A Optical Dispersion Analyzer, Third Edition...
- Page 120 Displays the general form of the selected equation and additional information specific to the selected curve fit. Hide Original Trace Removes the original trace from the graph so that only the curve fit trace is visible. Agilent 86038A Optical Dispersion Analyzer, Third Edition...
- Page 121 Use Next Trace to make any changes to the Display area functions. That is, X Scale, Y Scale, Auto Scale, Marker Setup, Marker Search, Define Trace, Smoothing, or Curve Fit. These functions are defined specifically for each trace. Agilent 86038A Optical Dispersion Analyzer, Third Edition...
- Page 122 Sens/Res setup panel. Object Select Turns off the currently active zoom or pan function and allows you to select and move markers, if markers are turned on. Agilent 86038A Optical Dispersion Analyzer, Third Edition...
- Page 123 Moves the entire trace on the active graph with the motion of the mouse pointer. Click the Pan icon and then click on the graph. This function is useful when you zoom in on a portion of the trace, and need to quickly view another portion. Agilent 86038A Optical Dispersion Analyzer, Third Edition...
- Page 124 Stops the measurement, normalization, mod bias, or length measurement whichever one is currently in progress. Trigger Mode (Toggle Continuous Sweep) Switches between continuous sweep mode and single sweep mode each time this icon is pressed. Agilent 86038A Optical Dispersion Analyzer, Third Edition...
- Page 125 Example 3: Control from LabView ....185 Example 4: Complete application - RepeatMeas..186 Agilent 86038A Optical Dispersion Analyzer, Third Edition...
-
Page 126: Overview
The RemoteClient is a layer of abstraction, which provides customers with an easy to use interface that provides events and methods to control the ODA and retrieve measurement data. Agilent 86038A Optical Dispersion Analyzer, Third Edition... - Page 127 ODA. These examples start from a blank project allowing you to see all the steps required. Agilent Technologies does not recommend controlling the ODA from C or C++ because of the difficulty of interfacing with COM objects that return safe arrays.
- Page 128 • Events may not be threadsafe in VC++. Internally in the RemoteClient, code has been added to pass the events to the clients GUI thread. This may not work in VC++ and the client may have to do this. Agilent 86038A Optical Dispersion Analyzer, Third Edition...
- Page 129 If you are manually typing the lines, you have to watch for and remove those dashes. Agilent 86038A Optical Dispersion Analyzer, Third Edition...
-
Page 130: Recommended Control Sequence
N O TE networks using TCP/IP and other Microsoft supported networking protocols. The ODA uses Microsoft® Windows 2000. To connect to your LAN, power-down your instrument, connect an active LAN cable, then power-up your instrument. Agilent 86038A Optical Dispersion Analyzer, Third Edition... -
Page 131: How To Change Network Settings
Because your network settings are unique to your IT infrastructure, N O TE Agilent Technologies will not be able to assist you with connecting your instrument to your network. Please contact your network administrator or IT department for assistance. For more information, refer to the MS Windows resource kit (available from Microsoft) that is appropriate for your computer system. - Page 132 For more information, click Start > Help > Index, and search for “DNS” or N O TE “WINS” or “static” or “dynamic.” To configure TCP/IP for static or dynamic addressing • To get started, follow the same steps listed above. Agilent 86038A Optical Dispersion Analyzer, Third Edition...
-
Page 133: Install The Remote Client
Make sure that you get the framework, not the SDK (software development kit.) 2 The 86038A CD shipped with the ODA contains the Remote Client Installation to install the ODA specific DLL’s and the programming examples. Insert the CD into the CD drive, use Windows Explorer to find ODA Remote Client Installer Folder. - Page 134 The start and stop wavelength is set in nm. Since a swept mode was chosen, you may want to specify the number of trace points: odaClient.Resolution.Swept.TracePoints = eTracePointsSweptMode_Step801 There are three different measurement modes, the same choices you get on the CD/PMD front panel setup menu: Agilent 86038A Optical Dispersion Analyzer, Third Edition...
- Page 135 ‘ Wait for TriggerComplete, but no longer than 30 minutes Dim elapsedTime As Double elapsedTime = 0 DoEvents Sleep 100 elapsedTime = elapsedTime + 100 If elapsedTime / 1000 / 60 > 30 Then Exit Do Loop Until odaClient.Status.TriggerComplete = True Agilent 86038A Optical Dispersion Analyzer, Third Edition...
- Page 136 (You can determine the number of points in the returned arrays.) then calculate the wavelength for each point as part of your application. Agilent 86038A Optical Dispersion Analyzer, Third Edition...
- Page 137 (such as Form_Close) that executes it: odaClient.Connectivity.Disconnect In addition, it is necessary to terminate the session when your program is closing down to allow clean up on both sides: odaClient.Connectivity.TerminateSession Agilent 86038A Optical Dispersion Analyzer, Third Edition...
-
Page 138: Program Structure: Events Vs. Sequential
100 ms, letting other programs run, and a timeout if nothing happens for too long. You cannot query a TriggerComplete flag too soon after requesting a sweep because the flag is not clear until the sweep actually starts. Agilent 86038A Optical Dispersion Analyzer, Third Edition... - Page 139 ODA, unable to proceed”) return end if To open the session and wait for a valid connection: odaClient.Connectivity.Connect() sleep(5000) \\ wait 5 seconds loop sleep(100) elapsedTime += 100 while elapsedTime < MAX_TIME and odaClient.Connectivity.Connected != TRUE Agilent 86038A Optical Dispersion Analyzer, Third Edition...
-
Page 140: Front Panel Functions With No Remote Equivalent
• X Scale • Y Scale • Auto Scale • Marker Setup • Marker Search • Marker Function • Smoothing • Wavemeter • Config • Optical Test Set Heater Set Point • Navigation Agilent 86038A Optical Dispersion Analyzer, Third Edition... -
Page 141: Enumerations
Values in VB 6 Values in .NET eDispersionMode_CD_PMD_Stepped eDispersionMode.CD_PMD_Stepped eDispersionMode eDispersionMode_CD_Stepped eDispersionMode.CD_Stepped odaClient.DispersionMode eDispersionMode_CD_Swept eDispersionMode.CD_Swept eEventLogType_EventError eEventLogType.EventError eEventLogType eEventLogType_Information eEventLogType.Information Event: NewStatus eEventLogType_Warning eEventLogType.Warning ODASensitivity.eGDOffsetMode: eGDOffsetMode_CenterPoint .CenterPoint eGDOffsetMode eGDOffsetMode_MaximumPoint .MaximumPoint odaClient.Display.GDOffsetMode eGDOffsetMode_MinimumPoint .MinimumPoint eGDOffsetMode_No_Offset .No_Offset Agilent 86038A Optical Dispersion Analyzer, Third Edition... - Page 142 Used in defining traces and reading data back. eMeasurementType_None eMeasurementType.None eMeasurementType_PDL eMeasurementType.PDL eMeasurementType_PMD eMeasurementType.PMD enumAcquisitionMode_eDriftMonitor enumAcquisitionMode.eDriftMonitor enumAcquisitionMode_eLength enumAcquisitionMode.eLength enumAcquisitionMode enumAcquisitionMode_eMeasurement enumAcquisitionMode.eMeasurement event: NewDataUpdate enumAcquisitionMode_eModBias enumAcquisitionMode.eModBias enumAcquisitionMode_eNormalization enumAcquisitionMode.eNormalization Agilent 86038A Optical Dispersion Analyzer, Third Edition...
- Page 143 ODAResolution.eTracePointsSweptMode: eTracePointsSweptMode eTracePointsSweptMode_Step801 .Step1601 For normalization and measurement trace point setting. .Step801 eTriggerType_TriggerContinuous eTriggerType.TriggerContinuous eTriggerType odaClient. T riggerModeParams eTriggerType_TriggerSingle eTriggerType.TriggerSingle This command comes off the root: Agilent.LWD.Ag86038x.InstrumentObjects. Agilent 86038A Optical Dispersion Analyzer, Third Edition...
-
Page 144: Event Table
NewStatusDelegate This event occurs when the ODA begins and completes an PresetProgress instrument preset. The pass parameter indicates whether it is the beginning or, end. odaClient.Status.PresetComplete ProgressDelegate Agilent 86038A Optical Dispersion Analyzer, Third Edition... - Page 145 This event occurs at the start and finish of most ODA actions such TriggerProgress as sweeping or normalization. The pass parameters indicate what the current activity is and whether it has started, completed, or aborted. Status. T riggerComplete TriggerProgressDelegate Agilent 86038A Optical Dispersion Analyzer, Third Edition...
-
Page 146: Troubleshooting
ODA objects, and then close the dialog. Reopen the dialog and reselect the references. Refer to “Example 1: Simple Application for Controlling the ODA” on page 154 for a step-by-step procedure of adding references. Agilent 86038A Optical Dispersion Analyzer, Third Edition... -
Page 147: Front Panel Maps
Front Panel Maps Remote Operation Front Panel Maps Figure 12 Front Panel Related Commands Agilent 86038A Optical Dispersion Analyzer, Third Edition... - Page 148 Remote Operation Front Panel Maps Figure 13 Measurement Type Related Commands Agilent 86038A Optical Dispersion Analyzer, Third Edition...
- Page 149 Front Panel Maps Remote Operation Figure 14 Length Measurement Related Commands Agilent 86038A Optical Dispersion Analyzer, Third Edition...
- Page 150 Remote Operation Front Panel Maps Figure 15 Measurement Range Related Commands Agilent 86038A Optical Dispersion Analyzer, Third Edition...
- Page 151 Front Panel Maps Remote Operation Figure 16 Port Selection Related Commands Agilent 86038A Optical Dispersion Analyzer, Third Edition...
- Page 152 Remote Operation Front Panel Maps Figure 17 Normalization Range Related Commands Agilent 86038A Optical Dispersion Analyzer, Third Edition...
- Page 153 Front Panel Maps Remote Operation Figure 18 Sensitivity and Resolution Related Commands Agilent 86038A Optical Dispersion Analyzer, Third Edition...
-
Page 154: Example 1: Simple Application For Controlling The Oda
This example is presented in three different languages: VB6.0, VB.NET and C#. Go through the version for the language you are most likely to use. The source code is included with the Remote Control Installation. Navigate down to C:\Program Files\Agilent\Agilent ODA Remote Control\Examples Agilent 86038A Optical Dispersion Analyzer, Third Edition... - Page 155 8 Select Open, which takes you back to the References dialog. Note that the name of the Remote Client might appear as a long string "This is the RemoteClient for the Optical Dispersion Analyzer." Click close the References dialog. Agilent 86038A Optical Dispersion Analyzer, Third Edition...
- Page 156 It probably says Load. Click on the selections, and choose Unload. This will take you to Form_Unload, where you can insert the following lines: odaClient.Connectivity.Disconnect odaClient.Connectivity.TerminateSession Agilent 86038A Optical Dispersion Analyzer, Third Edition...
- Page 157 If it is in type face, bold there is code for it. You do not need to implement all the events, just the ones you find useful. Agilent 86038A Optical Dispersion Analyzer, Third Edition...
- Page 158 This consists of adding a button to trigger the sweep, and adding an event handler for the TriggerProgress event, to detect when the sweep is finished and save the data in C:\mydata.txt. Agilent 86038A Optical Dispersion Analyzer, Third Edition...
- Page 159 When you type the '=' (equals sign), the Visual Basic editor will Intellisense all the possible values of the enumeration, and present you a list. In this case you want eMeasurement. Intellisense makes dealing with events and enumerated types much easier in Visual Basic. Agilent 86038A Optical Dispersion Analyzer, Third Edition...
- Page 160 For cnt = LBound(gainData) To UBound(gainData) buf = CStr(xStart + xStep * idx) + "," + CStr(gainData(cnt)) Write #outputFileNum, xStart + xStep * idx, gainData(cnt) idx = idx + 1 Next Close #outputFileNum End Sub Agilent 86038A Optical Dispersion Analyzer, Third Edition...
- Page 161 = centerWavel - span / 2 odaClient.MeasurementRange.XStop = centerWavel + span / 2 It works better if you first set the ODA to a relatively narrow sweep, such as 1530 to 1540 nm. Agilent 86038A Optical Dispersion Analyzer, Third Edition...
- Page 162 = 0 For cnt = LBound(gainData) To UBound(gainData) buf = CStr(xStart + xStep * idx) + "," + CStr(gainData(cnt)) Write #outputFileNum, xStart + xStep * idx, gainData(cnt) idx = idx + 1 Agilent 86038A Optical Dispersion Analyzer, Third Edition...
- Page 163 MsgBox ("Wavelength out of range, defaulted to 1550") centerWavel = 1550 txtCenter.Text = "1550" End If odaClient.MeasurementRange.xStart = centerWavel - span / 2 odaClient.MeasurementRange.xStop = centerWavel + span / 2 ' Trigger the measurement odaClient.Measure End Sub Agilent 86038A Optical Dispersion Analyzer, Third Edition...
- Page 164 Button on the form, name it pbConnect with text Connect. Double click the button to edit the source code. This will place you at pbConnect_Click. To establish the connection to the ODA, place the following lines between the Private Sub ... End Sub block: Agilent 86038A Optical Dispersion Analyzer, Third Edition...
- Page 165 ODA front panel and select Help > About to verify the ODA Name. When the program is exited, the remote session will be disconnected from the ODA leaving it free for front panel or other remote use. Agilent 86038A Optical Dispersion Analyzer, Third Edition...
- Page 166 All of the ODA events follow a similar pattern. The most useful events are TriggerProgress, which tells you when a measurement or normalization is complete, and TLSSettlingProbability, which warns you how long until the laser needs to perform a temperature settling. Agilent 86038A Optical Dispersion Analyzer, Third Edition...
- Page 167 When you type the ‘=’, the Visual Basic editor will Intellisense all the possible values of the enumeration, and present you a list. In this case we want eMeasurement. Intellisense makes dealing with events and enumerated types much easier in visual basic. Agilent 86038A Optical Dispersion Analyzer, Third Edition...
- Page 168 You can look at it with a text editor or import it into a spreadsheet. This program will grab data even if a sweep is triggered from the front panel. Run the software, and then connect. Go to the ODA front panel and click Local, then Agilent 86038A Optical Dispersion Analyzer, Third Edition...
- Page 169 Private Sub Form1_Load(ByVal sender As System.Object, ByVal e As System.EventArgs) Handles MyBase.Load odaClient = New RemoteClient.Communicator() End Sub Private Sub pbConnect_Click(ByVal sender As System.Object, ByVal e As System.EventArgs) Handles pbConnect.Click odaClient.Connectivity.Connect(tbOdaName.Text) pbConnect.Enabled = False Agilent 86038A Optical Dispersion Analyzer, Third Edition...
- Page 170 Common.enumStatus.COMPLETE Then ' Write the data to disk sendDataToFile("c:\mydata.txt") End If End If End Sub Private Sub sendDataToFile(ByVal fileName As String) Dim gainData() As Double Dim xStart As Double Dim xStop As Double Agilent 86038A Optical Dispersion Analyzer, Third Edition...
- Page 171 (nm), Gain (dB)") idx = 0 For cnt = LBound(gainData) To UBound(gainData) buf = CStr(xStart + xStep * idx) + "," + CStr(gainData(cnt)) file.WriteLine(buf) idx = idx + 1 Next file.Close() End Sub End Class Agilent 86038A Optical Dispersion Analyzer, Third Edition...
- Page 172 Insert the following line after the Text Box and Label declarations: // Declare a local object to communicate with the ODA private RemoteClient.Communicator odaClient; The odaClient will host all the interaction with the ODA. Before you can use it, Agilent 86038A Optical Dispersion Analyzer, Third Edition...
- Page 173 ODA front panel and select Help > About. The ODA name is on the About panel. When the program is exited, it will disconnect from the ODA, leaving it free for front panel or other remote use. Agilent 86038A Optical Dispersion Analyzer, Third Edition...
- Page 174 The first hit (with the lightning bolt) represents the event itself. The second hit is the function prototype. NewStatus is expecting a function that accepts a string and an eEventLogType. Note that the fully qualified eEventLogType is Agilent.LWD.Ag86038x.InstrumentObjects.ODACommon.eEventLogType. Agilent 86038A Optical Dispersion Analyzer, Third Edition...
- Page 175 // Declare event handlers for ODA all! private ODARemoting.NewStatusDelegate NewStatusHandler; 3 Find the declaration of Form1_Closing, and insert this routine after it: private void NewStatusEvent( string msg, ODACommon.eEventLogType e ) // Let the user know something happened lblStatus.Text=msg; Agilent 86038A Optical Dispersion Analyzer, Third Edition...
- Page 176 Take Sweep, and watch the sweep progress on both the ODA and on the application message bar. Add an event handler to TriggerProgress. This involves declaring the delegate, instantiating the delegate, then adding and removing the handler from odaClient. Agilent 86038A Optical Dispersion Analyzer, Third Edition...
- Page 177 6 Add the sendDataToFile function. This is a very simple implementation using text streams: private void sendDataToFile(string fileName) // Transfer the gain data over from the ODA and save it to a file double[] gainData; double xStart; double xStop; double xStep; npoin; string buf; Agilent 86038A Optical Dispersion Analyzer, Third Edition...
- Page 178 ODA. The ODA thinks in terms of start/stop, so you have to convert the center wavelength to a start and stop wavelength: // Get the center wavelength double centerWavel, startWavel, stopWavel, oldSpan; centerWavel = double.Parse(txtCenter.Text); Agilent 86038A Optical Dispersion Analyzer, Third Edition...
- Page 179 System.Windows.Forms.Button pbSweep; private System.Windows.Forms.Button pbConnect; private System.Windows.Forms.TextBox txtCenter; private System.Windows.Forms.Label label2; /// <summary> /// Required designer variable. /// </summary> private System.ComponentModel.Container components = null; public Form1() // Required for Windows Form Designer support Agilent 86038A Optical Dispersion Analyzer, Third Edition...
- Page 180 TriggerProgressEvent(ODACommon.enumStatus status, ODACommon.enumAcquisitionMode acqMode) if (acqMode == ODACommon.enumAcquisitionMode.eMeasure- ment) // Instrument is making a measurement if (status == ODACommon.enumStatus.COMPLETE) // The measurement is done, transfer data! sendDataToFile(@"c:\mydata.txt"); private void sendDataToFile(string fileName) Agilent 86038A Optical Dispersion Analyzer, Third Edition...
- Page 181 // Instantiate the odaClient odaClient = new RemoteClient.Communicator(); // Connect to the ODA odaClient.Connectivity.Connect(tbOdaName.Text); // Create our event handlers this.NewStatusHandler = new ODARemoting.NewStatusDele- gate(this.NewStatusEvent); this.TriggerHandler = new ODARemoting.TriggerProgressDele- gate(this.TriggerProgressEvent); // Register event handlers Agilent 86038A Optical Dispersion Analyzer, Third Edition...
- Page 182 1550 nm"); centerWavel=1550; txtCenter.Text = centerWavel.ToString(); // Convert center to start, stop startWavel=odaClient.MeasurementRange.XStart; stopWavel=odaClient.MeasurementRange.XStop; oldSpan=stopWavel - startWavel; // Write new start and stop odaClient.MeasurementRange.XStart=centerWavel - oldSpan/2; odaClient.MeasurementRange.XStop=centerWavel + oldSpan/2; // Take the measurement odaClient.Measure(); Agilent 86038A Optical Dispersion Analyzer, Third Edition...
-
Page 183: Example 2: Control From Excel
Dim npoin As Integer Dim cnt As Integer npoin = UBound(GainData) - LBound(GainData) + 1 ReDim XData(npoin) For cnt = 0 To npoin - 1 XData(cnt) = XStart + cnt * xinc Next cnt Agilent 86038A Optical Dispersion Analyzer, Third Edition... - Page 184 ' Add right hand y axis with title .SeriesCollection(2).Select .SeriesCollection(2).AxisGroup = 2 .Axes(xlValue, xlSecondary).HasTitle = True .Axes(xlValue, xlSecondary).AxisTitle.Characters.Text = "delay, ps" ' Move the legend to the bottom of the plot .Legend.Position = xlLegendPositionBottom End With End Sub Agilent 86038A Optical Dispersion Analyzer, Third Edition...
-
Page 185: Example 3: Control From Labview
This vi contains all the settings for making a stepped gain and CD ODAset1_stepped.vi measurement. This vi contains all the settings for making a swept gain and CD ODAset2_swept.vi measurement. This vi triggers a sweep and waits for it to complete. ODAsweep.vi Agilent 86038A Optical Dispersion Analyzer, Third Edition... -
Page 186: Example 4: Complete Application - Repeatmeas
2 Go to the ODA Help >About menu to obtain the ODA computer name. Type that name into the ODA Name field, and click Connect. After a pause while contact is established, the Connection status should turn green: Agilent 86038A Optical Dispersion Analyzer, Third Edition... - Page 187 6 Click Start and observe the measurement results as they are taken. The statistics are calculated for Gain and Group Delay. The All Measurements block is calculated treating all wavelengths of all measurements equally. This is useful for measuring very flat and stable Agilent 86038A Optical Dispersion Analyzer, Third Edition...
- Page 188 There are three main functional blocks in the code: • Triggering measurements and setting up the delay between measurements • Processing the measured data into statistics and writing data to the file • Updating the ODA status Agilent 86038A Optical Dispersion Analyzer, Third Edition...
- Page 189 – User requested delay between each measurement nextDelay – Remaining time left before next measurement requestedDelay – Either the delayPerMeas (if between measurements) or the delayPerGroup (if between groups) TimerMax – How long to wait between progress bar updates. Agilent 86038A Optical Dispersion Analyzer, Third Edition...
- Page 190 ODA to find out what it is doing. This is handled in StatusTimer_Timer(). In addition, whenever a new status message appears on the ODA front panel, the NewStatus event handler, odaClient_NewStatus(), reads the message and displays it for the remote user as well. Agilent 86038A Optical Dispersion Analyzer, Third Edition...
- Page 191 TLS Commands ........251 Agilent 86038A Optical Dispersion Analyzer, Third Edition...
-
Page 192: Oda Remote Programming
The ODA Remote Control organizes its APIs into a Function Tree hierarchy. This associates like functions into logical groupings. Therefore, the remoting commands are grouped and listed by function, then command type in the following sections. Agilent 86038A Optical Dispersion Analyzer, Third Edition... -
Page 193: Server To Client Events
Programming Commands Server to Client Events The server to client events allow the 86038A ODA to update the client with current data or instrument settings. In this context, the ODA is the server and your program is the client. These events are asynchronous. That is, you cannot determine when they are going to occur. - Page 194 Indicates that a new status message is available, which can be displayed as part of the system status. Parameters Message - Message content. MessageType - Indicates the severity of the message (informational or error) Related Command Status.StatusLog method Agilent 86038A Optical Dispersion Analyzer, Third Edition...
- Page 195 TriggerProgress event to determine when the action is complete. Parameters progress - Indicates a measurement has begun, completed, or aborted. etestType - Indicates the type of test eTriggerMode - Indicates the subset the event resides in. (Normalization, Measurement, ModBias, DriftMonitor, Length) Agilent 86038A Optical Dispersion Analyzer, Third Edition...
- Page 196 When it falls below 10 minutes, you should force a TLS settling with the TLS.ForceSettling method. Parameters progress - Indicates TLS Settling has begun or completed. Related Command TLS.ForceSettling method Agilent 86038A Optical Dispersion Analyzer, Third Edition...
- Page 197 “begin” and one “completed” per action. Parameters progress - Indicates the measurement action has begun, completed, or has been aborted. eTriggerMode - Indicates the subset the event resides in. (Normalization, Measurement, ModBias, DriftMonitor, Length) Agilent 86038A Optical Dispersion Analyzer, Third Edition...
-
Page 198: Client To Server Commands
Client to Server Commands Client to Server Commands The client to server commands allow you to communicate with the 86038A ODA using either a .NET or COM interface. • The commands listed in the following section assume an instance of the remote client has been created using the following VB.NET commands:... - Page 199 XStop Property ........... . 224 Agilent 86038A Optical Dispersion Analyzer, Third Edition...
- Page 200 HighPower Read Only Property........251 Agilent 86038A Optical Dispersion Analyzer, Third Edition...
-
Page 201: Base Commands
Use this method to start a measurement after you have set the measurement parameters, and then watch the TriggerProgress event for completion. VB.NET Syntax odaClient.Measure() VB 6.0 Syntax odaClient.Measure Agilent 86038A Optical Dispersion Analyzer, Third Edition... - Page 202 Most remote applications use single sweep. Property Value InstrumentObjects.ODACommon.eTriggerTypeVB.NET Syntax odaClient.TriggerModeParams = _InstrumentObjects.ODACommon.eTriggerType.TriggerSingle VB 6.0 Syntax odaClient.TriggerModeParams = eTriggerType_TriggerSingle Agilent 86038A Optical Dispersion Analyzer, Third Edition...
-
Page 203: Actions Commands
TriggerProgress event for completion. VB.NET Syntax odaClient.Actions.Measure() VB 6.0 Syntax odaClient.Actions.Measure MeasureLength Method Starts a length measurement. VB.NET Syntax odaClient.Actions.MeasureLength() VB 6.0 Syntax odaClient.Actions.MeasureLength Agilent 86038A Optical Dispersion Analyzer, Third Edition... - Page 204 If ModBiasOnly = True, then only an optical modulator optimization is done during normalization. VB.NET Syntax odaClient.Actions.Normalize(False) VB 6.0 Syntax odaClient.Actions.Normalize PrintScreen Method This command is equivalent to the front panel Print button. VB.NET Syntax odaClient.Actions.PrintScreen() VB.6.0 Syntax odaClient.Actions.PrintScreen Agilent 86038A Optical Dispersion Analyzer, Third Edition...
-
Page 205: Analysis - Curvefit Commands
VB.NET Syntax Dim OutTraceData() As Double OutTraceData = odaClient.Analysis.CurveFit.Calculate _ ("Quadratic", XStart, XIncrement, InTraceData, GeneralForm, Equation) VB 6.0 Syntax Dim OutTraceData() As Double OutTraceData = odaClient.Analysis.CurveFit.Calculate _ ("Quadratic", XStart, XIncrement, InTraceData, GeneralForm, Equation) Agilent 86038A Optical Dispersion Analyzer, Third Edition... - Page 206 Sellmeier fit, zero-dispersion wavelengths found outside of the measurement range may not correspond to actual zero-dispersion wavelengths of the device under test. The equation is in the form: Ax + Bx + C + Dx + Ex Agilent 86038A Optical Dispersion Analyzer, Third Edition...
- Page 207 Returns String - Contains the short name of the curve fit, for example quadratic. VB.NET Syntax Dim eqName As String eqName = odaClient.Analysis.CurveFit.ShortName("Quadratic") VB 6.0 Syntax Dim eqName As String eqName = odaClient.Analysis.CurveFit.ShortName("Quadratic") Agilent 86038A Optical Dispersion Analyzer, Third Edition...
-
Page 208: Connectivity Commands
VB 6.0 Syntax odaClient.Connectivity.Connect("MYODA") Disconnect Method Disconnects the remoting session from the ODA. Events will not be sent to the remote client once it disconnects. VB.NET Syntax odaClient.Connectivity.Disconnect() VB 6.0 Syntax odaClient.Connectivity.Disconnect Agilent 86038A Optical Dispersion Analyzer, Third Edition... - Page 209 MsgBox("Connected") End If TerminateSession Method This method unregisters the communicator channel to the ODA. TerminateSession should be called when remoting to the ODA has been concluded. VB.NET Syntax odaClient.Connectivity.TerminateSession VB 6.0 Syntax odaClient.Connectivity.TerminateSession Agilent 86038A Optical Dispersion Analyzer, Third Edition...
-
Page 210: Display Commands
0 = Top Left, 1 = Bottom Left, 2 = Top Right, 3 = Bottom Right. ByVal trace As InstrumentObjects.ODACommon.eTraceLetter - Selects the left- or right-hand trace on the specified graph. ByVal port As InstrumentObjects.ODACommon.eODAPort - Selects the port number for the measurement. Agilent 86038A Optical Dispersion Analyzer, Third Edition... - Page 211 Writing a value to this property can change the point that is zeroed to the minimum or maximum of the trace. Reading the value of the property returns the current setting. Property Value InstrumentObjects.ODASensitivity.eGDOffsetMode VB.NET Syntax odaClient.Display.GDOffsetMode = _ InstrumentObjects.ODASensitivity.eGDOffsetMode.CenterPoint VB 6.0 Syntax odaClient.Display.GDOffsetMode = eGDOffsetMode_CenterPoint Agilent 86038A Optical Dispersion Analyzer, Third Edition...
- Page 212 Toggles the ODA user interface graph display between one, two, and four graphs. This method corresponds to the Change View front panel key. Parameters ByVal mode As InstrumentObjects.ODACommon.eLayoutMode - Defines the number of graphs that will be displayed on the 86038A user interface. VB.NET Syntax odaClient.Display.ToggleMode _ (InstrumentObjects.ODACommon.eLayoutMode.QUAD_Graph) VB 6.0 Syntax...
-
Page 213: File Commands
ODA. Parameters ByVal filename As String - Full filename and path of the ODA file. The file must exist on the ODA system. VB.NET Syntax odaClient.File.Recall("D:\Data\MyState.oda") VB 6.0 Syntax odaClient.File.Recall("D:\Data\MyState.oda") Agilent 86038A Optical Dispersion Analyzer, Third Edition... - Page 214 Also, any existing file by the same name will be overwritten. Parameters ByVal filename As String - Full filename and path of the ODA file. The file will be saved on the ODA system itself. VB.NET Syntax odaClient.File.Save("D:\Data\MyState.oda") VB 6.0 Syntax odaClient.File.Save("D:\Data\MyState.oda") Agilent 86038A Optical Dispersion Analyzer, Third Edition...
-
Page 215: Length Commands
InstrumentObjects.ODALength.eLengthMode eLengthMode.Measure - The ODA will measure length based on the index of refraction. eLengthMode.Specify - The ODA will use the Specified Length property to set length. VB.NET Syntax odaClient.Length.Mode = _ InstrumentObjects.ODALength.eLengthMode.Measure Agilent 86038A Optical Dispersion Analyzer, Third Edition... - Page 216 Specifies the length of the fiber-optic cable (in meters) for port 2. The length will also be used in computing CD and PMD coefficients. Property Value Double Related Command Length.ValidSpecifiedLength method VB.NET Syntax odaClient.Length.SpecifiedLengthPort2=3.8 VB 6.0 Syntax odaClient.Length.SpecifiedLengthPort2=3.8 Agilent 86038A Optical Dispersion Analyzer, Third Edition...
- Page 217 ByRef Minimum As Double - holds minimum specified length (in meters). ByRef Maximum As Double - holds maximum specified length (in meters). ByRef DefaultValue As Double - the default specified length (in meters). Agilent 86038A Optical Dispersion Analyzer, Third Edition...
- Page 218 Dim minLEN As Double Dim maxLEN As Double Dim defaultLEN As Double odaClient.Length.ValidSpecifiedLength(minLEN, maxLEN, defaultLEN) VB 6.0 Syntax Dim minLEN As Double Dim maxLEN As Double Dim defaultLEN As Double Call odaClient.Length.ValidSpecifiedLength(minLEN, maxLEN, defaultLEN) Agilent 86038A Optical Dispersion Analyzer, Third Edition...
-
Page 219: Measurementrange Commands
Dim maxWL As Double Call odaClient.MeasurementRange.ValidStartStop (minWL, maxWL) XStart Property Sets and reads the start wavelength for the next measurement. Property Value Double - The start wavelength in nanometers. Related Command MeasurementRange.ValidStartStop method Agilent 86038A Optical Dispersion Analyzer, Third Edition... - Page 220 MeasurementRange.ValidStartStop method VB.NET Syntax Dim myStop As Double myStop = odaClient.MeasurementRange.XStop odaClient.Measurement _ Range.XStop = myStop +1.0 VB 6.0 Syntax Dim myStop As Double myStop = odaClient.MeasurementRange.XStop odaClient.Measurement _ Range.XStop = myStop +1.0 Agilent 86038A Optical Dispersion Analyzer, Third Edition...
-
Page 221: Normalizationrange Commands
GD and Gain/Loss normalization data. VB.NET Syntax odaClient.NormalizationRange.ClearGDAndInsertionLossOffsets _ (InstrumentObjects.ODACommon.eODAPort.One) VB 6.0 Syntax odaClient.NormalizationRange.ClearGDAndInsertionLossOffsets _ (eODAPort_One) ClearModBias Method Clears the current optical modulator bias value. VB.NET Syntax odaClient.NormalizationRange.ClearModBias() VB 6.0 Syntax odaClient.NormalizationRange.ClearModBias Agilent 86038A Optical Dispersion Analyzer, Third Edition... - Page 222 PDAEnabled is not affected by this property. Property Value Boolean - True tells the ODA to use the NormalizationRange settings, False tells the ODA to use Measurement settings. VB.NET Syntax odaClient.NormalizationRange.UseCustomNormalization = True Agilent 86038A Optical Dispersion Analyzer, Third Edition...
- Page 223 Dim minWL As Double Dim maxWL As Double Call odaClient.NormalizationRange.ValidStartStop(minWL, maxWL) XStart Property Sets and reads the start wavelength for the next normalization. Property Value Double - The start wavelength in nanometers. Related Command NormalizationRange.XStop property Agilent 86038A Optical Dispersion Analyzer, Third Edition...
- Page 224 Sets and reads the stop wavelength for the next normalization. Property Value Double - The stop wavelength in nanometers. Related Command NormalizationRange.XStart property VB.NET Syntax odaClient.NormalizationRange.UseCustomNormalization = True odaClient. NormalizationRange.XStop = 1560.0 VB 6.0 Syntax odaClient.NormalizationRange.UseCustomNormalization = True odaClient. NormalizationRange.XStop = 1560.0 Agilent 86038A Optical Dispersion Analyzer, Third Edition...
-
Page 225: Normalizationrange - Stepped Commands
ByRef Maximum As Double - Maximum X-axis increment is returned. ByRef DefaultValue As Double - Default X-axis increment is returned. Related Command NormalizationRange.Stepped.Increment property VB.NET Syntax Dim minXinc As Double Dim maxXinc As double Dim defXinc As Double Agilent 86038A Optical Dispersion Analyzer, Third Edition... - Page 226 Programming Commands Base Commands odaClient.NormalizationRange.Stepped.ValidIncrement _ (minXinc, maxXinc, defXinc) VB 6.0 Syntax Dim minXinc As Double Dim maxXinc As double Dim defXinc As Double Call odaClient.NormalizationRange.Stepped.ValidIncrement _ (minXinc, maxXinc, defXinc) Agilent 86038A Optical Dispersion Analyzer, Third Edition...
-
Page 227: Normalization Range - Swept Commands
However, measurement time also increases. Property Value InstrumentObjects.ODAResolution.eTracePointsSweptMode - The number of trace points for a swept mode normalization. VB.NET Syntax odaClient.NormalizationRange.Swept.TracePoints = _ ODAResolution.eTracePointsSweptMode.Step1601 VB 6.0 Syntax odaClient.NormalizationRange.Swept.TracePoints = _ eTracePointsSweptMode_Step1601 Agilent 86038A Optical Dispersion Analyzer, Third Edition... -
Page 228: Printing Commands
Prints a copy of the graphical display and pertinent instrument settings to the default printer. This method is equivalent to pressing the front panel Print key. VB.NET Syntax odaClient.Printing.PrintScreen() VB 6.0 Syntax odaClient.Printing.PrintScreen Agilent 86038A Optical Dispersion Analyzer, Third Edition... -
Page 229: Resolution Commands
ByRef Minimum As Double - Minimum RF Modulation Frequency allowed, in MHz ByRef Maximum As Double - Maximum RF Modulation Frequency allowed, in MHz ByRef Default Value As Double - Default RF Modulation Frequency used, in MHz. Related Command Resolution.RFModulationFrequency property Agilent 86038A Optical Dispersion Analyzer, Third Edition... - Page 230 Dim Min As Double Dim Max As Double Dim Default As Double odaClient.Resolution.ValidRFModulationFrequency (Min, Max, Default) VB 6.0 Syntax Dim Min As Double Dim Max As Double Dim Default As Double Call odaClient.Resolution.ValidRFModulationFrequency (Min, Max, Default) Agilent 86038A Optical Dispersion Analyzer, Third Edition...
-
Page 231: Resolution - Stepped Commands
Specifies the separation between adjacent measurement wavelengths. Property Value Double - The wavelength spacing between points, in nanometers. Related Command Resolution.Stepped.ValidIncrement method, Resolution.Stepped.ValidTracePoints method VB.NET Syntax odaClient.Resolution.Stepped.Increment =.63 VB 6.0 Syntax odaClient.Resolution.Stepped.Increment =.63 Agilent 86038A Optical Dispersion Analyzer, Third Edition... - Page 232 Returns valid minimum and maximum trace point values. Parameters ByRef Minimum As Double - Minimum number of trace points is returned ByRef Maximum As Double - Maximum number of trace points is returned Agilent 86038A Optical Dispersion Analyzer, Third Edition...
- Page 233 Related Command Resolution.Stepped.Increment property, Resolution.Stepped.ValidIncrement method VB.NET Syntax Dim MinXtrc As Double Dim MaxXtrc As Double odaClient.Resolution.Stepped.ValidTracePoints (MinXtrc, MaxXtrc) VB 6.0 Syntax Dim MinXtrc As Double Dim MaxXtrc As Double Call odaClient.Resolution.Stepped.ValidTracePoints (MinXtrc, MaxXtrc) Agilent 86038A Optical Dispersion Analyzer, Third Edition...
-
Page 234: Resolution - Swept Commands
Sets the number of points used in a swept mode measurement. Choices are 801 or 1601 points. Property Value InstrumentObjects.ODAResolution.eTracePointsSweptMode - The number of trace points for a swept mode measurement. VB.NET Syntax odaClient.Resolution.Swept.TracePoints= _ODAResolution.eTracePoints SweptMode.Step801 VB 6.0 Syntax odaClient.Resolution.Swept.TracePoints=_eTracePoints SweptMode_Step801 Agilent 86038A Optical Dispersion Analyzer, Third Edition... -
Page 235: Results Commands
Returns the wavelength step size (or increment), in nm, for the last measurement. You can build the wavelength array with λ = XStart + (i - 1)XIncrement, i= 1 to number of points Agilent 86038A Optical Dispersion Analyzer, Third Edition... - Page 236 Dim sVal As Double sval = odaClient.Results.XStart (eMeasurementType_Gain) XStop Method Returns the stop wavelength for the last measurement of the specified type, in nm. Returns Double - The stop wavelength for the last measurement in nanometers. Agilent 86038A Optical Dispersion Analyzer, Third Edition...
- Page 237 Returns the data array for the last measurement for the specified measurement type and port. Use UBound for VB 6.0 or Length for VB.NET to find the number of trace points, and XStart and Increment to find the wavelengths Agilent 86038A Optical Dispersion Analyzer, Third Edition...
- Page 238 Returns Double() - The raw data array. VB.NET Syntax Dim rawData() As Double rawData = odaClient.Results.YData _ (InstrumentObjects.ODACommon.eMeasurementType.Gain, _ InstrumentObjects.ODACommon.eODAPort.One) VB 6.0 Syntax Dim rawData() As Double rawData = odaClient.Results.YData(eMeasurementType_Gain, _ eODAPort_One) Agilent 86038A Optical Dispersion Analyzer, Third Edition...
-
Page 239: Sensitivity Commands
(high sensitivity) and a longer measurement time. Reduce the IF bandwidth as needed to control trace noise. This is particularly important when measuring a high insertion loss device. Property Value InstrumentObjects.ODASensitivity.eIFBandwidth Agilent 86038A Optical Dispersion Analyzer, Third Edition... - Page 240 = 201 VB 6.0 Syntax odaClient.Sensitivity.SamplesPerPoint = 201 ValidSamplesPerPoint Method Returns valid minimum, maximum, and default values for the SamplesPerPoint. Parameters ByRef Minimum As Integer - Minimum Samples per point is returned. Agilent 86038A Optical Dispersion Analyzer, Third Edition...
- Page 241 Dim maxSamples As Integer Dim defSamples As Integer odaClient.Sensitivity.ValidSamplesPerPoint _ (minSamples, maxSamples, defSamples) VB 6.0 Syntax Dim minSamples As Integer Dim maxSamples As Integer Dim defSamples As Integer Call odaClient.Sensitivity.ValidSamplesPerPoint _ (minSamples, maxSamples, defSamples) Agilent 86038A Optical Dispersion Analyzer, Third Edition...
-
Page 242: Status Commands
120 minutes as the estimate. This value is updated every minute. Property Value Double - The estimated time in minutes to the next TLS Settling. Related Command TLS.ForceSettling method, Status.TLSSettling property VB.NET Syntax odaClient.Status.EstimatedTimeToTLSSettling Agilent 86038A Optical Dispersion Analyzer, Third Edition... - Page 243 Property Value String - A description of the error. VB.NET Syntax If(odaClient.Status.ErrorFlag = True) Then MsgBox("Error:" + odaClient.Status.LastError) End If VB 6.0 Syntax If(odaClient.Status.ErrorFlag = True) Then MsgBox("Error:" + odaClient.Status.LastError) End If Agilent 86038A Optical Dispersion Analyzer, Third Edition...
- Page 244 Dim ctr As Integer Dim entries() As InstrumentObjects.RemoteStatusEntry entries = odaClient.Status.StatusLog() For ctr = 0 To entries.GetUpperBound(0) Console.WriteLine("Time:" + entries(ctr).TimeStamp + "Summary:" + entries(ctr).Summary + "Type:" + entries(ctr).MessageType.ToString + "Detail:" + entries(ctr).Detail) Next Agilent 86038A Optical Dispersion Analyzer, Third Edition...
- Page 245 TriggerComplete Property Sets the value to True when the trigger is complete. Property Value Boolean - True when the last Measurement or Normalization is complete. VB.NET Syntax Dim TrigComplete As Boolean TrigComplete = odaClient.Status.TriggerComplete Agilent 86038A Optical Dispersion Analyzer, Third Edition...
- Page 246 Read-Only Property Boolean - True when current ODA settings fall within the current normalization boundaries. VB.NET Syntax Dim ValNorm As Boolean ValNorm = odaClient.Status.ValidNormalization VB 6.0 Syntax Dim ValNorm As Boolean ValNorm = odaClient.Status.ValidNormalization Agilent 86038A Optical Dispersion Analyzer, Third Edition...
-
Page 247: System Commands
_ (Instrument.Objects.ODACommon.enumOnOff.eOn) VB 6.0 Syntax odaClient.System.LaserState (enumOnOff_eOn) Preset Method Sets the instrument to defined setup conditions. Preset can only be called when the ODA is idle. VB.NET Syntax odaClient.System.Preset() VB 6.0 Syntax odaClient.System.Preset Agilent 86038A Optical Dispersion Analyzer, Third Edition... -
Page 248: System - Identity Commands
Programming Commands Base Commands System - Identity Commands CompanyName Property Returns Agilent Technologies as the company name of the 86038A ODA. Property Value String - Company name. VB.NET Syntax Dim CompName As String CompName = odaClient.System.Identity.CompanyName VB 6.0 Syntax Dim CompName As String CompName = odaClient.System.Identity.CompanyName... - Page 249 ODA system should match. A mismatch in versions may cause unexpected results. Property Value String - Version of remote client software. VB.NET Syntax Dim RemVersion As String RemVersion = odaClient.System.Identity.RemotingVersion Agilent 86038A Optical Dispersion Analyzer, Third Edition...
- Page 250 Programming Commands Base Commands VB.6.0 Syntax Dim RemVersion As String RemVersion = odaClient.System.Identity.RemotingVersion Agilent 86038A Optical Dispersion Analyzer, Third Edition...
-
Page 251: Tls Commands
Returns the power setting of TLS Output 2. Property Value Double - the TLS power setting. VB.NET Syntax Dim Power As Double Power = odaClient.TLS.HighPower VB.6.0 Syntax Dim Power As Double Power = odaClient.TLS.HighPower Agilent 86038A Optical Dispersion Analyzer, Third Edition... - Page 252 Programming Commands Base Commands Agilent 86038A Optical Dispersion Analyzer, Third Edition...
- Page 253 Hard Drive Backup and Recovery ....271 Cleaning Connections for Accurate Measurements . . 272 Returning the Instrument for Service ....282 Agilent 86038A Optical Dispersion Analyzer, Third Edition...
-
Page 254: Introduction
The rest of the chapter covers other important customer support information. Please note that the following initial isms are used: • ODA: Optical Dispersion Analyzer (Agilent 86038A) • PNA: Performance Network Analyzer • TLS: Tunable Laser Source •... -
Page 255: Troubleshooting Startup Problems
When the application launches, it attempts to contact the tunable laser source, the test set, and the multi-wavelength meter (when applicable). If there is any difficulty in contacting these instruments, error messages will Agilent 86038A Optical Dispersion Analyzer, Third Edition... - Page 256 TLS as the TLS takes at least 12 minutes to fully boot. If there is any difficulty in contacting these instruments, ensure that there is power to the test set, and refer to “Troubleshooting GPIB Communications Problems” on page 257. Agilent 86038A Optical Dispersion Analyzer, Third Edition...
-
Page 257: Troubleshooting Gpib Communications Problems
Model # GPIB Address Path to set GPIB Address Lightwave Measurement System 8164B / Config > GPIB Address with Tunable Laser Source Module 81640B or 81600B Multi-Wavelength Meter 86122A Setup > GPIB Setup Agilent 86038A Optical Dispersion Analyzer, Third Edition... - Page 258 Agilent web site. The upgrade process requires the use of a computer. For this purpose, an external computer or the ODA controller itself can be used. To use the ODA controller, first exit the ODA application (File>Exit>"agilentoda">Yes). Agilent 86038A Optical Dispersion Analyzer, Third Edition...
- Page 259 This again is the correct configuration for the ODA software to work properly. If the device settings have been changed, please restore them to the condition described above for the system GPIB to function properly. Agilent 86038A Optical Dispersion Analyzer, Third Edition...
- Page 260 2 Ensure that all of the instruments are at the proper GPIB addresses. 3 Reboot the PNA. 8. Swap GPIB Cables If the ODA still cannot communicate with the TLS or MWM, try using different GPIB cables. Agilent 86038A Optical Dispersion Analyzer, Third Edition...
-
Page 261: Troubleshooting Problems With Remote Programming
Troubleshooting Problems with Remote Programming Troubleshooting and Upgrades Troubleshooting Problems with Remote Programming For troubleshooting problems with remote programming, refer to “Troubleshooting” on page 146. Agilent 86038A Optical Dispersion Analyzer, Third Edition... -
Page 262: Troubleshooting Sweep And Normalization Problems
If there are errors, refer to the MWM online Help. 5 Isolate the problem to the TLS or MWM. Refer to “Test the High output on the TLS” on page 265, and test the Low SSE output on the TLS. Agilent 86038A Optical Dispersion Analyzer, Third Edition... -
Page 263: Troubleshooting Incorrect Data
• If the PDL values measured on the normalization patchcord are close to the noise floor (around 0.1dB), the polarization scanner is OK. • If the PDL values are extremely low (around 0.01dB), the polarization scanner Agilent 86038A Optical Dispersion Analyzer, Third Edition... - Page 264 N O TE phase between two points is too large. This condition will result in a phase wrap. Refer to “If the Group Delay measurement shows a sudden large offset” on page 267. Agilent 86038A Optical Dispersion Analyzer, Third Edition...
-
Page 265: Troubleshooting The Tls
Low SSE output on the TLS. Follow the steps above, using TLS Output 1. If there is a power discrepancy between the TLS and MWM, use the power meter to isolate where the failure lies. Agilent 86038A Optical Dispersion Analyzer, Third Edition... -
Page 266: Solving Measurement Problems
Real-Time Port Monitor to check the power stability. To run the Real-Time Port Monitor, attach a mouse and click on System->Real Time Port Monitor (F12). Agilent 86038A Optical Dispersion Analyzer, Third Edition... - Page 267 The Auto Modulation frequency option will aid in avoiding phase wraps when measuring fiber spools in stepped mode. To enable Auto Modulation frequency, press the Sens/Res front panel key and put a check in the Auto Modulation Frequency box. Agilent 86038A Optical Dispersion Analyzer, Third Edition...
- Page 268 Refer to “Laser Setup” on page 105 for more information. For more information, refer to Chapter 8, “Specifications and Regulatory N O TE Information.” Agilent 86038A Optical Dispersion Analyzer, Third Edition...
- Page 269 A common problem that leads to GD ripple is dirty fiber connections. “Example of a Dirty Connector’. Refer to “Relationship of setup parameters to ripple amplitude accuracy” on page 48 for more information. Agilent 86038A Optical Dispersion Analyzer, Third Edition...
-
Page 270: Software Upgrade Procedure
Troubleshooting and Upgrades Software Upgrade Procedure Software Upgrade Procedure The 86038A is built on the 8801A performance network analyzer (PNA). Firmware for the ODA is designed to work with a specific version of the PNA firmware. To Upgrade the firmware on the ODA: 1 Check the ODA website for firmware upgrades: www.agilent.com/comms/oct. -
Page 271: Hard Drive Backup And Recovery
• 3. Backup and Recovery Options. 2 Quickly select option 3. (The first option is the default, and will be automatically selected within a few seconds.) 3 When the Agilent Technologies System Utilities Screen appears, select from the following options. 1. Recover Factory’s Backup Image This process restores your system to the original, factory-installed operating system and system software. -
Page 272: Cleaning Connections For Accurate Measurements
Connectors also vary in the polish, curve, and concentricity of the core within the cladding. Mating one style of cable to another requires an adapter. Agilent Technologies offers adapters for most instruments to allow testing with many different cables. - Page 273 Agilent Technologies instruments typically use a connector such as the Diamond HMS-10, which has concentric tolerances within a few tenths of a micron. Agilent Technologies then uses a special universal adapter, which allows other cable types to mate with this precision connector.
- Page 274 0.2 µm. This process, plus the keyed axis, allows very precise core-to-core alignments. This connector is found on most Agilent Technologies lightwave instruments. The soft core, while allowing precise centering, is also the chief liability of the connector.
- Page 275 Use the following guidelines to achieve the best possible performance when making measurements on a fiber-optic system: • Never use metal or sharp objects to clean a connector and never scrape the con- nector. • Avoid matching gel and oils. Agilent 86038A Optical Dispersion Analyzer, Third Edition...
- Page 276 Troubleshooting and Upgrades Cleaning Connections for Accurate Measurements Figure 22 Clean, problem-free fiber end and ferrule. Figure 23 Dirty fiber end and ferrule from poor cleaning. Figure 24 Damage from improper cleaning. Agilent 86038A Optical Dispersion Analyzer, Third Edition...
- Page 277 It takes only one missed cleaning for a piece of grit to permanently damage the glass and ruin the connector. Agilent 86038A Optical Dispersion Analyzer, Third Edition...
- Page 278 WARN IN G instrument, system, or device before visually inspecting the fiber ends. Disable all optical sources before disconnecting fiber-optic cables. Failure to do so may result in permanent injury to your eyes. Agilent 86038A Optical Dispersion Analyzer, Third Edition...
- Page 279 Cleaning Connectors The procedures in this section provide the proper steps for cleaning fiber- optic cables and Agilent Technologies universal adapters. The initial cleaning, using the alcohol as a solvent, gently removes any grit and oil. If a caked-on layer of material is still present, (this can happen if the...
- Page 280 The second cleaning should be more arduous with a scrubbing action. To clean an adapter The fiber-optic input and output connectors on many Agilent Technologies instruments employ a universal adapter such as those shown in the following picture. These adapters allow you to connect the instrument to different types of fiber-optic cables.
- Page 281 Nitrogen gas or compressed dust remover can also be used. Do not shake, tip, or invert compressed air canisters, because this releases particles in the can into the air. Refer to instructions provided on the compressed air canister. Agilent 86038A Optical Dispersion Analyzer, Third Edition...
-
Page 282: Returning The Instrument For Service
Returning the Instrument for Service Agilent Technologies aims to maximize the value you receive, while minimizing your risk and problems. We strive to ensure that you get the test and measurement capabilities you paid for and obtain the support you need. - Page 283 Regulatory Information ......290 Declaration of Conformity......291 Agilent 86038A Optical Dispersion Analyzer, Third Edition...
-
Page 284: Introduction
Introduction Introduction This chapter contains specifications and characteristics for the Agilent 86038A optical dispersion analyzer. For specifications specific to the 81640 tunable laser sources refer to the specifications chapter in the Tunable Laser Modules User’s Guide. Agilent Technologies does not recommend installing any additional CAU T ION software on the system controller. -
Page 285: Angled Connector Specifications
The angled connector symbol is typically colored green. You should connect straight contact fiber end connectors with neutral sleeves to straight contact connectors and connect angled contact fiber end connectors with green sleeves to angled contact connectors. Agilent 86038A Optical Dispersion Analyzer, Third Edition... -
Page 286: Specifications
1.8 nm step size. Normalization performed with Phase Dynamic Accuracy selected. Repeatability is defined as the worse (plus or minus) standard deviation over the wavelength range 1520 nm to 1610 nm from 10 sweeps. Agilent 86038A Optical Dispersion Analyzer, Third Edition... - Page 287 Refer to Agilent 81640A and 81640B TLS absolute wavelength accuracy specification. Refer to Agilent 81640A and 81640B TLS relative wavelength accuracy specification. With Agilent 86122A: 1270,1 nm to 1375 nm Agilent 86038A Optical Dispersion Analyzer, Third Edition...
- Page 288 +10° C to +35° C Specified Temperature Range 25° C ±5° K Operating Humidity <80% RH Storage Temperature –40° C to +70° C Storage Humidity 5% to 95% at +40° C Altitude 2000 m maximum (8164B limit) Agilent 86038A Optical Dispersion Analyzer, Third Edition...
- Page 289 23 kg (51 lbs) 83427B 132 mm H x 426 mm W x 480 mm D 10 kg (25 lbs) 86122A 138 mm H x 425 mm W x 520mm D 14.5kg (32 lbs) Agilent 86038A Optical Dispersion Analyzer, Third Edition...
-
Page 290: Regulatory Information
Table 23 Notice for Germany: Noise Declaration Acoustic Noise Emission Geräuschemission LpA < 70 dB LpA < 70 dB Operator position am Arbeitsplatz Normal operation normaler Betrieb per ISO 7779 nach DIN 45635-1 Agilent 86038A Optical Dispersion Analyzer, Third Edition... -
Page 291: Declaration Of Conformity
Declaration of Conformity Specifications and Regulatory Information Declaration of Conformity Agilent 86038A Optical Dispersion Analyzer, Third Edition... - Page 292 Specifications and Regulatory Information Declaration of Conformity Agilent 86038A Optical Dispersion Analyzer, Third Edition...
- Page 293 Glossary Dispersion Terminology......294 Agilent 86038A Optical Dispersion Analyzer, Third Edition...
- Page 294 The shortest length of uniformly birefringent fiber over which the fast and slow polarization modes experience 360-degrees of phase shift. Birefringence The property of optical fiber and devices that causes light to decompose into two orthogonally polarized waves traveling at slightly different speeds. Agilent 86038A Optical Dispersion Analyzer, Third Edition...
- Page 295 Curve Fitting Post-processing of the measurement trace data in which a model mathematical curve is optimally fitted to the trace. The 86038A ODA provides a default set of curve fitting functions for fiber test: quadratic, 3- term and 5-term Sellmeier. Also provide is a linear curve fit that can be applied to some components.
- Page 296 “Narrowband Device” Intermediate Frequency Bandwidth (IFBW) The bandwidth of the filter employed in the network analyzer portion of the 86038A ODA. When testing high insertion loss devices, a narrower IF bandwidth decreases measurement noise and increases measurement time. Lamda Zero See “Zero Dispersion...
- Page 297 Glossary Modulation Frequency The frequency of the sinusoidal RF signal used to modulate the intensity of the test signal in the 86038A ODA. See also “Resolution” Narrowband Device A particular type of frequency selective device in which a relatively narrow range of wavelengths are transmitted or reflected.
- Page 298 PSP’s defined at the output. By definition, the PSP’s are the states at which the polarization transformation of the link is independent of wavelength (over a suitably narrow increment of wavelength). See also“PSP Bandwidth” Agilent 86038A Optical Dispersion Analyzer, Third Edition...
- Page 299 Resolution The ability of the 86038A ODA to reveal fine details in the response of the test device (for example, a fine group delay ripple, or a steep filter slope). Resolution depends on various setup factors, especially wavelength step size and modulation frequency.
- Page 300 Stokes parameters can be used to describe fully, partially, or unpolarized light. Wavelength Resolution “Resolution’. Wavelength Step In the 86038A ODA operating in the Step mode, the separation between adjacent test wavelengths. See also “Resolution” Waveplate Birefringent device used as a phase shifter.
- Page 301 92 front panel connections 18 device types, choosing setup parameters 65 C# programming 172 overview 26 differential group delay specifications 286 caution, definition of 11 dimensions 288, 289 CE mark 12 Agilent 86038A Optical Dispersion Analyzer, Third Edition...
- Page 302 Excel 183 laser narrowband filter, measuring 70 Lab View 185 classifications 15 network settings, how to change 131 VB 6.0 155 safety 15 VB.NET 164 setup 105 networking 130 length next trace selection 121 Agilent 86038A Optical Dispersion Analyzer, Third Edition...
- Page 303 270 setup USB hub 17 markers 114 user interface 26 parameters 63 parameters, theory of 43 wizard 97 VB 6.0 programming 155 Setup menu 97 VB.NET programming 164 setup wizard 30 Agilent 86038A Optical Dispersion Analyzer, Third Edition...
- Page 304 Index Agilent 86038A Optical Dispersion Analyzer, Third Edition...
- Page 306 Agilent Technologies GmbH 2004 Printed in Germany December 2004 Third edition, December 2004 86038-90006 Agilent Technologies...