Table of Contents
Advertisement
Quick Links
Advertisement
Table of Contents

Related Manuals for Agilent Technologies 86122A


Summary of Contents for Agilent Technologies 86122A
- Page 1 Agilent 86122A Multi-Wavelength Meter User's Guide Agilent Technologies...
- Page 2 Buyer's sole and exclusive remedies. Warranty formed or adhered to, could result Agilent Technologies shall not be liable in damage to the product or loss of for any direct, indirect, special, This Agilent Technologies instrument important data.
- Page 3 Warnings and Notices WARN IN G To avoid the possibility of injury or death, you must observe the following precautions before switching on the instrument. Insert the power cable plug only into a socket outlet provided with a protective earth contact. Do not negate this protective action by the using an extension cord without a protective conductor.
- Page 4 Agilent Technologies Sales and Service Offices For more information about Agilent Technologies test and measurement products, applications, services, and for a current sales office listing, viesit our web site: http://www.agilent.com/comms/lightwave You can also contact one of the following centers and ask for a test and measurement sales representative.
-
Page 5: Table Of Contents
Preparing the instrument for shipping Agilent Technologies Service Offices Call Center Service Center Hard Drive Backup and Recovery Create a New System Utility Disk Working in Comfort About Repetitive Strain Injury Mice and Other Input Devices Agilent 86122A Multi-Wavelength Meter, Second Edition... - Page 6 Using the 86122A Introduction Differences Between the 86122A and the 86120C Differences in General Operation Differences in Remote Commands Front and Rear Panel Features Rear Panel Front Panel Main Screen Layout Graphs and Tables Front Panel Buttons Menus 86122A Dialog Box Operation Making Measurements Step 1.
- Page 7 Compliance with German Noise Requirements Compliance with Canadian EMC Requirements Declaration of Conformity Agilent 86122A Multi-Wavelength Meter, Second Edition...
- Page 8 Agilent 86122A Multi-Wavelength Meter, Second Edition...
-
Page 9: Setting Up The 86122A
Returning the Instrument for Service ....49 Agilent Technologies Service Offices ....52 Hard Drive Backup and Recovery . -
Page 10: General Safety Considerations
WARN IN G procedure which, if not correctly performed or adhered to, could result in injury or loss of life. Do not proceed beyond a warning sign until the indicated conditions are fully understood and met. Agilent 86122A Multi-Wavelength Meter, Second Edition... - Page 11 The CSA mark is a registered trademark of the Canadian Standards Association. The C-Tick mark is a registered trademark of the Australian Spectrum Management Agency. This text denotes the instrument is an Industrial Scientific and ISM1-A Medical Group 1 Class A product. Agilent 86122A Multi-Wavelength Meter, Second Edition...
- Page 12 This instrument has autoranging line voltage input. Be sure the CAU T ION supply voltage is within the specified range. Use of controls or adjustment or performance of procedures other CAU T ION than those specified herein may result in hazardous radiation exposure. Agilent 86122A Multi-Wavelength Meter, Second Edition...
- Page 13 Windows 98 application program (Windows ® is a U.S. registered trademark of Microsoft Corp.) All 86122A Multi-Wavelength Meter functionality is directly available from within the 86122A Multi- Wavelength Meter application. Windows 98 configuration changes made outside of the 86122A Multi-Wavelength Meter application may not work correctly and could cause the instrument to become inoperable.
- Page 14 Do not enable the laser unless fiber or an equivalent device is attached to the optical output connector. Use of controls or adjustments or performance of procedures other CAU T ION than those specified herein can result in hazardous radiation exposure. Agilent 86122A Multi-Wavelength Meter, Second Edition...
-
Page 15: Step 1. Inspect The Shipment
52. If the shipment was damaged, contact the carrier, then contact the nearest Agilent Sales Office. Keep the shipping materials for the carrier’s inspection. The Agilent Sales Office will arrange for repair or replacement at Agilent’s option without waiting for claim settlement. Agilent 86122A Multi-Wavelength Meter, Second Edition... -
Page 16: Options And Accessories
Setting Up the 86122A General Safety Considerations Options and Accessories The following table lists the accessories that may be on the 86122A shipping list. The information on your actual shipping list is more accurate and should supersede the information in this table. - Page 17 General Safety Considerations Setting Up the 86122A Table 3 Fiber-Optic Adapters Front Panel Description Agilent Part Number Fiber-Optic Adapter FC/PC 81000FI 81000KI 81000SI 81000VI Agilent 86122A Multi-Wavelength Meter, Second Edition...
-
Page 18: Step 2. Consider Environmental Specifications
N O TE Random, 2 g rms, 5-500 Hz, 10 minutes per axis Vibration Sine, 0.5 g (0 to peak), 5 to 500 Hz, 1 octave per minute Vibration is type tested. N O TE Agilent 86122A Multi-Wavelength Meter, Second Edition... - Page 19 Setting Up the 86122A Power Requirements Voltage 100-240 V~ Frequency 50-60 Hz Maximum Power 150 W 14.5 kg (32 lb) Weight Dimensions Height 138 mm (5.2 in) Width 425 mm (16.7 in) Depth 520 mm (20.5 in) Agilent 86122A Multi-Wavelength Meter, Second Edition...
-
Page 20: Step 3. Configure For Bench Top Or Rack Mount Use
Step 3. Configure for Bench Top or Rack Mount Use The 86122A is shipped ready for bench top use. To configure the instrument for rack mount use, follow the steps below. You must have a rack mount kit to continue with this procedure. - Page 21 General Safety Considerations Setting Up the 86122A Front Handle Assembly are included with Option 86122A-1CP only. Agilent 86122A Multi-Wavelength Meter, Second Edition...
-
Page 22: Step 4. Connect A Keyboard And Mouse (Optional)
Refer to the figure below for PS/2 connections. You can also use the USB port for a USB keyboard and mouse. A keyboard and mouse are not supplied with the 86122A. N O TE Do not stack other objects on the keyboard; this will cause self-test N O TE failures at power-on. -
Page 23: Step 5. Connect The Line Cord
The line cord provided is matched by Agilent to the country in which the order originates. This instrument has autoranging line voltage input. Be sure the CAU T ION supply voltage is within the specified range. Agilent 86122A Multi-Wavelength Meter, Second Edition... -
Page 24: Line Power Cable
When connected to an appropriate AC power receptacle, this cable earths the instrument cabinet. The type of power cable shipped with each instrument depends on the country of destination. Line Power Cables - Plug Identification Agilent 86122A Multi-Wavelength Meter, Second Edition... -
Page 25: Step 6. Turn On The Line Power
Press the power switch at the lower left-hand corner of the front panel. After at least one minute, the display will look similar to the following figure. The Agilent Variable Optical Attenuator modules and Agilent Variable Optical Attenuator modules with Power Control is ready to use! Agilent 86122A Multi-Wavelength Meter, Second Edition... -
Page 26: Interacting With The Display
General Safety Considerations Interacting With the Display The 86122A is equipped with a touch screen display. You can explore the instrument’s functions and settings by touching elements on the display (such as menus, buttons, and other controls) with your finger or the supplied stylus. -
Page 27: Step 7. Calibrate The Touch Screen (Optional)
Therefore, when you touch an element on the display screen, the instrument can detect the task you want to perform. 1 On the Utility menu, click Touch Screen Calibration. The touch screen calibration utility opens. Agilent 86122A Multi-Wavelength Meter, Second Edition... - Page 28 N O TE display an error message and revert back to the previous calibration. This will prevent the touch screen from being rendered useless due to a poor calibration. Agilent 86122A Multi-Wavelength Meter, Second Edition...
-
Page 29: Step 8. Set The Time And Date
• Click the up or down arrows next to the time and date text boxes until the de- sired number is displayed. 3 Click Set Time & Date Now to apply the changes and close the dialog box. Agilent 86122A Multi-Wavelength Meter, Second Edition... -
Page 30: Step 9. Set The System Standby Mode
Using this feature can help extend the life of your instrument. To extend the life of the reference laser, you should turn off the instrument during long periods of inactivity. Agilent 86122A Multi-Wavelength Meter, Second Edition... - Page 31 30 min., 1 hr., 4 hrs., or Never. Selecting Never disables this feature. To reactivate the display • Touch the display screen or a front panel button • Move the mouse or press a key on the external keyboard (if attached) • Send a remote command Agilent 86122A Multi-Wavelength Meter, Second Edition...
-
Page 32: Step 10. Add A Printer
Setting Up the 86122A General Safety Considerations Step 10. Add a Printer Use of a printer with the 86122A is optional. Follow the steps below to add a printer. The 86122A only supports parallel printers. USB printers cannot be used. - Page 33 Installation of programs other than drivers necessary for your printer CAU T ION is not recommended or supported. Installation of additional software could render the 86122A software inoperable. Agilent 86122A Multi-Wavelength Meter, Second Edition...
- Page 34 4 On the Start menu, point to Settings, and then click Printers. 5 Double-click Add Printer. The Add Printer Wizard opens. Click Next. 6 Click Local printer, then click Next. The Add Printer Wizard displays a list of printer models and manufacturers. Agilent 86122A Multi-Wavelength Meter, Second Edition...
- Page 35 . You can then type the Have Disk path where the.inf file resides. 8 To return to the 86122A software, cycle the instrument power, or click Start, point to Programs, and then click 86122A. Agilent 86122A Multi-Wavelength Meter, Second Edition...
-
Page 36: Step 11. Avoid Costly Repairs
Before you connect any fiber-optic cable to the Agilent Variable Optical Attenuator modules and Agilent Variable Optical Attenuator modules with Power Control, refer to “Cleaning Connections for Accurate Measurements” on page Agilent 86122A Multi-Wavelength Meter, Second Edition... -
Page 37: Step 12. For More Information
Step 12. For More Information There are several ways to learn more about your 86122A. • Continue reading this book. Chapter 3, “Using the 86122A,” will help you get started using this instrument. • Refer to the Help. The Help contains the information that would normally be in- the user’s and programmer’s guide. -
Page 38: Cleaning Connections For Accurate Measurements
Connectors also vary in the polish, curve, and concentricity of the core within the cladding. Mating one style of cable to another requires an adapter. Agilent Technologies offers adapters for most instruments to allow testing with many different cables. - Page 39 Agilent Technologies instruments typically use a connector such as the Diamond HMS-10, which has concentric tolerances within a few tenths of a micron. Agilent Technologies then uses a special universal adapter, which allows other cable types to mate with this precision connector.
- Page 40 0.2 mm. This process, plus the keyed axis, allows very precise core-to-core alignments. This connector is found on most Agilent Technologies optical instruments. The soft core, while allowing precise centering, is also the chief liability of the connector.
-
Page 41: Inspecting Connectors
Material is smeared and ground into the end of the fiber causing light scattering and poor reflection. Not only is the precision polish lost, but this action can grind off the glass face and destroy the connector. Agilent 86122A Multi-Wavelength Meter, Second Edition... - Page 42 Figure 4 Clean, problem-free fiber end and ferrule. Figure 5 Dirty fiber end and ferrule from poor cleaning. Figure 6 Damage from improper cleaning. Use the following guidelines to achieve the best possible performance when making measurements on a fiber-optic system: Agilent 86122A Multi-Wavelength Meter, Second Edition...
- Page 43 It takes only one missed cleaning for a piece of grit to permanently damage the glass and ruin the connector. Agilent 86122A Multi-Wavelength Meter, Second Edition...
- Page 44 Inspect the fiber for cracks and chips. Visible imperfections not touching the fiber core may not affect performance (unless the imperfections keep the fibers from contacting). Agilent 86122A Multi-Wavelength Meter, Second Edition...
-
Page 45: Cleaning Connectors
Cleaning Connectors The procedures in this section provide the proper steps for cleaning fiber- optic cables and Agilent Technologies universal adapters. The initial cleaning, using the alcohol as a solvent, gently removes any grit and oil. If a caked-on layer of material is still present, (this can happen if the... - Page 46 Nitrogen gas or compressed dust remover can also be used. Do not shake, tip, or invert compressed air canisters, because this releases CAU T ION particles in the can into the air. Refer to instructions provided on the compressed air canister. Agilent 86122A Multi-Wavelength Meter, Second Edition...
- Page 47 Always remove both ends of fiber-optic cables from any WARN IN G instrument, system, or device before visually inspecting the fiber ends. Disable all optical sources before disconnecting fiber-optic cables. Failure to do so may result in permanent injury to your eyes. Agilent 86122A Multi-Wavelength Meter, Second Edition...
- Page 48 Cleaning Connections for Accurate Measurements To clean an adapter The fiber-optic input and output connectors on many Agilent Technologies instruments employ a universal adapter such as those shown in the following picture. These adapters allow you to connect the instrument to different types of fiber-optic cables.
-
Page 49: Returning The Instrument For Service
Returning the Instrument for Service The instructions in this section show you how to properly package the instrument for return to a Agilent Technologies service office. For a list of offices, refer to “Agilent Technologies Service Offices” on page If the instrument is still under warranty or is covered by an Agilent maintenance contract, it will be repaired under the terms of the warranty or contract (the warranty is at the front of this manual). -
Page 50: Preparing The Instrument For Shipping
• Wrap the instrument in antistatic plastic to reduce the possibility of damage caused by electrostatic discharge. • For instruments weighing less than 54 kg (120 lb), use a double-walled, corru- gated cardboard carton of 159 kg (350 lb) test strength. Agilent 86122A Multi-Wavelength Meter, Second Edition... - Page 51 Wrapping the instrument several times in this material will protect the in- strument and prevent it from moving in the carton. 4 Seal the carton with strong nylon adhesive tape. 5 Mark the carton “FRAGILE, HANDLE WITH CARE”. 6 Retain copies of all shipping papers. Agilent 86122A Multi-Wavelength Meter, Second Edition...
-
Page 52: Agilent Technologies Service Offices
For technical assistance, you can contact your local Agilent Call Center. • Visit http://www.agilent.com and click Contact Us. Also see “Agilent Technologies Sales and Service Offices” on page iv Service Center Before returning an instrument for service, you must first call the Agilent Technologies Instrument Support Center. -
Page 53: Hard Drive Backup And Recovery
1 Insert the System Utility disk (Agilent part number 5011-1306) into the floppy drive. 2 Restart the instrument/system controller. 3 When the Agilent Technologies System Utilities Screen appears, select from the following options: Recover Factory’s Backup Image This process restores your system to the original, factory-installed operating system and system software. -
Page 54: Create A New System Utility Disk
1 On the Utilities menu, click Protected Functions. 2 Enter the protected functions password “exit to windows” and click Activate. 3 On the Start menu, point to 86122A Tools, and then click Create Recovery Disk. 4 Insert a floppy disk, click OK, and then click Create Floppy. -
Page 55: Working In Comfort
(RSI) to soft tissues in the hands and arms. If you experience discomfort or pain while using your Agilent Technologies product, discontinue use immediately and consult your physician as soon as possible. -
Page 56: About Repetitive Strain Injury
About Repetitive Strain Injury Because your comfort and safety are our primary concern, we strongly recommend that you use the 86122A in accordance with established ergonomic principles and recommendations. Scientific literature suggests that there may be a relationship between injury to soft tissues - especially in the hands and arms - and prolonged improper use of keyboards or other equipment requiring repeated motions of the hands and forearms. - Page 57 Working in Comfort What if I experience discomfort? If you are experiencing any discomfort, seek professional medical advice immediately. Typically, the earlier a problem is diagnosed and treated, the easier it is to resolve. Agilent 86122A Multi-Wavelength Meter, Second Edition...
-
Page 58: Mice And Other Input Devices
• Be sure to keep your mouse and trackball clean. Regular removal of accumulat- ed dust and dirt helps ensure proper tracking and reduces unnecessary hand and wrist motions. Agilent 86122A Multi-Wavelength Meter, Second Edition... -
Page 59: Using The 86122A
Menus ......... . . 71 86122A Dialog Box Operation ..... . . 75 Making Measurements . -
Page 60: Introduction
Because the 86122A simultaneously measures multiple laser lines, you can characterize dense-wavelength-division-multiplexed (DWDM) systems and the multiple lines of Fabry-Perot lasers With the 86122A you can quickly and easily measure the following parameters: • Up to 1000 laser lines simultaneously •... -
Page 61: Differences Between The 86122A And The 86120C
Using the 86122A Differences Between the 86122A and the 86120C The 86122A is backward compatible with the 86120C. However, because of improvements in the 86122A, there are some operational differences from the 86120C. For your convenience, these differences are listed below:... -
Page 62: Differences In General Operation
86120C. To return all the data available with the 86122A, use the new parameter EXT1 (CALC1:TRAN:FREQ:POIN EXT1). • Elevation: There is no need to enter an elevation for the 86122A because it has an internal weather station. The command SENS:CORR:ELEV remains for back- ward compatibility, but has no affect on the 86122A. -
Page 63: Differences In Remote Commands
Differences in Remote Commands • CALC1:TRAN:FREQ:POIN: For the 86120C, this command selected the normal (MAX) or fast (MIN) update mode. For the 86122A, this command remains for backward compatibility. Without changing the resolution of the 86122A, this command configures the queries SENSE:DATA? and CALC1:DATA? to return the number of data points used by the 86120C. -
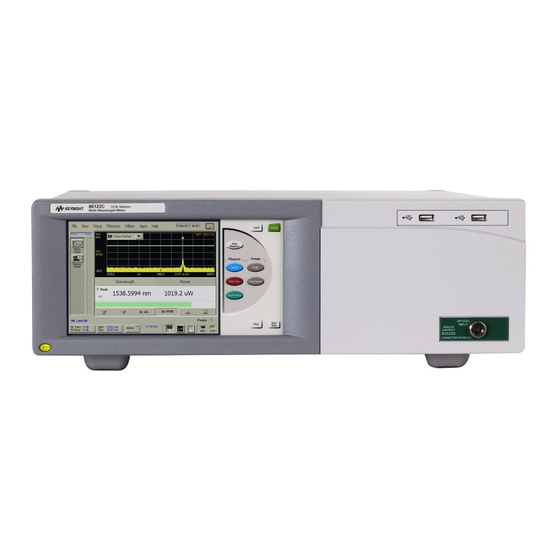
Page 64: Front And Rear Panel Features
6 LAN: A keyboard must be used to set up LAN connectivity 7 GPIB: Fully programmable, complies with IEEE 488.2 8 Video Output: SVGA An optional rear-panel optical input is also available. N O TE Agilent 86122A Multi-Wavelength Meter, Second Edition... -
Page 65: Front Panel
Front and Rear Panel Features Using the 86122A Front Panel 1 Line button 2 Display screen 3 Front panel buttons 4 3.5-inch disk drive 5 Optical Input: 9/125 mm single-mode fiber Agilent 86122A Multi-Wavelength Meter, Second Edition... -
Page 66: Main Screen Layout
Using the 86122A Main Screen Layout Main Screen Layout The main screen of the 86122A is shown below: The basic main screen components are described below. For more detailed information, refer to the Help. 1 Instrument Toolbars: You can use the graphical toolbar to easily access measurement setup, data view, and application functions. - Page 67 10 Number of Peaks Status: This indicator displays the number of peaks currently detected that meet the specified peak criteria. 11 Graphical Display: The Agilent 86122A has a high-resolution touch screen that allows easy navigation of the instrument. You can also use a mouse. The graphical display shows the transformed, uncorrected frequency-domain measurement data in a spectrum analyzer type graph.
-
Page 68: Graphs And Tables
For more information, refer to Peak Criteria. E The peak marker is always displayed and allows you to associate a peak wave- length in the graph with a row of peak data in the table. Agilent 86122A Multi-Wavelength Meter, Second Edition... -
Page 69: Front Panel Buttons
Local and AC power buttons are the only front panel controls active when the instrument is in remote operation. Press this button to return the instrument to its factory default conditions. The exceptions are Agilent 86122A Multi-Wavelength Meter, Second Edition... - Page 70 Press this button to open the dialog box. Select a file name Save Meas Data and click Save Press this button to open the dialog box. Select the Default Print Setup Printer and Printout Type, and click Print Agilent 86122A Multi-Wavelength Meter, Second Edition...
-
Page 71: Menus
Using the 86122A Menus The instrument menus provide access to all functions. This section shows the layout of each menu. For detailed information on each of these menus, refer to the Help. The File menu Agilent 86122A Multi-Wavelength Meter, Second Edition... - Page 72 Using the 86122A Menus The View menu The Setup menu Agilent 86122A Multi-Wavelength Meter, Second Edition...
- Page 73 Menus Using the 86122A The Measure menu The Utilities menu The Apps menu Agilent 86122A Multi-Wavelength Meter, Second Edition...
- Page 74 Using the 86122A Menus The Help menu Agilent 86122A Multi-Wavelength Meter, Second Edition...
-
Page 75: 86122A Dialog Box Operation
86122A Dialog Box Operation Using the 86122A 86122A Dialog Box Operation The 86122A dialog boxes allow real-time changes to instrument settings. Because of this, the dialog boxes do not have , and Apply Cancel buttons. When you have finished changing a setting, simply click... -
Page 76: Making Measurements
+10 dBm is the maximum total displayed input power. Do not CAU T ION exceed +18 dBm source power. The Agilent 86122A’s input circuitry can be damaged when total input power exceeds this level. Agilent 86122A Multi-Wavelength Meter, Second Edition... - Page 77 Always remove both ends of fiber-optic cables from any WARN IN G instrument, system, or device before visually inspecting the fiber ends. Disable all optical sources before disconnecting fiber-optic cables. Failure to do so may result in permanent injury to your eyes. Agilent 86122A Multi-Wavelength Meter, Second Edition...
-
Page 78: Step 2. Select Basic Measurement Setup Parameters
Basic measurement setup parameters that you should choose before making a measurement are medium, device type, units, and sweep mode. Select the Medium The 86122A can display wavelength values in a vacuum, or in standard air. 1 Press and click 2 Click the Medium tab, and select In Air or In Vacuum. - Page 79 3 Click Close. Select the Device Type You can optimize (or match) the measurement technique of the 86122A to the type of device you are measuring – narrowband or broadband. Narrowband devices include DFB lasers and modes of Fabry-Perot lasers.
- Page 80 You can also set up data logging to perform measurement sweeps at any desired interval. The green SWP indicator in the lower right-hand corner is lit when a measurement is being acquired. Agilent 86122A Multi-Wavelength Meter, Second Edition...
-
Page 81: Step 3. Define Laser-Line Peaks
4 and 5 does not drop to the peak excursion limit. Use Peak Criteria to Define Peaks 1 Click 2 Click the Peak Criteria tab. 3 Select Relative or Absolute threshold type. 4 Click the Threshold Value box and enter the threshold value. Agilent 86122A Multi-Wavelength Meter, Second Edition... - Page 82 2 Click the Wavelength Limiting tab. 3 Select On 4 Click the Limit Start Wavelength box and enter the start wavelength value. 5 Click the Limit Stop Wavelength box and enter the stop wavelength value. 6 Click Close. Agilent 86122A Multi-Wavelength Meter, Second Edition...
-
Page 83: Step 4. Make Measurements
Making Measurements Using the 86122A Step 4. Make Measurements The 86122A can make a wide variety of wavelength and power measurements. Peak Wavelength and Power Press and click Multiple Laser Lines Press and click Average Wavelength and Total Power Press... - Page 84 It is often important to measure the wavelength and power separation between multiple laser lines. This is especially true in wavelength-division- multiplexed (WDM) systems where channel spacing must be adhered to. The Agilent 86122A can display the wavelength and amplitude of any laser line relative to another. 1 Press and click 2 Select a channel as the reference by clicking in the “Ref”...
- Page 85 1 Connect an optical attenuator between the front-panel OPTICAL INPUT connector and the fiber-optic cable from your device. The attenuator must reduce the total input power to the Agilent 86122A so that it is below +10 dBm. 2 Press and click 3 Click the Power Offset tab.
-
Page 86: Step 5. Adjust The Graph To Your Preference
You can adjust the x-axis in any of the following ways: • Click and enter graph limits as start/stop or center/span. • Select an x-axis control from the Graph Control list. Click anywhere on the graph and drag to the left or right. Agilent 86122A Multi-Wavelength Meter, Second Edition... - Page 87 • If ClickZoom is enabled, click any cell in the “Wavelength” column of the table. The peak marker will move the corresponding peak wavelength in the graph, and the graph will zoom in to that peak. To zoom out, click the “Wavelength” cell again. Agilent 86122A Multi-Wavelength Meter, Second Edition...
- Page 88 • Select Peak Marker from the Graph Control list. Click close to a peak on the graph. • Select Peak Marker from the Graph Control list. Click anywhere on the graph and drag to the left or right. Agilent 86122A Multi-Wavelength Meter, Second Edition...
-
Page 89: Step 6. Save Measurement Results
Select a file name and Save Meas Data click Save Print Data Press to open the dialog box. Select the Default Printer Print Setup and Printout Type, and click Print Agilent 86122A Multi-Wavelength Meter, Second Edition... - Page 90 Data logging allows you to record measurement data over time for later analysis. Follow the steps below to set up data logging. 1 On the Measure menu, click Data Logging. 2 Enter the Logging Duration and Logging Interval time. 3 Click Start Data Logging. Agilent 86122A Multi-Wavelength Meter, Second Edition...
- Page 91 24-hrs, and the interval to 5 minutes. • To log data for a turn-on transient test (to observe how lasers change during warm-up), set the data logging duration to 5 minutes, and the interval to 0 time (free run). Agilent 86122A Multi-Wavelength Meter, Second Edition...
- Page 92 Using the 86122A Making Measurements Agilent 86122A Multi-Wavelength Meter, Second Edition...
-
Page 93: Using The Built-In Information System
Introduction........94 The 86122A Help Contents ......95 Description of the Contents Topics . -
Page 94: Introduction
Windows applications. You can, of course, navigate through the help by either using the touch screen or the mouse. In this chapter, you’ll learn features that are unique to the 86122A Help, as well as tips that will make the Help more useful to you. -
Page 95: The 86122A Help Contents
Using the Built-In Information System The 86122A Help Contents The following figure shows the 86122A Help contents. This is the starting point for learning how to use your Agilent Variable Optical Attenuator modules and Agilent Variable Optical Attenuator modules with Power Control. -
Page 96: Description Of The Contents Topics
Making Measurements This topic contains descriptions of all file, printing, and utility functions. Files, Printing, and Utilities This topic provides information about programming the instrument, programming examples, and all valid programming commands. Programming Agilent 86122A Multi-Wavelength Meter, Second Edition... - Page 97 Messages and Technical Support This topic contains descriptions of all instrument functions. Description of Functions This topic lists specifications and characteristics for the instrument. Specifications This topic provides information about optical connector care Connectors Agilent 86122A Multi-Wavelength Meter, Second Edition...
-
Page 98: Getting Help While Changing Instrument Settings
After clicking the What’s this? icon, keep your finger on the display and “drag” the to the button or field in which you are interested. When you release your finger, a description appears as shown in the following figure. Agilent 86122A Multi-Wavelength Meter, Second Edition... -
Page 99: Hiding The Help
• To hide the Help, click the Minimize button located at the top of the Help win- dow. • To re-display the Help, click the Restore button that is shown on the display. Agilent 86122A Multi-Wavelength Meter, Second Edition... -
Page 100: Printing The Contents Of A Topic
1 Connect a printer and a mouse pointing device to the Agilent Variable Optical Attenuator modules and Agilent Variable Optical Attenuator modules with Power Control. 2 Place the pointer over the topic, and click the right button. Then click on Print Topic. Agilent 86122A Multi-Wavelength Meter, Second Edition... -
Page 101: Selecting The Help Language
You can only view one version of help at a time. Help Version Refer to the English version of help to view the most current information about instrument features and specifications. Agilent 86122A Multi-Wavelength Meter, Second Edition... - Page 102 Using the Built-In Information System Selecting the Help Language Agilent 86122A Multi-Wavelength Meter, Second Edition...
-
Page 103: Specifications And Regulatory Information
Compliance with Canadian EMC Requirements ..108 Declaration of Conformity......109 Agilent 86122A Multi-Wavelength Meter, Second Edition... -
Page 104: Specifications
µW Sensitivity Single Line Input –32 dBm (1270 to 1600 nm) –22 dBm (1600 to 1650 nm) 25 dB below total input power, but not less Multiple Lines Input than single line input sensitivity Agilent 86122A Multi-Wavelength Meter, Second Edition... - Page 105 Inputs/Outputs Optical Input 9/125 µm single-mode fiber Rear Panel Connectors LAN, PS/2 for Keyboard & Mouse, SVGA for external monitor, GPIB, parallel printer port, AC Line, optional optical input Agilent 86122A Multi-Wavelength Meter, Second Edition...
- Page 106 90 to 264 VAC, 47 Hz to 63 Hz Maximum Power 310 VA max Characteristic Contact Agilent Technologies for availability of special instruments with higher sensitivity. Type tested means tested, but not warranted, for continuous operation. At 1550 nm Agilent 86122A Multi-Wavelength Meter, Second Edition...
-
Page 107: Laser Safety Information
• Pressing the "acitve" button enables the laser. The laser is on when the green- LED is lit. • The use of optical instruments with this product will increase eye hazard. • Refer servicing only to qualified and authorized personnel. Agilent 86122A Multi-Wavelength Meter, Second Edition... -
Page 108: Compliance With German Noise Requirements
Normal position normaler Betrieb per ISO 7779 nach DIN 45635-1 t.19 Compliance with Canadian EMC Requirements This ISM device complies with Canadian ICES-001. Cet appareil ISM est conforme a la norme NMB-001 du Canada. Agilent 86122A Multi-Wavelength Meter, Second Edition... -
Page 109: Declaration Of Conformity
Declaration of Conformity Specifications and Regulatory Information Declaration of Conformity Agilent 86122A Multi-Wavelength Meter, Second Edition... - Page 110 Specifications and Regulatory Information Declaration of Conformity Agilent 86122A Multi-Wavelength Meter, Second Edition...
- Page 112 Agilent Technologies GmbH 2004 Printed in Germany November 2004 Second edition, November 2004 86122-90004 Agilent Technologies...