Table of Contents
Advertisement
Quick Links
Download this manual
See also:
Product Documentation
Advertisement
Table of Contents

Subscribe to Our Youtube Channel
Related Manuals for Jung Smart Visu Server Series


Summary of Contents for Jung Smart Visu Server Series
- Page 1 Smart Visu Server Art-No.: SV-SERVER-01 SV-SERVER-INT Product Documentation SV-SERVER-01 / SV-SERVER-INT 0 / 157...
- Page 2 Product Documentation Smart Visu Server SV-SERVER-01 SV-SERVER-INT ALBRECHT JUNG GMBH & CO. KG Volmestraße 1 D-58579 Schalksmühle Tel: +49 (0) 23 55/80 60 Fax: +49 (0) 23 55/80 61 89 kundencenter@jung.de https://www.jung.de/en/ Service Centre Kupferstr. 17-19 44532 Lünen Germany SV-SERVER-01 / SV-SERVER-INT...
-
Page 3: Table Of Contents
COMMISSIONING THE SMART VISU SERVER ..........4 Correct use ........................4 Product characteristics ....................4 Scope of delivery ......................5 Technical data ........................5 Structure of the device, function ..................6 System information......................7 Montage, commissioning ....................8 SV-Home – User interface ..................9 1.7.1 SV-Control –... - Page 4 Performing a system update ..................129 APPLICATIONS EXAMPLES ................ 130 MAINTAINING THE SMART VISU SERVER ..........131 APPENDIX ..................... 131 Accessories ........................131 COPYRIGHT ....................132 Open Source Lizenzen ....................133 8.1.1 GNU GENERAL PUBLIC LICENSE Version 2 (GPL v2) ........133 8.1.2 GNU GENERAL PUBLIC LICENSE Version 3 (GPL v3) ........
-
Page 5: Commissioning The Smart Visu Server
1 Commissioning the Smart Visu Server Safety instructions WARNING Failure to comply with these instructions may result in damage to the device, fire or other hazards. These instructions are a component part of the product and must remain with the end customer. Electrical equipment must only be installed and mounted by qualified electricians. -
Page 6: Scope Of Delivery
1.3 Scope of delivery Smart Visu Server including software Retaining bracket for wall or support rail mounting Operating instructions Power supply unit with plug o SV-SERVER: EU power supply unit (Euro plug) o SV-SERVER-01: Power supply unit, including adapter for BS (United Kingdom), EU (Euro plug) and CN (China) o SV-SERVER-INT: Power supply unit, including adapter for BS (United Kingdom), EU (Euro plug) and CN (China) -
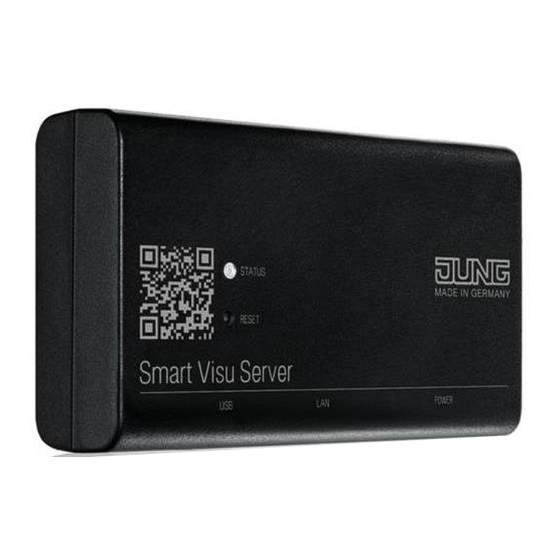
Page 7: Structure Of The Device, Function
1.5 Structure of the device, function Figure 1: Structure of the Smart Visu Server (1) USB interface For software updates and data backup (2) Ethernet interface For connection to the local network (3) Power supply Only the power supply unit from the scope of delivery (4) Reset button Reset and update (5) Status LED... -
Page 8: System Information
1.6 System information The Smart Visu Server is used to visualise and operate a KNX system connected to the same network via a smartphone, tablet, laptop or PC and to control Philips Hue systems (SV-Home). A local network is required for it to function. The connection to the KNX is made via the KNX IP interface. -
Page 9: Montage, Commissioning
1.7 Montage, commissioning Mounting takes place using the supplied retaining unit on the wall or on a support rail according to DIN EN 60715. The server is snapped onto the retaining unit. A current HTML5-capable browser (input device) or the corresponding iOS / Android App is required for access to SV-Home and SV-Control. -
Page 10: Sv-Home - User Interface
1.7.1 SV-Home – User interface The SV-Home is the integrated web interface of the Smart Visu Server for the visualisation, status display and operation of the KNX system and the Philips Hue system. The SV-Home is generated automatically from the configuration set up in SV-Control. A current HTML5-compatible browser (input device) is required for access to SV-Home. -
Page 11: Sv-Control - Project Design Interface
1.7.2 SV-Control – Project Design Interface This subchapter is intended to help you get to know the structure of the project design interface. The following chapter describe the functions and exact procedure for project design in more detail. SV-Control is the integrated web-based commissioning tool of the Smart Visu Server. In addition, the system configuration can be performed here. -
Page 12: Warranty
1.8 Warranty Warranty is offered according to the statutory provisions via specialist dealers. The CE symbol is a free trade symbol, intended solely for the authorities and does not carry any guarantee of properties. SV-SERVER-01 / SV-SERVER-INT 11 / 157... -
Page 13: Sv-Control
2 SV-Control This chapter describes the configuration and commissioning of the Smart Visu Server using SV-Control in detail. 2.1 Project tab The "Project" tab serves as the homepage of SV-Control. Here, it is possible to set the required language (1), start project design (2), back up the overall project (3) or restore a previously backed up project (4). -
Page 14: Restoring A Project
2.1.4 Restoring a project A previous project state can be restored using the " " button (4). This operation can take a couple of minutes to complete. INFORMATION The Smart Visu Server can only manage one project. If a project is downloaded using the "Restore"... - Page 15 No access within “KNX” tab No access within “Hue” tab No access within “Areas & Functions” tab Areas & Functions Right to create, change and delete areas Right to add or delete “Hue functions” from areas No right to delete “KNX functions” completely or to edit group Exclusively addresses of KNX functions.
-
Page 16: Sv-Home
2.1.6 SV-Home SV Home can be called up using the " " button (1) in Figure 9. 2.1.7 Product Documentation The product documentation can be called up using the " " button (1) in Figure 9. Figure 9: SV-Control Access Protection SV-SERVER-01 / SV-SERVER-INT 15 / 157... -
Page 17: Knx
Server via the IP network. We recommend using one of the following KNX-IP data interfaces: Jung: KNX IP interface Art. no.: IPS 200 REG Jung: KNX IP router Art. no.: IPR 200 REG The Smart Visu Server must be informed of the current IP address of the KNX-IP data interface. -
Page 18: Importing The Knx-Opc Project File
2.2.2 Importing the KNX-OPC project file SV-Control offers the option of importing ETS projects in the form of OPC project files. OPC project files can be generated from the ETS3 (File Data Exchange), ETS4 (Tools Export OPC) and ETS5 (Export project file type - OPC) and contain all the group addresses, group names, group descriptions and data types created in your project. -
Page 19: Hue
2.3 Hue The "Hue" tab is used for the definition of the Philips Hue Bridge and to import previously integrated Hue devices and other ZigBee Light Link components. The "Hue" tab can be operated fully for both profiles (Administrator/User). 2.3.1 Defining the Hue-IP Gateway The Smart Visu Server supports the integration, visualisation and operation of the Philips Hue System. -
Page 20: Importing Hue Lamps
2.3.2 Importing Hue lamps The lamps configured in the Hue system are then listed beneath with their name and the current status. Only those lamps can be listed that are configured in the bridge. Pressing the " " button (1) allow the selected lamps to be added as the Hue function. Previously added lamps can be removed again using the same button "... - Page 21 ZigBee – tested devices Group Figure Name compatibility ✔ Hue White Hue GU10 ✔ Hue White Ambiance E14 ✔ Hue White Ambiance E27 ✔ Hue white ambiance ✔ Flexstrip Hue White Ambience Being ✔ Hue white ambiance ✔ Flexstrip ✔ Hue White Ambiance Cher Hue white ambiance wellner ✔...
- Page 22 Hue white ambiance ✔ wellness Hue white ambiance ✔ Flexstrip Hue White Ambiance Spot ✔ Pillar Hue White Ambiance – Spot ✔ Runner GU10 Hue Beyond ✔ Hue Phoenix ✔ Hue E27 ✔ RGBW Hue GU10 ✔ RGBW Hue White and Color ✔...
- Page 23 Hue LightStrip Plus ✔ RGBW Hue Go ✔ RGBW (✔) Hue Iris Attention! Must RGBW be Friends of Hue certified! (✔) Hue Bloom Attention! Must RGBW be Friends of Hue certified! SV-SERVER-01 / SV-SERVER-INT 22 / 157...
-
Page 24: Area & Functions
2.4 Area & Functions An area is a group of functions and actions for visualisation in SV-Home under an individual area name. To improve recognition, an icon can be added to each of the up to 24 areas. Areas allow you to group the up to 240 functions and 250 actions as you require, e.g. spatially and/or by unit. -
Page 25: Creating A New Area
2.4.1 Creating a new area The up to 24 areas must be provided individual names, icons from the SV-Server library or additional descriptions. The "User" and the "Administrator" have identical access rights within the "Areas" column. To create a new area, enter the name of the new area in the "Areas" column (1) and then press the "... -
Page 26: Editing Or Deleting Areas
2.4.2 Editing or deleting areas Select an area to edit or delete it. The "Areas" column lists all the existing areas. In the "Properties" column, it is possible to assign an alternative icon to the selected area by pressing the currently selected icon " " (3), edit the name of the area (4) and, beneath that, add a description (5). -
Page 27: Creating A New Function
2.4.3 Creating a new function A function corresponds to, for example, a KNX function, which possibly comprises multiple group addresses. The up to 240 functions can be given individual names, icons from the SV-Server library or additional descriptions. Each function can be assigned to one or more areas or to none. - Page 28 Access as User You require Administrator rights to be able to create new KNX functions (see chapter Fehler! Verweisquelle konnte nicht gefunden werden.). Figure 18: Access rights of the user with access to web functions SV-SERVER-01 / SV-SERVER-INT 27 / 157...
-
Page 29: Configuring Knx Functions
2.4.4 Configuring KNX functions Successful commissioning of the KNX system and definition of the KNX-IP Gateway in SV- Control are required to be able to use KNX functions. Access as Administrator or User The "User" and the "Administrator" can have different access rights to KNX functions within the "Functions"... - Page 30 KNX group addresses Depiction in SV-Control Function KNX function Size Read Size type Write addresses addresses [DPT] Switch 1 Bit Switch 1 Bit Switch (1 Bit) 1.001 feedback 1.001 On / Off 1 Bit On / Off (1 Bit) 1.001 8 Bit Brightness 8 Bit...
- Page 31 1 Bit Short time 1.008 1 Bit Long time 1.008 UP / DOWN / 1 Bit Short time STOP (State) 1.008 Curtain 8 Bit position 5.001 feedback Curtain Rollershutter/ 8 Bit 8 Bit Curtain position position Awning 5.001 5.001 feedback Curtain 8 Bit 8 Bit...
- Page 32 Status Status 1 Bit Heat / Cool Heat / Cool 1.001 1 Bit Fan level 8 Bit Ventilate Fan Mode 1.001 feedback 5.010 Switch operation 8 Bit Switch operation 8 Bit Operation mode mode 20.102 mode feedback 20.102 climate HVAC Control Switch operation 8 Bit Switch operation...
- Page 33 8 Bit Setpoint shift 8 Bit Setpoint shift 6.010 feedback 6.010 Setpoint shift Display 16 Bit temperature 9.001 16 Bit Actual temperature 9.001 16 Bit Display temperature 9.001 16 Bit Actual temperature 9.001 8 Bit Setpoint shift 8 Bit Setpoint shift 6.010 feedback 6.010...
- Page 34 8 Bit 8 Bit Volume Volume feedback 5.001 5.001 Text 1/2/3 Byte 16.001 Mulit- Playlist Various media 1 Bit 1 Bit PlayPause PlayPause feedback 1.010 1.010 1 Bit Playlist 1.007 1 Bit Track 1.007 8 Bit Playlist selection 5.010 8 Bit 8 Bit Volume Volume feedback...
- Page 35 8 Bit 8 Bit Volume Volume feedback 5.001 5.001 Text 1/2/3 Byte 16.001 1 Bit PlayPause 1 Bit PlayPause 1.010 feedback 1.010 1 Bit Track 1.007 Mulit- Playlist Mode media 1 Bit Playlist 1.007 1 Bit 1 Bit Repeat Repeat feedback 1.003 1.003 1 Bit...
- Page 36 8 Bit Display 1 byte ---- Value e.g. (0...100%) 5.010 8 Bit Display 1 byte ---- Value e.g. (0…255%) 5.004 8 Bit Display 1 byte ---- Value e.g. (0…360°) 14.007 16 Bit Display 2 byte ---- Value e.g. (float) 9.001 16 Bit Display 2 byte (lux) ----...
- Page 37 32 Bit Display 4 byte value ---- Value e.g. (unsigned integer) 12.001 32 Bit Display 4 byte value ---- Value e.g. (signed integer) 13.013 112 Bit Display 14 Byte ---- Value e.g. ASCII 16.001 8 Bit Value ---- 5.004 Send 1 byte Value 0 -255 ----...
- Page 38 Switch / Dimmer If required, the function type "Switch / Dimmer" can be depicted by four KNX functions. Switch: The "Switch" function (1) is the standard KNX function for simply switching on and off of switching actuators. In the "Switch" function, a group address can be defined for writing "Switch"...
- Page 39 On / Off: The "On / Off" (1) function is stateless (without feedback) for targeted triggering of a switching signal (e.g. only switch-off). A group address "On/Off" (2) can be configured for writing of the value specified in the input field "Value" (3). Figure 21: Parameters of the "On/Off"...
- Page 40 Dimmer: The "Dimmer" function (1) is used for simple dimming of dimmer actuators. A "Brightness value" (2) group address can be configured for switching or writing a new brightness value. In the same way, to read the feedback, it is possible to configured the group addresses "Brightness value feedback"...
- Page 41 Dimmer/Switch: The "Dimmer + Switch" function (1) is used for simple dimming of dimmer actuators. A "Switching" (2) and / or "Brightness value" (4) group address can be configured for switching or writing a new brightness value. In the same way, to read the feedback, it is possible to configured the group addresses "Switching feedback"...
- Page 42 RGB: The "RGB" function (1) is the KNX function for controlling RGB dimmer actuators. With the group address, e.g. "Transmit value red" (2), it is possible to write the current brightness value of the red colour channel to the bus. The "Value red feedback" group address (3) can be defined to read the current brightness of the red colour channel.
- Page 43 The function has favorites within the symbol library (13). Additional icons are available via the " " button. Selection of the icon library in SV-Control Operating and display element in SV-Home function Table 6: Display of the "RGB (KNX)" function SV-SERVER-01 / SV-SERVER-INT 42 / 157...
- Page 44 Motor If required, the function type "Motor" can be depicted by one of three KNX functions. Up/Down/Stop: The "UP/DOWN/STOP" function (1) is the KNX function for simple control of motorised drives without feedback objects. The motorised drive can be activated by the group addresses "Long time"...
- Page 45 Up / Down / Stop (State): The "UP/DOWN/STOP (State)" function (1) is the KNX function for simple control of motorised drives with feedback objects. The motorised drive can be activated by the group addresses "Long time" (2) and "Short time" (3). The "Position feedback"...
- Page 46 Rollershutter/Awning: The “Rollershutter/Awning” function (1) is the KNX function for control of motorised roller shutters/awnings with position specification. The motorised drive can be activated by the group address "Position specification" (2). The "Position feedback" (3) group address must be configured for reading the position. In addition, the current status of a selectable group address can be polled by defining an initialisation address (4) on starting the system.
- Page 47 The function has favorites within the symbol library (5). Additional icons are available via the " " button. KNX function Selection of the icon library in SV-Control Operating and display element in SV-Home Rollershutter/Awning Table 9: Display of the "Rollershutter/Awning" function SV-SERVER-01 / SV-SERVER-INT 46 / 157...
- Page 48 Venetian Blinds (Slider): The "Venetian Blinds (Slider)" function (1) is the KNX function for controlling motorised Venetian blinds with position and slat specification. The motorised drive can be activated by the group addresses "Position specification" (2) and "Slat specification" (4). To read the positions, it is possible to configured the group addresses "Feedback position"...
- Page 49 The function has favorites within the symbol library (8). Additional icons are available via the " " button. KNX function Selection of the icon library in SV-Control Operating and display element in SV-Home Venetian Blinds (Slider) Table 10: Display of the "Venetian Blinds (Slider)" function SV-SERVER-01 / SV-SERVER-INT 48 / 157...
- Page 50 Venetian Blinds (Button): The "Venetian Blinds (Button)" function (1) is the KNX function for controlling motorised Venetian blinds with position and slat specification. The motorised drive can be activated by the group addresses "Long time" (2), "Short time" (3), "Position specification" (4) and "Slat specification"...
- Page 51 The function has favorites within the symbol library (10). Additional icons are available via the " " button. KNX function Selection of the icon library in SV-Control Operating and display element in SV-Home Venetian Blinds (Button) Table 11: Display of the "Venetian Blinds (Button)" function SV-SERVER-01 / SV-SERVER-INT 50 / 157...
- Page 52 Climate If required, the function group "Climate" can be depicted by various KNX functions. Status Heat/Cool (KNX): The "Status Heat / Cool" function (1) allows the display of the current status of a binary climate actuator system. If, for example, your electrical underfloor heating is switched on, then this function can be displayed in SV-Home.
- Page 53 Ventilate: The "Ventilate" function (1) allows the display and control of the status of a KNX ventilation controller. In the input field (2), it is possible to specify the group address for controlling the fan and, in the input field (3), it is possible to enter the group address for the feedback of the currently set fan step.
- Page 54 Operation Mode: The function "operating mode" (1) is the function for switching the different operating modes in accordance with the KNX. This can be initiated by the group address "operating mode changeover" (2). The current operating mode can be read by the group address "Operating mode feedback" (3).
- Page 55 HVAC Control Mode: With the function "HVAC control mode" (1), you can switch between heating / cooling and ventilation manually / auto. Switched by the group address "operating mode switching" (2). The current operating mode can be read by the group address "Operating mode feedback" (3).
- Page 56 Base Setpoint: The Smart Visu Server supports KNX climate control by specifying a base setpoint (1). The temperature control can be influenced by the group address "basic setpoint" (2). The reading of the current setpoint and the current actual value can be configured by the group addresses "Display temperature"...
- Page 57 Setpoint shift: With the function "Setpoint adjustment" (1), a KNX climate control can be influenced via the setpoint shift. The group address "Setpoint shift" (2) can be used to influence the temperature control. Reading the current setpoint shift can be configured by the corresponding feedback addresses (3).
- Page 58 HVAC Group: With the function "function group HVAC" (1) an all-embracing KNX climate control can be initiated. The current setpoint temperature is indicated by the group address "setpoint temperature display" (2) depending on the set operating mode. The group address "actual temperature"...
- Page 59 The function has favorites within the symbol library (7). Additional icons are available via the " " button. Auswahl der Symbol-Bibliothek Bedien- und Anzeigeelement KNX-Funktion im SV-Control in der SV-Home HVAC group Table 18: Display of the „HVAC“ function SV-SERVER-01 / SV-SERVER-INT 58 / 157...
- Page 60 Multimedia Playlist various: The "Playlist divers (1)" function is the KNX function for controlling simple multimedia applications. The volume can be influenced and confirmed by the group addresses "volume" or "volume feedback" (2). In the input fields (3) the function can read ASCII characters of the registered group addresses (for example, playlist, artist, title).
- Page 61 The function has favorites within the symbol library (8). Additional icons are available via the " " button. KNX function Selection of the icon library in SV-Control Operating and display element in SV-Home Playlist Various Table 19: Display of the „Playlist various“ function SV-SERVER-01 / SV-SERVER-INT 60 / 157...
- Page 62 Playlist Mode: The "Playlist mode (1)" function is the KNX function for comprehensive control of multimedia applications. The volume can be influenced and confirmed by the group addresses "volume" or "volume feedback" (2). In the input fields (3) the function can read ASCII characters of the registered group addresses (for example, playlist, artist, title).
- Page 63 Figure 38: Function „Playlist Mode“ SV-SERVER-01 / SV-SERVER-INT 62 / 157...
- Page 64 The function has favorites within the symbol library (11). Additional icons are available via the " " button. KNX function Selection of the icon library in SV-Control Operating and display element in SV-Home Playlist Mode Table 20: Display of the "Playlist Mode" function SV-SERVER-01 / SV-SERVER-INT 63 / 157...
- Page 65 Multimedia Sonos: The "Multimedia Sonos (1)" function is the KNX function for comprehensive control of multimedia applications. The volume can be influenced and confirmed by the group addresses "volume" or "volume feedback" (2). In the input fields (3) the function can read ASCII characters of the registered group addresses (for example, playlist, artist, title).
- Page 66 Figure 39: Function „Multimedia Sonos“ SV-SERVER-01 / SV-SERVER-INT 65 / 157...
- Page 67 The function has favorites within the symbol library (11). Additional icons are available via the " " button. KNX function Selection of the icon library in SV-Control Operating and display element in SV-Home Multimedia Sonos Table 21: Display of the "Multimedia Sonos" function SV-SERVER-01 / SV-SERVER-INT 66 / 157...
- Page 68 Scene The Smart Visu Server supports the execution and learning of KNX function values. If required, the function type "Scene" can be depicted by two differentiated KNX functions. Activate Scene: The "Activate Scene" function (1) is a Smart Visu Server function for executing KNX scenes. The function transmits a scene value (2) to the KNX group address entered in the input field "Scene group address (1 Byte)"...
- Page 69 The "Activate and Learn Scene (KNX)" function (1) is a Smart Visu Server function for executing KNX scenes. This is currently only with a terminal (PC or similar) including mouse usable. The function transmits a scene value (2) to the KNX group address entered in the input field "Scene group address (1 Byte)"...
- Page 70 Value / State The function type "Value / Status" can optionally be mapped by 12 differentiated KNX functions. Display 1-Bit (boolean): The function "Display 1-bit" (1) is the KNX function for displaying one-bit status values of the KNX system. The function reads the KNX group address entered in the input field "Status (1 Bit)" (2). In addition, the current status of the function can be polled by defining two initialisation addresses (3) on starting the system.
- Page 71 The function has favorites within the symbol library (5). Additional icons are available via the " " button. KNX function Selection of the icon library in SV-Control Operating and display element in SV-Home Display 1-bit Table 24: Display of the "Display 1 Bit" function SV-SERVER-01 / SV-SERVER-INT 70 / 157...
- Page 72 Display 1 Byte (0 ..100%): The function "Display 1-Byte" (1) is the KNX function for displaying one-bit integer values (0...100%) in SV-Home. The function reads the KNX group address entered in the input field "Values (1 Byte)" (2). As values can be sent without a unit in the KNX system, the input field "Unit" (3) can be used to enter an individual unit, which is added to the numerical value in the visualisation.
- Page 73 Display 1 Byte (0 ..255%): The function "Display 1-Byte" (1) is the KNX function for displaying one-bit integer values (0...255%) in SV-Home. The function reads the KNX group address entered in the input field "Values (1 Byte)" (2). As values can be sent without a unit in the KNX system, the input field "Unit" (3) can be used to enter an individual unit, which is added to the numerical value in the visualisation.
- Page 74 Display 1 Byte (0 ..360°): The function "Display 1-Byte" (1) is the KNX function for displaying one-bit integer values (0...306°) in SV-Home. The function reads the KNX group address entered in the input field "Values (1 Byte)" (2). As values can be sent without a unit in the KNX system, the input field "Unit" (3) can be used to enter an individual unit, which is added to the numerical value in the visualisation.
- Page 75 Display 2 Byte (Float): The function "Display 2-Byte" (1) is the KNX function for displaying KNX two-bit values (floating) in SV-Home. The displayed values are rounded down to the first decimal place. The function reads the KNX group address entered in the input field "Values (2 Byte)" (2). As only values can be sent without a unit in the KNX system, the input field "Unit"...
- Page 76 The function has favorites within the symbol library (6). Additional icons are available via the " " button. KNX function Selection of the icon library in SV-Control Operating and display element in SV-Home Display 2-Byte (Float) Table 28: Display of the "Display 2-Byte (Float)" function SV-SERVER-01 / SV-SERVER-INT 75 / 157...
- Page 77 Display 2 Byte (Lux): The function "Display 2-Byte (Lux)" (1) is the KNX function for displaying KNX two-bit values (floating) in SV-Home. The displayed values are rounded down to the first decimal place. The function reads the KNX group address entered in the input field "Value (2 Byte)" (2). As only values can be sent without a unit in the KNX system, the input field "Unit"...
- Page 78 Display 2 Byte (Time): The function "Display 2-Byte (Time)" (1) is the KNX function for displaying KNX two-bit values (floating) in SV-Home. The displayed values are rounded down to the first decimal place. The function reads the KNX group address entered in the input field "Value (2 Byte)" (2). As only values can be sent without a unit in the KNX system, the input field "Unit"...
- Page 79 Display 4 Byte (Time): The function "Display 4-Byte (Time)" (1) is the KNX function for displaying KNX two-bit values (floating) in SV-Home. The displayed values are rounded down to the first decimal place. The function reads the KNX group address entered in the input field "Value (4 Byte)" (2). As only values can be sent without a unit in the KNX system, the input field "Unit"...
- Page 80 Display 4 Byte (Float): The function "Display 4-Byte (float)" (1) is the KNX function for displaying positive or negative floating point values of the KNX system in SV-Home. The displayed values are rounded down to the first decimal place. The function reads the KNX group address entered in the input field "Values (4 Byte)" (2). As values can be sent without a unit in the KNX system, the input field "Unit"...
- Page 81 Display 4 Byte (Unsigned Integer): The function "Display 4 Byte (Unsigned integer)" (1) is the KNX function for displaying positive or negative integer values of the KNX system in SV-Home. The function reads the KNX group address entered in the input field "Values (4 Byte)" (2). As values can be sent without a unit in the KNX system, the input field "Unit"...
- Page 82 Display 4 Byte (Integer): The function "Display 4 Byte (Integer)" (1) is the KNX function for displaying positive or negative integer values of the KNX system in SV-Home. The function reads the KNX group address entered in the input field "Values (4 Byte)" (2). As values can be sent without a unit in the KNX system, the input field "Unit"...
- Page 83 Display 14 Byte (ASCII): The function "Display 14 Byte (ASCII)" (1) is the KNX function for displaying texts of a maximum of 14 characters of the KNX system in SV-Home. The function can read the ASCII characters in the group address entered in the input field "Values (14 Byte)"...
- Page 84 Value transmitter The function type "value transmitter" can optionally be represented by three differentiated KNX functions. Send 1 Byte (0…255%): The function "Send 1 byte" (1) is the KNX function with which 1-byte percentage values can be set. This is passed on via the group address "Value" (2). In addition, a predefined value can be set via "Send value"...
- Page 85 Send 2 Byte (lux): The function "Send 2 byte" (1) is the KNX function with which 2 byte lux values can be set. This is passed on via the group address "Value" (2). In addition, a predefined value can be set via "Send value" and the range can be defined via "Value range"...
- Page 86 Send 2 Byte (time): The function "Send 2 byte" (1) is the KNX function with which 2 byte time values can be set. This is passed on via the group address "Value" (2). In addition, a predefined value can be set via "Send value" and the range can be defined via "Value range"...
-
Page 87: Astro
2.4.5 Astro The function type "Astro" can optionally be mapped by nine differentiated functions. The location coordinates (latitude and longitude) are stored under SV-Control configuration management " " (chapter 2.6). Astro times: The function "Astro times" (1) displays the times for today's sunrise, sunset, moonrise and moonset. - Page 88 Moonphase: The function “Moonphase” (1) displays the different phases of the moon with the date and time for the current month. Figure 58: Parameter of the „Moonphase“ function The function has favorites within the symbol library (2). Additional icons are available via the "...
- Page 89 Elevation / Azimuth: The function "Elevation / Azimuth" (1) displays the current position of the sun (horizontal and vertical) starting from the observation location. Figure 59: Parameter of the „Elevation / Azimuth“ function The function has favorites within the symbol library (2). Additional icons are available via the "...
-
Page 90: Configuring Philips Hue Functions
2.4.6 Configuring Philips Hue functions Successful commissioning and authentication of the Philips Hue System is required to be able to use hue functions. The "User" and the "Administrator" have identical access rights to Hue functions within the "Functions" column. The Hue luminaires added to the SV-Server in the "Hue" tab are automatically supplemented with their name in the function list (for information on Hue setup, please consult Chapter 2.3 ”Hue"). - Page 91 Dimming (Hue white) Table 42: Display of the "RGB (Hue)" and “Dimming (White) function SV-SERVER-01 / SV-SERVER-INT 90 / 157...
-
Page 92: Configuring Websites / Ip Functions
2.4.7 Configuring websites / IP functions For web functions to be used, an Internet connection is required (except local IP cameras). Access as Administrator or User The "User" and the "Administrator" have different access rights to the web functions within the "Functions"... - Page 93 Websites The "Website" function (1) can be used to integrate a website in SV-Home into selectable areas. This function can be used, for example, to add your favourite weather forecasting service to your building automation. In the same way, any other websites can be added to the user interface of the SV-Home of your building automation.
- Page 94 IP camera The "IP Camera" function (1) can be used to integrate an IP camera in the Smart Visu Server into selectable areas. This means that it is possible within the user interface of your SV- Home to, for example, display a live image of your entrance area from an IP camera. Local IP cameras can not be displayed when using the remote access.
- Page 95 IP camera : tested Devices INFORMATION It´s recommended to integrate a maximum of 4 IP cameras at one SV- server installation. If a network camera is integrated with the "IP Camera" function, this results in a permanent data flow in the home network, independent of the SV Home call.
- Page 96 following chart shows which device operates with which function: (State May 2018) manufacturer function: IP- figure title function: Website Camera ✔ ✔ DCS930L max. resolution mode of transmission 640 x 480 network cable / WLAN operating IP-protection voltage 5V / DC configuration IP-address: receive from router...
- Page 97 manufacturer figure title function: IP-Camera function: Website ✔ 5040504 max. resolution mode of transmission 1280 x 720 WLAN oerating voltage IP-protection 5V / DC configuration receive from router IP-address: http://ip-addresse/ user name (default): password (default): MJPEG address Rollei Camera configuration via Rollei App (Smart Phone e.g.) ...
- Page 98 manufacturer figure title function: IP-Camera function: Website ✔ ✔ IC-3116W max. resolution mode of transmission 1280 x 720 network cable / WLAN operating voltage IP-protection 12 V / DC configuration IP-address: receive from router user name admin (default): password 1234 (default): MJPEG EDIMAX...
- Page 99 manufacturer figure title function: IP-Camera function: Website ✔ ✔ FI9804W max. resolution mode of transmission 1280 x 720 network cable / WLAN operating voltage IP-protection 12V / DC IP 66 configuration receive from router IP-address + Port 88 IP-address: (http://ip-address:88 e.g.) user name admin (default):...
- Page 100 manufacturer figure title function: IP-Camera function: Website ✔ ✔ M1124 max. resolution mode of transmission 8 bis 28V DC / network cable operating voltage IP-protection 12V / DC configuration IP-address: receive from router user name root (default): password root (default): MJPEG http://ip- address...
- Page 101 manufacturer figure title function: IP-Camera function: Website ✔ SNC-5312IR max. resolution mode of transmission 1920 x 1080 network cable operating IP-protection voltage 12 V DC 24 V AC IP 66 configuration IP-address: receive from router user name admin (default): password 9999 (default):...
-
Page 102: Configuring Status Logic Functions
2.4.8 Configuring status logic functions With the "Status Logic" (1) function, the Smart Visu Server can logically link up to 10 functional states. Thus, with status logic, you can, for example, interlink the status of window contacts, so that you can see at a glance in SV-Home whether all the windows are closed. Using the "Logical link"... - Page 103 The "Status logic" function (1) possesses the following individualisation options within the icon library (4). Status Selection of the icon library in SV- Operating and display element in SV-Home logic Control Status logic Table 47: Display of status logic SV-SERVER-01 / SV-SERVER-INT 102 / 157...
-
Page 104: Editing Or Deleting A Function
2.4.9 Editing or deleting a function Access as Administrator or User The "User" and the "Administrator" have different access rights to KNX functions within the "Functions" column. Access as Administrator Select an existing function (1) to edit or delete it. The "Functions" column lists all the existing functions. -
Page 105: Action
2.5 Action An action is a grouping of one or more functions. Actions can be triggered by time, events, or via user-defined controls in SV-Home. An action group can contain several actions. In SV-Control, action groups and actions can be created, edited and deleted in the “Actions” tab (1). - Page 106 Figure 66: SV-Control “Actions“ tab Points in time Activation type “Points in time” can be used to activate and deactivate action groups based on date and time. Use the calendar to set the date and then the time for activation (8a) and deactivation (8b).
-
Page 107: Creating An Action
Manually With the activation type (8) "Manually" the group can be activated manually in the SV-Home. Figure 69: Parameters for activation type “Manually” 2.5.2 Creating an action To create a new action, enter the name of your new action in the input field (2) and then press the "... - Page 108 Figure 70: "Actions" tab Each function assigned to the selected action is listed beneath the drop-down menu (10) in a function list (10a). The parameters (10b) of each function can be set separately. Various operating elements are available, depending on the function type. These correspond to the elementary operating elements of the appropriate function in SV-Home.
- Page 109 Figure 72: Parameters of the "Point in Time" action type Alongside that, you can specify the weekdays (9c) on which the action is executed. Active days have a blue background. Figure 73: Parameters of the "Point in Time" action type In addition to the set time and the day of the week, a random delay can be activated.
- Page 110 Figure 75: Parameters of the "Event" action type Astro The action type "Astro" (9) automatically triggers functions depending on the position of the sun. As a trigger (9a), the sunrise or sunset can be selected. The time (9b) for today's sunrise or sunset is shown on the right.
-
Page 111: Editing Or Deleting An Action
User Defined Actions of type "User Defined" (9) are actions, which can only be triggered manually via SV-Home. For this reason, this action type does not require any additional configuration. Figure 77: Parameters of the "User Defined" action type 2.5.3 Editing or deleting an action To be able to edit or delete an action, you must first select it in the "Actions"... -
Page 112: Point In Time Overview Of The Actions
2.5.4 Point in time overview of the actions In the area SV-Home Options (1) – Point in time overview (2) a list of the actions with the respective time switching points can be displayed. The currently selected action is highlighted in blue (3) in this overview. Figure 79: Point in time Overview ä... -
Page 113: Configuration Management
2.6 Configuration management Configuration management is used to set elementary system parameters of the Smart Visu Server. You can change the network settings (2), the time and the current date (3). When using the astro function (4) the latitude and longitude of the location can be entered. Furthermore, a remote access (5) can be set up and online system updates can be carried out (6) and the update progress can be displayed. -
Page 114: Network Settings
2.6.1 Network settings The network settings can be edited in the "Network Settings" field (2) for the local network (IPv4) in the configuration management of SV-Control. The network settings of the Smart Visu Server can be entered automatically via DHCP address assignment (2a) or manually ("statically") (2b). -
Page 115: Setting The System Time And Date
2.6.2 Setting the system time and date The system time and the current date can be edited in the "Time" field (3) in the configuration management of SV-Control. The time synchronization can be performed both by ntp time server and manually. Figure 82: Timeserver In the input field (3a), it is possible to enter the current date in the format "dd.mm.yyyy". -
Page 116: Remote-Access
2.6.3 Remote-Access Remote access allows secure access to the SV server. To do this, the switch (1) must be set to "On" and the email address of the MyJung portal must be entered in the field "Remote user name" (2). If a connection is established, a check mark appears after "Remote connection"... - Page 117 After successful registration in the MyJUNG-Portal, you will get to the overview page of MyJUNG. On this page, please select the tile "Software License Activation". Figure 86: Service overview page MyJUNG Selection of the desired product In this overview you have the opportunity to purchase the desired product. In this case please select in the left list (1) the license "Smart Visu Server"...
- Page 118 Figure 88: Software license sales dialogue If you have successfully redeemed the coupon code or have successfully completed a subscription, you will see the following view. Figure 89: Successful licence purchase ä SV-SERVER-01 / SV-SERVER-INT 117 / 157...
- Page 119 Activation remote access in your SV-Server To enable secure remote access to your SV server, the following final steps are necessary. (1) Activation of your MyJUNG account in your SV-Server Switch to any browser of your operating system. In this, call up the start page of the SV server. To do this, use either "sv-server.local"...
- Page 120 For final steps, please change to a new browser window or a new browser tab. Log into the MyJUNG Portal on the JUNG website. Switch to the Smart Visu Server Remote Access tile via the "Manage" button (1).
- Page 121 If the connection between your SV server and the MyJUNG-Portal succeeds, the following view will appear in the SV-Control. With the confirmation tick behind Remote connection (1) you will see that a successful connection between your SV Server and the MyJUNG server. To set up the apps, please see the dedicated chapter (Android 3.2 3.3).
-
Page 122: Server Update
2.6.4 Server update To perform a system update, the Smart Visu Server requires access to the Internet. Depending on the speed of the available Internet connection, this operation can take several minutes. We recommend not interrupting the power and network connection for the period of the update. -
Page 123: Sv-Home
SV-Control and is divided up into three sections. The top section is always visible and consists of the Jung logo and the title "SV-Home" (1). Clicking the "SV-Home" header (1) takes you back to the homepage, via which you can switch to SV-Control at any time. -
Page 124: Sv-Home Settings
3.1 SV-Home settings In addition to the operation of the SV-Home, there are some settings which can be set in the upper section to the left of the label "SV-Home" (1). Figure 101: SV-Home settings ä SV-SERVER-01 / SV-SERVER-INT 123 / 157... -
Page 125: Language
3.1.1 Language In the "Language / Sprache" window (2), 15 different languages can be selected. This changes the language in the SV-Home Settings area. Thus the further settings can be made in the desired language. Figure 102: Language 3.1.2 Columns setting The column settings (1) can be made in the second window. -
Page 126: Design
3.1.3 Design The SV-Home interface can be visualized in two different design variants. The variants can be set under the "Design" window (1). After selecting the desired design, the display is switched directly (2,3). Figure 104: Design „black“ Figure 105: Design „white“ 3.1.4 Start page The setting of the start page, which is displayed if the SV-Home page is opened, can be changed in the "Home"... -
Page 127: Font Size
3.1.5 Font size The font size is individually adjustable in the SV-Home. Using the button (2), the font size can be reduced and the button (3) can be enlarged. To return to the default font size, the button (4) is provided. The changes are immediately recognizable. Figure 107: Font size 3.1.6 Presentation labels In this area "Navigation"... -
Page 128: Sv-Server App For Android
"Remote only". The app can start automatically after the system start (6) and the screen orientation can be defined (7), which is especially useful for built-in devices. The navigation bar at the bottom of the JUNG Launcher (Smart Control 7 .. 19) can be hidden and replaced by a control sidebar (8). -
Page 129: Sv-Server App For Ios
3.3 SV-Server App for iOS In addition to the HTML5 surface you can download the Smart Visu Server App from the iTunes Store. When starting the app for the first time, the connection mode (1) must be selected and the server address (2) must be entered. -
Page 130: Update Of The Smart Visu Server
4 Update of the Smart Visu Server JUNG is always working to improve the support and functionality of the SV Server. In the context of these efforts, we make updates for the system software available. 4.1 Reading out the software version You can read out the software version currently installed on your Smart Visu Server via SV-Control. -
Page 131: Applications Examples
5 Applications examples SV-SERVER-01 / SV-SERVER-INT 130 / 157... -
Page 132: Maintaining The Smart Visu Server
6 Maintaining the Smart Visu Server In case you need support, the Smart Visu Server allows remote maintenance access via SSH server. This server is exclusively for fault analysis purposes. It allows trained JUNG personnel to access your server to analyze the device status. -
Page 133: Copyright
8 Copyright This product incorporates open source software components covered by the terms of third party copyright notices and license agreements contained below. GNU Linux 3.10.17 armv7l Copyright (C) 1989, 1991 Free Software Foundation, Inc. 51 Franklin St, Fifth Floor, Boston, MA 02110-1301, USA GNU GENERAL PUBLIC LICENSE Version 2: http://www.gnu.org/licenses/gpl-2.0.txt Debian 7 “Wheezy”... -
Page 134: Open Source Lizenzen
8.1 Open Source Lizenzen 8.1.1 GNU GENERAL PUBLIC LICENSE Version 2 (GPL v2) GNU GENERAL PUBLIC LICENSE Version 2, June 1991 Copyright (C) 1989, 1991 Free Software Foundation, Inc., 51 Franklin Street, Fifth Floor, Boston, MA 02110-1301 USA Everyone is permitted to copy and distribute verbatim copies of this license document, but changing it is not allowed. - Page 135 to say, a work containing the Program or a portion of it, either verbatim or with modifications and/or translated into another language. (Hereinafter, translation is included without limitation in the term "modification".) Each licensee is addressed as "you". Activities other than copying, distribution and modification are not covered by this License; they are outside its scope.
- Page 136 3. You may copy and distribute the Program (or a work based on it, under Section 2) in object code or executable form under the terms of Sections 1 and 2 above provided that you also do one of the following: a) Accompany it with the complete corresponding machine-readable source code, which must be distributed under the terms of Sections 1 and 2 above on a medium customarily used for software interchange;...
- Page 137 not excuse you from the conditions of this License. If you cannot distribute so as to satisfy simultaneously your obligations under this License and any other pertinent obligations, then as a consequence you may not distribute the Program at all. For example, if a patent license would not permit royalty-free redistribution of the Program by all those who receive copies directly or indirectly through you, then the only way you could satisfy both it and this License would be to refrain entirely from distribution of the Program.
- Page 138 DEFECTIVE, YOU ASSUME THE COST OF ALL NECESSARY SERVICING, REPAIR OR CORRECTION. 12. IN NO EVENT UNLESS REQUIRED BY APPLICABLE LAW OR AGREED TO IN WRITING WILL ANY COPYRIGHT HOLDER, OR ANY OTHER PARTY WHO MAY MODIFY AND/OR REDISTRIBUTE THE PROGRAM AS PERMITTED ABOVE, BE LIABLE TO YOU FOR DAMAGES, INCLUDING ANY GENERAL, SPECIAL, INCIDENTAL OR CONSEQUENTIAL DAMAGES ARISING OUT OF THE USE OR INABILITY TO USE THE PROGRAM (INCLUDING BUT NOT LIMITED TO LOSS OF DATA OR DATA BEING...
- Page 139 You should also get your employer (if you work as a programmer) or your school, if any, to sign a "copyright disclaimer" for the program, if necessary. Here is a sample; alter the names: Yoyodyne, Inc., hereby disclaims all copyright interest in the program `Gnomovision' (which makes passes at compilers) written by James Hacker.
-
Page 140: Gnu General Public License Version 3 (Gpl V3)
8.1.2 GNU GENERAL PUBLIC LICENSE Version 3 (GPL v3) GNU GENERAL PUBLIC LICENSE Version 3, 29 June 2007 Copyright (C) 2007 Free Software Foundation, Inc. <http://fsf.org/> Everyone is permitted to copy and distribute verbatim copies of this license document, but changing it is not allowed. - Page 141 but in those that do, we wish to avoid the special danger that patents applied to a free program could make it effectively proprietary. To prevent this, the GPL assures that patents cannot be used to render the program non-free. The precise terms and conditions for copying, distribution and modification follow.
- Page 142 available to the public in source code form. A"Major Component", in this context, means a major essential component (kernel, window system, and so on) of the specific operating system (if any) on which the executable work runs, or a compiler used to produce the work, or an object code interpreter used to run it.
- Page 143 You may convey verbatim copies of the Program's source code as you receive it, in any medium, provided that you conspicuously and appropriately publish on each copy an appropriate copyright notice; keep intact all notices stating that this License and any non-permissive terms added in accord with section 7 apply to the code;...
- Page 144 physical medium customarily used for software interchange, for a price no more than your reasonable cost of physically performing this conveying of source, or (2) access to copy the Corresponding Source from a network server at no charge. c) Convey individual copies of the object code with a copy of the written offer to provide the Corresponding Source.
- Page 145 The requirement to provide Installation Information does not include a requirement to continue to provide support service, warranty, or updates for a work that has been modified or installed by the recipient, or for the User Product in which it has been modified or installed.
- Page 146 relicensing or conveying under this License, you may add to a covered work material governed by the terms of that license document, provided that the further restriction does not survive such relicensing or conveying. If you add terms to a covered work in accord with this section, you must place, in the relevant source files, a statement of the additional terms that apply to those files, or a notice indicating where to find the applicable terms.
- Page 147 You may not impose any further restrictions on the exercise of the rights granted or affirmed under this License. For example, you may not impose a license fee, royalty, or other charge for exercise of rights granted under this License, and you may not initiate litigation (including a cross-claim or counterclaim in a lawsuit) alleging that any patent claim is infringed by making, using, selling, offering for sale, or importing the Program or any portion of it.
- Page 148 who would receive the covered work from you, a discriminatory patent license (a) in connection with copies of the covered work conveyed by you (or copies made from those copies), or (b) primarily for and in connection with specific products or compilations that contain the covered work, unless you entered into that arrangement, or that patent license was granted, prior to 28 March 2007.
- Page 149 WITHOUT WARRANTY OF ANY KIND, EITHER EXPRESSED OR IMPLIED, INCLUDING, BUT NOT LIMITED TO, THE IMPLIED WARRANTIES OF MERCHANTABILITY AND FITNESS FOR A PARTICULAR PURPOSE. THE ENTIRE RISK AS TO THE QUALITY AND PERFORMANCE OF THE PROGRAM IS WITH YOU. SHOULD THE PROGRAM PROVE DEFECTIVE, YOU ASSUME THE COST OF ALL NECESSARY SERVICING, REPAIR OR CORRECTION.
- Page 150 If the program does terminal interaction, make it output a short notice like this when it starts in an interactive mode: <program> Copyright (C) <year> <name of author> This program comes with ABSOLUTELY NO WARRANTY; for details type `show w'. This is free software, and you are welcome to redistribute it under certain conditions;...
-
Page 151: Gnu Lesser General Public License Version 3 (Lgpl)
8.1.3 GNU LESSER GENERAL PUBLIC LICENSE Version 3 (LGPL) GNU LESSER GENERAL PUBLIC LICENSE Version 3, 29 June 2007 http://fsf.org/. Everyone is permitted to copy and distribute verbatim copies of this license document, but changing it is not allowed. This version of the GNU Lesser General Public License incorporates the terms and conditions of version 3 of the GNU General Public License, supplemented by the additional permissions listed below. - Page 152 3. Object Code Incorporating Material from Library Header Files. The object code form of an Application may incorporate material from a header file that is part of the Library. You may convey such object code under terms of your choice, provided that, if the incorporated material is not limited to numerical parameters, data structure layouts and accessors, or small macros, inline functions and templates (ten or fewer lines in length), you do both of the following:...
- Page 153 covered by this License, and convey such a combined library under terms of your choice, if you do both of the following: a) Accompany the combined library with a copy of the same work based on the Library, uncombined with any other library facilities, conveyed under the terms of this License. b) Give prominent notice with the combined library that part of it is a work based on the Library, and explaining where to find the accompanying uncombined form of the same work.
-
Page 154: Eclipse Public License - V 1.0 (Epl)
8.1.4 Eclipse Public License - v 1.0 (EPL) Eclipse Public License - v 1.0 THE ACCOMPANYING PROGRAM IS PROVIDED UNDER THE TERMS OF THIS ECLIPSE PUBLIC LICENSE ("AGREEMENT"). ANY USE, REPRODUCTION OR DISTRIBUTION OF THE PROGRAM CONSTITUTES RECIPIENT'S ACCEPTANCE OF THIS AGREEMENT. - Page 155 a third party patent license is required to allow Recipient to distribute the Program, it is Recipient's responsibility to acquire that license before distributing the Program. d) Each Contributor represents that to its knowledge it has sufficient copyright rights in its Contribution, if any, to grant the copyright license set forth in this Agreement.
- Page 156 requires any other Contributor to pay any damages as a result, the Commercial Contributor must pay those damages. 5. NO WARRANTY EXCEPT AS EXPRESSLY SET FORTH IN THIS AGREEMENT, THE PROGRAM IS PROVIDED ON AN "AS IS" BASIS, WITHOUT WARRANTIES OR CONDITIONS OF ANY KIND, EITHER EXPRESS OR IMPLIED INCLUDING, WITHOUT LIMITATION, ANY WARRANTIES OR CONDITIONS OF TITLE, NON-INFRINGEMENT, MERCHANTABILITY OR FITNESS FOR A PARTICULAR PURPOSE.
- Page 157 distinguishing version number. The Program (including Contributions) may always be distributed subject to the version of the Agreement under which it was received. In addition, after a new version of the Agreement is published, Contributor may elect to distribute the Program (including its Contributions) under the new version. Except as expressly stated in Sections 2(a) and 2(b) above, Recipient receives no rights or licenses to the intellectual property of any Contributor under this Agreement, whether expressly, by implication, estoppel or otherwise.
Need help?
Do you have a question about the Smart Visu Server Series and is the answer not in the manual?
Questions and answers