Table of Contents
Advertisement
Quick Links
Advertisement
Table of Contents

Related Manuals for Proxim ORINOCO AP-600B


Summary of Contents for Proxim ORINOCO AP-600B
- Page 1 User Guide for the ORiNOCO AP-600 The Capacity to Do Great Things.
- Page 2 5,875,179; 6,006,090; 5,809,060; 6,075,812; 5,077,753. This user’s guide and the software described in it are copyrighted with all rights reserved. No part of this publication may be reproduced, transmitted, transcribed, stored in a retrieval system, or translated into any language in any form by any means without the written permission of Proxim Corporation.
-
Page 3: Table Of Contents
ORiNOCO AP-600 User’s Guide Contents Introduction ........... .10 Introducing the AP-600 . - Page 4 Status Information ..........33 Logging into the HTTP Interface .
- Page 5 Bridge ............. . . 57 Spanning Tree .
- Page 6 Troubleshooting ..........81 Troubleshooting Concepts .
- Page 7 Related Applications ........... . 91 RADIUS Authentication Server .
- Page 8 Other Network Settings ..........106 Configure the AP-600 as a DHCP Server .
- Page 9 Bridge Parameters............123 Spanning Tree Parameters.
-
Page 10: Introduction
Proxim is a leading manufacturer of wireless networking equipment. Proxim’s unmatched expertise in radio networking technology, combined with the company’s extensive experience serving the communication needs of the mobile computing user, have kept Proxim at the forefront of the wireless Local Area Networking (LAN) market. Document Conventions •... -
Page 11: The Product Package
802.11a. 802.11a devices are not compatible with 2.4 GHz 802.11 or 802.11b devices. 802.11a radios use a radio technology called Orthogonal Frequency Division Multiplexing (OFDM) to achieve data rates of up to 54 Mbits/sec. In addition, Proxim’s 802.11a products support an extension of the 802.11a standard, known as 2X Turbo mode. -
Page 12: Wireless Networking Concepts
As wireless clients move from one coverage cell to another, they maintain network connectivity. To determine the best location for an Access Point, Proxim recommends conducting a Site Survey before placing the device in its final location. For information about how to conduct a Site Survey, contact your local reseller. -
Page 13: Management And Monitoring Capabilities
ORiNOCO Enterprise MIB Proxim provides these MIB files on the CD included with each Access Point. You need to compile one or more of the above MIBs into your SNMP program’s database before you can manage an Access Point using SNMP. Refer to the documentation that came with your SNMP manager for instructions on how to compile MIBs. -
Page 14: Wireless Network Manager
Introduction Wireless Network Manager The Wireless Network Manager is Proxim’s premier management tool for Access Points and Outdoor Routers. It provides a single management interface that lets an IT manager configure, manage, upgrade, and troubleshoot thousands of wireless devices from anywhere in the world. The Wireless Network Manager simplifies network maintenance and easily integrates in an existing SNMP management system. -
Page 15: Software Features
Introduction Software Features The table below compares the software features available for the AP-600a and the AP-600b: Feature AP-600a AP-600b Comments 802.11a 802.11b Number of stations per Basic Service Set (BSS) up to 50 up to 250 HTTP Server Telnet / CLI SNMP Agent Emergency Reset to Default Configuration DHCP Client... - Page 16 Introduction The following table provides detailed information on the some of the differences between the 802.11a and 802.11b feature sets. AP-600a AP-600b (802.11a) (802.11b) Physical Layer Type ODFM DSSS (Modulation Type) (Orthogonal Frequency Division Multiplexing) (Direct Sequence Spread Spectrum) Auto Channel Select Enable (default) Enable (default) Disable...
-
Page 17: Installation & Basic Configuration
Installation & Basic Configuration In This Chapter This chapter describes how to install and configure an AP-600 for the first time. • Prerequisites • Installation • Initialization • Download the Latest Software • Additional Hardware Features Prerequisites Before installing an AP-600, you need to gather certain network information. The following section identifies the information you need. -
Page 18: Installation
Installation & Basic Configuration Installation Follow these steps to install an AP-600: 1. Unpack the Access Point and accessories from the shipping box. 2. If you intend to install the unit free-standing or if you intend to mount it to the ceiling, use a Phillips screwdriver to attach the metal base to the underside of the unit. - Page 19 Installation & Basic Configuration Figure 2-3 Remove Cable Cover 5. Remove the front cover (the side with the LED indicators) from the unit. Figure 2-4 Remove the Front Cover 6. Remove the back cover from the unit.
- Page 20 Installation & Basic Configuration Figure 2-5 Remove the Back Cover 7. Connect one end of an Ethernet cable to the Access Point’s Ethernet port. The other end of the cable should not be connected to another device until after the installation is complete. •...
- Page 21 1 2 7 ( 1 2 7 ( Proxim recommends that you perform a Site Survey prior to determine the installation location for your AP-600 units. For information about how to conduct a Site Survey, contact your local reseller. 14. Replace the back cover, front cover, and cable cover. Be careful to avoid trapping the power and Ethernet cables when replacing the cable cover.
-
Page 22: Initialization
Installation & Basic Configuration Initialization Proxim provides two tools to simplify the initialization and configuration of an AP-600: • ScanTool • Setup Wizard ScanTool is included on the ORiNOCO CD; the Setup Wizard launches automatically the first time you access the HTTP interface. - Page 23 Installation & Basic Configuration Figure 2-8 Scan List 7. Locate the MAC address of the AP-600 you want to initialize within the Scan List. 1 2 7 ( 1 2 7 ( 1 2 7 ( 1 2 7 ( If your Access Point does not show up in the Scan List, click the Rescan button to update the display.
-
Page 24: Setup Wizard
Installation & Basic Configuration Set IP Address Type to Static. Enter a static IP Address for the AP-600 in the field provided. You must assign the unit a unique address that is valid on your IP subnet. Contact your network administrator if you need assistance selecting an IP address for the unit. - Page 25 Installation & Basic Configuration Figure 2-10 Enter Network Password Figure 2-11 Setup Wizard 5. Click Setup Wizard to begin. If you want to configure the AP-600 without using the Setup Wizard, click Exit and Advanced Configuration. The Setup Wizard supports the following navigation options: •...
- Page 26 Installation & Basic Configuration 8. Assign the AP-600 new passwords to prevent unauthorized access and click Save & Next. Each management interface has its own password: — SNMP Read Password — SNMP Read-Write Password — CLI Password — HTTP (Web) Password By default, each of these passwords is set to “public”.
-
Page 27: Download The Latest Software
Proxim periodically releases updated software for the AP-600 on its Web site at http://www.proxim.com/support/. Proxim recommends that you check the Web site for the latest updates after you have installed and initialized the unit. Three types of files can be downloaded to the AP-600 from a TFTP server: —... -
Page 28: Download Updates From Your Tftp Server Using The Web Interface
Installation & Basic Configuration Download Updates from your TFTP Server using the Web Interface 1. Download the latest software from http://www.proxim.com/support/. 2. Copy the latest software updates to your TFTP server. 3. In the Web Interface, click the Commands button and select the Download tab. - Page 29 Installation & Basic Configuration 7. Remove the back cover from the unit. See Remove the Back Cover for an illustration. 8. Place the back cover on the mounting location and mark the center of the three mounting holes. 9. Remove the cover from the wall and drill a hole at each of the locations you marked above. Each hole should be wide enough to hold a mounting plug (which is 6 mm x 35 mm).
-
Page 30: Ceiling Mount
Installation & Basic Configuration Figure 2-13 AP-600 Mounted on a Wall 15. Replace the front cover. 16. Replace the cable cover. 17. Turn on the AP-600. Ceiling Mount Follow these steps to mount the AP-600 to a ceiling: 1. Unplug the Access Point’s power supply, if necessary. 2. -
Page 31: Kensington Security Slot
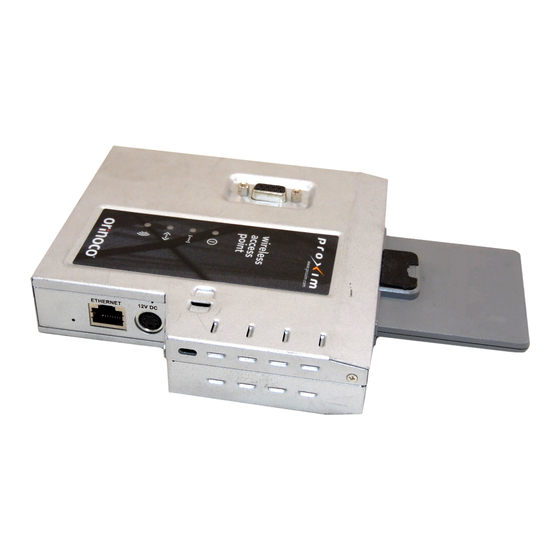
Installation & Basic Configuration Figure 2-14 Mounting the AP-600 to the Ceiling Kensington Security Slot The AP-600 enclosure includes a Kensington Security Slot for use with a Kensington locking mechanism. When properly installed, a Kensington lock can prevent unauthorized personnel from stealing the AP-600. In addition, the Kensington locks secures the cable cover in place, which prevents tampering with the Ethernet and power cables. -
Page 32: Led Indicators
Installation & Basic Configuration LED Indicators The AP-600 has four LED indicators. The LEDs are identified in LED Indicators Illustrated and exhibit the following behavior: Power Ethernet Link Ethernet Activity Wireless Activity Indication Solid Green Green when link Green flash Green flash Normal Operation exists... -
Page 33: Status Information
Status Information In This Chapter This chapter describes the statistical information that is reported within the Access Point’s HTTP interface. • Logging into the HTTP Interface • System Status Logging into the HTTP Interface Once the AP-600 has a valid IP Address and an Ethernet connection, you may use your web browser to monitor the system status. -
Page 34: System Status
Status Information System Status System Status is the first screen to appear each time you connect to the HTTP interface. You can also return to this screen by clicking the Status button. Figure 3-2 System Status Screen Each section of the System Status screen provides the following information: –... -
Page 35: Advanced Configuration
Advanced Configuration In This Chapter This chapter describes all of the operating parameters that can be configured using the Access Point’s HTTP interface. • Configuring the AP-600 Using the HTTP Interface • System: Configure specific system information such as system name and contact information. •... - Page 36 Advanced Configuration Figure 4-1 Enter Network Password Screen 5. Click the Configure button located on the left-hand side of the screen. Figure 4-2 Configure Main Screen 6. Click the tab that corresponds to the parameter you want to configure. For example, click Network to configure the Access Point’s TCP/IP settings.
-
Page 37: System
Advanced Configuration System You can configure and view the following parameters within the System Configuration screen: • Name: The name assigned to the AP-600. • Location: The location where the AP-600 is installed. • Contact Name: The name of the person responsible for the AP-600. •... -
Page 38: Dhcp Server
Advanced Configuration • DNS Client Default Domain Name: The default domain name for the Access Point’s network (for example, “proxim.com”). Contact your network administrator if you need assistance setting this parameter. Advanced • Default TTL (Time to Live): Time to Live (TTL) is a field in an IP packet that specifies how long in seconds the packet can remain active on the network. -
Page 39: Link Integrity
Advanced Configuration • Gateway IP Address: The AP-600 will assign the specified address to its DHCP clients. • Primary DNS IP Address: The AP-600 will assign the specified address to its DHCP clients. • Secondary DNS IP Address: The AP-600 will assign the specified address to its DHCP clients. •... -
Page 40: Interfaces
Advanced Configuration You can configure and view the following parameters within the Link Integrity Configuration screen: • Enable Link Integrity: Place a check mark in the box provided to enable Link Integrity. • Poll Interval (milliseconds): The interval between link integrity checks. Range is 500 - 15000 ms in increments of 500 ms;... -
Page 41: Dynamic Frequency Selection (Dfs)
Advanced Configuration • Transmit Rate: Use the drop-down menu to select a specific transmit rate for the AP-600a. Choose between 6, 9, 12, 18, 24, 36, 48, 54 Mbits/s, and Auto Fallback for standard 802.11a mode. If Turbo mode is enabled, choose between 12, 18, 24, 36, 48, 72, 98, 108 Mbits/s, and Auto Fallback. -
Page 42: Rts/Cts Medium Reservation
Advanced Configuration RTS/CTS Medium Reservation The 802.11 standard supports optional RTS/CTS communication based on packet size. Without RTS/CTS, a sending radio listens to see if another radio is already using the medium before transmitting a data packet. If the medium is free, the sending radio transmits its packet. - Page 43 Advanced Configuration Figure 4-6 Wireless Interface Configuration Screen (AP-600b) • Multicast Rate: Sets the rate at which Multicast messages are sent. This value is related to the Distance Between APs parameter (described previously). The table below displays the possible Multicast Rates based on the Distance between APs setting.
-
Page 44: Distance Between Aps
ORiNOCO 802.11a/b ComboCard or a non-ORiNOCO client with the AP-600b. Proxim recommends that you leave this parameter enabled, particularly if you have ORiNOCO clients on your wireless network (leaving this parameter enabled should not adversely affect the performance of any ORiNOCO 802.11a/b ComboCards or non-ORiNOCO cards on your network). -
Page 45: Multicast Rate
Advanced Configuration & $ 8 7 , 2 1 & $ 8 7 , 2 1 & $ 8 7 , 2 1 & $ 8 7 , 2 1 The distance between APs should not be approximated. It is calculated by means of a manual Site Survey, in which an AP-600b is set up and clients are tested throughout the area to determine signal strength and coverage, and local limits such as physical interference are investigated. -
Page 46: Wireless Distribution System (Wds)
Advanced Configuration Wireless Distribution System (WDS) A Wireless Distribution System (WDS) creates a link between two AP-600b units over their radio interfaces. This link relays traffic from one AP-600b that does not have Ethernet connectivity to a second AP-600b that has Ethernet connectivity. -
Page 47: Ethernet
For best results, Proxim recommends that you configure the Ethernet setting to match the speed and transmission mode of the device the Access Point is connected to (such as a hub or switch). If in doubt, leave this setting at its default, auto-speed-auto-duplex. -
Page 48: Management
1 2 7 ( 1 2 7 ( For security purposes Proxim recommends changing ALL PASSWORDS from the default “public” immediately, to restrict access to your network devices to authorized personnel. If you lose or forget your password settings, you can always perform the Reset to Factory Default Procedure. -
Page 49: Services
Advanced Configuration Services You can configure the following management services: 1 2 7 ( 1 2 7 ( 1 2 7 ( 1 2 7 ( You must reboot the Access Point if you change the HTTP Port or Telnet Port. SNMP Settings •... -
Page 50: Filtering
1 2 7 ( 1 2 7 ( 1 2 7 ( To avoid potential problems when communicating with the AP-600 through the serial port, Proxim recommends that you leave the Flow Control setting at None (the default value). •... -
Page 51: Static Mac
Advanced Configuration 3. Configure the Ethernet Protocol Filter Table. This table is pre-populated with existing Ethernet Protocol Filters, however, you may enter additional filters by specifying the appropriate parameters. • To add an entry, click Add, and then specify the Protocol Number and a Protocol Name. —... -
Page 52: Static Mac Filter Examples
Advanced Configuration Figure 4-12 Static MAC Configuration Screen Static MAC Filter Examples Consider a network that contains a wired server and three wireless clients. The MAC address for each unit is as follows: – Wired Server: 00:40:F4:1C:DB:6A – Wireless Client 1: 00:02:2D:51:94:E4 –... -
Page 53: Advanced
Advanced Configuration Prevent All Wireless Devices From Communicating With a Single Wired Device Configure the following settings to prevent all three Wireless Clients from communicating with Wired Server 1. • Wired MAC Address: 00:40:F4:1C:DB:6A • Wired Mask: FF:FF:FF:FF:FF:FF • Wireless MAC Address: 00:00:00:00:00:00 •... -
Page 54: Tcp/Udp Port
Advanced Configuration TCP/UDP Port Port-based filtering enables you to control wireless user access to network services by selectively blocking TCP/UDP protocols through the AP-600. A user specifies a Protocol Name, Port Number, Port Type (TCP, UDP, or TCP/UDP), and filtering interfaces (Wireless only, Ethernet only, all interfaces, or no interfaces) in order to block access to services, such as Telnet and FTP, and traffic, such as NETBIOS and HTTP. -
Page 55: Alarms
Advanced Configuration Alarms This category has three sub-categories. – Groups – Alarm Host Table – Syslog Groups There are seven alarm groups that can be enabled or disabled: • Enable Configuration Alarms • Enable Security Alarms • Enable Wireless Alarms •... -
Page 56: Configuring Syslog Event Notifications
Advanced Configuration Event Priority Description LOG_EMERG system is unusable LOG_ALERT action must be taken immediately LOG_CRIT critical conditions LOG_ERR error conditions LOG_WARNING warning conditions LOG_NOTICE normal but significant condition LOG_INFO informational LOG_DEBUG debug-level messages Configuring Syslog Event Notifications You can configure the following Syslog settings from the HTTP interface: •... -
Page 57: Bridge
For more information on Spanning Tree protocol, please see Section 8.0 of the IEEE 802.1d standard. The Spanning Tree configuration options are advanced settings. Proxim recommends that you leave these parameters at their default values unless you are familiar with the Spanning Tree protocol. -
Page 58: Packet Forwarding
Advanced Configuration Packet Forwarding The Packet Forwarding feature enables you to redirect traffic generated by wireless clients that are all associated to the same AP-600 to a single MAC address. This filters wireless traffic without burdening the AP-600 and provides additional security by limiting potential destinations or by routing the traffic directly to a firewall. -
Page 59: Wep Encryption
Advanced Configuration Figure 4-15 MAC Access Configuration Screen WEP Encryption The IEEE 802.11 standards specify an optional encryption feature, known as Wired Equivalent Privacy or WEP, that is designed to provide a wireless LAN with a security level equal to what is found on a wired Ethernet network. WEP encrypts the data portion of each packet exchanged on an 802.11 network using an Encryption Key (also known as a WEP Key). - Page 60 Advanced Configuration Figure 4-16 Encryption Configuration Follow these steps to set up WEP encryption on an AP-600: 1. Place a check mark in the box labeled Enable Encryption (WEP). 2. Enter one to four Encryption Keys in the fields provided. Keep in mind the following: •...
-
Page 61: Authentication Process
Advanced Configuration • EAP-Transport Layer Security (TLS): Certificate-based authentication (a certificate is required on the server and each client); supports automatic key distribution • EAP-Tunneled Transport Layer Security (TTLS): Certificate-based authentication (a certificate is required on the server; a client’s username/password is tunneled to the server over a secure connection); supports automatic key distribution •... -
Page 62: Configuring Security Settings
Advanced Configuration Configuring Security Settings The AP-600 offers four security settings: 1 2 7 ( 1 2 7 ( 1 2 7 ( 1 2 7 ( 802.1x settings are located under the 802.1x heading. WEP Encryption settings are located under the Encryption heading. -
Page 63: Mixed Mode (802.1X And Wep Encryption)
Advanced Configuration Mixed Mode (802.1x and WEP Encryption) Follow these steps to use both 802.1x and WEP Encryption simultaneously (clients that do not support 802.1x use WEP Encryption for security purposes): 1. Within the 802.1x Configuration screen, set 802.1x Security Mode to Mixed. 2. -
Page 64: Mac Access Control Via Radius Authentication
Advanced Configuration The back-up servers are optional, but when configured, the AP-600 will communicate with the back-up server if the primary server is off-line. After the AP-600 has switched to the backup server, it will periodically check the status of the primary RADIUS server every five (5) minutes. -
Page 65: Radius Authentication With 802.1X
Advanced Configuration Figure 4-19 RADIUS Access Control Configuration Screen RADIUS Authentication with 802.1x You must configure a primary RADIUS Authentication server to use 802.1x security. A back-up server is optional. 1 2 7 ( 1 2 7 ( 1 2 7 ( 1 2 7 ( Problems with RADIUS Server configuration or RADIUS Authentication should be referred to the RADIUS Server developer. -
Page 66: Radius Accounting
Advanced Configuration 12. Enter the maximum number of times an authentication request may be retransmitted in the Maximum Retransmissions field. Range is 1-4; default is 3. 13. If you are configuring a back-up server, repeat Steps 7 through 12 for the back-up server. 14. - Page 67 Advanced Configuration Figure 4-20 RADIUS Accounting Server Configuration...
- Page 68 Advanced Configuration...
- Page 69 Advanced Configuration...
- Page 70 Advanced Configuration...
-
Page 71: Monitor Information
Monitor Information In This Chapter This chapter describes the statistical information that is reported within the Access Point’s HTTP interface. • Logging into the HTTP Interface • Version: Provides version information for the Access Point’s system components. • ICMP: Displays statistics for Internet Control Message Protocol packets sent and received by the AP-600. •... -
Page 72: Version
Monitor Information Figure 5-1 Enter Network Password Screen 5. Click the Monitor button located on the left-hand side of the screen. Figure 5-2 Monitor Main Screen 6. Click the tab that corresponds to the statistics you want to review. For example, click Learn Table to see the list of nodes that the AP-600 has discovered on the network. -
Page 73: Icmp
Monitor Information • Version: Specifies the component’s version or build number. The Software Image version is the most useful information on this screen for the typical end user. Figure 5-3 Version Information Screen ICMP This tab provides statistical information for both received and transmitted messages directed to the AP-600. Not all ICMP traffic on the network is counted in the ICMP (Internet Control Message Protocol) statistics. -
Page 74: Ip/Arp Table
Monitor Information IP/ARP Table This tab provides information based on the Address Resolution Protocol (ARP), which relates MAC Address and IP Addresses. Figure 5-5 IP/ARP Table Learn Table This tab displays information relating to network bridging. It reports the MAC address for each node that the device has learned is on the network and the interface on which the node was detected. -
Page 75: Iapp
Monitor Information IAPP This tab displays statistics relating to client handovers and communications between ORiNOCO Access Points. Figure 5-7 IAPP Screen RADIUS This tab provides RADIUS authentication and accounting information for both the Primary and Backup RADIUS servers. 1 2 7 ( 1 2 7 ( 1 2 7 ( 1 2 7 (... -
Page 76: Interfaces
Monitor Information Interfaces This tab displays statistics for the Ethernet and wireless interfaces. The Operational Status can be up, down, or testing. Figure 5-9 Wireless Interface Monitoring... -
Page 77: Link Test (Ap-600B Only)
Monitor Information Link Test (AP-600b Only) This tab displays information on the quality of the wireless link to clients and other AP-600b units in the Wireless Distribution System. During a Link Test, the Access Point and the selected device exchange a series of packets to test the strength of the connection. - Page 78 Monitor Information • 5.5 Mbps (pkts): The number of packets received at the 5.5 Mbits/sec transmit rate since the start of the Link Test. • 2 Mbps (pkts): The number of packets received at the 2 Mbits/sec transmit rate since the start of the Link Test.
- Page 79 Monitor Information...
- Page 80 Monitor Information...
-
Page 81: Commands
Commands In This Chapter This chapter describes the commands that can be issued from the Access Point’s HTTP interface. • Logging into the HTTP Interface • Download: Download files from a TFTP server to the AP-600. • Upload: Upload configuration files from the AP-600 to a TFTP server. •... - Page 82 Commands Figure 6-1 Enter Network Password Screen 5. Click the Commands button located on the left-hand side of the screen. Figure 6-2 Commands Main Screen 6. Click the tab that corresponds to the command you want to issue. For example, click Reboot to restart the unit.
-
Page 83: Download
Commands Download Use the Download tab to download Configuration, AP Image, and Bootloader files to the AP-600. A TFTP server must be running and configured to point to the directory containing the file. Figure 6-3 Download Command Screen If you don’t have a TFTP server installed on your system, install the TFTP server from the ORiNOCO CD. You can either install the TFTP server from the CD Wizard or run OEM-TFTP-Server.exe found in the CD’s Xtras/SolarWinds sub-directory. -
Page 84: Reboot
Commands Figure 6-4 Upload Command Screen Reboot Use the Reboot tab to save configuration changes (if any) and reset the AP-600. Entering a value of 0 (zero) seconds causes an immediate reboot. Note that Reset, described below, does not save configuration changes. &... -
Page 85: Reset
Commands Reset Use the Reset tab to restore the AP-600 to factory default conditions. The AP-600 may also be reset from the RESET button located on the side of the unit. Since this will reset the Access Point’s current IP address, a new IP address must be assigned. -
Page 86: Troubleshooting
Troubleshooting In This Chapter If you are having problems with an AP-600, review the troubleshooting suggestions contained in this chapter. • Troubleshooting Concepts • Symptoms and Solutions • Recovery Procedures • System Alarms (Traps) • Related Applications 1 2 7 ( 1 2 7 ( 1 2 7 ( 1 2 7 (... -
Page 87: Symptoms And Solutions
Troubleshooting Symptoms and Solutions Connectivity Issues Connectivity issues include any problem that prevents you from powering up or connecting to the AP-600. AP-600 Unit Will Not Boot - No LED Activity 1. Make sure your power source is operating. 2. Make sure all cables are connected to the AP-600 correctly. 3. -
Page 88: Http (Browser) Or Telnet Interface Does Not Work
Troubleshooting 3. To find the unit’s current IP address if using DHCP, open the IP Client Table in the DHCP Server and match the Access Point’s IP address to its MAC address (found on the product label). Alternatively, use ScanTool to identify an Access Point’s current IP address. -
Page 89: Client Connection Problems
Client PC Card Does Not Work 1. Make sure you are using the latest PC Card driver software. 2. Download and install the latest ORiNOCO client software from http://www.proxim.com/support/. Intermittent Loss of Connection 1. Make sure you are within range of an active AP-600. -
Page 90: Recovery Procedures
Troubleshooting Recovery Procedures The most common installation problems relate to IP addressing. For example, without the TFTP server IP Address, you will not be able to download a new AP Image to the AP-600. IP Address management is fundamental. We suggest you create a chart to document and validate the IP addresses for your system. -
Page 91: Forced Reload Procedure
Download Procedure Follow these steps to use ScanTool to download a software image to an Access Point with a missing image: 1. Download the latest software from http://www.proxim.com/support/. 2. Copy the latest software updates to your TFTP server. 3. Launch ScanTool. -
Page 92: Download A New Image Using The Bootloader Cli
Download Procedure 1. Download the latest software from http://www.proxim.com/support/. 2. Copy the latest software updates to your TFTP server’s default directory. 3. Use a straight-through serial cable to connect the Access Point’s serial port to your computer’s serial port. -
Page 93: Setting Ip Address Using Serial Port And Normal Cli
Troubleshooting 7. Enter only the following statements: [Device name]> set ipaddrtype static [Device name]> set ipaddr <Access Point IP Address> [Device name]> set ipsubmask <IP Mask> [Device name]> set tftpipaddr <TFTP Server IP Address> [Device name]> set tftpfilename <AP Image File Name, including file extension> [Device name]>... - Page 94 Troubleshooting 2. Under File -> Properties -> Settings -> ASCII Setup, enable the Send line ends with line feeds option. Result: HyperTerminal sends a line return at the end of each line of code. 3. Press the RESET button on the AP-600 (see RELOAD and RESET Buttons to identify the location of the RESET button).
-
Page 95: System Alarms (Traps)
Troubleshooting System Alarms (Traps) Security Alarms oriTrapAuthenticationFailure A client has failed to authenticate using one of the following authentication methods: MAC Access Control Table, RADIUS MAC Authentication, or 802.1x Authentication (for 802.1x, EAP type is specified) oriTrapUnauthorizedManagerDetected An unauthorized manager has attempted to view and/or modify parameters Wireless Interface Card Alarms oriTrapWLCNotPresent... -
Page 96: Related Applications
Troubleshooting Related Applications RADIUS Authentication Server If you enabled RADIUS Authentication on the AP-600, make sure that your network’s RADIUS servers are operational. Otherwise, clients will not be able to log in. There are several reasons the authentication server services might be unavailable, here are two typical things to check: •... - Page 97 Troubleshooting...
-
Page 98: In This Appendix
Command Line Interface (CLI) In This Appendix This section describes the AP-600’s Command Line (CLI) Interface. CLI commands can be used to initialize, configure, and manage the Access Point. – CLI commands may be entered in real time through a keyboard or submitted with CLI scripts. –... -
Page 99: Navigation And Special Keys
Command Line Interface (CLI) • Group - A logical collection of network parameter information. For example, the System Group is composed of several related parameters. Groups can also contain Tables. All items for a given Group can be displayed with a show <Group>... -
Page 100: Bootloader Cli
Command Line Interface (CLI) Bootloader CLI The Bootloader CLI is a minimal subset of the normal CLI used to perform initial configuration of the AP-600. This interface is only accessible via the serial interface if the AP-600 does not contain a software image or a download image command over TFTP has failed. -
Page 101: Cli Command Types
Command Line Interface (CLI) CLI Command Types This guide divides CLI Commands into two categories: Operational and Parameter Controls. Operational CLI Commands These commands affect Access Point behavior, such as downloading, rebooting, and so on. After entering commands (and parameters, if any) press the Enter key to execute the Command Line. Operational commands include: •... - Page 102 Command Line Interface (CLI) Example 3. Display parameters for set and show Example 3a allows you to see every possible parameter for the set (or show) commands. Notice from example 3a that the list is very long. Example 3b shows how to display a subset of the parameters based on initial parameter letters. Example 3a.
-
Page 103: Done, Exit, Quit
Command Line Interface (CLI) Example 4. Display Prompts for Successive Parameters Enter the command, a space, and then ?. Then, when the parameter prompt appears, enter the parameter value. Result: The parameter is changed and a new CLI line is echoed with the new value (in the first part of the following example, the value is the IP Address of the TFTP server). -
Page 104: History
Command Line Interface (CLI) Figure A-8 Results of “help” CLI command 2. Complete command description and command usage can be provided by: [Device Name]>help <command name> [Device Name]><command name> help history Shows content of Command History Buffer. The Command History Buffer stores command statements entered in the current session. -
Page 105: Upload
Command Line Interface (CLI) upload Uploads a text-based configuration file from the AP-600 to the TFTP Server. Executing upload with the asterisk character (“*”) will make use of the previously set/stored TFTP parameters. Executing upload without parameters will display command help and usage information. 1. -
Page 106: Set" And "Show" Command Examples
Command Line Interface (CLI) Example 1: Configuring objects that require the device to be rebooted The following message is displayed every time the user has configured an object that requires the device to be rebooted. [Device Name]>set ipaddr 135.114.73.10 The following elements require reboot ipaddr Example 2: Executing the “exit”, “quit”, or “done”... - Page 107 Command Line Interface (CLI) Example 4 - Enable, Disable, or Delete a table entry or row The following example illustrates how to manage the second entry in a table. Syntax: [Device Name]>set <Table> index status <enable, disable, delete> [Device Name]>set <Table> index status <1=enable, 2=disable, 3=delete> Example: [Device Name]>set mgmtipaccesstbl 2 status enable [Device Name]>set mgmtipaccesstbl 2 status disable...
-
Page 108: Using Tables & User Strings
Command Line Interface (CLI) 2. View all parameters in a table. Syntax: [Device Name]> show <table name> Example:[Device Name]> show mgmtipaccesstbl Result: Displays the IP Access Table and its entries. Using Tables & User Strings Working with Tables Each table element (or parameter) must be specified, as in the example below. [Device Name]>set mgmtipaccesstbl 0 ipaddr 10.0.0.10 ipmask 255.255.0.0 Below are the rules for creating, modifying, enabling/disabling, and deleting table entries. -
Page 109: Configuring The Ap-600 Using Cli Commands
1 2 7 ( 1 2 7 ( 1 2 7 ( 1 2 7 ( Proxim recommends changing your default passwords immediately. To perform this operation using CLI commands, refer to Change Passwords. Log into the AP-600 using Telnet The CLI commands can be used to access, configure, and manage the AP-600 using Telnet. -
Page 110: Change Passwords
& $ 8 7 , 2 1 & $ 8 7 , 2 1 Proxim strongly urges you to change the default passwords to restrict access to your network devices to authorized personnel. If you lose or forget your password settings, you can always perform the... -
Page 111: Set Wep Encryption For The Wireless Interface
Command Line Interface (CLI) Set WEP Encryption for the Wireless Interface & $ 8 7 , 2 1 & $ 8 7 , 2 1 & $ 8 7 , 2 1 & $ 8 7 , 2 1 Wireless clients must be configured with the same encryption key to be able to communicate with the AP-600. The AP-600 can only support one Key Length (so each of the configured keys must have the same length). -
Page 112: Other Network Settings
Command Line Interface (CLI) Other Network Settings There are other configuration settings that you may want to set for the AP-600. Some of them are listed below. – Configure the AP-600 as a DHCP Server – Configure the DNS Client –... -
Page 113: Maintain Client Connections Using Link Integrity
Command Line Interface (CLI) Maintain Client Connections using Link Integrity [Device Name]>show linkinttbl (this shows the current links) [Device Name]>set linkinttbl <1-5 (depending on what table row you wish to address)> ipaddr <ip address of the host computer you want to check> [Device Name]>set linkintpollint <the interval between link integrity checks>... -
Page 114: Set Ethernet Speed And Transmission Mode
Command Line Interface (CLI) Set the Distance Between APs (AP-600b Only) [Device Name]>set wif 3 distaps <large, medium, small, minicell, microcell> [Device Name]>reboot 0 1 2 7 ( 1 2 7 ( 1 2 7 ( 1 2 7 ( The distance between APs should not be approximated. -
Page 115: Configure Syslog
Command Line Interface (CLI) Set Telnet Session Timeouts [Device Name]>set tellogintout <time in seconds between 1 and 300 (default is 30)> [Device Name]>set telsessiontout <time in seconds between 1 and 36000 (default is 900)> Configure Serial Port Interface 1 2 7 ( 1 2 7 ( 1 2 7 ( 1 2 7 (... -
Page 116: Configure 802.1X Authentication
Command Line Interface (CLI) Configure 802.1x Authentication [Device Name]>set secconfig <none, 802.1x, mixed> [Device Name]>set secenckeylentbl 3 enckeylen <64bits, 128bits, 152bits (152 bits available with AP-600a only)> [Device Name]>set secrekeyint <60 – 65535 seconds; default is 900 sec> [Device Name]>reboot 0 1 2 7 ( 1 2 7 ( 1 2 7 (... -
Page 117: Cli Monitoring Parameters
Command Line Interface (CLI) Figure A-18 Result of “show radius” CLI Command Configure RADIUS Accounting server [Device Name]>set radacctbl <index> status <enable> seraddrfmt <ipaddr or name> ipaddr <RADIUS IP address or name> port <user defined> ssecret <user defined> responsetm <1 to 4 seconds> maxretx <1 to 10 times> [Device Name]>show radacctbl Figure A-19 Results of “show radacctbl”... -
Page 118: Parameter Tables
Command Line Interface (CLI) Parameter Tables Objects contain groups that contain both parameters and parameter tables. Use the following Tables to configure the Access Point. Columns used on the tables include: — Name - Parameter, Group, or Table Name — Type - Data type —... -
Page 119: System Parameters
Command Line Interface (CLI) System Parameters Name Type Values Access CLI Parameter System Group system Name DisplayString User Defined sysname Location DisplayString User Defined sysloc Contact Name DisplayString User Defined sysctname Contact E-mail DisplayString User Defined sysctemail Contact Phone DisplayString User Defined sysctphone max 254 characters... -
Page 120: Dhcp Server Parameters
Command Line Interface (CLI) DNS Client for RADIUS Name Resolution Name Type Values Access CLI Parameter DNS Client Group DNS Client status Integer enable dnsstatus disable (default) Primary DNS Server IP IpAddress User Defined dnspridnsipaddr Address Secondary DNS Server IpAddress User Defined dnssecdnsipaddr IP Address... -
Page 121: Link Integrity Parameters
Command Line Interface (CLI) Link Integrity Parameters Name Type Values Access CLI Parameter Link Integrity Group linkint Link Integrity Status Integer enable linkintstatus disable (default) Link Integrity Poll Integer 500 - 15000 ms linkintpollint Interval (in increments of 500ms) 500 ms (default) Link Integrity Poll Integer 0 - 255... - Page 122 Command Line Interface (CLI) AP-600a Only Parameters Name Type Values Access CLI Parameter Operating Frequency Channel Integer Varies by regulatory channel domain and country. See 802.11a Channel Frequencies for the AP-600a 2X Turbo Mode Integer enable turbo (not available in all countries) disable (default) Supported Data Rates Octet String...
-
Page 123: Ethernet Interface Parameters
Command Line Interface (CLI) Name Type Values Access CLI Parameter Load Balancing Integer enable (default) ldbalance disable Medium Distribution Integer enable (default) meddendistrib disable MAC Address PhyAddress 12 hex digits macaddr Supported Data Rates Octet String Reported in 500 Kb/sec suppdatarates intervals: 2 (1 Mbits/sec) -
Page 124: Management Parameters
Command Line Interface (CLI) Management Parameters SNMP Parameters Name Type Values Access CLI Parameter SNMP Group snmp SNMP Management Interface Bitmask 0 or 2 - no interfaces snmpifbitmask Interface Bitmask (disable) 1 or 3 - Ethernet 4 or 6 - Wireless 5 or 7 - all interfaces (default is 7) Read Password... -
Page 125: Serial Port Parameters
Command Line Interface (CLI) Serial Port Parameters Name Type Values Access CLI Parameter Serial Group serial Baud Rate Integer 2400, 4800, serbaudrate 9600 (default), 19200, 38400, 57600 Data Bits Integer serdatabits Parity Integer none serparity Stop Bits Integer serstopbits Flow Control Value none (default) serflowctrl... -
Page 126: Static Mac Address Filter Table
Command Line Interface (CLI) Ethernet Filtering Table Identify the different filters by using the table index. Name Type Values Access CLI Parameter Ethernet Filtering Table Table etherflttbl Table Index index Protocol Number Octet String protonumber Protocol Name (optional) DisplayString protoname Filter Comment DisplayString 2- 31 characters... -
Page 127: Broadcast Filtering Table
Command Line Interface (CLI) Broadcast Filtering Table Name Type Values Access CLI Parameter Broadcast Filtering Table broadcastflttbl Table Index Integer index Protocol Name DisplayString protoname Direction Integer ethertowireless direction wirelesstoether both (default) Status Integer enable status disable (default) TCP/UDP Port Filtering The following parameters are used to enable/disable the Port filter feature. -
Page 128: Alarms Parameters
Command Line Interface (CLI) Alarms Parameters SNMP Table Host Table Parameters When creating table entries, you may either specifying the argument name followed by argument value. CLI applies default values to the omitted arguments. Due to the nature of the information, the only argument that can be omitted is the “comment”... -
Page 129: Bridge Parameters
Command Line Interface (CLI) Bridge Parameters Spanning Tree Parameters Name Type Values Access CLI Parameter Spanning Tree Group Spanning Tree Status Integer enable stpstatus disable (default) Bridge Priority Integer 0 – 65535 stppriority 32768 (default) Maximum Age Integer 600 – 4000 stpmaxage (in 0.01 sec intervals;... -
Page 130: Intra Bss Subscriber Blocking
Command Line Interface (CLI) Intra BSS Subscriber Blocking The following parameters control the Intra BSS traffic feature, which prevent wireless clients that are associated with the same AP-600 from communicating with each other: Name Type Values Access Intra BSS Traffic Group intrabss Intra BSS Traffic... -
Page 131: Mac Access Control Parameter
Command Line Interface (CLI) 1 2 7 ( 1 2 7 ( 1 2 7 ( 1 2 7 ( WEP Encryption for information on the supported WEP Key lengths. Security Encryption Key Length Table The following table details how to set the Encryption Key Length for the wireless interfaces. Name Type Values... -
Page 132: Radius Authentication
Command Line Interface (CLI) RADIUS Accounting Integer enable radaccstatus Status disable (disable) Accounting Inactivity Integer32 0 – 2147483647 radaccinactivetmr Timer minutes; default is 5 min. RADIUS Authentication 1 2 7 ( 1 2 7 ( 1 2 7 ( 1 2 7 ( Use a server name only if you have enabled the DNS Client functionality. -
Page 133: Other Parameters
Command Line Interface (CLI) Other Parameters IAPP Parameters Name Type Values Access CLI Parameter IAPP Group iapp IAPP Status Integer enable (default) iappstatus disable Periodic Announce Integer iappannint Interval (seconds) 120 (default) Announce Response Integer 2 seconds iappannresp Time Handover Time-out Integer 410 ms iapphandtout... -
Page 134: Ascii Character Chart
ASCII Character Chart You can configure WEP Encryption Keys in either Hexadecimal or ASCII format. Hexadecimal digits are 0-9 and A-F (not case sensitive). ASCII characters are 0-9, A-F, a-f (case sensitive), and punctuation marks. Each ASCII character corresponds to two hexadecimal digits. The table below lists the ASCII characters that you can use to configure WEP Encryption Keys. -
Page 135: C Specifications
Specifications In This Appendix • Hardware Specifications • Radio Specifications Hardware Specifications Physical Specifications AP-600 Unit (without metal base) Dimensions (H x W x L) = 3.5 x 17 x 21.5 cm (1.5 x 6.75 x 8.5 in.) Weight = 0.68 kg (1.50 lb.) Electrical Specifications Using the Power Adapter Voltage (Input) = 100 to 240 VAC (50-60 Hz) @ 0.4 A... -
Page 136: Active Ethernet Interface
Specifications Active Ethernet Interface Category 5, foiled, twisted pair cables must be used to ensure compliance with FCC Part 15, subpart B, Class B requirements Standard 802.3af pin assignments HTTP Interface Microsoft Internet Explorer 5.5 or later (preferred), or Netscape 4.x or later. Radio Specifications For AP-600a: 802.11a radio certification is available in the U.S. -
Page 137: Japan (Mkk)
Specifications The AP-600a can operate on the following Channels in the European countries that allow operation in the 5.15-5.25 GHz band: Channel ID Center Frequency Channel ID Center Frequency (GHz) (GHz) 5.180 5.260 5.200 5.280 5.220 5.300 5.240 5.320 Japan (MKK) The AP-600a can operate on the following Channels in Japan: Channel ID Center Frequency... -
Page 138: Wireless Communication Range
Communications at a lower transmit range may travel longer distances. The range values listed in the Communications Range Chart are typical distances as calculated by Proxim’s development team for FCC-certified products. These values provide a rule of thumb and may vary according to the actual radio conditions at the location where the product is used. -
Page 139: D Technical Support
You can reach ORiNOCO Technical Support by phone or e-mail, as described below. 1 2 7 ( 1 2 7 ( 1 2 7 ( 1 2 7 ( The latest software and documentation is available for download at http://www.proxim.com/support/. For the U.S. and Canada: Phone: 1-866-ORiNOCO (1-866-674-6626) E-mail: USAsupport@orinocowireless.com... - Page 140 Technical Support For Asia Pacific: Phone: +1 661-367-2230 E-mail: APACsupport@orinocowireless.com For Europe, the Middle East, and Africa (EMEA): Your local supplier in the EMEA region is trained to give you the support you require. Local suppliers have direct access to the ORiNOCO Technical Support Center and will help you in every way they can. Phone: +1 661-367-2230 E-mail:...
-
Page 141: Information To The User
USA/Canada section from the products regulatory flyer: INFORMATION TO THE USER This document provides regulatory information for the following products: Wireless Base Station products such as the AP- 600 Base Station products are wireless network products based on IEEE 802.11 standards for wireless LANs as defined and approved by the Institute of Electrical and Electronics Engineers. - Page 142 INFORMATIONS POUR L’UTILISATEUR Ce document fournit des informations sur les réglementations concernant les produits suivants : • Les produits sans fil de la Base Station tels que la AP- 600. Les produits client et de la Base Station sont des produits pour réseaux sans fil conçus selon les normes IEEE 802.11 définies et approuvées par l’Institute of Electrical and Electronics Engineers (IEEE).
-
Page 143: Declaration Of Conformity
United States Federal Communications Commission (FCC) This equipment has been tested and found to comply with the limits for a Class B digital device, pursuant to Part 15 of the FCC Rules. These limits are designed to provide reasonable protection against harmful interference in a residential installation. -
Page 144: Radio Approvals
RADIO APPROVALS To determine whether you are allowed to use your device in the countries listed below, please check the “transmitter number” that is printed on the identification label of your device. Certifications radio Pour déterminer si vous êtes autorisé à utiliser votre dispositif dans les pays indiquées ci-dessous, veuillez contrôler le “numéro de l’émetteur”...
Need help?
Do you have a question about the ORINOCO AP-600B and is the answer not in the manual?
Questions and answers