Mitel Inter-Tel 5000 Installation And Maintenance Manual
Hide thumbs
Also See for Inter-Tel 5000:
- User manual (32 pages) ,
- Reference manual (10 pages) ,
- Quick reference manual (2 pages)
Table of Contents
Advertisement
Quick Links
Advertisement
Chapters
Table of Contents

Related Manuals for Mitel Inter-Tel 5000


Summary of Contents for Mitel Inter-Tel 5000
- Page 1 M I T E L ® Inter-Tel 5000 Installation and Maintenance Manual...
- Page 3 Part Number 580.8000 Inter-Tel 5000 Installation and Maintenance Manual Issue 2.4, May 2008...
-
Page 5: Product Disposal Instructions
Chandler, AZ 85226-3224 1-888-777-EASY (3279) For information on how to contact Mitel Technical Support outside of North America, please refer to your Channel Support Agreement. If you have any questions or comments regarding this manual or other technical documentation, contact the Chandler Technical Publications Department at: tech_pubs@inter-tel.com... -
Page 7: Safety Instructions
Safety Instructions Safety Instructions For basic installation guidelines necessary fo rthe proper and safe functining of this equipment, refer to the Important Safety Instructions (part number 835.3209) packaged with the system, included on the product software CD, and posted on the Inter-Tel edGE Online Manuals and Guides (www.inter-tel.com/techpublications) Web site. - Page 8 Limited Warranty The responsibility of Inter-Tel to honor the express limited warranty stated above also shall be predicated on receiving timely written notice of the alleged defect(s) with as much specificity as is known within thirty (30) calendar days of the malfunction or by the expiration of the warranty period (plus thirty [30] calendar days), whichever occurs first.
- Page 9 Secure Socket Layer Secure Socket Layer © Copyright 1995-1998 Eric Young (eay@cryptsoft.com) All rights reserved. This package is an SSL implementation written by Eric Young (eay@cryptsoft.com). The implementation was written so as to conform with Netscapes SSL. This library is free for commercial and non-commercial use as long as the following conditions are adhered to.
- Page 10 Network Security Statement Network Security Statement Although no telecommunications system or data network is entirely secure, as long as appropriate security measures are put in place and properly maintained by both the customer ® and the installing company, this Inter-Tel Advanced Communications Platform architecture and its associated server-based applications are substantially secure against unauthorized access to the customer’s data network via the telecommunications system.
-
Page 11: Table Of Contents
Figures Inter-Tel 5000 v2.4 New Features Version 2.4 Content Summary ........... .1-2 Knowledge Base Article: Port Information (KB2377) . - Page 12 Contents Specifications Chapter Overview ............. .4-4 Environmental Requirements .
- Page 13 Grounding the Inter-Tel 5000 Base Server ........
- Page 14 Contents Maintenance Tasks Powering Up the System ............5-87 Powering Down the System .
- Page 15 Contents Reference Chapter Overview ............. .6-2 Technical Support Contact Information .
- Page 16 Contents Open Source License Agreements Introduction ..............C-2 GNU Public License .
- Page 17 Dimensions of Inter-Tel 5000 Base Server ........4-18...
- Page 18 Table 5-21 IP Endpoint Overview — Mitel and Inter-Tel ....... .5-147 Table 5-22 Troubleshooting Problems and Possible Solutions .
- Page 19 Mitel IP Endpoint Feature Buttons ........
- Page 21 Figures Figures Figure 1-1 AWS System Upgrade Page ..........1-7 Figure 1-2 AWS TFTP Server Files Page .
- Page 22 Mitel IP Endpoint Wall Mounting ........
- Page 23 Mitel Model 5212 ........
- Page 24 Figures Figure A-4 Example Call Path Through Nodes ........A-19 Figure A-5 Network Planning Sheet .
-
Page 25: Inter-Tel 5000 V2.4 New Features
Mitel and Inter-Tel IP Endpoint Differences ........ -
Page 26: Version 2.4 Content Summary
When this occurs on an Inter-Tel IP endpoint, the tone and the audio stream are heard at the same time (the tone is in the “background”). On a Mitel IP endpoint, feature activation tones supersede (interrupt) the audio stream. -
Page 27: Mitel Ip Endpoint Feature Buttons
Chapter 1: Inter-Tel 5000 v2.4 New Features Mitel and Inter-Tel IP Endpoint Differences • The DND alert tone generated on a Mitel IP endpoint differs from the DND alert tone generated on an Inter-Tel IP endpoint. • Speakerphone (handsfree) volume is generally lower on Mitel IP endpoints when compared to Inter-Tel IP endpoints. -
Page 28: Features Not Supported In V
Features not Supported in v2.4 The following sections describe features that are not supported in v2.4. Mitel Endpoint Features not Supported in v2.4 The following features are currently not supported for Mitel IP endpoints: • Session Initiation Protocol (SIP) mode •... -
Page 29: Unified Messaging Open Standards Edition
Unified Messaging Open Standards Edition Unified Messaging Open Standards Edition The Inter-Tel 5000 v2.4 system supports Unified Messaging Open Standards Edition (OSE), a client-free Unified Messaging distribution for the Inter-Tel Enterprise Messaging (EM) voice messaging server. EM v1.2 is being released in May 2008. Refer to the Enterprise Messaging Installation Manual Issue 1.1 (part no. -
Page 30: Upgrading To V2.4
Features and Programming Guide (part no: 580.8006). For the changes that have been made to the v2.4 Utilities, refer to the Inter-Tel 5000 Features and Programming Guide (580.8006). Some of the changes are general and are not tied to a specific v2.4 feature. -
Page 31: Administrative Web Session (Aws) Pages
Administrative Web Session (AWS) Pages Administrative Web Session (AWS) Pages The Administrative Web Session (AWS) pages include a variety of changes for Inter-Tel 5000 system software v2.4. Some changes include new pages and information for Mitel IP endpoints and for the Inter-Tel 5000 onboard trivial file transfer protocol (TFTP) server. -
Page 32: Onboard Tftp Server Files
TFTP server status: Status includes Running, Stopped, Suspended, or Dead. • Total File Space Used (M or K used): The MB or KB space used for the TFTP files. This page lists the following information about the files that reside on the Inter-Tel 5000 TFTP server: •... - Page 33 View the contents of the configuration (.cfg) files by clicking a configuration file name to view its contents in a read-only view. • Download the Mitel endpoint firmware (Models 5212/5224 and 5330/5340), see below. To download the Mitel endpoint firmware: Click the Download 5212/5224 Firmware or the Download 5330/5440 Firmware link.
-
Page 34: Tftp Log File (Dynamic View) Page
Chapter 1: Inter-Tel 5000 v2.4 New Features TFTP Log File (Dynamic View) Page TFTP Log File (Dynamic View) Page To locate the TFTP Log File (Dynamic View) page, click TFTP Log File (Dynamic View) from the System Management navigation tab. The TFTP Log File (Dynamic View) allows you to view the TFTP Server log file dynamically, where the page reloads every five seconds. -
Page 35: Document Overview
Chapter 2: Document Overview Document Overview Introduction ..............1-2 New Manual . -
Page 36: Introduction
For prior releases, refer to the documentation for that release. All other information is now in the new Inter-Tel 5000 Features and Programming Guide (part number 580.8006), and it covers all features, programming, diagnostics and troubleshooting, and any other information other than installation-related. -
Page 37: Chapters Of The Manual
Basic Voice Mail and Fax over IP (FoIP), Wide Area Network (WAN) Fail Survivability, and a Power Fail Bypass relay. Inter-Tel 5000 platforms connect to external voice mail; to loop start, T1, T1/PRI, E1/PRI, and Basic Rate Interface (BRI)—S interface—trunks [Europe only];... -
Page 38: Inter-Tel Reference Documents
Inter-Tel 5000 Installation and Maintenance Manual, part no. 580.8000 • Inter-Tel 5000 Features and Programming Guide, part no. 580.8006 • Inter-Tel 5000 Administrator Guide & Administrator Quick Reference Guide, part no. 580.8001 • Inter-Tel 5000 Installation Quick Start Guide, part no. 835.2879 •... -
Page 39: Document Style Conventions
References to “Endpoints” This document uses the term “endpoint” to describe the devices that the Inter-Tel 5000 family of products supports over Internet Protocol. In this context, digital and IP phones are endpoints, as are data modules, fax machines, computer telephony (CT) gateways, Single-Line Adapters... -
Page 40: Hazard Identification, Notices, And Notes
Chapter 2: Document Overview Hazard Identification, Notices, and Notes Hazard Identification, Notices, and Notes This manual uses standardized graphic conventions to promote safe practices by technicians and to prevent damage to equipment and data. Potentially harmful situations are identified according to the degree of hazard the technician is exposed to. Relevant policies appear in a boxed format, while important information and notes are set apart from the text with attention- getting labels. -
Page 41: Product Description
Chapter 3: Product Description Product Description Chapter Overview ............. .3-3 Brief System Descriptions . - Page 42 Licenses for Inter-Tel 5000 DEI Units ........
-
Page 43: Chapter Overview
IP solution for small- and medium-sized business environments. The Inter-Tel 5000 is a family of converged communications platforms that supports Internet Protocol (IP), digital, and analog single line endpoints. Systems are marketed as the Inter-Tel CS-5200, CS-5400, and CS-5600 Communication Servers. -
Page 44: System Evolution
System Evolution System Evolution An Inter-Tel 5000 platform running on v2.x provides increased IP endpoint capacity for all its configurations. This increased capacity is achieved by using a less processing-intensive codec to allocate IP resources than was used in preceding versions. Starting with v2.0, G.711 became the default vocoder for Inter-Tel 5000 platforms instead of G.729. -
Page 45: System Configurations
4-39. An Inter-Tel 5000 platform running on v2.x provides increased IP endpoint capacity for all its configurations. This improvement is achieved by using a less processing-intensive codec to allocate IP resources than was used in previous versions. With v2.0 and later, the system uses G.711 as the default vocoder instead of G.729. - Page 46 Mail and handles call processing chores for the entire system. It controls and communicates with the Base Server across the customer’s local area network (LAN). For a feature description, refer to the basic voice mail information in the Inter-Tel 5000 Features and Programming Guide (part no. 580.8006).
-
Page 47: Inter-Tel Cs-5200/5400/5600 Base Server
Basic Voice Mail service is provided with the system, and additional voice mail capacity is available by installing either the optional Voice Processing Unit or an Enterprise Messaging system. For details, refer to the Inter-Tel 5000 Features and Programming Guide (part no. 580.8006). -
Page 48: Base Server Interfaces
“Interfaces on Back of Base Server” on page 4-23. For DB Programming information discussed in this section, refer to the Inter-Tel 5000 Features and Programming Guide (part no. 580.8006). • 2 – Loop start trunk circuits in a single port, preprogrammed for connection to the local telephone company central office (CO) [local exchange] trunks. -
Page 49: Digital Capability
Digital Capability Digital Capability The addition of the DEI unit to the Inter-Tel 5000 platform allows the installation of digital endpoints. Customers may install digital or IP endpoints on the Inter-Tel 5000 platform for optimum use of their communication resources. All call processing functionality on the Inter-Tel 5000 is available to both digital and IP endpoints. -
Page 50: Single-Line Adapter
Inward Dialing (DID) trunks—or, one single line endpoint and one DID trunk. For more information on using DID trunks, refer to the Inter-Tel 5000 Features and Programming Guide (part no. 580.8006). SLAs are shipped with both ports set for single line device operation. -
Page 51: Trunks And Endpoints
Central Office (CO) [Local Exchange] Trunks: Up to 12 loop start [local exchange] trunks can be installed in increments of four trunks per LSM-4 module. In addition, two loop start trunks can be installed in the RJ-14 port built in on the Inter-Tel 5000 Base Server. -
Page 52: System Licensing Requirements
Inter-Tel License Management Center (LMC) Web site and then loaded onto the platform before installing the system. By default, unlicensed Inter-Tel 5000 platforms can be programmed with the capabilities of fully provisioned systems. However, if the applicable licenses are not provided and authenticated within four hours, the system invokes a reset. -
Page 53: Licensing Integrity
The Inter-Tel 5000 uses one unique Category D license for each of the Models 5212, 5224, 5330, and 5340 endpoints, which is a chargeable license. Licensing requirements have not changed for Inter-Tel endpoints. -
Page 54: Upgrading From Inter-Tel Cs-5200 To Cs
Software Upgrade: A customer owns or leases an Inter-Tel CS-5200, CS-5400, or CS-5600 system running on an Inter-Tel 5000 v1.x or v2.0 license. Customers upgrading from v1.x to v2.1 require a v1.x to v2.0 Upgrade license, part no. 840.0623 and a v2.0 to v2.1 Upgrade license, part no. -
Page 55: Licensing For V2.X And Inter-Tel Cs-5600 Upgrades
Licensing for v2.x and Inter-Tel CS-5600 Upgrades Licensing for v2.x and Inter-Tel CS-5600 Upgrades The existing Inter-Tel 5000 licensing plan does not change with the product going from v1.2 to v2.x. However, to use v2.x features, customers must purchase a new software license or an upgrade license. -
Page 56: Table
Chapter 3: Product Description Endpoint Model-Specific Licensing Endpoint Model-Specific Licensing All IP endpoints are licensed in accordance with three licensing categories. Table 3-1 summarizes the categories and the endpoints requiring a license in each category. Table 3-1. Endpoint License Categories License Category Endpoints Covered Category A... -
Page 57: Ip Gateway Trunk Licensing
IP Endpoint Licensing This section identifies the types of IP endpoints that the Inter-Tel 5000 platform supports and the process used for activation of licensed endpoints. -
Page 58: Types Of Ip Endpoints
Message Print Diagnostic Manual, part no. 550.8018. Licenses for Inter-Tel 5000 DEI Units Any of the three Inter-Tel 5000 platforms supports one or two Inter-Tel DEI units, and each unit supports up to 48 digital endpoints. One license is required for each Inter-Tel DEI to come online, meaning that two different licenses are required for operation of a fully expanded Inter-Tel 5000 system: •... -
Page 59: Ip Resources
Oversubscription allows you to program more endpoints than there are IP resources available on the Inter-Tel 5000 platform. This capability is useful for systems that support numerous IP endpoints and IP trunks and that utilize IP networking. The ability to oversubscribe results from the following interrelated factors in a Inter-Tel 5000 v2.0 or later platform:... -
Page 60: Networking
IP resources in the system. It provides useful diagnostic data to determine what types of calls are going on in the system and how long calls have been both camped-on or on an active call. For details, refer to the Inter-Tel 5000 Features and Programming Guide (part no. 580.8006). -
Page 61: Basic Voice Mail
Fax-On-Demand, buffered SMDR, Record-A-Call, Unified Messaging, etc.). The VPU is housed in a separate unit that is cabled to the Inter-Tel 5000 Base Server. For more detailed information, refer to the Voice Processing Unit Installation Manual, part no. 835.2890. -
Page 63: Specifications
Chapter 4: Specifications Specifications Chapter Overview ............. .4-4 Environmental Requirements . - Page 64 Chapter 4: Specifications Base Server Expansion Modules ..........4-25 Single and Dual T1/E1/PRI Modules .
- Page 65 Mitel IP Endpoint Specifications ..........4-42 Mitel IP Endpoint Environmental Conditions ........4-43 Mitel IP Endpoint Regulatory Standards .
-
Page 66: Chapter Overview
Chapter Overview Chapter Overview Correct installation and operation of the Inter-Tel 5000 platform depends on a technician’s ability to access accurate and complete information about the system. The following pages provide a composite of system’s environmental, physical, and electrical characteristics, as well as its computing and networking capabilities. -
Page 67: System-Wide Specifications
Important system-wide specifications appear in the following subsections. Loop Limits Table 4-2 identifies the maximum distances from the Inter-Tel 5000 Base Server to which digital and single line endpoints can be installed. Table 4-2. Loop Limits for Digital and Single Line Endpoints... -
Page 68: Uninterruptable Power Supply Wattage Requirements
AC phase and ground reference. To assure that the electrical source is the same, plug Inter-Tel 5000 equipment into the same UPS unit. A common electrical source is most critical with Inter-Tel 5000 Base Server and associated Digital Equipment Interface (DEI) units. -
Page 69: Ups Monitoring
For correct operation, the UPS Monitoring feature requires compatible hardware and software, as described in the following sections. An expanded description of the UPS Monitoring feature and for Flags associated with UPS Monitoring, refer to the Inter-Tel 5000 Features and Programming Guide (part no. 580.8006). For information about hardware and software... -
Page 70: Table
Chapter 4: Specifications Compatible USB Hubs Table 4-4. USB Hub Compatibility Chart for the Inter-Tel CS-5200/5400 Platform Manufacturer Model No. Ports ONEAC 19501SG-1V Belkin F5U007-UNV Belkin F5U021 Belkin F5U101-MAC Belkin F5U234 REV3 Cables To Go 29560 D-Link DUB-H4 IOGEAR GUH274 Kensington K33058 Linksys... -
Page 71: Table
Chapter 4: Specifications Software Specifications Software Specifications The UPS Monitoring feature requires the software found in the Inter-Tel 5000 v2.2 or later software release. Operating System: The Inter-Tel 5000 platform requires the Linux operating system shipped with the v2.2 or later software release to ensure proper operation of the UPS Monitoring feature. -
Page 72: Cabling To Endpoints
Chapter 4: Specifications Cabling to Endpoints Table 4-6. Main Distribution Frame Materials (Continued) Material Description and Purpose Patch cables If using the rack-mount installation method, patch cables terminated with 8P/8C plugs provide rapid, safe, and secure interconnection of trunk module circuits with telco facilities. For further details, see the Installation chapter. -
Page 73: Trunk Characteristics
Chapter 4: Specifications Connections to the Public Network Connections to the Public Network In the United States, CO trunks are terminated on telephone company 66-type connecting blocks, as required by FCC regulations. Cross-connect cable connects the 66-type blocks to the CO terminal blocks on the MDF. -
Page 74: Capacities
However, the actual capacities that an Inter-Tel 5000 platform can support will depend on the mixture of trunks and types of endpoints installed, among other network and environmental factors. - Page 75 Chapter 4: Specifications System Capacities Table 4-8. System Capacities for Systems Running v2.4 and later (Continued) Feature CS-5200 CS-5400 CS-5600 Automatic Route Selection (ARS) • Route groups • Facility groups per route group • Trunk groups per facility group • Dial Rules (16 digits each) o Total o Programmable...
- Page 76 Endpoint or trunk numbers/list • Endpoints/list used for Hunt Groups • Endpoints/list used for Paging Fax over IP (FoIP)—T.38 (Maximum simultaneous faxes between Inter-Tel 5000 platforms only) Forwarding Paths • System total • Paths per endpoint • Points per path...
- Page 77 System Capacities for Systems Running v2.4 and later (Continued) Feature CS-5200 CS-5400 CS-5600 Single Line Module, 4-port (SLM-4) (Only in Inter-Tel 5000 Base Server.) Single Line Module, 8-port (SLM-8) • Per Digital Expansion Interface • Per system, or node Socket connections per system •...
-
Page 78: Maximum Licensing Capacities
Chapter 4: Specifications Licensing Capacities Licensing Capacities Table 4-9 summarizes IP maximum licensing capacities for the Inter-Tel CS-5200, CS-5400, and CS-5600 platforms. Digital endpoints do not require additional licensing. Table 4-9. Maximum Licensing Capacities Type of Endpoint CS-5200 CS-5400 CS-5600 IP Endpoints Configured/supported IP Trunks... -
Page 79: Endpoint Capacities Of Inter-Tel 5000 Platforms
Capacity assumes the presence of two Digital Expansion Interface units, each equipped with three DEM-16 modules. c. Includes single line endpoints installed on ports built into the Inter-Tel 5000 Base Server but none that may be attached to IP-SLA or SLA units. -
Page 80: Base Server
Chapter 4: Specifications Base Server Base Server The Inter-Tel 5000 Base Server houses the system processor module (PM-1) and the Processor Expansion Card (PEC-1) for a CS-5400, the motherboard, and power supply. Chassis Description Table 4-11 summarizes the physical dimensions of Inter-Tel 5000 Base Server chassis. -
Page 81: Motherboard Elements
“call.” Because the connection is established with a call, each modem application in a system is assigned an extension. The default extension is 1500. For details about the modem, refer to the Inter-Tel 5000 Features and Programming Guide (part no. 580.8006). ®... -
Page 82: Processor Module With Processor Expansion Card
IP address exposure of the PM-1. This includes, but is not limited to, interrupted network service. Inter-Tel recommends that the customer install the Inter-Tel 5000 platform in a private IP network behind a firewall or Network Address Translation (NAT) unit. -
Page 83: Software-Managed Functions
The IPR Application (IPRA) can be programmed to provide private networking using IP. To use the IPRA for private networking, voice resources and appropriate IP connection information must be programmed. For details, refer to the Inter-Tel 5000 Features and Programming Guide (part no. -
Page 84: Interfaces On Front Of Base Server
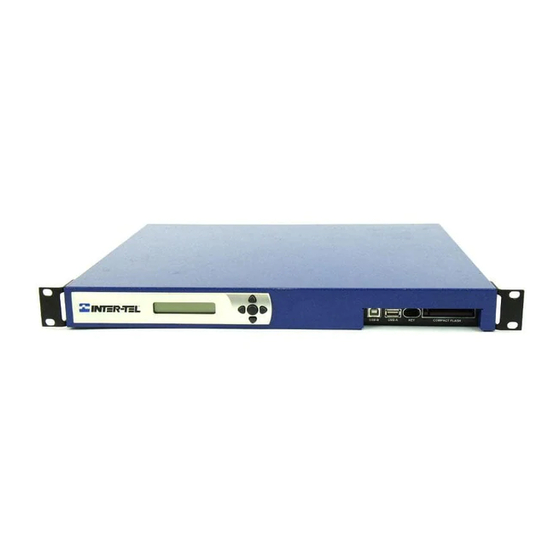
Interfaces on Front of Base Server Interfaces on Front of Base Server The front of the Inter-Tel 5000 Base Server is equipped with a two-line LCD panel, an LCD control consisting of four triangular buttons surrounding a circular button, two USB jacks, a Security Key socket, a recessed compact flash ejection button, and a compact flash card bay. -
Page 85: Interfaces On Back Of Base Server
Interfaces on Back of Base Server Interfaces on Back of Base Server The back of the Inter-Tel 5000 Base Server consists of the connection interfaces for expansion units, the local area network (LAN), external paging, Music On Hold, the PM-1 bay, and bays for expansion modules. -
Page 86: Usb Flash Drives
USB Flash Drives USB Flash Drives The USB-A serial port located on the front of the Inter-Tel 5000 Base Server receives a USB flash drive that backs up Basic Voice Mail messages. Although other flash drives may operate adequately with the system, the flash drives listed in... -
Page 87: Base Server Expansion Modules
Base Server Expansion Modules This section describes the modules that can be installed in any of the three bays at the expand the capability of the Inter-Tel 5000 platforms. Expansion modules include: • T1/E1/PRI Module, 1-port – T1, T1/PRI, E1/PRI (PRI requires additional licensing) •... - Page 88 DTMF transmitters: (T1M and T1M-2 modules only) Generates DTMF tones for traffic on the T1M and T1M-2 modules. To use these transmitters, the Enable On-Module Dialing flag must be enabled in DB Programming. Refer to the Inter-Tel 5000 Features and Programming Guide (part no. 580.8006).
- Page 89 Chapter 4: Specifications Single and Dual T1/E1/PRI Modules • Zero code suppression scheme: The type of zero suppression scheme, AMI (bit-7 stuffing) or Bipolar Eight Zero Substitution (B8ZS), used by the T1 span connected to each module. • Line build-out (LBO): The LBO attenuation of the T1 span connected to the module. This value can be determined automatically by the system, or it can be set according to the T1 provider’s recommendation.
-
Page 90: Special T1/E1 Cabling Requirements
Chapter 4: Specifications Special T1/E1 Cabling Requirements Special T1/E1 Cabling Requirements Inter-Tel recommends that special high-speed data cable with the following characteristics be used for all T1/E1 installations: • 22 AWG (0.64 mm) • Individually shielded two-pair (or with the transmit and receive pairs run in separate cables or binder groups) •... -
Page 91: Two-Port Loop Start Module
“hybrid balanced” in DB programming. Hybrid balancing refers to selecting the balance network that best matches the trunk’s impedance. To determine an appropriate hybrid balance setting for analog loop start trunk interfaces, refer to the Inter-Tel 5000 Features and Programming Guide (part no. 580.8006). -
Page 92: Four-Port Loop Start Module
Is hot-swappable. • Is designed to be inserted into one of the three bays on the back side of the Inter-Tel 5000 Base Server. The form factor used for the SLM-4 is the same as used for the T1M or T1M- 2, LSM-2, LSM-4, and BRM-S modules. -
Page 93: Processing Server (Ps-1)
RS-232, DB-9 serial port with null modem cable Security Key USB 2.0 PS-1 Licensing Adding the PS-1 to the Inter-Tel 5000 platform requires the following licensing, at a minimum: • Inter-Tel 5000 v2.0 software, part no. 840.0622 • Inter-Tel CS-5600 License Base, part no. 840.0624 When installing v2.x software, the license must match the system CPU... -
Page 94: Ps-1 Bios Settings
Chapter 4: Specifications PS-1 BIOS Settings PS-1 BIOS Settings The Basic Input/Output System (BIOS) settings of the PC in the PS-1 chassis have been customized to control specifically the way Inter-Tel CS-5600 software interacts with system hardware. Because the default BIOS settings have been modified to allow the system to operate, the BIOS settings must remain as they came from the factory. -
Page 95: Digital Expansion Interface (Dei)
4-5. • Two DB-15 connectors. The 15-pin D-subminiature socket connectors provide electrical interface to the Inter-Tel 5000 Base Server chassis and to either another DEI or an optional, external Voice Processing Unit or Enterprise Messaging system. • An earth ground lug. -
Page 96: Eight-Port Single Line Module Characteristics
Is hot swappable. • Is designed to be inserted into one of the three bays of the Inter-Tel 5000 Digital Expansion Interface (DEI) chassis. The form factor used for the SLM-8 is the same as used for the Digital Endpoint Module (DEM-16) module. -
Page 97: Resources Available With Chassis And Dem-16S
• Inter-Tel Audio and Web Conferencing (IAWC) System Resources with DEI Installing one or two DEI units to an Inter-Tel 5000 platform increases the number of resources available for each of three DEM-16s. Table 4-15 summarizes the number of resources available with the main chassis and with each DEM-16. -
Page 98: Cabling For Digital Capability
Amphenol-type connector at the MDF. For usage instructions, see “Connecting CO Trunks to a U.S. System” on page 5-26. Digital Endpoints The following digital endpoints can be installed on DEI equipment attached to the Inter-Tel 5000 platform: • Models 8500, 8520, and 8560 •... -
Page 99: Bvm Voice Mail Ports
Message Notification/Retrieval, Automated Attendant, and Record-A-Call. The Inter-Tel 5000 platform is equipped with four licensed BVM ports in its default configuration without an external voice processing PC. Additional four-port licenses may be purchased. An Inter-Tel CS-5200 or CS-5400 system can be programmed with 0, 4, or 8 ports reserved for voice mail. -
Page 100: Authentication Supported By Bvm
E1/PRI spans, IP gateway trunks, and loop start trunks. Trunking Capacity and Constraints The Inter-Tel 5000 platform supports up to 104 trunk groups in DB Programming and each trunk group supports a variable number of CO and IP gateway trunks. Up to 208 trunks can be programmed per trunk group in DB Programming, but the actual number of trunks that can be connected depends on the physical constraints of the system. -
Page 101: Trunking Capacity By Type Of Module
Chapter 4: Specifications Capacities of All-Trunk systems Capacities of All-Trunk systems Table 4-18 summarizes system trunk capacity in terms of the trunk module type and the possible number of trunks provided in all-trunk systems. A typical installation may include a combination of hard-wire trunks and IP gateway trunks. -
Page 102: Endpoints
Endpoints Endpoints A variety of IP endpoints can be used on the Inter-Tel 5000 platform. The combination of endpoints depends on the number and type of endpoint modules installed. For endpoint illustrations and endpoint feature description, refer to the Inter-Tel 5000 Features and Programming Guide (part no. -
Page 103: Multi-Protocol Endpoint Features
Chapter 4: Specifications Multi-Protocol Endpoints Multi-Protocol Endpoints The following multi-protocol endpoints support the Inter-Tel Protocol (ITP) mode and restricted functionality of the Session Initiation Protocol (SIP) mode: • Model 8600 – No Display • Model 8620/8622 – With 2-Line Display •... -
Page 104: Table
Chapter 4: Specifications IP (Only) Endpoints IP (Only) Endpoints The Inter-Tel 5000 platforms support the following IP-only endpoints: • Model 8660 – 6-Line Display • Model 8664 – 2-Line Display 802.11b Wireless • Model 8665 – 2-Line Display 802.11b Wireless •... -
Page 105: Table
Operational: 40°F to 120°F (4°C to 49°C) 95% (non-condensing) Storage: –40°F to 150°F (–40°C to 66°C) 15% (non-condensing) Mitel IP Endpoint Regulatory Standards Table 4-23 shows Mitel endpoint electromagnetic compatibility (EMC) and safety regulatory standards. Table 4-23. EMC and Safety Regulatory Standards Standard Canada... -
Page 106: Ip And Wireless Ip Endpoint Features
The Hold button is not red. b. Can be programmed as a feature, secondary extension, or DSS button. SIP (Only) Softphones The Inter-Tel 5000 platform supports the Model 8601 SoftPhone for Pocket PC and the Model 8602 softphone application. Model 8602 Model 8602 application software is distributed separately from the system software. -
Page 107: Multi-Protocol Endpoint Led Flash Rates, Itp Mode
4-8 describe the LED flash rates for IP endpoints in ITP and SIP mode in interruptions per minute (IPM). For more general information, refer to the Inter-Tel 5000 Features and Programming Guide (part no. 580.8006). Table 4-25. Multi-Protocol Endpoint LED Flash Rates, ITP Mode... -
Page 108: Multi-Protocol Endpoint Led Flash Rates, Sip Mode
Chapter 4: Specifications Endpoint LED Flash Rates Table 4-25. Multi-Protocol Endpoint LED Flash Rates, ITP Mode (Continued) Steady Slow Medium Fast Flutter 0 IPM 30 IPM 120 IPM 240 IPM 60/960 IPM Speakerphone is on or ready for SPEAKER use. Or, endpoint programming is in progress. -
Page 109: Table
Direct Station Select/Busy Lamp Field Units Direct Station Select/Busy Lamp Field Units The Inter-Tel 5000 platform supports two 60-button DSS/BLF Units and one 50-button model. Although you can use either type of DSS/BLF Unit on any of the endpoints, the type of endpoint determines which is the more appropriate unit to use. -
Page 110: Model 8416 Mini-Dss Unit Dimensions
Model 8416 Mini-Direct Station Select (Mini-DSS) Unit Model 8416 Mini-Direct Station Select (Mini-DSS) Unit The Inter-Tel 5000 platform supports a Mini-DSS Unit that provides one-button access to 16 extension numbers and/or feature buttons/resources. The Mini-DSS attaches to a Model 8660 endpoint. -
Page 111: Ip Single Line Adapter (Ip Sla)
IP Single Line Adapter (IP SLA) In addition to the two built-in single line ports on the Inter-Tel 5000 Base Server, single line endpoints can be connected to IP Single Line Adapters (one per IP SLA); to SLAs connected to DEM-16 modules (two per SLA);... -
Page 112: Optional Handset Amplifiers
3 dB over normal single line endpoint voice volume levels. This increase in volume level attempts to compensate for any loss in the external OPX circuit. Refer to the Inter-Tel 5000 Features and Programming Guide (part no. 580.8006) ®... -
Page 113: Playback Devices
Each OPX circuit can have extended ring cadence enabled or disabled. For details, refer to the Inter-Tel 5000 Features and Programming Guide (part no. NOTE 580.8006). The extended setting lengthens the duration of the ring signal to meet the requirements of many OPX and/or repeater applications. -
Page 114: Attendant Console
Chapter 4: Specifications Attendant Console Attendant Console With the Inter-Tel 5000 platform, the attendant function can be served by a software application operating on a personal computer (PC) or by a multiline display endpoint and attachment. Personal Computer Application The Attendant Console is a special software program and hardware security key that allows attendants to use a PC to answer and manage incoming call traffic. -
Page 115: Ip Network Requirements
IP Network Requirements This section provides a brief technical overview of data network characteristics that will help to minimize faulty operation of the Inter-Tel 5000 platform. For additional technical details and applicable procedures designed to promote an adequate IP network environment, see... - Page 116 Chapter 4: Specifications Performance Criteria • Network Jitter: Variance in delay. For near toll quality service, average jitter should not exceed 20 ms and maximum jitter should not exceed 40 ms. For business communication quality service, average jitter should not exceed 40 ms and maximum jitter should not exceed 80 ms.
-
Page 117: Automatic Nat Detection
Expanded IP endpoint capability with v2.0 and later requires changes in User Datagram Protocol (UDP) port usage. If the Inter-Tel 5000 v2.x equipment operates inside a firewall and services external IP endpoints, the firewall configuration needs to be updated to reflect the changes in the UDP port assignments of system. -
Page 118: Mitel Ip Endpoint Ports
UDP port range applicable to v1.x and the UDP ports applicable to v2.x. These port assignments apply to the Processor Module (PM-1) and the Processor Expansion Card (PEC-1) in the Inter-Tel 5000 Base Server, but not to the Processing Server PS-1. -
Page 119: Nodes Support
Multiple Attendant Console applications, along with fully populated nodes, could increase OAI data by 50% during the Attendant Console power-up sequence. For information about programming 99 nodes, refer to the Inter-Tel 5000 Features and Programming Guide (part no. 580.8006). ®... -
Page 120: 99 Nodes Support Component Compatibility
Because Inter-Tel recommends that you use these versions if you are using the 99 NOTE Nodes feature, you should upgrade to the latest nonchargeable upgrade available. Table 4-31. 99 Nodes Support Component Compatibility Inter-Tel 5000 Version V2.1 V2.2 V2.3 V2.4... -
Page 121: Peripheral Equipment
Output data from SMDR and Error Message Recording features is accessed through an IP socket defined on the Administrative Web Session. The output may be sent to a PC or to a printer. For details, refer to the Inter-Tel 5000 Features and Programming Guide (part no. 580.8006). -
Page 122: Additional Information
Chapter 4: Specifications CT Gateway CT Gateway System OAI Level 2 applications can be used in conjunction with the CT Gateway. The CT Gateway provides a TCP/IP System OAI interface that supports a network. As far as the System OAI streams are concerned, each node in a network functions individually. The user cannot program a System OAI serial port on Node 1 that will control devices or receive events for other nodes. -
Page 123: Installation
Grounding the Inter-Tel 5000 Base Server ........ - Page 124 Chapter 5: Installation Base Server Modules Installing a Processor Module (PM-1) ..........5-36 Installing a Processor Expansion Card (PEC-1) .
- Page 125 Chapter 5: Installation Connecting Station Cables to the MDF ..........5-78 Connecting Station Cables to a U.S.
- Page 126 MItel 5330/5340 Setup for Teleworking ........
-
Page 127: Chapter 5: Installation
Chapter 5: Installation Installing SIP Gateways ............5-177 SIP Gateway . -
Page 128: Chapter Overview
Chapter 5: Installation Chapter Overview This chapter provides information for installing and upgrading Inter-Tel 5000 platforms, the Inter- Tel Digital Expansion Interface (DEI) unit, expansion modules, IP, digital, and analog single line endpoints, and optional system components. For system specifications and a description of the... -
Page 129: Installation Planning
NOTICE With regard to IP Addresses, subnet mask, and gateways, the CT Gateway must be on the same LAN as the Inter-Tel 5000 platform IP address and subnet mask, or the system will not work. ® Page 5-7 Inter-Tel 5000 Installation Manual –... -
Page 130: Planning Digital And Analog Endpoint Locations
• Single Line Endpoints: Single line endpoints such as DTMF endpoints or fax machines can be attached to the Inter-Tel 5000 platform in any of the following ways: o Connected to four-port or eight-port Single Line Modules (SLM-4 or SLM-8). -
Page 131: Pre-Installation Checklist
Locate the chassis within 5 ft (1.5 m) of an isolated, dedicated, 105–125 VAC, 57–63 Hz, 15 A, single-phase commercial power source. Also, use an uninterruptible power supply (UPS) with the Inter-Tel 5000 Base Server chassis. WARNING Electric Shock Hazard. The following list is from UL 1459, a product safety specification governing telephone equipment: •... -
Page 132: Gathering The Necessary Tools And Supplies
Chapter 5: Installation Gathering the Necessary Tools and Supplies • Install a UPS with the Inter-Tel CS-5200/5400/5600 Base Server. • Locate the equipment in a climate-controlled room. Inter-Tel recommends that the maximum operating temperature (as stated below) never be exceeded. Therefore, when installing the chassis and any other system equipment, allow a sufficient margin for error (for example, air conditioning failure, routine maintenance, plant shutdown, etc.) As a general rule, if conditions are suitable for office personnel, they are also suitable for all... - Page 133 Chapter 5: Installation Gathering the Necessary Tools and Supplies If installing any T1 or E1 and/or Primary Rate Interface (PRI) trunks: Depending on the type of T1/PRI or E1/PRI termination used by the service provider [network provider] and how close it is to the MDF, the following tools and supplies are also needed.
-
Page 134: Planning Station Locations
IP endpoint into the LAN port, then plug the computer network cable into the LAN port on the IP endpoint. o Digital: An Inter-Tel 5000 platform equipped with a Digital Expansion Interface (DEI) unit and Digital Endpoint Module (DEM-16) can support nine Inter-Tel digital endpoint models and the Inter-Tel Single-Line Adapter (SLA). -
Page 135: Inter-Tel 5000 Base Server Chassis
Chapter 5: Installation Gathering Optional Equipment INTER-TEL 5000 BASE SERVER CHASSIS The following sections provide procedures for installing the Inter-Tel CS-5200/5400/5600 Base Server chassis. The procedures appear in the order they should be performed at a new installation. Upgrade procedures and procedures for installing the Processing Server (PS-1), Digital Expansion Interface (DEI), expansion modules, and optional equipment appear in separate sections. -
Page 136: Checking The Unit Pre-Assembly
Chapter 5: Installation Checking the Unit Pre-Assembly Checking the Unit Pre-Assembly Please read all sections leading up to the procedures, paying close attention to any cautions and notes included. For information about system requirements and capacities, see the Specifications chapter. Figure 5-1 on page 5-15 provides an illustration of the unit chassis. -
Page 137: Installing The Inter-Tel Cs-5200/5400/5600 Base Server
5200/5400/5600 Base Server. The EM unit is a standalone Windows-based PC, similar in appearance to the VPU, that can also be rack-mounted (recommended) or installed on a horizontal surface. Do not plug in the system AC power cable. Continue to “Grounding the Inter-Tel 5000 Base Server” on page 5-16. Figure 5-1. -
Page 138: Wall-Mounting The Base Server
5-9 for additional AC power requirements. With a U.S. system, the Inter-Tel 5000 Base Server must be plugged into a UPS and the UPS plugged into a properly grounded AC power source. Some effective grounding connections include the steel frame of the building in which the system is installed, a grounding rod that has been driven a minimum of 8 ft (2.4 m) into the earth, or a copper—not PVC—cold-water pipe. -
Page 139: Equipment To Support Ups Monitoring
4-7. The UPS connects directly to an Inter-Tel 5000 USB port, and you should use only the USB cable provided by the UPS manufacturer. Product validation testing has determined that non- original equipment manufacturer (non-OEM) cables interfere with UPS Monitoring feature operation. -
Page 140: Installing Ups Monitoring
Clearing this flag prevents a system from shutting down when a low battery event is received from the UPS unit. Plug the Inter-Tel 5000 platform into the UPS. In a CS-5600 configuration, both the Base Server and the PS-1 are assumed to be plugged into the same UPS. If the UPS unit provides outlets for both Surge Protection and Back Up Battery, use only the outlets for Back Up Battery. -
Page 141: Installing The Usb Security Key And Inter-Tel Memory Card
Do not remove or install the Inter-Tel memory card while the system is up and running or power is otherwise supplied to the Inter-Tel 5000 Base Server chassis, as this may damage the memory card. Shut down the system using the LCD panel and unplug the power cord before removing or inserting the memory card. -
Page 142: Laying Out Cable Runs
• If uninterruptible power supply (UPS) protection has not been installed as part of the Inter-Tel 5000 system, IP and SIP endpoints will not operate when electrical power fails either at remote sites or at the main system location. To place calls during a power failure in this situation, IP and SIP endpoint users can use only a single line endpoint connected to one of the circuits built into the system chassis. -
Page 143: Mounting And Cabling The Main Distribution Frame (Mdf)
Chapter 5: Installation Mounting and Cabling the Main Distribution Frame (MDF) • If desired, two- or three-pair twisted cable and four- or six-conductor modular jacks [line jack units] may be used for all endpoint connections. This allows the various types of endpoints to be easily interchanged as needed. -
Page 144: Connecting Co Trunk Cables To The Mdf
Inter-Tel, Inc. will continue to support existing LSM-2s in the field, but new modules will not be sold. For connecting loop start trunks to the Inter-Tel 5000 platform, use the LSM-4 module, part no. 580.2304, or the T1/E1 module, part no. 580.2700. - Page 145 Chapter 5: Installation Connecting Trunks to LSM-2 Module Ports Figure 5-2. Cabling Option 1 for the LSM-2 8-pin Jack LSM-2 Module Dual Single Line Port LS 3 SL 2 8-pin Jack T-1 R-1 T-2 T-1 R-1 T-2 Adapter LS 4 SL 1 6-pin Plug LS 1...
- Page 146 Chapter 5: Installation Connecting Trunks to LSM-4 Module Ports Connecting Trunks to LSM-4 Module Ports This section provides information on connecting CO trunk cables for the LSM-4 module. For this procedure, see Figure 5-2 and Figure 5-3 on page 5-23 as a guide.
- Page 147 Chapter 5: Installation Connecting Trunks to LSM-4 Module Ports Figure 5-4. Cabling Option 1 – LSM-4 8-pin Jack LSM-2 Module Dual Single Line Port LS 3 SL 2 8-pin Jack T-1 R-1 T-2 T-1 R-1 T-2 Adapter LS 4 SL 1 6-pin Plug LS 1 6-pin Plug...
-
Page 148: Example Of Ferrite Bead Installation And Connection Types
Chapter 5: Installation Connecting CO Trunks to a U.S. System Connecting CO Trunks to a U.S. System Connect the CO trunks and other module cables. This procedure describes additional information for installing digital endpoints. Note that step 2 mentions two installation methods. Although the first method is more flexible, the second method can be used to minimize the number of terminal blocks required. -
Page 149: Built-In Dual Loop Start And Dual Single Line Ports
Survivability feature. See Figure 5-7. Figure 5-7. Built-In Dual Loop Start and Dual Single Line Ports Back of Inter-Tel 5000 Base Server DUAL LS DUAL SL PAGE Dual Loop Start Port Dual Single Line Port (to single line endpoints) For this procedure, see Figures 5-8 and 5-9 on page 5-28 as a guide. -
Page 150: Cabling Option 1 For The Dual Ls And Dual Sl
Chapter 5: Installation Built-In Ports for WAN Fail Survivability Figure 5-8. Cabling Option 1 for the Dual LS and Dual SL 8-pin Jack LSM-2 Module Dual Single Line Port 8-pin Jack LS 3 SL 2 Adapter T-1 R-1 T-2 T-1 R-1 T-2 SL 1 LS 4 6-pin Plug... -
Page 151: Connecting T1/Pri And E1/Pri Trunks To The Mdf
Chapter 5: Installation Connecting T1/PRI and E1/PRI Trunks to the MDF Connecting T1/PRI and E1/PRI Trunks to the MDF The installation procedure used to connect T1/PRI and/or E1/PRI spans at the MDF depends on the type of termination used by the service provider [network provider] and how close it is to the MDF. -
Page 152: T1/Pri Or E1/Pri Terminations From Rj-48C [Rj45 In Europe] Jacks
Chapter 5: Installation Method B – T1/PRI Trunks Terminated on RJ-48C Jacks Away from the MDF Figure 5-10. T1/PRI or E1/PRI Terminations from RJ-48C [RJ45 in Europe] Jacks Four-Pair Four-Pair Non-Reversing, Non-Reversing, Mod-To-Mod Mod-To-Mod Line Cord Line Cord T1 Cable Module Telco in Chassis... -
Page 153: T1/Pri Or E1/Pri Trunk Terminations From 66-Type Blocks
Chapter 5: Installation Method C – T1/PRI Trunks Terminated on a 66-Type Block Method C – T1/PRI Trunks Terminated on a 66-Type Block To install the T1/PRI trunks terminated on an 66-type block: On the MDF backboard, mount one eight-conductor modular jack [line jack unit] assembly for each T1/PRI trunk termination on the service provider 66-type block(s). -
Page 154: Connecting Two T1M Or T1M-2 Modules Together
(tip out and ring out) on the other module, as shown in Figure 5- 13. For information about programming various types of T1M or T1M-2 installations, refer to the Inter-Tel 5000 Features and Programming Guide (part no: 580.8006). Figure 5-13. Connecting Two T1M or T1M-2 Modules Together... -
Page 155: Verifying And Securing Cable Connections
Chapter 5: Installation Verifying and Securing Cable Connections Verifying and Securing Cable Connections At this point in the installation all cabling to the MDF, patch panel, rack, and endpoints should be completed, including all cables that terminate at the chassis modules. To complete cabling: Plug all applicable cables into their respective modules and chassis ports. -
Page 156: Setting Initial System Configuration
Chapter 5: Installation Setting Initial System Configuration Setting Initial System Configuration Upon initial power up, the system uses DHCP to establish a network connection. If the site is not running a DHCP server, you must provide site-specific IP addresses and other network information before you can begin programming the system in DB Programming. - Page 157 Press the center button, and when prompted to reboot, use the Up arrow button to change the selection to Yes. Wait while the system reboots. Check that the front of the LCD reads: “Inter-Tel 5000,” and then do one of the following: •...
-
Page 158: Base Server Modules
Chapter 5: Installation Installing a Processor Module (PM-1) BASE SERVER MODULES This section provides procedures for installing and removing the expansion modules that can be installed in the Inter-Tel CS-5200/CS-5400/CS-5600 Base Server. The procedure for installing a Processor Expansion Card (PEC-1) on a PM-1 also appears in this section. Installing a Processor Module (PM-1) Install the processor module (PM-1) as described in the following procedure. -
Page 159: Components Of A Processor Module (Pm-1)
Chapter 5: Installation Installing a Processor Module (PM-1) Figure 5-16. Components of a Processor Module (PM-1) Processor Module Battery This strap must be in place. Read the NOTICE below. Chassis Back Processor expansion card mount points Processor Module Top View Processor Module SDRAM... -
Page 160: Installing A Processor Expansion Card (Pec-1)
Chapter 5: Installation Installing a Processor Expansion Card (PEC-1) To remove a processor module (PM-1): Use the LCD panel on the front of the chassis to shut down the system. NOTICE Equipment Damage Hazard. Use the LCD panel to shut down the system, and unplug all power sources to the chassis before working with the processor module (PM-1). - Page 161 Installing a Processor Expansion Card (PEC-1) To install the processor expansion card: Perform a Database backup using DB Programming. You can also back up the database using the LCD panel. For details, refer to the Inter-Tel 5000 Features and Programming Guide (part no: 580.8006). NOTICE System Inoperability.
-
Page 162: Expansion Card Upgrade (Inter-Tel Cs-5200 To Cs-5400)
5-36. Check that all cables are connected and plug in the AC power cord. The system boots and when finished, it displays Inter-Tel 5000 on the LCD panel. This indicates the system is ready to be programmed. Refer to the Inter-Tel 5000 Features and Programming Guide (part no: 580.8006) for information to load the license file. -
Page 163: Installing A Two-Port Loop Start Module (Lsm-2)
Chapter 5: Installation Installing a Two-Port Loop Start Module (LSM-2) Installing a Two-Port Loop Start Module (LSM-2) Install the two-port loop start module (LSM-2) as described below. Part numbers appear in Table 6-4 on page 6-4. See Figure 5-18 on page 5-41. -
Page 164: Installing A Four-Port Loop Start Module (Lsm-4)
Chapter 5: Installation Installing a Four-Port Loop Start Module (LSM-4) Installing a Four-Port Loop Start Module (LSM-4) The LSM-4 provides four trunk interface ports. For additional technical data about the LSM-4, see the Specifications chapter. See page 5-23 for information on how this module is cabled to the MDF. -
Page 165: Installing A Dual T1/E1/Pri Module (T1M-2)
Chapter 5: Installation Installing a Dual T1/E1/PRI Module (T1M-2) Installing a Dual T1/E1/PRI Module (T1M-2) This procedure assumes the required pre-installation checklist items, regarding T1/E1/PRI, are in place. If necessary, see “Gathering the Necessary Tools and Supplies” on page 5-10. The Dual T1/E1/PRI module is installed and configured like the single T1/E1/PRI module with the following exception: Each port on the dual module can be configured differently from the other. -
Page 166: Dual T1/E1/Pri Module
Chapter 5: Installation Dual T1/E1/PRI Module LED Summary Figure 5-20. Dual T1/E1/PRI Module Side Module Handle Module to Chassis Fastener Chassis Back Remove Module LED DUAL LS DUAL SL PAGE Module Release Lever Dual T1/E1/PRI Module To remove a dual T1/E1/PRI module: Using a properly terminated anti-static wrist strap, loosen the fastener at the top of the module (this fastener secures the module to the chassis). - Page 167 Chapter 5: Installation Dual T1/E1/PRI Module LED Summary Table 5-3. Dual T1/E1/PRI Module LED Summary — 4-LED Stack LED Name Color Indication Online Green #1 ON: Board is online and functioning normally. OFF: Board is not online. Remove Green #2 ON: Board is safe to remove.
-
Page 168: Installing A Single-Port T1/E1/Pri Module (T1M)
Chapter 5: Installation Installing a Single-Port T1/E1/PRI Module (T1M) Installing a Single-Port T1/E1/PRI Module (T1M) See Figure 5-22 on page 5-46 for an illustration of this module and for the following procedure. The T1M module can be removed with power on; however, you must wait for the REMOVE LED indicator to change to green before removing the module. -
Page 169: Figure
Chapter 5: Installation Single T1/E1/PRI Module LED Summary Single T1/E1/PRI Module LED Summary The single T1/E1/PRI module has a total of 7 LEDs (two unused) on the faceplate to indicate module status. The LEDs are contained in two separate locations: 3 LEDs to the right side of the module faceplate, and 2 green LEDs integrated into each RJ-45 connector. -
Page 170: Installing A Basic Rate Module (Brm-S)
Chapter 5: Installation Installing a Basic Rate Module (BRM-S) Installing a Basic Rate Module (BRM-S) Each Inter-Tel 5000 Base Server chassis accepts up to three Basic Rate Modules (BRM-S) for connecting ISDN S-interface trunking. For additional information about modules, see the Specifications Product Description chapters. -
Page 171: Brm-S Online/Off-Line Handling And Led Descriptions
For programming details, refer to the Inter-Tel 5000 Features and Programming Guide (part no: 580.8006). The system recognizes the BRM-S as off-line when removed from the expansion bay. All the ports and circuits are recognized as being off-line and all calls dropped, when the module is removed. -
Page 172: Installing A Four-Port Single Line Module (Slm-4)
Chapter 5: Installation Installing a Four-Port Single Line Module (SLM-4) Installing a Four-Port Single Line Module (SLM-4) This section provides specifications, drawings, and procedures needed for installing an SLM-4, part no. 580.2100. Installing an SLM-4 consists of inserting the module into an empty bay on the back side of an Inter-Tel CS-5200/5400/5600 Base Server and assigning the module to the Uninstalled bay through DB Programming. -
Page 173: Inter-Tel Cs-5600 Processing Server (Ps-1)
For capacity details, see “System Endpoint Capacities” on page 4-17. Licensing Adding the PS-1 to the Inter-Tel 5000 platform requires, at a minimum, the following licensing: • Inter-Tel 5000 v2.0 software, part no. 840.0622 • Inter-Tel CS-5600 License Base, part no. 840.0624 When installing v2.0 software, the license must match the system CPU... -
Page 174: Processing Server (Ps-1) Chassis, Front View Without Cover
Chapter 5: Installation Essential PS-1 BIOS Settings Essential PS-1 BIOS Settings The Basic Input/Output System (BIOS) settings of the PS-1 have been customized to control specifically the way Inter-Tel CS-5600 software interacts with system hardware. Because the default BIOS settings have been modified to allow the system to operate, the BIOS settings must remain as they came from the factory. -
Page 175: Installing The Processing Server (Ps-1)
Chapter 5: Installation Installing the Processing Server (PS-1) Figure 5-27 shows the back of PS-1 units. Figure 5-27. Processing Server (PS-1) Chassis, Back View USB Security Key DB-15 Monitor (Insert in any RJ-45 to LAN (not included) USB port.) Connection Power to monitor On/Off... -
Page 176: Digital Expansion Interface (Dei)
Chapter 5: Installation Installing a DEI DIGITAL EXPANSION INTERFACE (DEI) The following sections provide processes and procedures required for installing digital interface equipment. Installing a DEI This section describes installing the Inter-Tel Digital Expansion Interface (DEI) unit, the Digital Endpoint Module (DEM-16), and the eight-port Single Line Module (SLM-8). Other digital endpoint-related items are also discussed such as Single-Line Adapters (SLA) and supported digital endpoint installations. -
Page 177: Running Cables To Endpoints
5-74 for examples. • Install a patch panel in the rack above the location you will install the Inter-Tel 5000 Base Server. A patch panel allows for convenient cable terminations from the MDF, and a patch panel allows you to use patch cables (for T1M or T1M-2 modules) or modular line cord cables (built-in dual Loop Start and LSM-2/-4 modules). - Page 178 5-54 for additional loop limits for devices connected to the Inter-Tel 5000 platform. Because the Inter-Tel 5000 platform uses digital voice and data transmission between the digital endpoints and the chassis, the following cabling requirements apply: • Do not use shielded cable, and do not use cable smaller than 24 AWG.
-
Page 179: Terminating Cables At Digital Endpoint Locations
Chapter 5: Installation Terminating Cables at Digital Endpoint Locations Terminating Cables at Digital Endpoint Locations Terminate the digital endpoint, single line endpoint, and playback device station cables on four- conductor modular jack [six-conductor line jack unit in Europe] assemblies at the station locations. -
Page 180: Labeling Station Cable And Mapping Circuit Numbers
XX.YY.01, the first data port is assigned number XX.YY.02, and the second data port is assigned number XX.YY.03. For detailed information about programming endpoints, refer to the Inter-Tel 5000 Features and Programming Guide (part no: 580.8006). - Page 181 Chapter 5: Installation Labeling Station Cable and Mapping Circuit Numbers Figure 5-30. DEM-16 Circuit Mapping Example Inter-Tel 5000 Base Server Male (DEI cable) DUAL LS DUAL SL PAGE MOH BAY 1/SYS BAY 2/SYS BAY 3/SYS DEI 1 Female (to DEI) 1 –...
-
Page 182: Assembling And Cabling The Main Distribution Frame
Not used Assembling and Cabling the Main Distribution Frame The Main Distribution Frame (MDF) is the location where the Inter-Tel 5000 platform and digital expansion equipment is connected to station instruments, trunks, and auxiliary system equipment. Solid copper wire connections are made across industry-standard terminal blocks [Krone blocks in Europe] and/or modular jack [line jack unit] assemblies. - Page 183 Chapter 5: Installation Assembling and Cabling the Main Distribution Frame To assemble the MDF: Mount a 4 ft x 6 ft (1.2 m x 1.8 m), ¾-inch (2 cm) plywood backboard at the MDF location. Depending on the number of stations and trunks to be installed, a larger backboard may be necessary.
-
Page 184: Unpacking The Dei Equipment
Inter-Tel DEI chassis and modules. NOTICE Electrostatic Discharge (ESD). Inter-Tel 5000 modules and components are static-sensitive. Handle the modules by the edges only and keep them in their protective bags until they are to be installed. -
Page 185: Installing Dei Hardware
DEI Chassis Front MODULE 1 MODULE 2 MODULE 3 BUSY BUSY BUSY Status Panel To Inter-Tel 5000 Base Server DEI Chassis Back Fuse 1 – 4 5 – 8 9 – 12 13 – 16 1 – 4 5 – 8 9 –... - Page 186 Chapter 5: Installation Installing the DEI Chassis Figure 5-32. Example Base Server Chassis Front and Back Views Base Server Front ® CompactFlash Card 2-Line LCD Panel LCD Panel Controls Eject Button KEY (security) recessed USB-A (USB hub; UPS cable; or, Basic Voice Mail backup) Optional External Voice Mail or DEI USB-B...
- Page 187 Chapter 5: Installation Installing the DEI Chassis Figure 5-33. Example DEI Connection to Inter-Tel 5000 Base Server Base Server Back DB-15 (to VM only or DEI) See Figure 5-39 on page DUAL LS DUAL SL PAGE 5-74 Ethernet to LAN via switch...
- Page 188 2ND VPC Slot arrangement and Optional FAX card (not in EM) Arrangement connector locations To Inter-Tel 5000 Base Server shown at right could or DEI (Part no. 813.1806) be different. not used Power Cable Connector NOTICE Equipment Damage: Use adapters when connecting any 6-pin plug to an 8-pin jack.
-
Page 189: Connecting Cables And Checking Cables To The System
5-68 for a pinout and cabling example. Pinouts must follow the 568B standard. If installing optional equipment, see “Optional System Equipment” on page 5-169 following. Continue to “Grounding the Inter-Tel 5000 Base Server” on page 5-16. ® Page 5-67 Inter-Tel... - Page 190 Chapter 5: Installation Connecting Cables and Checking Cables to the System Figure 5-35. DEM-16 Pinouts and Cabling Port 1 Signal Port 3 Signal Pin-1 Tip 3 Pin 1 Tip 11 Pin-2 Ring 3 Pin 2 Ring 11 Pin-3 Tip 2 Pin-3 Tip 10 Pin-4...
- Page 191 Chapter 5: Installation Connecting Cables and Checking Cables to the System Table 5-9. Station Cable Terminations with a U.S. System Circuit Extension AMPHENOL Cable DEM-16 Position # Pair Bay 1 W-BL 01.01.01 1000 BL-W RING 01.02.01 1001 RING 01.03.01 1002 RING W-BR 01.04.01...
- Page 192 Chapter 5: Installation Connecting Cables and Checking Cables to the System Table 5-9. Station Cable Terminations with a U.S. System (Continued) Circuit Extension AMPHENOL Cable DEM-16 Position # Pair Bay 1 NOT USED NOT USED V-BL NOT USED BL-V NOT USED NOT USED NOT USED NOT USED...
- Page 193 Chapter 5: Installation Connecting Cables and Checking Cables to the System Table 5-10. Cable Terminations on MDF Blocks [Twin Block Cables] for DEM-16 (Continued) Cable Pair Color Plug Pin No. BLOCK NO. BLOCK PAIR CIRCUIT Black/Blue 11.01 Blue/Black Black/Orange 12.01 Orange/Black Black/Green 13.01...
- Page 194 Chapter 5: Installation Connecting Cables and Checking Cables to the System Figure 5-36. Cabling Option 1 – Dual LS and Dual SL 8-pin Jack LSM-2 Module Dual Single Line Port SL 2 LS 3 8-pin Jack T-1 R-1 T-2 T-1 R-1 T-2 Adapter LS 4 SL 1...
-
Page 195: Attaching Dei Units And External Voice Mail System
Figure 5-38 shows the cable connections and physical elements of the Inter-Tel CS-5200/5400/ 5600 Base Server. Figure 5-38. Example VPU or DEI Connection to Inter-Tel 5000 Base Server Base Server Back DB-15 (to VM only or DEI) See Figure 5-39 on... -
Page 196: Installing Modules In The Dei
NOTICE Electrostatic Discharge (ESD). Inter-Tel 5000 modules and components are static- sensitive. When working with the modules, use a properly terminated anti-static wrist strap. Any static charge (no matter how small) must be discharged from the body before touching the modules or other components. - Page 197 Chapter 5: Installation Installing a Digital Endpoint Module (DEM-16) Figure 5-40. DEM-16 in DEI 1 and DEI 2 Chassis DEI Chassis Back To Base Server only 1 – 4 5 – 8 9 – 12 13 – 16 DEI 1 EXP 1 EXP 2 DEM-16...
-
Page 198: Installing An Eight-Port Single Line Module (Slm-8)
All cabling connected to the RJ-14 interfaces should be constructed of standard 24-gauge twisted pair cable. To ensure reliable operation of single IMPORTANT line endpoints connected to the Inter-Tel 5000 platform, do not use flat ribbon cabling or untwisted pair cabling. Figure 5-42. - Page 199 Chapter 5: Installation Single Line Module Pinouts Figure 5-43. SLM-8 and DEM-16 Circuit Mapping Example Inter-Tel 5000 Base Server Male to Inter-Tel 5000 DUAL LS DUAL SL PAGE MOH Base Server chassis BAY 1/SYS BAY 2/SYS BAY 3/SYS DEI 1...
-
Page 200: Connecting Station Cables To The Mdf
Chapter 5: Installation Connecting Station Cables to the MDF Connecting Station Cables to the MDF This section describes connecting station cables to the MDF in a USA or European system. Connecting Station Cables to a U.S. System Digital endpoints are connected to DEM-16 ports. Single line endpoints are connected to Single- Line Adapters (SLA) which are in turn connected to available DEM-16 circuits. - Page 201 Chapter 5: Installation Connecting Station Cables to a U.S. System Figure 5-44. DEM-16 Block Cable Terminations for Endpoints on a U.S. System 60M1-50-Type Block To Digital (Part of MDF) Endpoint or Single-Line 1.1.1 1.1.1 Adapter RING RING 1.2.1 1.2.1 RING Amphenol W/BL BL/W...
- Page 202 Chapter 5: Installation Connecting Station Cables to a European System Connecting Station Cables to a European System Each type of station instrument is connected to a specific port on a DEM-16. Digital endpoints are connected to DEM-16s. Single line endpoints and playback devices are connected to either the built-in single line ports, or they can connect to Single-Line Adapters (SLA), which are in turn connected to available DEM-16 ports After the cables are run, connect them to the station blocks on the MDF.
-
Page 203: Connecting Station Cables To A European System
Chapter 5: Installation Connecting Station Cables to a European System Figure 5-46. DEM-16 Block Terminations for Endpoints on European System Female Amphenol-Type Connectors 1-16 W/BL-Y/BL WH/BL BL/WH Use non-conducting plastic connector covers To Endpoint or SLA To DEI and DEM-16s 25-Pair cable from Amphenol-Type... - Page 204 Chapter 5: Installation Connecting Station Cables to a European System Figure 5-47. SLA Terminations for Single Line Endpoint with a European System Endpoint LJU BL/WH DEM-16 Block WH/BL Western Electric to BT Converters (C74) AC Desktop Converter The SLA is supported with two Western Electric to BT converters (part no. C74) for use when the attached devices are near the SLA.
-
Page 205: Station Loop Resistance Test
Chapter 5: Installation Station Loop Resistance Test Station Loop Resistance Test Do not use shielded cable. Achieve longer loop lengths by using heavier gauge cable, such as 22AWG. (For additional station cabling requirements and loop limits, see page 5-20.) Perform the loop resistance test for each station cable individually. With a U.S. -
Page 206: Connecting Off-Premises Extensions
Chapter 5: Installation Connecting Off-Premises Extensions Connecting Off-Premises Extensions Off-premises extensions (OPX) are remote single line DTMF stations connected to the Inter-Tel platform through telephone company [network provider] OPX circuits or customer-provided circuits. The circuits are connected to Single-Line Adapter (SLA) circuits, which are connected to available DEM-16 circuits or to T1M or T1M-2 module circuits. -
Page 207: Analog Fallback System [Europe Only]
Chapter 5: Installation Analog Fallback System [Europe Only] Analog Fallback System [Europe Only] The fallback kit, part no. PS2728-A, contains the following items: • 12 volt DC power supply (PS2736) • Fallback Control Module and Control Lead (J36) • Fallback Module 3-Circuit (J20) •... - Page 208 Chapter 5: Installation Analog Fallback System [Europe Only] Figure 5-50. Fallback Connections Dedicated Connections To Dedicated To PSTN To LSM-2/4 Fallback Endpoint Connectors PSTN System Connections To PSTN To LSM-2/4 Connectors PSTN Connectors PSTN To SL Ports Endpoint in chassis Fallback operation can be tested by removing the line cord from the CPU.
-
Page 209: Maintenance Tasks
Do not remove or install the Inter-Tel memory card while the system is up and running or power is otherwise supplied to the Inter-Tel 5000 Base Server, as this may damage the memory card. Shut down the system using the LCD panel and unplug the power cord before removing or inserting the memory card. -
Page 210: Powering Down The System
If applicable (first-time installation), follow the initial system startup in accordance with the section titled, “Setting Initial System Configuration” on page 5-34. Otherwise, continue to the Programming chapter in the Inter-Tel 5000 Features and Programming Guide (part no: 580.8006). Powering Down the System To power down the system: Make sure Database (DB) Programming is not running. -
Page 211: Converting A Database From One Version To Another
By following the instructions in this section, you can convert the system database structure from one version to another while retaining system data. Refer to the Inter-Tel 5000 Features and Programming Guide (part no: 580.8006) for additional database conversion information. - Page 212 Converting a Database from One Version to Another Click Open. In the Inter-Tel 5000 Database Converter Utility window, the selected and opened source file appears in the Source File: box, and the Source Version appears below the Destination File box. In the following illustration the source version is 2.0.5.142 - USA.
-
Page 213: Saving The System And Voice Processor Databases
Chapter 5: Installation Saving the System and Voice Processor Databases Saving the System and Voice Processor Databases NOTICE If using an external voice processing system, the EM Unit or Voice Processing Unit must remain attached when saving and restoring the database. If the unit is not attached, converted voice mail information, such as non-associated mailboxes and cascade levels, will not be restored. - Page 214 24. If external voice processing is not used, make sure the USB flash drive is inserted into the Inter-Tel 5000 Base Server before continuing. The option in this dialog box saves all voice processor information. If you want to save specific voice processor information, see “Saving the System and Voice Processor Databases”...
- Page 215 Chapter 5: Installation Enable Basic Voice Mail or Disable Basic Voice Mail Enable Basic Voice Mail or Disable Basic Voice Mail If installing an external voice mail system, you must disable basic voice mail before installing and programming the external voice processing system. After disabling Basic Voice Mail, a System Alarm 203 appears on both the LCD panel on the Base Server and on the administrator endpoint (normal functionality).
-
Page 216: Restoring The Database
Chapter 5: Installation Restoring the Database Restoring the Database From the DB Studio menu bar, select Operations – Database Operations – Database Restore to open the window shown below. It allows you to restore the database to disk during a programming session. - Page 217 Chapter 5: Installation Restoring the Database • Cancel: To stop an operation before it is completed, click Cancel. A message appears, indicating that the operation was aborted by the user. NOTICE Canceling a restore operation causes the system to default the database and terminate the programming session.
-
Page 218: Backing Up The Database
If desired, you can force DB Programming to save the backup file immediately, as described below. To set Backup Database Save parameters, refer to the Inter-Tel 5000 Features and Programming Guide (part no: 580.8006). -
Page 219: Replacing The Power Fuse
Replacing the Power Fuse Replacing the Power Fuse The Inter-Tel 5000 Base Server has a replaceable power fuse, part no. 802.2028. The fuse is located above the power cord connection on the back of the chassis, as shown in Figure 5-51. -
Page 220: Replacing The Processor Module Battery
Programming Guide (part no: 580.8006) for details. Perform a voice mail backup. Use a USB flash drive attached to the USB-A port on the front of the Inter-Tel 5000 Base Server chassis. Do not back up VM to the compact flash- type Inter-Tel memory card. See page 5-91 for backup details. -
Page 221: Installing The Usb-B Port Serial Driver
Installing the USB-B Port Serial Driver The USB-B port on the front of the Inter-Tel 5000 Base Server chassis allows you to connect a laptop and view online messages. However, a driver must be installed on the laptop to allow the laptop to use this USB-B port. -
Page 222: Using Terminal Emulation To Retrieve Online Messages
Chassis Front Start the terminal emulation program and set any configuration options the program needs to communicate with the Inter-Tel 5000 platform. See the documentation that came with the terminal emulation program for this USB-B information. For the terminal emulation program you use, set the following options if available: •... -
Page 223: Installing Ip And Multi-Protocol Endpoints
Installing IP and Multi-Protocol Endpoints IP or SIP endpoints are connected to a power source and to the network. There is no direct wiring from either the MDF or the Inter-Tel 5000 platform. All IP endpoints use a LAN connection. See the Specifications chapter for a list of supported endpoints. - Page 224 Chapter 5: Installation Hardware Revision Identification Hardware Revision Identification Check the following areas to identify endpoint hardware types: • Endpoint Web Interface: The hardware type is displayed in the Firmware Information field under Status – Firmware – Hardware Type. • LCD (Liquid Crystal Display): The hardware type is displayed on the bottom line of the LCD on startup.
- Page 225 • Eclipse IP PhonePlus (page 5-109) Make sure the Inter-Tel 5000 system is up and running. Also, read “Notices” on page 5- 101. Connect one end of the Ethernet cable to a PC port on the back of the endpoint.
- Page 226 Chapter 5: Installation Procedure • Power over Ethernet (PoE) hub (LAN Jack): The Red Hawk PowerSense™ modular, in-line PoE hubs (for multi-port) are available through the Inter-Tel ® CommSource division. The power hub provides power to IP devices without the use of an external power supply for each device.
-
Page 227: Physical Interfaces
When there is receive or transmit activity on the link, this LED flashes. o 10/100 Mbps: When the link is connected at a speed of 100 Mbps, the green LED on the right side of the port is lit. The Inter-Tel 5000 platform operates only on 100Base-T LANs. - Page 228 When there is receive or transmit activity on the link, this LED flashes. o 10/100 Mbps: When the link is connected at a speed of 100 Mbps, the green LED on the right side of the port is lit. The Inter-Tel 5000 platform operates only on 100Base-T LANs.
- Page 229 Chapter 5: Installation Model 8690 Model 8690 The Model 8690 multi-protocol endpoint has a touch screen that displays feature, dialpad, and menu buttons. It supports ITP or SIP mode using 100Base-TX interfaces. The Model 8690 is configured to use ITP mode by default. For details about ITP and SIP modes, see page 5-115.
- Page 230 When there is receive or transmit activity on the link, this LED flashes. o 10/100 Mbps: When the link is connected at a speed of 100 Mbps, the green LED on the right side of the port is lit. The Inter-Tel 5000 platform operates only on 100Base-T LANs.
- Page 231 LED on the right side of the port lights. • Handset Jack: Connects to a handset. For information about programming an Eclipse IP PhonePlus, refer to the Programming chapter in the Inter-Tel 5000 Features and Programming Guide (part no: 580.8006). ® Page 5-109 Inter-Tel...
-
Page 232: Wall-Mounting Ip Endpoints
Chapter 5: Installation Wall-Mounting IP Endpoints Wall-Mounting IP Endpoints See the following sections for information about wall-mounting your specific endpoint type. Model 8600 Series Endpoints Wall-mounting the Model 8600 series endpoints is not recommended if the user will be connecting and disconnecting cords (handset, headset, line) and/or cables NOTE (Ethernet, USB, power supply) frequently. - Page 233 Chapter 5: Installation Model 8600 Series Endpoints To prepare the endpoint for wall-mounting (regardless of base type): Remove the metal plate from the base of the endpoint by removing the two plastic rivets to unlock it from the base. Plastic Rivets Slide the cover off.
- Page 234 Chapter 5: Installation Model 8600 Series Endpoints To wall-mount the Model 8600 series endpoints that have a support mechanism: Collapse the support mechanism completely and secure it against the bottom housing of the endpoint, as shown in the following illustration. Bottom Housing Support Base...
- Page 235 Chapter 5: Installation Model 8600 Series Endpoints To wall-mount Model 8600 series endpoints with release buttons on the bottom housing: Close the base completely so that it lies flat against the endpoint. (Rivet hole 1 on the base aligns with the rivet hole on the bottom housing of the endpoint.) Bottom Housing (Base not shown) Release Buttons...
- Page 236 Chapter 5: Installation Axxess IP PhonePlus Axxess IP PhonePlus To wall-mount the Axxess IP PhonePlus: Remove the baseplate from the top half of the back of the endpoint. Carefully unplug the ribbon cable. On the back of the endpoint, use a pair of Back cutting pliers to remove the plastic knockout covering the lower connector on the endpoint...
-
Page 237: Changing Protocol Modes: Itp And Sip
ITP mode; however, Call Processing will not allow the endpoint to register until the SIP Server relinquishes its connection on behalf of the endpoint. For details discussed in this procedure, refer to the Inter-Tel 5000 Features and Programming Guide (part no: 580.8006) •... -
Page 238: Reading Ip Endpoint Status Displays
Chapter 5: Installation Reading IP Endpoint Status Displays Reading IP Endpoint Status Displays While the boot code is loading, you will see the displays shown in the following table. The top lines on the display change, as shown in the chart, and the bottom lines always contain the IP address and the Ethernet address. - Page 239 Chapter 5: Installation IP PhonePlus and Model 8660 IP PhonePlus and Model 8660 Table 5-16. IP PhonePlus and Model 8660 Progress Displays Display Status WAITING FOR DOWNLOAD Awaiting Download: The boot code is waiting for a code download. ERASING FLASH Programming State - Erasing Flash Memory: The boot code is receiving object code and programming the flash memory.
- Page 240 Chapter 5: Installation Models 8620/8622, 8662, and 8690 Models 8620/8622, 8662, and 8690 The following information does not apply to a non-display endpoint, such as the Model 8600. Table 5-17. Models 8620/8622, 8662, and 8690 Progress Displays Display Status Download State: The file is being downloaded to the DOWNLOAD endpoint.
- Page 241 Finding IP Card (Module): The application code is attempting to find a local IP ID: XXXXXXXXXXXX resource (Inter-Tel 5000 platform) by using the reply from the LAN broadcast. The first MY IP ADDRESS: line contains the hexadecimal Ethernet address of the endpoint, while the second and XXX.XXX.XXX.XXX...
- Page 242 Status UDP-Failed Error Message: If the endpoint did not receive a response via UDP after ID: XXXXXXXXXXXX attempting to contact the IP resource (Inter-Tel 5000 platform), the display will show this COULD NOT error message for five seconds. CONTACT IP CARD XXX.XXX.XXX.XXX...
-
Page 243: Download Error Message Displays
The image written to flash does not match the file downloaded. A VERIFY write error occurred. Where to Program IP Resources Program IP resources in DB Programming. Refer to the Inter-Tel 5000 Features and Programming Guide (part no: 580.8006). ® Page 5-121 Inter-Tel 5000 Installation Manual –... -
Page 244: Installation Options For Single Line Endpoints
5-50. As applicable, program the endpoint in accordance with the procedure on programming a four- port single line module in the Inter-Tel 5000 Features and Programming Guide (part no: 580.8006). If required, install a SLM-8 module in the Digital Expansion Interface chassis in accordance with the procedure, “Installing an Eight-Port Single Line Module (SLM-8)”... -
Page 245: Installing Digital Endpoints
Chapter 5: Installation Installing Digital Endpoints Installing Digital Endpoints The following endpoints can be installed through the DEI: • Digital endpoints • Single-Line Adapters, connected to DEM-16 ports Installing Digital Endpoints Before installing the digital endpoints, unpack each one and check for damage. If items are damaged or missing, contact Inter-Tel Customer Support. - Page 246 Performing the Digital Endpoint Self-Test If necessary, change the endpoint ring tone by performing the steps described in the Inter-Tel 5000 Features and Programming Guide (part no: 580.8006). If necessary, replace the endpoint paper template with one labeled to match the programmed feature buttons.
- Page 247 Chapter 5: Installation Performing the Digital Endpoint Self-Test Perform the following self-test procedure if installing a Model 8500, 8520, or 8560: While pressing the asterisk (*) and pound/hash (#) buttons, unplug and replace the endpoint line cord. Release the buttons. The endpoint rings momentarily. Display endpoints show a dark display –...
- Page 248 Chapter 5: Installation Performing the Digital Endpoint Self-Test Figure 5-55. Digital Display and Basic Digital Endpoints Self-Test Key Matrix BASIC DIGITAL ENDPOINT EXECUTIVE OR PROFESSIONAL DISPLAY ENDPOINT STANDARD OR ASSOCIATE DISPLAY ENDPOINT ® Page 5-126 Inter-Tel 5000 Installation Manual – Issue 2.4, May 2008...
- Page 249 Chapter 5: Installation Performing the Digital Endpoint Self-Test Figure 5-56. Model 8500, 8520, and 8560 Endpoints Self-Test Key Matrix MODEL 8560 ENDPOINT LAMP MODEL 8500 ENDPOINT LAMP LAMP MODEL 8520 ENDPOINT ® Page 5-127 Inter-Tel 5000 Installation Manual – Issue 2.4, May 2008...
- Page 250 Chapter 5: Installation Adjusting the Baseplate Adjusting the Baseplate The Professional, Associate, and Eclipse Basic endpoints have adjustable baseplates that allow users to set the angle of the endpoint. To change the baseplate position: Gently press on one edge of the baseplate and lift it off of the endpoint. If you have a PCDPM installed, route the cables so that they will be between the baseplate and the bottom of the endpoint.
- Page 251 Chapter 5: Installation Wall-Mounting Model 8500, 8520, and 8560 Digital Endpoints Model 8000 series digital endpoints are shipped with a plastic adhesive label that covers the rectangular wall-mount knockout on the base of the endpoint. A portion of the adhesive label must be removed to use the wall-mount knockout.
- Page 252 Chapter 5: Installation Wall-Mounting Model 8500, 8520, and 8560 Digital Endpoints Plug the four-inch line cord into the jack on the back of the endpoint and thread the line cord through the wall-mount knockout on the base. Test the base to verify that it is securely locked to the endpoint. Insert the two plastic rivets through the metal plate and press them firmly into the holes on the endpoint base.
-
Page 253: Installing An Optional Headset On A Digital Endpoint
Chapter 5: Installation Installing an Optional Headset on a Digital Endpoint Insert the remaining plastic rivet through rivet hole 3 (as Metal Plate shown at right) in the metal plate and press it firmly into rivet hole 2 in the base. This locks the metal plate to the base. -
Page 254: Installing Single Line Adapters (Sla)
Chapter 5: Installation Installing Single Line Adapters (SLA) Installing Single Line Adapters (SLA) When installed in a DEM-16 port, each SLA unit can support one DID [DDI] trunk, two single line endpoints, or one off-premises extension (OPX). Wall-Mounting an SLA The SLA can be placed horizontally on a table, or it can be wall-mounted using the two L- shaped brackets that accompany the unit. -
Page 255: Installing Did Trunks On An Sla (Usa Only)
Chapter 5: Installation Installing DID Trunks on an SLA (USA Only) Installing DID Trunks on an SLA (USA Only) Connect the Direct Inward Dialing (DID) trunks to the Single-Line Adapters as outlined below. See Figure 5-57 on page 5-133. DID trunks are also supported through T1 circuits. In addition to DID trunks, SLAs can also be used to install single line endpoints, playback devices, and off- premises extension (OPX) stations. - Page 256 Programming an SLA for Dual DID Trunks You can use an SLA to install DID trunks on the Inter-Tel 5000 platform. The trunks coming in from the CO [local exchange] attach to the SLA that has been programmed for Dual DID functionality on a DEM-16 port.
-
Page 257: System Upgrades
“Installing DID Trunks on an SLA (USA Only)” on page 5-133. SYSTEM UPGRADES This section provides procedures for upgrading Inter-Tel 5000 systems. See page 5-149 information on upgrading to version 2.4. Upgrade Scenarios An upgrade may involve one of the following scenarios: •... -
Page 258: Guidelines For Adding To Or Upgrading A System
5-91 and related sections under that title. Also, refer to the voice processor information in the Inter-Tel 5000 Features and Programming Guide (part no: 580.8006). Inter-Tel does not supply the USB flash drive. If performing an upgrade, follow the instructions provided with the software for saving, converting, and restoring software. -
Page 259: Upgrading System And Application Software
Perform a voice mail backup. Connect a USB flash drive (2.0 compatible) to the USB-A port on the front of the Inter-Tel 5000 Base Server chassis. Do not back up VM to the Inter-Tel memory card. See “Saving the System and Voice Processor Databases” on page 5-91 ®... - Page 260 From an Internet Explorer window, enter the URL to access the Administrative Web Session interface on the Inter-Tel 5000 platform you want to upgrade. Enter the Inter-Tel 5000 platform username and password to log on. The default username is it5k and the default password is itpassw.
- Page 261 Chapter 5: Installation Upgrading System and Application Software Figure 5-59. Example Inter-Tel 5200 Upgrade Administrative Web Session This is a display of what is also in DB Programming. DataBase Programming An empty checkbox indicates a package that is not installed. Click Update to refresh the list of packages in the display.
- Page 262 For specific information or messages that appear about the files and applications upgraded or installed, see the Diagnostics and Troubleshooting chapter in the Inter-Tel 5000 Features and Programming Guide (part no: 580.8006).
-
Page 263: Removing System Voice Prompts And Inter-Tel Endpoint Firmware
Chapter 5: Installation Removing System Voice Prompts and Inter-Tel Endpoint Firmware Removing System Voice Prompts and Inter-Tel Endpoint Firmware If an Inter-Tel firmware or voice prompt package is added to the system, and later it is determined that you need to revert back to a previous version of the same package, the package will need to be removed and the previous version installed. -
Page 264: Tftp Server Configuration Example
Inter-Tel, Inc. does not provide support for this TFTP server. It is shown here as an example only. For DB Programming information discussed in this procedure, refer to the Inter-Tel 5000 Features and Programming Guide (part no: 580.8006). To set TFTP server properties: Launch the TFTP server application and click the Settings button. - Page 265 IP address. Translate UNIX file names: Without this checked, the operation will fail. Click OK, then restart the TFTP server application. The TFTP server must be running before you attempt to upgrade the Inter-Tel 5000 platform. ® Page 5-143 Inter-Tel 5000 Installation Manual –...
-
Page 266: Upgrading System Memory
Basic Voice Mail storage capacities, see the Specifications chapter. For database and voice processing data information, refer to the Inter-Tel 5000 Features and Programming Guide (part no: 580.8006). To upgrade the Inter-Tel memory card: Schedule this upgrade at a time that will have the least impact on the customer. - Page 267 Chapter 5: Installation Upgrading System Memory Remove the Inter-Tel memory card and insert the new memory card into the slot labeled COMPACT FLASH, as shown in the following example. Chassis Front Compact Flash Eject Button Plug in the power cord. Restore the database.
-
Page 268: Upgrading System Software To Version 2.X
Inter-Tel 5000 platform. Network Environment Requirements For the most efficient network connectivity and system performance, the Inter-Tel 5000 platform must operate in a suitable network environment. Detailed characteristics appear in VoIP Data Network Requirements, part no. 835.2885. -
Page 269: Onboard Tftp Server
69 or 20001, to which the client request is sent. Port 69 must be open on the corporate firewall for endpoints at remote locations (Mitel models 5212/ 5224 are not supported for teleworker/remote location use). If left at 0, the system will try port 20001 followed by port 69. -
Page 270: Firmware Management
Mitel IP and Inter-Tel IP endpoints. However, the Inter-Tel endpoint firmware has not been changed for this release. The endpoint firmware is maintained in packages to be upgraded as part of the Inter-Tel 5000 system upgrade. The Inter-Tel images must be explicitly installed. -
Page 271: Procedure: Upgrading The System To Version
Inter-Tel 5000 Features and Programming Guide (part no: 580.8006). Upgrading to v2.4 hardware and/or software requires the following considerations. If not discussed here, refer to the appropriate sections referenced as well as the Inter-Tel 5000 Features and Programming Guide (part no: 580.8006). - Page 272 Perform a voice mail backup. For Basic Voice Mail, connect a USB flash drive (2.0 compatible) to the USB-A port on the front of the Inter-Tel 5000 Base Server chassis. If using an external voice mail system, refer to the Inter-Tel 5000 Features and Programming Guide (part no: 580.8006) for details.
- Page 273 Make sure this IP address setting points to a separate TFTP server—not to the onboard TFTP server on the Inter-Tel 5000. b. Click Change Location. Click Update at the bottom of the page to see a list of available packages and applications.
- Page 274 Chapter 5: Installation Procedure: Upgrading the System to Version 2.4 ® Page 5-152 Inter-Tel 5000 Installation Manual – Issue 2.4, May 2008...
- Page 275 If you want to remove voice prompts you do not need, click the link for the voice prompt file name, and then click Remove. • If installing Mitel IP endpoints, continue to “Installing Mitel IP Endpoints” on page 5- 154.
-
Page 276: Installing Mitel Ip Endpoints
Installing Mitel IP Endpoints For complete programming procedures for features introduced with v2.4, refer to the Programming chapter in the Inter-Tel 5000 Features and Programming Guide (part no: 580.8006). Refer to other locations in this chapter for information to install or upgrade system software beyond what is covered in this document. - Page 277 The Mitel Models 5212 and 5224 are not suported for remote/teleworker locations. • When using a Mitel Model 5330 or 5340 from a remote/teleworker location, make sure port 69 is open on the corporate firewall to allow communication to Inter-Tel 5000 server.
- Page 278 Do either of the following: • Continue to “Wall-Mounting Mitel IP Endpoints” on page 5-157. • Continue to “Initial Mitel Endpoint – Automatic Configuration (DHCP)” on page 5- 159. • Continue to “Initial Mitel Endpoint – Manual Configuration” on page 5-160.
-
Page 279: Wall-Mounting Mitel Ip Endpoints
Chapter 5: Installation Wall-Mounting Mitel IP Endpoints Wall-Mounting Mitel IP Endpoints The following procedure provides information on mounting the Mitel IP endpoints on a wall or on a wall plate. Use Figure 5-62 as a guide. Figure 5-62. Mitel IP Endpoint Wall Mounting... - Page 280 DHCP Discovery Verify that the IP addresses entered in the endpoint for the Inter-Tel 5000 Option 128 Missing appears on Base server and TFTP server are correct (they must be the same IP address, the endpoint display.
- Page 281 5-101. If a Mitel IP endpoint is pointing to the Inter-Tel 5000 and the endpoint has not been configured in DB Programming, the display appears to be downloading but nothing is actually happening. You must configure the Mitel IP endpoints in DB Programming before configuring the endpoint.
- Page 282 5-101. If a Mitel IP endpoint is pointing to the Inter-Tel 5000 and the endpoint has not been configured in DB Programming, the display appears to be downloading but nothing is actually happening. You must configure the Mitel IP endpoints in DB Programming before configuring the endpoint.
-
Page 283: Inter-Tel Ip Endpoint Configuration
5-101. Make sure the endpoint is configured to use the NAT option. If a Mitel IP endpoint is pointing to the Inter-Tel 5000 and the endpoint has not been configured in DB Programming, the display appears to be downloading but nothing is actually happening. -
Page 284: Upgrade Scenarios
Power down the endpoint and deliver it to the user. The user simply plugs it in for it to boot up and begin working. Continue to the Inter-Tel 5000 Features and Programming Guide (part no: 580.8006) for information on programming endpoints or other features in this release. -
Page 285: Upgrading Only Software
Inter-Tel CS-5200, CS-5400, or CS-5600 platforms. For other upgrade scenarios, Table 5-23. For some of the tasks in this procedure, refer to the Inter-Tel 5000 Features and Programming Guide (part no: 580.8006) as appropriate. To upgrade the system version: Obtain applicable licensing from the Licence Management Center (LMC), as necessary. -
Page 286: Upgrading From Cs-5200 V1.X Or V2.X To Cs-5400 V2.X
Processes and Procedures For some of the tasks in this procedure, refer to the Inter-Tel 5000 Features and Programming Guide (part no: 580.8006). To upgrade an Inter-Tel CS-5200 system running v1.x to a CS-5400 running v2.x: Perform a complete Voice Processor save to one or more thumb drives and a database save to a PC or other adequate data storage device. -
Page 287: Upgrading From Cs-5200 V1.X To Cs-5600 V2.X
“Upgrading from CS-5200 v1.x or v2.x to CS-5400 v2.x” on page 5-164. Inter-Tel 5000 v2.x software will not prevent the installation of a PS-1 on an Inter-Tel NOTE CS-5200. However, in this configuration system performance will probably be degraded because call processing will have significantly fewer IP resources to use. - Page 288 Verify that external clients point to the PS-1 rather than the Base Server. To prepare the Inter-Tel CS-5400 for the conversion and upgrade: Back up the system and voice mail databases. Refer to the Inter-Tel 5000 Features and Programming Guide (part no: 580.8006) for the detailed procedure.
- Page 289 Programming session. • To continue, restart the DB Programming session. For details about using this wizard, refer to the Inter-Tel 5000 Features and Programming Guide (part no: 580.8006). When you click Finish, the Connection Wizard closes the DB Programming session.
-
Page 290: Inter-Tel Cs-5600 Licensing With Usb Security Key
Inter-Tel CS-5600 Licensing with USB Security Key To reload system and voice mail databases: For the tasks in this procedure, refer to the Inter-Tel 5000 Features and Programming Guide (part no: 580.8006). Restore the full database and voice processor data to the system. -
Page 291: Optional System Equipment
If wanted, external music sources may be connected to the system for Music-On-Hold (MOH). The music jack optional external music sources (radio, tape player, etc.) is on the back of the Inter-Tel 5000 Base Server chassis. The music source can be used for music-on-hold and background music. - Page 292 Plug in the AC power cord for the music source. DO NOT use the same power outlet used for the Inter-Tel 5000 Base Server. Turn on the AC power to the music source. Also, Inter-Tel recommends using an UPS.
-
Page 293: Installing External Paging Equipment
Connect the paging speaker(s) to the amplifier using speaker cable. Plug in the amplifier AC power cord. do not use the outlet for the Inter-Tel 5000 Base Server. Also, Inter-Tel recommends using an UPS. Set the amplifier volume control to the lowest setting and turn on the amplifier. -
Page 294: Installing An External Voice Processing System
110 VAC and retains a charge after it has been turned OFF. Failure to allow the high voltage to dissipate can cause bodily injury. Like the Inter-Tel 5000 platform, the external voice processing PC must have an isolated, dedicated, properly grounded AC circuit for proper operation and it should be plugged into an UPS. -
Page 295: Review And Update For Enabling A Voice Processor
The AWS default login is it5k, and the default password is itpassw. Review and Update for Enabling a Voice Processor Inter-Tel 5000 platforms support any of the following voice processors: Basic Voice Mail (BVM), Enterprise Messaging (EM), or a Voice Processing Unit (VPU). And, for proper configuration, DB Programming requires that the voice processor type is identified. - Page 296 8.5 ft (2.5 m) cable is available (part no. 813.1806). Or, if necessary, contact the Inter-Tel CommSource division for information on purchasing longer cable lengths. Figure 5-65. Example External Voice Mail Connection to Inter-Tel CS-5x00 Back of Inter-Tel 5000 Base Server Connection to VM only (not using DEI)
-
Page 297: Installing An Ip Sla
The IP SLA provides an interface between a standard single line endpoint and a 10/100Base-T network. The Inter-Tel 5000 platform operates only on a 100Base-T network. The IP SLA allows you to make calls through the IP network. The IP SLA operates like a standard SLA. However, its interface to the system is replaced by the Ethernet IEEE 802.3 10 Mbps UTP interface. -
Page 298: Defaulting Ip Sla Settings
Chapter 5: Installation Defaulting IP SLA Settings Defaulting IP SLA Settings This allows you to change the IP SLA configuration (such as an IP address) to its default settings. To default the IP SLA: Press and hold the DEFAULT button using a pinhole tool (such as a bent paper clip). The SL STATUS LED flutters for five or six seconds. -
Page 299: Installing Sip Gateways
• If uninterruptible power supply (UPS) protection has not been installed as part of the Inter-Tel 5000 system, IP and SIP endpoints will not operate when electrical power fails either at remote sites or at the main system location. To place calls during a power failure in this situation, IP and SIP endpoint users can only use a single line endpoint connected to one of the power failure bypass circuits built-in to the system chassis. -
Page 300: Sip Gateway
Caller ID receivers are not available on all SIP gateways. Consult the device documentation for information on Caller ID support. Refer to the Inter-Tel 5000 Features and Programming Guide (part no: 580.8006) for additional details. Figures... - Page 301 Chapter 5: Installation SIP Gateway NOTICE Positive Disconnect. Signaling a call termination from the CO over an analog loop start line differs from CO to CO. Because the SIP/MGCP gateways detect this call event differently, you must pay particular attention to how the CO and the SIP/MGCP gateway detect far-end call termination.
-
Page 302: Installing A Mini-Dss Unit
Chapter 5: Installation Installing a Mini-DSS Unit Installing a Mini-DSS Unit The Model 8416 Mini-DSS Unit provides 16 additional user-programmable buttons and connects directly to the Model 8660 IP endpoints. Mini-DSS Units are physically attached to a special cable pin connector. Because the Mini-DSS Units draw power from the endpoint, external AC transformers are not required. - Page 303 Chapter 5: Installation Installing a Mini-DSS Unit Figure 5-68. Mini-DSS Installation Cable Top Access Panel Cable Pin Connector (1¾”) Bottom Access Panel Mini-DSS (Bottom) 8660 Endpoint (Bottom) For illustration clarity, the endpoint base is not shown. Figure 5-69. Model 8660 with Attached Mini-DSS Mini-DSS Faceplate Mini-DSS...
-
Page 304: Installing A Single Line Handset Amplifier
Three models of Direct Station Select (DSS)/Busy Lamp Field (BLF) units can be installed on Inter-Tel digital endpoints, depending on the model of endpoint. Each suitable digital endpoint supports up to four DSS/BLF units, and each Inter-Tel 5000 platform supports a total of 20 DSS/ BLF units. -
Page 305: Installing A Pcdpm
(page 5-187) • System DB Programming (refer to the Inter-Tel 5000 Features and Programming Guide (part no: 580.8006)) For Off-Hook Voice Announce (OHVA) receive capability, and to allow a DSS/BLF Unit and/or Modem Data Port Module to be installed, any Standard, Associate, Executive, or Professional Display endpoint or Model 8520 or 8560 endpoint may be equipped with a PC Data Port Module (PCDPM). - Page 306 Chapter 5: Installation Installing a PCDPM Figure 5-70. AC Transformer Requirements for PCDPMs AC = AC transformer required PCDPM For Off-Hook Voice Announce only ENDPOINT (450 mA) (450 mA) PCDPM DSS/BLF DSS/BLF ENDPOINT PCDPM ENDPOINT (450 mA) Data device or PCDPM MDPM single line endpoint...
- Page 307 Chapter 5: Installation In Executive Display or Standard Display Endpoints In Executive Display or Standard Display Endpoints For installation diagrams, see Figure 5-71 on page 5-188 and Figure 5-72 on page 5-189. To install the PCDPM for an Executive or Standard Display Endpoint: Unplug the line cord and the handset from the modular jack on the back of the endpoint.
- Page 308 Chapter 5: Installation In Professional Display or Associate Display Endpoints In Professional Display or Associate Display Endpoints To install a PCDPM in a Professional or Associate Display Endpoints: Press up on the tabs and lift off the cover. Remove the cover and the display endpoint foot in the back, as shown below.
- Page 309 Chapter 5: Installation In Model 8520 or Model 8560 Endpoints Carefully thread the cables connected to the PCDPM through the slots on the access panel, and re-attach the access panel to the endpoint. Make sure the cables exit through the slot between the cover and the bottom of the display endpoint, as shown below on the left.
- Page 310 Chapter 5: Installation In Model 8520 or Model 8560 Endpoints Because a Modem Data Port Module will be attached to the PC Data Port Module, see the instructions on page 5-190. The only purpose of installing a PCDPM in a digital endpoint is to provide the copper path between the MDPM and a DSS/BLF unit.
- Page 311 Chapter 5: Installation In Model 8520 or Model 8560 Endpoints Figure 5-72. PCDPM Cables on Executive or Standard Display Endpoints RS232 PCDPM-to-MDPM CABLE Interface Cable PCDPM-to-KEYSET Interface Cable PC DATA PORT MODEM DATA MODULE PORT MODULE (Inside of Baseplate) (Top Cover Removed) DSS-to-DSS BACK OF DIGITAL INTERFACE CABLE...
- Page 312 Chapter 5: Installation In Model 8520 or Model 8560 Endpoints Figure 5-74. PCDPM Installation in a Model 8520 or 8560 Endpoint MODEL 8560 ENDPOINT (BACK) PCDPM ACCESS PANEL J10 PIN CONNECTOR J3 CONNECTOR CABLE SLOTS SCREW (BACK) Figure 5-75. MDPM Cable Connection in a Model 8520 or 8560 Endpoint PCDPM-to-MDP INTERFACE CAB (813.1566)
-
Page 313: Installing An Mdpm
Chapter 5: Installation Installing an MDPM Installing an MDPM Digital endpoints equipped with PC Data Port Modules may be equipped with Modem Data Port Modules, part no. 550.3015 [PB2549-A in Europe]. The MDPM contains a four-conductor modular jack [line jack unit] that can be used to connect a single line endpoint or trunk to the digital endpoint. -
Page 314: Connecting Dss/Blf Units
Chapter 5: Installation Connecting DSS/BLF Units Connecting DSS/BLF Units Up to 20 DSS/BLF Units can be installed on the system. A single endpoint can be equipped with up to four units. Before installing DSS/BLF units on digital endpoints, each endpoint must be equipped with a PCDPM and an MDPM. - Page 315 Chapter 5: Installation To Executive, Standard, Professional, or Associate Display Endpoints Figure 5-77. PCDPM Installation on Executive or Standard Display Endpoints Inside of Baseplate Back of Digital Endpoint PCDPM To Chassis Handset If the endpoint will be wall-mounted, open the back of the endpoint and To MDPM reroute the Module-to-Keyset Inter- To DSS/BLF...
- Page 316 Chapter 5: Installation To Executive, Standard, Professional, or Associate Display Endpoints Figure 5-79. Executive or Standard Display Endpoint PCDPM Cable Connections PCDPM-to-MDPM Interface Cable (813.1566) PCDPM-to-Endpoint Interface Cable PC Data Port Modem Data Module PCDPM-to-DSS Port Module (Inside of Baseplate) Interface Cable (Top Cover Removed) (813.1519*)
- Page 317 Chapter 5: Installation To Executive, Standard, Professional, or Associate Display Endpoints Figure 5-80. PCDPM Cables on Professional or Associate Display Endpoints PCDPM-to-MDPM Interface Cable (813.1566) Modem Data Port Module (Back of Unit) Back of Display Endpoint with PCDPM PCDPM-to-DSS Interface Cable DSS-to-DSS (Daisy Chain Cable) Interface Cable...
- Page 318 Chapter 5: Installation To Executive, Standard, Professional, or Associate Display Endpoints Figure 5-81. Model 8520 or 8560 Endpoint PCDPM Installation Model 8560 Endpoint (Back) PCDPM Access Panel Connector Connector Cable Slots Screw (Back) Figure 5-82. Model 8520 or 8560 Endpoint PCDPM Cable Connections ®...
- Page 319 Chapter 5: Installation To Executive, Standard, Professional, or Associate Display Endpoints PCDPM-to-MDPM Interface Cable (813.1566) Modem Data Port Module (Back) Bottom of Endpoint with PCDPM PCDPM-to-DSS (Base not shown for illustrative purposes) Interface Cable (813.1519*) *Same as DSS-to-DSS Cable DSS-to-DSS Interface Cable (813.1519) Bottom of 2nd DSS Unit...
- Page 320 Chapter 5: Installation Connecting to Model 8520 or 8560 Endpoints Connecting to Model 8520 or 8560 Endpoints To connect PCDPM cable: Install the PC Data Port Module for a Model 8520 or 8560 endpoint. For installation diagrams, see Figure 5-81 on page 5-196 and Figure 5-82 on page...
- Page 321 Chapter 5: Installation Attaching 6-Row and 50-Key Models Attaching 6-Row and 50-Key Models Install the 6-Row or Model 8450 50-Key (50-Button) DSS/BLF Unit as outlined in the following procedure. For diagrams of the installation, see Figure 5-79 on page 5-194 and Figure 5-78 on page 5-193.
- Page 322 Chapter 5: Installation Attaching a 12-Row Model Attaching a 12-Row Model Install each 12-row DSS/BLF Unit as outlined following procedure. For diagrams of the installation, see Figure 5-80 on page 5-195. A description of the units appears in “Direct Station Select/Busy Lamp Field Units”...
-
Page 323: Reference
Mitel IP Endpoints ........ -
Page 324: Chapter Overview
Acronyms and glossary terms are also provided. Technical Support Contact Information Table 6-1 summarizes important contact information you may need when installing, upgrading, or servicing an Inter-Tel 5000 platform. For your reference, write in the applicable e-mail address and phone number. Table 6-1. Contact Information... -
Page 325: Rationale For Stocking Spare Parts
Inter-Tel Price List for details. System Kits Table 6-2 summarizes the system kits available for the Inter-Tel 5000 Network Communications Solutions family of products. Table 6-2. Inter-Tel 5000 System Kits Description Part No. -
Page 326: Inter-Tel Memory Cards
Chapter 6: Reference Inter-Tel Memory Cards Inter-Tel Memory Cards Table 6-3 identifies the compact flash-type memory cards available for use in Inter-Tel 5000 platforms. Table 6-3. Compact Flash-Type Inter-Tel Memory Cards Part No. Description [Europe] Inter-Tel Memory Card with Software, 1024 MB 841.0273 [841.0277]... -
Page 327: Trunk Interfaces/Modules
Chapter 6: Reference Trunk Interfaces/Modules Trunk Interfaces/Modules Table 6-5 summarizes the modules and endpoints available and licensing required to connect to trunks on the public telephone network. Table 6-5. Public Network Trunk Interfaces Description Part No. AudioCodes MP-114 SIP Gateway 901.3924 See “SIP Gateway”... -
Page 328: Licenses
CS-5400 to CS-5600 IP Networking Upgrade 840.0636 IP System Identifier IP System Identifier License 840.0408 Required to unlock the Inter-Tel 5000 Digital Only software packages (580.9001, 580.9002, 580.9046, 580.9047) to allow IP endpoints to be added to the system. ® Page 6-6 Inter-Tel 5000 Installation Manual –... - Page 329 Chapter 6: Reference Licenses Table 6-6. Inter-Tel 5000 Platform Licenses and Security Key (Continued) Description Part No. Features Requiring License Agent Help 840.0228 Analog Voice Mail Hunt Groups 840.0229 Automatic Call Distribution (ACD) 840.0230 Desktop OAI Interface 840.0319 Remote Automatic Call Distribution (ACD) 840.0233...
-
Page 330: System Software
841.0889 SW Inter-Tel 5000 U.K. PS-1 Installation Image (v2.4) 841.0890 Digital Expansion Equipment Table 6-8 identifies the components available and licenses required for equipping Inter-Tel 5000 systems with digital capability. Table 6-8. Digital Expansion Components and Licenses Description Part No. -
Page 331: Cables
Direct Station Select (DSS)/Busy Lamp Field (BLF) Equipment Table 6-10 summarizes equipment, cables, and parts needed to connect the Mini-DSS Unit to IP endpoints and DSS/BLF units to digital endpoints that operate on Inter-Tel 5000 platforms. Table 6-10. DSS/BLF Units, Data Port Modules, and Transformers Part No. -
Page 332: Analog Single Line Modules
Analog Single Line Modules Table 6-11 identifies the single line modules available for equipping Inter-Tel 5000 platforms with analog single line endpoints. The four-port single line module (SLM-4) is installed in the Inter-Tel CS-5200/5400/5600 Base Server. A system can support only one SLM-4. The eight-port single line module (SLM-8) is installed in a DEI bay, and a system can support up to six SLM-8 modules. -
Page 333: Endpoints, Softphones, And Related Endpoints
Chapter 6: Reference Endpoints, Softphones, and Related Endpoints Endpoints, Softphones, and Related Endpoints Table 6-13 identifies the endpoints, softphones applications, and Single-Line Adapter s that Inter-Tel 5000 platforms support. Table 6-13. Endpoints Part No. Endpoint [Europe] IP and SIP Endpoints Model 8600 Multi-Protocol Endpoint with No Display 550.8600... -
Page 334: Documentation
580.8000 Inter-Tel 5000 Features and Programming Guide 580.8006 Inter-Tel 5000 Installation Quick Start Guide 835.2879 Inter-Tel 5000 Administrator Guide & Quick Reference Guide 580.8001 Table 6-15 identifies the user guides for endpoints/softphone applications that are supported by Inter-Tel 5000 platform. -
Page 335: Endpoints And Endpoint Features
Chapter 6: Reference Endpoints and Endpoint Features Endpoints and Endpoint Features Figure 6-1 through Figure 6-13 show endpoints and endpoint features supported on the Inter-Tel CS-5200, CS-5400, and CS-5600 platforms. Figure 6-1. Model 8600 Endpoint MESSAGE LAMP HEARING COMPATIBLE (HAC) SPECIAL HANDSET BUTTON... - Page 336 Chapter 6: Reference Endpoints and Endpoint Features Figure 6-2. Model 8620/8622 Endpoint MESSAGE LAMP 2-LINE LCD DISPLAY HEARING COMPATIBLE (HAC) SPECIAL HANDSET BUTTON HOLD BUTTON (RED) RING AND VOICE VOLUME CONTROLS SPEAKER SPEAKERPHONE ON/OFF CONTROL DEDICATED HEADSET JACK (UNDERNEATH) PROGRAMMABLE BUTTONS KEYPAD MICROPHONE...
- Page 337 Chapter 6: Reference Endpoints and Endpoint Features Figure 6-3. Model 8660/8662 Endpoint MESSAGE LAMP 6-LINE LCD DISPLAY MENU HEARING BUTTONS COMPATIBLE MENU BUTTONS (HAC) HANDSET HOLD BUTTON (RED) RING AND SPECIAL VOICE BUTTON VOLUME CONTROLS SPEAKER SPEAKERPHONE ON/OFF CONTROL DEDICATED HEADSET JACK (UNDERNEATH)
- Page 338 Chapter 6: Reference Endpoints and Endpoint Features Figure 6-4. Model 8690 Endpoint SPEAKER MESSAGE LAMP SPEAKER HEARING AID COMPATIBLE (HAC) HANDSET DEDICATED HEADSET JACK STYLUS UNDERNEATH TOUCH SCREEN MICROPHONE ® Page 6-16 Inter-Tel 5000 Installation Manual – Issue 2.4, May 2008...
-
Page 339: Mitel Ip Endpoints
Chapter 6: Reference Mitel IP Endpoints Mitel IP Endpoints The Figures in this section show Mitel 5000-series IP endpoints. Figure 6-5. Mitel Model 5212 Handset Ring/Message Indicator Feature buttons Speaker Dialpad buttons Programmable buttons Figure 6-6. Mitel Model 5224 Handset... - Page 340 Chapter 6: Reference Mitel IP Endpoints Figure 6-7. Mitel Model 5330 Handset Programmable buttons Ring/Message Indicator Feature buttons Dialpad buttons Speaker Navigation page buttons Figure 6-8. Mitel Model 5340 Handset Menu buttons Ring/Message Indicator Feature buttons Dialpad buttons Speaker Navigation page buttons Programmable buttons ®...
- Page 341 Chapter 6: Reference Mitel IP Endpoints Table 6-16. Mitel IP Endpoint Feature Buttons Button Action • (Up) Provide volume control for the ringer, handset, and speaker. • (Down) Scroll through options in some features. • (Speaker) Activates Handsfree Mode (speakerphone).
-
Page 342: Sip (Only) Softphone
Chapter 6: Reference SIP (Only) Softphone SIP (Only) Softphone The Inter-Tel CS-5200/5400/5600 platform supports the Model 8601 SoftPhone for Pocket PC. The Model 8601 is a software-based SIP softphone that runs on selected Pocket PC 2002 or later Personal Digital Assistant (PDA) platforms. For information about installation and programming, refer to the Model 8601 Installation Manual, part no. - Page 343 Chapter 6: Reference SIP (Only) Softphone Figure 6-9. Model 8601 Softphone DEFAULT MODEL 8601 DISPLAY: MINIMIZED MODEL 8601 DISPLAY: ® Page 6-21 Inter-Tel 5000 Installation Manual – Issue 2.4, May 2008...
- Page 344 Chapter 6: Reference SIP (Only) Softphone The Axxess IP PhonePlus endpoints shown in the Figure 6-10 and Figure 6-11 on page 6-23 are Inter-Tel legacy instruments. Figure 6-10. Axxess IP PhonePlus Front 6-LINE LCD CALL, INTERCOM, AND DISPLAY PROGRAMMABLE BUTTONS HEARING AID COMPATIBLE (HAC)
- Page 345 Chapter 6: Reference SIP (Only) Softphone Figure 6-11. Eclipse IP PhonePlus Front MESSAGE LAMP 6-LINE LCD DISPLAY MENU BUTTONS SPEAKER HOLD BUTTON (RED) SPECIAL BUTTON SPEAKER BUTTON RING AND VOICE CALL, INTERCOM, KEYPAD VOLUME CONTROL MICROPHONE PROGRAMMABLE (UNDERNEATH) BUTTONS Back LCD CONTRAST KNOB HANDSET JACK BARREL JACK...
- Page 346 Chapter 6: Reference SIP (Only) Softphone Figure 6-12. Model 8664 Wireless Endpoint EARPIECE VOLUME BUTTONS DISPLAY SELECT DOWN MENU BUTTONS POWER ON/START CALL POWER OFF/END CALL MENU 12-KEY PUSHBUTTON KEYPAD FUNCTION LINE MICROPHONE HEADSET JACK CHARGING CONTACTS ® Page 6-24 Inter-Tel 5000 Installation Manual –...
- Page 347 Chapter 6: Reference SIP (Only) Softphone Figure 6-13. Model 8665 Wireless Endpoint EARPIECE VOLUME BUTTONS DISPLAY SELECT DOWN MENU BUTTONS POWER ON/START CALL POWER OFF/END CALL MENU 12-KEY PUSHBUTTON KEYPAD FUNCTION LINE MICROPHONE HEADSET JACK CHARGING CONTACTS ® Page 6-25 Inter-Tel 5000 Installation Manual –...
-
Page 348: Additional Feature Information
However, the lamp can be programmed for a different feature using the keymap in DB Programming. For details, refer to the Inter-Tel 5000 Features and Programming Guide (part no: 580.8006). The lamp flashes when the feature associated with it is active. -
Page 349: Default Feature Codes
This allows the user to answer a call with the handset without having to disable the headset. Default Feature Codes For reference, the following sections identify Inter-Tel 5000 default feature codes. Also, all endpoint user guides provide a feature code list and feature code information. Trunk Access Codes Table 6-18. -
Page 350: Code-Accessible Endpoint Features
Inter-Tel 5000 platforms. If a default feature button can be used in place of keying in the feature code, that capability is indicated at the end of the description. - Page 351 CNF button. Data Allows operation of a data device attached to a digital endpoint. Requires a modem-equipped data device. Supported on Inter-Tel 5000 systems equipped with appropriate digital interface equipment. Default Endpoint This single feature code cancels account codes for all calls following, Do- Not-Disturb, manual call forwarding, background music, ring intercom always, and queue requests;...
- Page 352 Chapter 6: Reference Code-Accessible Endpoint Features Table 6-19. Endpoint Feature Codes (Continued) Feature Code Description Do-Not-Disturb Halts all intercom calls, transferred calls, and pages to the endpoint. The Do-Not-Disturb Cancel cancel code returns the endpoint to normal operation. The ON/OFF code Do-Not-Disturb On/Off can be used to turn Do-Not-Disturb on or off.
- Page 353 DB Programming but is not per second (bps) rate of an attached PCDPM serial port. Not supported on supported.) Inter-Tel 5000 platforms. Program Endpoint Password Programs the endpoint password for the Remote Programming feature. The password can be changed by entering the Program Endpoint Password feature code at the endpoint or when using the Remote Programming feature.
- Page 354 Chapter 6: Reference Code-Accessible Endpoint Features Table 6-19. Endpoint Feature Codes (Continued) Feature Code Description Station Speed Dial Accesses and dials up to 10 Station Speed Dial numbers that have been programmed/associated with location codes 0–9 or Speed Dial buttons, as applicable.
-
Page 355: Sip And Itp Default Feature Codes
Chapter 6: Reference SIP and ITP Default Feature Codes SIP and ITP Default Feature Codes The Show IP feature code displays different information in SIP and ITP modes. Table 6-20. SIP and ITP Mode Functions for Show IP Feature Feature Default Code SIP Mode ITP Mode... - Page 356 Chapter 6: Reference SIP and ITP Default Feature Codes Table 6-22 shows default codes when operating in ITP mode. Table 6-22. Inter-Tel Protocol IP Default Feature Codes Feature Code Feature Code 1. Account Code – Following Calls Hunt Group Remove Account Code –...
-
Page 357: Administrator Feature Codes
Chapter 6: Reference Administrator Feature Codes Administrator Feature Codes Table 6-23 summarizes the default feature codes for system administrator endpoints. For feature descriptions, see the Inter-Tel 5000 Features and Programming Guide (part no: 580.8006). Table 6-23. System Administrator Default Feature Codes Feature... -
Page 358: Diagnostics Mode Feature Codes
System History – Freeze 9993 9193 System History – Unfreeze 9998 9198 Voice Prompts Refer to the Inter-Tel 5000 Features and Programming Guide (part no: 580.8006) for voice prompt information. ® Page 6-36 Inter-Tel 5000 Installation Manual – Issue 2.4, May 2008... -
Page 359: Abbreviations And Acronyms
Chapter 6: Reference Abbreviations and Acronyms Abbreviations and Acronyms In addition to industry-wide and/or internationally recognized units of measure, such as Hz, V, AC, DC, A, ms, etc., Table 6-25 lists the abbreviations and acronyms that appear in this document. Compact flash is a type of data storage device packaged in a matchbook-sized ®... - Page 360 Chapter 6: Reference Abbreviations and Acronyms Table 6-25. Abbreviations and Acronyms (Continued) Abbreviation Spelled-Out Meaning Computer Telephony Database Direct Dialing Inward (DID in U.S.) Discard Eligible Digital Expansion Interface Digital Endpoint Module DHCP Dynamic Host Configuration Protocol Deutsche Institute fur Normung (German Institute for Standardization) DKTS A legacy Inter-Tel, Inc.
- Page 361 Spelled-Out Meaning IPRA IPR Application IPRC IP Resource Card ISDN Integrated Services Digital Network IT5K Inter-Tel 5000 Inter-Tel Protocol Local Area Network Liquid Crystal Display Light Emitting Diode License Management Center Loop Start Adapter (port) Loop Start Module Medium Access Control (Address)
- Page 362 Chapter 6: Reference Abbreviations and Acronyms Table 6-25. Abbreviations and Acronyms (Continued) Abbreviation Spelled-Out Meaning Primary Rate Interface PS-1 Processing Server PSTN Public Switched Telephone Network Quality of Service Ringer Equivalence Number Radio Frequency Interference Registered Jack Root Mean Square Real Time Clock RTCP Real-time Transport Control Protocol...
-
Page 363: Glossary
Chapter 6: Reference Glossary Glossary Table 6-26 defines terms used in this manual to describe networking and related Inter-Tel applications. Table 6-26. Networking Terminology Term Definition 2B+D A circuit divided into two 64 kbps B-channels that can carry voice, video, or data. It also has a 16 kbps D-channel for low-speed data and signaling. - Page 364 (PRI) simultaneously. It also has one D-channel for out-of-band signaling and packet data. See also 23B+D and 30B+D. The Inter-Tel 5000 family of Network Communications Solutions does not support the use of the D-channel for packet data. ® Page 6-42 Inter-Tel 5000 Installation Manual –...
- Page 365 Chapter 6: Reference Glossary Table 6-26. Networking Terminology (Continued) Term Definition Primary Rate Interface Allows communication between a private branch exchange (PBX) system and a Centrex Nodal/Centrex Express system. (Currently not supported on Inter-Tel 5000 platforms.) Private Line Integration Allows the system to have private lines using individual channels. The D-channel is not used on the private lines.
-
Page 367: Inter-Tel Private Networking
Appendix A: Inter-Tel Private Networking Inter-Tel Private Networking Appendix A: Inter-Tel Private Networking Introduction ..............A-2 Planning the Network . -
Page 368: Introduction
Appendix A: Inter-Tel Private Networking Introduction Introduction The Inter-Tel CS-5200/5400/5600 is capable of connecting with other Inter-Tel 5000 platforms and Inter-Tel Axxess Advanced Communications Platforms to form a network that supports many call processing features. This networking capability can be implemented using point-to- point T1/E1 PRI circuits, or it can be implemented using IP networking. - Page 369 Appendix A: Inter-Tel Private Networking Introduction Figure A-1 on page A-2 shows the networking types: IP and T1/PRI connections. Each type can communicate directly with another node that uses the same connection type. For example: • Phoenix and Austin can speak directly to each other through the IP Resource Application and the IP network.
-
Page 370: Planning The Network
Appendix A: Inter-Tel Private Networking Planning the Network Planning the Network The most important step in setting up a network is planning. Without careful planning, the network will be difficult to program and maintain. If necessary, see Network IP Topology information on network topology, including firewalls and NAT. -
Page 371: Design The Network
Appendix A: Inter-Tel Private Networking Design the Network Design the Network For optimum network operation, follow these guidelines: • Carefully manage the traffic on a central node: The central node is susceptible to unintentional bottlenecks. Tips for preventing bottlenecks on the central node are: o If the node contains an EM or Voice Processing Unit voice mail system with more than 16 ports and more than 128 Executive Display, Professional Display, or Model 8560 endpoints, redistribute the load by moving some of the Executive Display, Professional... -
Page 372: T1/Pri Or E1/Pri Networking
To install a network, you need the following: • Inter-Tel 5000 platform: The Inter-Tel CS-5200 provides 3 IP resources for networking. The Inter-Tel CS-5400 or CS-5600 provides 6 networking IP resources. To increase the number of IP networking resources, you must have the IP Networking license. With the IP Networking license in place, you can then decrease the resource allocations for endpoints, faxing, or networking resources. -
Page 373: T1/Pri And E1/Pri Programming
You can also configure T1/E1 PRI networking using the Networking Wizard. The section here describes each portion of the networking in DB Programming. For programming information discussed here, refer to the Inter-Tel 5000 Features and Programming Guide (part no: 580.8006). - Page 374 Appendix A: Inter-Tel Private Networking T1/PRI and E1/PRI Programming Check that the T1M or T1M-2 module has been installed and configured for either T1/ PRI or E1/PRI. Also, if using PRI, make sure you have the PRI software feature license, part no.
- Page 375 Appendix A: Inter-Tel Private Networking T1/PRI and E1/PRI Programming T1/PRI networking only. Set the Line Build-Out for both nodes. In the Communications Server folder, locate the module configured in each node (for networking) and set the following: a. Click on the module configured for T1/PRI or E1/PRI. b.
- Page 376 Appendix A: Inter-Tel Private Networking T1/PRI and E1/PRI Programming Create Off-Node IP Connections (for each node that will network to the other). a. Under the Devices and Feature Codes/IP Connections/<Off Node IP Connection Group number> folder, right-click in the empty area and select Create Off-Node IP Connection.
-
Page 377: Ip Networking
Appendix A: Inter-Tel Private Networking IP Networking IP Networking Refer to the Inter-Tel 5000 Features and Programming Guide (part no: 580.8006) for information discussed in this section. The Inter-Tel CS-5200/5400/5600 system can also provide networking using an IP network. You can also configure IP networking using the Networking Wizard. -
Page 378: Ip Resource Programming
For a programming example, see page A-11. For details discussed in this procedure, refer to the Inter-Tel 5000 Features and Programming Guide (part no: 580.8006), as applicable. To program the database: Under System\Communication Server, add and equip a T1M or T1M-2 module for networking. - Page 379 Appendix A: Inter-Tel Private Networking IP Resource Programming Verify that the remote IP connection is located under the Node IP Connection Group folder. a. Double-click the remote node extension under System\Devices and Feature Codes\IP Connections. There should be a P8XXX extension listed under the Node IP Connection Groups field.
- Page 380 Appendix A: Inter-Tel Private Networking IP Resource Programming Under System\Devices and Feature Codes\Node IP Connection Groups, enter a description and username for the each P8XXX extension. Use a description/username that identifies where the off-node extensions reside. For example, if P8000 includes the off-node IP connection extension for connecting to Node 2, use TO NODE 2 as the description/username for P8000.
-
Page 381: Extension Numbers
Appendix A: Inter-Tel Private Networking Extension Numbers Extension Numbers Each node has an extension and feature code programming. However, the network should have a universal numbering plan so that extension numbers on the various nodes do not overlap and do not conflict with feature codes. That is, when planning the extension numbers for each of the nodes in the network, set aside a block of extension numbers (for endpoints, hunt groups, Voice Processing applications, etc.) for each node. -
Page 382: Wildcard Character X In Off-Node Extensions
Appendix A: Inter-Tel Private Networking Wildcard Character X in Off-Node Extensions Wildcard Character X in Off-Node Extensions You can use the wildcard character X in extension numbers to represent “any digit.” This allows you to include a range of extensions as one off-node device entry. Wildcard extensions can only be used for off-node devices. -
Page 383: Node Programming
Appendix A: Inter-Tel Private Networking Node Programming Node Programming Each node is programmed individually and contains its own database. Only one DB Programming session—including administrator database programming—may be active on any single node at a time. However, several nodes can have DB Programming sessions active throughout the system. - Page 384 Appendix A: Inter-Tel Private Networking Sample Node Programming Sample Node Programming The programmer must define the routes to every node in the network to give the system the information necessary to route calls. Each node trunk group, and its B-Channels, in a route group must connect the node to another node in the network.
-
Page 385: Sample Node Programming
Appendix A: Inter-Tel Private Networking Sample Node Programming To prevent circular or excessive routes, the system limits the number of “hops.” A call or communication can take up to 10 hops to other nodes. However, 2-3 hops maximum is recommended. Using the example shown in Figure A-3 on page A-18, Figure A-4 on page A-19... - Page 386 Appendix A: Inter-Tel Private Networking Sample Node Programming For example, Linear search type is the preferred method for avoiding glare between two nodes that have two or more connections. Place the Node Trunk Groups in opposite order in the Nodes on each side of the connection and use Linear search type, as shown below. Linear Order Linear Order Node Trunk Grp 97501...
-
Page 387: Node Programming Procedures
Appendix A: Inter-Tel Private Networking Node Programming Procedures Node Programming Procedures Program the network in the following order: Local Node Number Nodes T1M or T1M-2 modules set up for T1/PRI or E1/PRI Node Trunk Groups Node Trunk Lists Off-Node Devices Local Node Number To program a node local node number and description: Make sure you have the PRI software license. -
Page 388: Network Operation Of System Features
Network Operation of System Features When an Inter-Tel 5000 converged communication system is programmed for use in a network the features listed here are affected. Refer to the features information in the Inter-Tel 5000 Features and Programming Guide (part no: 580.8006) for details. - Page 389 Appendix A: Inter-Tel Private Networking Network Operation of System Features • Network Primary Attendant: There can be a network primary attendant programmed on each node. (There is usually one Network Primary Attendant shared by all of the nodes.) When the network needs to direct a call to an attendant, it attempts to direct the call to the network primary attendant first.
- Page 390 Appendix A: Inter-Tel Private Networking Network Operation of System Features • Automatic Route Selection (ARS): Each node has its own ARS programming. All trunk groups and nodes in a facility group must reside on the same node as the facility group. You cannot place a node trunk group into a facility group.
- Page 391 Appendix A: Inter-Tel Private Networking Network Operation of System Features • Transfer Recall Destination: The endpoint transfer recall destination can be an off-node device. • Call Screening: In a network setting, the Voice Processing can provide call screening for a destination extension on another node. However, the node where the Voice Processing is connected must have an off-node device programmed for the destination extension and access to the remote node.
- Page 392 Appendix A: Inter-Tel Private Networking Network Operation of System Features • Day and Night Modes: The network determines the day/night mode status of a call based on the day/night mode status of the node where the trunk resides. • Call Cost: The call cost shown on the display and SMDR output use the factors and rates for the node on which the trunk resides.
- Page 393 Appendix A: Inter-Tel Private Networking Network Operation of System Features • Message Print: Each node has its own message print programming, message print output port, and message print output port backup. There should be a message print terminal at each node to monitor node and network performance and aid in troubleshooting. o If the node Message Print output port is a node, the network sends Message Print records to the specified node.
-
Page 394: Network-Wide Alarms
Appendix A: Inter-Tel Private Networking Network-Wide Alarms Network-Wide Alarms To allow one administrator to monitor multiple nodes, the system provides both system alarms and network-wide alarms: • Network-Wide Alarms: When an event occurs that generates a network-wide alarm, the alarm is broadcast to every node in the system. •... - Page 395 Appendix A: Inter-Tel Private Networking Clearing Network Alarms Figure A-5. Network Planning Sheet NODE #__ LOC: ___________ NODE #__ LOC: ___________ EXTENSIONS: EXTENSIONS: NODE #__ LOC: ___________ NODE #__ LOC: ___________ EXTENSIONS: EXTENSIONS: NODE #__ LOC: ___________ NODE #__ LOC: ___________ EXTENSIONS: EXTENSIONS: NODE #__ LOC: ___________...
- Page 396 Appendix A: Inter-Tel Private Networking Clearing Network Alarms Figure A-6. Network Numbering Plan Worksheet Determine the following numbers for the network: Voice Processing Unit Node Number: Voice Mail Application Number: Message Notification/Retrieval Application Number: Record-A-Call Application Number: EXTENSION NUMBERS: Network Primary Attendant: Node 1 Range Of Extensions: Node 2 Range Of Extensions: Node 3 Range Of Extensions:...
- Page 397 Appendix A: Inter-Tel Private Networking Clearing Network Alarms Figure A-7. IP Networking Planning Worksheet (example) The following is an example of a completed IP Private Networking Planning sheet. A blank sheet is provided on the following page for your use. Node 1 Node 2 Node 3...
- Page 398 Appendix A: Inter-Tel Private Networking Clearing Network Alarms Figure A-8. IP Networking Planning Worksheet (blank) Node 1 Node 2 Node 3 Node 4 Extensions Area Code Nodes (Node Route Group) IP Connection Group Node IP Connection Group IPRA (Networking) IPRA (Station) MGCP IPPhone Plus Subnet...
-
Page 399: Network Ip Topology
Appendix B: Network IP Topology Network IP Topology Appendix B: Network IP Topology Introduction ..............B-2 Terminology . -
Page 400: Introduction
NAT IP Address: This is the public IP address that is statically mapped to the Inter-Tel 5000 system IP address. • Native IP Address: This is the IP address of the Inter-Tel 5000 system network interface. This is the Inter-Tel 5000 system real IP address. •... -
Page 401: Terminology
Appendix B: Network IP Topology Terminology • Port: In Internet Protocol terminology, a port is a logical subaddress of an IP address. The port usually indicates the application layer protocol being used (for example, TCP port 80 indicates http). • Private: In networking terminology, private refers to the portion of a network within an organization. -
Page 402: Network Address Translation Overview
Appendix B: Network IP Topology Network Address Translation Overview Network Address Translation Overview Network Address Translation (NAT) is an Internet standard that enables a local-area network (LAN) to use one set of IP addresses for internal traffic and a second set of addresses for external traffic. -
Page 403: Communication Types
SSH/Telnet/USB Console IP Endpoints and Trunks The Inter-Tel 5000 platform communicates to endpoints through the internet protocol (IP). There is an Inter-Tel proprietary protocol known as Inter-Tel Proprietary mode (ITP) as well as the industry-standards protocol SIP, MGCP, OAI, and RTP. -
Page 404: Topology Requirements
Appendix B: Network IP Topology Computer Telephony Integration (CTI) Computer Telephony Integration (CTI) This section discusses computer telephony integration using the Open Architecture Interface (OAI). Inter-Tel Audio and Web Conferencing Inter-Tel Audio and Web Conferencing runs on a standalone server to provide multiparty audio conferences. -
Page 405: Private (Trusted) Networks
Appendix B: Network IP Topology Private (Trusted) Networks Private (Trusted) Networks With regard to the last bullet in “Topology Requirements” on page B-6, all configurations require that the Inter-Tel CS-5200/5400/5600 system, SIP Server, and IWAC are on the same network. In the simplest form, all IP devices, including endpoints, are on the same network as shown in the following illustration. - Page 406 Appendix B: Network IP Topology Private (Trusted) Networks To allow IP endpoints on the Internet in the private networking scenario described above, you may want to consider the following options: • Configure a static NAT assignment in the near-end NAT. Program the CS-5200/5400/5600 to know its NATed address along with which endpoints are connecting from the Internet.
-
Page 407: Public (Untrusted) Networks
Appendix B: Network IP Topology Public (Untrusted) Networks Public (Untrusted) Networks The private networking scenarios discussed in “Private (Trusted) Networks” on page B-7 impose very few restrictions on the topology of the IP telephony equipment because there are no security barriers between devices. However, one of the major benefits of IP telephony is the ability to leverage the existence of large public IP networks (for example, the Internet) to extend the communication network. - Page 408 Appendix B: Network IP Topology Public (Untrusted) Networks In some environments, DMZs are implemented in what is referred to as a two-tier architecture using two firewalls as shown in the following example. In this environment, the DMZ is between the inside trusted network and the outside untrusted network. The security issues are still the same, but the configuration is split between the two firewalls.
- Page 409 Appendix B: Network IP Topology Public (Untrusted) Networks For the Inter-Tel CS-5200/5400/5600 system and other IP devices to function properly in the DMZ, the DMZ must be a non-NAT network . That is, the devices in the DMZ use public IP addresses.
- Page 410 Appendix B: Network IP Topology Public (Untrusted) Networks This topology uses public addressing. To support IP addressing means that Inter-Tel networking must be routed over the Internet. To use Inter-Tel Private Networking, set up each location in the same manner. An example is shown in the following illustration. DB Programming, OAI Apps, DB Programming,...
-
Page 411: Configuring Near-End Nat Traversal For Ip Endpoints
Appendix B: Network IP Topology Configuring Near-End NAT Traversal for IP Endpoints Configuring Near-End NAT Traversal for IP Endpoints The Inter-Tel CS-5200/5400/5600 supports traversing near-end NAT using statically assigned NAT addresses. An administrator configures the NAT device to always associate a specific public address with the Inter-Tel CS-5200/5400/5600 native address. - Page 412 Appendix B: Network IP Topology CS-5200 CS-5200 To set up Near-End NAT Traversal for IP Endpoints on a CS-5200 system: Configure the firewall/NAT device for a static mapping. This associates a public IP address with the Inter Tel CS-5200/5400/5600 native private address. Configure the firewall security settings for the newly mapped IP address(es) as described in “Port Usage Summary”...
- Page 413 Appendix B: Network IP Topology CS-5200 For the “internal” IP endpoints (those in the internal network with private addresses), set the NAT address type Native , and configure the IP endpoints to communicate with the Inter-Tel CS-5200 (private) internal address, 192.168.1.2. Incorrect configuration may result in an undesirable effect called tromboning (also known as “hairpinning”).
- Page 414 Appendix B: Network IP Topology CS-5400 CS-5400 To set up Near-End NAT Traversal for IP Endpoints on a CS-5400 system: Configure the firewall/NAT device for a static mapping for the IP address of the Processor Expansion Card. This associates a public IP address with the Inter Tel CS- 5400 native address of the Processor Expansion Card.
-
Page 415: Configuring Near-End Nat Traversal For Ip Gateway Trunks
Appendix B: Network IP Topology Configuring Near-End NAT Traversal for IP Gateway Trunks Configuring Near-End NAT Traversal for IP Gateway Trunks In addition to IP endpoints, the Inter-Tel CS-5200/5400/5600 also supports near-end NAT traversal for IP trunk gateways. Note that IP trunk gateways impose additional restrictions on far-end NAT. -
Page 416: Firewall Configuration
Appendix B: Network IP Topology Firewall Configuration Firewall Configuration In computer networks, a totally secure network is practically impossible. In general, the more types of communications allowed from the Internet, the less secure the network. Therefore, a network should be configured so as to allow only the minimum level of communication unless other capabilities are required. -
Page 417: Internal Session Initiation Protocol (Sip
Appendix B: Network IP Topology Remote Maintenance and Diagnostics Remote Maintenance and Diagnostics These protocols provide capabilities to diagnose problems, update software, etc. To enable remote maintenance and diagnostics over the Internet, enable the ports for DB Programming (TCP port 4000), Web interfaces (TCP port 80), SSH (TCP port 22), and AVDAP Monitor (TCP port 4444). -
Page 418: Port Usage Summary
Port Usage Summary Port Usage Summary Stateful Packet Inspection (SPI) is required when an Inter-Tel 5000 platform is placed in a non- NATed DMZ in an Inter-Tel Private Networking scenario and is communicating over the Internet. A port is a form of addressing that is subordinate to IP addressing. As such, port numbers serve to distinguish one protocol or application from another at the same IP address. -
Page 419: Comparison Of Inter-Tel Advanced Communications Platforms
Tel CS-5400 has two IP addresses. The second IP address is used for VoIP only. • Because the Inter-Tel 5000 has a single physical Ethernet interface, it has a single network location. It cannot operate both inside the firewall and outside the firewall. -
Page 420: Example Cisco ® Configuration Commands
Appendix B: Network IP Topology ® Example Cisco Configuration Commands Example Cisco Configuration Commands ® The following commands are provided as an example to further illustrate the recommended configuration with respect to security. QoS configuration is beyond the scope of this appendix. ®... -
Page 421: Private Network With Near-End Nat Traversal
Appendix B: Network IP Topology Private Network With Near-end NAT Traversal The following commands set up the connection to the internal LAN. NAT is enabled, and it uses access-group e0in for traffic coming in (to the router) from the internal LAN. interface Ethernet0/0 description Internal LAN ip address 192.168.1.1 255.255.255.0... - Page 422 Appendix B: Network IP Topology Private Network With Near-end NAT Traversal The following command associates the public address with the Inter-Tel CS-5200/5400/5600 private address. This creates the “NATed” address. The ISP must be known to send packets for this public IP to the Inter-Tel CS-5200/5400/5600. ip nat inside source static 192.168.1.2 208.13.17.2 The following commands set up the dynamic NAT configuration to use a pool of public addresses.
- Page 423 Appendix B: Network IP Topology Non-NAT DMZ Configuration Non-NAT DMZ Configuration The following illustrates a nonNAT DMZ configuration. Internet External Endpoint Dynamic Public IP S0/0 208.13.17.33/30 Non-NAT DMZ E1/0 208.132.23.64/26 E0/0 192.168.100.1/24 Inter-Tel CS-5x00 Internal LAN 208.132.23.66 UC/SIP Server Enterprise Conferencing 208.132.23.67 208.132.23.68 Internal Endpoint...
-
Page 424: Single Node With Itp Endpoints
Appendix B: Network IP Topology Single Node with ITP Endpoints • The following section sets up the connection to the Internet. NAT is enabled between the Internet and the internal LAN. Traffic from the Internet is filtered using the access-group called Internet. -
Page 425: Itp Endpoints And Inter-Tel Networking
Appendix B: Network IP Topology ITP Endpoints and Inter-Tel Networking ITP Endpoints and Inter-Tel Networking This example shows that to add support for Inter-Tel networking, you expand the ACL to allow the Inter-Tel Private Networking port to be accessible from the Internet to the Inter-Tel CS-5200/ 5400/5600 system. -
Page 426: Adtran Netvanta ® Switch/Router Example
Appendix B: Network IP Topology ® Adtran NetVanta Switch/Router Example Adtran NetVanta Switch/Router Example ® ® ® Adtran provides a family of products (NetVanta ) that are a combination of switch, router, and firewall . The security considerations are independent of the router vendor, but the implementation of the DMZ using Adtran NetVanta products is slightly different. - Page 427 Appendix B: Network IP Topology ITP Endpoints and Inter-Tel Private Networking • Each VLAN functions as a port on the router with its own IP address. Also, apply access policies to each interface. The access policies are defined further below. interface vlan 1 ip address 192.168.1.1...
-
Page 428: Private Network With Near-End Nat Traversal
Appendix B: Network IP Topology Private Network With Near-End NAT Traversal Private Network With Near-End NAT Traversal The following diagram shows an example configuration. Home Office LAN IP Endpoint (Private Address) Home Office Router (e.g. The IP endpoint must be Linksys) configured to talk to the (public) NAT IP address of the Inter -Tel... - Page 429 Appendix B: Network IP Topology Private Network With Near-End NAT Traversal In this example, the connection is to the Internet with a T1. Set up the IP address and apply the access policy (defined further below). In this example, assume that the ISP is configured with this address as a gateway for the (public) NATed addresses.
- Page 430 Appendix B: Network IP Topology Non-NATed DMZ Configuration • These commands define the policy for the interface to the private (trusted) network. Each policy can specify more than one access list. From a security perspective, allow everything from the trusted network. The “nat” commands define the behavior of outbound NAT. If the packet is from the Inter-Tel CS-5200/5400/5600, translate the source address to the specified public address.
- Page 431 Appendix B: Network IP Topology Non-NATed DMZ Configuration Each VLAN performs as a port on the router with its own IP address. Access policies are applied to each interface. The access policies are defined further below. interface vlan 1 ip address 192.168.1.1 255.255.255.0 access-policy Private...
- Page 433 Appendix C: Open Source License Agreements Open Source License Agreements Appendix C: Open Source License Agreements Introduction ..............C-2 List of Licenses .
-
Page 434: Introduction
GNU Lesser General Public License : Used by the following software (see page C-8 details). o Glibc : A version of the GNU C library provided with the Inter-Tel 5000 platform v1.2 and later. o Libusb : A version of the USB library provided with the Inter-Tel 5000 platform v1.2 and later. -
Page 435: Abbreviations
Appendix C: Open Source License Agreements Abbreviations Abbreviations This appendix refers to the selected abbreviations listed in the following table. Table C-1. Selected Abbreviations Abbreviation Meaning GNU’s Not Unix General Public License LGPL Lesser GPL NOTICE The licenses contained in this section are represented as they appear in the original sources, with one exception. -
Page 436: Gnu Public License
Appendix C: Open Source License Agreements GNU Public License GNU Public License Version 2, June 1991 Copyright (C) 1989, 1991 Free Software Foundation, Inc. 51 Franklin Street, Fifth Floor, Boston, MA 02110-1301, USA Everyone is permitted to copy and distribute verbatim copies of this license document, but changing it is not allowed. -
Page 437: Terms And Conditions For Copying, Distribution, And Modification
Appendix C: Open Source License Agreements Terms and Conditions for Copying, Distribution, and Modification Terms and Conditions for Copying, Distribution, and Modification This License applies to any program or other work which contains a notice placed by the copyright holder saying it may be distributed under the terms of this General Public License. - Page 438 Appendix C: Open Source License Agreements Terms and Conditions for Copying, Distribution, and Modification You may copy and distribute the Program (or a work based on it, under Section 3) in object code or executable form under the terms of Sections 2 and 3 above provided that you also do one of the following: a.
- Page 439 Appendix C: Open Source License Agreements Terms and Conditions for Copying, Distribution, and Modification If, as a consequence of a court judgment or allegation of patent infringement or for any other reason (not limited to patent issues), conditions are imposed on you (whether by court order, agreement or otherwise) that contradict the conditions of this License, they do not excuse you from the conditions of this License.
-
Page 440: Gnu Lesser General Public License
Appendix C: Open Source License Agreements No Warranty No Warranty BECAUSE THE PROGRAM IS LICENSED FREE OF CHARGE, THERE IS NO WARRANTY FOR THE PROGRAM, TO THE EXTENT PERMITTED BY APPLICABLE LAW. EXCEPT WHEN OTHERWISE STATED IN WRITING THE COPYRIGHT HOLDERS AND/OR OTHER PARTIES PROVIDE THE PROGRAM “AS IS”... - Page 441 Appendix C: Open Source License Agreements Preamble For example, if you distribute copies of the library, whether gratis or for a fee, you must give the recipients all the rights that we gave you. You must make sure that they, too, receive or can get the source code.
-
Page 442: Terms And Conditions For Copying, Distribution, And Modification
Appendix C: Open Source License Agreements Terms and Conditions for Copying, Distribution, and Modification Terms and Conditions for Copying, Distribution, and Modification This License Agreement applies to any software library or other program which contains a notice placed by the copyright holder or other authorized party saying it may be distributed under the terms of this Lesser General Public License (also called “this License”). - Page 443 Appendix C: Open Source License Agreements Terms and Conditions for Copying, Distribution, and Modification These requirements apply to the modified work as a whole. If identifiable sections of that work are not derived from the Library, and can be reasonably considered independent and separate works in themselves, then this License, and its terms, do not apply to those sections when you distribute them as separate works.
- Page 444 Appendix C: Open Source License Agreements Terms and Conditions for Copying, Distribution, and Modification Otherwise, if the work is a derivative of the Library, you may distribute the object code for the work under the terms of Section 7. Any executables containing that work also fall under Section 7, whether or not they are linked directly with the Library itself.
- Page 445 Appendix C: Open Source License Agreements Terms and Conditions for Copying, Distribution, and Modification It may happen that this requirement contradicts the license restrictions of other proprietary libraries that do not normally accompany the operating system. Such a contradiction means you cannot use both them and the Library together in an executable that you distribute.
-
Page 446: No Warranty
Appendix C: Open Source License Agreements No Warranty If the distribution and/or use of the Library is restricted in certain countries either by patents or by copyrighted interfaces, the original copyright holder who places the Library under this License may add an explicit geographical distribution limitation excluding those countries, so that distribution is permitted only in or among countries not thus excluded. -
Page 447: Lighttpd
Appendix C: Open Source License Agreements Lighttpd Lighttpd Copyright (c) 2004, Jan Kneschke, incremental All rights reserved. Redistribution and use in source and binary forms, with or without modification, are permitted provided that the following conditions are met: • Redistributions of source code must retain the above copyright notice, this list of conditions and the following disclaimer. -
Page 448: Embedded Configurable Operating System
C-2. To obtain the source code of third-party components licensed under the GNU General Public License or Lesser General Public License, email gplrequest@mitel.com. ® Page C-16 Inter-Tel 5000 Installation Manual – Issue 2.4, May 2008... - Page 449 Index Index Symbols Assembling Main Distribution Frame (MDF) backboard 5-60 Assembling and Cabling the Main Distribution Frame 5-60 10Base-T Module 5-108, 5-109 Assembly Wiring for T1/PRI Trunks 5-30 237A Krone termination block 4-11 Associate Display Endpoint 66M1-50 terminal block 4-9 headset 5-131 99 Nodes Support 4-57 PCDPM cable connections 5-189, 5-195...
- Page 450 Index Backing Up the Database 5-96 Burst Rate (BR) 4-54 Backup Database 5-96 BVM Forward to E-Mail Characteristics 4-37 Bad Flash 5-118 BVM Licenses, Time Slot Group Ports, and IP Resources Allo- cated 4-36 Bandwidth 6-41 BVM See Basic Voice Mail Barrel Jack 5-109 BVM Voice Mail Ports 4-37 Base Server 4-18...
- Page 451 Index CAT 5/CAT 5e 4-10 Components of a Processor Module (PM-1) 5-37 CAT 5/CAT5e 4-20 Computer Telephony Integration (CTI) B-6 CAT5e Conferencing See Cables and Cabling resources 4-19 resources on Processor Module (PM-1) 4-19 CF (Compact Flash) 5-107 Configuration Changing Protocol Modes network 5-7, A-6 ITP and SIP 5-115 Configuring Near-End NAT Traversal for IP Endpoints B-13...
- Page 452 5-57 Dedicated Isolated Circuit 4-5 Digital Phones, Single-Line Sets, and Executone Phones 5-57 Default Feature Codes 6-27 Dimensions of Inter-Tel 5000 Base Server 4-18 Defaulting IP SLA Settings 5-176 Direct Station Select (DSS)/Busy Lamp Field (BLF) Equipment DEI and External Voice Mail Connection to Base Server 5-66...
- Page 453 Index DSP (Digital Signal Processor) Endpoint Cabling 5-20, 5-55 failure 5-120 Endpoint Capacities of Inter-Tel 5000 Platforms 4-17 not running 5-120 Endpoint Feature Codes 6-28 DSS/BLF Endpoint LED Flash Rates 4-45 See Direct Station Select/Busy Lamp Field Unit Endpoint License Activation Process 3-18...
- Page 454 Example of IP Networking Programming A-11 Model 8690 6-16 Example TFTP Server Configuration 5-142 network operation A-22 Example VPU or DEI Connection to Inter-Tel 5000 Base Server summary of system 3-3 5-73 Ferrite Split Beads 5-26, 5-78 Executive Display Endpoint...
- Page 455 In Professional Display or Associate Display Endpoints 5-186 General 3-17 In Progress 5-118 Glibc C-8 Initial Mitel Endpoint – Automatic Configuration (DHCP) 5-159 Glossary 6-41 Initial Mitel Endpoint – Manual Configuration 5-160 GNU Public License C-4 Initial Recording Handling 4-37...
- Page 456 Index Installing a Mini-DSS Unit 5-180 Inter-Tel 5000 Equipment and Peripheral Cables Installing a PCDPM 5-183 Inter-Tel 5000 Platform Licenses and Security Key Installing a Processor Expansion Card (PEC-1) 5-38 Inter-Tel 5000 System Kits Installing a Processor Module (PM-1) 5-36...
- Page 457 License, Software 4-20 IP Resource Application 4-21 Licenses 6-6 IP Resource Programming A-12 overview 3-18 IP Resources 3-19 Licenses for Inter-Tel 5000 DEI Units 3-18 IP Resources Defined 3-19 Licensing 5-51 IP Single-Line Adapter 4-50 Licensing Capacities 4-16 Description 4-51 Licensing for v2.x and Inter-Tel CS-5600 Upgrades 3-15...
- Page 458 Mini-DSS 4-48 LSM-4 Module 5-42 Mini-DSS Installation 5-181 Misc Error 5-118 MItel 5330/5340 Setup for Teleworking 5-161 Mitel Endpoint Hardware Installation and Cabling Procedure 5- MAC Address 5-120 Main Distribution Frame Mitel IP Endpoint Environmental Conditions 4-43 66M1-50 4-9 Mitel IP Endpoint Installation Troubleshooting 5-158...
- Page 459 Index Model 8500 Phone Model 8690 Endpoint 6-16 message lamp 6-26 Models 8600, 8620, and 8662 5-106 Model 8500, 8520, and 8560 Endpoints Models 8600, 8620/8622, and 8662 5-106 self-test 5-125 Models 8620, 8662, and 8690 5-118 self-test matrix 5-127 Models 8620/8622 and 8662 Dimensions 4-40 Model 8500, 8520, and 8560 Endpoints Self-Test Key Matrix 5-...
- Page 460 Index Network A-2 No Warranty C-8, C-14 alarms A-28 Node IP Connection Group 3-20 bandwidth requirements 4-53 Node Programming A-17, A-21 capability analysis 4-53 Node Programming Procedures A-21 clock circuitry 4-19 Nodes A-21 configuration 5-7, A-6 number A-21 connecting nodes 5-32 programming A-17, A-21 delay 4-53 programming procedure A-21...
- Page 461 4-23 PCDPM Installation in an Executive or Standard Display End- Positive Disconnect 5-179 point 5-188 Possible Upgrade Scenarios for Inter-Tel 5000 v2.0 or Later 5- PCDPM Installation on Executive or Standard Display Endpoints 5-193 Power Cord Socket 4-23 PCDPM-to-MDPM Cables, Stripe Orientation For 5-193...
- Page 462 Index Power Supply 4-5 Professional Display Phone compatibilities 5-101 display 6-26 isolated dedicated circuit 4-5 Programming universal 5-104 off-node extension numbers A-15 Power Supply Kits 5-103 Programming an SLA for Dual DID Trunks 5-134 Powering Down the System 5-88 Programming Code 5-117 Powering Up the System 5-87 Programming for Node 1 A-11 Preamble C-4, C-8...
- Page 463 Index Requirements Single Line Module Pinouts 5-76 for Topology B-6 Single Line Module, 4-Port Resources Available with Chassis and DEM-16s 4-35 capacity 4-15 specifications 4-30 Restoring the Database 5-94 Single Line Module, 8-Port Retrieving SMDR or Error Message Output Data 5-99 capacity 4-15 Review and Update for Enabling a Voice Processor 5-173 specifications 4-34...
- Page 464 Index Softphone System Model 8601 6-20 alarms clearing A-28 SIP only 4-44 clock 4-19 Software Feature Licensing 3-17 upgrading 5-136 Software License 3-12, 4-20 System Administrator Default Feature Codes 6-35 database restore 5-95 System Alarm #203 5-93 description 3-17 features requiring license 3-17 System Alarms for Insufficient Licensing 3-18 number of licenses per system 3-17 System Board...
- Page 465 Index T1 Trunks, continued Temporary Files 4-37 fractional 4-25 Temporary Files, Voice Mail 4-37 framing type 4-25, 4-26 Terminating Cables at Digital Endpoint Locations 5-57 installation 5-11, 5-54, 5-60, 5-136 Terminating the Cables at Station Locations 5-57 line build-out 4-25, 4-27 Terminology B-2 master/slave clock 4-25 Terms and Conditions for Copying, Distribution, and Modification...
- Page 466 Upgrading from CS-5400 v1.x or v2.x to CS-5600 v2.x 5-165 Wall-Mounting IP Endpoints 5-110 Upgrading from Inter-Tel CS-5200 to CS-5400 3-14 Wall-Mounting Mitel IP Endpoints 5-157 Upgrading Only Software 5-163 Wall-Mounting Model 8500, 8520, and 8560 Digital Endpoints 5- Upgrading System and Application Software 5-137...
- Page 468 Part No. 580.8000 Issue 2.4, May 2008 A691/9111A...