Mitel 3300 Technician's Handbook
3300 ip communications platform communications director release 5.0
Hide thumbs
Also See for 3300:
- Technician's handbook (320 pages) ,
- General information manual (184 pages) ,
- Hardware technical reference manual (161 pages)

Related Manuals for Mitel 3300


Summary of Contents for Mitel 3300
- Page 1 MITEL 3300 IP Communications Platform Technician’s Handbook Mitel Communications Director Release 5.0...
- Page 2 Mitel or any of its affiliates or subsidiaries. Mitel and its affiliates and subsidiaries assume no responsibility for any errors or omissions in this document.
-
Page 3: Table Of Contents
Install System Software ....................6 Maintain System ......................7 Install and Replace Units ....................7 About the 3300 ICP .......................8 3300 ICP Documentation - Mitel eDocs ................8 Contacting Mitel ......................9 Chapter 2 : Initial Setup Connect PC to Controller ....................13 PC Requirements ......................13 AX, MXe, CX, CXi, CX II and CXi II Controller .............13... - Page 4 Installing System Software on the FTP Server ..............106 Upgrade to MCD 5.0 and Group Licensing ..............107 Upgrade the 3300 ICP Software on the MXe Server ............108 Upgrading/Installing with Maximum Elements Change ............ 108 Upgrade to Rel 6.0 or later with Flexed Dimensions ............110 Apply a Software Patch ....................
- Page 5 Recover MXe Server ......................146 Before You Begin ......................146 Install Replacement Hardware ..................146 Connect Laptop PC and CD/DVD Drive ..............147 Install Mitel Application Server Software ..............148 Configure MAS Parameters ..................149 Configure Server Manager Fields ................150 Reset MXe Server System IP Address to default ............155 Chapter 6 : Install and Replace Units Component Replacement Notes ..................159...
- Page 6 Enter document Title using Variable Analog Main Board ......................175 MXe ..........................175 CX/CXi ........................176 CX II/CXi II ......................... 178 Analog Option Board ......................179 CX/CXi ........................179 CX II/CXi II ......................... 180 Configure Embedded Analog Boards ................ 183 Application Processor Card ....................
- Page 7 Table of Contents Dual T1/E1 Framer .....................250 Quad BRI Framer .......................250 Analog Board (CX/CXi, CX II/CXi II, and MXe Controllers) ........251 Line Cards (AX Controller) ..................253 Controller Alarm Port Pinouts ..................253 Controller Remote Alarm Behavior ................253 Network Services Units .....................254 Universal/R2 NSU .......................254 BRI NSU ........................258 Analog Services Unit ......................260...
- Page 8 Enter document Title using Variable Implementing a Voice-Only Network ................317 Implementing a Voice and Data Network ..............319 Installing External Layer 2 Switches ................322 Windows 2000 FTP Server ....................326 Appendix D : Status LEDs Controller LEDs ........................ 332 Controller Alarm LEDs (AX, MXe/MXe Server) ............
- Page 9 Table of Contents Appendix G : Older Hardware and Software Procedures for Older Controllers ..................395 Programming the Controller DHCP Server Settings (prior to Rel 7.0) ......395 To use an alternative DHCP server (prior to Rel 7.0) ..........396 Configuring a Windows 2000 DHCP Server (prior to Release 7.0) ......397 Program DHCP for VLAN (prior to Rel 7.0): ...............399 Connect a Windows 95/98 PC to the NSU via Dial-Up ..........401 Physically Connecting the PC to an NSU ..............402...
- Page 10 Enter document Title using Variable...
-
Page 11: Chapter 1 : Getting Started
Chapter 1 Getting Started... - Page 12 3300 ICP Technician’s Handbook...
-
Page 13: Purpose Of This Handbook
CAUTION: Indicates a potentially hazardous situation that could result in damage to the equipment. Safety Instructions A printable version of the Safety Instructions is available on the Mitel Customer Documentation web site. CAUTION: Read the safety instructions before performing the... - Page 14 3300 ICP Technician’s Handbook CAUTION: Failure to follow all instructions may result in improper equipment operation and/or risk of electrical shock. Refer to “3300 Safety Instructions” for complete safety infor- mation. CAUTION: To prevent ESD damage to the equipment: (1) Ensure that the system is grounded before you install a card.
-
Page 15: Start Here Guide
MXe, CX, CX i CX II and CXi II: provided on separately ordered hard drive; see Appendix E on page 369 for part numbers. • AX and MXe Server: Mitel Communications Director Installation CD (included with controller) Optional Hardware, such as •... -
Page 16: Initial Setup
3300 ICP Technician’s Handbook Review Appendix C: “Typical Network Configurations” on page 299 Initial Setup “Connect PC to Controller” on page 13 “Establish Communication with Controller” on page 25 “Enable Licenses and Options” on page 29 Install Hardware ... -
Page 17: Maintain System
Getting Started “Install System Software using the Software Installer” on page 91 Upgrade system software: “Online Upgrade” on page 94 “Offline Upgrade” on page 98 “Installing MSL Software on APC (CX/CXi) or APC-CX(i) II (CX II/CXi II)” on page 105 Maintain System ... -
Page 18: About The 3300 Icp
3300 ICP Technician’s Handbook About the 3300 ICP The 3300 ICP is a Voice over IP solution that delivers robust call control, extensive features and supports a wide range of desktop devices and applications for medium-to-large enterprises. There are several system configurations: •... -
Page 19: Contacting Mitel
Getting Started To upgrade software, confirm a current password, or purchase new options and receive a new password, use the AMC at Mitel Online any time. Contacting Mitel Order Desk You can reach the Order Desk at 1-800-796-4835. Repair Services Department You must get a Return of Merchandise Authorization (RMA) form from the Repair Services Department before sending equipment back to Mitel. - Page 20 3300 ICP Technician’s Handbook...
-
Page 21: Chapter 2 : Initial Setup
Chapter 2 Initial Setup... - Page 22 3300 ICP Technician’s Handbook...
-
Page 23: Connect Pc To Controller
IIS or PWS, for example) Tip: Windows 98 with PWS does NOT include an FTP server application required for installations of 3300 ICP Software before Rel 8.0, and will not work for the software installation/upgrade process unless a third-party server application is used. -
Page 24: Power Up The Controller
3. Proceed to “Establish Communication with Controller” on page 25 MXe Server Unlike the other 3300 ICP controllers, the MXe Server arrives complete, with all of the software pre-installed on the hard disk. This includes the Mitel Communications Director (MCD) software and the VxWorks virtual machine. - Page 25 Initial Setup Tip: If you are replacing an existing 3300 ICP controller with an MXe Server and you want to use the same system IP address for the MXe Server, initially you will only be able to connect to the MXe Server from the local subnet.
- Page 26 (see Figure 1). Figure 1: Laptop Connections 3. Open a communication application (for example ProCom or Hyperterminal) on your laptop to the 3300 ICP and set the connection parameters as follows: Table 2: Communication Connection Parameters...
- Page 27 Enter a password. Then, enter it again to verify it. Note that passwords are case-sensitive. Also, see Caution below this table. Select Primary Domain Name Enter name (for example mitel.com) Select System Name Enter name (for example the company name) Enter Local Networking Parameters Enter 192.168.1.8...
- Page 28 9. At the login page, enter Username: admin Password: (enter the Linux admin password that you set through the Server Console). The Managed Application Server Manager application opens. 10. Under Applications, click Mitel Communications Director. The Mitel Communications Director screen is displayed:...
- Page 29 Initial Setup Figure 2: Example of Mitel Communications Director Screen 11. Click Modify to change the existing System IP Address and the APC Gateway Address. 12. Enter the new System IP Address and APC Gateway Address. 13. The IP addresses in the following screens are examples only.
- Page 30 Layer 2 (L2) IP 16. Enter the Voice VLAN ID (1 to 4093), if required for the network. At the bottom of the Mitel Communications Director screen, the following information is displayed: Active 3300 ICP Version: currently active system software version...
- Page 31 Initial Setup latest upgrade. On an initial installation of the 3300 ICP, this field displays "Not Installed". MCD Version: current Mitel Communications Director software version that was installed using the Software Installer tool. It is NOT the software version of the MCD blade software.
- Page 32 Set the date, time, and time zone. Click Save. 28. From the Software Installer, connect to the MXe Server. 29. Re-license the 3300 ICP software on the MXe Server. See “Licensing the MXe Server with AMC” on page 23 for instructions.
-
Page 33: Licensing The Mxe Server With Amc
Password = <your current MSL password> MN 3300 Login = system Password = password The 3300 ICP Address is blank and you won’t be able to edit it. 7. Click Configure. Time: It may take a few minutes for the next screen to appear. -
Page 34: Setting Your Dns Server Ip
3300 ICP Technician’s Handbook Setting your DNS Server IP 1. Log in to the MXe-Server System Administration Tool (for example 10.x.y.25). 2. Navigate to the System IP Properties form. 3. On the lower panel, enter your corporate DNS Server IP address in the DNS Server IP address field. -
Page 35: Establish Communication With Controller
(e), IP address and subnet mask (hex) for controller RTC (Get it from your IT administrator.) gateway inet (g), IP address of the default gateway for the 3300 (must be outside the DHCP range) user (u), ftp password (ftp)), CAUTION: Do not use leading zeroes in the IP addresses. -
Page 36: Configure System Ip Address (Mxe Server)
MXe Server. See Table 1 on page 15 for the list of addresses that will be used by the MXe Server. 5. Launch the web-based MSL Server-Manager, and select the Mitel Communications Director blade panel. The APC IP address will be read-only. -
Page 37: Configure The Layer 2 Switch (Mxe Server)
4. If you are not using the controller’s DHCP server, disable it in the DHCP Server form. Tip: See “Configuring a Windows 2000 DHCP Server (prior to Release 7.0)” on page 397 for information on programming 3300 ICP DHCP settings on a Windows 2000 DHCP server. Configure the Layer 2 Switch (MXe Server) - Page 38 The MXe Server doesn’t have an internal DHCP server, so you must use an external DHCP server. Tip: See “Configuring a Windows 2000 DHCP Server (prior to Release 7.0)” on page 397 for information on programming 3300 ICP DHCP settings on a Windows 2000 DHCP server.
-
Page 39: Enable Licenses And Options
To enable or upgrade licenses and options, you must connect to the AMC using either the MCD Software Installer Tool or the 3300 ICP System Administration Tool. Connecting to the AMC Server requires specific settings for the Software Installer Tool and the System Administration Tool. - Page 40 1. DNS Name Resolution: Because the SI win32sync client performs a name lookup on “register.mitel-amc.com”, the SI host PC needs to be properly configured for DNS name resolution. 2. TCP/IP Source Port on the SI Host: A Windows operating system will use an arbitrary high port for the TCP connection to the AMC.
-
Page 41: Automatic Sync With Amc Via Mcd Software Installer Tool (Rel 6.0 Or Later)
License and Restore, and then click Perform Full Install. 4. Specify the IP address username and password of the FTP server, or if you are using the 3300 FTP server, type in or browse to the location of the upgrade software. - Page 42 3300 ICP Technician’s Handbook 8. In the License and Option Selection screen, enter the ARID (Application Record ID) and click Retrieve Licenses. If the licenses exist, the screen is updated with all of the licenses and options. If the licenses do not exist, the Software Installer will try to connect to the AMC to get licenses.
-
Page 43: Automatic Sync Via System Administration Tool
Initial Setup 15. In the License and Option Selection screen, enter the Application Record ID and select Retrieve Licenses: If licenses exist, the screen is updated with the Purchased Options. If the licenses do not exist, the Software Installer connects to the AMC to obtain the licenses. -
Page 44: Manual License And Options Entry Via Mcd Software Installer Tool
Server. 1. Launch the Software Installer and select either the MXe Server check box or the 3300 ICP check box to get to the Login screen. 2. Enter the Iogin information and the IP addresses. Click Configure. Tip: If the SI is connecting to the MXe from behind a firewall, the firewall must be configured to allow https (443), ftp (20, 21), and ssh (22). -
Page 45: Manual License And Options Entry Via System Administration Tool
Leave this field blank. 2. Select the appropriate Country variant and Configuration Options, and fill in the fields as required (see your Mitel Options sheet). For more information, click Help. Tip: When you Change and Save in the License and Option Selection form (prior to Release 7.0), an error message that references “sysid # 65535”... -
Page 46: Install The Online Help (Optional)
3300 ICP Technician’s Handbook Install the Online Help (Optional) You can install the online Help on all 3300 ICP controllers with the exception of the AX controller using the Software Installer. For the AX controller, you must install the Help either on an external web server or locally on a PC. -
Page 47: Verify The Operation Of The Controller
Initial Setup Verify the Operation of the Controller 1. On the Maintenance PC, access the System Administration Tool. 2. In the System Hardware Profile folder, verify that the information in each of the forms is correct, including the IP address of the E2T for the MXe system. - Page 48 3300 ICP Technician’s Handbook...
-
Page 49: Chapter 3 : Installation And Programming
Chapter 3 Installation and Programming... - Page 50 3300 ICP Technician’s Handbook...
-
Page 51: Install Hardware
Installation and Programming Install Hardware Determine Controller Module Configuration The following illustrations include available components for each controller. Refer to Chapter 6 on page 157 for installation instructions. Figure 5: Slot Locations for the MXe Controller and MXe Server Card Table 4: MXe Controller: Supported Modules Module MMC1... - Page 52 3300 ICP Technician’s Handbook Table 4: MXe Controller: Supported Modules (continued) Module MMC1 MMC2 MMC3 MMC4 MMC5 MMC6 DSP II Echo Canceller Page 2 of 2 Table 5: MXe Server: Supported Modules MMC1 Module MMC2 MMC3 MMC4 MMC5 MMC6 Up to two DSP modules for additional compression...
- Page 53 Installation and Programming Figure 7: Slot Locations for the CXi Controller (with an Ethernet L2 Switch) Note: Only three ASU ports are supported system wide. Figure 8: Slot Locations for the CX Controller (without an Ethernet L2 Switch)
- Page 54 3300 ICP Technician’s Handbook Note: Only three ASU ports are supported system-wide. Figure 9: Slot Locations for the CXi II Controller (with an Ethernet L2 Switch with POE) Figure 10: Slot Locations for the CX II Controller (without an Ethernet L2 Switch)
-
Page 55: Identify Controller Component Options
Installation and Programming Identify Controller Component Options Table 6: Controller Component and Upgrade Options Processor Speed CX/CXi Components MXe II MXe III Server CX/CXi II — — — Embedded CIM —... - Page 56 3300 ICP Technician’s Handbook Table 6: Controller Component and Upgrade Options (continued) Processor Speed CX/CXi Components MXe II MXe III Server CX/CXi II Hard Drives — (page 205) RAID controller — —...
-
Page 57: Remove Controller Cover
Installation and Programming Table 6: Controller Component and Upgrade Options (continued) Processor Speed CX/CXi Components MXe II MXe III Server CX/CXi II Notes: 1. The Quad CIM requires Release 7.1 or later software. The CIM ports on the MXe Server are not available for use, but the LEDs will continue to flash. 2. -
Page 58: Install Controller Modules
Read the Safety Instructions before performing the procedures in this chapter (see “Safety Instructions” on page 3). Tip: Before installing a 3300 ICP, always read the RN for the software you are installing (see “3300 ICP Documentation - Mitel eDocs” on page 8). - Page 59 Installation and Programming 1. Shut down the controller (see page 129). 2. Disconnect all cables from the controller. 3. Remove the controller cover (page 47). 4. Remove the module from its packaging. MXe, MXe Server, CX/CXi, CX II/CXi II 5. Remove the blank module cover at the front of the controller, and insert the module in an appropriate slot.
- Page 60 3300 ICP Technician’s Handbook 6. Carefully slide the MMC face plate under the lip of the controller face plate. See Figure 13. Do not push the MMC past the controller face plate as shown in Figure 14. 7. Re-install and/or re-tighten the screws.
-
Page 61: Install Controller Stratum 3 Clock Module
Installation and Programming Install Controller Stratum 3 Clock Module To install the clock module in the CX/CXi, and MXe: Note: The other controllers use the Stratum 3 Clock, but in each case, the clock is embedded and is not field replaceable. The MXe Server does not use a Stratum 3 Clock. - Page 62 3300 ICP Technician’s Handbook Figure 15: MXe and CX II/CXi II Controller Rack-Mount 4-Piece Bracket Installation MXe (Two-piece Bracket Installation) 1. Attach the mounting brackets to the MXe using the flat head screws provided. 2. Loosely install one frame mounting screw on each side of the frame: in the bottom hole position of the space that the MXe will occupy.
- Page 63 Installation and Programming 5. Tighten all six of the mounting screws. Figure 16: MXe Rack-mount Screw Placement (2-piece Bracket Installation) CAUTION: Remove the MXe from the rack in reverse order. Loosen the bottom screws before the other screws are removed. Never turn the bottom screws while the rack is resting on them.
- Page 64 3300 ICP Technician’s Handbook CX/CXi 1. Peel off the rubber bumper from one of the brackets. Removing the rubber bumper makes it easier to insert the controller into the rack. 2. Turn the cabinet over and place the bracket on the left side of the cabinet as shown in Figure 17.
- Page 65 Installation and Programming CX II and CXi II 1. Position a mounting bracket inside the rack frame at the desired height. Fasten the mounting bracket to the front of the rack frame with two screws—one in the top hole, the other in the bottom (see Figure 18).
-
Page 66: Wall Mount The Cx/Cxi And Cx Ii/Cxi Ii Controller
3/4" plywood that is securely fastened to the wall studs. DO NOT mount the bracket directly onto drywall (sheetrock). Mitel is not respon- sible for units damaged as a result of improper wall mounting. - Page 67 Installation and Programming CX/CXi To wall mount the CX/CXi controller: 1. Turn the controller upside down. 2. Locate the two holes on the bottom of the Controller as shown Figure 21. 3. Assemble the two supplied screws and washers, then screw them into the holes on the bottom of the controller.
-
Page 68: Install Service Units And Cabinets
Install Service Units and Cabinets This section contains detailed information on installing and configuring the Network Services Unit and the Analog Services Unit for the 3300 ICP. This section also contains information on configuring embedded analog. Tip: The MXe Server does not support Network Services Units, Analog Services Units, embedded trunking or embedded analog. - Page 69 Installation and Programming You can double the number of Universal and R2 NSUs in a system by chaining a secondary NSU to each primary NSU connected to the controller. BRI NSUs cannot be chained. Some NSUs must be programmed with the ISDN Maintenance and Administration Tool (IMAT) (see “ISDN Maintenance and Administration Tool”...
- Page 70 6. On the PC, program the BRI NSU using a VT100 emulator (see TB #58004741, “Basic Setup Guide for the MC268 BRI card”). Tip: Although the TB is written for the SX-2000 system, the parameters described are also applicable to the 3300 BRI NSU.
- Page 71 Installation and Programming Analog Services Unit This procedure applies to the ASU, the Universal ASU, and the ASU II (compatible only with Release 7.0 or later software). Ensure that there is a free CIM port on the controller. ASU II mounting instructions: •...
-
Page 72: Installing Sx-200 Bays
Installing SX-200 Bays You can connect up to seven SX-200 Bays to the 3300 MXe controller using CIM or FIM cables. Only SX-200 ELx Bays equipped with BCC III controller cards and ONS, OPS and DNIC station circuits cards are supported. - Page 73 Installation and Programming Note: The 3300 ICP lacks dedicated hardware and software support for the Door Opener facilities available on the SX-200 ICP. Equivalent functionality can be provisioned by using the loudspeaker paging feature and the associated paging relays on the AOB or AMB.
-
Page 74: Install Telephones
Also, all chained phones share the same bandwidth. Note: If you intend to rely on LLDP VLAN Discovery in the network, you must first upgrade the 3300 ICP to Release 7.0 or later and upgrade the IP Phone firmware to version 2.0.0.18 or later. -
Page 75: Install And Configure Music On Hold
IP Phones (requires a DHCP server configured with options 128-133). You can also download firmware to the telephone by plugging it directly into an Ethernet port on the 3300 controller. The controller must be running Release 7.0 or later to provide LLDP-compliant firmware to the telephone. -
Page 76: Installing Dnic Music On Hold/Paging Unit
(according to the manufacturer’s instructions). 6. Connect the external speakers as required to the paging adapter via the MDF (according to the manufacturer’s instructions). Tip: Refer to the 3300 ICP Hardware Technical Reference Manual for connector pinouts. Program 5485 IP Paging Unit Note: See Table 46 for the paging unit pinout and Figure 119 on page 266 for the cross connection wiring. -
Page 77: Register Ip Devices From The Telephone
Ensure that the station is not restricted from Paging. Register IP Devices from the Telephone Use this procedure to register IP devices with the 3300 ICP database. The procedure will program the 3300 ICP database with the MAC address of the IP device. - Page 78 1. Connect the IP device to an RJ-45 Ethernet port on the LAN. For the CXi and CXi II, connect to a controller Ethernet port. 2. Provide power to the IP device (refer to the 3300 ICP Hardware Technical Reference Manual at on Edocs (http://edocs.mitel.com) for power option information).
- Page 79 Installation and Programming • each member of the cluster is programmed with the directory numbers of the other controllers. This information must be programmed using OPS Manager. • the Set Registration Access Codes and Set Replacement Access Codes are the same for each controller in the cluster. •...
-
Page 80: Program System
Software Installer also enables databases from legacy SX-2000 LIGHT, SX-2000 MicroLIGHT, 3200 ICP, and 3800 WAG systems to migrate to the 3300 ICP. (You must use the Configuration Tool or the OPS Manager to create a database backup for the legacy systems before they can be restored using the Software Installer.) For current... -
Page 81: Log Into The Programming Tools
Log into the Programming Tools Embedded System Management Tools To log into one of the ESM tools: 1. Launch a browser and go to the URL of the 3300 Controller - https://<hostname>/main.htm <hostname> is the name or IP address assigned to the Controller if no DNS is available. - Page 82 To install IMAT on the PC: 1. Close all the applications running on the PC. 2. Obtain the IMAT software from MOL or insert the 3300 ICP/MCD software CD-ROM in the CD drive (applies to MCD 4.x and earlier). 3. For CD-ROM-based software only, open the Tools folder, then the Disk 1 folder.
-
Page 83: Configure Nsu Via Imat
Mitel Standard Linux Server Manager Before you can launch the MSL Server Manager, you must configure the 3300 ICP and APC to support MSL. For this procedure, refer to the 3300 ICP System Administration Tool Help. Note: To launch the MSL Server Manager, you must know the IP address of the APC. - Page 84 3300 ICP Technician’s Handbook Tip: You must use the latest release of the IMAT software. Refer to Table 17 on page 138 for information on the correct database version for the 3300 software load you are using. Program an IP Address into the NSU You must change the IP and gateway addresses to match an available address on the LAN.
- Page 85 Installation and Programming 9. At [VXWorks Boot], type @, or press the Reset button on the controller. 10. Connect the NSU Ethernet port to the LAN. Dial-up Connection of the IMAT PC to the NSU For Windows 95 and Windows 98, refer to "Installing System Software on the FTP Server"...
-
Page 86: Program The Controller Dhcp Server (Mxe, Cx/Cxi, Cx Ii/Cxi Ii)
Program the Controller DHCP Server (MXe, CX/CXi, CX II/CXi II) Note: DHCP options 128-133 used to configure Mitel IP endpoints have been reclassified as public options by the Internet Engineering Task Force (see RFC 2133 and RFC 3925). To comply with the change, Mitel recommends using either option 43 or 125, depending on the server's ability to support them and on administrator preference. - Page 87 Installation and Programming 1. On the Maintenance PC, access the System Administration Tool (see "Log into the Programming Tools" on page 71). 2. Select View Alphabetically in the view drop-down list. 3. Click DHCP Subnet form, enter the subnet name, IP address and bit mask.
-
Page 88: Program Ls Trunk Settings Via Ls Measure Tool
Analog Trunks form of the LS trunks to reduce the possibility of echo and audio level issues between the trunks and IP phones. The Distortion/Echo test should only be run at the request of Mitel Technical Support. Refer to the following book in the System Administration Tool online help for instructions: Programming ->... -
Page 89: Configure Analog Music On Hold/Paging
Installation and Programming Both types of lines will work satisfactorily with the 3300 ICP, however line type ‘3’ is the preferred line type for connecting a PBX/PABX. Configure Analog Music On Hold/Paging The 3300 ICP supports • Analog Music on Hold •... - Page 90 3300 ICP Technician’s Handbook 6. If you assigned Music on Hold to an E&M port on the AMB (on a controller with embedded analog) reboot the controller to start Music on Hold operation. Or, if you assigned Music on Hold to a port on a Universal ASU E&M card, reload the Analog Services Unit to start...
-
Page 91: Chapter 4 : Software Installation
Chapter 4 Software Installation... - Page 92 3300 ICP Technician’s Handbook...
-
Page 93: About Installing And Upgrading Software
Software Installation Requirements: Installation/Maintenance PC requirements (page 13) IP address of the 3300 ICP (System IP for the MXe Server; RTC IP for all other controllers) 3300 ICP username and password 3300 ICP software CD (or a copy of the 3300 ICP software) ... - Page 94 3300 ICP Technician’s Handbook Tip: You need a new Options Password to change the purchased options or perform an upgrade for a major software release. You do not need a new password to change the configuration options.
-
Page 95: Install System Software Manually
Software Installation Install System Software Manually Note: This procedure applies to all platforms except the MXe Server. To install software on the MXe Server, see “Installing MSL Software on an MXe Server” on page 106. Use this manual procedure to install software •... - Page 96 3300 ICP Technician’s Handbook 1. Back up the 3300 ICP database to the Installer PC (page 130). CAUTION: If you have a Universal NSU with a PRI database, you may need to convert that database before you begin the upgrade. Refer to “Converting a PRI Database on a Universal NSU”...
- Page 97 (h) IP address of FTP Server. Used for software upgrades. gateway inet (g) IP address of the end user’s default gateway for the 3300 ICP (must be outside the DHCP range). user (u) User name of FTP Server.
- Page 98 12. PING the controller to verify that you have established a connection. 13. Set the options in the License and Option Selection form according to your purchased Mitel options. Refer to your records or go to the AMC (page 29).
- Page 99 Software Installation 14. Restore the database backup (page 132). Not all steps are required. 15. If you do not have a database backup: Reset the controller (page 129). Access the System Administration Tool. In the View Alphabetically list, click Maintenance Commands. Issue the dbms save maintenance command.
- Page 100 3300 ICP Technician’s Handbook Tip: If you have an IP console, you must: Cycle the power on the IP TKB (key pad). Upgrade the IP Console software (if required). Renew the IP address for the console PC (if required). Power down or at the DOS prompt enter ipconfig /release and then ipconfig /rene 24.
-
Page 101: The Mcd Software Installer Tool
1 for R8.0 or earlier; disk 2 for R9.0 to MCD 4.x) into the Installer PC’s CD drive. 2. For CD-based software only: Open the Tools folder, then the Mitel Communications Director Software Installer folder. 3. Double-click the MCDSoftwareInstallerSetup_<version>.exe file. - Page 102 Tip: If you are installing Rel 8.0+ onto a Rel 8.0 or Rel 8.0+ software load, you do not need to install from an external FTP server. 6. If you are using the 3300’s internal FTP server, type in or browse to the location of the upgrade load.
- Page 103 10. In the License and Option Selection screen, enter the ARID (Application Record ID) and click on Retrieve Licenses. If you chose 3300 ICP, you will be able to manually enter some of the license options if you wish. If you chose MXe Server, you will not be able to enter any of the licenses.
-
Page 104: Upgrade System Software
In addition, you can do the entire install, and then schedule the reboot whenever it is convenient. You can close the Software Installer anytime after the Installer has finished transferring the new files to the 3300. See Table 8 for more information about closing the Software Installer before the upgrade is complete. - Page 105 7. In the License and Option Selection screen, enter the ARID (Application Record ID) and click on Retrieve Licenses. If you chose 3300 ICP, you will be able to manually enter some of the license options if you wish. If you chose MXe Server, you will not be able to enter any of the licenses manually.
- Page 106 ... during software During the software transfer portion of the upgrade, the file transfer (while 3300 will request that the 3300 send individual files to the performing the ftp hard drive. When the file transfer is complete, the 3300 push) will begin unzipping and extracting each file.
- Page 107 Resume an Online Upgrade 1. Launch the Software Installer. 2. Login and connect to the 3300. If the SI determines that an upgrade is in progress on the 3300, it will display the In Progress screen. 3. Click on Resume Upgrade.
-
Page 108: Offline Upgrade
7. In the License and Option Selection screen, enter the ARID (Application Record ID) and click on Retrieve Licenses. If you chose 3300 ICP, you will be able to manually enter some of the license options if you wish. If you chose MXe Server, you will not be able to enter any of the licenses manually. - Page 109 Phones (page 112) when the Software Installer completes the upgrade. Tip: After you upgrade the 3300 ICP software, you must reboot the 3300 CITELlink Gateway in order for the gateway to load the new software. Tip: If the system includes IP DECT wireless phones, reboot each Open Mobility Manager (OMM) in the IP DECT system after the upgrade.
- Page 110 Reprogram external DHCP servers (required for Release 7.0) Note: If you intend to rely on LLDP VLAN Discovery in the network, you must first upgrade the 3300 ICP to Release 7.0 or later and upgrade the IP Phone firmware to version 2.0.0.18 or later.
-
Page 111: System Software Installation Details
Software Installation System Software Installation Details Software Upgrade/Install Options Table 9: 3300 ICP Upgrade/Install Options Online or Upgrade Path Procedure Offline? Server From 3.2 or 3.3 to any Manual install only Offline External later release From 4.0 or 5.x to any... -
Page 112: Upgrading System Software - Notes, Tips, And Cautions
RAM in your system. If you are upgrading an AX, it must have the extra Flash installed. Note 3: To upgrade the MXe Server to 3300 ICP Release 9.0, follow the procedure, "Upgrade the 3300 ICP Software on the MXe Server" on page 108. -
Page 113: Change Number Of Ip User Licenses
Software Installation Change Number of IP User Licenses If you need to decrease or increase the number of IP User Licenses during the software installation, perform the following steps to avoid losing all data at reboot. Table 10: Changing the Number of IP User Licenses You MUST do the following: If you are increasing or decreasing the number of IPUser Licenses... - Page 114 3300 ICP Technician’s Handbook Table 11: Maximum Elements Change or Flexed Dimension Selection (continued) Elements / Dimensions MCD Software Notes Installer From 30 or 60 / 30 or 60 / Install or Upgrade Use Dimension Selections Flexed Flexed from the backup file.
-
Page 115: Installing Msl Software On Apc (Cx/Cxi) Or Apc-Cx(I) Ii (Cx Ii/Cxi Ii)
To install the MSL software on an APC (CX/CXi): 1. Insert the MSL software CD into a portable CD-ROM drive attached to a USB connector located on the front panel of the 3300 ICP. 2. Power down the 3300 ICP controller (page 129). -
Page 116: Installing Msl Software On An Mxe Server
3300 ICP Technician’s Handbook Installing MSL Software on an MXe Server Use this procedure to install Mitel Standard Linux (MSL) software on a replacement hard drive for an MXe Server with two hard drives. Refer to page 213 for instructions to install the replacement hard drive. -
Page 117: Upgrade To Mcd 5.0 And Group Licensing
Software Installation Click Next to accept the location displayed and continue. You will see a read-only list of the configurations you have made. Tip: If you do not see this list, your FTP server is not installed properly. Re-install your FTP server. 5. -
Page 118: Upgrade The 3300 Icp Software On The Mxe Server
Upgrade the 3300 ICP Software on the MXe Server Upgrading the 3300 ICP software on the MXe Server sometimes also requires upgrading MSL—for example, when upgrading to 3300 ICP, Release 9.0. To find out whether you need to upgrade MSL, check the RN for the 3300 ICP software you are installing. - Page 119 Software Installation 3. Restore the database (page 132). Click the Use the existing/current Dimension Selections radio button. 4. When prompted, reset the controller (page 129). 5. Back up the database (page 130). To upgrade and change to a flexed dimension: •...
-
Page 120: Upgrade To Rel 6.0 Or Later With Flexed Dimensions
1. Print the Dimension Selection form. 2. Launch the Software Installer. 3. In the Identification Screen, enter the following: 3300 ICP IP Address or DNS Name of the controller onto which you want to install the software System Login ID System Password 4. -
Page 121: Apply A Software Patch
Apply a Software Patch Use the Software Installer to apply a software patch, from Release 4.1 and later. Get the patch (service pack) from Mitel OnLine or from Technical Support. Tip: Always follow the steps in the readme.txt file for the most up-to-date installation instructions.They take precedence over the following instructions. -
Page 122: Distributing New Firmware To Ip Phones
Load IP Phone Software Remotely Use the LOAD IPDEVICE maintenance command to transfer IP Phone software to the IP Phones. Because the 3300 ICP supports a maximum of 300 TFTP connections at any one time, you must issue the command multiple times to load software to a large number of IP devices. -
Page 123: Downgrading To A Previous Software Release
6. A flashing red LED indicates activity (data flow) on the network. 7. Use the PING (Packet Internet Groper) on the IP telephone to determine whether the server's (3300 ICP, DHCP, and/or TFTP) IP address is accessible. 8. Ensure that the DHCP server has been programmed with the correct information. - Page 124 3300 ICP Technician’s Handbook...
-
Page 125: Chapter 5 Maintenance
Chapter 5 Maintenance... - Page 126 3300 ICP Technician’s Handbook...
-
Page 127: Check System
Maintenance Check System Check Alarm State Alarms indicate the functional state of the system.You can check the alarm status on the front panel of the controller (see LEDs— Appendix D Status page 329), on the attendant console, or through the system LEDs on administration tool. -
Page 128: Check Controller Hardware Profile
Certifying Authority (CA) that issued the certificate. 2. Click Certification Path. Within the certificate chain, it is the Mitel Root CA that we need to trust. -
Page 129: View Logs
Maintenance 5. Click Next to navigate through the Certificate Import Wizard windows. 6. Click Finish on the Completing the Certificate Import Wizard window. 7. Click Yes on the Root Certificate Store window. 8. Click OK until you can view the web page. View Logs View Maintenance or Software Logs View maintenance and software logs from the System Administration Tool. - Page 130 3300 ICP Technician’s Handbook You can select specific sets of logs to look at, including system logs and Atlas logs. The system logs will indicate milestones in installing and starting the Atlas blade. The Atlas logs will indicate milestones in Atlas startup leading to a running Call Server.
-
Page 131: View Logs Remotely, Tcp/Ip Socket Numbers
Maintenance 7. Navigate to the desired folder on your computer or network drive. 8. Rename the file if desired (the file extension remains .tar.gz). 9. Click Save. The file is downloaded to your computer. Collecting System Lockup Logs Use the Remote on/off button to generate a debug diagnostic file. This procedure applies to LX platforms running Release 5.1.5.8 or higher only. -
Page 132: View Login And Logout Audit Logs
You can view login and logout audit logs from the System Administration Tool. Refer to the Online Help for instructions. Downloading MXe Server Logs You can download MXe Server logs from the Mitel Communications Director page of the server manager console. These logs are useful for troubleshooting the MXe Server. -
Page 133: Detect Device Moves For E911
Detection of Layer 2 connectivity is through Spanning Tree Protocol (STP) or Cisco Discovery Protocol (CDP). The Device Connectivity form excludes Mitel Soft Phones, Symbol, DECT, and SpectraLink wireless phones, DNIC telephones, CITELlink telephones, and Hot Desk Users. - Page 134 3300 ICP Technician’s Handbook Table 16: Device Connectivity Form Fields (continued) Field name Description Previous STP Port Identifier Port number on the STP Layer 2 switch where the IP device was connected before being moved. Previous CDP L2 Port MAC...
- Page 135 Maintenance Table 16: Device Connectivity Form Fields (continued) Field name Description Last Known CDP L2 Port MAC MAC address of the CDP Layer 2 switch where the IP device was connected on first registration or registration after a move. “Unknown” device is one that does not support CDP with its current firmware load.
-
Page 136: Detecting Device Moves
3300 ICP for 10 minutes or more. In a case where the primary 3300 ICP is Release 5.0 or later and the secondary is Release 4.x, a device move will not be detected if it occurs while the set has failed over to the secondary. -
Page 137: Analyze Ip Phone Issues
Maintenance Analyze IP Phone Issues Use the Mitel 3300 ICP IP Phone Analyzer to collect performance information from the IP devices on the network. Tip: The PC must be connected to the network via a Layer 2 switch port on the controller. - Page 138 3300 ICP Technician’s Handbook Disable Tool Analysis To disable tool analysis from the PC hosting the Analyzer Tool: • Access the Status View window, left-click on the IP address, then right-click and select Delete. To disable tool analysis from the System Administration Tool: 1.
-
Page 139: Power Down The Controller
Maintenance Power Down the Controller To power down the MXe Server: 1. Shut down the controller operating system before turning off the power switch by • log in to the MSL shell and type “shutdown -h now” • start the Server Manager and shut down using the Reboot or Shutdown panel. -
Page 140: Back Up A Database
3300 ICP Technician’s Handbook Back Up a Database Tip: It is very important to maintain current database backups; backups should be done on a regular basis. Tip: Many of the following procedures assume that you have voice mail. If you don’t have voice mail, please disregard voice mail-related steps. - Page 141 Maintenance 4. Click Browse to launch the Save As dialog box, then navigate to the location on your local drive where you want to save the backup file (for example C:\3300_ICP\backup). 5. Type a name for your backup file, and then click Save As. 6.
-
Page 142: Restore A Database
Yes - if the number of embedded circuits analog circuits match Note: The LX and the MXe Server have no embedded circuits. Note: You cannot restore a database backed up from a 3300 system (LX, AX, MXe) to an MXe Server. - Page 143 Maintenance CAUTION: You must reboot the controller after restoring a database. Service will be LOST during this reboot. You need the following information and equipment to restore a database: Installer PC (page 13) IP address of the Controller ...
- Page 144 3300 ICP Technician’s Handbook 6. Click Start Restore. 7. Click OK. The system will show an “in progress” message. 8. When the status window shows “complete”, click OK. 9. Reset the controller (page 129). When the reset is complete, the database is converted, and the system automatically resets.
- Page 145 Maintenance 5. Issue the message subsystem (me sub) command to check the programmed NSU links; they should be OPEN. If any programmed links are in SCAN, check the LINK STATUS LEDs; if the amber LEDs are marching, the NSUs are writing to the RAM DISK.
-
Page 146: Migrate Sx-2000 Database Across Platforms
3300 ICP Technician’s Handbook Migrate SX-2000 Database Across Platforms To migrate an SX-2000 database to a 3300 Release 7.0 system and up, you use the 3300 ICP Configuration Tool to back up the SX-2000 database and then use the Software Installer Tool to restore the SX-2000 database file to the 3300 ICP. - Page 147 Maintenance 3. Navigate to the SX-2000 database file to be restored and click on the file to select it. The filename will automatically be entered in the text box. 4. To restore your Hotel/Motel options, select the Restore Hotel/Motel wakeup information option. This option restores the wakeup information and the room status.
-
Page 148: Converting A Pri Database On A Universal Nsu
4. Select PRI and NSU version from Table 17 for your new database version. 5. Convert the database and then save the new database into the NSU. Table 17: PRI, NSU DB version to use with 3300 ICP Software version 3300 ICP Software Version Universal NSU Database Version Release 3.0 - 3.3 (NSU or PRI card) -
Page 149: Export Configuration Data
Export Configuration Data You can export data from most forms in the System Administration Tool into comma separated files (.csv) files. You can then use the Mitel Integrated Configuration Wizard to import the data from the .csv files into another system. If you want to view or edit the exported data, Microsoft Excel must be installed on your client station. -
Page 150: Import Configuration Data
Import Configuration Data You can export the form data from an existing system into .csv files and then use the Mitel Integrated Configuration Wizard to import the form data into a new system. To import configuration data using the Configuration Wizard: 1. -
Page 151: Restoring Default Addresses On Mxe Server
Password: (enter the Linux admin password that you set through the Server Console). The Managed Application Server Manager application opens. 3. Under Applications, click Mitel Communications Director. The Mitel Communications Director screen is displayed. 4. Click Modify. 5. Click Restore Defaults at the bottom of the IP Addresses screen. -
Page 152: Assign Static Ip Addresses To Ip Phones
3300 ICP Technician’s Handbook Assign Static IP Addresses to IP Phones The customer may prefer to assign static IP addresses to IP sets rather than using dynamic IP addressing. You cannot set static IP addresses on non-display sets. Setting Static IP Addresses on Dual Mode Sets On the 5215 IP Phone (Dual Mode), press * (yes), 0 (default), and # (no);... - Page 153 Maintenance Viewing and modifying the static IP address: 1. Access the Configuration (Debug) Menu on the IP Phone. Refer to the 3300 ICP Troubleshooting Guide for instructions. 2. At NETWORK PARAMETERS?, press Yes. VIEW CURRENT VALUES? appears. 3. Do one of the following: Press Yes, and then press the Up/Down volume keys to view each setting.
- Page 154 3300 ICP Technician’s Handbook 3. At the USE PRESENT SETTINGS screen, select # - ENABLE to enter a complete set of IP data. Tip: Select * - DISABLE to revert back to DHCP from static parameters. 4. At INPUT VLAN ID, if VLANs are used, enter the VLAN ID that will be inserted into packets sent by the phone.
-
Page 155: Providing Power Over Ethernet To Devices (Cxi/Cxi Ii)
1, until less than 100 Watts is being consumed. Tip: Refer to Table 113 on page 386 for a list of all Mitel IP Phones and their power consumption. For more detail, see the 3300 ICP Engineering... -
Page 156: Recover Mxe Server
Recover MXe Server Use this recovery procedure if both hard drives have failed. Before You Begin To complete this procedure, you will require Backup of 3300 ICP database Replacement hard drive(s) Laptop External USB connected CD/DVD drive ... -
Page 157: Connect Laptop Pc And Cd/Dvd Drive
6. Connect the CD/DVD drive to the USB port on the MXe Server. 7. Open a communication application (for example ProCom or Hyperterminal) on your laptop to the 3300 ICP and set the connection parameters as follows: Table 19: Communication Connection Parameters... -
Page 158: Install Mitel Application Server Software
3300 ICP Technician’s Handbook Install Mitel Application Server Software 8. Insert the Mitel Communications Director Recovery Disk that was shipped with the MXe Server into the external CD/DVD drive. 9. Run the CD-ROM test. It takes approximately 5 minutes to complete. -
Page 159: Configure Mas Parameters
Enter a password. Then enter it again to verify it. Note that passwords are case-sensitive. Also, see the Caution below this table. Select Primary Domain Name Enter name (for example mitel.com) Select System Name Enter name (for example the company name) Enter Local Networking Enter 192.168.1.8... -
Page 160: Configure Server Manager Fields
3300 ICP Technician’s Handbook CAUTION: Ensure that you record your Linux Admin password. If you lose this password, it cannot be recovered. You will have to re-install the MAS software and set a new password. Configure Server Manager Fields 15. If running VLANs, ensure that the VLAN ID is reset to the default value of 1. - Page 161 Password: (enter the Linux admin password that you set through the Server Console). The Managed Application Server Manager application opens. 20. Under Applications, click Mitel Communications Director. The Mitel Communications Director screen is displayed: Figure 24: Example of Mitel Communications Director Screen 21.
- Page 162 3300 ICP Technician’s Handbook Figure 25: Change the System IP and APC Gateway Addresses 23. Click Next. After you click Next, you should see a message stating that the addresses were successfully modified displayed in green text. The system automatically reserves four IP addresses that are required to support the system in the network.
- Page 163 Active 3300 ICP Version: currently active system software version Inactive 3300 ICP Version: previous system software version before latest upgrade. On an initial installation of the 3300 ICP, this field displays "Not Installed". MCD Version: current Mitel Communications Director software version that was installed from using the SI Tool.
- Page 164 MXe Server, you must add the network. Under Security, click Local Networks and add the IP address of the network. Also add the networks of any other Mitel applications or tools, such as OPS Manager, Enterprise Manager, system administrator client stations and so forth that require access to the MXe Server.
-
Page 165: Reset Mxe Server System Ip Address To Default
Set the Voice VLAN ID as required (see Table 21) Finally, reset the Local Network Parameter back to the APC-MXe IP address (see Step 27 to Step 31). 40. Launch the 3300 ICP System Administration Tool and enter the following maintenance command: UpgradeBootrom ALL 41. - Page 166 3300 ICP Technician’s Handbook...
-
Page 167: Chapter 6 : Install And Replace Units
Chapter 6 Install and Replace Units... - Page 168 3300 ICP Technician’s Handbook...
-
Page 169: Component Replacement Notes
Install and Replace Units Component Replacement Notes Use Table 6 on page 45 for controller component options. For information about component replacement on an MXe Server, see page 160. Required Tools To install or replace components, you require the following tools: •... -
Page 170: Mxe And Mxe Server
3300 ICP Technician’s Handbook CAUTION: To prevent ESD damage to the equipment: (1) Ensure that the system is grounded before you install a card. (2) Whenever you handle cards, wear an anti-static strap (attached to the cabinet). (3) When removing cards from the cabinet, immediately place them in an anti-static bag. - Page 171 Install and Replace Units ANALOG MAIN MXe CARRIER BOARD BOARD (AMB) RETAINING SCREW POWER CABLES STRATUM 3 CLOCK MODULE MXe CARRIER BOARD Figure 28: MXe III Controller with Top Cover Removed Figure 29, below, shows the MXe II PATA RAID controller and pre-formed IDE cable.
- Page 172 3300 ICP Technician’s Handbook Figure 30 shows the MXe III SATA RAID controller and SATA cables. Use the cables to connect the RAID controller to the hard drive backplane. POWER CABLE SATA CABLES RAID Controller Figure 30: MXe III SATA RAID Controller and SATA Cables Figure 31 shows the APC-MXe board and its pre-formed IDE cable.
- Page 173 Install and Replace Units Accessing the MXe Carrier Board Before you can add or replace a component, you must first access the MXe carrier board. 1. Power down the controller and remove the controller cover (see page 47). 2. Attach the anti-static strap to your wrist and connect the clip to the controller chassis.
- Page 174 3300 ICP Technician’s Handbook Figure 33: Removing the Power Cable 6. Remove the Stratum 3 clock module and keep the screws. 7. Unfasten the MXe carrier chassis retaining screw (see Figure 34). Figure 34: Carrier Chassis Retaining Screw 8. Facing the front of the controller, wiggle the chassis back towards...
- Page 175 Install and Replace Units 9. Tilt the back of the chassis up several inches, reach underneath the MXe carrier board and then do one of the following: • For the MXe II, disconnect the IDE interconnect cable from the RTC (host) IDE connector (see Figure 35). Figure 35: Disconnecting the IDE Interconnect Cable - MXe II •...
-
Page 176: Add Or Replace Controller Frus
3300 ICP Technician’s Handbook Add or Replace Controller FRUs See page 371 for part numbers. Table 22: Field Replaceable Units CX II/ Component MXe II MXe III CX/CXi Server CXi II DSP Module pg 170 Echo Canceller pg 170 pg 170... -
Page 177: Component
Install and Replace Units Table 22: Field Replaceable Units (continued) CX II/ Component MXe II MXe III CX/CXi Server CXi II Replace one pg 210 pg 215 drive Replace both pg 213 pg 212 pg 216 drives Fan Complex pg 218 pg 220 pg 219 Power Supply... -
Page 178: Controller Modules
3300 ICP Technician’s Handbook Controller Modules Adding or replacing controller modules To add or replace controller modules: 1. Read the notes in this section that apply to the type of module that you are adding or installing before proceeding. 2. Refer to “Determine Controller Module Configuration” on page 41 for appropriate slot location. -
Page 179: Ax Controller
Install and Replace Units AX Controller To add or replace controller modules in AX front panel 1. Remove the blanking plate (or the old MMC) from the controller by removing the screws that hold the standoffs to the controller. (The screws are on the back side of the controller card.) 2. -
Page 180: Controller Module Installation Notes
3300 ICP Technician’s Handbook Figure 39: Slide in and seat module (AX) Controller Module Installation Notes DSP Module • Refer to “Increasing DSP Resources” on page 287. • Make sure that you have sufficient compression licenses before installing DSP modules for compression. -
Page 181: T1/E1 Combo
T1/E1 Combo cards in a primary and a secondary controller, for resilient operation, with a one-to-one RJ-45 cable. Enable the resilient feature in the Digital Links form. Refer to the Resiliency document on Edocs (http://edocs.mitel.com) for instructions on how to configure T1/E1 resiliency. •... -
Page 182: Quad Cim
(with 3-4 and 5-6 crossed at one end) for “S” interfaces to sets. Quad CIM MMC • Support for the Quad CIM requires that the 3300 ICP is running software Release 7.1 or later. • The Quad CIM MMC cannot be installed in an MXe Server. -
Page 183: Stratum 3 Clock Module
Install and Replace Units Stratum 3 Clock Module To replace the clock module in the CX/CXi, or MXe: Note: The other controllers use the Stratum 3 Clock, but in each case, the clock is embedded and is not field replaceable. The MXe Server does not use a Stratum 3 Clock. -
Page 184: System I-Button/System Id Module
3300 ICP Technician’s Handbook System i-Button/System ID Module To replace the System i-Button (MXe, CX/CXi, CX II/CXi II, AX) 1. Remove the old system i-Button from the main board. Lift slightly the metal clips that hold the i-Button in place. -
Page 185: Analog Main Board
Install and Replace Units Analog Main Board To replace the analog main board (AMB) in an MXe: 1. Remove the narrow flex cable on the AMB (J4) by flipping up the clip on the connectors at each end of the cable (prior to Rel 7.1 version) or remove the ribbon cable on the AMB (J8) (see Figure 41). -
Page 186: Cx/Cxi
3300 ICP Technician’s Handbook Figure 41: AMB with new cable for MXe Controller CX/CXi To add or replace the analog main board (AMB) in a CX or CXi: 1. Remove the screw that secures the faceplate to the back panel. - Page 187 Install and Replace Units 10. Replace the Analog Option Board (if previously removed). Figure 42: CX/CXi, Insert the Analog Main Board Figure 43: CX/CXi AMB ribbon cable...
-
Page 188: Cx Ii/Cxi Ii
3300 ICP Technician’s Handbook CX II/CXi II To replace the AMB in a CX II/CXi II: 1. Power down the controller and remove the controller cover; see page 129 for procedure. 2. Remove the Analog Option Board, if one has been installed. Remove by reversing the steps on page 180 of this document. -
Page 189: Analog Option Board
(4). 7. Replace the top cover and power up the controller. 8. In the System Administration Tool, go the Analog Services Units form. 9. Select Unit 4 and click Modify. 10. Select 3300 Expanded Analog and click Save. -
Page 190: Cx Ii/Cxi Ii
3300 ICP Technician’s Handbook Figure 45: Screws and Standoffs on the Analog Option Board CX II/CXi II Add an AOB to a CX II or CXi II controller to increase LS CLASS circuits from 6 to 12 and ONS CLASS circuits from 4 to 8 (see page 251). - Page 191 Install and Replace Units 3. Remove the four screws that secure the Analog Main Board (AMB) to the bottom of the chassis. 4. Replace the screws removed above with the standoffs included with the AOB. 5. Attach the flex and power cables supplied with the AOB to the AMB. To attach the flex cable, lift up on the tabs at the end of the connector to loosen it, insert the cable label side up, and then press down on the tabs to tighten the connector.
- Page 192 3300 ICP Technician’s Handbook 7. Attach the mounting plate to the standoffs and the back panel of the controller using the supplied screws. Figure 49: AOB Mounting Plate in Position 8. Lower the AOB on to the mounting plate and secure it with the four smaller screws supplied with the AOB.
-
Page 193: Configure Embedded Analog Boards
Tip: Verify, in the System Administration Tool, that 3300 Embedded Analog or 3300 Expanded Analog appears as the Installed Type in the Analog Services Units form. 4. Using the System Administration Tool, program the analog settings on the controller. -
Page 194: Application Processor Card
3300 ICP Technician’s Handbook Application Processor Card APC-MXe Server The Application Processor Card (APC-MXe) is an embedded PC card that is installed in the MXe Server. This section provides instructions on how to • replace an APC-MXe • replace the APC-MXe battery. - Page 195 Install and Replace Units Figure 52: Removing the APC-MXe Retaining Screws 4. Place the faulty APC-MXe into an anti-static bag. 5. Remove the replacement APC-MXe from its anti-static bag. 6. Align the mounting holes on the APC-MXe heatsink with the standoffs on the MXe carrier board.
- Page 196 3300 ICP Technician’s Handbook Figure 53: Installing an APC-MXe in the MXe Server 8. Install the five mounting screws into the holes on the APC-MXe heatsink but do not tighten. 9. Tighten the retaining screws in the following order, referring to...
- Page 197 Licensing Help for instructions.) The software is still installed but will have to be re-licensed after you have replaced the faulty card. 17. Re-license the Mitel Communications Director software by following the procedure at “Enable Licenses and Options” on page 29.
-
Page 198: Apc-Cx(I)
APC-CX(i) The optional Application Processor Card (APC-CX(i)) allows the system to host Mitel Standard Linux (MSL) software that can run applications such as Unified Communicator Mobile. Each of the applications is released with guidelines defining conditions, performance, and installation combinations. - Page 199 Install and Replace Units To add or replace the APC-CX(i): CAUTION: Use ESD straps when handling the APC. 1. Remove the controller, hard drives, and APC-CX(i) from their packaging. 2. Remove the top cover of the controller (Refer to the Release 8.0 Technician’s Handbook for instructions).
- Page 200 3300 ICP Technician’s Handbook 4. To seat the connectors, grasp the APC Module with your index finger and thumb and press down firmly on edges. You should feel the connectors seat together. Tip: To ensure that the APC-CX(i) module is seated securely, press down on it over each of the four connectors, one at a time.
- Page 201 Install and Replace Units Figure 57: Positioning the Heat Spreader on the APC Module 7. Tighten the screws in an alternating pattern until they are snug. Do not over-tighten.
-
Page 202: Apc Hard Drive (Cx/Cxi)
3300 ICP Technician’s Handbook Figure 58: Tightening the Screws 8. Slide the bracket back into the chassis, and fasten the screws connecting the bracket to the back of the controller. Tip: In the CX, there is no internal connection between the controller and the APC-CX(i) so you must connect both the 10/100 LAN port and the 10/100 ETX port (on the front panel of the CX) to the LAN. - Page 203 Install and Replace Units To install the APC hard drive in a CX/CXi: 1. Unplug the ribbon cable and the power cable from the old hard drive. 2. Remove the screws connecting the bracket to the back of the controller, then slide the bracket forward and remove it. 3.
-
Page 204: Apc-Cx(I) Ii Assembly
3300 ICP Technician’s Handbook APC-CX(i) II Assembly The APC-CX(i) II Assembly is an embedded PC with support for USB, VGA, RS-232,10/100/1000-base-T Ethernet and SATA hard disk drives that can be installed in the CX II/CXi II. This section provides instructions on how to •... - Page 205 Install and Replace Units To install an APC-CX(i) II Assembly in a CX II/CXi II: 1. Power down the controller and remove the controller cover; see pages 47 and 129. 2. Using diagonal cutters, clip the tie-wrap holding the power cables to the tie-wrap base.
- Page 206 3300 ICP Technician’s Handbook one end of the Ethernet cable to the Ethernet jack on the APC-CX(i) II; (5) in Figure 62 (page 196). Underside of APC Assembly Topside of Main Board APC Assembly Figure 62: Connect Power and SATA Data Cables 4.
- Page 207 Install and Replace Units mate to secure the APC-CX(i) II Assembly to the controller. Two additional screws secure the assembly through holes in the controller back panel. Figure 63: Notches and Shoulder Bolts 5. Lower the APC-CX(i) II Assembly into the controller with the VGA, USB, and RS-232 connectors facing their respective openings in the back panel of the controller.
- Page 208 3300 ICP Technician’s Handbook 8. Complete the remaining cable connections as follows (refer to Figure 62 (page 196) above for connector locations): Connect the loose end of the Ethernet cable to the Ethernet jack on the APC-CX(i) II Assembly to the corresponding jack on the main board;...
- Page 209 Install and Replace Units 9. Remove the blanking plate from controller cover to expose the APC-CX(i) II connectors. Figure 66: Remove Blanking Plate 10. Replace the controller cover. To replace the APC-CX(i) II hard disk drive: 1. Power down the controller and remove the controller cover; see pages 47 and 129.
- Page 210 3300 ICP Technician’s Handbook Figure 67: APC-CX(i) II Hard Disk Drive Removal 5. Place the faulty hard disk drive into an anti-static bag. 6. Remove the replacement APC-CX(i) II hard disk drive from its anti-static bag. 7. Install and secure the replacement hard disk drive in the orientation as shown in Figure 67 (page 200).
- Page 211 Install and Replace Units Lift the clip that holds the battery in place with the index finger of one hand CAUTION: Lift the clip just enough to slide the battery out. Forcing the clip up too far could cause damage requiring replacement of the entire assembly.
-
Page 212: E2T Or Rtc Processor
3300 ICP Technician’s Handbook E2T or RTC Processor Tip: Refer to the 3300 ICP Engineering Guidelines to determine when a second processor is necessary in the MXe. Tip: The MXe Server ships with both E2T and RTC as standard equipment. - Page 213 Install and Replace Units disconnect the I2C and SATA cables from the RTC (host) IDE connector (see Figure 70). RTC (HOST) CONNECTORS I2C CABLE and SATA CABLE RAID CONTROLLER Figure 70: Disconnecting the I2C Ribbon Cable and the SATA Cable - MXe III 3.
- Page 214 3300 ICP Technician’s Handbook Figure 71: MXe, MXe Server: RTC / E2T/ APC on the Main Board, bottom view...
-
Page 215: Hard Drives
LX or CX system), you MUST manually install the software (see page 85) and restore the database. A new hard drive purchased from Mitel is configured for installation in any system. CAUTION: In a redundant MXe II or MXe Server, the two PATA hard drives must have the same accessible capacity. - Page 216 3300 ICP Technician’s Handbook 3. Remove the screws connecting the bracket to the back of the controller, then slide the bracket forward and remove it. (Removal is unnecessary if the drive is installed in the upper bracket position.) 4. Replace the drive with the new one (1) (see Figure 72 on page 206) and secure it to the bracket (2).
-
Page 217: Cx Ii/Cxi Ii (Hard Disk Or Solid State Drive)
Install and Replace Units 8. Restore the connections to the Maintenance PC. 9. Manually install the software on the hard drive (see “Install System Software Manually” on page 85). 10. Reconnect the controller to the network. 11. If you backed up your database in Step 1, restore the database (see “Restore a Database”... - Page 218 3300 ICP Technician’s Handbook 5. Reconnect the data cable and power cable to the hard disk drive. The cables are keyed for proper connection. 6. Replace the controller cover. 7. Remount the controller. 8. Restore the connections to the Maintenance PC.
-
Page 219: Mxe Ii (Single Hard Disk Or Solid State Drive)
Install and Replace Units 6. Secure the new hard drive backing plate with the hard drive attached, to the controller cover using the screws provided. 7. Remount the controller. 8. Restore the connections to the Maintenance PC. 9. Manually install the software on the hard drive (see page 85). 10. -
Page 220: Mxe Ii/Mxe Server (Two Hard Drives)
If both drives are defective, or if the system is still under warranty, replace both drives. Note: Before proceeding with a warranty claim, contact Mitel Repair Services (page 9) to obtain a Return of Merchandise Authorization (RMA) number. If only one drive is defective and the system is no longer under warranty, use the following procedure to determine whether you should replace one or both drives. - Page 221 Install and Replace Units To replace one hard drive in an MXe II/MXe Server: Tip: Refer to Table 71 on page 337 for a complete description of LED activity. 1. If the hard drive is already off-line (normally or faulted) go to step 5. 2.
- Page 222 3300 ICP Technician’s Handbook Replace Both Hard Drives in an MXe II Use this procedure if: both drives are defective, or the system is still under warranty, or the current and replacement drives are different sizes. CAUTION: You must install only the first hard drive before you boot the system.
- Page 223 7. Tighten the thumb screw. 8. Return power to the controller. 9. Once the system is booted, install and configure Mitel Standard Linux (MSL) software on the hard drive (see “Installing MSL Software on an MXe Server” on page 106).
-
Page 224: Mxe Iii (Single Hard Disk Or Solid State Drive)
3300 ICP Technician’s Handbook 15. To copy data onto the second new hard drive, complete steps 11 to 13 of the “Replace One Hard Drive in an MXe II/MXe Server” procedure on page 210. 16. To reinstall and/or relicense the software, follow the steps in "Recover MXe Server"... -
Page 225: Mxe Iii (Two Hard Drives)
Independent Disks) configuration, you can replace one or both of them. Note: If the system is under warranty, you must replace both hard drives. Before proceeding with a warranty claim, contact Mitel Repair Services (page 9) to obtain a Return of Merchandise Authorization (RMA) number. - Page 226 Replace both hard drives if they are both defective, or if the system is still under warranty. Note: Contact Mitel Repair Services before proceeding with warranty work. CAUTION: You must install only the first hard drive before you boot the system. After the system is fully booted, slide the second hard drive into the HD2 position.
- Page 227 Install and Replace Units 11. Push to seat the hard drive into the hard drive backplane. 12. Tighten the thumb screw. 13. Install the controller cover and power up the controller; see page 14. 14. The rebuild process starts automatically. The source drive LED (HD1) flashes quickly while the destination drive LED (HD2) flashes slowly.
-
Page 228: Fan Complex
3300 ICP Technician’s Handbook Fan Complex MXe/MXe Server To replace the fan in an MXe or MXe Server: 1. Remove the controller cover (see page 47). 2. Remove the two screws that fasten the fan to the cabinet frame (see Figure 76). - Page 229 Install and Replace Units 5. If you have a new fan assembly with longer cables, loop and tie them together using the supplied cable ties as shown in Figure 77. Side View Top View Figure 77: Fan Cable Management (New Fan Assembly) 6.
-
Page 230: Cx Ii/Cxi Ii
3300 ICP Technician’s Handbook CX II/CXi II To replace the fan assembly in an CX II/CXi II: 1. Power down the controller and remove the controller cover; see page 47 of the Technician’s Handbook for procedure. 2. Using diagonal cutters, clip the tie-wrap around the fan and ethernet cables;... -
Page 231: Power Supply Unit
Install and Replace Units Power Supply Unit MXe, AX To replace a power supply unit in a single power supply MXe or AX: 1. Turn off the power switch on power supply. 2. Remove the power cord from the power supply AC receptacle. 3. -
Page 232: Redundant Power Supply
3300 ICP Technician’s Handbook Redundant Power Supply AX, MXe, MXe Server To add or replace a redundant power supply in an AX, MXe or MXe Server: Tip: If two power supplies are installed, one can be swapped out without turning the other off. The system can remain running on one power supply while the other is replaced. -
Page 233: Raid Controllers
Install and Replace Units RAID Controllers The RAID (Redundant Array of Independent Disks) controller mirrors all data on two hard drives. In the event that one drive fails, the system continues to operate on the remaining drive. Refer to Knowledge Base Article 06-2806-00012 “RAID Controller Operations Manual”... - Page 234 3300 ICP Technician’s Handbook Figure 79: Position the RAID Controller Board 7. Slowly retract the RAID controller from the LED module holes until its high-density HDD connector is aligned over the backplane connector. 8. Press the high-density HDD backplane connector gently into place on the backplane connector.
- Page 235 Install and Replace Units (SUPPLIED WITH 2-PACK HARD DRIVE KIT) Figure 80: Routing the Pre-formed IDE Interconnect Cable 12. Carefully lower the MXe carrier chassis back into place. Ensure that the ribbon cable is in the channel and does not become pinched between the cabinet frame and the MXe carrier chassis.
-
Page 236: Mxe Iii
3300 ICP Technician’s Handbook To replace a faulty RAID controller 1. Remove the controller cover (see page 47). 2. Disconnect the IDE interconnect cable and power cable from the faulty RAID controller. 3. Using a Phillips #2 screwdriver, remove the three screws from the RAID controller. - Page 237 Install and Replace Units 4. Position the new RAID controller board by carefully inserting the LED indicators into the holes in the controller rear panel (see Figure 81). RAID CONTROLLER RAID CONTROLLER LEDs REAR PANEL Figure 81: Position the SATA RAID Controller Board 5.
- Page 238 3300 ICP Technician’s Handbook RAID POWER OUT CONNECTOR SATA POWER IN CONNECTOR HD1 CONNECTOR HD2 CONNECTOR Figure 82: Hard Drive Backplane Connectors HD1 P3 CONNECTOR HD2 P2 CONNECTOR HOST P1 CONNECTOR P5 RAID I2C CONNECTOR Figure 83: RAID Controller Connectors 12.
- Page 239 Install and Replace Units SATA BCKPLNE POWER IN CONNECTOR RAID POWER OUT CONNECTOR SATA POWER IN CONNECTOR Figure 84: Power Connectors Note: Push the SATA, I2C and power cables out of the way so that they are not pinched by the top cover. 13.
- Page 240 3300 ICP Technician’s Handbook 6. Position the replacement RAID controller by carefully inserting the LED indicators into the holes in the controller rear panel (see Figure 79). 7. Slowly retract the RAID controller from the LED holes until the mounting holes align with the standoffs.
-
Page 241: Line Cards
Install and Replace Units Line Cards To install 24 Port ONS, 16 Port ONS, or 4+12 Port Combo line cards: 1. If necessary, loosen the thumb screw and remove the blanking plate from the cabinet rear. 2. Slide the card into the slot, with the lock latch open, and seat it securely. -
Page 242: Controller Card (Ax)
3300 ICP Technician’s Handbook Controller Card (AX) To replace the AX controller card: 1. Power down the controller and disconnect cables. 2. From the rear of the controller, loosen the lock screws. 3. Lift the lock latch and slide the controller card from the chassis. -
Page 243: Flash Cards (Ax)
Install and Replace Units Flash Cards (AX) There are two flash cards for the AX controller: • System flash (labeled Compact Flash 2): under the MMC Slot 1 site • Voice mail flash (labeled Compact Flash 1): under the MMC Slot 2 site Note: Voice Mail is optional on the AX Controller. - Page 244 3300 ICP Technician’s Handbook 6. Replace the controller card and connect the cables. 7. Plug in and turn on the power supplies and power up the controller. 8. Perform a full install of the system software from the Software Installer tool.
-
Page 245: Memory Module (Cx, Cxi, Ax)
Install and Replace Units Memory Module (CX, CXi, AX) Follow this procedure to upgrade the factory-installed 256M RAM to 512M: 1. Power down the controller and disconnect all cables. 2. Remove the controller cover (page 47). For the AX controller, remove the controller card (page 232). -
Page 246: Install Cabinet Frus
8. Affix the label included with the replacement module to the main board. The label ensures proper handling should you need to return the controller to Mitel for repair. 9. Replace the cover and reconnect power. 10. Verify that the module and software is properly installed by powering up the controller and confirming that it boots up. -
Page 247: Appendix A : Hardware Reference
Appendix A Hardware Reference... - Page 248 3300 ICP Technician’s Handbook...
-
Page 249: System Configurations
Hardware Reference System Configurations There are several basic versions of the 3300 ICP: • MXe Server • AX Controller • MXe Controller • CXi and CXi II system with embedded Analog and an Ethernet Layer 2 switch • CX and CX II system with embedded Analog and without Ethernet... -
Page 250: Controller Hardware Details
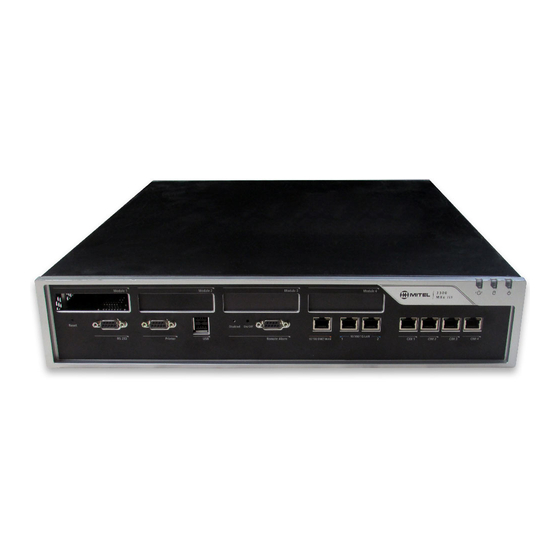
3300 ICP Technician’s Handbook Controller Hardware Details For detailed information on the 3300 ICP components, see the 3300 ICP Hardware Technical Reference Manual on Edocs (http://edocs.mitel.com). Tip: Refer to the Release 7.0 version of the Technician’s Handbook for hardware details of the older controllers; 100-user, 250/700-user, LX, and MX, and their components. - Page 251 Hardware Reference Figure 90: AX Controller Card View Figure 91: AX Controller – Rear Panel...
- Page 252 3300 ICP Technician’s Handbook Figure 92: MXe Controller – Front Panel Figure 93: MXe Controller – Back Panel, Redundant...
- Page 253 Hardware Reference Figure 94: MXe Controller – Back Panel, Non-Redundant Figure 95: MXe II Controller – Hard Drive Jumper Settings Figure 96: MXe Server – Front panel – CIM ports not used...
- Page 254 3300 ICP Technician’s Handbook Figure 97: MXe Server – Back panel Figure 98: CX Controller – Front Panel...
- Page 255 Hardware Reference Figure 99: CXi Controller – Front Panel Figure 100: CX and CXi Controller – Back Panel...
- Page 256 3300 ICP Technician’s Handbook Figure 101: CX II Controller - Front Panel Figure 102: CXi II Controller - Front Panel...
-
Page 257: Controller Cabinet Numbering
Hardware Reference Figure 103: CX II and CXi II - Back Panel Controller Cabinet Numbering • Cabinet 1 (hardcoded): internal. • Cabinets 2 to 13: module ports (left to right) Note:LX and MXe have 4 embedded CIM ports. All systems except for LX and MXe Server have Embedded Analog. -
Page 258: T1/E1 Combo Card
3300 ICP Technician’s Handbook T1/E1 Combo Card The T1/E1 combo module provides T1 trunking and DSP functionality for the CX with Release 6.0 software and for all controllers (266/300 MHz minimum) with Release 7.0 software (MCD 4.0 on the CX II/CXi II). The DSP provides resources for CLASS tone generation, Record a Call conferences, DMTF receivers, voice compression. - Page 259 Hardware Reference Figure 105: T1/E1 Combo Card - Resilient, from Release 7.0 Table 23: T1/E1 Combo Card Tip/Ring Assignments NT/LT Settings Signal NT (Default) Rx Ring Tx Ring Rx Tip Tx Tip Tx Ring Rx Ring Tx Tip Rx Tip Note: Network and Line Termination settings are software-controlled.
-
Page 260: Dual T1/E1 Framer
3300 ICP Technician’s Handbook Dual T1/E1 Framer Figure 106 below shows the dual T1/E1 module, which provides embedded PRI and embedded T1/D4 functionality to a minimum 300 MHz controller. Figure 106: Dual T1/E1 Framer Quad BRI Framer Figure 107 below shows the Quad BRI module which provides embedded BRI functionality to a minimum 300 MHz controller. -
Page 261: Analog Board (Cx/Cxi, Cx Ii/Cxi Ii, And Mxe Controllers)
Hardware Reference Analog Board (CX/CXi, CX II/CXi II, and MXe Controllers) Analog Boards provide connectivity for analog trunks and telephones. Table 24: Embedded Analog - Circuits/Ports Analog Main Board Analog Option Board Circuits/Ports CX/CXi only CX/CXi, CX II/CX iII and MXe LS CLASS Circuits ONS CLASS Circuits Power Fail Transfer Circuits... - Page 262 3300 ICP Technician’s Handbook Table 26: Analog Main Board/Analog Option Board Pinouts (continued) Port Pin Number Function ONS 1 - 4 Ring ONS 3 - 4 Contact sensor Contact sensor Relay 1/2 (not RLY1_Common used) RLY1_NO (normally open) RLY1_NC (normally closed)
-
Page 263: Line Cards (Ax Controller)
Hardware Reference Line Cards (AX Controller) The AX controller line cards are the same as those for the ASU II. See Table 40: ASU II/AX Line Card Lock Latch Color Code (page 261), Table 41: ASU II/AX 25-Pair Male D-Type Connector Pinout (page 262), and Table 43: ASU II/AX Combo Card SFT/PFT Port Connections (page 264). -
Page 264: Network Services Units
3300 ICP Technician’s Handbook Network Services Units The Network Services Unit provides connectivity to digital trunks. There are three variants of the NSUs: • Universal NSU • R2 NSU • BRI NSU Universal/R2 NSU Figure 109: Universal NSU – Front Panel Figure 110: R2 NSU –... - Page 265 Hardware Reference Universal and R2 NSU DIP Switch Settings Table 30: Message Link DIP Switch Setting DIP Switch Notes Rear panel, Primary NSU Set to 1 (up). Connected to the controller left side Secondary NSU Set to 2 (down). Connected to another NSU Table 31: T1/E1 Ports DIP Switches Defined DIP Switch Notes...
- Page 266 Not used Notes: 1: One or two Quad CIMs can be installed in any 3300 ICP controller to provide for connection to a maximum of 12 ASUs, with the exception of the CX/CXi and CX II/CXi II which support only the first three ports of one Quad CIM module, and the AX controller which support four ports on one module.
- Page 267 Hardware Reference Table 35: RS-232 Maintenance Connector RJ-45 Connector Pin Signal Name DCD (data carrier detector) RXD (receive data) TXD (transmit data) DTR (data terminal ready) GND (ground) DSR (data set ready) RTS (ready to send) CTS (clear to send) Not used Table 36: T1 and E1 Connector Pin Allocation Signal Name...
-
Page 268: Bri Nsu
3300 ICP Technician’s Handbook Table 37: NSU Trunk Type Programming Information Link Descriptor MSDN Trunk Protocol (Integrated Circuit Descriptor Access) Type Universal T1/E1 T1/E1 PRI/QSIG ISDN Node Universal T1 Universal E1 Universal T1 T1 E&M T1D4 Universal T1 Universal T1/E1... - Page 269 Hardware Reference Table 38: BRI Connector Pinout (Amphenol 25-pin) Signal Signal Signal BRI NSU DIP Switch Settings Table 39 below shows the settings for the CEPT port DIP switch for the BRI NSU. Table 39: CEPT Mode - E1 Port DIP Switch Settings Switch Setting Notes...
-
Page 270: Analog Services Unit
3300 ICP Technician’s Handbook Analog Services Unit The Analog Services Unit (ASU) provides connectivity for analog trunks and telephones (POTS and On-Premise Station, ONS). There are three variants of 3300 ASUs: • • Universal ASU • ASU II (only on systems running Release 7.0 and later). - Page 271 Hardware Reference Figure 117: ASU II – Front Panel Figure 118: ASU II – Back Panel with a Line Card There are three line cards available for the ASU II: • 24 Port ONSP card • 16 port ONSP card •...
-
Page 272: Connector Pinout
3300 ICP Technician’s Handbook Table 41: ASU II/AX 25-Pair Male D-Type Connector Pinout 16 port 4 + 12 port Color Code PLID PLID and 24 port ONS Combo 26/1 W/BL, BL/W ONS Tip/Ring 1 n 1 x 1 ONS Tip/Ring 1... - Page 273 Hardware Reference Table 41: ASU II/AX 25-Pair Male D-Type Connector Pinout (continued) 16 port 4 + 12 port Color Code PLID PLID and 24 port ONS Combo Note: In the PLID column, n represents the unit number and x represents the number of the slot in which the card is installed (either one or two).
- Page 274 3300 ICP Technician’s Handbook Table 42: ASU 25-Pair D-Type Connector Pinout (continued) Color Code PLID Universal ASU PLID 44/19 Y/BR, BR/Y ONS Ring/Tip 19 n 1 3 3 LS Ring/Tip 2 n 1 3 2 45/20 Y/S, S/Y ONS Ring/Tip 20...
- Page 275 Hardware Reference Table 45: Universal ASU Pager Connector Pinout Signal Zone Virtual Circuit n 1 5 1 Ring n 1 5 1 Common contact n 1 5 2 Ring n 1 5 2 Normally open contact Common contact Normally open contact Note: CIM 1: n = 2.
-
Page 276: 5485 Ip Paging Unit
3300 ICP Technician’s Handbook 5485 IP Paging Unit Table 46: 5485 IP Paging Unit Pinout Color Code Signal BR/R Audio output, Positive R/BR Audio output, Negative BK/BL Relay Closure (normally closed) BK/O Relay Closure (normally open) BL/BK Page Control input... -
Page 277: Sx-200 Bay
ONS, OPS, and Mitel SUPERSET 4000 series telephones; the SUPERCONSOLE 1000; and the PKM 12 and PKM 48. For a complete list of supported devices, see the 3300 ICP Hardware Technical Reference. Table 47: SX-200 Bay Tip and Ring Assignments... - Page 278 3300 ICP Technician’s Handbook Table 47: SX-200 Bay Tip and Ring Assignments (continued) J1, J2, J3, and J4 Lead Designation Slot / Plug Pair ONS or DNI BK-G SPARE G-BK SPARE BK-BR BR-BK BK-S 1-J1 S-BK Y-BL 3-J2 BL-Y 5-J3...
-
Page 279: Appendix B : Installation Planner
Appendix B Installation Planner... - Page 280 3300 ICP Technician’s Handbook...
-
Page 281: Reserved Ip Addresses
Installation Planner Reserved IP Addresses Table 48 identifies the IP addresses that are reserved for the Analog Main Board (AMB) and the CIMs on the ASUs and ASU IIs. Table 48: Reserved IP Addresses Prior to Release 7.0 Release 7.0 and later 192.168.10.0 to 192.168.10.15 169.254.10.0 to 169.254.10.15 192.168.11.0 to 192.168.11.15... -
Page 282: Mxe Server/Mxe/Ax/Cxi/Cxi Ii Requirements For Ip Networking
3300 ICP Technician’s Handbook MXe Server/MXe/AX/CXi/CXi II Requirements for IP Networking LAN Requirements • A subnet with IP addresses reserved for the following: the MXe Server/MXe/AX/CXi/CXi II system the internal Layer 2 switch the system gateway (router on the LAN or the controller itself) static IP addresses or DHCP-assigned addresses for IP phones (DHCP-assigned addressing is recommended). - Page 283 Installation Planner WAN Requirements • Internet Gateway (WAN interface) IP address details; program one of the following address assignment methods: Static address assignment IP address Subnet Mask Default Gateway DHCP address assignment Client name (as required by ISP) Client ID or MAC address (as required by ISP) PPPoE address assignment User name Password...
- Page 284 3300 ICP Technician’s Handbook applies to untagged and VLAN 1 tagged packets only; voice VLAN tagging is always preserved. • IP Routing form When the CXi/CXi II/MXe receives a packet from a host on the LAN, it checks the table. If a route is found on the Network List, the CXi/CXi II/MXe/AX forwards the packet to the system Gateway or a router connected to the local subnet.
-
Page 285: Controller Configuration Settings (Rtc)
Installation Planner • Data VLAN (CXi - Release 9.0 and later and CXi II) The CXi/CXi II switch can be assigned a data VLAN to override the default VLAN 1. By default, all ports on the CXi/CXi II switch belong to VLAN 1. -
Page 286: Dhcp Configuration Settings
Note host inet (h) IP address of PC used for software upgrades. gateway inet (g) IP address of the default gateway for the 3300 ICP (must be outside the DHCP range). user (u) ftp password (ftp) flags (f) Fixed IP address (0x40 used on E2T for DHCP). - Page 287 Installation Planner Table 50: E2T Static IP Address Programming (continued) Option Name Value Notes/Example Hardware Address: Type MAC Address Other - Type Address MAC address of controller 00:12:3a:4b:c5:67 E2T (see the Note) Other - Address Length Client ID Note: The E2T MAC address is found on the MAC Address label on the rear panel of the ICP.
- Page 288 3300 ICP Technician’s Handbook Table 52: Mitel DHCP Server Options Value Option ID Name Type (notes, example) Router IP address IP Address. 192.168.1.3 DNS server IP IP Address Required for the 5230 IP address Appliance. Vendor Specific ASCII String Default is...
- Page 289 Installation Planner Table 52: Mitel DHCP Server Options (continued) Value Option ID Name Type (notes, example) VLAN ID (optional) HEX, 2 (for external server, use (See note) numeric Hex LONG; for internal server use decimal) Priority (optional) HEX, 6 (for external server, use...
- Page 290 3300 ICP Technician’s Handbook Table 53: DHCP Server Configuration Settings (continued) (Router) Default IP Address Gateway Options (at Global Scope for WEB devices) DNS Server IP Address DNS Domain Name ASCII String Options (for 3300 E2T) TFTP Server ASCII String...
- Page 291 The Option 125 string is auto-generated upon upgrade to Release 7.0 provided that Options 128-135 were previously programmed in the DHCP Options form AND Option 130 contains the “MITEL IP PHONE” discrimination string AND there is no option 60 ipphone.mitel.com scope configured in the given subnet. Page 3 of 3...
-
Page 292: Programming E2T Via Debug Cable Or Secure Telnet
For the MXe and MXe Server, connect to the controller through secure telnet to port 2007. Tip: Use this section only if you already have a debug cable, and only if you are directed to do so by Mitel Technical Support. Table 54: Debug Cable E2T VxWorks Settings Prompt... -
Page 293: Configuring External Dhcp Settings For E2T
66 and 67 on the external DHCP (Windows NT) to E2T reserved IP address. During installation of the 3300 ICP you will manually enter a static IP address on the RTC card. The E2T card will send a DHCP broadcast to obtain an IP address from the DHCP server. -
Page 294: Configuring A Windows 2000 Or Windows 2003 Dhcp Server (Rel 7.0 And Later)
Note:If you intend to rely on LLDP VLAN Discovery in the network, you must first upgrade the 3300 ICP to Release 7.0 or later and upgrade the IP Phone firmware to version 2.0.0.18 or later. - Page 295 Installation Planner 6. In the New Class dialog box, type “Mitel Vendor Class” or other name for the new option. 7. Type “ipphone.mitel.com” in the right side of the text box under ASCII. 8. Enter a null terminator (0x00) at the end of the hex string under Binary.
-
Page 296: System Administration Tool Settings
Tool to create the configuration string, then copy it into a text editor and modify it as required. 16. Click OK. 17. Add the Mitel option to the DHCP scopes that require it, modifying the ID string accordingly. System Administration Tool Settings Record the following settings: •... -
Page 297: Increasing Dsp Resources
Installation Planner Table 55: Telephone Compression Conditions G729 Compression Call setup conditions compression DSP required supported IP Phone to IP Phone (except 5x01, 5x05, and 5207) IP Phone to IP Trunk to IP Phone (except 5x01, 5x05, and 5207) IP Phone to TDM Phone IP Phone to Embedded voice mail IP Phone in conference IP Phone on Hold, listening to music... - Page 298 3300 ICP Technician’s Handbook Tip: Make sure you have the appropriate compression licenses for compression or T.38 licenses for FAX over IP support (FAX Relay) before installing DSP modules. Note:Installing DSP II module(s) in an MXe controller may define one of the 192 Channel PSTN Gateway configurations that does not allow any embedded Voice Mail ports (see Table 57).
- Page 299 Installation Planner • Installing a DSP II module into a system already upgraded to Release 9.0 or later may generate a Check Bootrom or Check FPGA alarm indicating that the firmware in the module needs to be upgraded. Use the UpgradeBootrom ALL maintenance command in the System Administration Tool to upgrade the firmware.
- Page 300 3300 ICP Technician’s Handbook MXe Controller and MXe Server - DSP Resources The following table identifies the DSP resources available for the MXe controller and MXe Server: Table 57: MXe, MXe Server, and 192 Channel PSTN Gateway DSP Resources Maximum Resources Supported...
- Page 301 Installation Planner Table 57: MXe, MXe Server, and 192 Channel PSTN Gateway DSP Resources (continued) Maximum Resources Supported Configuration 192 Gateway (144 T1) (80) (16) (with 363 DSP) (180 E1) 1 x DSP II, 2 x 128 VEC 192 Gateway (144 T1) (with 363 DSP) (180 E1)
- Page 302 Configuration Notes: 1 All 3300 systems can support a maximum of 64 members in a group page. However, the MXe Standard with 64 E2T channels should restrict the number of members in a group page to less than 32 to reduce the risk of conflict with trunk E2T channels.
- Page 303 Installation Planner CX/CXi Configurations - DSP Resources Table 58 and Table 59 list the DSP resources available on the CX/CXi. Table 58: CX/CXi DSP Configurations with DSP II Configuration Base + two T1/E1 10x3 Combo + DSP II Base + Dual 161 10x3 + DSP II Base + Dual 161...
- Page 304 3300 ICP Technician’s Handbook Table 59: CX/CXi DSP Configurations without DSP II Configuration Base System Base + one 10x3 T1/E1 Combo Base + two 10x3 T1/E1 Combo 10x3 Base + Dual 10x3 Base + Dual 10x3 161 + T1/E1 10x3...
- Page 305 Installation Planner Table 59: CX/CXi DSP Configurations without DSP II (continued) Configuration Notes: 1 The number of conference, voice mail, and compression resources is fixed by the purchased option and the number of DSP devices available; the other values are adjustable. Compression alters the number of resources available for the system.
- Page 306 3300 ICP Technician’s Handbook CX II/CXi II DSP Configurations with DSP II Configuration Base + DSP II 10x3 Base + one 10x3 T1/E1 Combo + DSP II Base + two 10x3 T1/E1 Combo + DSP II Note:Compression and T.38 are licensable options and are determined by the number of licenses purchased.
- Page 307 Installation Planner To determine the number of DSP modules required in a system, refer to the table above. • MXe Server ships with two Quad Echo Canceller Modules. • MXe and AX controllers ship with embedded DSP sufficient to support a 400-user system •...
- Page 308 3300 ICP Technician’s Handbook...
- Page 309 Appendix C T ypical Network Configurations...
- Page 310 3300 ICP Technician’s Handbook...
-
Page 311: Appendix C : Typical Network Configurations
Tip: See “Configuring a Windows 2000 DHCP Server (prior to Release 7.0)” on page 397 and “Configuring a Windows 2000 or Windows 2003 DHCP Server (Rel 7.0 and later)” on page 284 for information on programming 3300 DHCP settings on a Windows 2000 DHCP server. -
Page 312: Configuration 1: One Dhcp Server Per Vlan
3300 ICP Technician’s Handbook Configuration 1: One DHCP Server per VLAN Figure 120: One DHCP Server per VLAN - Example Table 60 shows the DHCP settings programmed for this configuration. Table 60: DHCP Settings Example - Configuration 1 DHCP Server on VLAN 1 Internal DHCP Server on (IP: 10.10.10.2) - Page 313 Access port for VLAN 2 VLAN 1 = NO VLAN 2 = untagged Trunk port VLAN 1 = untagged VLAN 2 = tagged Note:For additional switch setting examples, refer to to the Network Configuration Specifics chapter in the 3300 ICP Engineering Guidelines.
-
Page 314: Configuration 2: One Dhcp Server For Two Vlans
3300 ICP Technician’s Handbook Configuration 2: One DHCP Server for Two VLANs Figure 121: One DHCP Server for two VLANs - Example Table 63 shows the DHCP settings programmed for this configuration. Table 63: DHCP Settings Example - Configurations 2 and 3 DHCP Server on VLAN 1 (IP: 10.10.10.2) -
Page 315: Configuration 3: Router On A Stick
LLDP-MED and IP Phone Network Policy LLDP-MED stands for Link Layer Discovery Protocol - Media Endpoint Discovery. LLDP-MED is based on VoIP-specific extensions to the IEEE 802.1A LLDP standard. Refer to the Network Configuration chapter in the 3300 ICP Engineering Guidelines for details. -
Page 316: Cisco Discovery Protocol (Cdp)
3300 ICP Technician’s Handbook Cisco Discovery Protocol (CDP) Prior to Release 5.1 the Mitel IP devices discovered VLAN information dynamically through DHCP. With Release 5.1, Mitel IP device messages are now compatible with Cisco Discovery Protocol (CDP) for the purpose of port duplex and speed settings, port MAC identification and Auxiliary VLAN assignment. -
Page 317: Cxi/Cxi Ii/Mxe/Mxe Server Configuration
The WAN Settings form is used to enable the WAN interface and provide internet connectivity settings. • Enable WAN Access • Select a WAN IP method: Static IP Address, DHCP Client, or PPPoE. Tip: Refer to the Network Configuration chapters in the 3300 ICP Engineering Guidelines. -
Page 318: Configuration A: Cxi/Cxi Ii/Typical Voice-Only Network
3300 ICP Technician’s Handbook Configuration A: CXi/CXi II/Typical Voice-Only Network Figure 123: CXi/CXi II Voice-Only Configuration Example IP Address 192.168.1.2 Subnet 255.255.255.0 Gateway 192.168.1.1 Layer 2 192.168.1.1... -
Page 319: Configuration B: Mxe Typical Voice-Only Network
Typical Network Configurations Configuration B: MXe Typical Voice-Only Network Figure 124: MXe Voice-Only Configuration Example IP Address 192.168.1.2 Subnet 255.255.255.0 Gateway 192.168.1.1 Layer 2 192.168.1.1... -
Page 320: Configuration C: Cxi/Cxi Ii Typical Voice And Data Network
3300 ICP Technician’s Handbook Configuration C: CXi/CXi II Typical Voice and Data Network Figure 125: CXi/CXi II Voice and Data Configuration Example IP Address 192.168.1.2 Subnet 255.255.255.0 Gateway (Router) 192.168.1.1 Layer 2 192.168.1.3 If an IP Address is on the IP Network List in the IP Routing form, Tip: the connection will be routed to 192.168.1.1 (router). -
Page 321: Configuration D: Mxe Typical Voice And Data Network
Typical Network Configurations Configuration D: MXe Typical Voice and Data Network Figure 126: MXe Voice and Data Configuration Example IP Address 192.168.1.2 Subnet 255.255.255.0 Gateway (Router) 192.168.1.1 Layer 2 192.168.1.3 If an IP Address is on the IP Network List in the IP Routing form, Tip: then the connection will be routed to 192.168.1.1 (router). -
Page 322: Ax Configuration Procedures
3300 ICP Technician’s Handbook AX Configuration Procedures AX Typical Voice-Only Network Figure 127: AX Voice-Only Configuration Example IP Address 192.168.1.2 Subnet 255.255.255.0 Gateway 192.168.1.1... -
Page 323: Ax Typical Voice And Data Network
Typical Network Configurations AX Typical Voice and Data Network Figure 128: AX Voice and Data Configuration Example IP Address 192.168.1.2 Subnet 255.255.255.0 Gateway (Router) 192.168.1.1 If an IP Address is on the IP Network List in the IP Routing form, Tip: then the connection will be routed to 192.168.1.1 (router). -
Page 324: Cxi, Cxi Ii, Mxe And Ax-Specific Guidelines
3300 ICP Technician’s Handbook CXi, CXi II, MXe and AX-Specific Guidelines This section describes VLAN behavior, and the different types of network configurations: voice-only, voice and data, and the programming and configuration requirements for CXi, CXi II, MXe and AX. - Page 325 Typical Network Configurations Data VLAN (CXi - Release 9.0 and later and CXi II) The CXi/CXi II switch can be assigned a data VLAN to override the default VLAN 1. By default, all ports on the CXi/CXi II switch belong to VLAN 1. In addition, VLAN membership can be assigned on a per port basis.
- Page 326 3300 ICP Technician’s Handbook Figure 129: CXi/CXi II VLAN Behavior Note:The default VLAN may not be 1, but it is untagged.
-
Page 327: Implementing A Voice-Only Network
Typical Network Configurations Implementing a Voice-Only Network In a voice-only network, IP telephony devices are the only devices connected to the controller’s network interfaces. Figure 130: CXi/CXi II-based Typical Voice-Only Network... - Page 328 3300 ICP Technician’s Handbook MXe/AX/CXi/CXi II IP Settings No changes to the controller’s default IP settings are required for a voice-only network: • CXi/CXi II - plug up to 16 IP phones into the internal Layer 2 switch ports (marked 10/100 802.3af) and plug up to 84 phones into the external L2 switches for a total of up to 100 IP phones.
-
Page 329: Implementing A Voice And Data Network
Typical Network Configurations Implementing a Voice and Data Network Using a CXi/CXi II ICP A voice and data network uses the CXi/CXi II controller’s network interfaces to provide services for IP phones and PCs plus a firewall-protected connection to the Internet. The 10/100/1G LAN port in the illustration is connected to a pair of Layer 2 switches. - Page 330 3300 ICP Technician’s Handbook Using an MXe or AX ICP Figure 133: MXe-based Typical Voice and Data Network Note:The AX controller does not have a built in Internet Gateway like the MXe does. The Internet Gateway features supported on the MXe, such as firewall, routing, NAT and remote routing, are not available on the AX controller.
- Page 331 Typical Network Configurations DHCP Server: The default address information and options may need to be changed when installing the controller on a network with multiple subnets. If you are using an external DHCP server, disable the one in the controller. For programming instructions, refer to the System Administration Tool Online Help.
-
Page 332: Installing External Layer 2 Switches
10/100 802.3af LAN ports on the CXi/CXi II. • Mitel telephones require power, which they can receive from an adapter or power brick, or from a powered Ethernet connection. The 10/100 802.3af LAN ports of the CXi/CXi II provide Power over Ethernet (PoE), as do some expansion switches. - Page 333 Typical Network Configurations • The MXe and AX do not support PoE. The phones need to be powered from an adapter or power brick, or from a powered Ethernet connection. A variety of L2 switches provide PoE. • Category 5 cable is required for the uplink connection between the expansion switches and the CXi/CXi II/MXe/AX, and is recommended for all other Ethernet connections.
- Page 334 3300 ICP Technician’s Handbook Program the uplink port of the expansion switches to send and receive tagged packets on the default VLAN (1), and make sure that the expansion switches treat packets with priority value 6 as highest priority (this is the default setting on most switches).
- Page 335 Typical Network Configurations 8. Mitel telephones can receive power from an adapter, a power brick or a powered Ethernet connection. The 10/100 802.3af LAN ports on the CXi/CXi II provide Power over Ethernet (PoE), as do some expansion switches. The 10/100/1G LAN port does not provide PoE and the MXe and AX do not provide PoE.
-
Page 336: Windows 2000 Ftp Server
3300 ICP Technician’s Handbook Windows 2000 FTP Server Figure 135, Figure 136 and Figure 137 below show examples of the settings needed on a Windows 2000 FTP server. To program these FTP settings 1. Open the Computer Management control panel (Start/Settings/Control Panels/Administrative Tools/Computer Management). - Page 337 Typical Network Configurations Figure 136: Windows 2000 Security Accounts Tab Figure 137: Windows 2000 Home Directory Tab...
- Page 338 3300 ICP Technician’s Handbook...
-
Page 339: Appendix D : Status Leds
Appendix D Status LEDs... - Page 340 3300 ICP Technician’s Handbook...
- Page 341 IP Phone and IP Appliance LAN LEDs (page 357) • Peripheral Cabinet LEDs (page 358) • Digital Services Unit LEDs (page 363) • In-Line Power Unit LEDs (page 366) For detail on any alarms, see the 3300 ICP Troubleshooting Guide.
-
Page 342: Controller Leds
3300 ICP Technician’s Handbook Controller LEDs Figure 138: AX Controller Card LEDs Power LED (page 336) T1/E1 Combo (page 346) Flash Activity LED (page 336) Dual T1/E1 Framer (page 345) Alarm LED (page 336) Quad BRI Framer (page 347) CIM LEDs (page 342) Ethernet LEDs (page 341) Figure 139: MXe/MXe Server –... - Page 343 Status LEDs Figure 140: MXe Controller – Rear Panel with Analog (page 345) RAID Controller LEDs (page 337) Power Supply LED Figure 141: MXe Server – Rear Panel (page 345) RAID Controller LEDs (page 337) Power Supply LED...
- Page 344 3300 ICP Technician’s Handbook Figure 142: Controller LEDs (CX/CXi) Figure 143: Controller LEDs (CX II/CXi II) (page 336) Ethernet LEDs (page 341) Power LED (page 336) T1/E1 Combo Card (page 347) Hard Drive LED Alarm LED (page 344) Quad BRI Framer (page 347)
- Page 345 Status LEDs Figure 144: Controller LEDs (LX) Power LED (page 336) CIM LEDs (page 342) Hard Drive LED (page 336) Alarm (Relay) LEDs (page 342) FIM LEDs (page 340) Dual T1/E1 Framer (page 345) Ethernet LEDs (page 341) Quad BRI Framer (page 347) T1/E1 Combo (page 346)
-
Page 346: Controller Alarm Leds (Ax, Mxe/Mxe Server)
3300 ICP Technician’s Handbook Controller Alarm LEDs (AX, MXe/MXe Server) Table 66: CX/CXi, CX II/CXi II, AX and MXe Controller Alarm LED LED Status Meaning There is no system alarm. Yellow flashing Minor alarm. Orange flashing Major alarm. Red flashing Critical alarm. -
Page 347: Raid Controller
Status LEDs RAID Controller Refer to Knowledge Base Article 11-5191-00213 “SATA RAID Controller Operations Manual” for RAID operation details. MXe II Figure 145: MXe II/MXe Server RAID Controller LEDs Table 69: MXe II/MXe Server RAID Controller LEDs Activity Meaning Green ON No access Orange ON Read or write occurring on hard disk... - Page 348 3300 ICP Technician’s Handbook Table 71: MXe II/MXe Server RAID Fault and Access LEDs Hard Drive Fault Access Description State Request off-line OFF GREEN flashing Button pushed while (1/sec) online Going off-line GREEN Button released, processing request Off-line Request on-line Note...
- Page 349 Status LEDs MXe III RESET BUTTON (PRESS TO RESET THE CARD) Figure 146: MXe III RAID Controller LEDs Table 72: MXe III RAID Controller LEDs Host Meaning • System off or reset • Hard disks disconnected Green ON Host idle Flashing Green Disks being accessed Table 73: MXe III RAID Link LEDs...
-
Page 350: Fim
3300 ICP Technician’s Handbook Table 73: MXe III RAID Link LEDs (continued) Hard Drive HD 1 HD 2 Description State Failure BLUE Slow BLUE HD 2 failed or out of flashing date Slow BLUE BLUE HD 1 failed or out of... -
Page 351: Lan Ethernet Ports
Status LEDs LAN Ethernet Ports Figure 147: Controller LAN Ethernet Port LEDs (LX) Table 75: Controller Ethernet Port LEDs (LX) Meaning Bottom Normal Mode Switch Pressed Mode ON (Green) — Link activity Full duplex ON (Red) — Collision — ON (Green) Link integrity 100 Mbps —... -
Page 352: Cim, Embedded And Quad Mmc
3300 ICP Technician’s Handbook Table 76: WAN/LAN Port LEDs (CX/CXi, CX II/CXi II/ MXe/MXe Server, AX) Meaning Yellow on Data transmission/reception is at 100 Mbps (the port speed for the 10/100/1GigE LAN Port can be up to 1 Gbps). Yellow off Data transmission/reception is at 10 Mbps. - Page 353 Status LEDs Table 78 below shows the meaning of the Alarm LEDs. Table 78: Controller Alarm (Relay) LEDs (LX) Alarm State Meaning Critical Red on Service is lost; immediate maintenance required (critical alarm invokes system fail transfer if enabled). Power on reset ongoing. OR INIT switch activated (resets all boards).
- Page 354 3300 ICP Technician’s Handbook Table 79 below shows the meaning of the alarm LEDs. Table 79: Controller Alarm LEDs (CX/CXi, CX II/CXi II/ MXe/MXe Server, AX) Alarm CX/CXi, Meaning State CX II/CXi II/MXe/ MXe Server Critical Critical Service is lost; immediate...
-
Page 355: Power Supply Unit Leds
Status LEDs Power Supply Unit LEDs Status Meaning Input OK Green ON Input is within parameters. Power supply is OFF Output OK Green ON Output voltage is within normal operating range. Dual T1/E1 Framer Module Figure 150: Dual T1/E1 Framer Module Table 80: Controller Dual T1/E1 Framer LEDs Meaning Alarm (bottom) -
Page 356: T1/E1 Combo Card
3300 ICP Technician’s Handbook T1/E1 Combo Card Figure 151: Controller T1/E1 Combo Card (Rel 6.0) Figure 152: Resilient T1/E1 Combo Card (Rel 7.0) -
Page 357: Quad Bri Framer Module
Status LEDs Table 81: Controller T1/E1 Combo Card Status LED Alarm LED Meaning (green) (red/yellow) Link not programmed or link descriptor not assigned. Solid Red Red alarm. Loss of signal; check link connection. Solid Yellow Yellow alarm. No signal from remote end; check link with analyzer. - Page 358 (1:1 or crossover). BRI link may not be active (or layer 1 power save is active). No alarms are returned to the 3300 and circuits are idle. To prevent routing problems when there is a faulty BRI port, program the MSDN/DPNSS Stepback feature.
-
Page 359: Network Services Unit Leds
Status LEDs Network Services Unit LEDs Universal/R2 NSU Figure 154: Universal and R2 NSU LEDs NSU FIM LEDs Table 83: NSU FIM LEDs LED Status Meaning for local (upper) and remote (lower) FIM In-frame synchronization. Flashing Out of synchronization OR Tx and Rx fibers reversed. Power off OR held in reset. - Page 360 3300 ICP Technician’s Handbook Universal NSU LED States Table 85: Universal NSU LED States State Meaning flashing LAN activity MS (message solid green Message link open to the system system) Message link not open to the system; may be downloading when L0 and L1 are “walking”...
- Page 361 Status LEDs NSU Card Status Table 86: Message Link Controlled (Card Status) Meaning Green Yellow — — No error. — — Out of service. — — Error (not necessarily total failure). — Out of service (may occur at power up). —...
-
Page 362: Bri Nsu
3300 ICP Technician’s Handbook Table 87: R2 NSU LED States (continued) State Meaning L0 and L1 right side - solid red Error (no physical layer is present (on front and rear) or network/line side jumper is not set correctly) right side - OFF... - Page 363 Status LEDs BRI NSU LED States Fifteen circuit LEDs and one status LED are mounted on the faceplate. The status LED shows the status of the CEPT link, and each of the circuit LEDs shows the status of one BRI circuit. The BRI circuit LEDs are also used during card initialization to indicate the progress of the self-test and to indicate that the download is in progress.
-
Page 364: Analog Services Unit Leds
3300 ICP Technician’s Handbook Analog Services Unit LEDs Figure 156: Universal ASU LEDs The Universal ASU has 16 ONS LEDs, 4LS LEDs, and a CIM Status LED. Figure 157: ASU LEDs The ASU has 24 ONS LEDs, and a CIM Status LED. - Page 365 Status LEDs Universal ASU, ASU, and ASU II CIM Status LEDs Table 89: CIM LED LED Status - RED Meaning Communication link synchronized with Controller. Flashing Powered on, BSP running. No power. Universal ASU LS Circuit LEDs Table 90: Universal ASU and ASU ONS/LS Circuit LEDs LED Status Circuit State Circuit Status...
-
Page 366: Asu Ii Card Leds
3300 ICP Technician’s Handbook ASU II Card LEDs ASU II ONS and Combo Card Alarm LED Table 93: ASU II Card Alarm LED LED Status Meaning Red ON System error. Red OFF No error. ASU II ONS Card Activity LED... -
Page 367: Ip Device Leds
Status LEDs IP Device LEDs The IP Phones and IP Appliances have LAN Line Status LEDs on the back of the device. The network connection (LAN) LEDs are on the back of the phone near the LAN and PC ports. The Dual Mode IP Phones do not have LAN LEDs. -
Page 368: Peripheral Cabinet Leds
3300 ICP Technician’s Handbook Peripheral Cabinet LEDs Peripheral Cabinet FIM Figure 159: Peripheral Cabinet FIM LEDs Table 97: Peripheral Cabinet LEDs LED Status Meaning (All LEDs) In-frame synchronization Flashing Out of synchronization OR TX and RX fiber optic cables reversed. - Page 369 Status LEDs Table 98: Peripheral Card LEDs (continued) LED Status Meaning (All LEDs) Red ON Card has a fault in some or all of its circuits or it is in manbusy state. Red OFF Card is in service. Circuit Status LEDs Circuit busy or booting.
-
Page 370: Sx-200 Bay Leds
3300 ICP Technician’s Handbook SX-200 Bay LEDs BCC III Figure 160: Peripheral Cabinet FIM LEDs... - Page 371 Note: It takes more than 70 seconds before See Note. the BCC III begins communicating with the 3300 ICP. Just before the BCC III starts to communicate with the 3300 ICP, the TX/RX LED goes out and then the alarm LED goes out.
- Page 372 3300 ICP Technician’s Handbook Table 101: Peripheral Card LEDs LED Status Meaning (All LEDs) Card Alarm Status LEDs Wrong card is plugged into the slot or plugged into a slot that is unassigned (not programmed). Card is in service. Circuit Status LEDs Circuit busy or booting.
-
Page 373: Digital Services Unit Leds
Status LEDs Digital Services Unit LEDs BRI Card Figure 161: DSU BRI Card LEDs One status LED and fifteen circuit LEDs are mounted on the BRI card faceplate. The status LED shows the status of the CEPT link, and each of the circuit LEDs shows the status of one BRI circuit. - Page 374 3300 ICP Technician’s Handbook Table 102: BRI Card Circuit LEDs (continued) State Meaning (All LEDs) Circuit BRI circuit not in use (no device connected to circuit) Flashing at 1 Hz Idle device connected to the circuit (layer 1 established) Flashing at 4 Hz...
- Page 375 Status LEDs DSU PRI and R2 Card LEDs Three status LEDs and 14 circuit LEDs are mounted on the DSU card faceplate. Each of the card circuit LEDs shows the status of one circuit. Table 103: DSU Card Circuit LEDs State Meaning DSU PRI...
-
Page 376: In-Line Power Unit Leds
3300 ICP Technician’s Handbook In-Line Power Unit LEDs Figure 162: In-Line Power Unit LEDs The In-Line Power Unit LEDs are grouped as follows: • AC Power (below) • Power Unit Alarm (page 351) • Power Unit Port Status (page 367) - Page 377 Status LEDs Power Unit Alarm Table 105 below shows the meaning of the Alarm LED. Table 105: Power Unit Alarm LED (Orange) LED Status Meaning Built-in self test failed. Flashing Software load failure. Re-install the software. Built-in self test passed. Power Unit Port Status Each port pair has two Status LEDs: •...
- Page 378 3300 ICP Technician’s Handbook...
-
Page 379: Appendix E : Fru Part Numbers
Appendix E FRU Part Numbers... - Page 380 3300 ICP Technician’s Handbook...
-
Page 381: Hardware Part Numbers
FRU Part Numbers Hardware Part Numbers Table 107: Hardware Part Numbers Part Number Description 3300 ICP Controllers, software, and components 50006269 MXe III Controller 50005363 MXe II Controller, expanded, 1400-user 50005080 MXe II Controller, HD, i-Button, base software, AMB II, AC power... - Page 382 16 Port ONS Card (AX and ASU II) 50005104 4 + 12 Port Combo Card (AX and ASU II) 50005533 3300 16 Port ONSP Card (for all markets, including Brazil) 50005731 3300 24 Port ONSP Card (for all markets, excluding Brazil) 50005160...
- Page 383 3300 Universal NSU T1/E1 (NA) 50004991 3300 Universal NSU T1/E1 (Euro) 50004992 3300 R2 NSU, 110/220 V 50005105 3300 Analog Services Unit II with AC Power Supply Power Units 50000363 Power Distribution Unit 50000687 24 VDC IP Power Adapter 240V 50Hz, Euro (Qty 1)
- Page 384 CX II/CXi II Fan Assembly 50005683 MXe, CX II/CXi II Fan Assembly 51000582 C7 Power Cord with UK Plug 51002525 3300 Phone Power Dongles (6-Pack) 51004716 3300 In-Line Power Unit 51004990 C7 Power Cord with Euro Plug 51005172 C7 Power Cord with NA Plug...
- Page 385 FRU Part Numbers Table 107: Hardware Part Numbers (continued) Part Number Description 50002376 Peripheral Cabinet Door 19 inch, dark grey, (Qty 2) 50002572 Peripheral Cabinet FRU 19 inch 50004201 Redundant Control Node with MCIIIE(AC) Int’l 50004202 Redundant Control Node with MCIIIE (DC) 50004203 Peripheral Cabinet III 120 V (NA) 50004204...
- Page 386 3300 ICP Technician’s Handbook Table 107: Hardware Part Numbers (continued) Part Number Description 9400-200-164-BA Redundant Control Cabinet with MCIIIE (DC) UK 9400-200-163-NA Redundant Control Cabinet with MCIIIE (DC) 9400-200-200-NA Power Module Redundant (in Control Node) 9400-200-301-NA Peripheral/DSU Resource Card 9400-200-303-NA...
- Page 387 12-Port Digital Line Card - ML (MC292AA) 9109-110-001-NA 12-Port ONS CLASS Line Card (MC294AA) 9109-110-003 12-Port ONS CLASS - ML (MC295AA) 9109-616-001-NA Peripheral Interface Module Carrier Card 9180-510-001-NA FIM Module - 820nM Multi-mode. Connects to 3300 Part Number 50001248 Page 7 of 8...
-
Page 388: Software Part Numbers
3300 ICP Technician’s Handbook Table 107: Hardware Part Numbers (continued) Part Number Description 9180-510-002-NA Fibre Interface Module - 1300 nM Multi-mode. Connects to 3300 Part Number 50003695 9180-510-003-NA Fibre Interface Module - 1300 nM Single Mode. Connects to 3300 Part Number 50003696... - Page 389 FRU Part Numbers Table 108: Software Part Numbers (continued) Part Number Description 9125-501-002-NA ISDN Auto Min/Max Software Option for the PRI Card 9125-501-003-NA ISDN NFAS Software Option for the PRI Card 9125-501-004-NA ISDN D-Channel Back up Software Option - PRI Card 9125-501-005-NA ISDN Remote LAN Access Software Option - PRI Card...
- Page 390 3300 ICP Technician’s Handbook...
-
Page 391: Appendix F : System Capacity And Parameters
Appendix F System Capacity and Parameters... - Page 392 3300 ICP Technician’s Handbook...
-
Page 393: System Parameters
System Capacity and Parameters System Parameters Port Usage Table 109: Port Usage Function Port/Socket Number IP Trunk (unsecured) 1066 IP Trunk (SSL) 1067 Software Log 1750 Maintenance Log 1751 SMDR 1752 PMS/Hotel Logs 1753 (only one direction) LPR1 (printer port) 1754 PDA, Application communication 3999... -
Page 394: Encryption Support
Signaling encryption is device dependent and used whenever supported. Voice stream encryption is optional and used if both endpoints support it. Calls initiated on a 3300 ICP or a legacy IP set which does not support encryption (pre-release 6.0) are supported, but will not be encrypted. The... -
Page 395: Ip Set Features
System Capacity and Parameters IP Set Features Table 112: IP Set Features 5320, 5212, 5215, TeleMatrix 5201, 5230, 5235, 5220, 5330, Option Navigator 3000IP, 5207 5240, 5312, 5224 5340, 5560 IPT 5324 5360 Compression G.711 G.711 G.711 G.711 G.711 See Note 1 Support G.729a G.729a... -
Page 396: Ip Phone Power Consumption
3300 ICP Technician’s Handbook IP Phone Power Consumption Table 113: Actual Phone Set Power Consumption Typical Power Device consumption (W) 5001 IP Phone 5005 IP Phone 5010 and 5020 IP Phones 5201 IP Phone 5205 IP Phone 5207 IP Phone... -
Page 397: Capacity
Hardware Capacity The following tables provide a view of the maximum capacity of the 3300 ICP. The capacities in these table are for a non-resilient 3300 ICP. Tip: The capacities in Table 114 are not true hardware limitations, but may be limits set by software. - Page 398 A combination of IP and DNI phones (no DNI in the CX/CXi, CX II/CXi II, or AX, or MXe Server). Refer to 3300 ICP Engineering Guidelines for details. The largest number is available only with the 192 channel PSTN gateway configuration.
-
Page 399: System Capacity
System Capacity and Parameters System Capacity Tip: Digital Links are also limited by the number of dual FIMs available on the controller. Table 116: System Capacity Parameter Name (numbers in brackets are minimum Maximum Value and maximum values with flexible dimensioning) (default maximum) IP User Licenses 5600 (1400) - Page 400 3300 ICP Technician’s Handbook Table 116: System Capacity (continued) Parameter Name (numbers in brackets are minimum Maximum Value and maximum values with flexible dimensioning) (default maximum) Conferees in a conference; maximum (see note 2) Default Account Codes (10-600) Departments (in Telephone Directory) (10-5000)
- Page 401 System Capacity and Parameters Table 116: System Capacity (continued) Parameter Name (numbers in brackets are minimum Maximum Value and maximum values with flexible dimensioning) (default maximum) PKM Devices (2-500) Routes (10-2400) 200 / 1200 (see note 1) Route Lists (10-1200) 128 / 600 (see note 1) Single Line Sets (16-5000) Speed Call Digit String (average 12 digits) (65000 max) 2501...
- Page 402 3300 ICP Technician’s Handbook...
-
Page 403: Appendix G : Older Hardware And Software
Appendix G Older Hardware and Software... - Page 404 3300 ICP Technician’s Handbook...
-
Page 405: Procedures For Older Controllers
Programming the Controller DHCP Server Settings (prior to Rel 7.0) For additional information on programming DHCP settings for the 3300 ICP, refer to the System Administration Tool Online Help. To use an external DHCP Server, do not enable the internal DHCP server and refer to “Configuring External DHCP Settings for E2T”... -
Page 406: To Use An Alternative Dhcp Server (Prior To Rel 7.0)
See page 283 and page 283: 1. In the DHCP Server form, disable the internal DHCP server. 2. Program your DHCP server with the following options: - 128 TFTP IP address format - 129 RTC IP address format - 130 MITEL IP PHONE, string value. -
Page 407: Configuring A Windows 2000 Dhcp Server (Prior To Release 7.0)
TFTP Server IP address • IP address of the RTC card • Mitel tag “MITEL IP PHONE” To modify a Windows 2000 DHCP Server: 1. In the Start menu, point to Programs, then Administrative Tools, and click DHCP. 2. Highlight the Server name and point to Action, then click Set Predefined Options. - Page 408 Type: Hex LONG Code: 133. Then click OK. Value: enter a value from 1 to 7; Mitel recommends 0x6. Click OK. Tip: The server will automatically convert the numeric value to Hex. 13. Highlight the Scope which contains the IP range for the IP Phones and select Scope Options.
-
Page 409: Program Dhcp For Vlan (Prior To Rel 7.0)
Program DHCP for VLAN (prior to Rel 7.0): Follow this procedure if using two DHCP servers: central server (external) on a default VLAN and other (3300 DHCP Server) on the voice VLAN. 1. Set up the central DHCP Server with the following options:... - Page 410 3300 ICP Technician’s Handbook Figure 163: Windows 2000 FTP Site Tab Figure 164: Windows 2000 Security Accounts Tab...
-
Page 411: Connect A Windows 95/98 Pc To The Nsu Via Dial-Up
Windows XP without a NIC. By default, Windows does not support a direct cable connection. You must add a device driver. Windows takes the information from a Mitel file and creates the driver called NT Direct Connection. To install a Direct Connection Device Driver (Windows 95/98): 1. -
Page 412: Physically Connecting The Pc To An Nsu
3300 ICP Technician’s Handbook 6. Click Have Disk. 7. Type c:\Program Files\Mitel\Imat in the Copy manufacturer's files from field, then click OK. 8. In the Install from Disk window, click OK. 9. Click Next to select the NT Direct Connection. - Page 413 Older Hardware and Software 1. On the Start menu, point to Programs, point to Accessories, and then click Dial-Up Connections. 2. Double-click Make New Connection. 3. Enter an appropriate name for the connection (for example, Direct for direct connections, Remote or a customer’s name for remote connections) and click Next.
-
Page 414: Migrate Sx-2000 Pbx Hardware
4. Do NOT remove any other cards. Tip: Refer to Knowledge Base Article 04-1000-00068 (TB 58005193) for Migration procedure details. An SX-2000 MicroLIGHT system converted to 3300 control uses fiber interface modules (FIM) of the triple FIM carrier card as required: •... -
Page 415: Collecting System Logs Manually
Optionally, connect FIM Circuits 2 and 3 as DSU pairs in the cabinet, identifying them as NSU pairs in ESM. Any DSU or peripheral cabinets that were previously connected to the MicroLIGHT must now be connected by fiber directly to the 3300 ICP controller. Figure 166: SX-2000 MicroLIGHT under 3300 control Collecting System Logs Manually Collecting System Logs - Release 5.1 System... -
Page 416: Collecting System Lockup Logs Manually
406. This procedure is needed to obtain system.wvr logs and output from RTC console. To prepare to for collecting system lockup logs: 1. Save the “HardResetHook” commands in a text file called sysinfo.txt. The file is also available at ftp://ftp.mitel.com/outgoing/. -
Page 417: Peripheral Cabinet
Type cd /db Type put sysinfo.txt (OR enter each command at the RTC console) Type bye 3. Execute the sysinfo.txt on the RTC Console if the 3300 ICP locks up: Access RTC Console via communication software (i.e. HyperTerm). Type cd “/db”... - Page 418 3300 ICP Technician’s Handbook...
-
Page 419: Index
253 combo card SFT/PFT port 264 LEDs, ASU II 355 illustration 261 ASU II/AX Card Lock Latch Color 261 3300 ICP connection 30 Audio file enabling licenses automatically 31 Software Installer Tool 30 installing embedded 65 Analog Main Board... - Page 420 3300 ICP Technician’s Handbook components 240 configuring Layer 2 switch (MXe, Cabinets, installing 58 CXi, CXi II) 26 Cache, clear browser 138 encryption support 384 Capacity establish communication between hardware, all controllers 387 PC and controller 25 system 389 hardware 240...
- Page 421 DNIC Music on Hold, install 66 illustration, front 245 DNS name resolution CXi controller AMC connection 30 VLAN behavior 314 Documentation CXi II on Mitel Online 8 illustration, back 247 Downgrading slot locations 44 restrictions 113 CXi/CXi II DSP II module IP networking requirements 272...
- Page 422 3300 ICP Technician’s Handbook flash cards 233 hard drives 205 line cards 231 programming via debug cable 282 power supplies 221 replacing 202 precautions 159 Echo canceller, installation notes 170 redundant power supply 222 Electro-static discharge, precautions RTC processor 202...
- Page 423 Index ASU II 261 AX controller card 241 Handbook, symbols in 3 AX front panel 240 Hard drive CX front panel 244 CX II/CXi II CX II back panel 247 install APC-CX(i) II 199 CX II front panel 246 replace hard drive 207 CXi back panel 245 replace SSD 207 CXi front panel 245...
- Page 424 3300 ICP Technician’s Handbook Installing daisy chaining 64 LEDs 357 ASUs 61 loading software remotely 112 BRI NSUs 60 move detection 123 connecting maintenance PC 13 power consumption 386 DMP 66 DNIC music on hold 66 ISDN Maintenance and Admin...
- Page 425 Index combo card R2 351 activity, ASU II 356 Universal 350 alarm, ASU II 356 message link, Universal 351 front photo LEDs, peripheral cabinet ASU 354 BRI circuit 363 ASU II 354 FIM 358 Universal ASU 354 status 358, 362 ONS card LEDs, SX-200 Bays 360 activity, ASU II 356...
- Page 426 3300 ICP Technician’s Handbook IP Device 123 Maintenance PC 13 requirements 83 verifying connections 24 Music on Hold Maintenance Tools analog 65 Controller Hardware Profile 118 ASU pinout 264 Device connectivity 123 digital 65 IP Device detection 123 DNIC, paging unit 66...
- Page 427 Part numbers LX, CX, CX II examples 301 hardware FRUs 371 software FRUs 378 BRI DIP switch settings 259 Password, Mitel options 8 BRI, illustration 258 Patch, applying software patches 111 card status LEDs 351 CEPT DIP switch 259 connecting to controller 13...
- Page 428 3300 ICP Technician’s Handbook pinout 267 link status 351 Phones Rack-mount consumption, actual power 386 AX 53 installing 64 CX II/CXi II 55 CX/CXi 54 Pinouts MXe 52 Peripheral Cabinet 267 rack-mount the controller 52 SX-200 Bay 267 SX-200 Bays 267...
- Page 429 Index II, CXi II) 25 Static IP address RTC processor, replacing 202 remove static from IP phone 145 setting static IP address 143 Stratum 3 clock module, replacing Safety SX-200 Bays considerations 159 FRUs 377 instructions 3 installing 62 Security Certificate, install 118 LEDs 360 Service units pinouts 267...
- Page 430 3300 ICP Technician’s Handbook TCP/IP Socket Numbers 121 Upgrading TCP/IP source port about 83 adding compression channels 287 AMC connection 30 adding TDM devices 287 Technical support Flexed Dimension 103 contacting 9 IP sets software 89 Telephones Maximum Elements change 103...