User Manuals: Lightware UMX-HDMI-140-Plus HDMI Extender
Manuals and User Guides for Lightware UMX-HDMI-140-Plus HDMI Extender. We have 3 Lightware UMX-HDMI-140-Plus HDMI Extender manuals available for free PDF download: User Manual
Lightware UMX-HDMI-140-Plus User Manual (161 pages)
Universal Multimedia Switcher
Table of Contents
-
Features10
-
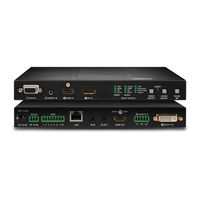
Front View15
-
Rear View15
-
Port Legend16
-
Status Leds16
-
Control Lock17
-
Installation18
-
IR Connector21
-
Connector21
-
Port Diagram24
-
Modes27
-
Recognizer28
-
Wake-On-Lan28
-
IR Interface30
-
Ethernet Tab35
-
Serial Tab36
-
Video Output41
-
Audio Output42
-
Test Pattern43
-
EDID Menu45
-
Control Menu47
-
Gpio49
-
Ethernet49
-
Infra52
-
Macros54
-
Variables55
-
Status61
-
Network61
-
Front Panel62
-
Backup62
-
System62
-
Compile Time70
-
Mute Output72
-
Lock Output73
-
Settings77
-
Mode Setting77
-
Overview83
-
Escaping84
-
Signature85
-
Subscription85
-
Dark Mode87
-
Lock Output92
-
Mute Output92
-
Enable the Event101
-
Value Assignment102
-
Scan and Store104
-
HTTP Messaging109
-
Databits Setting113
-
Operation Mode113
-
Protocol Setting113
-
Stopbits Setting114
-
Parity Setting114
-
Message Sending115
-
Set the Timeout116
-
Further Commands119
-
EDID Management122
-
Firmware Update130
-
Introduction131
-
Preparation131
-
LDU2 Interfaces132
-
Updating Via GUI134
-
How to Run135
-
How to Use136
-
CLI Commands136
-
Help136
Advertisement

Lightware UMX-HDMI-140-Plus User Manual (126 pages)
Universal Multimedia Switcher
Table of Contents
-
Features9
-
Front View14
-
Rear View15
-
Port Legend16
-
Control Lock17
-
Installation18
-
IR Connector21
-
Connector21
-
Port Diagram24
-
Recognizer28
-
IR Interface28
-
Video Output39
-
Audio Output40
-
Test Pattern41
-
EDID Menu42
-
Control Menu44
-
Gpio46
-
Ethernet46
-
Infra47
-
Network52
-
Status52
-
Front Panel53
-
System53
-
Mute Output62
-
Lock Output63
-
Mode Setting67
-
Settings67
-
Overview73
-
Escaping74
-
Signature75
-
Subscription75
-
Dark Mode77
-
Lock Output81
-
Mute Output81
-
Balance87
-
Volume87
-
Recognizer91
-
Firmware Upgrade104

Lightware UMX-HDMI-140-Plus User Manual (93 pages)
Universal Multimedia Switcher
Table of Contents
-
Features7
-
Installation10
-
Front View12
-
Rear View13
-
Connector14
-
IR Connector15
-
Port Diagram16
-
IR Interface20
-
Port Legend22
-
Operation22
-
Control Lock23
-
Video Output30
-
Audio Output30
-
Test Pattern31
-
EDID Menu32
-
Control Menu34
-
Ethernet36
-
Gpio36
-
Infra37
-
Status42
-
Network42
-
Front Panel43
-
System44
-
Compile Time47
-
Lock Output48
-
Mute Output48
-
Overview53
-
Escaping54
-
Signature55
-
Subscription55
-
Dark Mode57
-
Mute Output61
-
Lock Output61
-
Recognizer67
-
Installation79
Advertisement