
Related Manuals for Beech ovens REC Series


Summary of Contents for Beech ovens REC Series
-
Page 1: Installation And Operation Manual
Installation and Operation Manual RND - REC - RGO Oven Series (Revision 1 – July 2011) To obtain the best results from your Beech Oven, please read this manual in it‟s entirety before operation. © Beech Ovens Pty Ltd 2010... - Page 2 Name: Signature: Purchaser: Oven installation location: Model Number: Serial No: Warranty Start Date: The completed warranty card must be returned to Beech Ovens by one (1) of the following methods: Email: technical@beechovens.com.au Fax: +617 3397 0030 P.O. Box 1577 Certified Mail:...
- Page 3 Beech Ovens Page 2 28/07/2011 (C) RND-REC-RGO Manual (R1) Confidential and Proprietary CRITICAL ISSUES TO BE CONSIDERED 1. Beech Ovens must installed with adequate ventilation allowance both above and below the oven (Refer pages 37 – 42) including tube burner vent device.
-
Page 4: Table Of Contents
Method 2 – Use of Exhaust Fan................29 Method 3 – Use of Existing System ................ 29 Method 4 – Use of a Beech Ovens Spray Filter ............30 Spray Filter normal operating Temperatures and Air flow volumes ......31 Method 5 –... - Page 5 Beech Ovens Page 4 28/07/2011 (C) RND-REC-RGO Manual (R1) Confidential and Proprietary Digital Temperature Controller ................46 Gas Burners ......................47 Tube burner ......................47 Display burner ......................47 Gas Char Grill ......................47 Tri-Electrode/ Igniter Assembly ................. 48 Thermocouple ......................49 Duck Oven Thermocouple..................
- Page 6 Beech Ovens Page 5 28/07/2011 (C) RND-REC-RGO Manual (R1) Confidential and Proprietary Fault/ Reset button ....................91 Digital Temperature Controller ................91 Temperature Control Procedures ................92 Using Gas only......................92 Using Gas and Wood ....................92 Using Wood only ..................... 93 Gas Ovens ........................
- Page 7 All measurements shown are as a guide only. Refer to design documentation and technical specifications for correct dimensions. Contact Information Beech Ovens Head Office: 36 Gladys St Stones Corner Brisbane Qld 4120...
-
Page 8: Section 1 - Installation
Beech Ovens Page 7 28/07/2011 (C) RND-REC-RGO Manual (R1) Confidential and Proprietary Section 1 - Installation Installation... -
Page 9: Important Information
Local regulations may apply. Retain this manual for future use Additional copies of this manual are available from Beech Ovens, online or from your local Beech Ovens representative. -
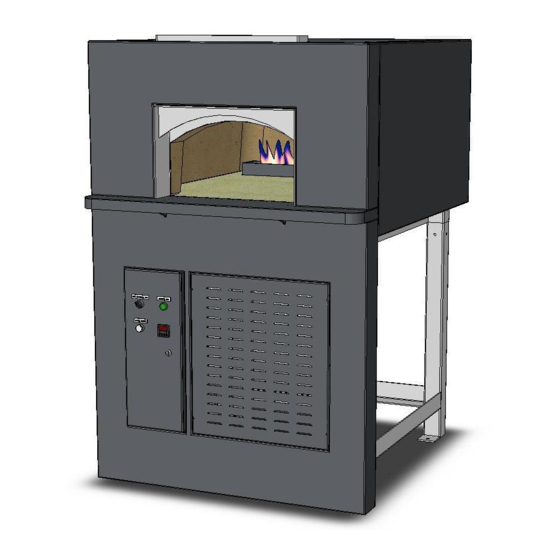
Page 10: Oven Overview
28/07/2011 (C) RND-REC-RGO Manual (R1) Confidential and Proprietary Oven Overview Due to the many variations of Beech Ovens the following ovens are an outline as to the most common components that make up a standard construction. Upper Refractory Spray Filter/Transition... - Page 11 Beech Ovens Page 10 28/07/2011 (C) RND-REC-RGO Manual (R1) Confidential and Proprietary The following is an outline of the Rectangular Grill Oven or RGO1250. Many components are the same as the previous RND1300 Round oven, though the RGO1250 has the added feature of an in-oven Gas fired Char Grill.
-
Page 12: Preliminary Checks
Beech Ovens Page 11 28/07/2011 (C) RND-REC-RGO Manual (R1) Confidential and Proprietary Preliminary checks The oven is transported by truck, ship or plane to its destination. The oven is shipped in two halves; the Upper Refractory and the Base. (The consignment document is a good check to establish the correct oven weight.) -
Page 13: Site Preparation
Beech Ovens Page 12 28/07/2011 (C) RND-REC-RGO Manual (R1) Confidential and Proprietary Site Preparation Once on the ground, the method of installation is dependent on the type of access. If there is level access of sufficient width e.g. 1600mm (in the case of the round RND 1300 model) and no stairs, the oven can be moved by pallet trolley or forklift to its desired location. -
Page 14: Protection Of Combustible Floors
Protection of Combustible floors All Beech Ovens must be installed upon non-combustible material. The minimum hearth extension areas to be covered with non-combustible material in relation to the door opening of the oven shall cover at least the following areas: ... -
Page 15: Oven Installation Procedure
Beech Ovens Page 14 28/07/2011 (C) RND-REC-RGO Manual (R1) Confidential and Proprietary Oven Installation Procedure Prior to installing the oven, visit the installation area and determine if there are doorways narrower than the oven in an upright (normal) position. If there are no narrow doorways, the oven can be kept in the horizontal plane i.e. -
Page 16: Transportation
Beech Ovens Page 15 28/07/2011 (C) RND-REC-RGO Manual (R1) Confidential and Proprietary Transportation Take the Oven to the site. Lift the Upper section from truck using hotel crane or mobile crane of sufficient capacity. Move the Upper section to kitchen. (Remove from pallet and place on it’s side on pallet... -
Page 17: Assembly
Beech Ovens Page 16 28/07/2011 (C) RND-REC-RGO Manual (R1) Confidential and Proprietary Assembly The procedure mentioned below uses an “A-Frame” lifting method for assembling the oven. Other lifting methods may be used e.g. a fork truck or crane, however the following principals still apply. - Page 18 Beech Ovens Page 17 28/07/2011 (C) RND-REC-RGO Manual (R1) Confidential and Proprietary Place strips of 60mm x 13mm ceramic insulation wool (supplied) beneath the top of the oven where the top section touches the base. NOTE: No wool should come between the steel of the top and base.
- Page 19 Beech Ovens Page 18 28/07/2011 (C) RND-REC-RGO Manual (R1) Confidential and Proprietary The external surfaces (sides and top) of the oven are then completely covered with ceramic insulation wool (50mm Superwool) using the high temperature “Kaogrip” glue provided. First cut all pieces required to cover the sides and top using a sharp knife.
- Page 20 Beech Ovens Page 19 28/07/2011 (C) RND-REC-RGO Manual (R1) Confidential and Proprietary When fitting the ceramic insulation wool to the oven, be sure that the wool is firmly in place and that all air pockets are removed. The glue will dry in approximately one (1) hour depending on ambient conditions.
-
Page 21: Stainless Steel Hearth
Beech Ovens Page 20 28/07/2011 (C) RND-REC-RGO Manual (R1) Confidential and Proprietary Stainless Steel Hearth When fitting the Stainless Steel Hearth (SSH), be sure that the top of the hearth is level with the top of the floor bricks. Should the hearth be fitted too low, the floor bricks may be damaged when using the oven. -
Page 22: Flue Connection
Confidential and Proprietary Flue Connection Most Beech Ovens are supplied with either a Flue Transition or a Spray Filter. The main function of the Flue Transition is to form a transition from the oven spigot to a standard commercial flue duct connection point directly above the oven. The Spray Filter has the same properties as the Flue Transition though it has the added feature of a fine mist spray to remove particulate and dampen embers expelled from the oven. -
Page 23: Spray Filter
Beech Ovens Page 22 28/07/2011 (C) RND-REC-RGO Manual (R1) Confidential and Proprietary Spray Filter The improved Spray Filter, released into production in August 2010, includes a removable cyclonic filter. The cyclonic filter is permanently washed with a water misting spray which is designed to adhere to particulate such as soot, ash and grease and contain it in the waste water, which is then drained away. -
Page 24: Spray Filter - Technical Specifications
Beech Ovens Page 23 28/07/2011 (C) RND-REC-RGO Manual (R1) Confidential and Proprietary Spray Filter - Technical Specifications Water Usage @ 1.5 bar – 11.2l/Hr X 2 = 22.4l/Hr Total @ 3 bar – 15.8l/Hr x 2 = 31.6l/Hr Total Air Flow Volume... -
Page 25: Interlock System - Australian Markets Only
Australian Gas Association (AGA) for the Gas system of your Beech Oven to comply with the Gas Installation Standard AS5601. To meet this requirement, all Gas fired Beech Ovens are required to be fitted with a “Power flue” system of exhaust extraction. This is to safeguard against spillage of combustion product gases into the kitchen area. - Page 26 RND-REC-RGO Manual (R1) Confidential and Proprietary Beech Ovens supply a flue performance monitoring system that will fulfil the requirement of this Standard. The system consists of an Interlock Thermocouple, a mounting gland nut and a temperature controller, most of which are assembled into the Gas control cabinet.
-
Page 27: Water Flow Sensor - Uk Market Only
Beech Ovens Page 26 28/07/2011 (C) RND-REC-RGO Manual (R1) Confidential and Proprietary Water Flow Sensor - UK market ONLY For those ovens supplied to the United Kingdom with a Spray Filter, a Water Flow Sensor is fitted to safeguard that the water supply to the spray filter is on and constant. -
Page 28: Exhaust Duct Design
Beech Ovens Page 27 28/07/2011 (C) RND-REC-RGO Manual (R1) Confidential and Proprietary Exhaust Duct Design The following section is for your guidance in establishing a design to suit your Exhaust duct design requirements. Exhaust ductwork should be carried out by a qualified, experienced trade team with knowledge of local authority requirements. -
Page 29: Methods Of Exhaust Ducting
Dedicated flue less than 15m in length with less than 3m horizontal. Normally this system is used for Wood Only ovens though if used with Gas, a special test should be performed to ensure that no spillage occurs. Contact Beech Ovens Technical Support for more information. technical@beechovens.com.au... -
Page 30: Method 2 - Use Of Exhaust Fan
Beech Ovens Page 29 28/07/2011 (C) RND-REC-RGO Manual (R1) Confidential and Proprietary Method 2 – Use of Exhaust Fan Optional high temp sprinkler head connected Dedicated oven system. to sprinkler system Flue size 300mm x 300mm or equivalent (internal dimension). -
Page 31: Method 4 - Use Of A Beech Ovens Spray Filter
Method 4 – Use of a Beech Ovens Spray Filter Beech Ovens have developed a system to treat all oven exhausts with a water misting spray and cyclonic filter operation. Included in the system is a “cool air make-up device”... -
Page 32: Spray Filter Normal Operating Temperatures And Air Flow Volumes
Beech Ovens Page 31 28/07/2011 (C) RND-REC-RGO Manual (R1) Confidential and Proprietary Spray Filter normal operating Temperatures and Air flow volumes The diagram below identifies the normal operating temperatures for the Spray filter System. NOTE: Normal operating temperatures should be under 100°C. This will rapidly increase due to the following;... -
Page 33: Method 5 - Canopy Method
3. Better access to oven spigot to allow for regular cleaning 4. Allowance for Spray heads to be fitted for fire protection 5. Options such as an Automatic Water Wash and Misting Spray System for high use applications (Contact Beech Ovens for detailed information) Optional Spray heads for fire protection... - Page 34 Beech Ovens Page 33 28/07/2011 (C) RND-REC-RGO Manual (R1) Confidential and Proprietary...
-
Page 35: General Information On Flues
Beech Ovens Page 34 28/07/2011 (C) RND-REC-RGO Manual (R1) Confidential and Proprietary General Information on Flues Due to the nature of wood fired ovens, the exhaust temperatures can be quite high and sparks or embers may be present (hence fire danger should be considered.) To avoid problems there are a number of options to be considered: ... -
Page 36: Possible Cause Of Flue Fire
Beech Ovens Page 35 28/07/2011 (C) RND-REC-RGO Manual (R1) Confidential and Proprietary Possible cause of Flue fire Flue fires are primarily due to poor maintenance and the lack of a rigid cleaning schedule. Most flue fires can be prevented by... -
Page 37: Possible Cause Of Fire Behind The Façade
Beech Ovens Page 36 28/07/2011 (C) RND-REC-RGO Manual (R1) Confidential and Proprietary Possible cause of fire behind the façade Poor sealing between façade and oven door leads to grease contamination between façade and oven wall. This grease contamination is then ignited by a flash fire off the grill. -
Page 38: Ventilation Requirement
A very important area which is commonly overlooked with gas fired Stone Hearth Ovens is access and, most importantly, Ventilation to under and above the oven. With many of Beech Ovens being gas fired there is either a Tube or Display burner mounted into the oven floor, which needs a fresh air supply to function correctly. -
Page 39: Tube Burner Ventilation
Beech Ovens Page 38 28/07/2011 (C) RND-REC-RGO Manual (R1) Confidential and Proprietary Tube Burner Ventilation From October 2010, all ovens supplied with a tube burner will also be supplied with a ventilation kit that should be installed as per the instructions below. This is designed to eliminate any problems related to poor or insufficient ventilation resulting in the flame being drawn or “disappearing”... -
Page 40: Installing The Tube Burner Vent
Beech Ovens Page 39 28/07/2011 (C) RND-REC-RGO Manual (R1) Confidential and Proprietary Installing the Tube Burner Vent All ovens with a tube burner supplied from October 2010 will be fitted with a revised tube burner mount which has a 125mm round attachment. - Page 41 Beech Ovens Page 40 28/07/2011 (C) RND-REC-RGO Manual (R1) Confidential and Proprietary Keeping in mind to leave enough room for the 125mm flexible tube, cut a hole in the front façade panel big enough to house the vent box. NOTE: The vent MUST be below the oven mouth and in the same room as the oven mouth.
- Page 42 Beech Ovens Page 41 28/07/2011 (C) RND-REC-RGO Manual (R1) Confidential and Proprietary Install the vent box into the façade wall using appropriate fixings. Vent box installed into façade wall (seen from behind) With the vent box now in position, connect the vent box to the tube burner mount using the supplied 125mm semi-rigid flexible duct tube.
- Page 43 Beech Ovens Page 42 28/07/2011 (C) RND-REC-RGO Manual (R1) Confidential and Proprietary With the duct connected the front vent panel can now be fitted using the 4 screws as supplied. Do not over tighten. Vent panel fixing screws (x4) NOTE: Do NOT cover the vent panel during operation. This may cause the...
-
Page 44: Gas Systems Overview
Beech Ovens Page 43 28/07/2011 (C) RND-REC-RGO Manual (R1) Confidential and Proprietary Gas Systems overview The gas management system automatically controls and monitors the oven temperature and can maintain an impressive display burner. The system features easily programmable and adjustable components. The use of high quality, electronic ignition and flame management components combine to give a simple and reliable system. - Page 45 Beech Ovens Page 44 28/07/2011 (C) RND-REC-RGO Manual (R1) Confidential and Proprietary The Gas control cabinet has the following internal components: Flame Pack Thermocouple Combination Gas Valve Electrical Circuit Breaker Manual Gas Isolation Valve Power supply cord Components for installation.
-
Page 46: Gas Control Cabinet Functions
Beech Ovens Page 45 28/07/2011 (C) RND-REC-RGO Manual (R1) Confidential and Proprietary Gas Control Cabinet Functions Main Control Switch The Main Control Switch has three positions: Both temperature controller & burner are off in this position. CONTROL The temperature controller only is energized. -
Page 47: Fault/ Reset Button
Beech Ovens Page 46 28/07/2011 (C) RND-REC-RGO Manual (R1) Confidential and Proprietary Fault/ Reset button In the event of the burner failing to light, the Fault/ Reset button will light and the burner will go into „lock-out mode‟. In this mode, the oven is 100% safe; no gas can flow. -
Page 48: Gas Burners
Beech Ovens Page 47 28/07/2011 (C) RND-REC-RGO Manual (R1) Confidential and Proprietary Gas Burners There are three (3) types of burners available: Tube burner This burner mounts below the oven floor and fires into the oven chamber through a floor brick with a 100mm hole. -
Page 49: Tri-Electrode/ Igniter Assembly
Beech Ovens Page 48 28/07/2011 (C) RND-REC-RGO Manual (R1) Confidential and Proprietary Tri-Electrode/ Igniter Assembly A high voltage spark, energized from the Flame Pack, (which also controls the Flame Failure System) ignites the burner. This Flame Pack will also immediately close the main valve (Combination Gas Valve) in the event of a fault, causing flame failure. -
Page 50: Thermocouple
Beech Ovens Page 49 28/07/2011 (C) RND-REC-RGO Manual (R1) Confidential and Proprietary Thermocouple The Thermocouple is a probe which is inserted into the oven floor from beneath, finishing flush or slightly below working surface in the oven space. The positioning of the Thermocouple varies depending on the oven type. - Page 51 Beech Ovens Page 50 28/07/2011 (C) RND-REC-RGO Manual (R1) Confidential and Proprietary...
-
Page 52: Duck Oven Thermocouple
Beech Ovens Page 51 28/07/2011 (C) RND-REC-RGO Manual (R1) Confidential and Proprietary Duck Oven Thermocouple The Duck Oven thermocouple is located directly below the spotlight and is accessed using the spotlight access panel. It is located here to give a true indication of the temperature where the ducks are situated in the oven, unlike a pizza oven which has the thermocouple in the floor to sense the temperature where the pizzas are cooked. -
Page 53: System Connection
Beech Ovens Page 52 28/07/2011 (C) RND-REC-RGO Manual (R1) Confidential and Proprietary System Connection The Gas control cabinet is delivered pre-set from the factory, though should be re- checked upon connection. Gas pressure should be checked as per the Flame Calibration section in this manual. -
Page 54: Connection Procedures
Beech Ovens Page 53 28/07/2011 (C) RND-REC-RGO Manual (R1) Confidential and Proprietary Connection Procedures Mount the stainless steel gas control cabinet to the brackets supplied. (Usually on the front leg of the oven, or hanging from the front base strut with two (2) angles) There is a key supplied to open the Gas control cabinet door. - Page 55 Beech Ovens Page 54 28/07/2011 (C) RND-REC-RGO Manual (R1) Confidential and Proprietary Connect the high-tension leads from the Flame Pack to the Tri-electrode at the burner head. The cables will normally be delivered coiled within the Gas control cabinet. These connectors are colour-coded and different sized plugs to ensure connection cannot be mixed up.
- Page 56 Beech Ovens Page 55 28/07/2011 (C) RND-REC-RGO Manual (R1) Confidential and Proprietary The stainless steel burner shroud should now be fitted inside the oven. The main purpose of the shroud is to protect the burner from debris and foreign objects. Ensure that these are fitted properly, as failure to do so may result in burner and/or ignition problems.
-
Page 57: Char Grill Connection
Beech Ovens Page 56 28/07/2011 (C) RND-REC-RGO Manual (R1) Confidential and Proprietary NOTE: When coiling the lead to the Thermocouple, be sure not to kink or damage the lead. The lead is to be routed in a tidy manner using the supplied clips and cable ties under the oven base ensuring that it is not attached to other cables, metallic or sharp objects. -
Page 58: Double Burner Installations
Combination gas valves, Burners and Flame packs are connected to the corresponding zone components. If this labelling seems incorrect or there is confusion as to which burner should be connected to which component, please contact Beech Ovens Technical Support for assistance. technical@beechovens.com.au Zones 1 &... -
Page 59: Spray Filter Connection
Beech Ovens Page 58 28/07/2011 (C) RND-REC-RGO Manual (R1) Confidential and Proprietary Spray Filter Connection The diagram below shows the connection location for the spray filter services. The services details are outlined in the Spray Filter – Technical Specifications section of this manual. -
Page 60: Window Installation
Confidential and Proprietary Window Installation From July 2010, Beech Ovens have introduced a new design for the viewing window assembly. This new design is to ensure that the outer surface temperature of the viewing glass is safe to touch and the surrounding façade materials do not damage from excess heat transfer from the viewing window. - Page 61 Beech Ovens Page 60 28/07/2011 (C) RND-REC-RGO Manual (R1) Confidential and Proprietary Carefully lean the top of the outer glass assembly forward (1) and lift so the lugs on the bottom release (2). Tilt the window out slightly at the top enough to allow the bottom hinge cylinder to slip over the bottom of the hinge rod.
- Page 62 Beech Ovens Page 61 28/07/2011 (C) RND-REC-RGO Manual (R1) Confidential and Proprietary Close the door and lock with a 6mm hex key. Remove the hex key and re-fit the outer glass assembly in reverse order. NOTE: Ensure that the plastic caps are fitted as the steel section will become very hot during use.
-
Page 63: Window Vent Connection
Beech Ovens Page 62 28/07/2011 (C) RND-REC-RGO Manual (R1) Confidential and Proprietary Window Vent Connection All viewing windows are now delivered with a window vent transition, 2 x duct spigots and flexible duct which should be connected to the exhaust duct. For those installations using a Spray Filter, this connection should be made at least 200mm after the Spray Filter. -
Page 64: Spotlight Connection
Beech Ovens Page 63 28/07/2011 (C) RND-REC-RGO Manual (R1) Confidential and Proprietary Spotlight Connection For those ovens fitted with a spotlight, there will be a cable from the main control cabinet that must be connected in order for the spotlight to function. The cable will be coiled on the back of the control cabinet and provision for running the cable (clamps and holes cut in oven body where required) to the spotlight fitting has already been made. -
Page 65: Electrical Connection
Beech Ovens Page 64 28/07/2011 (C) RND-REC-RGO Manual (R1) Confidential and Proprietary Electrical Connection The system will require the following earthed mains electricity supply; 220-240 Volt (other voltages available by request) 50Hz 10 Amp Within the Gas cabinet a power supply cable is supplied connected to an Australian standard plug. -
Page 66: Installation Checklist
Refer to the Oven Façade Guide – available from Beech Ovens Head Office. Check to ensure that suitable fire extinguishing equipment is close at... -
Page 67: Section 2 - Commissioning
Beech Ovens Page 66 28/07/2011 (C) RND-REC-RGO Manual (R1) Confidential and Proprietary Section 2 - Commissioning Commissioning... -
Page 68: Commissioning
Beech Ovens Page 67 28/07/2011 (C) RND-REC-RGO Manual (R1) Confidential and Proprietary Commissioning The gas system is fully automatic and when switched to ON sends a high voltage spark to the gas burner head. It continues to spark for 6-10 seconds. The flame will light automatically, heating up the oven space on high flame, then drop to low flame once set point temperature (SV) is reached. -
Page 69: System Damper Calibration
Beech Ovens Page 68 28/07/2011 (C) RND-REC-RGO Manual (R1) Confidential and Proprietary System Damper Calibration For those ovens supplied with either a Flue Transition or a Spray Filter from Beech Ovens, an integrated System Damper is fitted. Correct adjustment of the System Damper is an extremely important part of commissioning to ensure oven efficiency and safe operation. -
Page 70: Cool Air Make-Up Check
Beech Ovens Page 69 28/07/2011 (C) RND-REC-RGO Manual (R1) Confidential and Proprietary Cool Air Make-up check It is strongly recommended that the cool air make-up device (Barometric Controller) have access to well ventilated fresh air, preferably an outside air source. Consult your mechanical service consultant to design supply. -
Page 71: The A4 Paper Test
Beech Ovens Page 70 28/07/2011 (C) RND-REC-RGO Manual (R1) Confidential and Proprietary The A4 Paper Test Without access to suitable measuring equipment, the most effective method to correctly calibrate the oven exhaust is using the A4 Paper Test as explained below. - Page 72 Beech Ovens Page 71 28/07/2011 (C) RND-REC-RGO Manual (R1) Confidential and Proprietary Exhaust spigot with paper folded width wise held in position. (RND1300 Round oven) With the exhaust fan running, the suction at the exhaust spigot at the mouth of the oven should be enough to hold a sheet of A4 paper folded in half width wise.
-
Page 73: Ventilation Test
Beech Ovens Page 72 28/07/2011 (C) RND-REC-RGO Manual (R1) Confidential and Proprietary With the A4 sheet folded lengthwise the suction should not be able to hold the paper in position at the flue spigot at the mouth of the oven. If the sheet stays in position the System damper will need to be adjusted (closed slightly) to decrease the airflow. -
Page 74: System Balancing
Beech Ovens Page 73 28/07/2011 (C) RND-REC-RGO Manual (R1) Confidential and Proprietary System Balancing Having checked that the oven is correctly vented and that the Flue is correctly calibrated, in some cases there may be external air pressure differences that can affect the performance of the oven. - Page 75 Beech Ovens Page 74 28/07/2011 (C) RND-REC-RGO Manual (R1) Confidential and Proprietary NEGATIVE PRESSURE Problem: Oven Facade POSITIVE PRESSURE Ventilation Panel Flame is being drawn under the oven Solution: Oven Facade POSITIVE PRESSURE Ventilation Panel Seal off the entire area between the...
-
Page 76: Flame Calibration - Sit Nova 826
Combination Gas valve. The valve allows for use with both Propane and Natural gas, however the jet in the burner will need to be changed and the data plate updated when converting gas types. Conversion kits are available to purchase from Beech Ovens Head Office (sales@beechovens.com.au) or your local Beech Ovens representative. -
Page 77: Setting High And Low Flame Pressure
Beech Ovens Page 76 28/07/2011 (C) RND-REC-RGO Manual (R1) Confidential and Proprietary The calibration procedure is identical for Propane and Natural gas systems, though the reader must refer to the General Technical Details chart for adjusted pressure requirements. Note: This calibration procedure should be carried out by an experienced gas technician and is performed in situ with the system fully operational. -
Page 78: High Flame
Beech Ovens Page 77 28/07/2011 (C) RND-REC-RGO Manual (R1) Confidential and Proprietary High Flame Confirm that the Digital Temperature controller on the front of the Gas Control cabinet door is set so that the set point temperature (SV) is at least 100°C greater than the present value temperature (PV). -
Page 79: Low Flame
Beech Ovens Page 78 28/07/2011 (C) RND-REC-RGO Manual (R1) Confidential and Proprietary Low Flame When the correct pressure is achieved for High Flame, set the Digital Temperature controller so that the set point temperature (SV) is 12°C below the current oven temperature (PV). -
Page 80: Flame Calibration - Char Grill
Beech Ovens Page 79 28/07/2011 (C) RND-REC-RGO Manual (R1) Confidential and Proprietary Flame Calibration - Char Grill The procedure for calibrating the Char Grill flame is outlined below. Note: This calibration procedure should be carried out by an experienced gas technician and is performed in situ with the system fully operational. -
Page 81: Inspirator Calibration
Beech Ovens Page 80 28/07/2011 (C) RND-REC-RGO Manual (R1) Confidential and Proprietary Inspirator Calibration The main function of the inspirator is to allow fresh air to mix with the gas before it enters the nozzle of the burner. The amount of air that is mixed with the gas governs how the flame will burn. - Page 82 Page 81 28/07/2011 (C) RND-REC-RGO Manual (R1) Confidential and Proprietary Please direct gas technical questions to the Beech Ovens Technical Support team in Australia at: technical@beechovens.com.au Refer to the following Commissioning Checklist before firing the oven for the first time.
-
Page 83: Installation & Commissioning Check Sheet
RND-REC-RGO Manual (R1) Confidential and Proprietary Installation & Commissioning Check Sheet Please complete and return to Beech Ovens after commissioning. Failure to return to this form may void the warranty of the oven. A signed copy must remain with site personnel. -
Page 84: Installation Check Sheet
Beech Ovens Page 83 28/07/2011 (C) RND-REC-RGO Manual (R1) Confidential and Proprietary Installation Check Sheet Assembly Check: □ □ □ Flue System. Fitted Oven Components. Access above and below oven. Ensure that ONLY non-combustible materials are used in the construction of any façade surrounding the oven, including the areas closest to the oven steelwork, e.g. -
Page 85: Commissioning Check Sheet
Beech Ovens Page 84 28/07/2011 (C) RND-REC-RGO Manual (R1) Confidential and Proprietary Commissioning Check Sheet Electrical and Water supply: Power supply to Gas control cabinet is connected and turned on. If the exhaust system is fan forced, ensure that the fan is running and rotating the correct direction. -
Page 86: Section 3 - Operation
Beech Ovens Page 85 28/07/2011 (C) RND-REC-RGO Manual (R1) Confidential and Proprietary Section 3 – Operation Operation... -
Page 87: Preheating With Gas
Beech Ovens Page 86 28/07/2011 (C) RND-REC-RGO Manual (R1) Confidential and Proprietary Preheating with Gas Before the oven can be used for cooking it must undergo a Preheat or curing stage. This is a gradual, low flame stage designed to thoroughly “warm” the oven prior to use. -
Page 88: Preheating With Wood
Beech Ovens Page 87 28/07/2011 (C) RND-REC-RGO Manual (R1) Confidential and Proprietary Preheating with Wood As mentioned in Preheating with Gas, before the oven can be used for cooking it must undergo a Preheat or curing stage. This is best done by making a fire just as you would build any fire for a barbeque. -
Page 89: Adjustments For Normal Use
Beech Ovens Page 88 28/07/2011 (C) RND-REC-RGO Manual (R1) Confidential and Proprietary Adjustments for Normal use After the three (3) days of preheating are completed, some adjustments must be made to allow the oven to function normally. The following section explains the adjustments required to set the oven for normal use. -
Page 90: Firing Up To Cook
Beech Ovens Page 89 28/07/2011 (C) RND-REC-RGO Manual (R1) Confidential and Proprietary Firing up to Cook From cold, allow the oven approximately 3 hours to heat up initially. Thereafter, warm up should take about 60 minutes, depending on the size of the oven. This time can be reduced by using gas. -
Page 91: Gas Control Cabinet Functions
Beech Ovens Page 90 28/07/2011 (C) RND-REC-RGO Manual (R1) Confidential and Proprietary Gas Control Cabinet Functions Main Control Switch The Main Control Switch has three positions: Both temperature controller & burner are off in this position. CONTROL The temperature controller only is energized. -
Page 92: Fault/ Reset Button
Beech Ovens Page 91 28/07/2011 (C) RND-REC-RGO Manual (R1) Confidential and Proprietary Fault/ Reset button In the event of the burner failing to light, the Fault/ Reset button will light and the burner will go into „lock-out mode‟. In this mode, the oven is 100% safe; no gas can flow. -
Page 93: Temperature Control Procedures
Beech Ovens Page 92 28/07/2011 (C) RND-REC-RGO Manual (R1) Confidential and Proprietary Temperature Control Procedures Typical cooking temperature for pizza is 250-350°C and for breads 200-250°C. The burner controls on this oven have been designed to enable the operator to fire the oven using Gas, Wood or a combination of both. -
Page 94: Using Wood Only
Beech Ovens Page 93 28/07/2011 (C) RND-REC-RGO Manual (R1) Confidential and Proprietary Using Wood only Using Wood only in an oven that has a gas back-up system is quite an acceptable and common practice. The Digital Temperature controller can tell you the present oven temperature (PV) when the operating switch is set in the CONTROL position. -
Page 95: Char Grill
Beech Ovens Page 94 28/07/2011 (C) RND-REC-RGO Manual (R1) Confidential and Proprietary Char Grill The following instruction relates to those ovens fitted with the Char Grill option. The Char Grill is a fully independent gas system connected directly to the main Gas supply and is not directly controlled by the Gas Control cabinet. -
Page 96: Replacing The Char Grill Piezo Battery
Beech Ovens Page 95 28/07/2011 (C) RND-REC-RGO Manual (R1) Confidential and Proprietary Continue to press the main valve for twenty (20) seconds. (This is to allow the thermocouple enough time to sense a flame and open the main burner’s gas supply.) Release the main valve. -
Page 97: Finishing For The Day
RND-REC-RGO Manual (R1) Confidential and Proprietary All Beech Ovens supplied with a char grill option are supplied with a spigot cleaning brush. This long handled brush should be used daily to clean any excess soot or grease from the exhaust spigot above the mouth of the grill. -
Page 98: Plug Door Placement
Beech Ovens Page 97 28/07/2011 (C) RND-REC-RGO Manual (R1) Confidential and Proprietary Plug Door placement The stainless steel Plug Door is a loose fitting door used to retain the majority of heat within the oven when the oven is not in use. It is NOT... -
Page 99: Section 4 - Maintenance & Technical Specifications
Beech Ovens Page 98 28/07/2011 (C) RND-REC-RGO Manual (R1) Confidential and Proprietary Section 4 – Maintenance & Technical Specifications Maintenance & Technical Specifications... -
Page 100: Oven Maintenance
Regular Preventative Maintenance Service will also save you money on loss of profits from any down time. Beech Ovens strongly recommends a three (3) monthly inspection of the Flue system as to ascertain the levels of soot, grease and creosote build up during this period. - Page 101 Beech Ovens Page 100 28/07/2011 (C) RND-REC-RGO Manual (R1) Confidential and Proprietary Frequency Task to be performed Performed by Item Daily Weekly Monthly Months Months Each morning before the oven is fired up, remove fire ashes Oven Operator from the floor centre, using an ash pan and a shovel or brush.
- Page 102 Beech Ovens Page 101 28/07/2011 (C) RND-REC-RGO Manual (R1) Confidential and Proprietary Task to be performed Performed by Item Frequency Daily Weekly Monthly Months Months Visually check and clean any foodstuff, dirt or deposits from Oven Operator burner with a suitable small brush. Take care not to damage the tri-electrode over burner.
- Page 103 Beech Ovens Page 102 28/07/2011 (C) RND-REC-RGO Manual (R1) Confidential and Proprietary Task to be performed Performed by Item Frequency Daily Weekly Monthly Months Months Check correct burner flame / air mixture adjustment. Check Technician for correct operation, ensure flame is not luminous and the burner is free from debris.
-
Page 104: Tri-Electrode And Burner Maintenance
Beech Ovens Page 103 28/07/2011 (C) RND-REC-RGO Manual (R1) Confidential and Proprietary Tri-Electrode and Burner Maintenance The most common cause of erratic operation of the Gas system is that the Tri- electrode and/or burner becomes contaminated by debris. This may be in the form of foodstuffs or ash deposited in the area in which the Tri-electrode and/or burner operates. - Page 105 Beech Ovens Page 104 28/07/2011 (C) RND-REC-RGO Manual (R1) Confidential and Proprietary To remove the Tri-electrode assembly, loosen and remove the two (2) Phillips head Phillips head screws screws holding the Tri- electrode. Note: The Tri- electrode is mounted in a ceramic base and is easily cracked if not handled correctly.
- Page 106 Beech Ovens Page 105 28/07/2011 (C) RND-REC-RGO Manual (R1) Confidential and Proprietary If the position of the probes has been altered, be sure that the Flame Ignition probe and Earth probe have an approximately 5mm gap between them at the Spark point.
-
Page 107: Display Burner
Beech Ovens Page 106 28/07/2011 (C) RND-REC-RGO Manual (R1) Confidential and Proprietary Display Burner When using a Display burner, wood fuel should NOT be used. However, foodstuffs and other debris can disrupt the correct operating function of the Tri-electrode on a Display burner. - Page 108 Beech Ovens Page 107 28/07/2011 (C) RND-REC-RGO Manual (R1) Confidential and Proprietary Carefully lower the Display burner from the oven base. Be sure not to bump the position of the Tri- electrode when removing and replacing the burner. With the Display burner removed the Tri-electrode and/or burner can be cleaned and/or adjusted.
-
Page 109: Char Grill Maintenance
Beech Ovens Page 108 28/07/2011 (C) RND-REC-RGO Manual (R1) Confidential and Proprietary Char Grill Maintenance As part of the daily maintenance schedule, the Char Grill should be cleaned thoroughly after each service. The drip trays may need to be emptied during service depending on the type of product being cooked. -
Page 110: Window Maintenance
Beech Ovens Page 109 28/07/2011 (C) RND-REC-RGO Manual (R1) Confidential and Proprietary Window Maintenance Some ovens have a viewing window accessory which enables the internal of the oven to be viewed by the public to enhance the visual experience of stone hearth cooking. - Page 111 Beech Ovens Page 110 28/07/2011 (C) RND-REC-RGO Manual (R1) Confidential and Proprietary Remove 2 top caps only with a flat screw driver Step 3 Step 1 Step 2 Remove 2 top Bolts only with 4mm Hex key Step 4 Step 5 Step 6 ¼...
-
Page 112: Spotlight Maintenance
Beech Ovens Page 111 28/07/2011 (C) RND-REC-RGO Manual (R1) Confidential and Proprietary Spotlight Maintenance Normal maintenance with the oven spotlight should only ever consist of globe replacement and/or glass cleaning or replacement. For any electrical connection, alterations or maintenance always use a licensed electrician. -
Page 113: Spray Filter Maintenance
Beech Ovens Page 112 28/07/2011 (C) RND-REC-RGO Manual (R1) Confidential and Proprietary Spray Filter Maintenance Maintenance of the Spray Filter should occur regularly and in accordance with the maintenance schedule as listed above. General maintenance consists of the following: Remove and clean the cyclonic filter ... -
Page 114: Spare Parts List
Beech Ovens Page 113 28/07/2011 (C) RND-REC-RGO Manual (R1) Confidential and Proprietary Spare Parts List The following is a condensed list of spare parts for most ovens. Although it is not necessary to carry any or all spare parts, we do recommend that some of the parts mentioned below be kept as they are crucial to the ovens operation. - Page 115 Beech Ovens Page 114 28/07/2011 (C) RND-REC-RGO Manual (R1) Confidential and Proprietary Spare Parts (cont’) (cont’) Gas System Parts Image Item Description Brand / Type Part No. Tube Burner Inspirator PARTGAS-1617 (Complete) Manual Isolation Valve Generic PARTCOM-1600 SPAREPT-1004 Tri-Electrode leads 1.6m...
- Page 116 Beech Ovens Page 115 28/07/2011 (C) RND-REC-RGO Manual (R1) Confidential and Proprietary Spare Parts (cont’) Char Grill Parts Image Item Description Brand / Type Part No. Char Grill Bed Long (Standard 600m for Stainless Steel AGRILLL-1100 models prior to July...
- Page 117 Beech Ovens Page 116 28/07/2011 (C) RND-REC-RGO Manual (R1) Confidential and Proprietary Spare Parts (cont’) Char Grill Parts (cont’) Image Item Description Brand / Type Part No. Char Grill Gas Control Valve Knob SPAREPT-1013 (Control Knob ONLY) Char Grill Gas Control...
- Page 118 Beech Ovens Page 117 28/07/2011 (C) RND-REC-RGO Manual (R1) Confidential and Proprietary Spare Parts (cont’) General Oven Parts Image Item Description Brand / Type Part No. Ultralife 12V Spotlight Globe ASPOTLT-1603 Spotlight Glass Tempered Glass ASPOTLT-1602 (with edge Gasket) Viewing Window Inner...
- Page 119 Beech Ovens Page 118 28/07/2011 (C) RND-REC-RGO Manual (R1) Confidential and Proprietary Spare Parts (cont’) Spray Filter Parts Image Item Description Brand / Type Part No. Spray Filter Solenoid SMC VXZ2240 ASFSTND-1611 Valve Spray Filter Spray Nozzle ¼” B SS 1...
-
Page 120: General Technical Details
1 Door Ovens – 700 litres/sec (2520m³/Hr) @ 130Pa Static Pressure Air Flow 2 Door Ovens – 1000 litres/sec (3600m³/Hr) @ 130Pa Static Pressure Required The following table shows the correct jet orifice size for the standard Beech Ovens gas burners. Gas output (Mj) Natural Gas... -
Page 121: Ce Specifications
Beech Ovens Page 120 28/07/2011 (C) RND-REC-RGO Manual (R1) Confidential and Proprietary CE Specifications The following table outlines the technical details for ovens installed within the CE region. Natural Gas Nominal Nominal Injector Country Category Heat Input Pressure Rate Diameter... -
Page 122: Oven Materials
Beech Ovens Page 121 28/07/2011 (C) RND-REC-RGO Manual (R1) Confidential and Proprietary Oven Materials The following section describes the most common materials used in the construction of a Beech Oven. All oven materials are safe to handle when cool. The Oven Casing is mild steel with some stainless steel components attached. -
Page 123: Ecfia General Msds
Beech Ovens Page 122 28/07/2011 (C) RND-REC-RGO Manual (R1) Confidential and Proprietary ECFIA General MSDS ECFIA GENERIC MSDS HIGH TEMPERATURE INSULATION WOOLS 31 01 00 ....According to 91/155/CEE Table of contents ..1 . . . IDENTIFICATION OF THE PRODUCT AND OF THE COMPANY ..2 . - Page 124 Beech Ovens Page 123 28/07/2011 (C) RND-REC-RGO Manual (R1) Confidential and Proprietary 1 . . . IDENTIFICATION OF THE PRODUCT AND OF THE COMPANY . . . Identification of the product XYZ (commercial name) contains : CALCIUM-MAGNESIUM-SILICATE (CMS) WOOL . . . Identification of the company...
- Page 125 Beech Ovens Page 124 28/07/2011 (C) RND-REC-RGO Manual (R1) Confidential and Proprietary 6 . . . ACCIDENTAL RELEASE MEASURES Avoid creating dust. Provide workers with respirators if necessary (see section 8). Follow routine housekeeping procedures. Where possible, use a HEPA vacuum to clean up the spilled material. If sweeping is necessary, use a dust suppressant and place materials in closed containers.
- Page 126 Beech Ovens Page 125 28/07/2011 (C) RND-REC-RGO Manual (R1) Confidential and Proprietary 8 . . .EXPOSURE CONTROL / PERSONAL PROTECTION . . . Hygiene standards and exposure limits Industrial hygiene standards and occupational exposure limits vary between countries and local jurisdictions.
- Page 127 Beech Ovens Page 126 28/07/2011 (C) RND-REC-RGO Manual (R1) Confidential and Proprietary 9 . . . PHYSICAL AND CHEMICAL PROPERTIES Odor None Melting point > 1330°C Flammability None Explosive properties None Length weighted geometric mean diameter > 1.5 µm 10 . . . STABILITY AND REACTIVITY Upon heating above 900°C for sustained periods, this amorphous material begins to transform to mixtures of...
- Page 128 Beech Ovens Page 127 28/07/2011 (C) RND-REC-RGO Manual (R1) Confidential and Proprietary 14 . . .TRANSPORT INFORMATION Not classified as dangerous goods under relevant international transport regulations. Ensure that dust is not wind blown during transport. 15 . . .REGULATORY INFORMATION .
- Page 129 Beech Ovens Page 128 28/07/2011 (C) RND-REC-RGO Manual (R1) Confidential and Proprietary 16 . . .OTHER INFORMATION . . . Useful References Commission Directive 97/69/EC of 5 December 1997 adapting to technical progress for the 23rd time Council Directive 67/548/EEC on the approximation of the laws, regulations and administrative provisions relating to the classification, packaging and labeling of dangerous substances.
-
Page 130: Troubleshooting Guide
Troubleshooting guide to determine a possible source and solution to the problem. If after having read this manual and followed the instructions in the Troubleshooting guide failed to resolve the problem, please contact Beech Ovens Technical Support at technical@beechovens.com.au... - Page 131 Beech Ovens Page 130 28/07/2011 (C) RND-REC-RGO Manual (R1) Confidential and Proprietary 4.1 Gas supply problems. (For LPG, is tank near empty) 4.1.1 Check gas supply (Contact service technician). 4.2 Incorrect gas pressure setting. 4.2.1 Refer to Flame Calibration. 4.3 Inspirator air adjustment incorrectly calibrated.
- Page 132 Beech Ovens Page 131 28/07/2011 (C) RND-REC-RGO Manual (R1) Confidential and Proprietary 9.1 Faulty Thermocouple. 9.1.1 Replace Thermocouple. 9.2 Ventilation problem, flame being drawn under the oven floor. 9.2.1 Refer to System Balancing or www.beechovens.com 9.3 Faulty Digital Temperature Controller.
- Page 133 Beech Ovens Page 132 28/07/2011 (C) RND-REC-RGO Manual (R1) Confidential and Proprietary 14.1 Gas supply problems. (For LPG, is tank near empty) 14.1.1 Check gas supply (Contact service technician). 14.2 Ventilation problem, flame being drawn under the oven floor. 14.2.1 Refer to System Balancing or www.beechovens.com...
-
Page 134: Index
Beech Ovens Page 133 28/07/2011 (C) RND-REC-RGO Manual (R1) Confidential and Proprietary Index Exhaust duct design ............27 Exhaust Fan ..............29 exhaust gas ..............25 exhaust system .............. 28 Existing System ............29 A4 Paper Test ..............70 access panel ..............52 Adjustments for Normal use .......... - Page 135 Beech Ovens Page 134 28/07/2011 (C) RND-REC-RGO Manual (R1) Confidential and Proprietary lifting frame ..............16 secondary air ..............72 Lifting Positions ............14 set point temperature ............. 67 Lighting the burners (Char-Grill) ........94 shroud ................55 lock-out mode............46, 91 Sit Nova ................
Need help?
Do you have a question about the REC Series and is the answer not in the manual?
Questions and answers