Table of Contents
Advertisement
Quick Links
Advertisement
Table of Contents

Related Manuals for ATEN CM1284


Summary of Contents for ATEN CM1284
- Page 1 CM1164A / CM1284 Mul -View KVMP™ Switch User Manual...
-
Page 2: Compliance Statements
Multi-View KVMP™ Switch User Manual Compliance Statements FEDERAL COMMUNICATIONS COMMISSION INTERFERENCE STATEMENT This equipment has been tested and found to comply with the limits for a Class A digital device, pursuant to Part 15 of the FCC Rules. These limits are designed to provide reasonable protection against harmful interference when the equipment is operated in a commercial environment. - Page 3 Multi-View KVMP™ Switch User Manual Industry Canada Statement This Class A digital apparatus complies with Canadian ICES-003. HDMI Trademark Statement The terms HDMI, HDMI High-Definition Multimedia Interface, and the HDMI Logo are trademarks or registered trademarks of HDMI Licensing Administrator, Inc. RoHS This product is RoHS compliant.
-
Page 4: About This Manual
Model Product Name CM1164A 4-Port USB DVI Multi-View KVMP Switch CM1284 4-Port USB HDMI Multi-View KVMP Switch An overview of the information found in the manual is provided below. Chapter 1, Introduction, introduces you to the Multi-View KVMP™ Switch. Its purpose, features and benefits are presented, and its front and back panel components are described. -
Page 5: Conventions
Multi-View KVMP™ Switch User Manual Conventions This manual uses the following conventions: Monospaced Indicates text that you should key in. Indicates keys you should press. For example, [Enter] means to press the Enter key. If keys need to be chorded, they appear together in the same bracket with a plus sign between them: [Ctrl+Alt]. -
Page 6: Package Contents
1 IR remote control 1 rack mount kit 1 user instructions* The CM1284 package consists of: 1 CM1284 4-Port USB HDMI Multi-View KVMP Switch 4 KVM cables (HDMI, USB, audio) 1 power cord 1 IR remote control ... -
Page 7: Product Information
For information about all ATEN products and how they can help you connect without limits, visit ATEN on the Web or contact an ATEN Authorized Reseller. Visit ATEN on the Web for a list of locations and telephone numbers: International http://www.aten.com... -
Page 8: User Notice
Multi-View KVMP™ Switch User Manual User Notice All information, documentation, and specifications contained in this manual are subject to change without prior notification by the manufacturer. The manufacturer makes no representations or warranties, either expressed or implied, with respect to the contents hereof and specifically disclaims any warranties as to merchantability or fitness for any particular purpose. -
Page 9: Table Of Contents
CM1284 Rear View ........ - Page 10 Multi-View KVMP™ Switch User Manual Identifying the Source Device ........27 Switching .
- Page 11 Multi-View KVMP™ Switch User Manual Logout ..........71 Open/Close RS-232 Link .
- Page 12 Multi-View KVMP™ Switch User Manual General ..........117 Rack Mounting .
-
Page 13: Introduction
The Multi-View KVMP™ Switch charts a revolutionary new direction in KVM switch functionality by combining a 4-port DVI-D (CM1164A) / 4-port HDMI (CM1284) with a 2-port USB hub, and providing different display modes, including Quad View mode, Picture in Picture mode (Dual, Triple, or Quad), Picture by Picture mode (Dual, Triple, or Quad), Picture on Picture mode, and Full Screen mode. - Page 14 – daisy chain up to four units and switch between up to 16 computers/video sources. You can also choose to have all sources displayed on one monitor by cascading, where CM1164A/CM1284 units are connected to one another via its KVM Ports. In a cascade setup, you can control and monitor up to 16 computers (4 additional Multi-View KVMP™...
-
Page 15: Features
System configuration (display mode and KVM port selection) via the front panel, OSD, IR Remote control, and RS-232 commands Superior video quality – Up to 4K (4096 x 2160 @ 30 Hz) (CM1284 only) Drop-down menu – edit display windows and other functions with the console mouse and on-screen control panel ... - Page 16 Multi-View KVMP™ Switch User Manual Independent switching for USB peripheral port, stereo audio, and KVM switch focus Power on detection Auto Scan feature Firmware upgradeable via computer’s USB port Full base response that provides a rich experience for 2.0 channel audio ...
-
Page 17: Requirements
Chapter 1. Introduction Requirements Refer to the table below to prepare the required devices, equipment, and cables to set up a CM1164A/CM1284 system. CM1164A CM1284 Console 1 x DVI-D Single Link display 1 x HDMI cable capable of the highest possible ... -
Page 18: Operating Systems
OpenSuSE 13.2 UNIX Novell Netware 10.12 Optional Equipment An IR extension cable is available for the Multi-View KVMP™ Switch but is sold separately. To purchase the IR extension cable, contact your ATEN dealer and refer to the item’s part number, 2XRT-0003G. -
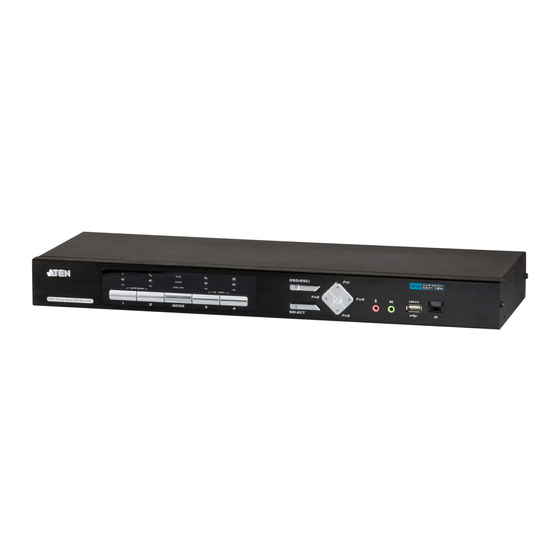
Page 19: Components
Chapter 1. Introduction Components CM1164A / CM1284 Front View Component Description KVM status panel This panel contains LED icons that light to indicate mode and port status. The mode and KVM port selection pushbuttons each have three corresponding LED icons that represent audio, KVM, and USB Link status. - Page 20 Multi-View KVMP™ Switch User Manual Component Description direction / function Use these buttons to: buttons Switch between different preset configurations (Fn1 to Fn4). For details about Function modes, see Preset Configuration, page 45. Cycle through the OSD Menu / selection. See IR Remote Control, page 11 for details.
-
Page 21: Cm1164A Rear View
Chapter 1. Introduction CM1164A Rear View Component Description Daisy Chain Control in Use these ports to connect to another CM1164A’s / out ports DCC port to pass keyboard and mouse signals. You can daisy chain up to four CM1164A units. (DCC port) ... -
Page 22: Cm1284 Rear View
You can daisy chain up to four CM1284 units. (DCC port) If the CM1284 is set up as a single station, you can control the CM1284 by sending serial commands through the DCC in port. For details, see Chapter 6, RS-232 Operation. -
Page 23: Ir Remote Control
Chapter 1. Introduction IR Remote Control Component Description OSD button Press this button to turn on or turn off the OSD Menu. When the OSD Menu is enabled, press the OSD button to go back to the previous menu / submenu. Fn1 / Fn2 / Fn3 / Use these buttons to switch between Function modes (Fn1 Fn4 buttons and... - Page 24 Multi-View KVMP™ Switch User Manual Component Description station selection If the Multi-View KVMP™ Switch is daisy chained to one or buttons several units (up to 4), press the button corresponding to the KVMP Switch that you want to configure or operate.
-
Page 25: Hardware Setup
Chapter 2 Hardware Setup 1. Important safety information regarding the placement of this device is provided on page 117. Please review it before proceeding. 2. To prevent damage to your installation from power surges or static electricity. It is important that all connected devices are properly grounded. - Page 26 Multi-View KVMP™ Switch User Manual 2. Using the screws provided in the mounting kit (not included with this package), screw the mounting bracket into the side of the unit as show in the diagram below: Phillips hex head Phillips hex head M3x6 M3x6 3.
-
Page 27: Installation
Chapter 2. Hardware Setup Installation CM1164A You can install the CM1164A as a single station, daisy chain up to 4 CM1164A units, or cascade up to 4 additional CM1164A units to a primary CM1164A. Single Station Installation To set up a single CM1164A unit, refer to the installation diagram on page 16 (the numbers in the diagrams correspond to the steps below), and do the following: 1. -
Page 28: Single Station Installation Diagram
Multi-View KVMP™ Switch User Manual Single Station Installation Diagram D V I... -
Page 29: Daisy Chaining
Chapter 2. Hardware Setup Daisy Chaining To display even more source devices, up to 3 additional CM1164A units can be daisy chained from the original CM1164A. As many as 16 source devices can be controlled from a single console in a complete daisy chain installation. Each CM1164A in a daisy chain requires its own monitor as the video signals cannot be passed through to other units on a daisy chain. -
Page 30: Daisy Chain Installation Diagram
Multi-View KVMP™ Switch User Manual 7. To switch to a computer in a daisy chain, select from the Control Station setting in the OSD Menu (Advanced > Control Station). When switching to a computer, only the keyboard and mouse signals are connected. Note: The second, third, and forth units in a daisy chain will not be able to use the IR remote for control. -
Page 31: Cascading
Chapter 2. Hardware Setup Cascading To centrally control up to 4 CM1164A units (16 sources), cascade 4 additional CM1164A units to another CM1164A. As many as 16 source devices can be controlled from a single CM1164A console in a complete cascade installation. To set up a cascade installation, make sure that the power to all devices has been turned off, and then do the following: 1. -
Page 32: Cascade Installation Diagram
Multi-View KVMP™ Switch User Manual Cascade Installation Diagram (4X4 multi-view) CM1164A Primary Unit Secondary Unit Secondary Unit Secondary Unit Secondary Unit Video / Keyboard / Mouse Audio Cat 5e Cable... -
Page 33: Cm1284
Chapter 2. Hardware Setup CM1284 You can install the CM1284 as a single station, daisy chain up to 4 CM1284 units, or cascade up to 4 additional CM1284 units to a primary CM1284. Single Station Installation To set up a single CM1284 unit, refer to the installation diagram on page 22... -
Page 34: Single Station Installation Diagram
Multi-View KVMP™ Switch User Manual 8. Plug the power cord into the CM1284’s power socket, and then plug the other end of the power cord into an AC power source. 9. Power on the KVM switch, the displays, and the computers / devices. -
Page 35: Daisy Chaining
To set up a daisy chain installation, make sure that the power to all devices has been turned off, and do the following: 1. Use a Cat 5 cable to connect the DCC out port of the primary CM1284 to the DCC in port of the secondary CM1284 unit(s) (first station out to second station in, second station out to third station in, etc.). -
Page 36: Daisy Chain Installation Diagram
Note: The second, third, and forth units in a daisy chain will not be able to use the IR remote for control. Only the first (primary) CM1284 can use the IR remote for control. -
Page 37: Cascading
To set up a cascade installation, make sure that the power to all devices has been turned off, and then do the following: 1. Connect the console ports of a secondary CM1284 to any set of the KVM ports on the primary CM1284 using the provided KVM cables. -
Page 38: Cascade Installation Diagram
Multi-View KVMP™ Switch User Manual Cascade Installation Diagram (4X4 multi-view) CM1284 (Rear) Video / Keyboard / Mouse Audio... -
Page 39: Basic Operation
Chapter 3 Basic Operation Overview This chapter explains the basic components used to switch and display computers connected to the Multi-View KVMP™ Switch. Identifying the Source Device You can identify the source connected to the Multi-View KVMP™ Switch from the channel information at the top-left corner in the screen: This computer is connected to Port 1 Click to extend the window to full screen This computer is named PC 1... - Page 40 Multi-View KVMP™ Switch User Manual Port ID number: This number is assigned according to the port that the computer is connected to on the rear of the KVM Switch. For example, a computer connected to port 1 is assigned port ID 1. Note: In a cascade setup, a port ID number of “1-3”...
-
Page 41: Switching
(stereo audio), and connect to peripheral devices on a third (USB). Note: By default, the CM1284’s Display 2 shows a video that is shown on Display 1, or of the focused video on Display 1 when Display 1 is in a multi-view mode. -
Page 42: Led Display
Multi-View KVMP™ Switch User Manual To switch stereo audio access to a computer, press Mode 3 times, and then press the KVM Port Selection pushbutton that corresponds to the computer. To switch USB access to a computer, press Mode 4 times, and then press the KVM Port Selection pushbutton that corresponds to the computer. -
Page 43: Hotkey Switching
Chapter 3. Basic Operation Hotkey Switching You can switch to a computer using hotkeys from the keyboard. To switch to computer 1, do the following: 1. Press and hold down [Num Lock]. 2. Press and release [-]. 3. Release [Num Lock]. 4. -
Page 44: Osd Switching
Multi-View KVMP™ Switch User Manual OSD Switching You can switch to a computer by accessing the Quick Access Toolbar with the console mouse. To switch computers with the OSD, do the following: 1. Move the cursor to the top of the OSD to display the Quick Access Bar. 2. -
Page 45: Boundless Switching
Chapter 3. Basic Operation 3. Click the port number at the top-left corner to open drop-down list, and then select a computer: 1, 2, 3, or 4. The display is immediately switched to the selected computer. 4. When you finish configuring, click to end the editor mode. -
Page 46: Tier (Chain Vert) Layout
Multi-View KVMP™ Switch User Manual Tier (Chain Vert) Layout Monitor Monitor Monitor 11 12 13 14 Monitor 15 16 Row (Chain Horz) Layout 13 14 11 12 15 16 Monitor Monitor Monitor Monitor Quarter (Chain 2 x 2) Layout Monitor Monitor 13 14 15 16... -
Page 47: Display Modes
Switch on the same screen, in different layout by setting the display mode. This section introduces you to different display modes, and ways of switching to them. Note: In a CM1284 system, Display 2 supports full-screen mode only. Full Screen A full-screen view displays one computer in full extension. - Page 48 Multi-View KVMP™ Switch User Manual Method Action Description Quick Access Move the mouse to the top center of the Toolbar OSD to display the Quick Access Toolbar, and then select from the Quick Access Toolbar. Note: Hardware Cursor Mode must be enabled, see The OSD Menu, page 59.
-
Page 49: Quad View
Chapter 3. Basic Operation Quad View A quad view displays four computers on the monitor in equal sized windows. Method Action Description Front Panel Press Select to cycle through display modes. IR Remote Press the Quad button. Control Quick Access Move the mouse to the top center of the Toolbar OSD to display the Quick Access Toolbar,... -
Page 50: Picture In Picture - Dual
Multi-View KVMP™ Switch User Manual Picture in Picture - Dual A dual PiP view shows 2 computers on the monitor with one as the main display, and the other overlapping the main display in an inset window. Method Action Description Front Panel Press Select to cycle through display modes. -
Page 51: Picture In Picture - Triple
Chapter 3. Basic Operation Picture in Picture - Triple A triple PiP view has 3 computers on the monitor with one computer as the main display and the other two overlapping the main display in inset windows. Method Action Description Front Panel Press Select to cycle through display modes. -
Page 52: Picture In Picture - Quad
Multi-View KVMP™ Switch User Manual Picture in Picture - Quad A quad PiP view has 4 computers on the monitor with one computer as the main display and the other three overlapping the main display in inset windows. Method Action Description Front Panel Press Select to cycle through display... -
Page 53: Picture On Picture
Chapter 3. Basic Operation Picture on Picture A picture-on-picture (PoP) view shows 4 computers in separate windows on the monitor. In editor mode, you can use the console mouse to resize and re-position each window on the screen. Method Action Description Front Panel Press Select to cycle through... -
Page 54: Picture By Picture - Dual
Multi-View KVMP™ Switch User Manual Picture by Picture - Dual The picture-by-picture (dual) view displays 2 computers side by side on the monitor. Method Action Description Front Panel Press Select to cycle through display modes. Quick Access Move the mouse to the top center Toolbar of the OSD to display the Quick Access Toolbar, and then select... -
Page 55: Picture By Picture - Triple
Chapter 3. Basic Operation Picture by Picture - Triple The picture-by-picture (triple) view displays 3 computers side by side on the monitor. Method Action Description Front Panel Press Select to cycle through display modes. Quick Access Move the mouse to the top center Toolbar of the OSD to display the Quick Access Toolbar, and then select... -
Page 56: Picture By Picture - Quad
Multi-View KVMP™ Switch User Manual Picture by Picture - Quad The picture-by-picture (quad) view displays 4 computers side by side on the monitor. Method Action Description Front Panel Press Select to cycle through display modes. Quick Access Move the mouse to the top center of Toolbar the OSD to display the Quick Access Toolbar, and then select... -
Page 57: Preset Configuration
Chapter 3. Basic Operation Preset Configuration You can save up to 4 sets of configuration, including the display mode, source assignment, division sizes, division locations, and KVM/Audio/USB focus status to easily toggle between different display configurations. To save a configuration, follow the steps below. 1. - Page 58 Multi-View KVMP™ Switch User Manual Method Action Description Quick Access Move mouse to top center of the OSD and then select from the Quick Toolbar Access Toolbar. Note: Hardware Cursor Mode must be enabled, see The OSD Menu page 59. Hotkey Enter the illustrated hotkeys.
-
Page 59: Hotkey Operation
Chapter 4 Hotkey Operation The Multi-View KVMP™ Switch provides easy-to-use hotkeys to control and configure your KVM installation from the keyboard. Open the OSD Menu To activate the OSD using your keyboard, tap the Scroll Lock key twice: [Scroll Lock] [Scroll Lock] You can close the OSD Menu by pressing [Esc] or Spacebar. -
Page 60: The Hotkey Setting Mode
Multi-View KVMP™ Switch User Manual The Hotkey Setting Mode You can operate and configure the Multi-View KVMP™ Switch with hotkeys when the Hotkey Setting Mode (HSM) is enabled. To use hotkeys, do the following: 1. Invoke the Hotkey Setting Mode. a) Press and hold down [Num Lock]. -
Page 61: Hotkeys List
(microphone and speakers) to the specified computer in a single station setup. [Port ID] specifies the target computer: When [Port ID] is omitted, the CM1164A/CM1284 switches to the specified device on the next computer device. [Port ID] = 1, 2, 3, or 4 [Device] specifies the focused device: ... - Page 62 See Auto Scanning, page 53 for more information. [J] [n] [Enter] Set the video content for Monitor 2. This function is only supported on the CM1284. [n] specifies the source of the displayed video. n is omitted (Displays the content of the focused window on Monitor 1) ...
- Page 63 Port 1.) n = 2 (Uses the EDID of the monitor connected to Port 2. This setting is supported by CM1284 only.) n = 3 (Sets the EDID to Remix mode, with which the Multi-View KVMP™ Switch uses the optimum EDID.)
- Page 64 Multi-View KVMP™ Switch User Manual Hotkey Function [F] [n] [Enter] Apply the specified Fn preset configurations (n = 1, 2, 3, or 4). For more information on Fn preset configurations, see Preset Configuration, page 45. [I] [n] [Enter] Sets the layout for daisy-chained boundless switching. For more information, see Multiview Monitor Layout Rule, page 33.
-
Page 65: Auto Scanning
Chapter 4. Hotkey Operation Auto Scanning The Auto Scan feature automatically cycles the KVM focus through the computer ports at regular intervals. This allows you to monitor the computer activity without having to switch from port to port manually. Although the video focus switches from port to port, the keyboard, mouse, and USB focus do not switch. - Page 66 Multi-View KVMP™ Switch User Manual This Page Intentionally Left Blank...
-
Page 67: Osd Operation
Chapter 5 OSD Operation Overview The Multi-View KVMP™ Switch can be operated and configured via the following OSD components: Quick Access Toolbar: This toolbar provides quick access for changing the display mode, saving display templates, and customizing division sizes. For details, see The Quick Access Toolbar, page 55. ... - Page 68 Multi-View KVMP™ Switch User Manual To display the Quick Access Toolbar, move the console mouse to the top of the screen. The Quick Access Toolbar provides the following controls: : Click an icon to apply the display mode. : Click this icon to enable the editor mode to allow you to assign source to a particular channel and resize inset windows.
-
Page 69: The Editor Mode
Chapter 5. OSD Operation The Editor Mode Use the editor mode to customize the source display. You can resize windows, change the display source, or relocate windows. To enable the editor mode, follow the steps below. 1. Make sure the following functions are enabled to allow console mouse to operate. - Page 70 Multi-View KVMP™ Switch User Manual 4. Configure and adjust the display as required. You can do the following when the editor mode is enabled: Function Action Change the display mode Click a display mode from the Quick Access Toolbar. ...
-
Page 71: The Osd Menu
Chapter 5. OSD Operation The OSD Menu The OSD Menu contains all the display settings and system settings for the Multi-View KVMP™ Switch. To access the OSD Menu, use any of the following methods: Press the OSD pushbutton on the front panel. ... -
Page 72: Password Protection
Multi-View KVMP™ Switch User Manual Password Protection By default, the Multi-View KVMP™ Switch’s OSD Menu is protected by password and is locked if the OSD Menu has not been operated for 30 seconds. This is to secure the advanced settings, the OSD Menu, from general operations using the Quick Access Toolbar, including: ... -
Page 73: System Settings
Follow A / Port 1 / Port This setting is supported by the 2 / Port 3 / Port 4 CM1284 only. Sets the video source of the display connected to the HDMI Console Port 2 on the CM1284. Keyboard Language English / German /... - Page 74 Multi-View KVMP™ Switch User Manual Setting Options Description [Num][-] / [Ctrl][F12] Defines the hotkey combination for enabling the Hotkey Setting Mode (HSM). Menu Hotkey Scroll*2 / Ctrl*2 Sets the hotkey combination for opening the menu. Display Channel Info Enable / Disable Enable this setting to display port ID numbers and device names.
- Page 75 Chapter 5. OSD Operation Setting Options Description Port 1 Name Type to name the computers connected to port 1 / port 2 / port 3 / Port 2 Name port 4 on the Multi-View KVMP™ Port 3 Name Switch. The Multi-View KVMP™ Switch only supports English characters of Port 4 Name upper and lower cases, numbers,...
- Page 76 EDID (1920 x 1080 @60Hz) to the connected sources. 4K UHD: This mode sends ATEN- predefined EDID (3840 x 2160 @30Hz for CM1284 only) to the connected sources. 4K DCI: This mode sends ATEN- predefined EDID (4096 x 2160 @30Hz for CM1284 only) to the connected sources.
- Page 77 Chapter 5. OSD Operation Setting Options Description Mouse Emulation Enable / Disable Enable mouse emulation to allow for error-free booting. Mouse emulation must be enabled for Hardware Cursor Mode, Channel Wheel Mode, and Mouse Switching to work. Mouse Wheel Enable / Disable Enable this function to allow the mouse Switching wheel to switch to the next port when it...
- Page 78 Multi-View KVMP™ Switch User Manual This Page Intentionally Left Blank...
-
Page 79: Rs-232 Operation
Chapter 6 RS-232 Operation Overview The Multi-View KVMP™ Switch supports system control via RS-232 serial commands sent through a PC or a high-end controller. Note that the RS-232 serial control is only possible when the Multi-View KVMP™ Switch is not daisy-chained with any secondary unit because the Switch’s DCC in port is required as the communication port for serial control. -
Page 80: Rs-232 Pin Assignments
Multi-View KVMP™ Switch from the controller PC. For information on RS-232 commands, see RS-232 Commands, page 69. RS-232 Pin Assignments Pin assignments for the CM1164A / CM1284’s rear DCC in port that is used for connecting to a serial terminal are given in the table, below: Assignment... -
Page 81: Rs-232 Commands
Chapter 6. RS-232 Operation RS-232 Commands This section lists the RS-232 commands and provides information on command syntax. Verification Messages Refer to the following table for details on verification messages that appear in the command line after entering a command. Verification Message Description Command OK... -
Page 82: Log In
Multi-View KVMP™ Switch User Manual Log In The Login command allows you to log in to the Multi-View KVMP™ Switch and begin sending RS-232 commands. When you log in, the RS-232 link is “opened” and the Multi-View KVMP™ Switch will not respond to front panel pushbuttons, hotkeys, OSD, or remote control signals - until the RS-232 link is closed (see Open/Close RS-232 Link, page 72). -
Page 83: Logout
Chapter 6. RS-232 Operation Logout The Logout command allows you to logout of the Multi-View KVMP™ Switch and close the RS-232 link. Type your command in the following format: Command + [Enter] Command Description logout Logout Command For example, to logout of the Multi-View KVMP™ Switch, type the following: logout [Enter] Note: To avoid RS-232 command loss, it is recommended to enter every RS-... -
Page 84: Open/Close Rs-232 Link
Multi-View KVMP™ Switch User Manual Open/Close RS-232 Link The Open/Close RS-232 Link command allows you to open/close the link between the computer sending RS-232 commands and the Multi-View KVMP™ Switch. When the link is “open” the Multi-View KVMP™ Switch only accepts RS-232 commands and will not respond to front-panel pushbuttons, hotkeys, OSD, or remote control signals - until the link is closed. -
Page 85: Switch Port
Chapter 6. RS-232 Operation Switch Port The switch port command allows you to switch the KVM, USB peripheral, and audio focus between computers connected to the Multi-View KVMP™ Switch’s ports. Type your command in the following format: Command + Input Command + [Enter] Command Description Switch Port Command... -
Page 86: Switch Port (Kvm Focus Only)
Multi-View KVMP™ Switch User Manual Switch Port (KVM Focus only) The switch port command allows you to switch the KVM focus between computers connected to the Multi-View KVMP™ Switch’s ports. Type your command in the following format: Command + Input Command + [Enter] Command Description Switch Port Command... -
Page 87: Switch Port (Usb Peripherals Focus Only)
Chapter 6. RS-232 Operation Switch Port (USB Peripherals Focus only) The switch port command allows you to switch the USB peripheral focus between computers connected to the Multi-View KVMP™ Switch’s ports. Type your command in the following format: Command + Input Command + [Enter] Command Description Switch Port Command... -
Page 88: Switch Port (Audio Focus Only)
Multi-View KVMP™ Switch User Manual Switch Port (Audio Focus only) The switch port command allows you to switch the audio focus between computers connected to the Multi-View KVMP™ Switch’s ports. Type your command in the following format: Command + Input Command + [Enter] Command Description Switch Port Command... -
Page 89: Daisy-Chained Boundless Switching
Chapter 6. RS-232 Operation Daisy-Chained Boundless Switching The daisy-chained boundless switching command allows you to move hardware cursor across display when they are daisy-chained. Type your command in the following format: Command + Control + [Enter] Command Description dlayout Daisy-Chained Boundless Switching Command Control Description Sets a row layout for daisy-chain monitors... -
Page 90: Pip Mode
Multi-View KVMP™ Switch User Manual PiP Mode The PiP Mode command allows you to change the Picture in Picture display mode settings. Type your command in the following format: Picture in Picture Dual Mode Setting: Command + Control1 + Control2 + [Enter] Picture in Picture Triple Mode Setting: Command + Control1 + Control2 + Control3 + [Enter] Picture in Picture Quad Mode Setting:... -
Page 91: Pbp Mode
Chapter 6. RS-232 Operation PbP Mode The PbP Mode command allows you to change the Picture by Picture display mode settings. Type your command in the following format: Picture by Picture Dual Mode Setting: Command + Control1 + Control2 + [Enter] Picture in Picture Triple Mode Setting: Command + Control1 + Control2 + Control3 + [Enter] Picture in Picture Quad Mode Setting:... -
Page 92: Pop Mode
Multi-View KVMP™ Switch User Manual PoP Mode The PoP Mode command allows you to change the Picture on Picture display mode settings. Type your command in the following format: Picture on Picture Mode Setting: Command + Control1 + Control2 + Control3 + Control4 + [Enter] Picture on Picture default Mode Setting: Command + Control1 + [Enter] Command... -
Page 93: Quad View Mode
Chapter 6. RS-232 Operation Quad View Mode The Quad View Mode command allows you to change the Quad View display mode settings. Type your command in the following format: Command + Control1 + Control2 + Control3 + Control4 + [Enter] Command + Control + [Enter] Command Description... -
Page 94: Change Display Mode
Multi-View KVMP™ Switch User Manual Change Display Mode The Change Display Mode command allows you to change the Display mode being used. Type your command in the following format: Command + Control + [Enter] Command Description display Change Display Mode Command Control Description full... -
Page 95: Port Disable
Chapter 6. RS-232 Operation Port Disable The Port Disable command allows you to disable a ports display from being shown. Type your command in the following format: Command + Control + Control + [Enter] Command Description Port Disable Command Control Description Disable video out of port number, x= 1~4 Example: p3... -
Page 96: Osd Language
Multi-View KVMP™ Switch User Manual OSD Language The OSD Language command allows you to change the OSD language setting. Type your command in the following format: Command + Control + [Enter] Command Description lang OSD Language Command Control Description Change OSD language to English. Change OSD language to German. -
Page 97: Keyboard Language Layout
Chapter 6. RS-232 Operation Keyboard Language Layout The Keyboard Language Layout command allows you to change the keyboard language layout. Type your command in the following format: Command + Control + [Enter] Command Description layout Keyboard Language Layout Command Control Description Change the keyboard language layout to English. -
Page 98: Set Operating System
Multi-View KVMP™ Switch User Manual Set Operating System The Set Operating System command allows you to set the operating system for a port. Type your command in the following format: Command + Control + Control1 + [Enter] Command Description Set Operating System Command Control Description p: Port number, x= 1~4... -
Page 99: Auto Scan
Chapter 6. RS-232 Operation Auto Scan The Auto Scan command allows you to set and enable Auto scan mode. Type your command in the following format: Command + Control + [Enter] Command Description scan Auto Scan Command Control Description Auto scan all ports Auto scan all ports with computers powered on Sets the KVM focus duration when scanning, xx= 05, 10, 15, 60, 90 seconds... -
Page 100: Port Id Display
Multi-View KVMP™ Switch User Manual Port ID Display The Port ID Display command allows you to configure the port ID for each port. Type your command in the following format: Command + Control + [Enter] Command Description portid Port ID Display Command Control Description pxyy... -
Page 101: Security
Chapter 6. RS-232 Operation Security The Security command allows you to secure access to the OSD Menu with password. Type your command in the following format: Command + Control + [Enter] Command Description security Security Command Control Description Disable password protection to the OSD Menu. Enable password protection to the OSD Menu. -
Page 102: Station
Multi-View KVMP™ Switch User Manual Station The Station command allows you to switch the console focus to the next station in a daisy chain setup. Type your command in the following format: Command + Control + Number + [Enter] Command Description station Station Command... -
Page 103: Dcc Control
Chapter 6. RS-232 Operation DCC Control The DCC Control command allows you to set the deployment type (daisy chain or cascade) of your Multi-View KVMP™ Switch system and if commands are applied to all cascaded secondary Multi-View KVMP™ Switches. Type your command in the following format: Command + Control + [Enter] Command + Control... -
Page 104: Mouse Emulation
Multi-View KVMP™ Switch User Manual Mouse Emulation The Mouse Emulation command allows you to set mouse emulation and mouse switching features. Type your command in the following format: Command + Control + [Enter] Command + Control2 + [Enter] Command Description msemu Mouse Emulation Command Control... -
Page 105: Keyboard Emulation
Chapter 6. RS-232 Operation Keyboard Emulation The Keyboard Emulation command allows you to enable/disable the keyboard emulation feature. Type your command in the following format: Command + Control + [Enter] Command Description kbemu Keyboard Emulation Command Control Description Disable keyboard emulation function Enable keyboard emulation function For example, to disable keyboard emulation, type the following: kbemu off [Enter]... -
Page 106: Video Dynasync
Set the EDID to the EDID of the monitor connected to port 1 of the Multi-View KVMP™ Switch. port 2 Set the EDID to the EDID of the monitor connected to port 2 of the CM1284. remix Set the EDID to an optimum among all the connected displays. -
Page 107: Hardware Cursor
Chapter 6. RS-232 Operation Hardware Cursor The Hardware Cursor command allows you to enable/disable the hardware cursor feature. Type your command in the following format: Command + Control + [Enter] Command Description Hardware Cursor Command Control Description Disable the hardware cursor Enable the hardware cursor For example, to enable the hardware cursor, type the following: hc on [Enter]... -
Page 108: Activate Beeper
Multi-View KVMP™ Switch User Manual Activate Beeper The Activate Beeper command allows you to enable/disable the beeper function. Type your command in the following format: Command + Control + [Enter] Command Description beeper Activate Beeper Command Control Description Disable beeper Enable beeper For example, to enable the beeper, type the following: beeper on [Enter]... -
Page 109: Hotkey Setting
Chapter 6. RS-232 Operation Hotkey Setting The Hotkey Setting command allows you to enable/disable and change the hotkey used to invoke the HSM (Hotkey Setting Mode). Type your command in the following format: Command + Control + [Enter] Command Description hotkey Hotkey Setting Command Control... -
Page 110: Osd Hotkey
Multi-View KVMP™ Switch User Manual OSD Hotkey The OSD hotkey command allows you to change the hotkey used to invoke the OSD. Type your command in the following format: Command + Control + [Enter] Command Description osdkey OSD hotkey command Control Description scroll... -
Page 111: Power On Detection
Chapter 6. RS-232 Operation Power on Detection The Power on Detection command allows you to enable/disable the power on detection feature. Type your command in the following format: Command + Control + [Enter] Command Description Power on Detection Command Control Description Enable power on detection function Disable power on detection function... -
Page 112: Fn Key
Multi-View KVMP™ Switch User Manual Fn Key The Fn Key command allows you to save and select Fn keys for a focused ports display settings. Type your command in the following format: Command + Control + [Enter] Command Description Fn Key Command Control Description savex... -
Page 113: Usb Reset
Chapter 6. RS-232 Operation USB Reset The USB Reset command allows you to reset the USB connection. Type your command in the following format: Command + Control + [Enter] Command Description usbreset USB Reset Command Control Description Enable USB reset connection For example, to reset the USB connection, type the following: usbreset on [Enter] Note: 1. -
Page 114: Restore Default Value
Multi-View KVMP™ Switch User Manual Restore Default Value The Restore Default Value command allows you to reset all of the Multi-View KVMP™ Switch’s settings back to the default. Type your command in the following format: Command + Control + [Enter] Command Description redefault... -
Page 115: Firmware Upgrade
Chapter 6. RS-232 Operation Firmware Upgrade The Firmware Upgrade command allows you to enable the firmware upgrade mode. Type your command in the following format: Command + Control + [Enter] Command Description upgrade Firmware Upgrade Command Control Description Enable firmware upgrade mode For example, to enable firmware upgrade mode, type the following: upgrade on [Enter] Note: 1. -
Page 116: Kvm Status
Multi-View KVMP™ Switch User Manual KVM Status The KVM Status command allows you to display read-only information about the Multi-View KVMP™ Switch’s current configuration status. Type your command in the following format: Command + [Enter] Command Description status KVM Status Command For example, to display the Multi-View KVMP™... -
Page 117: Hotkey List
Chapter 6. RS-232 Operation Hotkey List The Hotkey List command allows you to display a list of the KVM’s hotkeys. Type your command in the following format: Command + [Enter] Command Description list Hotkey List Command For example, to display the KVM’s hotkey list, type the following: list [Enter] Note: To avoid RS-232 command loss, it is recommended to enter every RS- 232 command with a two-second gap. -
Page 118: Info
Multi-View KVMP™ Switch User Manual Info The Info command allows you to display the Multi-View KVMP™ Switch’s current firmware version and copyright information. Type your command in the following format: Command + [Enter] Command Description info Info Command For example, to display the Multi-View KVMP™ Switch’s device information, type the following: info [Enter] Note: To avoid RS-232 command loss, it is recommended to enter every RS-... -
Page 119: Display B
Chapter 6. RS-232 Operation Display B The Display B command allows you to set different modes for display B. Type your command in the following format: Command + Control + [Enter] Command Description dispb Display B Mode Command Control Description followa Sets the display B to follow with display A. - Page 120 Multi-View KVMP™ Switch User Manual This Page Intentionally Left Blank...
-
Page 121: System Maintenance
Chapter 7 System Maintenance Firmware Upgrades New firmware packages are posted on our Website as new firmware revisions become available. Check the web site regularly to find the latest packages and information. To upgrade your Multi-View KVMP™ Switch, follow the steps below. 1. - Page 122 Multi-View KVMP™ Switch User Manual 4. Double-click the executable in the downloaded package. This screen appears. 5. Select the Firmware Upgrade Utility and click Next. This window appears.
- Page 123 Chapter 7. System Maintenance 6. Read the License Agreement, select I Agree, and then click Next. The Firmware Upgrade Utility main screen appears and lists the devices that can be upgraded. 7. Select a device from the Device List and click Next to start the upgrade. The upgrade status is indicated in the Status Messages column.
- Page 124 Multi-View KVMP™ Switch User Manual 8. When the upgrade is complete, the KVM Switch reboots itself.
-
Page 125: Backup / Restore
Chapter 7. System Maintenance Backup / Restore To backup or restore the Multi-View KVMP™ Switch’s OSD configuration, do the following: 1. Connect a PC’s USB port to the Multi-View KVMP™ Switch’s USB KVM port 1 using the supplied KVM cable. 2. - Page 126 Multi-View KVMP™ Switch User Manual 5. Select OSD Configuration Backup/Restore and click Next. This screen appears. 6. Click Connect to establish communication with the KVM Switch. This message appears in the Status Messages. 7. To back up the OSD configuration, follow the steps below. a) (Optional) Set up a password that will be required when applying this configuration file to the KVM Switch.
- Page 127 Chapter 7. System Maintenance c) Follow the on-screen instruction to finish the procedure. When the settings are restored, the message “Restore OSD configuration: OK” appears in the Status Messages column. d) The KVM Switch restarts itself when the settings are restored.
-
Page 128: Powering Off And Restarting
Multi-View KVMP™ Switch User Manual Powering Off and Restarting If it becomes necessary to power off the unit, before starting it back up you must do the following: 1. Shut down all the computers that are attached to the switch. 2. -
Page 129: Appendix
Appendix Safety Instructions General This product is for indoor use only. Read all of these instructions. Save them for future reference. Follow all warnings and instructions marked on the device. Do not place the device on any unstable surface (cart, stand, table, etc.). If the device falls, serious damage will result. - Page 130 Multi-View KVMP™ Switch User Manual electrician to replace your obsolete outlet. Do not attempt to defeat the purpose of the grounding-type plug. Always follow your local/national wiring codes. Do not allow anything to rest on the power cord or cables. Route the power cord and cables so that they cannot be stepped on or tripped over.
-
Page 131: Rack Mounting
Appendix Rack Mounting Before working on the rack, make sure that the stabilizers are secured to the rack, extended to the floor, and that the full weight of the rack rests on the floor. Install front and side stabilizers on a single rack or front stabilizers for joined multiple racks before working on the rack. -
Page 132: Technical Support
Multi-View KVMP™ Switch User Manual Technical Support International For online technical support – including troubleshooting, documentation, and software updates: http://eservice.aten.com For telephone support, Telephone Support, page vii. North America Email Support support@aten-usa.com Online Troubleshooting http://www.aten-usa.com/support Technical Documentation Support... -
Page 133: Specifications
Appendix Specifications Function CM1164A CM1284 Computer Connections Port Selection Front-p-panel Pushbuttons,, Hotkeys,, IR Remote Control,, On-screen Display (OSD), Mouse Wheel, Mouse Cursor, RS-232 Commands Connectors Console Keyboarde 1 x USB Type A Female 1 x USB Type A Female Ports... - Page 134 Multi-View KVMP™ Switch User Manual Function CM1164A CM1284 Physical Housing Metal Properties Weight 2.46 kg (5.42 lb) Dimensions (L x W x H) 43.72 x 16.40 x 4.40 cm (17.21 x 6.46 x 7.73 in.)
-
Page 135: Troubleshooting
Appendix Troubleshooting Operation problems can be due to a variety of causes. The first step in resolving them is to make sure that all cables are securely attached and seated completely in their sockets. In addition, updating the product’s firmware may solve problems that have been discovered and resolved since the prior version was released. -
Page 136: Fn Key Reference
Multi-View KVMP™ Switch User Manual Fn Key Reference Use the information below as a quick reference to invoke the Fn keys. -
Page 137: Mac Keyboard Emulation
Appendix Mac Keyboard Emulation The PC compatible (101/104 key) keyboard can emulate the functions of the Mac keyboard. The emulation mappings are listed in the table below. PC Keyboard Mac Keyboard [Shift] Shift [Ctrl] Ctrl [Ctrl] [1] [Ctrl] [2] [Ctrl] [3] [Ctrl] [4] [Alt] [Print Screen]... -
Page 138: Sun Keyboard Emulation
Multi-View KVMP™ Switch User Manual Sun Keyboard Emulation The PC compatible (101/104 key) keyboard can emulate the functions of the Sun keyboard when the Control key [Ctrl] is used in conjunction with other keys. The corresponding functions are shown in the table below. PC Keyboard Sun Keyboard [Ctrl] [T]... -
Page 139: Factory Default Hotkeys And Settings
Appendix Factory Default Hotkeys and Settings Setting Hotkey Default Invoking HSM [Number Lock] [-] Port Switching (Default / Alternate) [Scroll Lock] [Scroll Lock] Auto Scan Interval [Scroll Lock] 5 seconds [Scroll Lock] [A] [Enter] Keyboard Operating Platform [F10] PC Compatible Mouse Emulation Enabled Keyboard Emulation... -
Page 140: Limited Warranty
© Copyright 2021 ATEN® International Co., Ltd. Released: 2021-05-12 ATEN and the ATEN logo are registered trademarks of ATEN International Co., Ltd. All rights reserved. All other brand names and trademarks are the registered property of their respective owners.
Need help?
Do you have a question about the CM1284 and is the answer not in the manual?
Questions and answers