Promax HD RANGER+ Manual
Tv & satellite analyser
Hide thumbs
Also See for HD RANGER+:
- User manual (224 pages) ,
- User manual (266 pages) ,
- User manual (92 pages)
Table of Contents
Advertisement
Quick Links
Download this manual
See also:
User Manual
Advertisement
Table of Contents

Related Manuals for Promax HD RANGER+


Summary of Contents for Promax HD RANGER+
- Page 1 RANGER/ TV & SATELLITE ANALYSER - 0 MI1914 -...
-
Page 3: Safety Notes
User has to click on this icon to watch the video. All videos are in the PROMAX channel on YouTube, which is accessible through the PROMAX website at: www.promaxelectronics.com... - Page 5 SAFETY RULES The safety could not be assured if the instructions for use are not closely followed. Use this equipment connected only to systems with their negative of measurement connected to ground potential. The AL-103 external DC charger is a Class I equipment, for safety reasons plug it to a supply line with the corresponding ground terminal.
- Page 6 Symbols related with safety: Descriptive Examples of Over-Voltage Categories Cat I Low voltage installations isolated from the mains. Cat II Portable domestic installations. Cat III Fixed domestic installations. Cat IV Industrial installations. April 2013...
-
Page 7: Table Of Contents
T A B L E O F C O N T E N T S 1 INTRODUCTION ..................1-1 1.1 Description ..................1-1 2 SETTING UP ..................... 2-3 2.1 Package Content ................2-3 2.2 Power ................... 2-4 2.2.1 First charge................2-4 2.2.2 Charging the battery .............. - Page 8 5 TV MODE ....................5-47 5.1 Introduction..................5-47 5.2 Operation ..................5-47 5.2.1 TV MODE: TV views..............5-48 5.2.2 TV MODE: Radio views ...............5-52 5.3 Menu Options for the TV MODE............5-54 5.3.1 F1: Tuning ................5-54 5.3.2 F2: Signal Parameters ..............5-54 5.3.3 F3: Service (digital signal)/Input (analogue signal) ......5-54 5.3.4 F4: Audio (digital signal)/Aspect Ratio (analogue signal) ....5-54 5.4 IRG Descriptor ................5-55...
- Page 9 7 INSTALLATIONS MANAGEMENT..............7-80 7.1 Description ...................7-80 7.2 Operation ..................7-80 7.3 Installation Management ..............7-81 7.4 Create a new installation ..............7-84 7.5 Tools ...................7-84 8 CONNECTING TO EXTERNAL DEVICES............8-86 8.1 Mini-USB connector................8-86 8.1.1 Connecting the HD RANGER/+ (host) to an USB memory (slave) ..8-86 8.1.2 Connecting a computer (host) to the HD RANGER/+ (slave).....8-87 8.2 V/A Output Connector ..............8-88...
- Page 10 April 2013...
-
Page 11: Introduction
TV & SATELLITE ANALYSER RANGER/ 1 INTRODUCTION Description The new is the sixth generation of field meters that PROMAX RANGER/ launches. As each new generation, it represents an evolution from t he previous, since it integrates the latest technological innovations and develops applications for the new demands and needs that have emerged in recent years. - Page 12 Besides the basic functions of TV meter and spectrum analyser for terrestrial and satellite band, it provides additional tools, such as the detection of 4G signal interferences (some of its working frequencies are close to the TV bands), the diagrams constellations or the echoes detection. has an application to manage data generated at each RANGER/ installation.
-
Page 13: Setting Up
2 SETTING UP Package Content Check that your package contains the following elements: Analyser. RANGER/ External DC charger. Mains cord for external DC charger. Car lighter charger. "F" Adapters (3 units). • "F" / H - BNC / H Adapter. •... -
Page 14: Power
Power is powered by a 7.2 V built-in rechargeable Li-Ion battery RANGER/ of high quality and long operation time. This equipment can operate on battery or connected to the mains using a DC adapter. An adapter is also supplied to use with the power connector car (cigarette lighter). -
Page 15: Charge/Discharge Times
When the equipment is connected to the mains, the CHARGER indicator remains on. This indicator changes its colour according to the percentage of battery charge: Less than 80% of charge. ORANGE Between 80% and 90% of charge. GREEN 100% full charge. When switching on the equipment, the battery voltage is checked. -
Page 16: Usage Tips
Usage Tips The battery is losing storage capacity as you go through its life. Contact your PROMAX distributor when necessary to replace the battery. To prolong battery life the user should follow these tips: In case of providing a long inactivity period of the equipment it is advisable to make every 3 months a charge / discharge cycle and a subsequent partial charge (40% aprox.). -
Page 17: Equipment Details
Equipment Details Front View Figure 4. April 2013... - Page 18 Lateral view Figure 5. Top view Figure 6. * Optical Option. April 2013...
-
Page 19: Switching On/Off The Equipment
Switching On/Off the equipment This analyser is designed for use as a portable equipment and it does not require any previous installation. Switching On: ► Slide up for a while (approximately one second) the power slide switch located on the left side of the equipment. When all indicators light up at once release the switch, which returns to its rest position. -
Page 20: Screen Icons And Dialog Boxes
Screen Icons and Dialog boxes On the screen are some icons that provide useful information to the user about the current status of the instrument. Battery charging. USB flash drive inserted. Battery not charging. LTE filter enabled. Yellow level indicates charge left. -
Page 21: Menu Tree
Menu Tree SPECTRUM ANALYSER MENU TV MENU Only available for digital channels Only available for analogue channels 2-11 April 2013... - Page 22 MEASUREMENT MENU SETTINGS MENU Only available for digital channels 2-12 April 2013...
- Page 23 INSTALLATIONS MANAGEMENT PREFERENCES MENU Figure 7. 2-13 April 2013...
-
Page 24: Controls
Controls The equipment has been designed to be an easy tool to use. For this reason the number of keys has been reduced and these are grouped by function. The menu navigation includes hints that appear when the cursor is placed on an disabled (grayed) option for a while. -
Page 25: Keyboard Shortcuts
Using the ECHOES tool, the joystick is also multifunctional: CH or FR: Channel (CH) change or frequency (FR) change (according to the tune selected: tune by channel or tune by frequency). Echo change. According to the selected function, the joystick will do a specific action. 2.7. - Page 26 Measurements Figure 10. FULL MEASUREMENT Figure 11. MEASUREMENT + TV + SPECTRUM Figure 12. MEASUREMENT + PARAMETERS 2-16 April 2013...
- Page 27 Spectrum Analyser Figure 13. SPECTRUM + MEASUREMENT Figure 14. SPECTRUM + MEASUREMENT + TV Figure 15. FULL SPECTRUM 2-17 April 2013...
- Page 28 TV Mode Figure 16. FULL TV Figure 17. TV + SPECTRUM + MEASUREMENT Figure 18. TV + SERVICE DATA 2-18 April 2013...
-
Page 29: Softkeys
Screenshot key ► Pressing this key for a second, it captures the image currently being displayed and stores it in the memory of the equipment in PNG format. This screen can displayed on the same instrument and if desired, downloaded to a computer. Management Keys ►... -
Page 30: Virtual Keyboard
2.7.4 Virtual Keyboard When a user needs to enter or edit a file name (from an image, channel set, etc.), a screen with a virtual keyboard appears as shown at the figure. Figure 20. To edit the file n e u er shoul d follow these steps: Using the joystick, place the cursor over the text box where the name appears. -
Page 31: Stealthid Function: Signal Auto-Identification
StealthID Function: Signal Auto-identification The StealthID function of the is a signal identification function RANGER/ performed automatically by the equipment without any user intervention. The equipment tries to identify the channel or frequency of the input signal it receives, and according to the band selected by the user, it applies identifying criteria according to the standards of that band. -
Page 32: Equipment Settings And Configuration
Equipment Settings and Configuration 2.9.1 Tune Settings Menu Press the Settings key to access the settings menu. Depending on the selected band, the menu may be different. Figure 21. A brief explanation of each option available on the menu: Band (available for satellite and terrestrial band) ►... - Page 33 The channel tuning allows the cursor to jump from channel to channel when moving the joystick left or right or to jump to a specific channel of the selected channel set. The frequency tuning allows the cursor to move along the frequency band in 50 kHz steps, or to select a specific frequency.
- Page 34 DiSEqC Mode (only available for satellite band) ► It enables or disables DiSEqC mode. DiSEqC (Digital Satellite Equipment Control) is a communication protocol between the satellite receiver and accessories of the satellite system (see section 7.4). SatCR (only available for satellite band) ►...
-
Page 35: Video & Audio Settings
2.9.2 Video & Audio settings Press the Settings key for one second to access the Video & Audio settings menu. Figure 22. A brief explanation of each option available on the menu: Volume ► It increases or decreases the volume of the speaker audio output by moving the joystick to the right (+ volume) or left (- volume). -
Page 36: Preferences Menu
2.9.3 Preferences Menu You access the Preferences menu by pressing the Installations Management key for one second. The options are grouped as follows: Equipment: Equipment information (only read). ► Appearance: Equipment customization options. ► Date & Time: It allows the user to change date and time zone. ►... - Page 37 A brief explanation of each option available on the menu: Equipment options: ► Provider: Provider's name. Name: Equipment's name. Serial number: Unique identification number for this equipment. Release: Version and date of the software installed on the equipment. Flash: Size of the flash memory installed on the equipment. Free: Free size...
- Page 38 Date Options: ► Date: It allows the user to edit the date. Time: It allows the user to edit the time. Date Format: It allows the user to change the date format, which is the order in which is shown day (DD), month (MM) and year (YY).
- Page 39 Min. TER. Power: It sets the minimum power for a terrestrial digital signal to be identified. Min. SAT. Power: It sets the minimum power for a satellite digital signal to be identified. Min. TER. Level: It sets the minimum level for a terrestrial analogue signal to be identified.
-
Page 40: Measurement Mode
3 MEASUREMENT MODE Introduction On the panel left side, the equipment has three functions keys, which give direct access to the thr e most important functions. One of them is the key MEASUREM ENT ( ) that measures the signal received through the RF input connector. -
Page 41: Operation
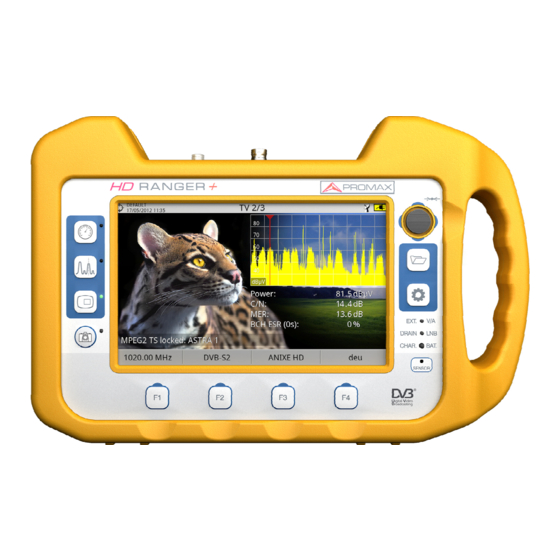
Operation Connect the RF input signal to the equipment. Select through the Tune Settings menu the frequency band (terrestrial or satellite). Access the MEASUREMENT option by pressing the key. Press again to display the next view. Views for digital signals are: MEASUREMENT 1/3: FULL MEASUREMENT Figure 24. - Page 42 MEASUREMENT 2/3: MEASUREMENT + TV + SPECTRUM Figure 25. Selected installation, date and time. Image of the locked signal. Number of view/total views. Selected band, battery level. Spectrum of the locked signal. Measurement values for the type of locked signal. Signal status (searching/locked/multiplex name).
- Page 43 MEASUREMENT 3/3: MEASUREMENT + PARAMETERS Figure 26. Selected installation, date and time. Number of view/total views. Selected band, battery level. Demodulation parameters of the locked signal. Measurement values for the type of locked signal. Signal status (searching/locked/multiplex name). Softkeys menus. Joystick right/left It changes the selected channel/frequency.
-
Page 44: Spectrum Analyser Mode
4 SPECTRUM ANALYSER MODE Introduction On the left side, the equipment has three function keys, which give direct access to the three most important functions. One of them is the SPECTRUM ANALYSER key that displays the signal spectrum received through the RF input connector. - Page 45 Available views are: SPECTRUM 1/3: SPECTRUM + MEASUREMENT Figure 27. Selected installation, date and time. Number of view/total views. Joystick active mode, selected band, battery level. Measured values of the signal at the frequency/channel where is pointing the cursor. Spectrum in the band with the selected span. Signal status (searching/locked multiplex name/selected span).
- Page 46 ∗ SPECTRUM 2/3: SPECTRUM + MEASUREMENT + TV Figure 28. Selected installation, date and time. Number of view/total views. Joystick active mode, selected band, battery level. Measured values of the signal at the frequency/channel where is pointing the cursor. Image of the tuned signal. Spectrum in the band with the selected span.
- Page 47 ∗ SPECTRUM 3/3: FULL SPECTRUM Figure 29. Selected installation, date and time. Number of view/total views. Joystick active mode, selected band, battery level. Spectrum in the band with the selected span. Softkeys menus. Joystick up/down: It changes the reference level. ►...
-
Page 48: Description In Detail Of The Full Spectrum Screen
Description in detail of the FULL SPECTRUM screen Figure 30. Horizontal reference line It indicates the signal level. Vertical axis It indicates the signal level. Vertical reference line It indicates the frequency. SPAN It is the frequency range displayed on the horizontal axis. The current span value appears at the bottom right of the screen. -
Page 49: Joystick Operation In Spectrum Analyser Mode
Cursor Red vertical line that indicates position during the channel or frequency tuning. To change frequency/channel use the joystick (left, right) in FR mode (tuning by frequency) or CH mode (tuning by channel). Marker It is a special cursor that can be placed on a given frequency to check the power in this point. -
Page 50: Menu Options For The Spectrum Analyser
Pressing up or down will change the reference level regardless the active mode. The frequency or channel tuning mode will appear depending on the selected tuning type. Access the TUNE BY menu to select the type of tuning. To show the MARKER mode, it must be active. Access the ADVANCED menu to activate the MARKER. -
Page 51: F1: Tuning
4.5.1 F1: Tuning Access by the function key. It contains the options to tune a channel. The tuning menu consists of the following options: Channel/Frequency: It displays the channel/frequency pointed by the ► cursor. Tuning type (channel/frequency) is selected by means of the "Tune by" option. In case of tuning by channel, it allows selecting a channel from the active channel set: Place over the Channel option and press the joystick. - Page 52 Channel Set: This option allows the user to select a channel set ► from the ones available for the current installation. Tune by: It allows the user to select between tuning by channel ► (selecting a channel or channel by channel with the joystick) tuning frequency...
-
Page 53: F2: Signal Parameters
4.5.2 F2: Signal Parameters Access by the function key. It allows selecting the standard transmission and displays the parameters for signal transmission. This menu allows selecting the transmission standard: Type of signal: It displays the selected standard. It allows selecting another ►... -
Page 54: F3: Tools
4.5.3 F3: Tools Access by the key. It shows the Tools menu. This menu can change depending on the type of selected standard. Tools are: Explore channel ► set: It explores the selected channel set. Constellation: It displays the constellation of the locked signal. ►... - Page 55 Spectrum ► Line: It defines the spectrum display. Outline option displays the spectrum outline. The Solid option displays the contour of the spectrum with solid background. Tone Level: This option produces a tone that changes according to the ► input level of the signal so the tone is sharper if the level increases and deeper if the level decreases.
-
Page 56: Location Of A Signal With The Spectrum Analyser
To select a parameter: Place over the option and press the joystick. The data field gets into the edit mode, indicated by the yellow background. A menu is displayed at the right with some options or if it is numeric, a number gets a black blackground. -
Page 57: Tv Mode
5 TV MODE Introduction On the left side of the front panel there are three functions, which give direct access to the three most important functions. One is the TV MODE key which displays the resulting image from decoding received RF signal. TV MODE, thanks to the StealthID function of automatic identification, automatically identifies and demodulates the TV signal received by the RF input, so the user can check the signal on the screen. -
Page 58: Tv Mode: Tv Views
5.2.1 TV MODE: TV views Views for TV mode are: TV 1/3: FULL TV Figure 33. Selected installation; date and time. Number of view/total views. Selected band, battery level. Tuned service image. Signal status (searching/locked/multiplex name). Softkeys menus. Joystick up/down: It changes service. ►... - Page 59 TV 2/3: TV + SPECTRUM + MEASUREMENT Figure 34. Selected installation; date and time. Number of view/total views. Selected band, battery level. Tuned service image. Spectrum. Measured values of the signal in the frequency/channel the cursor is pointing. Signal status (searching/locked/multiplex name). Softkeys menus.
- Page 60 TV 3/3: SCREEN TV + SERVICE DATA Figure 35. Selected installation; date and time. Tuned service image. Tuned service information. TYPE: Encoding type and video transmission rate. ► FORMAT: Resolution (horizontal x vertical), aspect ratio and ► frequency. PROFILE: Profile level. ►...
- Page 61 Tuned audio information. TYPE: Type of audio encoding and transmission speed ► FORMAT: Service audio format. Bit depth; sampling frequency; ► sound reproduction. LANGUAGE: Broadcasting language. ► PID: ID of the audio program. ► Softkeys menus. Joystick up/down: It changes service. ►...
-
Page 62: Tv Mode: Radio Views
5.2.2 TV MODE: Radio views Radio views are: RADIO 1/3: AUDIO RADIO Figure 36. RADIO 2/3: AUDIO RADIO + SPECTRUM + MEASUREMENTS Figure 37. 5-52 April 2013... - Page 63 RADIO 3/3: AUDIO RADIO + RDS DATA Figure 38. RDS data are: Details: It has the following fields: Programme service. ► Programme Identification. ► PTY: Program type. ► UTC Time: Universal time. ► Local: Local time. ► ECC: Extended country code. ►...
-
Page 64: Menu Options For The Tv Mode
Menu Options for the TV MODE 5.3.1 F1: Tuning It displays the frequency or channel tuned. It allows editing frequency or change channel in the active channel set (see how to select a frequency or channel on chapter 4.5.1). 5.3.2 F2: Signal Parameters It shows the parameters of the tuned signal. -
Page 65: Irg Descriptor
IRG Descriptor The analyser is compatible with IRG recommendations and it can extract the Carrier ID information and display it conveniently showing all the details. This information is useful to identify the interference, thanks to the carrier ID. This identifier provides enough information to detect the interference source (customer name, contact data, geo coordinates, etc.) and allows the operators to communicate directly with the RFI source to resolve the incident. -
Page 66: Tools
6 TOOLS Constellation 6.1.1 Description The constellation diagram is a graphic representation of the digital symbols received over a period of time. There are different types of constellation diagrams according to the modulation type. In the case of an ideal transmission channel without noise or interference, all symbols are recognized by the demodulator without errors. - Page 67 Constellation screen description: Figure 40. Selected installation; date and time. Constellation window. olour scale placed at the left side indicates the signal quality in a qualitative way by a gr dation of colou s pro ortional to the density symbols concentrated in a given area. The colour scale ranges from black (no symbols) to red (highest de nsity).
-
Page 68: Menu Options For Constellation Tool
6.1.3 Menu Options for Constellation tool On the bottom of the screen there are four menus accessible via the function keys. It displays the channel / frequency where is pointing the cursor and accesses the tuning menu. It displays the selected transmission standard menu and accesses the signal parameters. -
Page 69: Operation
6.2.2 Operation The LTE Ingress Test input is available to all DIGITAL TERRESTRIAL signals. To access the LTE Ingress Test tool: Connect the RF input signal to the equipment. Tune a digital signal of the terrestrial band. Enter the MEASUREMENT mode or SPECTRUM mode Press the key (Tools). - Page 70 The following describes the LTE display: Figure 41. Selected installation; date and time. Elapsed time with filter ON. Measurement with filter ON: MER (minimum, maximum) and power (minimum, maximum). Signal with LTE filter enabled (ON) or disabled (OFF). Identifier icon of the LTE filter ON. Selected band;...
-
Page 71: Menu Options For The Lte Ingress Test Tool
6.2.3 Menu options for the LTE Ingress Test tool On the bottom of the screen there are four menus accessible via the function keys. It displays channel/frequency and access the tuning menu. It allows selecting the channel where apply the LTE ingress test. It displays the selected transmission standard menu and accesses the signal parameters. -
Page 72: Operation
6.3.2 Operation Echoes function is available for DVB-T, DVB-T2 and DVB-C2 signals. Connect the RF input signal to the equipment. Tune a DVB-T, DVB-T2 or DVB-C2 digital signal at the terrestrial band. Enter the MEASUREMENT mode or SPECTRUM mode Press the key (Tools). - Page 73 The following describes the ECHOES screen: Figure 42. Selected installation; date and time. Selected band, battery level. Main signal data: Frequency, Power and C/N. ECHOES Diagram. The display shows a graphical representation of the echoes. The horizontal axis of the graph corresponds to the delay in receiving the echo on the main path (the stronger signal).The vertical axis represents the attenuation of the echo in dB on the main path.
-
Page 74: Menu Options For The Echoes Tool
6.3.3 Menu Options for the Echoes tool At the bottom of the screen there are four menus available via the function keys. It displays the channel/frequency where is pointing the cursor and access the tuning menu. It displays the selected transmission standard menu and accesses the signal parameters. - Page 75 The following describes the MER PER CARRIER screen: Figure 43. Selected installation; date and time. Joystick active mode; Selected band, battery level. Measurement values for the signal tuned at the frequency/channel selected. Average measurement value and standard deviation value of MER. MER by carrier graphic.
-
Page 76: Menu Options
6.4.3 Menu options At the bottom of the screen there are three menus available via the function keys. It displays the channel/frequency where is pointing the cursor and access the tuning menu. It displays the selected transmission standard menu and accesses the signal parameters. It displays the Tools menu. - Page 77 The following describes the MEROGRAM screen: Figure 44. Selected installation; date and time. Measurement values for the signal tuned at the frequency/channel selected. Maximum level of MER. MEROGRAM graphic. Minimum level of MER. Selected band, battery level. Maximum and minimum MER value and MER average over time. Maximum and minimum value of the measure selected by the user in the option "User measure".
-
Page 78: Menu Option
6.5.3 Menu option At the bottom of the screen there are four menus available via the function keys. It displays the channel/frequency where is pointing the cursor and access the tuning menu. It displays the selected transmission standard menu and accesses the signal parameters. It displays the Tools menu. -
Page 79: Operation
6.6.2 Operation The Spectrogram tool is available for all signals. Connect the RF input signal to the equipment. Enter the MEASUREMENT or SPECTRUM mode. Select a channel or frequency. Select the SPAN within the spectrogram will be displayed. Press the Tools key Select the Spectrogram option. - Page 80 The following describes the SPECTROGRAM screen: Figure 45. Selected installation; date and time. Measurement values for the signal tuned at the frequency/channel selected. Spectrum over time at the selected span. Softkeys menus. Selected band, battery level. Maximum and minimum values of signal power and band power over time.
-
Page 81: Menu Options
6.6.3 Menu options At the bottom of the screen there are four menus available via the function keys. It displays the channel/frequency where is pointing the cursor and access the tuning menu. It displays the selected transmission standard menu and accesses the signal parameters. It displays the Tools menu. -
Page 82: Operation
6.7.2 Operation To create a new datalogger: First select the installation on the Installations menu and load it pressing the "Load" key . An installation contains the channel sets and DiSEqC commands selected by the user and it stores dataloggers and screenshots made while it is selected (more information in chapter Installations Management). - Page 83 To change the channel set press on the key. Datalogger can be saved on a PC using the PkUpdate software, available on the PROMAX website. Information about service lists are in the XML files, which can be downloaded to a PC. 6-73...
- Page 84 Description of Datalogger screens ► The following describes the datalogger screen: Figure 46. Selected installation; date and time. Cur nt datalogger name. Selected band; battery level. Exploring the spectrum in real time. Level/Power, C/N ratio, MER, tim e remaining to identify a channel, elapsed time since the start of the channel identification.
- Page 85 The following describes the display of data acquired: Figure 47. Selected installation; date and time. Current datalogger name. Selected band; battery level. Tab identifying each test point. Date and time when the datalogger was created. Number of channels locked (PASS) or not locked (FAIL) Data table with measurement data for each channel.
-
Page 86: Screenshot
Channel set It displays a menu with the available channel sets to select the channel set whose data want to be displayed. Channel sets available are those that have been selected during the creation of the datalogger. Test Point It contains four options: Jump to: It allows selecting a test point. -
Page 87: Explore Channel Set
Display ► To display the captured image click on the Installations Management Select the installation where the screenshot was done and press Manage. Press : View. Select the “Screen Shots” option. This will limit the list to only screenshots. It appears a list of all the screenshots. Move the joystick up or down to find the image file to be displayed. - Page 88 After the exploration the following screen appears: Figure 49. The window is divided into three areas: Spectrum and Measurement It shows the cursor scrolling through each of the channels of the channel set. On the bottom of the screen the channel and frequency appears next to the Power/Level and the C/N ratio.
- Page 89 At the bottom are the function keys. They are detailed below. Cancel (during the process): This option appears only while performing the exploration process. It cancels the exploration before finish. When pressing, a confirmation message appears before cancelling. Save (at the end of the process): This option appears at the end of the exploration process.
-
Page 90: Installations Management
7 INSTALLATIONS MANAGEMENT Description The Installations Management is a program embedded in the equipment that allows the user to easily create a file (installation) to individually store and manage data for each installation. Measurements, channel sets, screenshots and any other data associated with the installation will be stored in the folder corresponding to that installation. -
Page 91: Installation Management
There are the following options: Load It loads the selected installation. To select a installation from the list, place the cursor on the installation and press the joystick, then press “Load” to load it. Once loaded, the name of the installation appears on the upper left corner of the screen, accompanied by the symbol , that means that is the current installation. - Page 92 The window is divided into three fields: Installation data It displays information about the installation using the following fields: Name: ► Name of the current installation file. Created: ► The date the current installation was created. Size: ► Size of the current installation. TER Channel Sets: ►...
- Page 93 The installation manager menu has four options linked with the softkeys. They are described below: VIEW All: ► On the list of files area it shows all type of files. Screenshots: ► On the list of files area it shows all available screenshots. Channel Sets: ►...
-
Page 94: Create A New Installation
from Installation manager press access MEASUREMENT, SPECTRUM or TV mode. Create a new installation When selecting the option Create New it runs the installation wizard that helps to create a new installation: During the process, the user has the option to edit the default name assigned or import data from another installation. - Page 95 Archive: ► It compresses (using the ZIP algorithm) the selected installations to save more space. A zipped installation shows a box icon at the left side in the list of installations. A zipped installation can be loaded as anyone else, but the load time can be slightly higher because previously it is unzipped automatically.
-
Page 96: Connecting To External Devices
8 CONNECTING TO EXTERNAL DEVICES can interact with external devices, sharing information RANGER through its interfaces: Input/output data interface via mini-USB connector to USB memory or Video/Audio analogue output interface via V/A connector output. Video/Audio analogue input interface via V/A connector input. DiSEqC interface via RF connector. -
Page 97: Connecting A Computer (Host) To The Hd Ranger/+ (Slave)
This connection allows the communication between the equipment and a computer via an USB cable or using the program NetUpdate4 of PROMAX. NetUpdate4 program can be downloaded for free from the PROMAX website. Connect the equipment to your computer using the cable CC-041 (mini USB male –... -
Page 98: V/A Output Connector
V/A Output Connector The V/A output connector allows connecting a video/audio analogue output signal. This connection allows you to switch between the image from the equipment to an auxiliary monitor by following these steps: Connect the jack 4V cable to the video/audio output connector (see figure 5), ensuring that the plug is fully inserted. -
Page 99: Rf Connector
RF Connector DiSEqC commands: ► The RF connector allows controlling an antenna using DiSEqC commands. DiSEqC (Digital Satellite Equipment Control) is a communication protocol between the satellite receiver and the installation accessories of satellite (switches, LNBs, etc.) proposed by Eutelsat, in order to standardize the diversity of switching protocols (13 to 18 V, 22 kHz) and meet the needs of the installations for the reception of digital TV. - Page 100 SatCR commands: ► By means of function SatCR it is possible to control the devices of a TV satellite installation that are compatible with the SatCR (Satellite Channel Router) technology, which allows to concentrate downlink frequencies (slots) by an only cable.
-
Page 101: Specifications
9 SPECIFICATIONS Specifications RANGER CONFIGURATION FOR MEASURING LEVEL AND POWER TUNING RANGE Digital frequency synthesis. Continuous tuning from 5 to 1000 M and from 950 to 2150 MHz (terrestrial and satellite respectively). Tuning modes Channel or frequency (IF o r downlink at satellite band). Channel set configurable on demand. - Page 102 MEASUREMENTS DVB-T (COFDM) Power, CBER, VBER, MER (up to 35 dB), C/N and Link margin. Presentation Numeric and level bar. DVB-T2 (COFDM) Power, CBER, MER (up to 35 dB), C/N, LBER, BCH ESR, LDPC Iterations and Wrong Packets. Presentation Numeric and level bar. DVB-C (QAM) Power, BER, MER (up to 35 dB), C/N and Link margin.
- Page 103 DVB-T2 SIGNAL PARAMETERS Carriers 1k, 2k, 4k, 8k, 8k+ EXT, 16k, 16k+ EXT, 32k, 32k+ EXT. Guard Interval 1/4, 19/256, 1/8, 19/128, 1/16, 1/32, 1/128. Bandwidth 5, 6, 7 and 8 MHz. Spectral Inversion ON, OFF (AUTO). Pilot Pattern PP1-PP8. Code Rate PLP 1/2, 3/5, 2/3, 3/4, 4/5, 5/6.
- Page 104 DVB-S SIGNAL PARAMETERS Symbol rate 2 to 45 Mbauds. Roll-off (α) factor 0.35. of Nyquist filter Code Rate 1/2, 2/3, 3/4, 5/6, 7/8. Spectral inversion ON, OFF (AUTO). DVB-S2 SIGNAL PARAMETERS Symbol rate (QPSK) 2 to 45 MSps. Symbol rate (8PSK) 2 to 45 MSps.
- Page 105 SAT IF TEST Function (IF distribution network response for satellite band) Test frequencies 3 selectable pilots. ATTENUATION TEST Function (Signal distribution network response for terrestrial band) Test frequencies 3 selectable pilots. VIDEO & AUDIO Format MPEG-2 (MP@HL) (Main Profile High Level). MPEG-4 AVC H.264. Aspect Ratio 16/9 or 4/3.
- Page 106 SPECTRUM ANALYSER MODE Measurement range Satellite band 10 dBµV to 130 dBµV (3.16 µV to 3.16 V). Terrestrial bands 10 dBµV to 130 dBµV (3.16 µV to 3.16 V). Resolution filter 100 kHz. Measurement bandwidth Terrestrial 100 kHz. Satellite 100 kHz. Span Terrestrial Full span (full band) - 500 - 200 - 100 - 50 - 20 - 10 MHz selectable.
- Page 107 BASE BAND SIGNAL VIDEO Codecs Video DVB: MPEG-2 (MP@HL) (Main Profile High Level). MPEG-4 AVC H.264 (High Profile Level 4.1). V/A input Multipole jack (75 Ω). Sensibility 1 Vpp (75 Ω) positive video. V/A output Multipole jack (75 Ω). SOUND Input Same V/A multipole jack (75 Ω).
- Page 108 > 5 hours in continuous mode (no EXT supply active). Recharging time 3 hours up to 80% (instrument off). External Voltage 12 V DC (using only PROMAX supplied accessories). Consumption 35 W. Auto power off Programmable. After the selected amount of minutes without operating on any control.
- Page 109 Specifications RANGER CONFIGURATION FOR MEASURING LEVEL AND POWER TUNING RANGE Digital frequency synthesis. Continuous tuning from 5 to 1000 MHz and from 950 to 2150 MHz (terrestrial and satellite respectively). Tuning modes Channel or frequency (IF or downlink at satellite band). Channel set configurable on demand.
- Page 110 MEASUREMENTS DVB-T (COFDM) Power, CBER, VBER, MER. Presentation Numeric and level bar. DVB-C (QAM) Power, BER, MER, C/N and Link margin. Presentation Numeric and level bar. DVB-S (QPSK) Power, CBER, VBER, MER (up to 30 dB), C/N and Link margin. Presentation Numeric and level bar.
- Page 111 DVB-S2 SIGNAL PARAMETERS Symbol rate (QPSK) 2 to 45 MSps. Symbol rate (8PSK) 2 to 45 MSps. Roll-off (α) factor 0.20, 0.25 and 0.35. of Nyquist filter Code Rate (QPSK) 1/2, 3/5, 2/3, 3/4, 4/5, 5/6, 8/9, 9/10. Code Rate (8PSK) 3/5, 2/3, 3/4, 5/6, 8/9, 9/10.
- Page 112 ANALOGUE SIGNALS MEASUREMENT LEVEL MEASUREMENT Measurement range Terrestrial TV & FM bands 15 dBµV to 130 dBµV (3.16 µV to 3.16 V). Satellite TV band 20 dBµV to 130 dBµV (31.6 µV to 3.16 V). Attenuation scale Auto-range. Numerical indication Absolute value according to selected units.
- Page 113 SPECTRUM ANALYSER MODE Measurement range Satellite band 10 dBµV to 130 dBµV (3.16 µV to 3.16 V). Terrestrial bands 10 dBµV to 130 dBµV (3.16 µV to 3.16 V). Resolution filter 100 kHz. Measurement bandwidth Terrestrial 100 kHz. Satellite 100 kHz. Span Terrestrial Full span (full band) - 500 - 200 - 100 - 50 - 20 - 10 MHz selectable.
- Page 114 BASE BAND SIGNAL VIDEO Codecs Video DVB: MPEG-2 (MP@HL) (Main Profile High Level). MPEG-4 AVC H.264 (High Profile Level 4.1). Ω V/A input Multipole jack (75 Ω Sensibility 1 Vpp (75 ) positive video. Ω V/A output Multipole jack (75 SOUND Ω...
- Page 115 > 5 hours in continuous mode (no EXT supply active). Recharging time 3 hours up to 80% (instrument off). External Voltage 12 V DC (using only PROMAX supplied accessories). Consumption 35 W. Auto power off Programmable. After the selected amount of minutes without operating on any control.
-
Page 116: 10 Maintenance
10 MAINTENANCE 10.1 Considerations about the Screen This paragraph offers key considerations regarding the use of the colour screen, taken from the specifications of the manufacturer. In the TFT display, the user may find pixels that do not light up or pixels that are permanently lit. - Page 117 Cleaning the plastic case The equipment has to be disconnected before cleaning the case. The case must be cleaned with a solution of neutral soap and water, using a soft cloth dampened with this solution. Before use, the equipment has to be completely dry. Never clean with...
- Page 118 10-108 April 2013...
-
Page 119: Annex 1 Signals Description
ANNEX 1 SIGNALS DESCRIPTION A1.1 DIGITAL signals Digital TERRESTRIAL Television FIRST Generation A1.1.1 (DVB-T standard/COFDM modulation) DVB-T Parameters Channel Bandwidth ► This parameter affects the frequency separation of the carriers. Its value is 6 MHz, 7 MHz or 8 MHz. Spectral inversion ►... - Page 120 DVB-T Measurements Power Measured power over the entire bandwidth of the channel. Carrier/Noise ratio, where C is the received power of the modulated carrier signal and N is the received noise power. To measure it correctly the channel should be tuned at its centre frequency. Modulation error ratio with link margin (LM).
- Page 121 Digital TERRESTRIAL Television SECOND Generation A1.1.2 (DVB-T2 standard/COFDM modulation) The DVB-T2 demodulator version allows working with Base (standard version) and Lite (mobile devices version) profiles. DVB-T2 Parameters Channel Bandwidth ► This parameter affects the frequency separation of the carriers. Its value is 6 MHz, 7 MHz or 8 MHz.
- Page 122 DVB-T2 Measurements Power Measured power over the entire bandwidth of the channel. (Carrier/Noise) where C is the received power of the modulated carrier signal and N is the noise power received. To measure it correctly the channel should be tuned at its centre frequency. PLP id It is the PLP identifier.
- Page 123 Digital SATELLITE Television FIRST Generation A1.1.3 (DVB-S standard/QPSK modulation) DVB-S Parameters Channel Bandwidth ► It displays the channel bandwidth from 1.3 MHz to 60.75 MHz. Spectral inversion ► It detects if the input signal has been inverted. Symbol Rate ► It represents the number of times that the signal status changes in a period of time.
- Page 124 DVB-S Measurements Power Measured power over the entire bandwidth of the channel. Carrier/Noise ratio where C is the received power of the modulated carrier signal and N is the noise power received. To measure it correctly the channel should be tuned at its centre frequency. Modulation Error ratio with indication of Link Margin (LM).
- Page 125 Digital SATELLITE television signal of SECOND generation A1.1.4 (DVB-S2 standard/QPSK/8PSK modulation) DVB-S2 Parameters Channel Bandwidth ► It displays the channel bandwidth from 1.3 MHz to 60.75 MHz. Spectral inversion ► It detects if the input signal has been inverted. Symbol Rate ►...
- Page 126 Modulation Error ratio. MER represents the ratio between the average power of the DVB signal and the average noise power of the signal constellation. Next to the MER appears the Link Margin (LM) measurement. The LM is equivalent to the noise margin (NM) and indicates the distance to the QEF (usually defined as a one lost packet per hour).The LM is measured in dB and its value corresponds to the safety margin that separates from the QEF.
- Page 127 Digital CABLE television signal of FIRST generation A1.1.5 (DVB-C standard/QAM modulation) DVB-C Parameters Bandwidth channel ► It displays the channel bandwidth up to 9.2 MHz. Spectral inversion ► It detects if the input signal has been inverted. Symbol Rate ► It represents the number of times the signal status changes in a period of time.
- Page 128 DVB-C Measurements Power Measured power over the entire bandwidth of the channel. Carrier/Noise ratio where C is the received power of the modulated carrier signal and N is the noise power received. To measure it correctly the channel should be tuned at its centre frequency. Modulation Error ratio with indication of Link Margin(LM).The link margin indicates the safety margin respect to the MER level , measured for the degradation of the signal up to the QEF (Quasi Error Free) value.
- Page 129 Digital CABLE television signal of SECOND generation A1.1.6 (DVB-C2 standard/COFDM modulation) DVB-C2 Parameters Channel Bandwidth ► It is the channel bandwidth between 6 MHz, 7 MHz and 8 MHz. Spectral inversion ► It detects if the input signal has been inverted. Guard Interval ►...
- Page 130 DVB-C2 Measurements Power Measured power over the entire bandwidth of the channel. Carrier/Noise ratio where C is the received power of the modulated carrier signal and N is the noise power received. To measure it correctly the channel should be tuned at its centre frequency. Modulation Error ratio with indication of Link Margin(LM).The link margin indicates the safety margin respect to the MER level , measured for the degradation of the signal up to the QEF (Quasi Error Free) value.
- Page 131 A1.2 ANALOGUE signals Terrestrial band A1.2.1 Analogue TV In the measurement of analogue signals in terrestrial band, measurements available are: LEVEL ► Indication of the carrier level of the tuned video. ► Ratio between the modulated signal power and noise power for the same bandwidth (depending on TV standard).The modulation error ratio (MER), used in digital systems is analogue to the Signal-Noise (S/N) ratio in analogue systems.
- Page 132 Satellite band A1.2.2 Analogue TV In the measurement mode of analogue signals in the satellite band, measures available are: Level ► Measurement of the tuned carrier level. ► Ratio between the modulated signal power and noise power equivalent to the same bandwidth (as TV standard).The modulation error ratio (MER), used in digital systems is analogue to the Signal-Noise (S/N) ratio in analogue systems.
-
Page 133: Annex 2 How To Point A Dish Antenna
ANNEX 2 HOW TO POINT A DISH ANTENNA A2.1 INSTALLING A SATELLITE DISH USING RANGER/ A bit of history A2.1.1 That's it, a bit of history. First artificial satellite "Sputnik I" was launched 4th of October of 1957 by former Soviet Union. It was about the size of a basketball with a weight below 100 Kgrs but went down in history as the start point for the space age. - Page 134 The antenna used to receive the test transmission from Telstar I was a huge horn inside a bubble radome 48 metres high. Only four decades later we have broken all records and we have high power DBS geostationary satellites carrying a lot of digital transponders on board and we start to worry about space junk having thousands of satellites in orbit, plenty of them beyond its useful life.
- Page 135 Figure A2.4. The LNB (Low Noise Block-converter) is an active device fruit of the great evolution of RF circuit manufacturing and includes amplifiers, oscillators and frequency converters in a small low cost package. The first section is made of a device called polarisation shifter that receives one polarisation or the other depending on the supply voltage given to the LNB.
- Page 136 Figure A2.5. An example of LNB(Low Noise Block-converter) Coarse dish alignment A2.1.3 We can use different techniques to find out where in the sky th e satellite we want is located. They can be anything from a pure guessing game to a sophisticated procedure.
- Page 137 With this information in hand we can calculate the elevation and azimuth we should put on the dish to begin our coarse antenna alignment. There are formulas to do that but some websites are again quite useful. There are also free mobile applications, as Dish Aligner, which calculates the elevation and azimuth and also your current location determined by the GPS of the mobile phone.
- Page 138 Knowing what satellite we are on A2.1.4 And the comes into action. Our dish is now more ore less RANGER/ "looking" in the direction where we presume our "bird" is parked. With the connected to the output of the LNB we select satellite RANGER/ frequency range, antenna alignment mode, span of 200 MHz and set the power supply voltage to one of the possible values.
- Page 139 Fine tuning the dish A2.1.5 Once we know for certain that we are on ASTRA 19E it is time to make fine adjustments to the dish to optimise the alignment. There are two goals to achieve. On the one hand we want to receive the maximum amount of power possible and on the other hand we need to make sure we minimise the interference from the crossed polarisation.
- Page 140 Look what we’ve got A2.1.7 can also display the free to air programs available in the RANGER/ satellite. That is very practical not so much for the picture itself but for amount of interesting data related to the transponders we can display as well. This includes: Tuned video information.
-
Page 141: Annex 3 Diseqc Commands
ANNEX 3 DiSEqC COMMANDS A3.1 DiSEqC introduction The DiSEqC (Digital Satellite Equipment Control) is an open protocol created by Eutelsat in 1997 as a communication standard between satellite TV receivers and external peripherals. The DiSEqC communications are based on the control commands, which travel combined with power voltage through the coaxial cable that leads the TV signal. - Page 142 Note: The LNB accept a very wide range of values for these voltages, usually 10-14.5V (for 13V) and 15.5-20V (for 18V). In the , the band and the polarisation selection can be done RANGER/ from different menus (all the different ways indicate dare equivalent): Menu Line External units power supply...
- Page 143 Command Selected input SAT A Satellite 1 SAT B Satellite 2 These switchers are transparent to the LNB's (13V, 18V, 22 kHz) commutation commands. Then, once chosen the satellite with the SAT command, the corresponding LNB can be used in a normal way. (see Universal LNB). Note: There are switchers of 2 inputs and 1 output in which other DiSEqC commands are used, such as POSITION or OPTION, to allow more complex assemblies.
- Page 144 DiSEqC Switcher with 4 inputs and 1 output A3.4.3 Figure A3. 3. This switcher allows the signal reception from four independent Universal LNBs (coming from 4 different satellites) on a single receiver. As it is possible to observe in the attached scheme, there are “OPTION” and “POSITION”...
- Page 145 A3.5 In the collective facilities The most frequent satellite signal distribution system in the small collective facilities is the “BIS-switched”. This technology implies to use the “Quattro” type LNBs (not to confuse with the “QUAD” type) and also supports specific multiswitches for this type of facilities.
- Page 146 Examples of multiswitch ► SAT Inputs TER Inputs Satellites Terminals Multiswitch 9/4 Multiswitch 5/16 Multiswitch 17/16 … … … … … We will not consider the input of terrestrial TV, since this does not take part in the satellite signal. Also the following indicated examples do not show more than a single output.
- Page 147 Multiswitch (2 Satellites) A3.5.2 Figure A3. 7. This type of multiswitch is used usually to switch the Astra 19º and Hotbird 13º satellites. As in the previous case, if for a certain satellite it is desired to change of band or polarisation, it is not sufficient with changing the corresponding parameter, but in addition it is necessary to send the command SAT A/B corresponding to cause the switching (even if one does not change of satellite).
- Page 148 Multiswitch (4 Satellites) A3.5.3 Figure A3. This type of multiswitch allows to distribute the signal coming from 4 different satellites. It uses a combination of OPTION, POSITION, Polarisation and Band commands. The TV Explorer allows to use easily this type of multiswitch thanks to the «...
- Page 149 Band Polarization Command Satellite Horizontal OPT/POS B-A Satellite-3 Vertical OPT/POS B-A Satellite-3 High Horizontal OPT/POS B-A Satellite-3 High Vertical OPT/POS B-A Satellite-3 Horizontal OPT/POS B-B Satellite-4 Vertical OPT/POS B-B Satellite-4 High Horizontal OPT/POS B-B Satellite-4 High Vertical OPT/POS B-B Satellite-4 DiSEqC programs and commands in the A3.6 RANGER/...
- Page 150 Programs ► There are eight predefined programs that execute basic functions to control an universal switch with two or four inputs. It also has more programs that control installations with 8 or 16 satellite antennas using SPAUN devices or switches Commited/Uncommited.
-
Page 151: Remote Control Commands
ANNEX 4 REMOTE CONTROL COMMANDS Introduction A4.1 The design of based on a microprocessor, allows data to be RANGER/ exchanged between the equipment and a remote controller (usually a personal computer) via USB. By this way, data can be obtained from the equipment and also control it remotely. - Page 152 Operation Mode A4.3 accepts remote commands at any time, which the RANGER/ instrument is on. That is, it is not necessary to put the instrument in special remote control mode; rather, this mode is selected immediately when it detects a complete command during the time necessary for its execution.
- Page 153 Commands should always be sent in capital letter and cannot be edited online, i.e., once a character is received it is stored in the buffer and RANGER/ cannot be rectified by sending an erase code. Commands in remote control are divided into two groups, orders and interrogations.
- Page 154 Remote commands table A4.5 Remote Commands Short Description EQUIPMENT POWER It shutdowns the equipment EQUIPMENT SN It provides the serial number of the equipment INSTALLATION It provides information about all the installations INSTALLATION It provides information about the current installation CURRENT INSTALLATION It removes all files of the current installation.
- Page 155 Name EQUIPMENT POWER OFF Description It shutdowns the equipment Order *EQUIPMENT POWEROFF Name EQUIPMENT SN Description It provides the serial number of the equipment Question *?EQUIPMENT SN Response *EQUIPMENT SN = equipment_resp equipment_resp Description equipment_resp Unique numeric code that identifies the equipment Name INSTALLATION...
- Page 156 Name INSTALLATION CURRENT Description It provides information about the current installation Question *?INSTALLATION CURRENT current=nn Response *INSTALLATION NAME=current_resp current Description nn Description (decimal value) current_resp <empty> <empty> Available data from the current installation TER-CH Terrest. channel Terrestrial channel set set index name with “nn”...
- Page 157 Name INSTALLATION CURRENT REMOVE Description It removes the files of the same type in the current installation Order *INSTALLATION CURRENT REMOVE tag=name Description tag SPECTRUM Spectrum capture file TER-CH Terrestrial channel set file SAT-CH Satellite channel set file DISEQC_PROGRAM DISEQC program file Print screens file CONSTELLATION Constellation capture file...
- Page 158 Name INSTALLATION FILE Description It reads an “xml” file of the current installation and sends it to a Question *?INSTALLATION CURRENT tag=name BLOCK=bbbb Response *INSTALLATION SIZE=size Description tag SPECTRUM It reads spectrum captures in the current installation TER-CH It reads terrestrial channel sets in the current install SAT-CH It reads satellite channel sets in the current...
- Page 159 Name INSTALLATION FILE ZIP Description It reads an “xml” file of the current installation and sends all the installation files zipped to a PC Question *?INSTALLATION CURRENT ZIP BLOCK=bbbb Response *INSTALLATION SIZE=size bbbb Description bb Byte (nnn decimal) size to which the file will be divided to be send size Description size...
- Page 160 Name INSTALLATION PC FILE Description It sends a file of the current installation to the PC. Order *INSTALLATION CURRENT tag=name SIZE=size BLOCK=bbbb Description tag SPECTRUM Spectrum captures files to the current installation TER-CH Terrestrial channel sets files to the current install SAT-CH Satellite channel sets files to the current instal.
- Page 161 Name INSTALLATION PC ZIP Description It sends a file from a PC to the equipment zipped with all files of the installation Order *INSTALLATION ZIP NAME=name SIZE=size BLOCK=bbbb name Description name abcd Name (“abcd”) of the installation size Description size Byte (nnn decimal) size of the file when send bbbb Description bbbb...
- Page 162 Name Description It provides / configures the LNB output Question *?LNB lnb Response *LNB lnb = lnb_resp Description lnb_resp OUTPUT Current selected output ENABLE LNB enable (ON) or disabled (OFF) VOLTAGE Last measurement of the LNB output voltage CURRENT Last measurement of the LNB output current AVAILABLE Available output with the current...
- Page 163 Name MEASURE Description It provides information of all active measurements Question *?MEASURE measure Response *MEASURE measure=measure_resp units measure Description measure_resp <empty> All the active measures POWER Digital channel power LEVEL Analogue channel level C/N of the measured channel (dB) Video/Audio carrier ratio MER measurement value CBER CBER measurement value...
- Page 164 Name MODE Description It provides/sets the operation mode of the equipment Question *?MODE Response *MODE mode_resp mode_resp Description mode_resp TV mode TV+SP+MEASURE TV mode with spectrum and measurements TV+PARAMETERS TV mode with TS parameters Spectrum mode SP+MEASURE Spectrum mode with measurement SP+MEASURE+TV Spectrum mode with TV and measurement...
- Page 165 Name PRINT SCREEN Description It makes a screenshot in PNG format Configuration *PRINT SCREEN=printscreen_conf =printscreen_conf Description =printscreen_conf <empty> It gives a name by default =abc It gives the name “abc” Name Description It provides/sets date and time Question *?RTC rtc Response *RTC rtc=rtc_resp rtc_resp...
- Page 166 Name SIGNAL Description It provides/configures the signal type Question *?SIGNAL signal Response *SIGNAL signal=signal_resp signal Description signal_resp TYPE Signal standard type Current code rate BANDWIDTH Signal bandwidth Signal symbol rate Spectral inversion enabled (ON) or disabled (OFF) MODE Measurement of the FFT in a COFDM modulation Measurement of the guard interval CONSTELLATION...
- Page 167 Name SPECTRUM Description It configures the span and/or the reference level Configuration *SPECTRUM spectrum=spectrum_config spectrum spectrum_config Description spectrum_config nn.n Value (nn.n) of the reference level in units of the current band SPAN nnnF nnn= span value number F= Order of magnitude for the span.
- Page 168 Name TUNE CH Description It provides/configures the channel Question *?TUNE CH Response *TUNE BAND= band_resp PLAN=plan_ resp CH= ch_ resp band_resp Description band_resp It means that channel belongs to the terrestrial band It means that channel belongs to the satellite band plan_resp Description plan_resp...
-
Page 169: Optical Option Op-001-Ps
ANNEX 5 OPTICAL OPTION OP-001-PS A5.1 GENERAL A5.1.1 Description This annex contains operating instructions for the next option: OP-001-PS: Selective Optical Power Meter + Optical to RF Selective Converter. The evolution of the telecommunications market, more and more demanding in quality standards, speed, services and so on and also economical and competitiveness factors... - Page 170 A5.2 Specifications A5.2.1 Selective optical power meter Optical Measure bands 1310 nm ± 50 nm. 1490 nm ± 10 nm. 1550 nm ± 15 nm. Connector FC/APC. Measurement Dinamic Range Input - 49,9 dBm to +10 dBm. Accuracy ± 0,5 dB. Isolation between bands >...
- Page 171 A5.3 DESCRIPTION OF INTERNAL OPERATION The selective meter consists, in first place, of a selective triple filter for 1310, 1490 and 1550 nm signals, so that it only measures selectively the power of these signals for each wavelength. There is also a switch that allows the user to select the wavelength to convert. The selected wavelength goes through the selective optical converter.
- Page 172 A5.3.1 Fibre optical test A5.3.1.1 Description The optical function of this module allows the user to certify a telecommunication installation by calibrating the signals at the installation and then measuring them in each of the user access points. with optical module can measure simultaneously and in a RANGER/ selective way the three wavelengths used in optical fibre (1390, 1410 and 1550 nm).
- Page 173 Next it is shown the screen to perform the fibre optic test: Figure A5.3. Status message depending on the level of attenuation. Power level of the signal. Wavelength of the signal (nm). Power level of the reference signal, which is used to calibrate and calculate the attenuation level (dBm).
- Page 174 A5.3.1.3 Menu options for the Fibre Optical Test tool On the bottom of the screen there are three menus accessible via the function keys. It exits the tool. When pressing this key it uses the current values of power as a reference values. It accesses the Advanced menu.
- Page 175 Step 1. Capturing reference measurements. ► Connect the SC pigtail end connector to the PROLITE-105 output connector. Connect the FC end of the pigtail to the optical input of the (see figure below). RANGER/ RANGER/ Turn on the PROLITE-105 and the In the , from the SPECTRUM or MEASUREMENT RANGER/...
- Page 176 Step 2. Attenuation Test Measurement. ► Connect the PROLITE-105 in a source node of the transmission optical network, example free strip main telecommunications cabinet of the building. Keep the PROLITE-105 in simultaneous mode for generating signals, so it SIMULTANEOUSLY generates all three wavelengths (1310 nm, 1490 nm and 1550 nm).
- Page 177 A5.4 Selective optical to RF converter A5.4.1 Description The selective optical converter consists of a photo-diode which converts the optical signal to radio-frequency. The input wavelength for optical input signals are between 1260 — 1600 nm. The band switch receives a signal and converts it to a frequency within the RF band (65 —...
- Page 178 A5.4.1.1 Operation Signal connection to use this option is as follows: Figure A6.6. Upper panel of (with this option installed). RANGER/ Pigtail to adapt to other connectors with input optical signal. Cable (supplied with this expansion module) with RF signal. FC—APC input connector for optical signal.
- Page 179 A5.4.1.2 Menu Options for the selective optical to RF converter To access the options of selective optical RF converter follow these steps: Press the Settings key. Select the Optical module option and press the joystick. It appears a window to enable the optical module and to configure additional parameters.
-
Page 180: Annex 6 Multimedia Content
ANNEX 6 MULTIMEDIA CONTENT This is the list with all the multimedia content in the user's manual: TITLE LINK Introducing the HD RANGER + http://youtu.be/XpNxlOSfkf0 Navigating through the menus http://youtu.be/Zm_QT-_qtY4 Switching satellite/terrestrial bands http://youtu.be/ecv1P0Cf_fI http://youtu.be/2Suh2xlvhdw Tuning by channel or frequency Manual input of frequencies http://youtu.be/81l5ezO4cgg DVB-S2 multi stream decoding...
Need help?
Do you have a question about the HD RANGER+ and is the answer not in the manual?
Questions and answers