Table of Contents
Advertisement
Quick Links
Advertisement
Table of Contents

Related Manuals for Oracle Netra SPARC T4-1B


Summary of Contents for Oracle Netra SPARC T4-1B
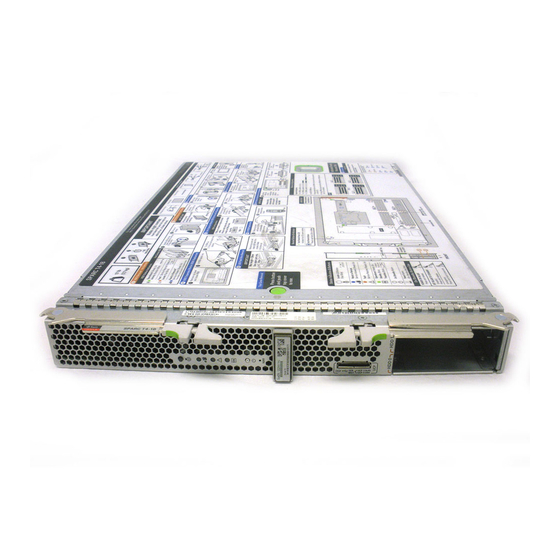
- Page 1 Netra SPARC T4-1B Server Module Service Manual Part No.: E25046-02 June 2012...
- Page 2 Corporation and its affiliates are not responsible for and expressly disclaim all warranties of any kind with respect to third-party content, products, and services. Oracle Corporation and its affiliates will not be responsible for any loss, costs, or damages incurred due to your access to or use of third-party content, products, or services.
-
Page 3: Table Of Contents
Diagnostics LEDs 10 Managing Faults (Oracle ILOM) 11 Oracle ILOM Troubleshooting Overview 12 Fault Management 12 Fault Clearing 13 Oracle Solaris Fault Manager Commands in Oracle ILOM 14 Drive Faults 14 ▼ Access the SP (Oracle ILOM) 15 ▼ Display FRU Information (show Command) 17 ▼... - Page 4 ASR Overview 46 ▼ Display System Components 47 ▼ Disable System Components 48 ▼ Enable System Components 49 Preparing for Service 51 Safety Information 51 Safety Symbols 52 ESD Measures 52 Netra SPARC T4-1B Server Module Service Manual • June 2012...
- Page 5 Antistatic Wrist Strap Use 53 Antistatic Mat 53 Handling Precautions 53 Tools Needed for Service 54 ▼ Find the Modular System Chassis Serial Number 54 ▼ Find the Server Module Serial Number 55 ▼ Locate the Server Module 56 Preparing the Server Module for Removal 56 ▼...
- Page 6 Remove a USB Flash Drive 105 ▼ Install a USB Flash Drive 106 Servicing the Battery 109 ▼ Replace the Battery 109 Replacing the Server Module Enclosure Assembly (Motherboard) 113 Netra SPARC T4-1B Server Module Service Manual • June 2012...
- Page 7 Returning the Server Module to Operation 117 ▼ Replace the Cover 117 ▼ Install the Server Module Into the Modular System 118 ▼ Power On the Host (Oracle ILOM) 120 ▼ Power On the Host (Power Button) 120 Glossary 123 Index 129 Contents...
- Page 8 Netra SPARC T4-1B Server Module Service Manual • June 2012...
-
Page 9: Using This Documentation
Using This Documentation This service manual explains how to identify faults, replace parts, and add additional options in Oracle’s Netra SPARC T4-1B server module. This document is written for technicians, system administrators, authorized service providers, and users who have experience troubleshooting and replacing hardware. - Page 10 Provide feedback on this documentation at: http://www.oracle.com/goto/docfeedback Support and Accessibility Description Links Access electronic support http://support.oracle.com through My Oracle Support For hearing impaired: http://www.oracle.com/accessibility/support.html Learn about Oracle’s http://www.oracle.com/us/corporate/accessibility/index.html commitment to accessibility Netra SPARC T4-1B Server Module Service Manual • June 2012...
-
Page 11: Identifying Components
Identifying Components These topics explain the components of the server module, focusing on the components that can be removed and replaced for service. “Illustrated Parts Breakdown” on page 1 ■ “Front and Rear Panel Components” on page 3 ■ Related Information “Detecting and Managing Faults”... - Page 12 “Replacing the Server Module Enclosure Assembly /SYS/MB (Motherboard)” on page 113 “Servicing the SP Card” on page 97 /SYS/MB/SP “Servicing the REM” on page 89 /SYS/MB/REM “Servicing the FEM” on page 93 /SYS/MB/FEM Netra SPARC T4-1B Server Module Service Manual • June 2012...
-
Page 13: Front And Rear Panel Components
Related Information “Front and Rear Panel Components” on page 3 ■ “Detecting and Managing Faults” on page 5 ■ “Replacing the Server Module Enclosure Assembly (Motherboard)” on page 113 ■ Front and Rear Panel Components “Diagnostics LEDs” on page 10 for more information. - Page 14 Amber LED: Drive Fault (Service Action Required) Blue LED: Drive Ready to Remove Rear chassis power connector Rear chassis data connection Related Information “Diagnostics LEDs” on page 10 ■ “Illustrated Parts Breakdown” on page 1 ■ Netra SPARC T4-1B Server Module Service Manual • June 2012...
-
Page 15: Detecting And Managing Faults
LEDs – Provide a quick visual notification of the status of the server module and ■ of some of the FRUs. Oracle ILOM – This firmware runs on the SP. In addition to providing the ■ interface between the hardware and OS, Oracle ILOM also tracks and reports the health of key server module components. - Page 16 The LEDs, Oracle ILOM, PSH, and many of the log files and console messages are integrated. For example, when the Oracle Solaris OS detects a fault, it displays the fault, logs it, and passes information to Oracle ILOM, where it is logged.
-
Page 17: Diagnostics Process
Diagnostics Process Use the flowchart to understand how to use the server module’s diagnostic tools to manage faults. Also see the table that follows this flowchart. Detecting and Managing Faults... - Page 18 Environmental faults can be caused by faulty FRUs, or by environmental conditions such as when computer room ambient temperature is too high, or airflow is blocked. When the environmental condition is corrected, the fault automatically clears. Netra SPARC T4-1B Server Module Service Manual • June 2012...
- Page 19 “Interpreting Log Files and System Messages” on page 23 ■ “Managing Faults (PSH)” on page 41 ■ “Managing Faults (POST)” on page 29 ■ “Managing Components (ASR)” on page 45 ■ “Checking if Oracle VTS Software Is Installed” on page 27 ■ Detecting and Managing Faults...
-
Page 20: Diagnostics Leds
LED is on. Service Action Amber Indicates that service is required. POST and Oracle ILOM are two Required LED diagnostics tools that can detect a fault or failure resulting in this indication. Also, faults detected by PSH can result in Oracle ILOM lighting this LED. -
Page 21: Managing Faults (Oracle Ilom)
“Checking if Oracle VTS Software Is Installed” on page 27 ■ Managing Faults (Oracle ILOM) These topics explain how to use Oracle ILOM, the SP firmware, to diagnose faults and verify successful repairs. “Oracle ILOM Troubleshooting Overview” on page 12 ■... -
Page 22: Oracle Ilom Troubleshooting Overview
■ Oracle ILOM Troubleshooting Overview Oracle ILOM enables you to remotely run diagnostics, such as POST, that would otherwise require physical proximity to the server module. You can also configure Oracle ILOM to send email alerts of hardware failures, hardware warnings, and other events related to the server module or Oracle ILOM. -
Page 23: Fault Clearing
You must replace a FRU identified as having a fault condition. In the event of a system fault, Oracle ILOM ensures that the Service Action Required LED is turned on, FRUID PROMs are updated, the fault is logged, and alerts are displayed. -
Page 24: Oracle Solaris Fault Manager Commands In Oracle Ilom
FRU while the SP is not running. This function enables Oracle ILOM to sense that a fault, diagnosed to a specific FRU, has been repaired. Note – Oracle ILOM does not automatically detect drive replacement. Oracle ILOM does not automatically clear voltage sensor faults. -
Page 25: Access The Sp (Oracle Ilom)
You can manage the server module through the Oracle ILOM CLI or through the Oracle ILOM web interface. Use this procedure to log into the CMM to access the SP and to use the Oracle ILOM CLI. For alternative methods to access the server module SP, refer to the Server Module Installation Guide. - Page 26 ■ PSH-detected faults. “Check for Faults (show faulty Command)” on page Note – You can use fmadm faulty in the Oracle ILOM faultmgmt shell as an alternative to show faulty. Netra SPARC T4-1B Server Module Service Manual • June 2012...
-
Page 27: Display Fru Information (Show Command)
“Oracle ILOM Properties That Affect POST Behavior” on page 30 ■ ▼ Display FRU Information (show Command) Use the Oracle ILOM show command to display information about individual FRUs. ● At the Oracle ILOM prompt, type the show command. In the following example, the show command displays information about a memory module. -
Page 28: Check For Faults (Show Faulty Command)
“Service-Related Oracle ILOM Commands” on page 22 ■ ▼ Check for Faults (show faulty Command) Use the Oracle ILOM show faulty command to display the following kinds of faults and alerts: Environmental or configuration faults – Faults caused by temperature or voltage ■... - Page 29 /SP/faultmgmt/0 | sunw-msg-id | SPT-8000-5X faults/0 /SP/faultmgmt/0 | uuid | 64d52ce4-614e-693f-bb71-ea3f829d faults/0 | ad73 /SP/faultmgmt/0 | timestamp | 2011-10-14/20:14:13 faults/0 /SP/faultmgmt/0 | detector | /SYS/PS0/S1/V_IN_ERR faults/0 /SP/faultmgmt/0 | product_serial_number | 1030NND0D2 faults/0 /SP/faultmgmt/0 | chassis_serial_number | 0000000-0000000000 faults/0 -> Example of the show faulty command displaying a fault that was detected by ■...
-
Page 30: Check For Faults (Fmadm Faulty Command)
You must run the Oracle Solaris fmadm faulty command from within the Oracle ILOM faultmgmt shell. Note – The characters SPT at the beginning of a message ID indicate that Oracle ILOM detected the fault. 1. At the Oracle ILOM prompt, access the Oracle ILOM faultmgmt shell. -
Page 31: Clear Faults (Clear_Fault_Action Property)
PSH-diagnosed faults, if the replacement of the FRU is detected by the SP or the fault is manually cleared on the host, the fault will also be cleared from Oracle ILOM. In such cases, you typically do not have to clear the fault manually. -
Page 32: Service-Related Oracle Ilom Commands
■ “Service-Related Oracle ILOM Commands” on page 22 ■ Service-Related Oracle ILOM Commands These are the Oracle ILOM shell commands most frequently used when performing service-related tasks. Oracle ILOM Command Description Displays a list of all available commands with syntax help [command] and descriptions. -
Page 33: Interpreting Log Files And System Messages
■ Interpreting Log Files and System Messages With the Oracle Solaris OS running on the server module, you have the full complement of Oracle Solaris OS files and commands available for collecting information and for troubleshooting. If POST or the PSH features do not indicate the source of a fault, check the message buffer and log files for notifications for faults. -
Page 34: Check The Message Buffer (Dmesg Command)
Over a period of time, the messages are further rotated to messages.1 and messages.2, and then deleted. 1. Log in as superuser. Netra SPARC T4-1B Server Module Service Manual • June 2012... -
Page 35: List Fru Status (Prtdiag Command)
Related Information “Check the Message Buffer (dmesg Command)” on page 24 ■ ▼ List FRU Status (prtdiag Command) ● At an Oracle Solaris OS command line, type the prtdiag command. FRU status information is displayed. Example: # prtdiag System Configuration:... - Page 36 All temperature indicators are OK. Current sensors: All current sensors are OK. Current indicators: All current indicators are OK. Voltage sensors: All voltage sensors are OK. Voltage indicators: All voltage indicators are OK. Netra SPARC T4-1B Server Module Service Manual • June 2012...
-
Page 37: Checking If Oracle Vts Software Is Installed
■ Oracle VTS Overview Oracle VTS is a validation test suite that you can use to test this server module. Oracle VTS provides multiple diagnostic hardware tests that verify the connectivity and functionality of most hardware controllers and devices for this server module. -
Page 38: Check If Oracle Vts Software Is Installed
If you receive messages reporting ERROR: information for package was ■ not found, then Oracle VTS is not installed. You must install the software before you can use it. You can obtain the Oracle VTS software from the following places: Oracle Solaris OS media kit (DVDs) ■... -
Page 39: Managing Faults (Post)
(CPU, memory, and I/O subsystem). You can also run POST as a system-level hardware diagnostic tool. To do this, use the Oracle ILOM set command to set the parameter keyswitch_state to diag. Detecting and Managing Faults... -
Page 40: Oracle Ilom Properties That Affect Post Behavior
You can also set other Oracle ILOM properties to control various other aspects of POST operations. For example, you can specify the events that cause POST to run, the level of testing POST performs, and the amount of diagnostic information POST displays. - Page 41 Parameter Values Description The host can power on and run POST, but no flash locked updates can be made. POST does not run. /HOST/diag mode Runs POST according to diag level value. normal Runs POST with preset values for diag level and service diag verbosity.
- Page 42 The following table shows combinations of Oracle ILOM parameters and associated POST modes. Normal Diagnostic Mode Service Mode Using the Oracle ILOM Parameter (Default Settings) No POST Execution Keyswitch_state keyswitch_state normal normal diag /HOST/diag mode normal /HOST/diag level Netra SPARC T4-1B Server Module Service Manual • June 2012...
-
Page 43: Configure Post
■ ▼ Configure POST 1. Log in to Oracle ILOM. “Access the SP (Oracle ILOM)” on page 2. Set the virtual keyswitch to the value that corresponds to the POST configuration you want to run. The following example sets the virtual keyswitch to normal, which will configure POST to run according to other parameter values. - Page 44 = normal trigger = hw-change error-reset verbosity = normal Commands: show -> Related Information “POST Overview” on page 29 ■ “Oracle ILOM Properties That Affect POST Behavior” on page 30 ■ Netra SPARC T4-1B Server Module Service Manual • June 2012...
-
Page 45: Run Post With Maximum Testing
■ ▼ Run POST With Maximum Testing 1. Access the Oracle ILOM prompt. “Access the SP (Oracle ILOM)” on page 2. Set the virtual keyswitch to diag so that POST will run in service mode. -> set /SYS/keyswitch_state=diag Set ‘keyswitch_state' to ‘Diag' 3. -
Page 46: Related Information
“Oracle ILOM Properties That Affect POST Behavior” on page 30 ■ “Configure POST” on page 33 ■ “Interpret POST Fault Messages” on page 37 ■ “Clear POST-Detected Faults” on page 37 ■ Netra SPARC T4-1B Server Module Service Manual • June 2012... -
Page 47: Interpret Post Fault Messages
SP is reset or power cycled. The fault is automatically cleared. 1. Replace the faulty FRU. 2. At the Oracle ILOM prompt, type the show faulty command to identify POST detected faults. POST-detected faults are distinguished from other kinds of faults by the text: Forced fail. - Page 48 5. Reset the server module. You must reboot the server module for the component_state property to take effect. 6. At the Oracle ILOM prompt, type the show faulty command to verify that no faults are reported. For example: -> show faulty...
-
Page 49: Post Output Reference
POST Output Reference POST error messages use the following syntax: c:s > ERROR: TEST = failing-test c:s > H/W under test = FRU c:s > Repair Instructions: Replace items in order listed by H/W under test above c:s > MSG = test-error-message c:s >... - Page 50 2011-07-03 18:44:17.241 0:7:2>END_ERROR Related Information “Oracle ILOM Properties That Affect POST Behavior” on page 30 ■ “Run POST With Maximum Testing” on page 35 ■ “Clear POST-Detected Faults” on page 37 ■ Netra SPARC T4-1B Server Module Service Manual • June 2012...
-
Page 51: Managing Faults (Psh)
PSH Overview The Oracle Solaris PSH technology enables the server module to diagnose problems while the Oracle Solaris OS is running and to mitigate many problems before they negatively affect operations. The Oracle Solaris OS uses the fault manager daemon, fmd(1M), which starts at boot time and runs in the background to monitor the server module. -
Page 52: Check For Psh-Detected Faults
The fmadm faulty command displays the list of faults detected by PSH. You can run this command either from the host or through the Oracle ILOM fmadm shell. As an alternative, you can display fault information by running the Oracle ILOM command show. - Page 53 FRU (/SYS/MB for motherboard in this example). 2. Use the message ID to obtain more information about this type of fault. a. Obtain the message ID from console output or from the Oracle ILOM show faulty command.
-
Page 54: Clear Psh-Detected Faults
Description : The number of correctable errors associated with this strand has exceeded acceptable levels. Response : The fault manager will attempt to remove the affected strand from service. Impact : System performance may be affected. Netra SPARC T4-1B Server Module Service Manual • June 2012... -
Page 55: Managing Components (Asr)
For the EVENT-ID in the example shown in Step 2, type: # fmadm repair 21a8b59e-89ff-692a-c4bc-f4c5cccca8c8 4. Use the Oracle ILOM clear_fault_action property of the FRU to clear the fault. -> set /SYS/MB clear_fault_action=True Are you sure you want to clear /SYS/MB (y/n)? y set ’clear_fault_action’... -
Page 56: Asr Overview
(FRU replacement, loose connector reseated, and so on), you might need to remove the component from the ASR blacklist. The following ASR commands enable you to view, add, or remove components (asrkeys) from the ASR blacklist. You run these commands from the Oracle ILOM prompt. Command Description Displays system components and their current state. -
Page 57: Display System Components
▼ Display System Components The show components command displays the system components (asrkeys) and reports their status. ● At the Oracle ILOM prompt, type show components. In the following example, one of the DIMMs (BOB1/CH0/D0) is shown as disabled. ->show components... -
Page 58: Disable System Components
“Enable System Components” on page 49 ■ ▼ Disable System Components You disable a component by setting its component_state property to Disabled. This action adds the component to the ASR blacklist. Netra SPARC T4-1B Server Module Service Manual • June 2012... -
Page 59: Enable System Components
Are you sure you want to start /SYS (y/n)? y Starting /SYS Note – In the Oracle ILOM shell, there is no notification when the system is actually powered off. Powering off takes about a minute. Use the show /HOST command to determine if the host has powered off. - Page 60 Note – In the Oracle ILOM shell, there is no notification when the system is actually powered off. Powering off takes about a minute. Use the show /HOST command to determine if the host has powered off. Related Information “View System Message Log Files” on page 24 ■...
-
Page 61: Preparing For Service
Preparing for Service The following topics describe how to prepare the server module for servicing. Step Description Links Review the safety and handling “Safety Information” on page 51 information. “Handling Precautions” on page 53 Gather the tools for service. “Tools Needed for Service” on page 54 find serial numbers for the modular “Find the Modular System Chassis system and the server module. -
Page 62: Safety Symbols
Follow all cautions and instructions described in the documentation that shipped ■ with your server module and in the Netra SPARC T4-1B Server Module Safety and Compliance Guide. Ensure that the voltage and frequency of your power source match the voltage ■... -
Page 63: Antistatic Wrist Strap Use
Antistatic Wrist Strap Use Wear an antistatic wrist strap and use an antistatic mat when handling components such as drive assemblies, circuit boards, or PCI cards. When servicing or removing server module components, attach an antistatic strap to your wrist and then to a metal area on the chassis. -
Page 64: Tools Needed For Service
See the documentation for the Sun Netra 6000 modular system. 2. Type. -> show /CH 3. In the output, locate the value for product_serial_number. That number is the serial number of the modular system. Netra SPARC T4-1B Server Module Service Manual • June 2012... -
Page 65: Find The Server Module Serial Number
However, this label is not present on a server module that has been moved into a new enclosure assembly. You also can type the Oracle ILOM show /SYS command to display the number. ●... -
Page 66: Locate The Server Module
3. Identify the server module with a blinking white LED. 4. Once you locate the server module, press the Locator LED to turn it off. Note – Alternatively, you can turn off the Locator LED by typing the Oracle ILOM set /SYS/LOCATE value=off command. -
Page 67: Shut Down The Os And Host (Commands)
▼ Shut Down the OS and Host (Commands) This topic describes one method for shutting down the Oracle Solaris OS. For information on other ways to shut down the Oracle Solaris OS, refer to the Oracle Solaris OS documentation. 1. Log in as superuser or equivalent. - Page 68 OpenBoot 4.30, 16256 MB memory available, Serial # 87305111. Ethernet address 0:21:28:34:2b:90, Host ID: 85342b90. {0} ok 6. Switch from the host console to the Oracle ILOM prompt by typing the #. (Hash Period) key sequence. 7. At the Oracle ILOM prompt, type.
-
Page 69: Shut Down The Os And Host (Power Button - Graceful)
▼ Shut Down the OS and Host (Power Button – Graceful) This procedure gracefully shuts down the OS and places the server module in the power standby mode. In this mode, the Power OK LED blinks rapidly. ● Press and release the recessed Power button. Use a stylus or the tip of a pen to operate this button. -
Page 70: Set The Server Module To A Ready-To-Remove State
▼ Set the Server Module to a Ready-to-Remove State 1. Log in to Oracle ILOM on the server module you plan to remove. 2. Ensure that the server module is in standby mode, with the host powered off. -> show /SYS/ power_state... -
Page 71: Remove The Server Module From The Modular System
▼ Remove the Server Module From the Modular System 1. Review the safety and handling precautions. “Safety Information” on page 51 “Handling Precautions” on page 2. If a cable is connected to the front of the server module, disconnect it. Press the buttons on either side of the UCP to release the connector. - Page 72 9. Remove the server module cover. “Remove the Cover” on page Related Information “Remove the Cover” on page 63 ■ “Install the Server Module Into the Modular System” on page 118 ■ Netra SPARC T4-1B Server Module Service Manual • June 2012...
-
Page 73: Remove The Cover
▼ Remove the Cover 1. (If needed) Remove the server module from the modular system. “Remove the Server Module From the Modular System” on page 2. Attach an antistatic strap to your wrist and then to a metal area on the server module. - Page 74 Netra SPARC T4-1B Server Module Service Manual • June 2012...
-
Page 75: Servicing Drives
Servicing Drives The following topics apply to hard drives and solid state drives installed in the front slots of the server module. Note – The term drive applies to either a hard drive or a solid state drive. Description Links Replace a faulty drive. -
Page 76: Drive Configuration
Note – The Oracle Solaris OS now uses the WWN syntax in place of the unique tn (target ID) field in logical device names. This change affects how a target storage device is identified. -
Page 77: Drive Leds
Drive LEDs LED or Button Color Icon Description Drive OK/Activity LED Green Indicates the following drive status: • On – Drive is idle and available for use. • Off – Read or write activity is in progress. Drive Service Action Amber Indicates that the drive has experienced a fault Required LED... -
Page 78: Drive Hot-Plugging Guidelines
The drive cannot be logically isolated from the online operations of the server ■ module. If your drive falls into these conditions, you must shut down the Oracle Solaris OS before you replace the drive. See “Shut Down the OS and Host (Commands)” on... -
Page 79: Remove A Drive
For more information, refer to the Oracle Solaris cfgadm man page. Shut down the Oracle Solaris OS. ■ If the drive cannot be taken offline, shut down the Oracle Solaris OS on the server module. See “Shut Down the OS and Host (Commands)” on page 57 3. -
Page 80: Remove A Drive Filler
“Install a Drive” on page 71 ■ ▼ Remove a Drive Filler All drive bays must be populated by either a drive or a filler. 1. Open the filler lever (panels 1 and 2). Netra SPARC T4-1B Server Module Service Manual • June 2012... -
Page 81: Install A Drive
2. Pull to remove the filler (panel 3). 3. Install a drive in this slot. “Install a Drive” on page Related Information “Install a Drive” on page 71 ■ “Install a Drive Filler” on page 73 ■ ▼ Install a Drive The physical address of a drive is based the slot in which it is installed. - Page 82 5. Close the latch to lock the drive in place (panels 2 and 3). 6. Verify the functionality of the new drive. “Verify Drive Functionality” on page Related Information “Remove a Drive” on page 69 ■ Netra SPARC T4-1B Server Module Service Manual • June 2012...
-
Page 83: Install A Drive Filler
▼ Install a Drive Filler All drive bays must be populated by either a drive or a filler. 1. Extend the filler handle, then align the filler to the empty drive bay (panel 1). 2. Push the filler into place. 3. -
Page 84: Verify Drive Functionality
You might need to partition the drive, create file systems, load data from backups, or have data updated from a RAID configuration. The following commands might apply to your circumstances: You can use the Oracle Solaris command cfgadm -al to list all drives in the ■ device tree, including unconfigured drives. -
Page 85: Servicing Memory
Servicing Memory The following topics describe how to determine which DIMMs are faulty, remove DIMMs, install DIMMs, and verify DIMM functionality after installation. Description Links Understand memory faults. “Memory Faults” on page 75 Replace a faulty DIMM. “DIMM Handling Precautions” on page 79 “Locate a Faulty DIMM”... - Page 86 “Clear the Fault and Verify the Functionality of the Replacement DIMM” on page PSH – A feature of the Oracle Solaris OS, PSH uses the fault manager daemon ■ (fmd) to watch for various kinds of faults. When a fault occurs, the fault is assigned a UUID and logged.
-
Page 87: Dimm Configuration
DIMM Configuration Description or Partial FRU Name (full names start with /SYS/MB/CMP0/) Fault Remind button Fault Remind Power LED DIMMs controlled by BOB3: CH0/D1 CH0/D0 CH1/D1 CH1/D0 DIMMs controlled by BOB4: CH0/D1 CH0/D0 CH1/D1 CH1/D0 Servicing Memory... - Page 88 ■ Use supported DIMM capacities: 4 Gbyte, 8 Gbyte, and 16 Gbyte. ■ Refer to the Netra SPARC T4-1B Server Module Product Notes for the latest information. Install quantities of 4, 8, or 16 DIMMs, in the correct slots: ■...
-
Page 89: Dimm Handling Precautions
This procedure describes how to use the DIMM LEDs on the motherboard to pinpoint the physical location of a faulty DIMM. Note – You can also obtain the location of the faulty DIMM using the Oracle ILOM show faulty command. This command displays the FRU name (such as /SYS/MB/CMP0/BOB0/CH0). -
Page 90: Remove A Dimm
“Locate a Faulty DIMM” on page 3. Remove the DIMM from the motherboard. a. Push down on the ejector tabs on each side of the DIMM until the DIMM is released (panel 1). Netra SPARC T4-1B Server Module Service Manual • June 2012... -
Page 91: Install A Dimm
b. Grasp the top corners of the DIMM, and lift and remove it from the server module (panel 2). c. Place the DIMM on an antistatic mat. 4. Install a replacement DIMM. “Install a DIMM” on page Related Information “Install a DIMM” on page 81 ■... -
Page 92: Clear The Fault And Verify The Functionality Of The Replacement Dimm
“Access the SP (Oracle ILOM)” on page 3. Determine how to clear the fault. The method you use to clear a fault depends on how the fault is identified by the show faulty command. Examples: Netra SPARC T4-1B Server Module Service Manual • June 2012... - Page 93 If the fault is a host-detected fault (displays a UUID), continue to Step 4. For ■ example: -> show faulty Target | Property | Value --------------------+------------------------+-------------------------------- /SP/faultmgmt/0 | fru | /SYS/MB/CMP0/BOB0/CH0/D0 /SP/faultmgmt/0 | timestamp | Dec 14 22:43:59 /SP/faultmgmt/0/ | sunw-msg-id | SUN4V-8000-DX faults/0 /SP/faultmgmt/0/...
- Page 94 Return to VBSC. 0:0:0>Master set ACK for vbsc runpost command and spin... Note – Depending on the configuration of Oracle ILOM variables that affect POST and whether POST detected faults or not, the server module might boot, or the server module might remain at the ok prompt.
- Page 95 8. (Only if previous steps did not clear the fault) Switch to the host console and type the fmadm repair command with the UUID. Use the same UUID that was displayed from the output of the Oracle ILOM show faulty command.
-
Page 96: Verify Dimm Functionality
Note – Use the show /HOST command to determine when the host has been powered off. The console will display status=Powered Off. Allow approximately one minute before typing this command. Netra SPARC T4-1B Server Module Service Manual • June 2012... - Page 97 Return the virtual keyswitch to Normal mode. -> set /SYS keyswitch_state=Normal Set ‘ketswitch_state’ to ‘Normal’ f. Switch to the host console and type the Oracle Solaris OS fmadm faulty command. # fmadm faulty If any faults are reported, see the diagnostics instructions in “Oracle ILOM...
- Page 98 UUID, you have completed the verification process. 7. Switch to the host console and type the fmadm repair command with the UUID. Use the same UUID that was displayed from the output of the Oracle ILOM show faulty command. # fmadm repair 3aa7c854-9667-e176-efe5-e487e520 Related Information “Remove a DIMM”...
-
Page 99: Servicing The Rem
Servicing the REM The server module supports the installation of one REM. For a list of supported REMs, refer to the Netra SPARC T4-1B Server Module Product Notes. Description Links Troubleshoot a REM Refer to the documentation for the REM. -
Page 100: Install A Rem
■ ▼ Install a REM For information about specific configuration tasks for your REM, refer to the REM documentation. 1. (If needed) Prepare for service. “Preparing for Service” on page Netra SPARC T4-1B Server Module Service Manual • June 2012... - Page 101 2. (If needed) Remove a REM. “Remove a REM” on page 3. Align the REM for installation (panel 1). 4. Slide the end of the REM that is opposite the connector under the tabs of the plastic standoff (panel 2). 5.
- Page 102 Netra SPARC T4-1B Server Module Service Manual • June 2012...
-
Page 103: Servicing The Fem
Servicing the FEM The server module supports the installation of one FEM. To see a list of supported FEMs for this server module, refer to the Netra SPARC T4-1B Server Module Product Notes. Description Links Replace a FEM. “Remove a FEM” on page 93 “Install a FEM”... -
Page 104: Install A Fem
“Install a FEM” on page 94 ■ ▼ Install a FEM This procedure applies to any of the form factors of FEM cards that are supported by this server module. Netra SPARC T4-1B Server Module Service Manual • June 2012... - Page 105 1. Prepare for service. “Preparing for Service” on page 2. (If needed) Remove a FEM. “Remove a FEM” on page 3. Determine the correct set of motherboard FEM connectors for your FEM. A double-width FEM (card 1) uses connectors FEM-0 and FEM-1. ■...
- Page 106 If the card has rubber bumpers you can press directly on them to seat the card into the connectors. 6. Return the server module to operation. “Returning the Server Module to Operation” on page 117. Related Information “Remove a FEM” on page 93 ■ Netra SPARC T4-1B Server Module Service Manual • June 2012...
-
Page 107: Servicing The Sp Card
■ ▼ Remove the SP Card 1. If possible, save the configuration information for the SP. Refer to the related procedures using Oracle ILOM in the SPARC and Netra SPARC T4 Series Servers Administration Guide. 2. Prepare for service. “Preparing for Service” on page 3. -
Page 108: Install The Sp Card
See“Install the SP Card” on page Related Information “Install the SP Card” on page 98 ■ ▼ Install the SP Card 1. (If needed) Remove the SP card. “Remove the SP Card” on page Netra SPARC T4-1B Server Module Service Manual • June 2012... - Page 109 2. Insert the replacement SP card into the retainer (panel 1). Ensure that the tab is aligned with the key (panel 2). 3. Seat the SP card into the connector by pressing the card toward the tabs while pressing down (panel 3). When the SP card is in place, the lever will close.
- Page 110 Netra SPARC T4-1B Server Module Service Manual • June 2012...
-
Page 111: Servicing The Id Prom
Servicing the ID PROM The ID PROM, sometimes referred to as the SCC, provides the server module with the host ID, MAC addresses, and some Oracle ILOM configuration information. The ID PROM does not typically require replacement. However, if you replace the ID PROM, be aware that the host ID and MAC address will change. -
Page 112: Install The Id Prom
▼ Install the ID PROM 1. (If needed) Remove the ID PROM. “Remove the ID PROM” on page 101. 2. Locate the ID PROM socket on the motherboard (panel 1). Netra SPARC T4-1B Server Module Service Manual • June 2012... -
Page 113: Verify The Id Prom
The host MAC address and the host ID values are stored in the ID PROM. This task describes ways to display these values. 1. Display the MAC address that is stored in the ID PROM. Example using the Oracle ILOM show command: -> show /HOST macaddress /HOST... - Page 114 1500 index inet 10.6.91.117 netmask fffffe00 broadcast 10.6.91.255 ether 0:21:28:7f:68:44 Related Information “Remove the ID PROM” on page 101 ■ “Install the ID PROM” on page 102 ■ Netra SPARC T4-1B Server Module Service Manual • June 2012...
-
Page 115: Servicing A Usb Flash Drive
Servicing a USB Flash Drive You can install one USB flash drive in the server module. Description Links Replace a USB flash drive. “Remove a USB Flash Drive” on page 105 “Install a USB Flash Drive” on page 106 Add a USB flash drive. “Install a USB Flash Drive”... -
Page 116: Install A Usb Flash Drive
1. Prepare for service. “Preparing for Service” on page 2. (If needed) Remove a USB flash drive. “Remove a USB Flash Drive” on page 105. 3. Locate the USB connector on the motherboard. Netra SPARC T4-1B Server Module Service Manual • June 2012... - Page 117 4. Plug your USB flash drive into the upper port of the USB connector (panels 1 and 2). Do not use the lower port of this connector. 5. Return the server module to operation. “Returning the Server Module to Operation” on page 117.
- Page 118 Netra SPARC T4-1B Server Module Service Manual • June 2012...
-
Page 119: Servicing The Battery
Servicing the Battery The battery operates the clock for the server module. “Replace the Battery” on page 109 ■ Related Information “Detecting and Managing Faults” on page 5 ■ “Preparing for Service” on page 51 ■ ▼ Replace the Battery The battery maintains server module time when the server module is powered off. - Page 120 “Returning the Server Module to Operation” on page 117 6. Access the Oracle ILOM prompt. “Access the SP (Oracle ILOM)” on page 7. Set the clock’s day and time. For example: -> set /SP/clock datetime=061716192011 -> show /SP/clock Netra SPARC T4-1B Server Module Service Manual • June 2012...
- Page 121 /SP/clock Targets: Properties: datetime = Fri JUN 17 16:19:56 2011 timezone = GMT (GMT) usentpserver = disabled Related Information “Servicing the FEM” on page 93 ■ “Returning the Server Module to Operation” on page 117 ■ Servicing the Battery...
- Page 122 Netra SPARC T4-1B Server Module Service Manual • June 2012...
-
Page 123: Replacing The Server Module Enclosure Assembly (Motherboard)
If you determine that a faulty component is not one of the replaceable FRUs described in this document, the enclosure assembly must be replaced. Note – This procedure must be performed by an Oracle field service representative. “Transfer Components to Another Enclosure Assembly” on page 113 ■... - Page 124 10. Transfer the USB flash drive (if present) from the original server module to the enclosure assembly. Ensure that you install a USB flash drive only in the top slot of the connector. See “Servicing a USB Flash Drive” on page 105. Netra SPARC T4-1B Server Module Service Manual • June 2012...
- Page 125 “Install the Server Module Into the Modular System” on page 118. 15. Start the server module host. “Power On the Host (Oracle ILOM)” on page 120. 16. Perform diagnostics to verify the proper operation of the server module. “Detecting and Managing Faults” on page 17.
- Page 126 Netra SPARC T4-1B Server Module Service Manual • June 2012...
-
Page 127: Returning The Server Module To Operation
Returning the Server Module to Operation These topics describe how to return Oracle’s Netra SPARC T4-1B server module to operation after removing it from the modular system for service. Step Description Links Replace the server module cover. “Replace the Cover” on page 117 Install the server module into the “Install the Server Module Into the... -
Page 128: Install The Server Module Into The Modular System
Caution – Hold the server module firmly with both hands so that you do not drop it. The server module can weighs as much as 20 pounds (9.0 kg). 1. (If needed) Replace the cover. “Replace the Cover” on page 117. Netra SPARC T4-1B Server Module Service Manual • June 2012... - Page 129 The front panel LEDs blink three times, then the green OK LED on the front ■ panel blinks for a few minutes. Oracle ILOM is initialized on the server module SP and ready to use, but the ■ server module host is not started.
-
Page 130: Power On The Host (Oracle Ilom)
“Power On the Host (Power Button)” on page 120 ■ ▼ Power On the Host (Power Button) Perform this step after Oracle’s Netra SPARC T4-1B server module is installed in a powered modular system. 1. Press the Power button on the front of the server module. - Page 131 Note – The server module power-on process can take several minutes to complete, depending on the amount of installed memory and the configured diagnostic level. By default, the server module boots the Oracle Solaris OS. 2. Perform any diagnostics that verify the results of servicing the server module.
- Page 132 Netra SPARC T4-1B Server Module Service Manual • June 2012...
-
Page 133: Glossary
Glossary ANSI SIS American National Standards Institute Status Indicator Standard. Alert standard format (Netra products only). Automatic system recovery. American wire gauge. blade Generic term for server modules and storage modules. See server module storage module. Server module. See server module. - Page 134 The part of the server or server module with the CPU and other hardware that runs the Oracle Solaris OS and other applications. The term host is used to distinguish the primary computer from the SP. See SP. Netra SPARC T4-1B Server Module Service Manual • June 2012...
- Page 135 Machine access code. MAC address Media access controller address. Modular system The rackmountable chassis that holds server modules, storage modules, NEMs, and PCI EMs. The modular system provides Oracle ILOM through its CMM. MSGID Message identifier. name space Top-level Oracle ILOM CMM target.
- Page 136 OpenBoot PROM. Oracle ILOM Oracle Integrated Lights Out Manager. Oracle ILOM firmware is preinstalled on a variety of Oracle systems. Oracle ILOM enables you to remotely manage your Oracle servers regardless of the state of the host system. Oracle Solaris OS Oracle Solaris operating system.
- Page 137 REMs and FEMs. Service processor. In the server or server module, the SP is a card with its own OS. The SP processes Oracle ILOM commands providing lights out management control of the host. See host.
- Page 138 User interface. Underwriters Laboratory Inc. US. NEC United States National Electrical Code. Coordinated Universal Time. Universal unique identifier. UUID World wide name. A unique number that identifies a SAS target. Netra SPARC T4-1B Server Module Service Manual • June 2012...
-
Page 139: Index
Index front and rear panel, 3 identifying, 1 accessing the SP, 15 location, 1 accounts, Oracle ILOM (Service), 15 managing with ASR, 45 airflow, blocked, 8 configuring how POST runs, 33 antistatic cover mat (Service), 53 installing, 117 wrist strap (Service), 53... - Page 140 42 the server module to be serviced, 56 FRU ID PROMs, 13 log files, 24 FRU information, displaying, 17 logging into Oracle ILOM, 15 FRU names components, 1 Netra SPARC T4-1B Server Module Service Manual • June 2012...
- Page 141 8, 30 maximum testing with POST, 35 interpreting POST fault messages, 37 memory and memory faults, 75 faults, 75 modes and Oracle ILOM parameters, 30 servicing, 75 output, 39 message buffer, checking, 24 running, 29 message identifier, 42...
- Page 142 Oracle Solaris OS log files, 8 using Oracle VTS, 8 using POST, 8, 9 USB flash drive, 105 UUID, 42 /var/adm/messages file, 24 verifying DIMMs, 82, 86 drives, 74 ID PROM, 103 Netra SPARC T4-1B Server Module Service Manual • June 2012...