Advertisement
Quick Links
Ride on Brush Mower
●
Before using the product, be sure to read and fully understand the important
danger parts appearing in the text of the instruction manual.
●
When purchasing this product, please ask your dealer for safety precautions
●
Keep this instruction manual in a safe place so that you can refer to it at
any time.
●
In order to maintain safety, please take an annual inspection according to
the periodic inspection table in this manual.
●
Be sure to use genuine products from the manufacturer for maintenance
of this product.
RM983F
(4WD)
Rabbit Mower
00
0347-70400
.
Advertisement

Related Manuals for OREC RM983F 4WD


Summary of Contents for OREC RM983F 4WD
- Page 1 Rabbit Mower Ride on Brush Mower RM983F (4WD) 0347-70400 ● Before using the product, be sure to read and fully understand the important danger parts appearing in the text of the instruction manual. ● When purchasing this product, please ask your dealer for safety precautions ●...
-
Page 2: Table Of Contents
Index Item ........Page 4.1.1 How to start the engine ..19 《Introduction》 ......1 《Definition and symbol mark》 ..1 4.1.2 How to stop the engine ..25 《Regulation of this product》 .... 2 Driving, Speed change, 《Important Notices》 ...... 2 .. - Page 3 ⑦Blade clutch wire adjustment ... 47 5.4.1 How to open and close the Blade ⑧Diff-lock wire adjustment ..47 replacement cover ....51 ⑨Safety switch adjustment ..48 5.4.2 Check and Replace Blade ..52 5.3.2 Tire Air pressure Adjustment 49 5.4.3 How to replace the Blade ..
-
Page 4: Introduction
■Regarding to the instruction manual. ● Please read this instruction manual carefully before using this machine. ● When lending or transferring this unit, be sure to hand it along with this unit. ● If lost or damaged, please order directly to the dealer shop. 《Introduction》... -
Page 5: Regulation Of This Product
《Regulation of this product》 1) This product has been developed as an agricultural machine, so please do not use it for any other purpose (use such as rental that the operator cannot identify). 2) Grasses such as ivy and vines that crawl along the ground may not be able to be cut. 3) This machine has one passenger capacity. - Page 6 safely and efficiently. Please make a regular inspection and maintenance. The warranty does not cover failures or accidents resulting from failure to perform these inspections / maintenances, non-compliance with this manual, such as use or modification beyond specifications. 6) The supply period (term) of repair parts for this product will be 9 years after the production is discontinued.
-
Page 7: Before Using 〈Please Read Carefully For Safe Use
1. ご使⽤の前に 1. Before using 〈Please read carefully for safe use〉 1.1 working conditions 1) Please do not use those who cannot understand the contents of this book. This product is a one-seater. Please do not carry people other than worker. 2) When lending a machine to another person, please explain the handling method and instruct them to work after understanding it fully. -
Page 8: Inspection Before Work
1. ご使⽤の前に 4) When traveling on a river, cliff, or a step (road shoulder) to prevent falling, please run on a sufficiently safe flat place. 5) It is dangerous to use it in poor visibility when it is dark. Please do not use when place condition cannot be grasped sufficiently. -
Page 9: No Fires・Fuel Supply
1. ご使⽤の前に 1.2.3 No fires・Fuel supply 1) Please do not bring the fire close while working or refueling Do not use cigarettes, bonfires etc., naked flames etc. absolutely near the machine. 2) After stopping the engine, please refuel after the muffler temperature drops sufficiently. 3) For refueling, if there is a fuel level upper limit mark, please do not exceed the mark. -
Page 10: Operational Precautions
1. ご使⽤の前に 1.3.2 Operational precautions Be sure to sit on the seat, move the cutting height adjustment lever to the "move" position, and depress (or lock) the parking brake pedal to start. Beware when turning and other operations on the slope. There is a fear of breaking the balance and falling and injuring. -
Page 11: Notes On Loading And Unloading
1. ご使⽤の前に 1.4 Notes on loading and unloading 1) Be sure to stop the engine and bring the fuel cock to the "closed" state when transporting this machine. Due to fuel leakage, spilled fuel may catch fire. 2) Do not tilt the machine beyond necessity. Fuel leakage may occur. Please use a suitable car according with the Machine for transportation. -
Page 12: Storage
1. ご使⽤の前に When replacing or installing / removing a knife / blade or tire / crawler, please make sure that it is securely tightened in the specified location or firmly tightened. When replacing the knife / blade or tire / crawler with a new one, please replace the mounting bolts together with a new one of the manufacturer genuine products for safety. - Page 13 1. ご使⽤の前に Location of warning Label 0215-83200 Wear protective equipment Engine Warning Label 0347-92100 Sloping caution label 20° 0-1488-9280-10 Rotating part caution mark 0223-76100 Caution label (L) Z26-5 0329-76200 Caution mark (cover) Meaning of caution label Engine Warning Label Be sure to use protective Work on slopes below glasses.
- Page 14 1. ご使⽤の前に Meaning of caution label Be careful of rotating objects Beware of cutting Blade inside the cover. Stand clear of the machine Beware of thrown object Read Ownerʼs manual. Before doing maintenance remove the spark plug. - 11 -...
-
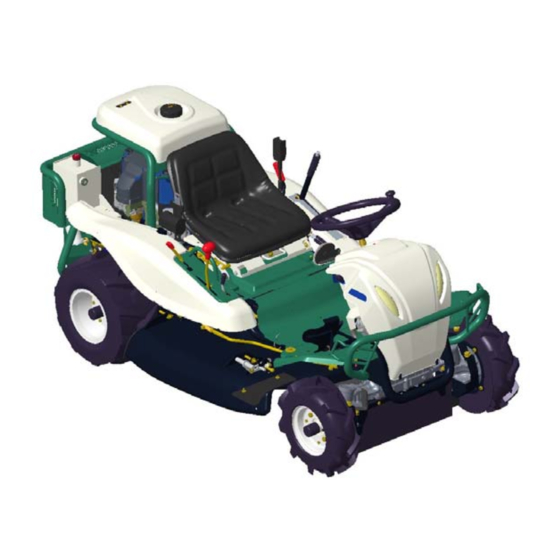
Page 15: Names And Functions Of Each Part
2.各部の名称とはたらき 2. Names and Functions of each part 2.1 Name of each part ⑤ Cutting Height Adjustment Lever (Stepless with assistance) ⑭ Fuse box ⑮ inclinometer Fuel Tank Cap ⑫ Seat steering wheel Fuel Tank Cover Sub handle HST Oil Thank Side cowl (R) Slow blow fuse (Back side of front hood) -
Page 16: Function Of Each Part
2.各部の名称とはたらき 2.2 Function of each part ①Engine switch Insert the key and operate "START", "RUN", and "Stop" of the engine. ②Thottle Lever Adjust the engine speed from "Low speed" to "High speed". ③Choke lever Used to start the engine in cold weather. If you pull it "closed” position、... -
Page 17: ⑥Blade Clutch Lever
2.各部の名称とはたらき ⑥Blade clutch lever Turns the Blade rotation "ON (rotation)" and "OFF (stop)". The Blade clutch lever cannot be operated when the cutting height adjustment lever is in the "move" position. ⑦Change pedal・Speed change Shift lever Used for running / stopping the product, running direction and speed adjustment. Push the change pedal forward from the neutral position to move forward, and toward the heel to move backward. -
Page 18: ⑨Differential Lock Lever
2.各部の名称とはたらき ⑨Differential lock lever Normally, use it in the "off" position. When working on a gentle slope or on a soft ground, or when one side of the rear wheel is slippery and it is difficult to go straight, or when loading / unloading to / from a truck, set the diff lock lever to the “ON”... -
Page 19: ⑫Seat(Seat Slide And Seat Suspension Functions Equipped.)
2.各部の名称とはたらき ⑫Seat( Seat slide and Seat suspension functions Equipped Adjust the seat slide front and back by raising the slider lever in front of Seat. The suspension can be adjustable the strength of the spring force according to the weight of the worker using the "suspension adjustment bolt"... -
Page 20: ⑯Engine Oil Warning Light
2.各部の名称とはたらき It is dangerous to work on a sloping ground over 20 °, so work under the 20 °. ⑯Engine oil warning light (Red) Illuminates when the engine switch is in the "Run "position and the engine is stopped, but remains off when the engine is running. -
Page 21: Inspection Before Work
3. Inspection before work ●Before starting work, check "1.2 Before Starting Work" and check the following "Before starting work checklist" and Be sure to perform the pre-operation inspection according to "7.1 Periodic inspection table". ※If you have any questions or problems, please be sure to contact the dealer where you purchased the product. -
Page 22: Fuel Inspection And Refueling
1) If you want to check the engine oil after the engine is running, wait for "about 5 minutes or more" after stopping the engine, and check the cooling condition of the muffler and the engine itself. 2) Be sure to check the engine oil level before starting, as excessive or insufficient engine oil may cause a malfunction. - Page 23 1) Fire is strictly prohibited during work and refueling. Risk of ignition and burns. Never use a cigarette, bonfire, or open flame near the machine。 Refueling, after the engine has stopped and the muffler temperature has dropped sufficiently. 3) If there is an oil level upper limit mark, refuel below the mark. If you put too much, remove it until it is below the mark.
-
Page 24: Operation And Work
7. 点検表 4. Operation and work ※Be sure to read 「"1. Precautions"」 before driving. Especially read and understand “1.1 Working Conditions”, “1.2 Before Working” and “1.3 Working”. Start to operation and work. 4.1 Starting and stopping the engine 4.1.1 How to start the engine Reference︔... - Page 25 7. 点検表 ③ Depress the parking brake pedal and apply the brake Change pedal Brake stopper stopper. If the change pedal or shift lever is not in the neutral “N” position, return it to the neutral “N” position. Parking brake pedal ④...
-
Page 26: How To Stop The Engine
7. 点検表 ⑦ Insert the key into the engine switch and continue turning the key from the "run" position to the "start" position to start the engine. ⑧ Release the keys as soon as the engine starts. Automatically returns to the "drive" position. ⑨... -
Page 27: Driving, Speed Change, Turning And Stopping
7. 点検表 4.2 Driving, Speed change, Turning and Stopping warning Do not use by unskilled people (people other than the owner) in safe work and operation methods. When you drive for the first time, check the safety of your surroundings and practice at a low speed on a flat surface without obstacles until you are familiar with the operation and features of the product. -
Page 28: How To Stop (Park)
7. 点検表 4.2.2 How to stop (park) When you depress the parking brake pedal, driving stops and the gear shift lever and change pedal return to the neutral "N" position all at once, and then stop. However, please make a habit of using the gear shift lever or change pedal to stop Driving normally. -
Page 29: How To Operate The
7. 点検表 4.2.3 How to operate the differential lock lever Caution Use the diff-lock lever only when loading and unloading, working on gentle slopes, or when it is difficult to go straight due to one of the rear wheels spinning in a soft place on the ground, and do not use it elsewhere. -
Page 30: And Unloading, Transportation
7. 点検表 4.3 Loading and unloading , Transportation. 1) Always stop the engine and keep the fuel cock in the “closed” state when transporting the machine. Fuel leaks can cause spilled fuel to catch fire. 2) Also, do not tilt the Machine more than necessary. Fuel may leak out.。 warning 1) Be sure to use the bridge. -
Page 31: Loading And Unloading
7. 点検表 4.3.1 loading and unloading ・Cutting height adjustment lever is in "move" position Diff lock lever is in the "on" position ① When loading, move forward, and when unloading, move backward. ② Use the standard the bridge . ③ Put the differential lock lever in the "ON" position, the cutting height adjustment lever in the "Move"... - Page 32 7. 点検表 3) If mud or dust adheres to the cooling part, the oil temperature will rise. Perform regular maintenance. 4) To prevent a fall or collision, do not work in the direction of buildings, rivers or cliffs, or people. 5) It is especially dangerous to stand on the upper side (mountain side) of the product when working on sloping ground.
-
Page 33: How To Do The Mowing Work
7. 点検表 Reference︔ 1) When using this product for the first time, select a flat surface free of foreign matter such as stones, and slowly mow straight so that the cut marks overlap slightly. 2) Mowed grass is discharged to the rear from the right side of this product. Always keep the trees, pillars, fences, and other obstacles to the left side of this product. - Page 34 7. 点検表 ① Keep the knife replacement cover on the right side of this Closed product closed when operating the mowing work. ② Start the engine. 〈4.1.1Refer to How to start the engine〉 ③ Turn the throttle lever to the high speed position and increase the engine speed.
- Page 35 7. 点検表 Reference︔ 1) When using this product for the first time, select a flat surface free of foreign matter such as stones, and slowly mow straight so that the cut marks overlap slightly. 2) The mowed grass is discharged backward from the right side of the product. When cutting the side of an obstacle, be sure to place an obstacle such as a tree, pillar, or fence on the left side of the product.
-
Page 36: Adjusting The Handle And Seat Position
7. 点検表 Adjusting the handle and seat position to suit your work and physique ●The handle can be adjusted in three stages up and down also can be adjust front and rear (tilt). The seat can be slid forward and backward. ①... -
Page 37: Inspection / Replacement / Lubrication
5. 点検・整備・調整 5. Inspection / maintenance / adjustment 5.1 Oil inspection / replacement / lubrication 1) Refer to the hour meter display on this product's for guidelines on inspection, replacement, and lubrication of oil in each part. 2) Oil is filled in the machine at the time of shipment, but before using this machine for the first time, check again that the specified amount of oil is in the place before using. -
Page 38: Engine Oil Check And Change
5. 点検・整備・調整 ① For lubrication, attach the drain plug (oil drain plug), remove the mission plug at the rear of the mission case, and add 1.0 liter of mission oil (# 90). After lubrication, be sure to tighten the mission plug to prevent oil leakage. -
Page 39: Oil Filter Replacement
5. 点検・整備・調整 5.1.3 Oil filter replacement After draining the engine oil, replace the oil filter according to the following procedure. ①Remove filter A by turning it counterclockwise. ② To prevent twisting, lightly apply new engine oil to the Filter gasket (O-ring) of the new filter with your fingertips. ③... - Page 40 5. 点検・整備・調整 ◎Exchange If the HST is operated for a long time, the HST oil will deteriorate and foreign substances will settle inside the unit. To keep your work safe and comfortable, change the HST oil regularly. Also, change the HST oil filter (installed under the HST oil tank) at the same time as changing the oil.
-
Page 41: Lubrication For Each Part
5. 点検・整備・調整 5.1.5 lubrication for each part 1) Grease about every 30 hours, add engine oil (# 30) to other moveing parts as needed. Neglecting to lubricate the grease may cause damage due to poor lubrication. Lubricate with reference to the grease nipple in the figure below. Recommended grease consistency number: No. -
Page 42: Related Part Cleaning, Inspection, And Adjustment
5. 点検・整備・調整 5.2 Engine related part cleaning, inspection and adjustment 5.2.1 Cleaning the air cleaner 1) If the air cleaner / recoil starter is clogged with grass debris, etc and continues to work, not only will the output be insufficient and fuel consumption will increase, but the exhaust gas temperature will rise, then causing a fire, which is extremely dangerous. -
Page 43: Checking And Adjusting The Spark Plug
5. 点検・整備・調整 Reference︔ 1) If the paper element is extremely dirty, replace it with a new one, or wash it with soapy water and wash it with water, and dry it thoroughly. Do not pull or tumble the foam element when cleaning. The element is easily torn. -
Page 44: Check The Fuel Filter
5. 点検・整備・調整 ① Rubber products such as fuel hoses will deteriorate even From Fuel Cock if they are not used. To Carburetor ② Replace with a new tightening band every 3 years or when damaged. ③ Always check for loose or damaged hoses or tightening bands. -
Page 45: How To Clean The Engine Exhaust System
5. 点検・整備・調整 5.2.6 How to clean the engine exhaust system guard muffler Exhaust pipe ① Remove foreign matter such as mud and grass dust around the engine exhaust pipe by blowing air. ② Remove the debris that has adhered to the mesh guard, etc. at the rear of the vehicle (muffler). -
Page 46: Wire / Belt Adjustment For Each Part
5. 点検・整備・調整 10) Look around the machine and check each part for oil leaks. ●If you can confirm an oil leak, please contact your dealer shop. ●Continued use with oil leakage is dangerous and may cause damage to the machine. 5.3.1 Wire / belt adjustment for each part 1) Before adjusting the belt /wire /rod, be sure to stop the engine on a wide flat surface, remove the key, set the parking brake, and check the safety sufficiently. -
Page 47: ②Blade Belt Adjustment (Under Seat Bracket)
5. 点検・整備・調整 ②Blade belt adjustment (under seat bracket) Visually inspect the belt for damage. If it is cracked or worn, replace it with a new one. Blade Belt ③Adjusting the belt retainer (under the seat bracket) ① Set the cutting height adjustment lever to the position of about 30 mm. ③... -
Page 48: ④Blade Brake Adjustment
5. 点検・整備・調整 ④Blade brake adjustment ① The Blade will stop in about 5 seconds when the Blade clutch lever is in the "off" position. If it does not stop, move the brake wire adjustment nut in the direction of the arrow to adjust. -
Page 49: ⑥Adjusting The Speed Shift Lever
5. 点検・整備・調整 ⑥Adjusting the Speed shift lever (change pedal) ② Move the Speed shift lever to the neutral "N" position. ② Adjust by turning the turnbuckle connected to the shift lever. ③ When moving a little in the forward direction. …Turn the turnbuckle in direction A. - Page 50 5. 点検・整備・調整 Reference; Adjust the play at the lever base is about 1 to 3 mm when the differential lock lever is in the "OFF" position (released). Be sure to securely tighten the lock nut after each adjustment. ⑨Safety switch adjustment. ①...
- Page 51 5. 点検・整備・調整 5.3.2 Tire Air pressure Adjustment. ① Check the tire pressure of the front and rear wheels according to the table below. If the air pressure of the left and right tires is not even, the steering wheel may shake during work. 5.3.3 Front tire inspection If dirt or grass gets in from a small gap and leaving it for a long time may damage the wheel of the tire, the oil seal of the front wheel, or the bearing.
- Page 52 5. 点検・整備・調整 ① Remove the wheel cap, front axle retaining ring, thrust washer, and tire. Use the screwdriver to remove the front axle retaining ring. When assembling after checking and cleaning, be careful not to forget to put the key. retaining ring ②...
- Page 53 5. 点検・整備・調整 6) Blade rotates at high speed. If the Blade is chipped or broken even a little, it will cause vibration. Not only is it dangerous to continue working while vibrating, but it can also cause cracks and cracks in various parts of the product, significantly shortening the life of the product.
- Page 54 5. 点検・整備・調整 5.4.2 Check and Replace Blade ① Stop the engine and remove the key from the engine switch. ② Set the cutting height to the middle position with the cutting height adjustment lever. ③ Fully open the Blade replacement side cover and fix it. ④...
- Page 55 5. 点検・整備・調整 5.4.3 How to replace the Blade If you need to replace the Blade (both front and back), refer to Hard lock nut the following to attach and detach the Blade. Nut guard ① Be sure to use a Blade change and loosen the hard lock nut to remove the Blade.
- Page 56 5. 点検・整備・調整 5.5 Long-term storage 5.5.1 Preparation for long-term storage Long-term storage with fuel left in the fuel tank or carburetor may cause problems such as poor starting or reduced output. 1) Since this product uses gasoline as fuel, it is dangerous to ignite for leak fuel, or smoke or bonfire near the product.
- Page 57 5. 点検・整備・調整 ① When the machine is not used for more than 30 days, Fuel Cock first remove the fuel in the fuel tank from the fuel filler into the container with a pump. Remove the remaining fuel by shifting the fuel hose clip on the tank side of the fuel cock and removing the remaining fuel in to the House Clip container B.
- Page 58 5. 点検・整備・調整 6. attached list 6.1 Specification sheet (Reference number) Name Rabbit Mower Model RM983F L×W×H (㎜) 2010×1070×950 Cutting width (㎜) Weight (㎏) Cutting Height (㎜) 10〜80(Stepless with assistance) Blade (Pcs) Free Blade ×2&Step stay×1 drive W800 SB32×1 V-Belt (Pcs) Cutting W800 SB81×1...
- Page 59 6. 付表 6.2 Tool bag details NAME Spec / Size remarks instruction manual Spanner 10×12 〃 14×17 L-type wrench 22mm L-Type box wrench Protective Gogel 0328-76100 Protective equipment For Blade front and back Setting bolts M14 replacement Knife change 〃 Blade replacement tool Maintenance tool Cover removal tool...
- Page 60 6. 付表 Parts Name Parts No Pcs/unit Remarks Brack shoe set (PA-7) 0244-88100 Blade brack wire 0322-75210 Diff lock wire 0244-72410 Choke wire (Kawasaki) 0348-70200 Choke wire (Vanguardi) 0348-70200 Throttel wire (Kawasaki) 0322-75400 Throttel wire (Vanguardi) 0322-75600 Oil Filter 88-49065-7007 Kawasaki (FS691V) Oil Filter 88-842921...
- Page 61 7. 点検表 7. check list 7.1 Periodic inspection table ★ Failure to perform inspection or maintenance may result in an accident or malfunction. Please perform inspection by referring to this "Periodic inspection table" so that normal functions can be exerted and always in a safe state. ★...
- Page 62 7. 点検表 7.2 Engine malfunction and how to deal with it If the engine is not in good condition, check it according to the table below and take appropriate action. phenomenon Cause treatment Not press the parking brake pedal Depress the pedal and lock with the stopper Cutting height lever is not in "move"...
- Page 63 7. 点検表 7.3 Self-diagnosis table If any of the following problems occur, refer to the instruction manual and take appropriate action. Phenomenon Cause Treatment The grass is wet. Work after the grass has dried. The grass is long. Increase the cutting height and cut twice. The grass is not The cutting height is low.
- Page 64 7. 点検表 7.4 Battery maintenance/inspection Improper handling of the battery can shorten the battery life or cause a serious accident. Please use with the correct handling method to the full effect. 1) Be aware of short circuits, sparks, and fire when handling the battery. 2) Combustible hydrogen gas is generated from the battery.
- Page 65 7. 点検表 1) The battery electrolyte must not have the below "LOWER" level. It may cause short life, heat generation and explosion. 2) Only put purified water into the battery. (Do not replenish with dilute sulfuric acid.) If impurities are put in, it may cause heat generation, ignition, and generation of toxic gas. 3) If too much purified water (distilled water) is put in, the electrolyte may spill and cause metal corrosion.
- Page 66 7. 点検表 ④ For supplementary charging, keep the normal charging electrical current and charging time. It may cause liquid leakage, ignition, or explosion. ⑤ After completing the charging, attach the 6 liquid inlet cap Keep fire away firmly as before. ....
- Page 67 7. 点検表 ・Start Start the engine when it is installed in the machine. The start operation should be within 5 seconds, and if it does not start at one time, pause for 10 seconds, or more and then start again. However, if the operation does not start even after performing this operation, the battery life may be suspected.
- Page 68 7. 点検表 7.4.4 Battery failure and how to deal with it phenomenon Cause treatment Prevention method Charging for a long time with battery Neglected to charge normal charging forcibly and charge it early. Starter does Thoroughly wash and tighten Clean terminal, tighten Poor contact of terminal...
- Page 69 7. 点検表 7.4.5 Treatment method in case of accident with electrolyte degree of Danger Accident type Treatment method Immediately wash your eyes with a large amount of clean water, and then immediately seek In case of eye contact medical treatment from doctor (ophthalmologist).
Need help?
Do you have a question about the RM983F 4WD and is the answer not in the manual?
Questions and answers