Table of Contents
Advertisement
OWNER'S MANUAL
SH72
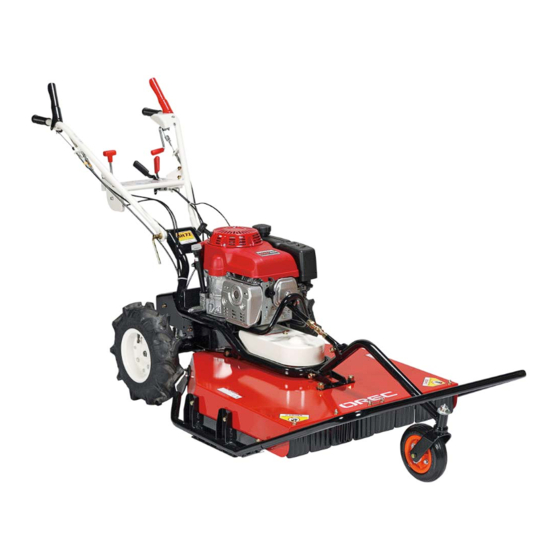
Samurai Mower
Samurai walk behind mower
Read this instuction manual carefully before any use of the machine, keep it as a reference.
Also, the engine manual is included as a set with the owners manual. Please read both carefully.
For any questions about this manual, please contact your OREC dealer, the
distributor in your country, or go to : http://www.orecamerica.com
0220-72000
1
Advertisement
Table of Contents

Related Manuals for OREC SH72


Summary of Contents for OREC SH72
- Page 1 Read this instuction manual carefully before any use of the machine, keep it as a reference. Also, the engine manual is included as a set with the owners manual. Please read both carefully. For any questions about this manual, please contact your OREC dealer, the distributor in your country, or go to : http://www.orecamerica.com...
- Page 2 Getting Started Thank you for purchasing this machine. These instructions explain the correct and easy way to always keep this machine in fine working order and operate it safely. Please read these instructions fully before using this machine in order to understand the safest, most efficient way of operating it, and the correct way maintain it.
-
Page 3: Table Of Contents
Contents ・・・・・・・・・・・・・・・・・・・・・・・・・・・・・・・・・・・・・・・・・・・・・・・・・・・・・・・・・・・・・・・・ 1. For Safe Operation 1) Warning labels ・・・・・・・・・・・・・・・・・・・・・・・・・・・・・・・・・・・・・・・・・・・・・・・・・・・・・・・・・・・・・・・・・・・ 4 2) Important safety points ・・・・・・・・・・・・・・・・・・・・・・・・・・・・・・・・・・・・・・・・・・・・・・・・・・・・・・・・・・・・ 6 ・・・・・・・・・・・・・・・・・・・・・・・・・・・・・・・・・・・・・・・・・・・・・・・・・・・・・ 2. Mower Controls and Features 3. How to Assemble Machine・・・・・・・・・・・・・・・・・・・・・・・・・・・・・・・・・・・・・・・・・・・・・・・・・・・14 ・・・・・・・・・・・・・・・・・・・・・・・・・・・・・・・・・・・・・・・・・・・・・・・・・・・・・・・・・・・・・・・・・・・・ 4. How to Operate 1) How to start and stop the engine ・・・・・・・・・・・・・・・・・・・・・・・・・・・・・・・・・・・・・・・・・・・・・・・・・・・ 17 2) How to drive, turn, change speed, and stop ・・・・・・・・・・・・・・・・・・・・・・・・・・・・・・・・・・・・・・・・・・... -
Page 4: For Safe Operation
1. For Safe Operation Please read the safety and engine manuals carefully before operating this machine. Furthermore, please prepare protective clothing and equipment such as gloves, helmet, ear and eye protection, non-hanging shirt sleeves and pant legs. Finally, please carefully inspect the machine to ensure that it works properly. 1) Warning Labels The warning labels are attached to the machine to draw attention to particularly serious dangers. - Page 5 (0220-71600) (0220-70700) (0220-71100) (0220-70900) (0220-70800) NOTICE If these warning labels become difficult to see, please replace them so that they can be easily ● seen and understood. Contact your Orec America dealer and request the part numbers indicated above. ●...
-
Page 6: Important Safety Points
2) Important safety points This machine is equipped with a high-powered engine and fast moving blades. Misuse of this machine can result in serious injury or death. Before using this machine, please be sure to read these instructions and understand and obey the following warnings. ■Notes for the operator of this machine WARNING The operator of this machine should fully read these instructions. - Page 7 Please do not modify the engine, as this could cause fires, malfunctions or other ● accidents. Orec assumes no liability for accidents or injuries resulting from modification or addition to the machine. Any additions or modifications will also void warranty claims.
- Page 8 ● safety cover) as this can cause injury and accidents. Altering this machine in any way will void the warrant. Orec America Inc. will bear no responsibility for damage or injury caused by alterations or modifications. Do not automatically change or tamper with the safety apparatus. Inspections should be ●...
- Page 9 Before removing entangled grass or other foreign objects from the blades, be sure to stop the ● engine and remove the spark plug cord. Check that the blades have stopped moving before carefully removing any entangled material. Be sure that there are no people, animals or vehicles close by. When operating this machine, ●...
- Page 10 When changing direction on a slope, do it slowly and carefully. The machine could roll over ● causing injury and accidents. Do not operate the machine on wet slopes. It is easy to slip on wet grass and suffer injury and ●...
- Page 11 ■Maintenance DANGER Remove fuel when storing or transporting the machine. Accidents and damage can be caused by ● spilt or spoiled fuel. WARNING Be sure to switch off the engine and remove the spark plug cord before performing any ● inspection, adjustment or maintenance on this machine.
-
Page 12: Mower Controls And Features
2, Mower Controls and Features Note: The model shown in Figure may looks slightly different from your machine. 2: Blade clutch lock lever 3: Blade clutch lever 5: Diff lock lever 1: Drive clutch lever (Parking brake) 4: Throttle lever 6: Speed change lever... - Page 13 1: Drive clutch lever Operates by turning power [ON] / [OFF] from the engine to the drive transmission. Push down the lever and grip the handlebars at the same time to start driving the machine [ON]. Release your grip on the lever to stop the machine [OFF]. When the drive clutch lever is released, the parking brake is engaged.
- Page 14 3, How to Assemble Machine NOTICE Assembly should be done on a flat surface. ● Assembly requires at least two people. ● Do not remove the pallet from the unit until assembly is completed. ● This unit is shipped WITHOUT OIL. After assembly, see owner’s manual for proper oil amount ●...
- Page 15 ■ Install the Clutch/Brake/Blade wires long bolt Drive Clutch Lever (Black): Put the brake Drive Clutch Lever (Black): Put the drive wire (outside) through the wire holder (it clutch wire (inside) through the wire holder. makes the job easier when the lever is squeezed).
- Page 16 ■ Install the tires 1. Peel the tape from the axle. 2. No need after serial No.WL10J00013~ Atattch Snap ring ⑩ into the ditch on the Lift the handle to install the tire without axle. dropping the key. Please ensure that the snap ring is firmly attached to the end of the axle.) ■...
-
Page 17: How To Operate
4. How to Operate ■How to move the machine manually with the engine switch OFF 1. Move the operator presence arm to the [OFF] position. 2. Push down and hold the operator presence lever. Remember to return the operator presence arm to the [ON] position when parking the machine. (Please refer to the engine use manual) 1) How to start and stop the engine ■Before starting the engine... -
Page 18: How To Start The Engine
1. Refuel the fuel tank with unleaded gasoline. (Please refer to the engine use manual) ■How to start the engine DANGER Do not start the engine in a confined space or a place with insufficient ventilation. Engine exhaust ● gas is odorless and contains carbon monoxide which can cause death. 1. -
Page 19: How To Drive, Turn, Change Speed, And Stop
■How to stop the engine 1. Shift the throttle lever to the [Stop] position to stop the engine. Stop 2. Shift the fuel valve to the [OFF] position. WARNING Do not touch the hot engine immediately after switching off. ● Allow time for it to cool down as there is a danger of burns. - Page 20 3. Shift the throttle lever to the intermediate position between Drive clutch lever (LOW)] and [ (HI)]. 4. Drive forward by gripping the drive clutch lever (black) together with the handlebars. WARNING Before driving, position the height adjusting front wheel at its ●...
-
Page 21: Mowing
■How to stop 1. Release the drive clutch lever [OFF] and allow the machine to stop. 2. Shift the speed change lever to the N position. Shift the throttle lever to the [ (LOW)] position and Note: then shift it to the [STOP] position to stop the engine. WARNING If you need to leave the machine unattended, be sure to ●... - Page 22 2. Set the handlebars at a height that is suitable for the operator. 3. Start the engine. 4. Shift the speed change lever to [1] (speed 1) position. ・ When mowing, always proceed forward in gear [1] or [2], never in [R]. This not only decreases the performance of the machine but also increase the likelihood of flying debris.
-
Page 23: How To Move Machine Manually With The Engine Switch Off
■How to stop WARNING Please do not leave the machine while the engine is running. If you need to leave the machine, ● then stop it on a level surface, stop the engine, leave the throttle in neutral (N) and engage the parking brake by letting go of the clutch lever. Leaving the machine unattended may cause accident or injury. -
Page 24: How To Inspect And Service Parts
5. How to Inspect and Service Parts 1) Oiled Parts inspection, Change, and refill WARNING When this machine is shipped, it is not lubricated with oil. Before operating the machine, be sure ● to check that it is lubricated with the described oil, in the described parts, and in the described quantities. -
Page 25: Checking And Adjusting The Spark Plug
Oil change Change engine oil after the first 5 hours of actual use or after the first month of ownership. After that, replace after every 50 hours of use or every 6 months of ownership. Refill Remove the oil filler cap and insert 1.16qt (1.1 liters) of the recommended SAE10w-30 oil. -
Page 26: Spark Arrester (Optional Equipment) ・・・・・・・・・・・・・・・・・・・・・・・・・・・・・・・・・・・・・・・・・・・・・・・・・26
3) Spark Arrester (optional equipment) The engine is not factory-equipped with a spark arrester. In some areas, it is illegal to operate an engine without a spark arrester. Check local laws and regulations. An optional USDA approved spark arrester is available. The spark arrester must be serviced every 100 hours to keep it functioning as designed. -
Page 27: Tire Pressure Adjustment
5) Tire pressure adjustment Please adjust tire pressure to 17.4 psi (0.12 Mpa) If the air pressure of the left and right tires is not equal, there is a danger of losing control of the handlebars. 6) Adjusting each wire WARNING Check that you are taking sufficient safety precautions when adjusting each type of wire by ●... -
Page 28: Belt Inspection
■Differential locking wire ・ If the machine does not function even when diff lock lever is ON. - It is necessary to increase the tension on the wire. First, loosen nut [A] on the right side part of the wire hook plate and then tighten nut [B] on the left side part of the wire hook plate. -
Page 29: Inspecting The Blade Brake ・・・・・・・・・・・・・・・・・・・・・・・・・・・・・・・・・・・・・・・・・・・・・・・・・・・・・・・・・29
■Inspecting the drive belt Do not move the belt guard on the engine side other than when completely necessary. 1. Depress the operator presence lever to [ON] and adjust the transmission side belt guard and the belt so that the gap between them is between 0.118-0.196 in. -
Page 30: Inspecting And Replacing Blades
9) Inspecting and replacing blades WARNING When inspecting or replacing the blade, always be sure to switch off the engine as there is a ● danger of injury. When having the blades replaced or repaired, always have any such work performed by a person ●... -
Page 31: Regarding Long-Term Storage
6. Regarding Long-term Storage If you do not use the machine for more than 30 days, please follow these procedures for maintenance. If the machine is not stored properly, there is a danger of fuel spoilage, the machine failing to start, or difficulty in running the machine. -
Page 32: Specifications
7, Specifications (Reference values) Name Samurai Mower Type SH72 Total length × Total width 87.4×33.5×40.6 (2220×850×1030mm) × Total height (Inch) Cutting width (Inch) 27.5 (700mm) Cutting height (Inch) 2.0----3.9 (50---100mm) Blade Bar blade Size of V-belt Drive belt : LA-36 / Blade belt: LB-45 Weight 262.4 lb (119kg) -
Page 33: Periodic Voluntary Inspection Table
11. Periodic Voluntary Inspection Table Neglecting inspection and maintenance is a cause of accidents and damage. Perform inspection referring to [Periodic voluntary inspection table] in order to always keep the machine functioning correctly. Perform annual inspection once a year and monthly inspection once a month, and starting checks every time you use the machine. - Page 34 Inspection Inspection Content freq. Cracking or deformity, Frame is not cracked or deformed. Nuts and Body mounting nuts and bolts are bolts have not fallen off. loose or have fallen off Cracking, deformity, Cover No cracking, deformity or corrosion. corrosion Damage, loosening, rattling Levers When moving or loading there is no damage,...
-
Page 35: Self Diagnosis Table
12. Self Diagnosis Table If any of the following effects occur, refer to the instruction manual and take the appropriate action. Effect Cause Treatment Grass is wet. Operate machine when grass is dry. Grass is too long. Raise the cutting height and cut twice. Cut grass is not discharged Cutting height is too low. -
Page 36: Troubleshooting
13. Troubleshooting If the engine is defective, perform diagnosis by referring to the following table and then taking the appropriate action. Effect Cause Treatment Safety switch is not in the [start up] Put the safety switch to the [start up] position. -
Page 37: Parts Supply Term Limit
The supply term (period) during which replacement parts will be supplied is 9 years from the time the last OREC product is produced. However, even during the supply period, it may be necessary to consult with OREC when seeking to purchase specific parts. If you have a request for replacement parts after this period has passed, please consult with OREC for prices and availability. -
Page 38: Limited Warranty
• Repairs, maintenance and/or modifications performed by unauthorized persons or dealers, as well as the use of unauthorized parts or accessories will lead to the immediate forfeiture of the warranty. • Under NO circumstances shall Orec America be liable for damages or expenses of any kind resulting from inappropriate use of its products. -
Page 39: Warranty Registration
Orec will report their decision to the distributor service manager or dealer from whom the claim was received. 5) In the event that OREC approves the claim, parts will be exchanged free of charge and repairs performed by the dealer.
Need help?
Do you have a question about the SH72 and is the answer not in the manual?
Questions and answers