Table of Contents
Advertisement
Quick Links
Ride on Mower
●Please read carefully and fully understand the important dangerous parts
that appear in the text of the instruction manual before using the product.
●When purchasing this product, please receive an explanation from the
retailer about how to use it for safety.
●Please keep the instruction manual in a safe place so that you can read it
at any time.
●To maintain safety, perform annual inspections according to the regular
inspection table on this paper.
●Be sure to use the manufacturer's genuine product for maintenance of this
product.
RM983
RM983Ⅹ
Rabbit Mower
改訂 10
0342-75200
Advertisement
Table of Contents

Related Manuals for OREC RM983


Summary of Contents for OREC RM983
- Page 1 改訂 10 Ride on Mower Rabbit Mower RM983 RM983Ⅹ 0342-75200 ●Please read carefully and fully understand the important dangerous parts that appear in the text of the instruction manual before using the product. ●When purchasing this product, please receive an explanation from the retailer about how to use it for safety.
-
Page 2: Table Of Contents
I INIDIEIX tem ........pageI 《Introduction》 ......1 4.1.1 How to start the engine ..21 《Definitions and Symbol marks》 ..1 4.1.2 How to stop the engine ..23 《Regulations for this product》 ..1 4.2 How to drive. Speed shift. 《Important Notices》... - Page 3 I INIDIEIX tem ........pageI 6. Note 6.1 Specifications ......54 6.2 Tool bag details ......55 6.3 Consumables details ....55 6.4 Electrical schematic ....57 7.点検表 7.1 Periodic checklist Engine malfunction and how to handle it 7.3 Self-diagnosis table 7.4 Battery maintenance / inspection 7.4.1 How to refill the battery fluid 7.4.2 How to supplement charge...
-
Page 4: Introduction
1.ご使用の前に ■About this instruction manual ● Please read this instruction manual carefully before using this machine. ● When renting or hand overing this machine, be sure to hand it with this machine. ● If the product is lost or damaged, please place an order directly with the retailer. 《Introduction》... -
Page 5: Important Notices
In that case, please refer to the following points and check the "Product model and serial number / Model name of the installed engine (engraved or affixed to the engine body)" and contact us at the same time. ロータリー モア(乗用型) RM983・RM983X BV○○○○○○○○ (株)オーレック - 2 -... -
Page 6: Before Use
1. Before use 1. Before use <Be sure to read for safe use> 1.1 Before operation 1) Do not use if you do not understand the contents of this manual. In addition, this product is a single-seater. Do not carry people or animals other than workers. In principle, no one other than the owner should use it. -
Page 7: Inspection Before Work
1. Before use 3) Remove stones and other foreign substances in advance, and if there are obstacles that cannot be removed, install a caution sign or a safety fence indicating the work prohibition range before starting work. Also, for safety, work at a higher mowing than usual in such fields. -
Page 8: No Fire・Fuel Refueling
1. Before use 6) Be sure to check the effectiveness of the parking brake every time. Misalignment of the brakes can lead to serious accidents. Check with one or more of the following. ① At the traveling clutch lever "OFF" position (Sub-change shift lever neutral "N" position), the parking brake is applied and it does not move even if two adults push it. -
Page 9: Precautions For Operation
1. Before use Do not place flammable or dangerous materials around you while running. Also, the exhaust muffler gets hot. If you touch the machine when operating it or immediately after finishing work, you may get burned. 5) When working on a slope, use it with a slope of 10 ° or less. Make sure to do it in the horizontal direction (contour line direction) rather than in the vertical direction. -
Page 10: Inspection During Work・Stop・Cleaning
1. Before use 1.3.3 Inspection during work・Stop・Cleaning Carefully remove any grass debris that has accumulated around the exhaust pipe, which becomes hot. It may cause engine seizure or fire such as cooling air suction port or grass clogging near the cylinder. Also, clean the inside of the air cleaner and the grass debris accumulated on the HST fan cover at the same time. -
Page 11: Inspection・Maintenance
1. Before use 4) Using to hang a strong Slope that meets the standard on a gentle slope (15 degrees or less), reduce the engine speed, load "forward", and unload "backward" slowly at low speed. 5) When transporting, secure it with a strong rope. Also, please try to drive safely. 1.5 Inspection・Maintenance ◎Regular inspections are essential to maintain quality and performance . -
Page 12: At The Time Of Storage
1. Before use Failure to follow the instructions below may cause a machine failure. 1) When washing the machine, do not splash water on the engine (electrical parts, near the air cleaner, fuel cap, etc.) and the place where the warning label is affixed. 2) Check and adjust the clutches, throttles, gear changes, etc. - Page 13 1. Before use 警告表示マーク貼付箇所 0334-80910 0294-72910 0244-81710 0214-72100 0262-81210 0308-75310 0215-83100 0223-76100 0329-76200 0215-83200 - 10 -...
-
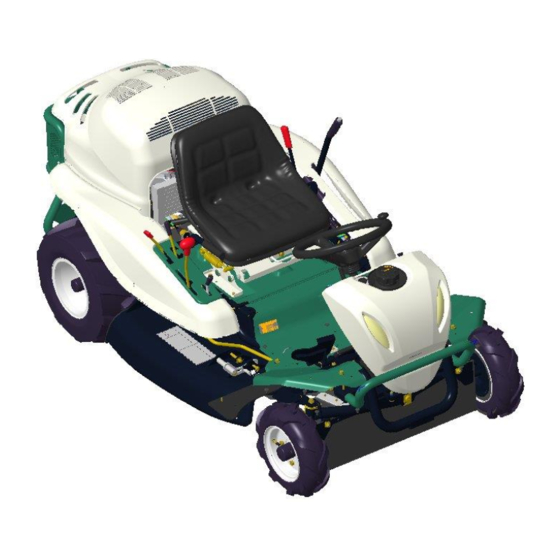
Page 14: Names And Functions Of Each Part
2.各部の名称とはたらき 2. Names and functions of each part 2.1Name of each part ⑤Cutting height adjustment lever Slow blow fuse (Stepless with assistance) (Lower right of seat bracket) ⑫Seat handle Engine bonnet Sub handle Tank Fuel Tank Cap Side cowl (right) Front cowl ⑧Sub Change lever ⑪Knife cover... -
Page 15: Functions Of Each Part
2.各部の名称とはたらき 2.2 Functions of each part ①Engine switch Insert the key and perform "START", "RUN" and "OFF" of the engine. ②Throttle lever Adjust the Engine speed from "High speed" to "Low speed". ③ Choke lever Used to start the engine in cold weather. If you pull it, it will be in the "closed" position, and if you return it, it will be in the "open"... -
Page 16: ⑤ Cutting Height Adjustment Lever
2.各部の名称とはたらき ⑥Blade clutch lever Turns the Blade on (rotates) and turns off (stops). The Blade clutch lever cannot be operated when the cutting height adjustment lever is in the "move" position. ⑦Change pedal・Shift lever (Hand manual) It is used for driving / stopping operation of this machine, driving direction and its speed adjustment. -
Page 17: ⑨Diff-Lock Lever
2.各部の名称とはたらき Be sure to insert the sub-chain lever operation to the notch position with the operation stopped. Operation while driving or inadequate shifting operation may cause slipping due to gear disengagement, which is extremely dangerous. Be sure to mow the grass only on the "Mowing work "... -
Page 18: ⑫Seat (With Seat Slide And Seat Suspension Function)
2.各部の名称とはたらき Be sure to close the knife cover during work. Mowing work with the cover open is extremely dangerous because it causes an increase in the scattering of foreign substances such as stones. Make sure that the knife cover is closed and locked except when inspecting or replacing the knife. -
Page 19: ⑭Fuse Box
2.各部の名称とはたらき ⑭Fuse BOX Protects harnesses and electrical components in the event of overcurrent. There are 10A (accessory) and 20A (charging) fuses, and a separate 20A fuse is included as a spare. If the fuse blows, be sure to eliminate the cause and replace it with a spare fuse. Also, use the spare fuse only for emergencies and immediately replace it with a regular A (ampere) fuse. -
Page 20: Machine Direction
2.各部の名称とはたらき 2.3 Machine direction The front, back, left, and right sides of the machine are shown in the direction seen by the operator sitting on the seat, as shown in the figure below. "Forward" and "backward" in the text are also expressed in the direction from the worker's point of view. Left Back / backward Front・Forward... -
Page 21: Inspection Before Work
3.作業前の点検 3. Inspection before work ●Before starting work, check "1.2 Before work", and check the "Pre-start checklist" below and Be sure to perform the pre-start inspection according to "7.1 Periodic inspection table". ※If you have any questions or concerns, please be sure to contact the store where you purchased the product. -
Page 22: Fuel Inspection And Refueling
3.作業前の点検 1) If you want to check the engine oil after running the engine, wait "about 5 minutes or more" after the engine is stopped and check the cooling condition of the muffler and the engine body. 2) Be sure to check the amount of engine oil before starting, as deficiency of engine oil may cause a malfunction. - Page 23 3.作業前の点検 If it spills, wipe it clean. Especially when using on slopes, Filter there is a risk of fuel leaking, so use the amount of refueling below the bottom of the filter. Bottom Middle position (Fuel level upper limit mark)) 1) The use of fire around the machine at all times, not just during work and refueling, is not permitted.
-
Page 24: How To Operate And Work
4.運転・作業のしかた 4. How to operate and work ※Please be sure to read 「1. Before use」 before using. In particular, after carefully reading and understanding 「1.1 Working Conditions」, 「1.2 Before Working」, and 「1.3 During Working」then gping to operation. 4.1 How to start / stop the engine 4.1.1 How to start the engine When starting the engine, carefully check the position of each lever and the safety around it. - Page 25 4.運転・作業のしかた ④ Set the knife clutch lever to the "off" position and the Knife Clutch Lever cutting height adjustment lever to the "move" position. Cutting Height Lever Reference; The knife clutch lever is linked to the cutting height adjustment lever. When the cutting height adjustment lever is moved to the "move"...
-
Page 26: How To Stop The Engine
4.運転・作業のしかた When the engine switch is set to the "START" position, a large current flows through the starter motor, so avoid continuous use for more than 5 seconds. If it does not start within 5 seconds, return the engine switch to the "stop" position, pause for 10 seconds, or more, and then repeat the same operation. -
Page 27: How To Stop (Park)
4.運転・作業のしかた ③ Depress the parking brake pedal deeply to release the brake stopper. Never operate the change pedal (shift lever) with the parking brake pedal Parking brake pedal 解除 "locked". It will force the braked wheels to be driven, which will overload the brakes and transmission and lead to damage. -
Page 28: How To Operate The Diff-Lock
4.運転・作業のしかた Reference; Be sure to use the engine switch to stop the engine. If you "lock" the parking brake and set the cutting height adjustment lever to the "move" position, the engine will not stop even if you stand up from the seat, but if you stand up from the seat in any other position, the engine will stop for safety (The pilot lamp does not go out and the engine switch is in the "RUN"... -
Page 29: Loading And Unloading
4.運転・作業のしかた 4.3 Loading and unloading and transportation When transporting this machine, be sure to stop the engine and put the fuel cock in the "closed" state. Fuel leaks can ignite spilled fuel. Also, do not tilt the unit more than necessary. Fuel may leak 1) Be sure to use a bridge. -
Page 30: How To Load And Unload
4.運転・作業のしかた 4.3.1 How to load and unload ・Cutting height adjustment lever is in the "move" position The diff-lock lever is in the "on" position ② Please load in the forward direction and unload in the reverse direction. ② Use a bridge that meets the standards. ③... - Page 31 4.運転・作業のしかた reference; If there is a lot of grass, mow it twice. Try to mow at a higher mowing height first, and then mow at a lower mowing height and mow again. Cut grass discharge Closed state ① Be sure to mow the grass with the knife replacement cover on the right side of this product closed.
- Page 32 4.運転・作業のしかた 2) The cut grass is spit out from the knife replacement cover on the right side of this product, but foreign matter such as stone blocks, wires, empty cans, etc. may be scattered from the entire of the cutting part and cause damage to the surroundings. In fields near buildings or in fields with a lot of foreign matter, remove them before work and mow high or to prevent people (especially children), vehicles, etc.
- Page 33 4.運転・作業のしかた 1) For work clothes, wear long-sleeved jackets and trousers with a squeezed hem, and be sure to wear non-slip boots, a hat or helmet, dust-proof glasses, and protective gloves. 2) Remove foreign objects such as stumps, stone blocks, wires, empty cans, and broken sticks before starting work.
-
Page 34: Adjusting The Handle / Seat Position According To Work And Physique
4.運転・作業のしかた 4) For safety, if the cutting height adjustment lever is returned to the "move" position, the knife clutch lever will also be linked and returned to the "off" position ., Its lifespan is significantly shortened. Except in an emergency, please observe the operation method of 4.4 Mowing wo rk. 5) The knife clutch lever cannot be operated when the cutting height adjustment lever is in the "move"... -
Page 35: Inspection / Maintenance / Adjustment
5. 点検・整備・調整 5. Inspection / maintenance / adjustment 5.1 Oil inspection / replacement / lubrication 1) Refer to the hour meter display on the meter panel of this product for a guideline for checking, replacing, and lubricating oil in each part. 2) The machine is filled with oil at the time of shipment, but before using the machine for the first time, be sure to check that the specified amount of oil is contained in the specified part before using it. -
Page 36: Engine Oil Inspection / Replacement
5. 点検・整備・調整 ③ For oiling, after installing the drain plug (drain plug), remove the mission plug at the rear of the mission case and add 1.0 liter of mission oil (# 90). After Oiling, be sure to tighten the mission plug so that there is no oil leakage. Be careful not to overtighten the mission plug. -
Page 37: Oil Filter Replacement
5. 点検・整備・調整 5.1.3 Oil filter replacement After draining the engine oil, replace the oil filter according to the following procedure. ① Turn filter A counterclockwise to remove it. ② To prevent twisting, apply a thin coat of new engine oil to the gasket (O-ring) of the new filter with your fingertips. - Page 38 5. 点検・整備・調整 ◎ xchange When changing the HST oil, wait until the HST tank and HST main unit have cooled sufficiently before starting work. Immediately after the engine is stopped, the temperature is high and there is a risk of burns. HST oil, also called hydraulic fluid, plays an important role in converting engine rotation into drive.
-
Page 39: Lubricate To Each Part
5. 点検・整備・調整 5.1.5 Lubricate to each part 1) Grease about every 30 hours, and lubricate other parts with rust preventive / lubricant as needed. In particular, if you neglect to lubricate the grease, it may cause damage due to poor lubrication. Lubricate referring to the grease nipple part in the figure below. Link pin (Front) Link Pin (Rear) Knife Shaft... -
Page 40: Engine Cleaning / Inspection / Adjustment
5. 点検・整備・調整 5.2 Engine Cleaning / Inspection / Adjustment 5.2.1 Air cleaner Cleaning 1) If you continue to work with an air cleaner / recoil starter that is clogged with grass dust, not only will the output be insufficient and fuel efficiency will increase, but the exhaust gas temperature will also rise, causing a fire. -
Page 41: Inspection And Adjustment Of Spark Plugs
5. 点検・整備・調整 Reference; 1) If the paper element is very dirty, replace it with a new one, or wash it with soap (wash), wash it with water, and dry it well. Do not pull or squeeze the foam element during cleaning. -
Page 42: Checking The Fuel Filter
5. 点検・整備・調整 From the fuel cock ① Rubber products such as fuel hoses deteriorate even if To the carburetor they are not used. ② Replace it with a new one every 3 years with the tightening band or if it is damaged. ③... -
Page 43: Product Inspection / Adjustment
5. 点検・整備・調整 grass etc. accumulated around the inside and outside of the HST fan cover. If you continue to use it as it is, the original performance of HST will not be exhibited due to the rise in HST oil temperature. ③... -
Page 44: Wire / Belt Adjustment
5. 点検・整備・調整 7) Be sure to replace the covers removed for adjustment. 8) Please avoid unreasonable work for the first 2-3 hours so that each part will be fully familiarized. 9) Don't forget to take care of it after work and perform regular inspections. 10) Look around the entire machine and check each part for oil leaks. -
Page 45: ②Knife Belt Adjustment
5. 点検・整備・調整 Rear side Tension spring About120mm Front side ②Knife belt adjustment (under the seat bracket) Visually inspect the belt for damage. If he has any damage such as cracks or wear, replace it with a new one. Knife Belt ③Belt retainer adjustment (under the seat bracket) Pic.2Knife pulley belt retainer Knife Pulley... -
Page 46: ④Knife Brake Adjustment
5. 点検・整備・調整 Pic.1 Belt retainer (L) Pic.2 Belt retainer (R) Pic.3 Belt retainer (rear) L Pic.3 Belt retainer (rear) R ④ Knife brake adjustment ① The knife will stop within about 5 seconds when the knife clutch lever is in the "off" position. If it does not stop, loosen the lock nut and move the brake wire adjust nut in the direction of the arrow to adjust. -
Page 47: ⑥ Speed Change Lever Adjustment
5. 点検・整備・調整 1) Regular inspections is not only for maintaining performance but also for braking surfaces are indispensable for maintaining safety. In the case of Ride on type, there is a risk of causing a serious accident, so be sure to perform inspections according to the regular inspection table at least before the start of work and once a month, and once a year at the store where you purchased the product. -
Page 48: ⑦Knife Clutch Wire Adjustment
5. 点検・整備・調整 ⑦Knife clutch wire adjustment ① Mover the cutting height adjustment lever Lowe position so that the knife clutch lever is in the "on" state. ③ Loosen the lock nut of the knife clutch wire and adjust with the adjust nut, referring to the photo on the left. The elongation of the spring When the tension of the knife belt is weak. -
Page 49: Tire Air Pressure
5. 点検・整備・調整 ③ Check the operation of the tip of the safety switch, sluggish, apply commercially available grease spray to the operation part of the switch. If it does not improve, replace the safety switch. Individually adjusted with the slotted holes in theseat switch stay 1) If you sit on the seat and move the mowing height adjustment lever to "move"... -
Page 50: Knife Inspection / Replacement / Installation
5. 点検・整備・調整 The front wheel rubber cover prevents the grass from rolling up anddust from entering, but please remove the front wheel Regulary for inspecting and cleaning. front wheel rubber cover Please lift the front with a jack referring to the photo on the left. - Page 51 5. 点検・整備・調整 The warranty does not cover failures or accidents caused by using non -genuine manufacturers. 3) If the knife hits a curb or a tree root during work and there is an impact, immediately stop the work, check the knife and knife stay for bending, chipping or wear, and replace if necessary.
-
Page 52: Open. Close The Knife Cover
5. 点検・整備・調整 5.4.1 Open and Close the knife replacement cover ① Stop the engine and remove the key from the engine Closed Pin receiver switch. ② Use the cutting height adjustment lever to set the cutting height to the middle position. ③... -
Page 53: How To Replace The Knife
5. 点検・整備・調整 Insufficient installation of the knife may cause the knife to suddenly break and pop out during work, resulting in serious personal injury to workers or people nearby. Please attach securely referring to the following.If it is not replaced, the knife may scatter during work due to wear, deformation, damage, etc. -
Page 54: How To Store For A Long Time
5. 点検・整備・調整 The hard lock nut is divided into two parts, and the upper part of the lower nut has a protrusion, which is slightly thinner than the upper part. There is a recess on the bottom of the nut on the top, and there is a "HARD-LOCK"... - Page 55 5. 点検・整備・調整 ⑤ Thoroughly clean each part. In particular, cleanly remove grass and dust accumulated near the rotating screen, exhaust system, air cleaner, muffler, HST fan cover, carburetor and belt cover by air blowing, etc., and remove rust on the rust - proof paint.
-
Page 56: Precautions For Next Use
5. 点検・整備・調整 Reference; The grass debris inside the knife cover can be washed off relatively easily by cleaning it with water pressurized with a hose etc. before it dries. Storage in cold regions 1) In winter, be sure to remove mud and foreign matter from the machine after use and park it on a flat, concrete or hard, dry road surface. - Page 57 5. 点検・整備・調整 6. Note 6.1 Specifications (reference values) Name Rabbit Mower Type RM983・RM983X L×W×H(㎜) 2000×1070×830 Cutting width (㎜) Weight (㎏) Cutting Heigt (㎜) 10~80(Stepless with assistance) Knife (Pcs) Free Knife×2 & Knife Stay×1 Drive W800 SB28×1 Belt (Pcs) Cutting W800 SB83×1...
- Page 58 6. 付表 6.2 Tool bag / bundled items details Name of Item Size Q’ty Remarks User's manual Double-ended wrench 10×12 〃 14×17 L-Type wrench 22mm safety goggles 0328-76100 Setting Bolt M14用 For replacing the knife Knife change tool 〃 Knife replacement tool Hex wrench 3/8 inch For HST oil drain...
- Page 59 6. 付表 Parts Name Parts No Qty/Unit Remarks Brake shoe set (PA-7) 0244-88100 Knife brake wire 0312-75210 Diff lock wire 0244-72410 Choke wire (K) 0312-75400 KAWASAKI Choke wire (B&S) 0312-75500 B&S Throttle wire (K) 0312-75100 KAWASAKI Throttle wire (B&S) 0244-72100 B&S Oil filter 88-49065-7007...
- Page 60 6. 付表 6.4 Electrical schematic - 57 -...
- Page 61 7. 点検表...
- Page 62 7. 点検表 7. check list 7.1 Periodic inspection table ★ Failure to perform inspection or maintenance may result in an accident or malfunction. Please perform inspection by referring to this "Periodic inspection table" so that normal functions can be exerted and always in a safe state. ★...
- Page 63 7. 点検表 7.2 Engine malfunction and how to deal with it If the engine is not in good condition, check it according to the table below and take appropriate action. phenomenon Cause treatment Not press the parking brake pedal Depress the pedal and lock with the stopper Cutting height lever is not in "move"...
- Page 64 7. 点検表 7.3 Self-diagnosis table If any of the following problems occur, refer to the instruction manual and take appropriate action. Phenomenon Cause Treatment The grass is wet. Work after the grass has dried. The grass is long. Increase the cutting height and cut twice. The grass is not The cutting height is low.
- Page 65 7. 点検表 7.4 Battery maintenance/inspection Improper handling of the battery can shorten the battery life or cause a serious accident. Please use with the correct handling method to the full effect. 1) Be aware of short circuits, sparks, and fire when handling the battery. 2) Combustible hydrogen gas is generated from the battery.
- Page 66 7. 点検表 1) The battery electrolyte must not have the below "LOWER" level. It may cause short life, heat generation and explosion. 2) Only put purified water into the battery. (Do not replenish with dilute sulfuric acid.) If impurities are put in, it may cause heat generation, ignition, and generation of toxic gas. 3) If too much purified water (distilled water) is put in, the electrolyte may spill and cause metal corrosion.
- Page 67 7. 点検表 ④ For supplementary charging, keep the normal charging electrical current and charging time. It may cause liquid leakage, ignition, or explosion. ⑤ After completing the charging, attach the 6 liquid inlet cap Keep fire away firmly as before. ....
- Page 68 7. 点検表 ・Start Start the engine when it is installed in the machine. The start operation should be within 5 seconds, and if it does not start at one time, pause for 10 seconds, or more and then start again. However, if the operation does not start even after performing this operation, the battery life may be suspected.
- Page 69 7. 点検表 7.4.4 Battery failure and how to deal with it phenomenon Cause treatment Prevention method Charging for a long time with battery Neglected to charge normal charging forcibly and charge it early. Starter does Thoroughly wash and tighten Clean terminal, tighten Poor contact of terminal...
- Page 70 7. 点検表 7.4.5 Treatment method in case of accident with electrolyte degree of Danger Accident type Treatment method Immediately wash your eyes with a large amount of clean water, and then immediately seek In case of eye contact medical treatment from doctor (ophthalmologist).
Need help?
Do you have a question about the RM983 and is the answer not in the manual?
Questions and answers