Table of Contents
Advertisement
Quick Links
INSTRUCTION MANUAL
GRASSLAND MOWER RABBIT RMK151
Read this instruction manual carefully before any use of the machine, keep it as a reference. For any question
about this manual, please report to your OREC dealer or to the distributor of your country.
OREC CO LTD
548-22 HIYOSHI HIROKAWA-MACHI YAME-GUN JAPON
http://www.orec-jp.com
Update : October 2020
Advertisement
Table of Contents

Related Manuals for OREC RABBIT RMK151


Summary of Contents for OREC RABBIT RMK151
- Page 1 GRASSLAND MOWER RABBIT RMK151 Read this instruction manual carefully before any use of the machine, keep it as a reference. For any question about this manual, please report to your OREC dealer or to the distributor of your country. OREC CO LTD 548-22 HIYOSHI HIROKAWA-MACHI YAME-GUN JAPON http://www.orec-jp.com...
-
Page 2: Introduction
Use only the OREC original parts : “ non genuine ” parts will not assure you of a correct and safe working and are likely to make the guarantee null and void. Write the name and the serial number of your machine hereunder : MODEL :.................. -
Page 3: Table Of Contents
CHECK LIST INSTRUCTIONS TO THE DEALER The assembly, the installation and the first application of the machine is under the OREC dealer’s responsability. Read the instruction manual as well as the safety measures. Check that all the before delivery and at delivery check points specified in the following lists have been verified and possibly modified before delivering the machine to its owner. -
Page 4: Safety Rules
Never work under the machine or its parts when lifted, unless they are blocked and maintained into position with sufficient security. When running on a slope, always work going up or down but never across the slope. OREC RMK151... - Page 5 Always use a chuck and bronze hammer when replacing or intervening on the pins and bolts at the end of rams, rod … etc in order to avoid the projection of metal fragments. OREC RMK151...
-
Page 6: Machine Description
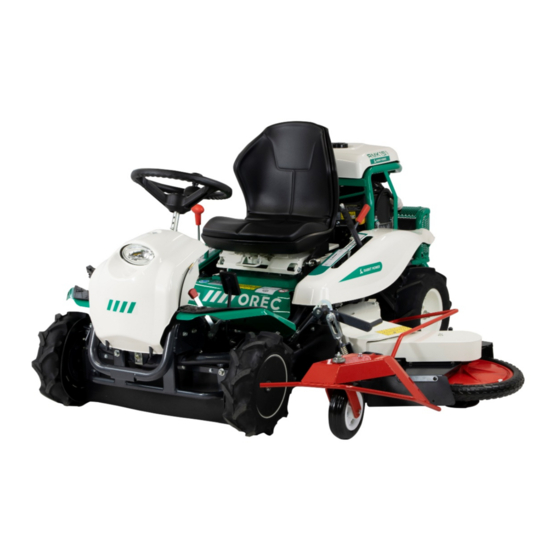
Blade Clutch Lever Offset open/close pedal Height of cut lever Offset lock lever Hanger Lever Cutting wing Figure 1 Steering wheel Front Diff lock lever hood Speed lever Brake pedal Throttle lever speed pedal Figure 2 Mowing deck OREC RMK151... -
Page 7: Safety Instruction Stickers
Do not exceed 15° slope Remove the spark plusg wire before maintenance Figure 3 Beware of rotating parts under Stay away from the machine Keep hands and feet away from the shields Always wear protective equipment against noise, rotating blades dust OREC RMK151... - Page 8 Beware of the flamable fuel Beware of the toxic exhaust gazs Beware of hot surfaces near engine Figure 4 Beware of rotating parts under the shields Keep away from the machine Keep away hands and feet from rotating blades OREC RMK151...
-
Page 9: Controls
The cutting blade Clutch lever make the engine drive the blade to mow. (3, Figure 6). Push the lever forward make the blade turning. Pull the lever on reverse to stop the blade. When using blade clutch lever, check that height of cut lever is in mowing position. OREC RMK151... - Page 10 When the engine has started, release the key which return in "operation", position. Figure 8 IGHT WITCH Push the light switch(2, Figure 8) to turn on the light. Push again to turn off the light. OREC RMK151...
- Page 11 It is possible to adjust the strength of the spring according to the weight of the user. If the suspention adjusting bolt(2, Figure 9 & 10) is turned clockwise, the spring is tensioned. If the suspention adjusting bolt is turned unclockwise, the spring is loosened. (Seat) (view from top) Figure 9 Figure 10 OREC RMK151...
- Page 12 To avoid falling the offset deck suddenly, shift it out slowly gripping the front tire BK. AFETY SWITCHES The OREC mower is equipped with safety switches : To start engine when cutting blade lever is disengage, if you do not press the brake pedal, you cannot start ...
- Page 13 The machine is equipped with a fuel cock. This one is open when the lever is in the same direction as the fuel hose. The fuel cock is closed when it is turned across the fuel line. Turn off the fuel cock when the machine is not used. (OPENED) (CLOSED) Figure 13 Figure 14 OREC RMK151...
-
Page 14: Operation
Then set the new nylon cord. WARNING Do not pull the nylon cord to outer direction. It can damage the holder spring. In case of using nylon cord in bundle, cut the nylon cord in length of 255mm. Figure 17 OREC RMK151... - Page 15 (Figure 19). Stop the machine immediatly when hitting something. Let the machine get cold, clean the machine from dust and debris. Check the machine or ask your dealer to check if the machine is Forward not damage. Figure 19 OREC RMK151...
- Page 16 Check for worn and damage parts, install new parts as required Preform the normal maintenance of the machine according to maintenance chart. Store the machine in a dry protected area Remove ignition key. OREC RMK151...
-
Page 17: Maintenance Operations To Be Carried Out By The User
Tighten the cap securely to prevent leakage. Never loosen the bolt (B Figure 24). Otherwise, it might influence for machine driving. To do so is considered misuse, and damage caused by misuse is not covered by Warranty. Figure 24 OREC RMK151... - Page 18 Check that tires are not cut, cracked or worn. rear. Check tires pressure : 1,2 bar front and 1,4 bar high Figure 27 AFETY STICKERS Check if safety stickers are sticked at their location. Replace them if they are worn and damage. OREC RMK151...
- Page 19 CAUTION Figure 30 Use only the OREC original parts : “ non genuine ” parts will not assure you of a correct and safe working and are likely to make the warranty null and void. Check also the Knife Stay for wear. Even if you do not see any bend or any ...
- Page 20 Press it to remove the oil in excess without squeezing it. IMPORTANT Do not blow at high pressure, and maintain a safe distance between the air nozzle and the cartrige to avoid damage on it. OREC RMK151...
- Page 21 Drain the oil by the plug(Figure 39) after the first 8 hours and after every 100 hours of use or every year whichever comes first. If needed, add “SAE10W30“ or “API SL class“. Oil quantity : 2.10L. Figure 39 Figure 38 OREC RMK151...
- Page 22 IFF LOCK LEVER ADJUSTMENT Ajust the control wire (B, Figure 42) until the lever has a free play of 1 to 3 mm before activate the diff lock. Figure 42 OREC RMK151...
- Page 23 Check they are bolted in their place ⊕ and in good condition Blade clutch control Check the adjustment of the wire ⊕ lever Blade brake Check the adjustment ⊕ Blade belt Check they tensionned and in good condition Engine Refer to engine manual OREC RMK151...
-
Page 24: Breakdowns And Solutions
313,8 to 353 441,3 to 480,5 617,8 to 657,1 176,5 to 205,9 421,7 to 451,1 539,4 to 578,6 608 to 647,2 843,4 to 882,6 235,4 to 264,8 539,4 to 568,8 706,1 to 745,3 784,5 to 823,8 1098,4 to 1137,6 OREC RMK151... -
Page 25: Ec Conformity Declaration
EC CONFORMITY DECLARATION Business name and full address of the manufacturer: OREC CO LTD 548-22 HIYOSHI HIROKAWA-MACHI YAME-GUN FUKUOKA JAPAN S.A.T. sarl - Force 7 – ZA – 38110 ROCHETOIRIN France owner of the technical documents Designation : Ride-on brush cutter... -
Page 26: Limited Warranty
OREC. 2° Each part concerned by a guarantee claim must be returned to OREC’s in order to be inspected, repaired or replaced. The part(s) must be returned with freight prepaid and must be accompanied with a proof of the purchase.
Need help?
Do you have a question about the RABBIT RMK151 and is the answer not in the manual?
Questions and answers