Table of Contents
Advertisement
Quick Links
●
Please fully read and understand all the important points in these
instructions before operating this machine.
● When you purchase this machine, please ask the retailer to explain the
safest way to operate it.
● Please keep these operating instructions and the warranty safe so that
they may be easily referred to at anytime.
(To the retailer)
Please inspect this machine before shipping it to the customer, and register for warranty at
Cyclone Flail Mower - Track
AHRC 663
OREC America Inc.
0336-0071
www.orecamerica.com/warranty
Advertisement
Table of Contents

Related Manuals for OREC AHRC 663


Summary of Contents for OREC AHRC 663
- Page 1 Cyclone Flail Mower - Track AHRC 663 0336-0071 ● Please fully read and understand all the important points in these instructions before operating this machine. ● When you purchase this machine, please ask the retailer to explain the safest way to operate it.
- Page 2 Getting Started Thank you for purchasing this machine. These instructions explain the correct and easy way to always keep this machine in fine working order and operate it safely. Please read these instructions fully before using this machine in order to understand the safest, most efficient way of operating it, and the correct way to maintain it.
-
Page 3: Table Of Contents
Contents For Safe Operation ......................3 Warning Symbols ............................... 3 Important safety points ............................5 Name of Parts ........................11 Working of Each Part ......................12 How to Assemble Machine ....................14 How to Run the Machine ....................16 Initial inspection before running the machine ....................16 How to move the machine manually with the engine switched off .............. -
Page 4: For Safe Operation
For Safe Operation Please read these instructions regarding safety and operation before operating this machine. In order for this machine to satisfactorily demonstrate its true performance, please perform regular maintenance and inspection as outlined on page 39. Warning Symbols The warning symbols are attached to the machine to draw attention to particularly serious dangers. Please be sure to fully understand the meaning of each warning symbol before operating this machine. - Page 5 (0220-70700) (0304-71200) (0220-70800)×2 (0304-71100) (0220-70800)×2 (0304-71200) *Position of symbols affixed to installed engine will be slightly diff erent. In the case that these warning symbols become difficult to see, please replace them so that they can be easily seen and understood.
-
Page 6: Important Safety Points
Important Safety Points This machine is equipped with a high -powered engine and fast moving blades. Misuse of this machine can result in serious injury or death. Before using this machine, please be sure to read these instructions and understand and obey t he following warnings. ... - Page 7 Caution when starting the engine Do not modify the engine as this can cause accidents or explosions. Altering this machine in any way will void the warranty. Orec America Inc. will bear no responsibility for damage or injury caused by alterations or modifications.
- Page 8 Absolutely do not try to modify this machine (including modification of the protective cover and safety cover) as this can cause injury and acciden ts. Altering this machine in any way will void the warranty. Orec America Inc. will bear no res ponsibility for damage or injury caused by alterations or modifications.
- Page 9 Caution during operation During operation, blades, chains and belts are hidden by a cover, be sure to keep hands and fee t well away. Touching these parts can cause serious injury such as the severing of hands and feet. ...
- Page 10 Use caution when operati ng the machine near buildings, shrubs and trees, as damage and accidents can occur. If you do hit something, switch off the engine immediately. Confirm that the blades have stopped moving and then check them for damage such as bending and twisting.
- Page 11 Maintenance Be sure to switch off the engine and remove the spark plug cord before performing any inspection, adjustment or maintenance on this machine. W hen performing inspection, adjustment or maintenance, use appropriate tools in order to work as safely as possible.
-
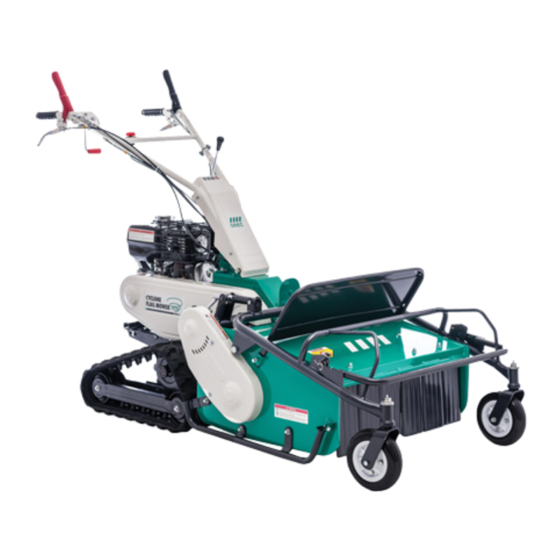
Page 12: Name Of Parts
Name of Parts (2) Blade clutch lock lever Throttle lever (9) Engine stop switch (3) Blade clutch lever (1) Drive clutch lever Safety cover (6) Front wheels (5) Cutting height adjustment lever (10) Steering clutch lever (7) Handlebar up/down lever (4) Speed change lever Drive sprocket (8)Front flappers... -
Page 13: Working Of Each Part
Working of Each Part (1) Drive clutch lever Operates by turning power [ON]/ [OFF] from the engine to the drive transmission. Lower the lever and grip it together with the handlebars to transfer power to the transmission and start driving the machine [ON]. - Page 14 (5) Cutting height adjustment lever This lever adjusts the height at which weeds and brush are cut. Turn the lever to the right to lower the cutting height and turn the lever left to raise the cutting height. When working on uneven ground, adjust the cutting height so that the blades do not cut into mud or rocks. ...
-
Page 15: How To Assemble Machine
How to Assemble Machine 1. Packaged product should resemble picture at left. Please ensure that wires are properly fitted and be careful not to damage wires during assembly of machine. 2. The bolts and pin in picture at left should be tightened with a 17mm wrench. - Page 16 Four (4) Axle Pins Note: When replacing axle pins, please use only pins supplied by OREC for use on the AHRC663. These are specially designed pins that protect the transmission if the machine comes in contact with solid objects like metal or concrete.
-
Page 17: How To Run The Machine
How to Run the Machine Initial inspection before running the machine (Please refer to the engine use manual) In order to safely operate the machine, please refer to the [Periodic voluntary inspection table] on page 39. Please have any defective parts repaired immediately, before operating the machine again. How to move the machine manually with the engine switched off Put the speed change lever in the [N] position. - Page 18 Unscrew the oil cap with attached oil gauge. Check the oil level. If the oil does not lie between the upper level and lower level, replenish to bring the oil to the upper level. Oil gauge Prep 2 : Check fuel ...
- Page 19 How to start the engine Move the fuel valve lever to the [ON] position. Turn the throttle lever to the [ (HI)] position. Throttle lever Confirm the drive clutch lever and blade clutch lever are the [OFF] position. Blade clutch lever OFF Drive clutch lever OFF To start a cold engine,move the choke lever to the [closed] position.
- Page 20 Grip the starter knob, pull slowly until you feel tension and then pull strongly from this position. Recoil starter Immediately after the engine has started, slowly return the start knob to its original position. If the choke lever was moved to the [CLOSED] position to start the engine, gradually move it to the [OPEN] position as the engine warms up.
-
Page 21: How To Drive, Change Speed, Turn, Stop (Park)
How to drive, change speed, turn, stop (park) Confirm that all around you is safe before proceeding to drive the machine. - If driving the machine alongside ditches or the edges of paths, there is a danger that the weight of the machine could cause the ground to collapse. - Page 22 How to change speed Release the drive clutch lever [OFF]. Do not try to change speed with the drive clutch lever [ON]. This can cause injury and accidents. 2. Be sure to put the speed change lever securely in the necessary position.
-
Page 23: How To Load And Unload Using A Truck
How to load and unload using a truck Park the truck on a flat and stable surface. Switch off the truck’s engine, engage reverse gear, and pull the parking brake. Also place chucks under the truck’s wheels to stop it from moving. ... -
Page 24: How To Operate The Machine
How to Operate the Machine How to cut weeds and brush Please again read the safety precautions (pages 3-9) and confirm the points regarding your work environment and general safety. When using the machine for the first time, choose a flat area free from rocks and foreign objects and slowly cut a path by going over the area in a straight line. - Page 25 Turn the throttle lever [1] to the [ (HI)] position, grip the blade clutch lock lever [2], and gently raise the blade clutch lever [3] to the [ON] position. The engine may stall if you pull the blade clutch lever up up suddenly.
-
Page 26: Oil Parts Inspection, Replacement, And Lubrication
Oiled Parts Inspection, Replacement, and Lubrication This machine is shipped WITH GEAR OIL. However, please check if it’s lubricated with the described oil, in the described parts, and in the described quantities before use. Low oil level can cause machine damage. This type of damage is not covered by manufacture warranty. ... -
Page 27: Engine Oil Inspection, Replacement, Lubrication
Engine oil inspection, replacement, lubrication Inspection Oil inlet plug Use the oil inlet plug with its attached level gauge to check the quality Oil level gauge and quantity of the engine oil. Perform this inspection before every Washer use or after every 8 hours of operation. ... -
Page 28: How To Lubricate Each Part
How to Lubricate Each Part Be sure to lubricate each part with grease or lubricating oil (SAE 30) every 30 hours. Operation will become difficult and the machine could be damaged if you n eglect lubrication and allow oil to run out. Handlebar up/down cable Steering clutch cable Blade clutch cable... -
Page 29: How To Inspect, Maintain, And Adjust Each Part
However, cleaning of the inside of the fan cover should be performed by the authorized OREC dealer. Please request this from the retailer where you purchased the machine. (Please note, there is a charge for this Cooling fan service.)... -
Page 30: How To Inspect The Fuel Lines
How to inspect the fuel lines When inspecting the fuel line, be absolutely sure not to be in the presence of lit tobacco, naked flame, or other sources of ignition. These can cause fire and explosions. Fuel pipe The rubber parts of the fuel pipe will deteriorate even if you do not use the machine. -
Page 31: How To Inspect And Adjust The Spark Plug
How to inspect and adjust the spark plug Remove the spark plug with a plug wrench and clean away any carbon deposits on the electrode (A) with a wire brush and wipe away any moisture if present. Replace the spark plug with a new one if the ceramic part has cracked or the electrode have suffered extensive wear and tear. -
Page 32: How To Adjust Each Cable And Belt
How to adjust each cable and belt When adjusting each type of cable, place the machine on flat, open ground with the engine switched off and making sure you take safety precautions. ■Adjusting the drive clutch cable Refer to diagram 1 and use the adjust nut to loosen or tighten the drive clutch cable. - Page 33 ■Adjusting the steering clutch cable Refer to diagram 3 and use the adjust nut to tighten or loosen the steering clutch cable. - If you return the steering clutch lever but drive will not engage, move the adjust nut in the direction of (A). -...
- Page 34 ※During the adjustment of wires, please make sure that the wire goes inside 1/8 in when be pushed by finger at arrow points. Do 1/8 in 1/8 in not tighten wires too much. [Refer to Diagram 7] Lock Nut Please make sure that the machine runs perfectly at each speed.
-
Page 35: Precautions In Cold Climate
If you are unable to drive the machine due to freezing, do not force the machine to move but pour hot water on the affected frozen parts and wait for the ice to melt. Orec America Inc. cannot be responsible for damage caused by improper use in cold conditi ons. -
Page 36: Blade Inspection And Replacement
Blade Inspection and Replacement In order to work as safely as possible, perform an inspection of the blades before you start. WARNING When inspecting or replacing the blades, always to switch off the engine as there is a danger of injury. When having the blades replaced or repaired, always have any such work performed by a person with adequate tools and experience. -
Page 37: Regarding Long-Term Storage
Regarding Long-Term Storage If you do not use the machine for more than 30 days, please carry out the following procedures for maintenance. If the machine is not stored properly, there is a danger of fuel spoilage, the machine failing to start, or trouble running the machine. -
Page 38: Specifications
Length x Width x Front height (inch) 74.8 x 31.5 x 39.3 Cutting width (inch) 25.6 Weight (lb) Cutting height (inch) 2.0 – 3.9 Blade (no.) flail blade x38 OREC’s Drive LA47 x 1 Middle LB63 x 1 Belt Blade SB39 x 1 Crawler track size Width6.3inch Pitch2.4inch No. -
Page 39: Included Parts And Tools
Included Parts and Tools Part name Standard/size Quantity Note Instruction manual Engine tool Attached to engine Double-ended wrench 10 12 Double-ended wrench 14 17 Goggles Anti-fog type Protective equipment Consumable Parts Part name Part no. Quantity Note Flail blade 0304-70300 Blade bolt 0304-70100 Blade nut... -
Page 40: Periodic Voluntary Inspection Table
Periodic Voluntary Inspection Table Neglecting inspection and maintenance is a cause of accidents and damage. Perform inspection referring to [Periodic voluntary inspection table] in order to always keep the machine functioning correctly. Please perform annual and monthly inspections as indicated, and starting checks before each use. Inspection freq. - Page 41 Inspection freq. Inspection Content Check for: Desired Result: Cracking or deformity, mounting nuts Frame is not cracked or deformed. Nuts and Body and bolts are loose or missing. bolts are secure. Cover Cracking, deformity, corrosion No cracking, deformity, corrosion. Damage, loosening, rattling of levers When moving, there is no damage, rattling, or Levers /Wires and wires, loss of split pins...
-
Page 42: Self Diagnosis Table
Self Diagnosis Table If any of the following effects occur, refer to the instruction manual and take the appropriate action. Effect Cause Treatment Weeds are wet. Operate machine when weeds are dry. Weeds are too long. Raise the cutting height and cut twice. Cut weeds are not released Cutting height is too low. -
Page 43: Troubleshooting
Troubleshooting If the engine malfunctions perform diagnosis by referring to the following table and then taking the appropriate action. Effect Possible cause Treatment Safety switch is not in the [start up] position. Put the safety switch to the [start up] position. Choke lever has not been pulled out. -
Page 44: Conformity Certificate
CONFORMITY CERTIFICATE I undersigned : OREC CO LTD 548-22 HIYOSHI HIROKAWA-MACHI YAME-GUN JAPAN Certify that the mower : 1. Class : ……........internal combustion engine..............2. Mark : ..............OREC................3. Type : ..............AHRC663....................4. Serial Identification (to be completed) : ...... -
Page 45: Parts Supply Term Limit
OREC product is produced. However, even during the supply period, it may be necessary to consult with OREC when seeking to purchase specific parts. If you have a request for replacement parts after this period has passed, please consult with OREC for availability and prices. -
Page 46: Limited Warranty
LIMITED WARRANTY Terms and Conditions ・ Orec America , Inc. provides a limited warranty of two (2) years for residential users, one (1) year for commercial users and one (1) year for rental companies, of its products against defects in workmanship and materials when said products are put to ordinary and normal use. - Page 47 2) The owner must present the warranty registration sheet or the invoice or receipt received at time of purchase. 3) The warranty claim will be taken and verified by the Orec dealer or distributor service manager and submitted to an Orec distributor. The dealer or distributors service manager will make a report and submit it to Orec America for consideration of warranty.
Need help?
Do you have a question about the AHRC 663 and is the answer not in the manual?
Questions and answers