
Related Manuals for Gatekeeper G4-508HD4a


Summary of Contents for Gatekeeper G4-508HD4a
- Page 1 G4-508HD4a User Manual & Install Guide Document Ref. No. : DN3007 Version No. : 1.0.1 Document Date : September 17th 2017...
-
Page 2: Table Of Contents
GLOSSARY ............................ 6 INTRODUCTION ........................8 G4-508HD4 ......................8 ELCOME TO ..................... 8 MPORTANT AFETY AND ANDLING NFORMATION YOUR G4-508HD4A AT A GLANCE .................... 10 .............................. 10 AKE A ’ ............................13 NCLUDED GETTING STARTED ........................ 15 ........................15 EARNING OW TO AVIGATE 3.1.1... - Page 3 G4-508HD4a User Manual & Install Guide 6.3.6 Application ............................87 ..........................87 URVEILLANCE ETTINGS 6.4.1 Live View ............................. 88 6.4.2 Record ..............................93 6.4.3 IPC Setup ............................104 ..........................108 OLLECTION ETTINGS 6.5.1 General ............................. 108 6.5.2 Snap Setting ............................. 113 ............................
- Page 4 TABLE OF FIGURES Figure 2-1 Front View of the G4-508HD4a ......................10 Figure 2-2 Close Up View of the G4-508HD4a Status Indicator Lights ..............11 Figure 2-3 Rear View of the G4-508HD4a ......................12 Figure 3-1 Front View of the IR Remote Control ....................16 Figure 3-2 Connecting the IR Remote Control and LCD Monitor .................
- Page 5 G4-508HD4a User Manual & Install Guide Figure 9-5 Cabling Diagram with Analog/AHD and Digital IP Cameras, and Wireless ........154 Figure 9-6 Cabling Diagram with Analog/AHD and Digital IP Cameras, Wireless, and AWM Module ....155 Figure 9-7 Wiring the Sensors (CAB000356) ......................156...
-
Page 6: Glossary
G4-508HD4a User Manual & Install Guide GLOSSARY Term/Abbreviation Description Accelerometer Controller Area Network is a vehicle bus standard designed to allow microcontrollers and devices to communicate with each other in applications without a host computer. Digital Video Recorder – a device which records audio and video input from the cameras and stores it to a hard disk drive and/or an SD card for retrieval and viewing. - Page 7 G4-508HD4a User Manual & Install Guide MAC Address Media Access Control address – it is a unique identifier assigned to network interfaces for communications on the physical network segment. On Screen Display – an image superimposed on a screen commonly used to display information such as volume, channel, date/time, device status, etc.
-
Page 8: Introduction
The G4-508HD4a records to a removable Hard Disk Drive. Utilizing a state of the art suspension system and smart thermal management technology, the G4-508HD4a is built to withstand the shocks, vibration and environmental stresses inherent in vehicle operation. - Page 9 G4-508HD4a. If at any time there is a question about how to proceed, please contact Gatekeeper Systems immediately at either 1-888-666-4833 or 1-604-864-6187 for assistance. Review all available installation documentation, including technical bulletins.
-
Page 10: Your G4-508Hd4A At A Glance
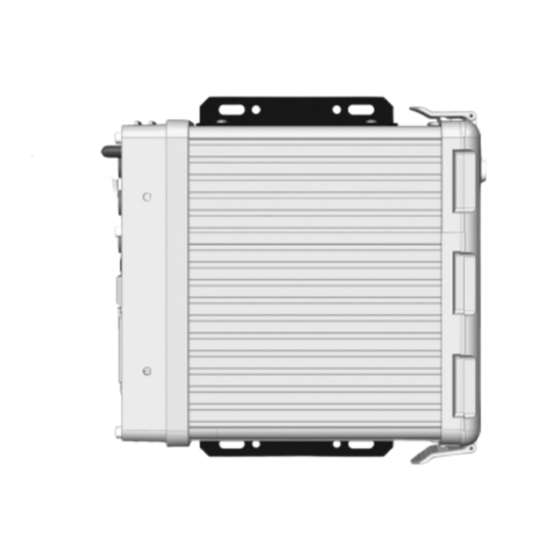
2 Your G4-508HD4a at a Glance Take a Tour This is the front panel of the G4-508HD4a: Figure 2-1 Front View of the G4-508HD4a 1. Removable Hard Disk Drive Caddy: This is the removable Hard Disk Drive Caddy for the DVR. It utilizes a state of the art suspension system and smart thermal management technology to withstand the shocks, vibration and environmental stresses inherent in vehicle operation. -
Page 11: Figure 2-2 Close Up View Of The G4-508Hd4A Status Indicator Lights
G4-508HD4a User Manual & Install Guide Figure 2-2 Close Up View of the G4-508HD4a Status Indicator Lights Description Illuminated blue indicates HDD is present. Flashing indicates activity. Do not remove the HDD when the light is flashing as this may result in data loss. -
Page 12: Figure 2-3 Rear View Of The G4-508Hd4A
IP Cameras. This port is also used for connection to the wireless equipment in a Gatekeeper Wireless deployment. 5. USB Out: Used to connect the Gatekeeper Systems Firebox. Speak with your sales representative for more information. -
Page 13: What's Included
G4-508HD4a User Manual & Install Guide What’s Included The following items are included as part of your basic product package. G4-508HD4a Digital Video Recorder (G4-508HD4a Assembly) Your new mobile digital video recorder with a state of the art hard disk drive suspension system and smart thermal management technology. - Page 14 There are numerous customisable options and accessories which can tailor the product installation to fit your unique operating environment and requirements. Please contact Gatekeeper Systems for information on optional download kits and other accessories for use with your product. 14 of 162...
-
Page 15: Getting Started
Learning How to Navigate Your G4-508HD4a comes with a simple graphical user interface from which you can access all the features and functions of the DVR. You can select from a choice of intuitive interface devices with which to navigate the system. -
Page 16: Using The Ir Remote Control
G4-508HD4a User Manual & Install Guide 3.1.1 Using the IR Remote Control The infra-red remote control, together with the accompanying LCD monitor, allows you to access the DVR functions and menu system. § Arrow Keys: These buttons can be used to... -
Page 17: Figure 3-2 Connecting The Ir Remote Control And Lcd Monitor
G4-508HD4a User Manual & Install Guide Figure 3-2 Connecting the IR Remote Control and LCD Monitor 17 of 162 Getting Started... -
Page 18: Using The Finger Mouse
G4-508HD4a User Manual & Install Guide 3.1.2 Using the Finger Mouse The trackball mouse, together with the accompanying LCD monitor, provides another way to access the DVR menu and functions using a familiar graphical user interface point-and-click system. Figure 3-3 Side View of the Finger Mouse Right Button: When viewing video streams, pressing this button will toggle between showing and §... -
Page 19: Figure 3-4 Connecting The Finger Mouse And Lcd Monitor
G4-508HD4a User Manual & Install Guide How to Connect the Finger Mouse and LCD Monitor Figure 3-4 Connecting the Finger Mouse and LCD Monitor 19 of 162 Getting Started... -
Page 20: Using The Interactive Control Display (Icd2)
G4-508HD4a User Manual & Install Guide 3.1.3 Using the Interactive Control Display (ICD2) The ICD2 is a full featured touch display that makes navigating the device menu system very intuitive. Besides the touch function, this accessory also has a number of buttons which act as hotkeys allowing the user to quickly select and go to different functions. -
Page 21: Figure 3-6 Connecting The Icd2
G4-508HD4a User Manual & Install Guide Arrow Keys: These buttons can be used to move the cursor or menu highlight to the left and right as § well as up and down in order to select a button or menu item. -
Page 22: Guide To Common Navigation Actions
G4-508HD4a User Manual & Install Guide Guide to Common Navigation Actions The following table provides a summary of commonly used navigation functions. Action IR Remote Finger Mouse ICD2 Navigating through Use the Arrow Keys to Move the on-screen Use your finger to tap the... - Page 23 G4-508HD4a User Manual & Install Guide Action IR Remote Finger Mouse ICD2 Control to type the numbers directly, once the numeric field has been selected. Click and drag an item. This action can’t be Move the on-screen Tap your finger on the...
-
Page 24: The G4-508Hd4A Startup Screen Layout
The G4-508HD4a Startup Screen Layout Upon startup, the screen of the G4-508HD4a will display the live video streams from the various cameras attached to the DVR. Users can select and configure how many video channels to be displayed on the screen for monitoring purposes. -
Page 25: Figure 3-7 G4-508Hd4A Startup Screen
G4-508HD4a User Manual & Install Guide Figure 3-7 G4-508HD4a Startup Screen Live Video From Cameras: By default upon system startup, the screen will display live video from the § camera attached to channel one in single camera full onscreen view. Clicking anywhere on the video screen will bring up the on-screen quick menu where the user can select from several different display options. -
Page 26: Viewing Live Video
G4-508HD4a User Manual & Install Guide Viewing Live Video Single Camera On-screen View When the screen is in Single Camera On-screen View mode, camera from a single camera channel will § be shown on the entire screen. In order to select a specific camera for viewing, you may press any of the keys [1-9] on the IR Remote §... -
Page 27: Figure 3-9 Cycling Through The Video Channels In Quad View
G4-508HD4a User Manual & Install Guide 4 Camera On-screen View In 4 Camera On-screen View mode, the screen is split into four sections (using a 2x2 grid layout) and § video from four cameras is simultaneously shown on the screen. -
Page 28: Quick View Of System Status Information
G4-508HD4a User Manual & Install Guide You can cycle through the available channels iteratively in (3x3) grid display mode by pressing the § key zero [0] on the IR Remote Control or the ICD2. Figure 3-10 Cycling through the Video Channels in 9-Split View Notes Channels which do not have cameras configured on them will just show a black display. -
Page 29: Figure 3-12 System Information Function On Quick Menu
G4-508HD4a User Manual & Install Guide Figure 3-12 System Information Function on Quick Menu This System Information function is a quick and easy way to access and view all the important information about your device’s status and configuration from one central location. It can be accessed directly from the on-screen quick menu without the need to log in. - Page 30 G4-508HD4a User Manual & Install Guide 3. Modules - Location This screen shows the GPS data giving the current (Not supported by Gatekeeper) device location (in terms of GPS coordinates), source of the location data, as well as some additional...
-
Page 31: Logging Into The System
Logging into the System In order to access many of the G4-508HD4a’s advanced functions, you will need to be logged in to the system. This is a security measure to ensure that access to sensitive functions and video data is restricted to authorised users. - Page 32 G4-508HD4a User Manual & Install Guide Step 1 System will display the log-in dialog box as shown below. § Click on the drop down ( v ) button at the right corner of the User Name field. § A drop down menu will appear which will list all the users who are set up to access the §...
- Page 33 G4-508HD4a User Manual & Install Guide The system ships with the following two default user credentials: § User name admin ( * default administrator account ) Password admin User name user Password user You may change the default administrator user password, and also edit/add additional users through §...
-
Page 34: Understanding The Main Menu
G4-508HD4a User Manual & Install Guide Understanding the Main Menu The Main Menu can be accessed by clicking the Person icon on the far right of the on-screen quick menu. Figure 3-13 Accessing the Main Menu If you are using an IR Remote Control, you could also press either the ( Login/Lock ) or ( Setup ) button to jump to the Main Menu. -
Page 35: Figure 3-14 Options In The Main Menu
Logout: Logout the current logged-in user. This will return the system to the live video view. § The REC Search and Log Search functions will be explained in the chapter on Viewing Recorded Data, whilst the Setup function will be explained in the chapter on Configuring the G4-508HD4a. 35 of 162 Getting Started... -
Page 36: Basic System Quick Start
Step 1: Powering Up the G4-508HD4a The Gatekeeper Project Team are able to mount and install the device into the vehicle based on your requirements and in accordance with industry best practices from years of experience. If you prefer to mount... -
Page 37: Step 3: Logging In And Accessing System Configuration
G4-508HD4a User Manual & Install Guide Step 3: Logging In and Accessing System Configuration You may now log into the system and go to the Main Menu where you can access the device Setup and configuration settings. Step 3.1 If you are using an IR Remote Control, press the ( Exit ) button to display the on-screen §... - Page 38 § Understanding the Setup Menu System for System Configuration The G4-508HD4a comes with a comprehensive setup menu system where you will be able to tailor almost every aspect of the device operations to your unique fleet requirements. The configuration options in the menu are broken into 5 major sections: Basic –...
-
Page 39: Step 4: Setting The Date And Time
G4-508HD4a User Manual & Install Guide Maintenance – where you will be able to perform various maintenance actions, including data export § and firmware upgrades. For a detailed explanation, please see Section 6.7. Each of these major configuration sections have their separate subsections as shown in the following diagram. - Page 40 G4-508HD4a User Manual & Install Guide Navigate to: Main Menu à Setup à Basic Setup à Time Setup Please verify that the following default settings are correctly configured. For a detailed explanation of each setting, please see Section 6.3.2. General...
-
Page 41: Step 5: Setting The Vehicle Identity Information
G4-508HD4a User Manual & Install Guide Start DEFAULT SETTINGS: MAR (month) § 2ND (week) § SUNDAY (day) § 02:00:00 (time) § DEFAULT SETTINGS: NOV (month) § 1ST (week) § SUNDAY (day) § 02:00:00 (time) § Step 5: Setting the Vehicle Identity Information The next step would be to set up the identification information for the device, so that it is tied to the vehicle for easy report generation and tracking purposes. -
Page 42: Step 6: Setting Basic Preferences
G4-508HD4a User Manual & Install Guide Driver Name If desired, you may also key in the name of the vehicle driver here. Maximum of: 10 characters Step 6: Setting Basic Preferences Next you will need to setup the ignition on/off delay time. -
Page 43: Step 7: Setting Up Authorised Users
6.3.4. Step 8: Setting Up Recording The G4-508HD4a is a hybrid DVR. It has the capability of having a combination of Analog; Analog HD and up to 4 IP cameras connected at the same time. This next step is a crucial step, where you will select the cameras to record the video from, and also set up the quality and resolution of the recorded video. - Page 44 G4-508HD4a User Manual & Install Guide Pre-Recording DEFAULT SETTINGS: Checkbox – Unselected § Main Stream Channel Name DEFAULT SETTINGS: Channel 1 – set name as – CH1 § Channel 2 – set name as – CH2 § Channel 3 – set name as – CH3 §...
- Page 45 G4-508HD4a User Manual & Install Guide For channels 9 to 12 (IP camera channels), set the following: 720P § 1080P § Frame Rate DEFAULT SETTINGS: For all channels (1 to 12), set the following: § Quality DEFAULT SETTINGS: For all channels (1 to 12), set the following: 1 (Best) §...
-
Page 46: Step 9: Setting U Pip Cameras
Main Menu à Setup à Surveillance à IPC Setup Your G4-508HD4a includes a Fast Setup option which allows you to automatically detect and setup all the connected Digital IP Cameras with a single click. For instructions on how to use Digital Cameras with your Gatekeeper Systems 4 Port Switch please see Page 154. - Page 47 G4-508HD4a User Manual & Install Guide Please also review Chapter 5 to learn about viewing and clipping the recorded video. 47 of 162 Basic System Quick Start...
-
Page 48: Viewing Recorded Data
G4-508HD4a User Manual & Install Guide 5 Viewing Recorded Data Using the Playback Feature The Playback feature can be accessed from the on-screen quick menu after logging in. It functions as a shortcut which allows the user to immediately access and view recorded video from the start of the current day (beginning 00:00:00H) till the current time of the day. -
Page 49: Figure 5-2 Playback On-Screen Controls
G4-508HD4a User Manual & Install Guide The Video Playback On-Screen Controls In playback mode, pressing the ( Setup ) button on the IR Remote Control will toggle between displaying and hiding the on-screen controls for the playback function. If you are using a Finger Mouse, you can toggle the on-screen controls by pressing the Right Button, whereas with the ICD2, you would just tap anywhere on the video. -
Page 50: Using Rec Search
G4-508HD4a User Manual & Install Guide Current Playback Time Control: This shows the current playback time. Selecting it will bring up the § time control dialog which allows you to key in a specific time (in hh:mm:ss 24-hour time format) from which to begin the playback. -
Page 51: Figure 5-3 Rec Search Date Controls
G4-508HD4a User Manual & Install Guide select and export video clips of specific time periods to an external storage device (such as USB flash drive) for later viewing. REC Search Step 1: Selecting the Date Essentially, the REC Search screen allows you to select a date to view the recorded video. It uses a calendar view to enable the user to easily visualise the availability of recorded video, and also employs color coding to provide easy identification of dates for which the recorded video has special characteristics (eg. - Page 52 G4-508HD4a User Manual & Install Guide Main Menu: Click this icon to return to the Main Menu. § Back to Previous Screen: Click this icon to return to the Previous Screen that you were at. § Recorded Video Available: A colored bar below the date indicates that recorded video exists for that §...
-
Page 53: Figure 5-4 Rec Search Camera Channel Controls
REC Search Step 2: Selecting the Camera Channels In a complex multi-camera DVR configuration such as the G4-508HD4a which can have up to 12 connected cameras in total, records of even a single day may contain a lot of recorded video data. This next step allows you to filter the data by selecting only the camera channels of interest to view. -
Page 54: Figure 5-5 Rec Search Time Controls
G4-508HD4a User Manual & Install Guide the time of interest from, as well as the specific camera channels, from which to commence playback. The system also allows you to export a video clip of the specified time period. Figure 5-5 REC Search Time Controls Main Menu: Click this icon to return to the Main Menu. - Page 55 G4-508HD4a User Manual & Install Guide Playback Start Time: This shows the selected playback time. Clicking on it will bring up the time § control dialog which allows you to key in a specific time (in hh:mm:ss 24-hour time format) from which to begin the playback.
-
Page 56: Figure 5-6 Rec Search Playback Controls
G4-508HD4a User Manual & Install Guide Figure 5-6 REC Search Playback Controls Selected Time Period: This time bar represents the selected time period. § Recorded Video Available: The green shaded areas in the time bar let’s you easily identify where the §... - Page 57 G4-508HD4a User Manual & Install Guide Cycle to Next Channel: Switch playback to the next camera channel. For example, if the system is § currently playing recorded video from Camera 3, then clicking this button will switch to playing recorded video from Camera 4.
- Page 58 G4-508HD4a User Manual & Install Guide REC Search Step 5: Exporting the Recorded Video At the time period selection screen of the REC Search function, you may also choose to export a video clip of the recorded video data by specifying a start and end time for the video and clicking the ( Export ) button on the screen.
- Page 59 G4-508HD4a User Manual & Install Guide Step 5.2 After selecting the camera channels, you can also specify the time period of the video § data that you wish to export. Click on the Playback Start Time to key in the specific start time of the video that you §...
-
Page 60: Using Log Search
G4-508HD4a User Manual & Install Guide Step 5.3 Once you have selected both the camera channels and the time period, click the ( Export § ) button to proceed. A summary screen will be displayed showing the selected time period and the estimated §... -
Page 61: Figure 5-7 Log Search Date Controls
G4-508HD4a User Manual & Install Guide Figure 5-7 Log Search Date Controls Main Menu: Click this icon to return to the Main Menu. § Back to Previous Screen: Click this icon to return to the Previous Screen that you were at. -
Page 62: Figure 5-8 Log Time And Type Selection
G4-508HD4a User Manual & Install Guide Figure 5-8 Log Time and Type Selection Main Menu: Click this icon to return to the Main Menu. § Back to Previous Screen: Click this icon to return to the Previous Screen that you were at. -
Page 63: Figure 5-9 View And Export Log File
G4-508HD4a User Manual & Install Guide Show all alarm events. IO Alarm Only show IO alarm events. Panel Alarm : Only show panel alarm events. Speed Alarm : Only show speed alarm events. ACC Alarm Only show ACC alarm events. -
Page 64: Configuring The G4-508Hd4A
6 Configuring the G4-508HD4a Quick Reference to Configuration Menu System The following shows a high level map to the various settings in the G4-508HD4a configuration menu system. Please refer to the following sections for a detailed description of each section. -
Page 65: Navigating The Configuration Menus
G4-508HD4a User Manual & Install Guide Navigating the Configuration Menus The configuration menus are presented in a tabular format, where the main sections can be selected from the row of tabs at the top of the screen. The subsections within each main section are arrayed in columnar format, and can be selected from the column of page subsections on the left edge of the screen. - Page 66 If you navigate away from the current page/tab without saving, any changes that you have made to the settings will be discarded. Please note that your configuration settings have been set by Gatekeeper Systems engineers to meet your specific deployment requirements. Do not reset to factory defaults or change the settings unless you fully understand the changes you are making, or as directed by Gatekeeper Systems.
- Page 67 G4-508HD4a User Manual & Install Guide Text Field This is a general field which accepts user input. Clicking the field will display an on-screen full qwerty keyboard for the user to key in the text (both alphabets and numbers). However, if the field will only accept numeric values, clicking on the field will display an on-screen keypad for the user to key in numeric values.
-
Page 68: Basic Settings
G4-508HD4a User Manual & Install Guide Time Field This is an input field for time. Clicking on this field will show an on-screen keypad which the user can use to enter the time values. Drop List This is a controlled input field which only accepts selections from a predefined list of items. -
Page 69: Regist Info
G4-508HD4a User Manual & Install Guide Figure 6-2 Basic Setup Tab in the Device Configuration Options 6.3.1 Regist Info Navigate to: Main Menu à Setup à Basic Setup à Regist Info This subsection enables you to view and set the various identification codes to be associated with the device, as well as the vehicle it will be installed in, and the associated vehicle driver. - Page 70 G4-508HD4a User Manual & Install Guide You may input up to a maximum of: 10 characters § DEFAULT SETTINGS: Please refer to Gatekeeper Project Team, in consultation with customer/school district, for the value to set. Vehicle Num Alphanumeric text field for setting the vehicle number.
-
Page 71: Time Setup
G4-508HD4a User Manual & Install Guide Please refer to Gatekeeper Project Team, in consultation with customer/school district, for the value to set. Driver Name Alphanumeric text field for setting the name of the driver. You may input up to a maximum of: 10 characters §... - Page 72 G4-508HD4a User Manual & Install Guide DEFAULT SETTINGS: (GMT-08:00) PACIFIC TIME (US & § CANADA) If this is not your time zone, please change this setting as appropriate to the actual time zone that your fleet will be operating in.
- Page 73 G4-508HD4a User Manual & Install Guide This setting requires a constant network connection either via cellular or WiFi. DEFAULT SETTINGS: Checkbox – Unselected § NTP Sync Checkbox – specifies if the device will synchronize the date and time periodically with a selected Time Server.
- Page 74 G4-508HD4a User Manual & Install Guide Date (set an actual hard date for when § daylight savings is active) DEFAULT SETTINGS: Week § Start This is a set of fields which allow you to choose the starting point of the period for which the device will adjust for daylight savings time.
-
Page 75: Startup
G4-508HD4a User Manual & Install Guide Time field to set the end time. § DEFAULT SETTINGS: NOV (month) § 1ST (week) § SUNDAY (day) § 02:00:00 (time) § 6.3.3 Startup Navigate to: Main Menu à Setup à Basic Setup à Startup This subsection enables you to set the startup characteristics of the device, as well behaviour of the device whilst in sleep mode. - Page 76 G4-508HD4a User Manual & Install Guide Timer From This consists of two time fields to set the start time and end time for which the device will turn on and turn off respectively. DEFAULT SETTINGS: Disabled/not applicable. Light off Time...
-
Page 77: User Setup
G4-508HD4a User Manual & Install Guide Voltage Startup Numeric text field to set the recovery boot voltage threshold. When the vehicle battery recovers its charge and is consistently above this threshold value, the device will automatically turn on again. For a vehicle with a 12V battery, the recommended threshold value is 12.5V. - Page 78 G4-508HD4a User Manual & Install Guide Notes: The user admin is the default administrator and cannot be deleted. Only administrators can add/delete users. In addition to the administrator, the maximum number of additional users that can be added is two.
- Page 79 G4-508HD4a User Manual & Install Guide edit user screen, the following fields will allow you to modify the selected user’s details: Alphanumeric text field to key in the user § name. Alphanumeric text field to key in the new §...
-
Page 80: Network
G4-508HD4a User Manual & Install Guide 6.3.5 Network Navigate to: Main Menu à Setup à Basic Setup à Network This subsection enables you to view and set up all the network configuration options for the device communications. These include settings for the local network, web port settings, WiFi,, communications module, and center server settings. - Page 81 G4-508HD4a User Manual & Install Guide DEFAULT SETTINGS: Checkbox – Unselected § Use Following DNS Checkbox – if selected, the device will use the manually configured DNS settings. DEFAULT SETTINGS: Checkbox – Selected § Preferred DNS Server Numeric text field allowing you to key in the IP address of the primary DNS server.
- Page 82 Numeric text field allowing you to key in the IP address of the gateway for the device. DEFAULT SETTINGS: Disabled/not applicable. NOTE: THE FOLLOWING SECTION (COMM) IS ONLY APPLICABLE FOR DVRS EQUIPPED WITH THE INTERNAL CELLULAR MODULE. GATEKEEPER DOES NOT SUPPORT THIS CONFIGURATION. 82 of 162 Configuring the G4-508HD4a...
- Page 83 G4-508HD4a User Manual & Install Guide Comm Module Drop list which displays a list of connected communication modules. Selecting one of them will display the currently set configuration values, and allow you to modify them. These configuration values are module specific. If...
- Page 84 G4-508HD4a User Manual & Install Guide Password Alphanumeric text field allowing you to configure the password. DEFAULT SETTINGS: Disabled/not applicable. Number Numeric text field allowing you to configure the dial-up number. DEFAULT SETTINGS: Disabled/not applicable. Certification Drop list allowing you to configure the...
- Page 85 G4-508HD4a User Manual & Install Guide Disabled/not applicable. NOTE: THE FOLLOWING SECTION (SERVER) IS ONLY APPLICABLE WHEN THE DEVICE IS BEING CONFIGURED AS PART OF A GATEKEEPER WIRELESS DEPLOYMENT. Server Center Server Drop list which displays a list of center servers configured in the device.
- Page 86 G4-508HD4a User Manual & Install Guide Local § WiFi – Not Supported § Module1 – Not Supported § Module2 – Not Supported § Auto Adaptation– Not Supported § DEFAULT SETTINGS: Local § Register Server IP Numeric text field to configure the IP address of the message server.
-
Page 87: Application
G4-508HD4a User Manual & Install Guide 6.3.6 Application Navigate to: Main Menu à Setup à Basic Setup à Application This subsection enables you to view and edit the application settings of the device, related to FTP and traffic management. NOTE: GATEKEEPER DOES NOT SUPPORT THIS CONFIGURATION. -
Page 88: Live View
G4-508HD4a User Manual & Install Guide Figure 6-3 Surveillance Tab in the Device Configuration Options 6.4.1 Live View Navigate to: Main Menu à Setup à Surveillance à Live View This subsection enables you to configure the settings for the live view of the video coming from the cameras. - Page 89 G4-508HD4a User Manual & Install Guide Image Setup Menu: The entire image setup menu is floating over the video from the live camera. § You may click and drag the entire image setup menu up and down in order to look at different parts of the image.
- Page 90 G4-508HD4a User Manual & Install Guide DEFAULT SETTINGS: Please adjust the margins if necessary to ensure the entire screen fits comfortably within your installed display monitor. Startup Screen Drop box for selecting the type of live video displayed by default after...
- Page 91 G4-508HD4a User Manual & Install Guide DEFAULT SETTINGS: Checkbox – Channel 1 – Selected § Checkbox – Channel 2 – Selected § Checkbox – Channel 3 – Selected § Checkbox – Channel 4 – Selected § Checkbox – Channel 5 – Unselected §...
- Page 92 G4-508HD4a User Manual & Install Guide : Four cameras on the screen in 2x2 (quad) grid layout : Nine cameras on the screen in 3x3 (9-split) grid layout Choose Channel: The drop lists are shown on-screen accordingly to the grid layout mode selected.
-
Page 93: Record
G4-508HD4a User Manual & Install Guide DEFAULT SETTINGS: Checkbox – Selected § Vehicle num Checkbox – if selected, the Vehicle num will be displayed as an overlay text on top of the live video view on the LCD monitor or ICD2. - Page 94 G4-508HD4a User Manual & Install Guide This subsection enables you to configure the settings related to the video being recorded from the various cameras. General System This drop list enables you to select what system format the video will be recorded in: §...
- Page 95 G4-508HD4a User Manual & Install Guide occur, video data leading up to the incident is available as well. Selecting this checkbox will enable a drop list where you can specify the duration of video to pre-record. DEFAULT SETTINGS: Checkbox – Unselected §...
- Page 96 G4-508HD4a User Manual & Install Guide Channel 9 – set name as – CH9 § Channel 10 – set name as – CH10 § Channel 11 – set name as – CH11 § Channel 12 – set name as – CH12 §...
- Page 97 G4-508HD4a User Manual & Install Guide Frame Rate Drop list allowing you to select the frame rate (in terms of frames per second) that you would like to record at. DEFAULT SETTINGS: For all channels (1 to 12), set the following: §...
- Page 98 G4-508HD4a User Manual & Install Guide Copy To – this feature allows you to copy § the current timer recording settings scheduled for any particular day to another day, thus allowing you to easily and quickly replicate the timer recording schedule settings.
- Page 99 G4-508HD4a User Manual & Install Guide However, for critical video (where detail must not be lost), and which also has a lot of fast movement, CBR is the better choice, as VBR would tend to introduce motion artefacts (jaggedness and blurriness) into the encoded video as the...
- Page 100 G4-508HD4a User Manual & Install Guide contact your Gatekeeper Systems sales representative for more details. DEFAULT SETTINGS: Internal SD § Record Mode Drop list where you can select the dual stream record mode: Sub Record – record a copy of the video §...
- Page 101 G4-508HD4a User Manual & Install Guide Resolution – drop list to select the § resolution to record this channel at. Available resolution options are QCIF (176x120), CIF (352x240), HD1 (704x240) and D1 (704x480). Frame Rate – drop list allowing you to §...
- Page 102 G4-508HD4a User Manual & Install Guide Time Checkbox – if selected, the date and time will be displayed as an overlay text on top of the recorded video. DEFAULT SETTINGS: Checkbox – Selected § Vehicle Plate Checkbox – if selected, the vehicle number will be displayed as an overlay text on top of the recorded video.
- Page 103 G4-508HD4a User Manual & Install Guide Notes: The Device ID data which the device will overlay into the recorded video is actually the identifier data which is set in the Basic Setup Regist Info Vehicle Info Vehicle Plate. à à...
-
Page 104: Ipc Setup
G4-508HD4a User Manual & Install Guide 6.4.3 IPC Setup Navigate to: Main Menu à Setup à Surveillance à IPC Setup This subsection enables you to easily search for and configure the Digital IP cameras which are connected to the DVR. -
Page 105: Figure 6-5 4 Ip Camera Search Screen
G4-508HD4a User Manual & Install Guide Figure 6-5 4 IP Camera Search Screen The available IP cameras will be displayed in a list together with the default settings for IP address, port and protocol type which have be automatically configured by the DVR. -
Page 106: Figure 6-6 4 Ip Camera Settings Configuration Screen
Fast Setup: This is an advanced Digital IP camera auto-configuration feature which is found on § Gatekeeper Systems high-end DVRs. It provides the user with an easy and automated configuration tool for IP cameras. Revert to Defaults: Clicking the ( Default ) button will revert all the settings to their defaults. -
Page 107: Figure 6-7 4 Fast Setup Screen
G4-508HD4a User Manual & Install Guide Using Fast Setup Fast Setup is an IP Camera auto-configuration feature which is available in all of Gatekeeper Systems’ latest generation DVRs. Figure 6-7 4 Fast Setup Screen Video from Camera: The video stream from the IP Camera is shown on the screen for easy §... -
Page 108: Collection Settings
G4-508HD4a User Manual & Install Guide Collection Settings Navigate to: Main Menu à Setup à Collection This section allows the user to configure all the settings related to data collection. This includes event logging from sensor input as well as alarms. The user can also configure the options for automated snapshots from the cameras based on specified triggers. - Page 109 G4-508HD4a User Manual & Install Guide For quick configuration, the copy function allows you to easily copy the settings of the current sensor to another sensor. Alphanumeric text field for setting a friendly name Sensor Name to easily identify the sensor.
- Page 110 G4-508HD4a User Manual & Install Guide Sensor Number: 5 Sensor Name – LEFTTURN § OSD Name – LT § Sensor Number: 6 Sensor Name – RIGHTTRN § OSD Name – RT § Sensor Number: 7 Sensor Name – EXTRA1 §...
- Page 111 G4-508HD4a User Manual & Install Guide External GPS § 3Axis Acc § Green Driver § § DEFAULT SETTINGS: None § The second associated drop list allows the user to set the baud rate for the port: 4800 § 9600 §...
- Page 112 G4-508HD4a User Manual & Install Guide RS-485-2 The first associated drop list allows the user to configure the port function: None § 485 Bus § External GPS § 3Axis ACC § Green Driver § § DEFAULT SETTINGS: None § The second associated drop list allows the user to...
-
Page 113: Snap Setting
G4-508HD4a User Manual & Install Guide Notes: If the measurement unit is set to Pulse, you will also need to select the calibration mode and perform a manual calibration. Pulse mode is currently unsupported, and Gatekeeper Systems recommends the use of Satellite for this setting. - Page 114 G4-508HD4a User Manual & Install Guide Clicking the ( Add ) button will add a snapshot schedule task to the displayed task list with the following settings that you can edit: Start Time – this is a time field which §...
- Page 115 G4-508HD4a User Manual & Install Guide DEFAULT SETTINGS: Checkbox – Unselected § Trigger Snap Alarm Snap Setting this enables the device to automatically take snapshots whenever an alarm event occurs. Clicking the ( Setup ) button displays the snap link...
-
Page 116: Alarm Settings
G4-508HD4a User Manual & Install Guide Disabled/not applicable. Manual Snap These settings are used for snapshots which are taken manually by the user. Clicking the ( Setup ) button displays the snap link settings page which allows you to configure the settings. -
Page 117: Base
G4-508HD4a User Manual & Install Guide All settings related to alarm events are contained in this section. The user can configure the settings for the various alarms such as speed, panel, IO, ACC, as well as video loss events. Figure 6-9 Alarm Tab in the Device Configuration Options 6.6.1 Base... - Page 118 G4-508HD4a User Manual & Install Guide DEFAULT SETTINGS: Disabled/not applicable. Speed Threshold: Numeric text field to key in the speed value over which the device will flag an § over speed alarm. Alarm Duration: Numeric text field to set the duration of the alarm (in seconds).
- Page 119 G4-508HD4a User Manual & Install Guide Linkage IO Output – checkboxes, if § enabled, the device will send a signal to the selected IO output lines. Output Delay Time – numeric text field § to set the delay time for the IO output (in seconds).
- Page 120 G4-508HD4a User Manual & Install Guide DEFAULT SETTINGS: Checkbox – Selected § Alarm Type Drop list to select the classification level for the alarm: Event § Alarm § DEFAULT SETTINGS: Event § Trigger Click the ( Setup ) button under Trigger to display the Trigger setup screen.
- Page 121 G4-508HD4a User Manual & Install Guide display, recording snapshot options associated with this alarm. The Linkage setup screen enables you to configure the following options: Channel – checkboxes which allow you § to select any combination of the camera channels to be included in the display and recording.
- Page 122 G4-508HD4a User Manual & Install Guide segments associated with an actual camera will be displayed as a black box PB Alarm Duration – numeric text field § to set the duration of the video playback (in seconds) when the alarm occurs.
- Page 123 G4-508HD4a User Manual & Install Guide Trigger Click the ( Setup ) button under Trigger to display the Trigger setup screen for the associated IO input line. This will display a drop list which allows you to select the trigger for this IO input line: Low (0V) §...
-
Page 124: Video
G4-508HD4a User Manual & Install Guide selected cameras on-screen when the alarm occurs. None : Not displayed. Single : Display 1 camera. Quad : Display 4 cameras. If Single (1x1) or Quad (2x2) display is selected, the ( Setup ) button allows you to select the layout of the channels to be displayed on-screen. - Page 125 G4-508HD4a User Manual & Install Guide detected on the specified camera channels, this alarm will be triggered. DEFAULT SETTINGS: Checkbox – Selected § Alarm Type Drop list to select the classification level for the alarm: Important § General § Panic Alarm §...
- Page 126 G4-508HD4a User Manual & Install Guide and quickly replicate the videoloss monitoring schedule settings. Once you have selected the day to copy to, click on the ( Copy ) button to make the copy. DEFAULT SETTINGS: Please choose the operational periods for which to monitor for video loss events.
- Page 127 G4-508HD4a User Manual & Install Guide Quad : Display 4 cameras. If Single (1x1) or Quad (2x2) display is selected, the ( Setup ) button allows you to select the layout of the channels to be displayed on-screen. The drop lists are shown on-screen accordingly to the grid layout mode selected.
- Page 128 G4-508HD4a User Manual & Install Guide options are available. Select the channel on which you want the motion detection to be recorded. The area setup button of the selected channel will display a grid pattern. Select the area required to be covered by Motion detection.
-
Page 129: Advanced
G4-508HD4a User Manual & Install Guide 6.6.3 Advanced Navigate to: Main Menu à Setup à Alarm à Advanced This subsection enables you to set up the trigger for alarm events based on ACC input, and also to define the actions that will be taken when the alarm occurs. - Page 130 G4-508HD4a User Manual & Install Guide Post Recording – drop list which allows § you to select the duration for which video will continue to be recorded when the alarm is triggered. Lock – checkbox, if selected will mark the §...
-
Page 131: Maintenance Settings
G4-508HD4a User Manual & Install Guide DEFAULT SETTINGS: Disabled. Calibrate Click the ( Calibrate ) button to calibrate the device accelerometer. DEFAULT SETTINGS: Disabled. Maintenance Settings Navigate to: Main Menu à Setup à Maintenance This section allows the user to perform various maintenance operation such as import and export of data and configuration files, firmware upgrades, and storage media formatting. -
Page 132: Filedata
G4-508HD4a User Manual & Install Guide be saved on an external storage device (most commonly a USB flash drive attached to the device USB port). Config File Import Click the ( Import ) button to export the device configuration settings from a file. You will need a... -
Page 133: Upgrade
G4-508HD4a User Manual & Install Guide Vehicle Info File § ACC Info File § CAN Info File § Dial Info File § Captured Picture § Alarm Log § Operation Log § File Option Currently unsupported at this time. 6.7.3 Upgrade Navigate to: Main Menu à... -
Page 134: Reset
G4-508HD4a User Manual & Install Guide Storage Storage Type This shows the various storage devices which are attached to the DVR. Available storage devices shown may include any combination of HDD, SD Card and/or USB flash drives. Free/Total This shows the total storage capacity of the device, and the remaining free space on it. -
Page 135: Special Topics
Port Camera switch available from Gatekeeper Systems, the IP Cameras need to be configured in the system with the appropriate settings and IP addresses before they will work. In the G4-508HD4a though, adding a new IP camera to the system can easily be done through the automated setup options available in the setup menu. - Page 136 G4-508HD4a User Manual & Install Guide The system will already have assigned a new IP address your new IP Camera. Review this § list against the list of IP addresses from the previous step to identify the IP address that belongs to your new IP Camera.
-
Page 137: Adding An Ip Camera Using Fast Setup
G4-508HD4a User Manual & Install Guide Click on the ( Save ) button to save the settings and exit from this screen. § Your new IP Camera is now configured, and will stream video to the selected channel for §... - Page 138 G4-508HD4a User Manual & Install Guide Step The system will proceed to detect and automatically configure all IP Cameras which are § 7.1.2.2 attached to the system. All the IP Cameras will then be assigned to one of the channels (9 to 12).
-
Page 139: Binding Ip Cameras To Any Channel
G4-508HD4a User Manual & Install Guide Click on the ( Save ) button to save the settings and exit from this screen. § Your new IP Camera is now configured, and will stream video to the selected channel for §... -
Page 140: Figure 7-1 Unused Channels Displayed As Black
G4-508HD4a User Manual & Install Guide Figure 7-1 Unused Channels Displayed as Black These unused channels can be reassigned to the IP Cameras instead, thus enabling you to view video from all cameras sequentially. To do this, follow the steps in the previous Section 7.1... -
Page 141: Configuring Substream Recording Quality
G4-508HD4a User Manual & Install Guide Configuring Substream Recording Quality When you choose to record the substream to a secondary storage device using the Sub Record option, you can also choose a different set of quality settings to use for this substream recording. - Page 142 G4-508HD4a User Manual & Install Guide This substream recording settings configuration needs to be done for each individual camera channel separately. The following options will be available for configuration: Choose Channel – drop list to select the particular channel to configure. When a channel is selected, §...
-
Page 143: Using A New Sd Card
G4-508HD4a User Manual & Install Guide Using a New SD Card The G4-508HD4a uses a special filesystem format to store data to the SD Card. As such, any new SD Card would need to be formatted in the device itself prior to use. -
Page 144: Upgrading Device Firmware
G4-508HD4a User Manual & Install Guide Upgrading Device Firmware From time to time, Gatekeeper Systems may release new firmware updates for your device which will improve performance and reliability. In order to update your device, please download the correct firmware update compatible with your device. If you have any doubts, please contact Gatekeeper Systems for assistance. -
Page 145: Maintenance And Troubleshooting
8 Maintenance and Troubleshooting Maintenance Whilst the G4-508HD4a is a dependable and robust piece of equipment, it is still a complex electronic device and as such, may require maintenance from time to time. To ensure optimal performance, Gatekeeper Systems strongly recommends that a proper Preventive Maintenance Schedule be set up and adhered to. -
Page 146: Hardware Installation
G4-508HD4a User Manual & Install Guide 9 Hardware Installation Quick Reference Guide for Installation 146 of 162 Hardware Installation... - Page 147 § menu. Navigate to Setup>Maintenance>Storage to format the drive(s). Please note, non-Gatekeeper branded SD cards may not function reliably. If used, non- Gatekeeper branded SD cards must be formatted in the DVR prior to use. Start vehicle, and wait for recorder to boot up (approximately two minutes). Confirm live camera §...
-
Page 148: Instructions For Mounting The System
Ensure that ALL provided Split Loom are used around exposed cables. Grommets are to be used as § directed by install sheet. Failure to use provided Split Loom and Grommets will void the warranty. Gatekeeper Systems provides Tek Screws with which to mount the 508HD4 – these have been tested § and are approved for mounting. - Page 149 G4-508HD4a User Manual & Install Guide Typically, grounds are established in the fuse panel, and installers would need to connect there. IGNITION (B) (Yellow) Connect to the vehicle ignition, +12V, signal required to activate the device. Ensure that the provided 3 AMP fuse is used.
-
Page 150: Instructions For Setting Up The System
G4-508HD4a User Manual & Install Guide Instructions for Setting Up the System The device is capable of recording up to 8 analog and 4 digital cameras simultaneously. The 8 analog cameras are plugged into the back of the recorder using the camera cables and 8 camera DB44 to Molex adapter cable, CAB000373. -
Page 151: Detailed Cabling Diagrams
G4-508HD4a User Manual & Install Guide Detailed Cabling Diagrams 9.4.1 Fuse Connections Figure 9-2 G4-508HD4a Fuse Connections 9.4.2 Cabling Diagrams Please refer to the following pages with detailed cabling diagrams for the different installation configurations of the G4-508HD4a. 1. Cabling Diagram with Analog Cameras Only 2. -
Page 152: Figure 9-3 Cabling Diagram With Analog/Ahd Cameras Only
G4-508HD4a User Manual & Install Guide Basic Analog 152 of 162 Hardware Installation... -
Page 153: Figure 9-4 Cabling Diagram With Analog/Ahd And Digital Ip Cameras
G4-508HD4a User Manual & Install Guide Basic Analog + IP 153 of 162 Hardware Installation... - Page 154 G4-508HD4a User Manual & Install Guide Basic Analog + IP + Wireless 154 of 162 Hardware Installation...
- Page 155 G4-508HD4a User Manual & Install Guide Basic Analog/AHD + IP + Wireless + AWM 155 of 162 Hardware Installation...
-
Page 156: Sensor Connections
G4-508HD4a User Manual & Install Guide 9.4.3 Sensor Connections Figure 9-7 Wiring the Sensors (CAB000356) 156 of 162 Hardware Installation... -
Page 157: Camera Mounting And Connections
§ Coil and tie off excess harness in a safe place. § DO NOT disassemble the Camera Ball unless directed to, and under the supervision of an authorised Gatekeeper Systems support technician. Camera Body Parts : Rubber Gasket : Base Plate... - Page 158 G4-508HD4a User Manual & Install Guide Camera Installation Instructions Step 1 Disassemble the camera into its five major parts, A, B, C, D, E and carefully place all parts § in a clean work area. Step 2 Position the Base Plate (B), in the mounting location.
- Page 159 G4-508HD4a User Manual & Install Guide Suggested Camera Mounting Locations G4-304SD1 / G4-504HD1a suggested G4-504HD2 suggested camera camera locations. locations. 159 of 162 Hardware Installation...
- Page 160 G4-508HD4a User Manual & Install Guide G4-508HD4 without Stop Arm camera suggested G4-508HD4 with Stop Arm camera suggested camera camera locations. locations. Check For Wire Routing Ceiling mount recommended. Camera harness to be connected through opening in base. Do not obstruct walkways.
-
Page 161: Customer Limited Warranty
Installation and Operating Manual. Advance replacements will be issued for the first 45 days from the date This warranty does not apply to any damage to the Gatekeeper Systems of shipment. product that is the result of improper maintenance or to any Gatekeeper Systems’... -
Page 162: Contact Information
G4-508HD4a User Manual & Install Guide 11 CONTACT INFORMATION GSI – Canada 301-31127 Wheel Avenue Abbotsford, BC V2T 6H1 Canada GSI – USA 446 Harrison Street Sumas, WA 98295 SALES & TECHNICAL SUPPORT North America: Tel: 1.604.864.6187 Fax: 1.604.864.8472 Toll Free: 1.888.666.4833...
Need help?
Do you have a question about the G4-508HD4a and is the answer not in the manual?
Questions and answers