Table of Contents
Advertisement
Advertisement
Table of Contents

Related Manuals for HBM T10FS


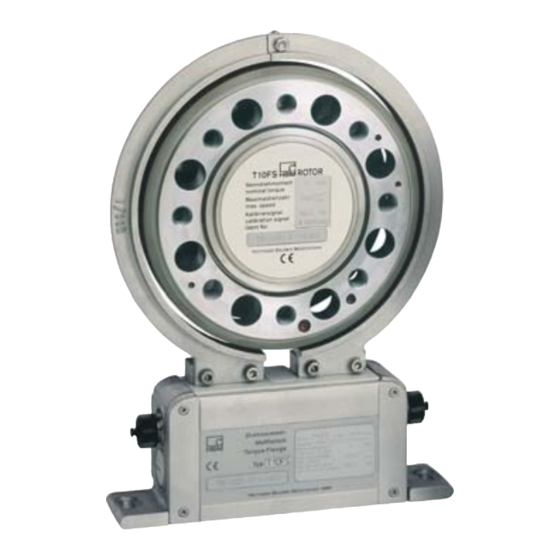
Summary of Contents for HBM T10FS
- Page 1 Mounting Instructions English T10FS...
- Page 2 Tel. +49 6151 803-0 Fax +49 6151 803-9100 info@hbm.com www.hbm.com Mat.: 7-2002.1315 DVS: A0785-150 HBM: public 04.2015 E Hottinger Baldwin Messtechnik GmbH. Subject to modifications. All product descriptions are for general information only. They are not to be understood as a guarantee of quality or...
-
Page 3: Table Of Contents
......5.9.2 Optical speed measuring system ......T10FS A0785-150 HBM: public... - Page 4 Measuring dynamic torque ........T10FS A0785-150 HBM: public...
- Page 5 14.1.3 Connector 2, double frequency, stat. direction of rotation signal 14.2 Axial and radial run‐out tolerances ......T10FS A0785-150 HBM: public...
-
Page 6: Safety Instructions
The FCC identifier or the unique identifier, as appropri ate, must be displayed on the device. Model Measuring range FCC ID T10S2 100 Nm, 200 Nm T10S3 500 Nm, 1 kNm T10S4 2 kNm, 3 kNm 2ADAT-T10S2TOS6 12438A-T10S2TOS6 T10S5 5 kNm T10S6 10 kNm T10FS A0785-150 HBM: public... - Page 7 RSS standard(s). Operation is subject to the follow ing two conditions: (1) this device may not cause interfer ence, and (2) this device must accept any interference, including interference that may cause undesired opera tion of the device. T10FS A0785-150 HBM: public...
- Page 8 Usage/Installation in the USA and Canada requires an EMI suppressor. Please refer to chapter 6.1.1, page 45. Designated use The T10FS torque flange is used exclusively for torque and rotation speed measurement tasks, and directly associated control and regulatory tasks. Use for any additional purpose shall be deemed to be not as intended.
- Page 9 The same applies to the use of accessories. Qualified personnel means persons entrusted with siting, mounting, starting up and operating the product who possess the appropriate qualifications for their function. T10FS A0785-150 HBM: public...
- Page 10 Warranty In the case of complaints, a warranty can only be given if the torque flange is returned in the original packaging. T10FS A0785-150 HBM: public...
-
Page 11: Markings Used In This Document
This marking draws your attention to information about the product or about handling the product. Information Emphasis Italics are used to emphasize and highlight text and See…. references to other chapters and external documents. T10FS A0785-150 HBM: public... -
Page 12: Symbols On The Product
CE mark The CE mark enables the manufacturer to guarantee that the product complies with the requirements of the rele vant EC directives (the declaration of conformity is avail able at http://www.hbm.com/HBMdoc). Label example Model: T10S2 FCC ID: 2ADAT-T10S2TOS6 IC: 12438AT10S2TOS6 This device complies with part 15 of the Label example with Model number, FCC ID and IC num... -
Page 13: Torque Flange Versions
Torque flange versions In the case of option 2 “Electrical configuration", the T10FS torque flange exists in versions KF1, SF1 and SU2. The difference between these versions lies in the electrical inputs and outputs on the stator, the rotors are the same for all the versions of a measuring range. - Page 14 Fig. 2.1 T10FS versions You can find out which version you have from the stator identification plate. The version is specified in the “T10FS-..." number there. Example: T10FS-001R-SU2-S-0-V1-Y (see also Page 89). T10FS A0785-150 HBM: public...
-
Page 15: Application
Application Application T10FS torque flanges record static and dynamic torque on fixed or rotating shafts and also return RS-422 signals with direction of rotation information to determine the speed. With an optical speed measuring system, a reference pulse can also be output with the speed pulses. -
Page 16: Structure And Mode Of Operation
L, the speed sensor is mounted on the stator, the customer attaches the associated slotted disc on the rotor. In the case of code H, the slotted disc is already mounted on the rotor. T10FS A0785-150 HBM: public... - Page 17 Structure and mode of operation Optical speed sensor (option) Antenna segments Rotor Stator (without slotted disc) Housing Fan‐type lock washers Fig. 4.1 Mechanical structure, exploded view T10FS A0785-150 HBM: public...
-
Page 18: Mechanical Installation
(medium strength) to exclude prestressing loss due to screw slackening. An appropriate shaft flange enables the T10FS torque flanges to be mounted directly. It is also possible to mount a joint shaft or relevant compensating element directly on the rotor (using an intermediate flange when required). -
Page 19: Conditions On Site
(see “Safety instructions"). There is wide ranging compensation for the effects of temperature on the output and zero signals of the T10FS torque flange (see Specifications on Page 91). This compensation is carried out at static temperatures in extensive furnace processes. -
Page 20: Installation Orientation
The measurement flange can be mounted in any position. With clockwise torque, the output frequency is 10 kHz to 15 kHz. With HBM amplifiers or with the “voltage output" option, a positive output signal (0 V ... +10 V) is present. -
Page 21: Installation Without Dismantling The Antenna Ring
Installation without dismantling the antenna ring (without speed measuring system) Customer mounting 1. Install rotor 2 Install stator Support supplied by customer Clamp fixture 3. Finish installation of shaft train 4. Mount the clamp fixture where required T10FS A0785-150 HBM: public... -
Page 22: Installation With Subsequent Stator Mounting
1. Install rotor 2. Install shaft train 3. Remove one antenna segment 4. Install antenna segment around shaft train Support supplied by customer Clamp fixture 5. Align stator and finish installation 6. Mount the clamp fixture where required T10FS A0785-150 HBM: public... -
Page 23: Installation Example With Couplings
Mechanical installation 5.3.3 Installation example with couplings Fig. 5.1 Installation example with coupling 5.3.4 Installation example with joint shaft Fig. 5.2 Installation example with joint shaft T10FS A0785-150 HBM: public... -
Page 24: Mounting The Rotor
For safe torque transfer, the surfaces must be clean and free from grease. Use a piece of cloth or paper soaked in solvent. When cleaning, make sure that you do not damage the transmitter coils. T10FS A0785-150 HBM: public... - Page 25 DIN ISO 4759, Part 1, product class A. WARNING With alternating load: Use a screw locking device (e.g. LOCTITE no. 242) to glue the screws into the counter thread to exclude prestressing loss due to screw slackening. T10FS A0785-150 HBM: public...
- Page 26 Guard against contamination from varnish fragments. Nominal Fastening Fastening screws Prescribed (rated) torque screws (Z) Property class tightening torque (NVm) (NVm) 10.9 10.9 12.9 Tab. 5.1 Fastening screws DIN EN ISO 4762912; black/oiled/m =0.125 T10FS A0785-150 HBM: public...
-
Page 27: Installing The Stator
In this case, you should also comply with Chapter 5.7. Notice Check the screw connections of the antenna segments (see Fig. 5.4) both after initial installation and then at regular intervals for correct fit and tighten them if necessary. T10FS A0785-150 HBM: public... - Page 28 (see Fig. 5.4)! Do not yet tighten the screws. 4. Install the two antenna segments' upper connecting screw so that the antenna ring is closed. Also pay attention to the fan‐type lock washers. T10FS A0785-150 HBM: public...
- Page 29 CAUTION To make sure that they function perfectly, the fan‐type lock washers (A5, 3-FST DIN 6798 ZN/galvanized) must be replaced after the bolted antenna connection has been loosened three times. T10FS A0785-150 HBM: public...
-
Page 30: Installing The Clamp Fixture
Mounting sequence 1. Loosen and remove the upper antenna segment screw fitting. 2. Fasten the clamp fixture with the enclosed screw fitting as shown in Fig. 5.6. It is essential to use the new fan‐type locking washers! T10FS A0785-150 HBM: public... - Page 31 Support supplied by the customer, e.g. threaded Antenna segments Fig. 5.6 Installing the clamp fixture Notice Use, e.g. plastic as the material. Do not use metallic material as this can affect the function of the antenna (signal transmission). T10FS A0785-150 HBM: public...
-
Page 32: Mounting The Slotted Disc (Optical Speed Measuring System)
Slotted disc Fig. 5.7 Mounting the slotted disc on the rotor Important At all stages of the mounting operation, be careful not to damage the slotted disc! T10FS A0785-150 HBM: public... - Page 33 Mechanical installation Mounting sequence ► Push the slotted disc onto the rotor and align the screw holes. ► Apply some of the screw locking device to the screw thread and tighten the screws (tightening torque <15 N⋅cm). T10FS A0785-150 HBM: public...
-
Page 34: Fitting The Mounting Elements (Speed Measuring System)
Important The mounting elements are only an aid to installation and must be removed before the initial operation of the torque flange! Mounting element Fastening screw Fig. 5.8 Inserting the mounting elements T10FS A0785-150 HBM: public... -
Page 35: Fixing The Mounting Elements
The mounting elements should be evenly distributed around the circumference (approx. every 120_). 3. Screw the fastening screws of the mounting elements into the tapped holes of the flange and gently tighten them by hand. T10FS A0785-150 HBM: public... -
Page 36: Mounting The Torque Flange With A Speed Measuring System
7. Check whether the axial and radial tolerances have been maintained. 8. With a torque wrench, definitively tighten the fastening screws of the rotor in a diagonally opposite sequence (for tightening torques, see Tab. 5.1, Page 26). T10FS A0785-150 HBM: public... - Page 37 (see Specifications, Page 91ff) you must make sure that the ’ stator follows the rotor s sequence of motions. When couplings are used, there is a possible longitudinal and radial play to be taken into account. T10FS A0785-150 HBM: public...
-
Page 38: Aligning The Stator (Speed Measuring System)
To maintain the specified pulse quality, the transducer components provided in multiple deliveries must not be mixed up. Before installation, compare the identification numbers of the rotor and stator (also see note on Page 24)! T10FS A0785-150 HBM: public... - Page 39 The rotor axis and the axis of the speed sensor must be along a line at right angles to the stator platform. The radial distance is critical for the radial alignment (see Fig. 5.10). A vertical marker line on the head of the T10FS A0785-150 HBM: public...
- Page 40 Î Î Î Î Î Î Î Î Î Î Î Î Î Î Î Î Î Î Î Î Î Î Î Î Î Î Î Î Î Î Î Î Î Î Fig. 5.11 Alignment marking on the sensor T10FS A0785-150 HBM: public...
- Page 41 Central fastening screw on the sensor head 1. Loosen the fastening screw (do not remove it!). 2. Set nominal distance a. 3. Tighten the screw at approx. 3 N⋅m. 4. Check the radial distance once again with a distance gauge. T10FS A0785-150 HBM: public...
-
Page 42: Optical Speed Measuring System
Divergence of up to ±2 mm is permissible in measuring mode (total of static and dynamic shift). Slotted disc Alignment lines Fig. 5.14 Position of the slotted disc in the speed sensor T10FS A0785-150 HBM: public... - Page 43 Î Î Î Î Î Î Î Î Î Î Î Î Î Î Î Î Î Î Î Î Î Î Î Î Î Î Î Î Î Î Î Î Fig. 5.15 Alignment marking on the sensor T10FS A0785-150 HBM: public...
-
Page 44: Electrical Connection
Avoid transformers, motors, contactors, thyristor controls and similar stray‐field sources. Important Transducer connection cables from HBM with attached connectors are identified in accordance with their intended purpose (Md or n). When cables are shortened, inserted into cable ducts or installed in control cabinets, this identification can get lost or become concealed. -
Page 45: Fcc And Ic Compliant Installation For Us And Canada Installation Only
Mounting fixture EMI suppressor Cable ties 3 Loops Fig. 6.1 Installation example EMI suppressor Information Consider longer cable of approximately 40 cm due to the installation of the EMI suppressor. T10FS A0785-150 HBM: public... - Page 46 Additional fixture should be used to prevent stress on the connector due to extra weight of the cable. Important The use of the EMI suppressor on the power cable (plug 1 or plug 3) is mandatory to ensure compliance with FCC regulations. T10FS A0785-150 HBM: public...
-
Page 47: Shielding Design
The stator should be fully grounded in the same way. T10FS A0785-150 HBM: public... -
Page 48: Option 2, Code Kf1
The transmission method between the rotor and the stator determines the function of the torque flange, which is dependent on: S the installation situation (for example, covering, area free of metal parts) S the length of the cable T10FS A0785-150 HBM: public... - Page 49 For when the calibration signal is unintentionally initiated with very short cables Normal position (factory setting) For cable lengths in excess of approx. 20 m Please ensure that after changing to switch position 3, the calibration signal is not initiated. T10FS A0785-150 HBM: public...
-
Page 50: Option 2, Code Sf1/Su2
Electrical connection Possible faults and their elimination Fault: No signal at the output, amplifier indicates overflow. Cause: Too little power, T10FS disconnects. Remedy: Switch position 3. Fault: The calibration signal has been triggered by mistake. Remedy: Switch position 1. Option 2, code SF1/SU2 On the stator housing, there are two 7‐pin device... - Page 51 The torque flanges of option 3, code SF1/SU2 are only intended for operation with a DC supply voltage. They must not be connected to older HBM amplifiers with square‐wave excitation. This could lead to the destruction of the connection board resistances, or other...
- Page 52 ; 0°) Speed measurement signal Top view (pulse string, 5 V phase‐shifted by 90 °) Supply voltage zero Shielding connected to housing ground RS422 complementary signals When switching to double frequency, static direction of rotation signal. T10FS A0785-150 HBM: public...
- Page 53 ; 0 °) Top view Speed measurement signal (pulse string, ; phase‐shifted by 90 °) Supply voltage zero Shielding connected to housing ground RS422 complementary signals When switching to double frequency, static direction of rotation signal. T10FS A0785-150 HBM: public...
-
Page 54: Supply Voltage
The notes in this chapter relate to the standalone operation of the T10FS without HBM system solutions. Distribution system for electrical energy with greater physical expansion (over several test benches, for example) that may possibly also supply consumers with high nominal (rated) currents. - Page 55 2 ( ) of connector 1 or 3. We recommend that you use HBM cable KAB 8/00‐2/2/2 and relevant Binder sockets, that at nominal (rated) voltage (24 V) can be up to 50 m long and in the nominal (rated) voltage range, 20 m long (see Accessories, Page 89).
-
Page 56: Calibration
Calibration Calibration The T10FS torque flange delivers an electrical calibration signal that can be switched at the amplifier end for measurement chains with HBM components. The measurement flange generates a calibration signal of about 50% of the nominal (rated) torque. The precise value is specified on the type plate. -
Page 57: Calibration Option 2, Code Sf1/Su2
Current consumption at nominal (rated) voltage is approx. 2mA and at maximum voltage is approx. 22 mA. Notice In the case of HBM system solutions, the measuring amplifier triggers the calibration signal. T10FS A0785-150 HBM: public... -
Page 58: Settings
Pulses / revolution 100 N⋅m 3 kN⋅m 5 kN⋅m 10 kN⋅m ein / on aus / off Hysterese Hysteresis Frequenz Ausgangsspannung 2 x f Frequency output voltage Fig. 8.1 Sticker with switch positions; optical speed measuring system T10FS A0785-150 HBM: public... - Page 59 Sticker with switch positions; magnetic speed measuring system All adjustable pulse counts for the magnetic speed measuring system can be found in Fig. 8.8, Page 67). Please note all changes to the factory settings on the sticker. T10FS A0785-150 HBM: public...
-
Page 60: Torque Output Signal, Code Kf1
In the case of the torque flange with the voltage output option (SU2), you can access two potentiometers by removing the stator cover. You can use the zero point potentiometer to correct zero point deviations caused by T10FS A0785-150 HBM: public... - Page 61 Important Turning the end point potentiometer changes the factory calibration of the voltage output. End point Zero point Fig. 8.4 Setting the voltage output zero point T10FS A0785-150 HBM: public...
-
Page 62: Functional Testing
8.4.2 Testing the optical speed module When required, you can test the correct functioning of the speed measuring system. S Remove the cover of the stator housing. S Turn the rotor by at least 2 min T10FS A0785-150 HBM: public... - Page 63 Green control LEDs Fig. 8.6 Control LEDs of the speed measuring system Important When closing the cover of the stator housing, make sure that the internal connection cables are positioned in the grooves provided and are not trapped. T10FS A0785-150 HBM: public...
-
Page 64: Setting The Pulse Count
(switches S1 ... S4), thus making available a greater selection of output pulse counts per revolution (see Fig. 8.8). Switches Switches F1...F3 S1...S4 Fig. 8.7 Setting the pulse count; magnetic speed measuring system T10FS A0785-150 HBM: public... - Page 65 500 NVm-1 kNVm D 720 2 kNVm-10 kNVm D 720 Tab. 8.1 Evaluation points per pole (• = factory setting) Output pulse division (6x DIP switches) Tab. 8.2 Switch settings for output pulse division (• = factory setting) T10FS A0785-150 HBM: public...
- Page 66 Settings Output pulses/revolution Switch position 100 NVm / 500 NVm / 2 kNVm ... S1 ... S4 F1 ... F3 200 NVm 1 kNVm 10 kNVm T10FS A0785-150 HBM: public...
- Page 67 Fig. 8.8 Switch settings for pulse count/revolution ¢ switch lever) Factory setting The output pulse count is calculated according to the following formula: magnetic poles @ evaluation point per pole output pulse count + output pulse division T10FS A0785-150 HBM: public...
-
Page 68: Optical Speed Measuring System
+ 2 @ pulse count @ speed The number of pulses per rotor revolution can be adjusted by means of DIP switches S1 ... S4. T10FS A0785-150 HBM: public... - Page 69 ► Use switches S1 ... S4 as per Tab. 8.3 to set the required pulse count. Pulses/revolution Rated torque 100 N⋅m ... 3 kN⋅m Rated torque 5 kN⋅m ... 10 kN⋅m Tab. 8.3 Switch settings for the pulse count ¢ switch lever) Factory setting T10FS A0785-150 HBM: public...
-
Page 70: Vibration Suppression (Hysteresis)
Speed measuring system magnetic optical Radial stator vibrations, approx. Torsional rotor vibrations, approx. Deg. Hysteresis Off On Switch S5 Fig. 8.10 Switch for switching off hysteresis T10FS A0785-150 HBM: public... -
Page 71: Form Of Speed Output Signal
At a speed of 0 min the direction of rotation signal has the last measured value. Direction of rotation arrow Fig. 8.11 Direction of rotation arrow on the head of the sensor T10FS A0785-150 HBM: public... -
Page 72: Type Of Speed Output Signal
You can use switch S7 to change the symmetrical 5 V output signal (factory setting) to an asymmetrical signal of 0 V ... 5 V. symmetrical asymmetrical Switch S7 Pos.2 Pos.1 Fig. 8.13 Switch S7; symmetrical/asymmetrical output signal T10FS A0785-150 HBM: public... -
Page 73: Optical Speed Measuring System With A Reference Pulse
LED L4 flashes (minimum speed 2 min ) and stays on permanently from approx. 1000 min . If the LED is not on, please change switch S8 (see Fig. 8.15). RS-422 complementary signals T10FS A0785-150 HBM: public... - Page 74 Settings Important When viewed from above, switch S8 is behind switch S7 in the opened stator housing. LED L4 Switch S8 (behind switch S7) Fig. 8.15 Switch S8; optimizing the reference pulse T10FS A0785-150 HBM: public...
-
Page 75: Loading Capacity
200 % (measuring range 100 NV@m 400 %; measuring range 3 ... 10 kN@m 160 %) of the nominal (rated) torque identified for the T10FS. The vibration bandwidth must fall within the T10FS A0785-150 HBM: public... - Page 76 Vibration bandwidth 200 % M (Measuring range 100 N@m: 400 % and 3...10 kN⋅m: 160 %) Oscillation width 100 % Fig. 9.1 Permissible dynamic loading Metrologically, however, the transducers can only be used up to the control range. T10FS A0785-150 HBM: public...
-
Page 77: Maintenance
Use compressed air (up to 6 bar) to clean the slotted disc. Carefully clean the optical system of the sensor with a dry cotton bud or one soaked with pure spirit. Do not use any other solvent! T10FS A0785-150 HBM: public... - Page 78 Maintenance Fig. 10.1 Cleaning points on the optical speed sensor T10FS A0785-150 HBM: public...
-
Page 79: Dimensions
(apart from option 2, center of the slotted disc ∅d code H). Measuring ranges 100 N⋅m and 200 N⋅m: 30° Dimensions without tolerances, Measuring ranges 100 N⋅m and 200 N⋅m: 60°, 6x60°= 360° as per DIN ISO 2768-mK T10FS A0785-150 HBM: public... - Page 80 Dimensions (in mm; 1 mm = 0.03937 inches) range ∅d ∅d ∅d ∅d ∅d ∅d ∅d ∅d ∅d ∅d za g5 100 N⋅m / 200 N⋅m 500 N⋅m / 101.5 1 kN⋅m 2 kN⋅m / 3 kN⋅m 5 kN⋅m 155.5 14.2 10 kN⋅m T10FS A0785-150 HBM: public...
-
Page 81: Rotor Dimensions With The Magnetic Speed System
View B = measuring plane (center of the application point) Dimensions without tolerances, as per DIN ISO 2768-mK Measuring ranges 100 N⋅m and 200 N⋅m: 30° Measuring ranges 100 N⋅m and 200 N⋅m: 60°, 6x60°= 360° ∅d T10FS A0785-150 HBM: public... - Page 82 Dimensions (in mm; 1 mm = 0.03937 inches) range ∅d ∅d 4+0.4 100 N⋅m 17.5 6xM8 200 N⋅m 500 N⋅m 17.5 8xM10 1 kN⋅m 2 kN⋅m 20.5 8xM12 3 kN⋅m 5 kN⋅m 22.5 8xM14 10 kN⋅m 28.5 8xM16 T10FS A0785-150 HBM: public...
-
Page 83: Stator Dimensions
For option 5, code A only; otherwise 18mm For the speed measuring system option only Space for connection cable with connector Does not apply to version KF1 Top view Accuracy of the cast base sizes as per DIN 1688-GTA 14/5 T10FS A0785-150 HBM: public... - Page 84 Dimensions (in mm; 1 mm = 0.03937 inches) range ∅d ∅D 100 N⋅m 17.5 157.5 42.5 42.5 200 N⋅m 500 N⋅m 17.5 167.5 42.5 1 kN⋅m 2 kN⋅m 20.5 185.5 42.5 3 kN⋅m 5 kN⋅m 22.5 202.5 10 kN⋅m 28.5 226.5 T10FS A0785-150 HBM: public...
-
Page 85: Stator Dimensions With The Magnetic Speed System
Does not apply to version KF1 7 or 8 pin mounting and 90° cable entry Space for connection cable with connector dismantling Space for the connected state Accuracy of the cast base sizes as per DIN 1688-GTA 14/5 T10FS A0785-150 HBM: public... - Page 86 17.5 157.5 200 N⋅m 500 N⋅m 17.5 167.5 1 kN⋅m 2 kN⋅m 20.5 185.5 3 kN⋅m 5 kN⋅m 22.5 202.5 105.5 10 kN⋅m 28.5 226.5 105.5 Variable by ±1.5 mm at the head of the sensor T10FS A0785-150 HBM: public...
-
Page 87: Mounting Dimensions
Dimensions 11.5 Mounting dimensions Rotor identification plate Rotor Stator identification plate T10FS A0785-150 HBM: public... - Page 88 Area free of metal parts Measuring Dim. "m" (mm) range (mm) 100 N⋅m 13.8 200 N⋅m 500 N⋅m 13.8 28.5 1 kN⋅m 2 kN⋅m 15.3 28.5 3 kN⋅m 5 kN⋅m 16.3 31.5 10 kN⋅m 19.3 34.5 T10FS A0785-150 HBM: public...
-
Page 89: Order Numbers, Accessories
<±0.13 % For option 3, code SF1, SU2 only Order number: K-T10FS Ordering example: 5 0 0 Q S F 1 K-T10FS With selections V2, V4, V6, W2 and W6, please specify required length of cable. T10FS A0785-150 HBM: public... - Page 90 423G-8S, 8‐pin cable socket, straight cable entry, for speed output (connector 2), Order No. 3-3312.0120 423W-8S, 8‐pin cable socket, 90 ° cable entry, for torque output (connector 2), Order No.: 3-3312.0282 Kab8/00-2/2/2 by the meter, Order No. 4-3301.0071 T10FS A0785-150 HBM: public...
-
Page 91: Specifications
Nominal output signal Frequency output at positive nominal (rated) 15 (5 V symmetrical /12 V asymmetrical torque at negative nominal (rated) torque 5 (5 V symmetrical /12 V asymmetrical Voltage output at positive nominal (rated) torque T10FS A0785-150 HBM: public... - Page 92 Frequency output <±0.05 Voltage output <±0.15 on the zero signal, related to the nominal (rated) sensitivity Frequency output <±0.05 (optional <±0.03) Voltage output <±0.15 (optional <±0.13) T10FS A0785-150 HBM: public...
- Page 93 < 0.9 measuring mode Current consumption in < 2 startup mode Nominal (rated) power < 12 consumption Linearity deviation including hysteresis, relative to the nominal (rated) sensitivity Frequency output <±0.05 (optional <±0.03) Voltage output <±0.07 (optional <±0.05) T10FS A0785-150 HBM: public...
- Page 94 Tolerance of the shunt <±0.05 signal, related to M RS-422 complementary signals; factory setting version SF1/SU2 Factory setting version KF1 (changeover not possible) Output signal range in which there is a repeatable correlation between torque and output signal. T10FS A0785-150 HBM: public...
- Page 95 Possible settings through additional 10 ... 1200 12 ... 1440 output pulse division Output signal symmetrical 2 square‐wave signals, approx. 90_ out‐of‐phase Maximum output frequency Minimum rotational speed for sufficient pulse stability μs Group delay <5 (typ. 1.3) T10FS A0785-150 HBM: public...
- Page 96 When changing to higher output pulse factors, note the maximum possible output frequency of 250 kHz. Max. permissible rotation speed for speed measurement is 20500 min-1. At higher speeds, less output pulses must be set. RS-422 complementary signals Can be switched off T10FS A0785-150 HBM: public...
- Page 97 Group delay <5 (typ. 2.2) Hysteresis of reversal in the case of relative vibrations between the rotor and the stator Torsional vibration of the rotor Deg. <approx. 1 Radial vibration amplitude of the <approx. 1 stator T10FS A0785-150 HBM: public...
- Page 98 ±1.5 mm. When changing to higher output pulse factors, note the maximum possible output frequency of 250 kHz. RS-422 complementary signals Can be switched off T10FS A0785-150 HBM: public...
- Page 99 Torsional vibration of the Deg. <approx. 2 rotor Radial vibration amplitude <approx. 2 of the stator Load resistance kΩ (note termination resistances as per RS-422) Degree of protection per EN 60529 IP 54 T10FS A0785-150 HBM: public...
- Page 100 Additional phase error at <20 min Deg. >20 min Deg. typ. < 0.1; leading negligible Reproducibility at 360 Deg. typ. <±0.04 (ideal installation, operates without speed pulses/revolution vibration) General Information Degree of protection per EN 60529 IP 54 T10FS A0785-150 HBM: public...
- Page 101 Degree of protection per EN 60529 IP 54 Weight, approx. Rotor 14.6 Stator ° Reference temperature Nominal (rated) ° +10 ... +60 temperature range Operating temperature ° range -10 ... +60 ° Storage temperature range -20 ... +70 T10FS A0785-150 HBM: public...
- Page 102 Number 1000 Duration Acceleration (half sine) Vibration resistance, test severity level per DIN IEC 68, Part 2-6: IEC 68‐2‐6‐1982 Frequency range 5 ... 65 Duration Acceleration (amplitude) Factory settings RS-422 complementary signals Can be switched off T10FS A0785-150 HBM: public...
- Page 103 1300 1500 1650 2450 direction c Stiffness during the kN@m/ 11.5 21.7 22.4 bending moment in a degree radial axis c Maximum deflection < 0.02 < 0.03 < 0.05 < 0.1 at longitudinal force limit T10FS A0785-150 HBM: public...
- Page 104 0.0027 0.0062 0.0196 0.0380 0.0995 speed measuring system with magnetic kg⋅m 0.0029 0.0065 0.0203 0.0201 0.0390 speed measuring system Proportional mass moment of inertia for the transmitter side No speed measuring system T10FS A0785-150 HBM: public...
- Page 105 Max. permissible static eccentricity of the rotor (radially) to the center point of the stator Without speed ±2 measuring system With optical speed ±1 measuring system (with or without a reference pulse) With magnetic ±0.7 speed measuring system T10FS A0785-150 HBM: public...
- Page 106 0.3 % of the nominal (rated) torque. The nominal (rated) torque for T10FS/200 N⋅m up to 10 kN⋅m must not be exceeded. With T10FS/100 N⋅m the nominal (rated) torque can be exceeded by 100 %.
-
Page 107: Supplementary Technical Information
Supplementary technical information 14.1 Output signals 14.1.1 Output MD torque (connector 1) Symmetrical output signals (factory setting) symmetrical Pos.2 Connector 1 10 Vpp Differential inputs Asymmetrical output signal 12 V 12 V asymmetrical Pos.1 Connector 1 T10FS A0785-150 HBM: public... -
Page 108: Output N: Speed And Speed With A Reference Pulse (Connector 2)
14.1.2 Output N: Speed and speed with a reference pulse (connector 2) Symmetrical output signals (factory setting) Connector 2 symmetrical Pos.2 Switch S7 10 V 10 V Differential inputs Differential inputs Reference pulse Asymmetrical output signal asymmetrical Connector 2 Switch S7 Pos.1 T10FS A0785-150 HBM: public... -
Page 109: Connector 2, Double Frequency, Stat. Direction Of Rotation Signal
14.1.3 Connector 2, double frequency, stat. direction of rotation signal Direction of rotation Direction of rotation in direction of the against direction of Connector 2 arrow the arrow 10 V 10 V Vibration suppression 10 V Reference pulse T10FS A0785-150 HBM: public... -
Page 110: Axial And Radial Run-Out Tolerances
0.02 0.02 To ensure that the torque flange retains its characteristics once it is installed, we recommend that the customer also chooses the specified form and position tolerances, surface quality and hardness for the connections provided. T10FS A0785-150 HBM: public... - Page 111 Supplementary technical information T10FS A0785-150 HBM: public...
- Page 112 HBM Test and Measurement Tel. +49 6151 803-0 Fax +49 6151 803-9100 info@hbm.com measure and predict with confidence...
Need help?
Do you have a question about the T10FS and is the answer not in the manual?
Questions and answers