Table of Contents
Advertisement
Operation manual
Integral Process Thermostats and High-Temperature Thermostats
IN 130 T, IN 230 T, IN 230 TW, IN 530 T, IN 530 TW, IN 1030 T, IN 1330 TW, IN 1830 TW, IN 150 XT,
IN 250 XTW, IN 280 XT, IN 280 XTW, IN 550 XT, IN 550 XTW, IN 590 XTW, IN 750 XT, IN 950 XTW, IN 1590 XTW,
IN 1850 XTW, IN 2560 XTW, IN 2050 PW, IN 2560 PW, IN 4 XTW, IN 8 XTW
V6R9
Read this manual prior to performing any task!
Advertisement
Table of Contents

Related Manuals for Lauda IN 130 T


Summary of Contents for Lauda IN 130 T
- Page 1 Integral Process Thermostats and High-Temperature Thermostats IN 130 T, IN 230 T, IN 230 TW, IN 530 T, IN 530 TW, IN 1030 T, IN 1330 TW, IN 1830 TW, IN 150 XT, IN 250 XTW, IN 280 XT, IN 280 XTW, IN 550 XT, IN 550 XTW, IN 590 XTW, IN 750 XT, IN 950 XTW, IN 1590 XTW,...
- Page 2 Manufacturer LAUDA DR. R. WOBSER GMBH & CO. KG Laudaplatz 1 97922 Lauda-Königshofen Germany Telephone: +49 (0)9343 503-0 Fax: +49 (0)9343 503-222 E-mail: info@lauda.de Internet: https://www.lauda.de Translation of the original operation manual Q4DA-E_13-006, 6, en_US 08/03/2022 © LAUDA 2019 replaces issue V5R21, V4R21, V3R38, V2R18/17, V1R100, V1R101...
-
Page 3: Table Of Contents
Table of contents Safety...................................... 7 Safety information................................. 7 Obligations of the operator............................9 EMC requirements..............................10 Software versions................................. 10 Observing additional operating instructions......................11 Limits of the device............................... 11 1.6.1 Usage limits..............................11 1.6.2 Environmental and operating conditions....................11 1.6.3 Time limits.............................. - Page 4 Connecting an external application........................... 37 LAUDA heat transfer liquids............................ 40 Cooling water requirements............................42 Connecting the cooling water........................... 43 Configuring interfaces............................... 44 4.7.1 Configure potential-free contact (alarm output)................45 4.7.2 Interface potential-free contact......................45 4.7.3 Configuring the Ethernet interface....................... 46 4.7.4...
- Page 5 Set and process program........................112 6.19 Set time, date, format and time zone........................114 6.20 Operator and viewer..............................115 6.21 Web server LAUDA Command..........................119 6.22 Cloud service LAUDA.LIVE............................. 121 6.23 Safe Mode safety fittings............................123 6.24 Importing and exporting data............................ 127 6.24.1 Importing data............................
- Page 6 Accessories..................................159 General....................................160 14.1 Copyright................................... 160 14.2 Technical changes..............................160 14.3 Warranty conditions..............................160 14.4 Contact LAUDA............................... 160 Technical data..................................161 15.1 General data................................161 15.2 Heating output and power supply..........................166 15.3 Cooling output................................168 15.4 Refrigerant and filling weight............................ 174 15.5...
-
Page 7: Safety
This operating manual is part of the device. If the device is passed on, the operating manual must be kept with it. The operating manual is available on our homepage (https:// www.lauda.de). An overview of authorized personnel and the protective equip- ment can be found in Ä Chapter 1.12 “Personnel qualification”... - Page 8 Do not handle flammable liquids in the immediate vicinity of the device. Do not place heavy parts on the device. The devices are intended for operation on grounded networks. Opera- tion on IT networks, for example, is not permitted. Turn off the device and pull out the mains plug for service and repair work, ...
-
Page 9: Obligations Of The Operator
Having leakage inspections, maintenance, repairs, decommissioning or recovery work carried out by certified, authorized personnel (for example LAUDA Service). Keeping records of refrigerants added or recovered, including quantity and type. Records must be kept for a minimum of 5 years. -
Page 10: Emc Requirements
EMC requirements Table 1: Classification in accordance with EMC requirements Device Immunity requirements Emissions class Customer power supply Integral T Only for EU Table 2 (Industrial) Process thermostat Emissions Class B in accord- in accordance with Domestic connection value ance with CISPR 11 Integral XT EN 61326-1 ³... -
Page 11: Observing Additional Operating Instructions
Software Valid from version RS 232/485 module 3.39 Web App 1.01 Observing additional operating instructions Interface modules Additional interface modules can be fitted to the device. Before installing and using interface modules, always read and observe the operating manual accompanying the relevant interface module. Limits of the device 1.6.1 Usage limits... -
Page 12: Time Limits
LAUDA heat transfer liquids have been tested by the company LAUDA DR. R. WOBSER GMBH & CO. KG and approved for this device. The heat transfer liquids are suitable for a specific temperature range. -
Page 13: Hose Requirements
If you wish to use your own heat transfer liquids, check to ensure that the fluids are compatible with the materials used. The heat transfer liquid must be provided with corrosion protection. 1.11 Hose requirements The hoses for the external hydraulic circuit must be resistant to: the heat transfer liquid used the pressure in the hydraulic circuit the high and low working temperatures... -
Page 14: Structure Of Warnings
1.14 Structure of warnings Warning signs Type of danger Warning – danger zone. Signal word Meaning DANGER! This combination of symbol and signal word indicates an imminently dangerous situation that will result in death or serious injury if it is not avoided. -
Page 15: Product Safety Label
Repeat the checks of the low-level protection at regular intervals. Further information Ä Chapter 9.2 “Maintenance intervals” on page 141 and Ä Chapter 9.7 “Checking the low-level pro- tection” on page 145. 1.15.3 Product safety label A "Hot surface" graphical symbol is affixed to the device. This symbol warns against hot surfaces on the device. - Page 16 Never stand under suspended loads Slip hazard due to liquid on the floor Lock the castors The yellow cable is always live, even when the main switch is turned off! Disconnect the device from the mains before carrying out (service) work on the device.
-
Page 17: Unpacking
Also notify the LAUDA Service department immediately. You will find the contact information here Ä Chapter 14.4 “Contact LAUDA” on page 160. - Page 18 Fig. 2: Unpacking instructions Fig. 2: Remove the ring bolts from the packaging. Fig. 4: Screw the two ring bolts all the way into the thread connection Ç (M10 or M16) on the top of the casing. Turn them clockwise to do Fig.
- Page 19 IN 530 T(W), IN 1030 T, Ring bolt M10 x 17 (higher load capacity) DSS 085 IN 1330 TW IN 130 T to IN 530 TW Hose fitting for pump connector EOA 004 IN 1030 T to IN 1330 TW...
- Page 20 Table 3: Standard accessories Integral XT Device type Designation Quantity Catalog number All devices Operating manual Q4DA-E_13-006 All devices Mains cable IN 150 XT, IN 250 XTW Ring bolt M10 x 17 DSS 044 IN 280 XT(W), IN 550 XT(W), Ring bolt M10 x 17 (higher load capacity) DSS 085 IN 590 XTW, IN 750 XT,...
-
Page 21: Device Description
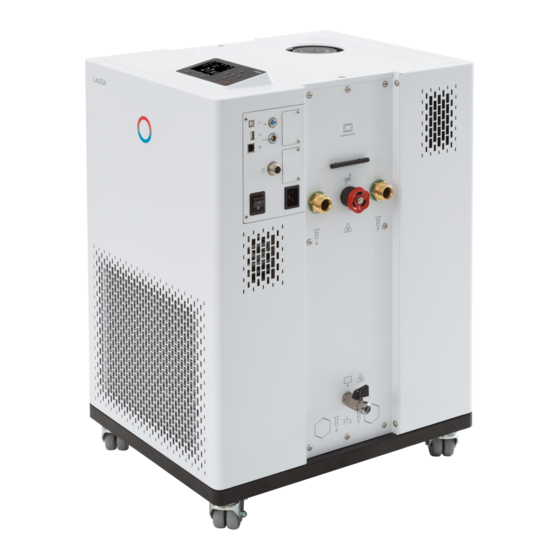
Device description Overall view of Integral (small casing version) Fig. 5: View of Integral 230 T Filler nozzle with cover Operating unit Interfaces and two slots for interface module Pump connector Adjusting wheel for bypass valve Cold appliances built-in connector Mains switch Overflow pipe on the rear of the device (covered) Drain tap for the hydraulic circuit... -
Page 22: Overall View Of Integral (Medium Casing Version)
Overall view of Integral (medium casing version) Fig. 6: View of Integral 950 XTW Filler nozzle with cover Overflow pipe on the rear of the device (covered) Operating unit Interfaces and two slots for interface module (covered) Mains switch Adjusting wheel for bypass valve Pump connector Drain tap for expansion vessel (from Integral 550 XT) Power cable... -
Page 23: Overall View Of Integral (Large Casing Version)
Overall view of Integral (large casing version) Fig. 7: View of Integral 2560 XTW Thread connection for ring bolt Overflow pipe on the rear of the device (covered) Operating unit and two slots for interface modules Mains switch Adjusting wheel for bypass valve Pump connector Drain nozzle with drain tap for expansion vessel Filling nozzle with non return valve... -
Page 24: Overall View Of Integral (Large Casing Version) With Pressure Overlay
Overall view of Integral (large casing version) with pressure overlay Fig. 8: View of Integral 2050 PW Thread connection for ring bolt Overflow pipe on the rear of the device (covered) Pushbutton for releasing the compressed air Hydraulic overpressure indicator (pressure gage) Operating unit and two slots for interface modules Mains switch Adjusting wheel for bypass valve... -
Page 25: Mains Switch
The rotary switch is not designed as a safety switch. The three- phase device has a separate automatic fuse built in. If the automatic fuse trips, contact the LAUDA Service department. Power supply at IN 2560 XTW and IN 2560 PW... - Page 26 Installation of the mains cable in the device Personnel: Specialized personnel Unscrew the covering plate on the right-hand side of the device. Unscrew the cover of the connection box. Undo the union nut of the cable gland. Insert the end of the mains cable through the cable gland. Pull the mains cable towards the terminals.
-
Page 27: Hydraulic Circuit
Hydraulic circuit Hydraulic circuit in Integral T The Integral T process thermostat is a powerful device for the temperature control and circulation of heat transfer liquid with a very small active bath volume. A thermally largely inactive part of the bath boiler serves as an additional expansion volume. - Page 28 All devices are equipped with an 8-stage, hermetically sealed (magnetically coupled) pump. The pump performance can thus be optimally adapted to the respective task: High pump pressure, if, for example, long hoses lead to the external consumer. As an alternative to the 8 power stages, operation with pressure control is provided.
-
Page 29: Rating Label
Hoses external application shut-off valves, if necessary Rating label The serial number of a LAUDA device is made up as follows: the letter S, the year of manufacture (is shown with two digits), and a 7-digit number. The figure shows an example of a rating label for a device without NRTL certification. - Page 30 Specification Description Filling charge I: Filling weight of the refrigerant and corresponding size of the CO equivalent in tonnes. PS high pressure l: Maximum permissible working pressure on the high-pressure side of the refrigeration circuit (compression, condensation) PS low pressure l: Maximum permissible working pressure on the low-pressure side of the refrigeration circuit (expansion, evaporation) Refrigerant ll:...
- Page 31 The figure shows an example of a rating label for a device with NRTL certification. Fig. 15: Rating label (example) Specification Description SCCR: Indicates the short-circuit current according to NEC 110-10 or UL508A which the components and assemblies used in the machine can withstand Compressor FLA I: Current consumption of Compressor I under full load...
-
Page 32: Interfaces
The RS 232/485 interface module (order no. LRZ 913) is available in a 9-pin SUB-D socket design Galvanically isolated by an optocoupler. When combined with the LAUDA interface command set, the module is compatible with the ECO, Variocool, Proline, Proline Kryomat, PRO, Integral XT and Integral T product lines. - Page 33 Pt100 LiBus module (order no. LRZ 925) with a Lemo socket (label: Pt100) for an external Pt100 temperature probe. The LiBus socket (label: LiBus) serves to connect components via the LAUDA device bus. External LiBus module box (order no. LCZ 9727) with two additional module bays.
-
Page 34: Before Starting Up
Before starting up Install device WARNING! Rolling away or overturning of the device due to incorrect han- dling Impact, crushing Do not tilt the device. Position the device on an even, non-slip surface with a sufficient load carrying capacity. Actuate the castor brake when setting up the device. -
Page 35: Hoses
Personnel: Operating personnel Place the device on a suitable level surface. The devices can be moved. To do this, release the parking brakes on the castors by pushing the lever upwards. Lock the castors of the device. To lock, press down the lever on the castor. - Page 36 Working pressure: maximum 10 bar Temperature range: -50 – 150 °C Application area: for heating and cooling applications with special insula- tion, for all LAUDA heat transfer liquids Fig. 17: Corrugated metal hose with cold insulation Clear width in mm, connec-...
-
Page 37: Connecting An External Application
EPDM hose is suitable for the cooling water supply Temperature range: -40 – 120 °C Application area: for all LAUDA heat transfer liquids, except Ultra 350, Kryo 65 and mineral oils Clear width, Ø in mm x wall... - Page 38 CAUTION! Risk of external consumer bursting Scalding, cold burns Adjust the pump pressure with the bypass. CAUTION! Risk of heat transfer liquid escaping from consuming unit in an elevated location Electric shock If the external consuming unit is positioned above the ...
- Page 39 If the external application is in a higher position, the application may run empty if the pump is switched off and air enters the thermostatic circuit (e.g. due to an incompletely closed or defective vent valve). This can cause the heat transfer liquid in the process thermostat to overflow. Install a dirt trap if the circuit in the application is not free of dirt.
-
Page 40: Lauda Heat Transfer Liquids
Observe the safety data sheets for the various heat transfer liquids. If required, you can download the safety data sheets from our homepage. Open the LAUDA homepage, tap Services Download center. In the Download center, chose the [Safety data sheet] option in the [Document type] drop-down list. - Page 41 Avoid chlorine content in the water at all costs. Do not add chlorine to the water. Cleaning agents and disinfectants, for example, contain chlorine. The water must be free of impurities. Water with iron content is unsuit- able due to rust formation and untreated river water is unsuitable due to algae growth.
-
Page 42: Cooling Water Requirements
Please note: Water may not be used with any Integral XTs over the entire working temperature range. Table 6: Heat transfer liquid order numbers Container size Designation Catalog number 10 L 20 L Kryo 95 LZB 130 LZB 230 LZB 330 Kryo 71 LZB 131 LZB 231... -
Page 43: Connecting The Cooling Water
Free chlorine consisting of disinfectant, for example, and water con- taining chloride will cause pitting corrosion in the cooling water circuit. Distilled, deionized and demineralized water are unsuitable due to their reactivity and will cause corrosion in the cooling water circuit. Sea water is unsuitable due to its corrosive properties and will cause corrosion in the cooling water circuit. -
Page 44: Configuring Interfaces
All water-cooled devices are equipped with the following cooling water con- nection: Exterior thread (male) G ¾ inch Table 7: Cooling water data Specification Value Maximum cooling water 10 bar pressure 15°C recommended; 10 to 30°C permitted Cooling water temperature (in upper temperature range with reduced cooling output) 3 bar recommended;... -
Page 45: Configure Potential-Free Contact (Alarm Output)
Equipment connected to the low-voltage inputs and outputs must be safely insulated against dangerous contact voltages as per DIN EN 61140, for example, using double or reinforced insulation as per DIN EN 60730-1 or DIN 60950-1. Refer to the separate operating manual accompanying the inter- face modules for further information on installing and operating these interface modules. -
Page 46: Configuring The Ethernet Interface
Fig. 20: Flange plug (front) in fault condition View of the flange plug (front) or into the coupling socket on the soldering side. Good condition Pin 1 and 2 are closed. During trouble-free operation, the alarm output is in good state. Fault condition Pin 2 and 3 are closed. - Page 47 The Ethernet interface can be configured in two different ways: Automatically - In order for this to work, a DHCP server must be obtain LAN con- present in the local network (LAN). If communication figuration is direct, the control station must support the auto IP standard.
- Page 48 Enter the numerical values for byte 2, byte 3 and byte 4. Once you have entered the numerical values, press the left arrow key. You return to the LAN configuration menu. Scroll to the numerical values of the [Local mask] menu item and press the Enter key.
- Page 49 There are two ways of checking: Enter the ping command together with the IP address. ping XXX.XXX.XXX.XXX@ For "XXX.XXX.XXX.XXX", put the IP address that was entered when the Ethernet interface was configured. Enter the ping command together with the serial number of the thermostatic circulator (possible with software control system 1.36 or later).
- Page 50 Checking with RealTerm Open the program "HyperTerminal" or the "terminal program" on a PC with Microsoft Windows operating system. The entry window will open. Fig. 22: "RealTerm” program Place a checkmark under Half Duplex in the Display tab. 50 / 198 Integral Process Thermostats and High-Temperature Thermostats...
- Page 51 Fig. 23: Entry in the Port field Enter the configured IP address and port number of the Ethernet interface on the constant temperature equipment in the Port tab. When you are doing this, be sure that the IP address and port number are separated by a colon.
-
Page 52: Data Transfer Rate
Fig. 24: Entries for the test A command must be sent to the constant temperature equipment to test communication. For example, TYPE. Type the command and press [Send ASCII]. If the connection is operational, the constant temperature equip- ment acknowledges the command. 4.7.4 Data transfer rate The data transfer rate cannot be precisely defined. -
Page 53: Protocol Of The Interface
4.7.5 Protocol of the interface Note the following instructions: The command from the computer must be made with a CR, CRLF, or LFCR. The response from the thermostatic circulator is always made with a CRLF. After each command sent to the thermostat, it is necessary to wait for the reply before sending another command. - Page 54 ID Function Unit, resolu- Command tion 33 Set temperature T in Safe Mode (Safe set point in case of communication [°C] IN_SP_07 interruption). 158 Actuating signal of master controller in case of external control [°C] IN_PV_11 Table 11: Pump ID Function Unit Command 6 Outflow pressure / pump pressure, relative to the atmosphere...
- Page 55 Table 13: Actuating signal ID Function Unit, resolu- Command tion 11 Resolution of controller actuating signal in per mill IN_PV_06 [‰] – negative value à device is cooling – positive value à device is heating 13 Controller actuating signal in watts IN_PV_08 –...
- Page 56 ID Function Unit Command 57 Control parameter XpF [–] IN_PAR_10 61 Control parameter Prop_E IN_PAR_15 Table 17: Control ID Function Unit Command 59 Set point offset IN_PAR_14 67 Control in control variable X: 0 = internal / 1 = external Pt / 2 = external [–] IN_MODE_01 analog / 3 = external serial / 5 = external Ethernet / 6 = external EtherCAT /...
- Page 57 Table 20: Programmer ID Function Unit Command 77 Program used as a basis for further commands [–] RMP_IN_04 88 Current segment number [–] RMP_IN_01 90 Number of preset program sequences [–] RMP_IN_02 92 Current program loop [–] RMP_IN_03 94 Currently running program (0 = no program currently running) [–] RMP_IN_05 Table 21: Contact input / output...
-
Page 58: Write Commands
ID Function Unit Command 119 Solenoid valve for automatic filling device [–] VERSION_M_1 (Solenoid valve must be present) 120 Solenoid valve for constant level device [–] VERSION_M_2 (Solenoid valve must be present) 121 Solenoid valve, shut off valve 1 [–] VERSION_M_3 (Solenoid valve must be present) 122 Solenoid valve, shut off valve 2... - Page 59 ID Function Unit Command 28 Limitation of outflow temperature TiH (lower limit) [°C] OUT_SP_05_XXX 32 Temperature set point T in Safe Mode [°C] OUT_SP_07_XXX.XX Table 24: Pump ID Function Unit Command 17 Pump power stage 1 – 8 [–] OUT_SP_01_XXX (only for Integral XT) 30 Set pressure (for pressure control settings) [bar]...
- Page 60 ID Function Unit Command 52 Control parameter TdE OUT_PAR_07_XXXX.X 54 Correction limitation OUT_PAR_09_XXX.X 56 Control parameter XpF [–] OUT_PAR_10_XX.X 60 Control parameter Prop_E OUT_PAR_15_XXX Table 28: Control ID Function Unit Command 58 Set point offset OUT_PAR_14_XXX.X 66 Control in control variable X: 0 = internal / 1 = external Pt / [–] OUT_MODE_01_X 2 = external analog / 3 = external serial / 5 = external Ethernet /...
-
Page 61: Error Messages
ID Function Unit Command 80 Continue programmer (after pause) [–] RMP_CONT 81 End programmer [–] RMP_STOP 4.7.8 Error messages The error messages of the Ethernet interface are described in the following. The string ERR_X or ERR_XX is output after an incorrect command. Error Description ERR_2... -
Page 62: Commissioning
The note only applies to devices in the USA Note for electric installation on site and Canada We recommend LAUDA that a back-up fuse is installed on the installa- tion side for three-phase devices: 25 A class cc low peak 62 / 198... -
Page 63: Switching On The Device For The First Time
Notes for electric installation on site The fuse on the installation side must at least correspond to the max- imum current consumption of the device (see type plate) and may not exceed the value permitted for the mains plug. Three-phase devices Three-phase devices may only be operated on networks grounded ... - Page 64 Fig. 26: Entry sequence Switch on the device Switch on the device at the mains switch. A sound is heard. Then the menu to choose the language appears. Fig. 27: Start screen 64 / 198 Integral Process Thermostats and High-Temperature Thermostats...
-
Page 65: Operating The Device With The Operating Unit
Use the down and up arrow keys to select the desired [menu lan- guage]. Press [CONTINUE] softkey to confirm your selection. You can change the menu language at any time via the menu. The menu for selecting the time zone then appears. ... - Page 66 Status bar When the pump is running, the pump symbol rotates. Only for Inte- gral XT will the pump level be additionally displayed as a figure. Display of the filling level of the heat transfer liquid in the device A red or yellow warning triangle indicates error, alarm or warning mes- sages.
-
Page 67: Enter Entry Window And Set Temperature
With [OK] you confirm an option in a selection window and confirm a numerical value in an entry window. With [CHANGE] a device parameter (for example set temperature) is changed. With [SELECT] an element is selected in a selection list. With [START] or [STOP] you can switch between the two operating modes Standby and Operation . -
Page 68: Graph Window
Press the Enter key. The entry window appears. The cursor flashes under the tem- perature value. The upper and lower temperature range is dis- played. Change the value with the arrow keys. By pressing the [ESC] key, you return to the previous menu without making any changes. -
Page 69: Operate The Device Using The Command Touch Unit
[Temperature scale]: automatic or manual. Here you can define which temperature range is displayed in the visible graph window. [Autom.]: The size of the visible graphic area automatically adapts to the changing temperature curves. If the setting is selected automatically, the following menu item ... - Page 70 WARNING! Overheating of heat transfer liquid due to incorrect entry of overtemperature switch-off point T for the expansion maxTank vessel Fire In the menu of the device, set the heat transfer liquid used in the device. Set the overtemperature switch-off point below the flash point of the heat transfer liquid.
-
Page 71: Fill The Device With Heat Transfer Liquid
Fill the device with heat transfer liquid LAUDA is not liable for damages resulting from the use of unsuitable heat transfer liquids. Do not mix different heat transfer liquids together! Use a funnel if required to fill the device with heat transfer liquid. - Page 72 WARNING! Overflow of heat transfer liquid Electric shock Do not overfill the device. Observe the level display and the thermal volume expansion of the heat transfer liquid. WARNING! Spraying of heat transfer liquid Electric shock Do not spray heat transfer liquid. Use a funnel for filling. ...
- Page 73 Information on filling the device Refilling during operation is possible. Only operate the thermostat if a flow in the consumer system is pos- sible. Open any shut-off valves in the consumer. During filling, the device may overflow if the consumer is positioned higher than the device and filling is interrupted (e.g.
- Page 74 Integral T: Switch on the pump and fill the application. The level in the device drops. Carefully top up the heat transfer liquid. Check the level indicator and do not overfill the device! From level 10 for Integral T or level 11 for Integral XT the device additionally supports you with a sound.
-
Page 75: Degas Heat Transfer Liquid (Low Boiling Point Expulsion)
Fill up with heat transfer liquid until the desired liquid level is reached. In the meantime, let the pump run. The cooling unit is switched off. The outflow temperature can rise above the set temperature due to the heat input of the pump. Press [Stop filling] to exit filling mode and stop the pump. - Page 76 We recommend an inert gas blanket for faster degassing of the IN 2560 XTW Ä Chapter 6.25 “Operation with inert gas blanket” on page 129. You can also use compressed air instead of an inert gas for degassing the heat transfer liquid.
-
Page 77: Setting The Flow Rate Of The Heat Transfer Liquid
Automatic degassing If necessary, the device carries out the degassing automatically. If the device detects gas in the hydraulic system, the heating and cooling output is first reduced or temporarily switched off completely. If the pump pressure drops sharply (a clear sign of degassing), the pump speed is limited and the pump may be switched off briefly. - Page 78 Setting pump level for Integral XT This section is relevant for: Integral XT devices The pump of the device can be adjusted by means of several pump levels. This optimizes the flow rate and discharge pressure, noise generation and mechanical heat input. If you have connected a pressure-sensitive application, you must use the settings [Set pump pressure] ( ...
-
Page 79: Control Parameters
Personnel: Operating personnel Protective equipment: Safety glasses Protective gloves Protective work clothing Setting the pump level Press the Enter key to open the menu. Select the menu items Pump Pump Level. The pump levels 1 to 8 are displayed. The currently active pump ... -
Page 80: Control Basics
5.8.1 Control basics Definition A brief explanation of terms Actuating - Initial value of the controller to compensate for the differ- signal ence between the actual value and target value (control deviation). PID con- - The PID controller operates with extreme speed and preci- troller sion and consists of a P, I and D-component. - Page 81 If the temperature range of an application is -20 to 80 °C, for example, a control setting of -10 to 20 °C is most suitable. Influence of control parameters on the control action Fig. 39: Ideal setting If the Xp parameter selected is too large, the actual value will reach the proportional range early and the P-component will be less than 100 % of the actuating signal.
-
Page 82: Overview Of Internal Control Parameters
In the case shown here, the preset I component is too large (parameter Tn too small, Tn must be increased). The I-component integrates the control deviation until it becomes 0. If integration proceeds too rapidly, the actuating signal, i.e. the output signal of the controller, is too large. As a result, the actual value fluctuates (fading) around the target value. -
Page 83: Overview Of External Control Parameters
5.8.3 Overview of external control parameters External control consists of a master controller (external controller) and a slave controller (internal controller). The temperature of the consumer to be temperature controlled is also required. In general this is deter- mined with an external “Pt100 sensor”. The master controller compares the set temperature with the external temperature (consumer temperature) and, from these temperatures, calculates the set temperature (set_internal) for the slave controller... -
Page 84: Activate Control Variable
Enter the value. Confirm the new value with the [Enter key]. The new value has been accepted. 5.8.4 Activate control variable If the device is to be controlled to the internal control variable or an external control variable, you must set it accordingly. When setting, the old control variable with its set values is automatically deactivated. - Page 85 Control parameter Tv With Tv manual/auto you can define whether the control parameter Tv and Td or Tve , Tde and Prop_E are set manually or automatically. If the automatic setting is enabled, these control parameters are displayed with a lock and cannot be selected. To be able to set these control parameters manually, change the control parameter Tv manual/auto to manual setting.
-
Page 86: Operation
Operation General warning DANGER! Hot heat transfer liquid in the expansion vessel Fire Keep the cover of the expansion vessel closed during oper- ation. DANGER! Risk of hot heat transfer liquid overflowing Fire A connecting hose with a collecting vessel must be ... - Page 87 WARNING! Malfunctions on the overtemperature protection or low-level protection are not detected Burns, scalding, fire Check the Tmax function and low-level protection on a regular basis. WARNING! Risk of refrigerant circuit bursting from excessive ambient tem- peratures while device is inoperative Impacts, cutting, device damage Observe the permitted storage and operating tempera- ...
-
Page 88: Operating Modes
If a low flow rate is required at high load, LAUDA recommends using the MID 80 flow controller (LAUDA catalog number L003217) for electri- cally conductive heat transfer liquids. The flow controller ensures that sufficient flow in the constant temperature equipment is guaranteed via its internal electronic bypass. -
Page 89: Menu Structure
Menu structure Fig. 45: Menu, Part 1 Integral Process Thermostats and High-Temperature Thermostats 89 / 198... - Page 90 Fig. 46: Menu, Part 2 continuation from previous page 90 / 198 Integral Process Thermostats and High-Temperature Thermostats...
- Page 91 Fig. 47: Menu, Part 3, continuation from previous page Integral Process Thermostats and High-Temperature Thermostats 91 / 198...
-
Page 92: Setting Tmax
Setting Tmax WARNING! Overheating of heat transfer liquid due to incorrect entry of overtemperature switch-off point T for the hydraulic circuit Fire Set the overtemperature switch-off point for the hydraulic circuit to 5 K above the upper limit of the temperature range for your application. -
Page 93: Self Adaptation
Personnel: Specialized personnel The limits for the T values (Integral T and XT) and T values (only Inte- maxTank gral XT) are set automatically,as soon as the heat transfer liquid is selected in the device menu. Therefore the value ranges of T and T to be set are limited by the maxTank... -
Page 94: Set The Setpoint Offset
The test run takes between 30 minutes and a maximum of 3 hours, depending on the application. During the run, the temperature of the heat transfer liquid deviates a maximum of ±15 Kelvin from the defined setpoint. After completion of the test run, the newly determined values of the control parameters are accepted and stored in the [Control parameter] menu. -
Page 95: Limiting Heating And Cooling
Select one of the following options: [Offset source] allows you to select the source used to measure the offset. [Diff. set/actual value] allows you to enter the value for the set- point offset. Entering the offset value Select the [Diff. set/actual] button in the setpoint offset menu. The entry window appears. -
Page 96: Dead-Time Correction
Press the [OK] button to return to the previous screen with the new setting configured. The new setting is active. Automatic heat limit for smaller pump In the Integral XT the heat output is increasingly reduced if the pump power power falls below 150 W (pump level <... -
Page 97: Dynamic Heatlimiter
Dynamic heatlimiter This section is relevant for: Integral XT devices With the dynamic heat limiter, you limit the heating output of the device. At low flow rates at the heaters, there is a risk that the heat transfer liquid will overheat locally. -
Page 98: Setting Temperature Limits Tih And Til
Press the Enter key to open the menu. Select the menu items Setup Cooling. Select one of the following options: With the [autom.] setting, the cooling unit is switched automati- cally. When cooling capacity is required, the cooling unit switches With [off], the cooling unit remains switched off. -
Page 99: Basic Settings
Lock the operating button Personnel: Operating personnel Switch to the main menu. Press and hold down the [input button]. Press and hold down the [Down] arrow button within 4 seconds. Hold down both buttons for 4 seconds. In the display the descriptions of the buttons are replaced by ... - Page 100 In the Basic setup menu select the menu item Sounds. A list containing the sounds opens. Select the sound that you wish to change using the arrow keys. Press the Enter key to confirm your selection. A list containing the volume settings opens. ...
- Page 101 Select one of the following options: With [Off], the device is set to standby operating mode after a power failure and when the power supply is restored. With [On], the device is set automatically continue after a power failure and when the power supply is restored. Automatic running of the device may result in unattended operation.
-
Page 102: Calibrating The Temperature Probe
In the [Basic setup] menu select the menu item Language. A list containing the languages opens. Select your language using the arrow keys. Press the Enter key to confirm your selection. The new setting is valid with immediate effect. ... - Page 103 Offset For calibration, the reference thermometer must be installed in the inlet of the device according to the specifications on the calibration certificate. To measure the temperature, wait until the system is in a steady state. Press the [Enter key] to open the menu. Select the menu items ...
-
Page 104: Restore The Factory Setting
Restore factory calibration Use this menu item to restore the calibration configured in the factory. Press the [Enter key] to open the menu. Select the menu items Setup Calibration intern Pt1000 or extern Pt100 Factory calibration. Select the option [yes]. -
Page 105: Viewing The Device Status
Personnel: Operating personnel Select the [Reset all] menu item. Select one of the following options: By pressing the [no] key, you return to the higher-level menu without making any changes. By pressing the [yes] key, the device is reset to factory settings when you confirm this action with the Enter key. - Page 106 The message marked above is explained in more detail at the bottom of the display. Displaying device data LAUDA Service uses this list for diagnostic purposes. The device data is required for on-site service visits and telephone support. Select the Device data menu item in the Device Status menu.
-
Page 107: Through-Flow Control Of The Internal Heater
Upper limit value (Tih) Degassing mode Fill mode Cont.outp.limit T_triac Displaying software versions and hardware The relevant versions of the installed software and hardware are required for versions on-site service visits and telephone support. In the Device status menu select the menu item SW version or ... -
Page 108: Programmer
6.18 Programmer 6.18.1 Basic information The programmer allows you to perform and save a temperature-time pro- gram. A program consists of several temperature-time segments A segment contains information on the final temperature of the segment, the duration, the temperature tolerance, the pump level and the switch position (off/on) of the contact module. - Page 109 The following options are available: [Status] Select the option [Start] to start the program. Once the program has started, you can press [Hold] to pause A paused program can be continued by pressing [Continue]. Select the option [Stop] to end the program. ...
- Page 110 Setting Description Pump In Integral T the pump is switched on or off. No pump levels can be set. In the Integral XT the pump level can be entered with which the segment is to be processed. S1, S2, S3 The switching state (off or on) of a contact module (if installed) can be entered here.
- Page 111 Start segment Each program starts with the segment Start , which determines the tem- perature at which segment 1 continues the program. The temperature of the Start segment is reached as quickly as possible. It is not possible to specify a time limit for the Start segment.
-
Page 112: Set And Process Program
Selecting a tolerance range that is too small can cause undesired delays. In extreme cases, it may not be possible to continue the program. The selected tolerance range should not be too small, especially if the control is external. A greater tolerance has been entered for segment 5 to guarantee adherence to the required time of 10 minutes, even with transient responses (3). - Page 113 Editing a program Please note: If in the hh and :mm field the value "0" is entered, the temperature T will be started as quickly as possible. Changes to the pump level are entered in the respective segment (= program line). The default value of the contact module is off .
-
Page 114: Set Time, Date, Format And Time Zone
UTC is also needed to obtain the time from the network because the time and date of NTP time servers are always supplied in UTC only. However, for this to work at all, the LAUDA device must be assigned an NTP time server via DHCP. -
Page 115: Operator And Viewer
6.20 Operator and viewer Definition Master - Operating unit on the LAUDA device Command - Command Touch remote control (optional accessory with its own operating manual) Operator - has read privileges and write privileges Viewer... - Page 116 Control station/PC connected to the constant temperature equipment via Ethernet interface, RS 232/485 interface (optional accessory), Profibus interface (optional accessory) or EtherCAT interface (optional accessory) Analog interface (optional accessory) Contact interface (optional accessory) Allowing access to the device via the network If you wish to have digital access to the device from the outside, this must be set in the device software beforehand.
- Page 117 An Operator is logged in and another operating unit requests Operator privi- leges ( Ä “Requesting Operator privileges” on page 118). The first Operator becomes a Viewer after this Operator requests Operator privileges. If an Operator is downgraded to Viewer, a pop-up window appears with a corresponding message.
- Page 118 Status display If an operating unit has Viewer privileges, a lock symbol is displayed instead of the right-hand softkey or the Start/Stop button: The right-hand softkey with the Start/Stop assignment is replaced by the assignment with the lock symbol in the Master. The Start/Stop button is replaced by the lock symbol in the Command.
-
Page 119: Web Server Lauda Command
App is started again. Security with the web browser The LAUDA device can be accessed with a web browser if users cannot use the LAUDA Command app for technical reasons or IT guidelines prohibit this. - Page 120 Confirm the connection. Operating the device via the Web server Operation of the LAUDA devices via the web server is carried out in the same way as operation via the operating unit on the device. If required, please refer to the respective descriptions of operation provided in this operating manual.
-
Page 121: Cloud Service Lauda.live
The user is checked by the remote station and the remote station is checked by the user. In the case of LAUDA, a user with automatically generated access data is created in the constant temperature equipment during the 2FA. The access data is stored in the App in the form of a token and as a cookie in the web browser. - Page 122 If a connection to LAUDA.LIVE already exists, a cloud appears in the status bar of the home window. Fig. 74: Status bar with cloud Since LAUDA provides the user with full control over the data to be trans- ferred, device data is not transferred until LAUDA.LIVE access has been configured.
-
Page 123: Safe Mode Safety Fittings
LAUDA Service. Changing the data in the device from the cloud, e.g. as part of remote maintenance by the LAUDA Service, is activated on the device side via [Op. param. writable] and [Service prm. writable]. In addition to measures provided in LAUDA.LIVE for authorizing access and changing device data, e.g. - Page 124 via a command over an interface module Ä Table 39 “Interface module and interface commands” on page 126 by alarms Ä Table 40 “Alarms which activate the Safe Mode function” on page 126 How does an alarm affect Safe Mode? Not all alarms trigger Safe Mode.
- Page 125 If an alarm has triggered Safe Mode, the alarm on the con- stant temperature equipment must be reset first. Only then can Safe Mode be switched off and then back on. Switching off Safe Mode via an interface command is not possible. Safe Mode menu Press the [Enter key] to open the menu.
- Page 126 Menu items in the Safe Mode menu Description Deactivation of Safe Mode Stop only appears when Safe Mode has been activated. Deactivation of Safe Mode is only possible when there are no Stop pending alarms. Configuration In this submenu you set the parameters with which the device will continue to work when the Safe Mode is activated Ä...
-
Page 127: Importing And Exporting Data
Exporting data Data can be exported from the LAUDA device to a USB stick. The software creates the directory LAUDA on the USB stick with a subdir- ectory. The subdirectory is named after the serial number of the device, for example "S200000.014". - Page 128 [Control parameters] This data record is located in the directory LAUDA / USER and contains the file CTRLPARA.INI. Only such a file can be exported. The file will be overwritten on re-export.
-
Page 129: Operation With Inert Gas Blanket
Select the Data export/import Data export menu items in the main menu. The submenu opens. Select one of the following options: n [Temperature graphic] n [Device status] n [Device data] n [Control parameters] [Analog module config.] [Contact module config.] Start the export by pressing the Enter key [OK]. - Page 130 Please note: The inert gas blanket may not be used in closed rooms. The operating areas must be well ventilated. Alternatively, use an extraction system. An overflow hose with a collecting vessel must be connected to the device overflow. Adjust the flow rate of the inert gas source to the desired flow rate (maximum pressure 0.1 bar) with an external fitting.
-
Page 131: Operation Of A High-Temperature Thermostat
Operation of a high-temperature thermostat Safety instructions for high-temperature High-temperature thermostats with a cooling water connection always thermostats with water counter-cooling require a cooling water supply, even if the devices are only used in heating mode. Degas mode and automatic degassing Degassing in high-temperature thermostats operates in the same way as in process thermostats. -
Page 132: Operating A Device With Pressure Overlay
Operating a device with pressure overlay Warnings, safety instructions and further information The warnings and safety instructions listed below apply to devices with pres- sure overlay. WARNING! Overflow of heat transfer liquid Slipping or falling over Do not overfill the device. Pay attention to the level indi- ... -
Page 133: Menu Structure Of The Pressure Overlay
Safety instructions for operating the pres- The flow rate of the heat transfer liquid at high cooling capacities sure overlay (> 15 kW) should be at least 40 l/min or equivalent to pump level 4. When operating on a pressure-sensitive application (e.g. a glass reactor), you must install a pressure relief device (e.g. - Page 134 Fig. 77: Menu structure of the pressure overlay Fig. 78: Schematic of the hydraulic circuit for devices with pressure overlay 134 / 198 Integral Process Thermostats and High-Temperature Thermostats...
-
Page 135: The System Pressure In Devices With Pressure Overlay
The system pressure in devices with pressure overlay The system pressure in the hydraulic circuit from the constant temperature equipment to the application is composed of the static pressure, which is influenced by the pressure overlay, and the dynamic pressure, which is generated by the pump. - Page 136 If you wish to maintain the temperature of a water-glycol mixture (in a ratio of 40:60, equivalent to LAUDA Kryo 30) at 130 °C, read off the steam pressure of the heat transfer liquid at 135 °C. This is stated as 2.0 bar absolute (see steam pressure table).
-
Page 137: Filling And Operating A Device With Pressure Overlay
1 kg of compressed air must not contain more than 1.7 g of water. Workshop coupling NW 7.2 (on the constant temperature equipment) Only these heat transfer liquids are permitted for devices with pressure overlay: LAUDA Kryo 30 Water-glycol mixture ... - Page 138 Completely assemble the hydraulic circuit (with application, hoses, constant temperature equipment and any additional equipment). Fig. 83: Connecting sleeves to the Inte- gral IN 2050 PW Connect the compressed air hose to the compressed air connector of the constant temperature equipment (see symbol). Prepare the heat transfer liquid.
- Page 139 Pressurized devices can also be filled by means of a pressure pump Ä “Filling with a pressure pump” on page 74. Activating and deactivating the pressure A temperature set point Tset of more than 90 °C can only be overlay entered when the pressure overlay is activated.
- Page 140 Draining WARNING! Discharge of liquid under high pressure Slipping hazard Reset the pressure overlay to 0 bar before emptying and use the pressure gage on the side of the device to check the pressure in the device. Bring the heat transfer liquid to room temperature before draining. Ensure that the heat transfer liquid in the hydraulic circuit is not below 5 °C or above 40 °C before draining, otherwise there is a risk of injury from scalding or frostbite.
-
Page 141: Maintenance
Maintenance Warning notes for maintenance DANGER! Contact with live or moving parts Electric shock, impacts, cutting, crushing The device must be disconnected from the mains power supply before any kind of maintenance is performed. Only skilled personnel are permitted to perform repairs. ... -
Page 142: Cleaning The Device
We recommend using ethanol as a decontaminant. If you are unsure whether decontaminants or cleaning agents are compatible with parts of the device or the materials contained in those parts, please contact the LAUDA Service department. Cleaning the air-cooled condenser This section is relevant for:... -
Page 143: Cleaning Cooling Water Circuit
Remove the screws with which the front panel is screwed to the columns on both sides of the device. Remove only the screws for the lower front panel in the case of two-piece front panels. The two marked screws must not be removed. They fix the plate of the module plug areas or the operating unit to the device. -
Page 144: Checking The Overtemperature Protection
This usually takes 15 to 30 minutes. Descaler: Only permitted: LAUDA descaler with article number LZB 126 (5 kg pack). You must always follow the safety instructions and the instructions for use on the packaging when handling the chemical! Flushing: Let at least 30 liters of clean water run through the device. -
Page 145: Checking The Low-Level Protection
Press and hold down the T key Ä Chapter 6.4 “Setting Tmax” on page 92. The values T and T appear on the display. maxTank With the arrow keys select the T value, while keeping the T pressed down. Press the Enter key. -
Page 146: Check The Heat Transfer Liquid
Protective equipment: Safety glasses Protective gloves Protective work clothing Switch on the device and the pump. Set the set temperature to room temperature. Watch the level indication on the display. Lower the liquid level in the device. For this purpose, allow the heat transfer liquid to flow out into a suitable container via the open drain nozzle. -
Page 147: Faults
If this happens, switch off the device at the mains switch. If the error occurs again after switching on the device, make a note of the error code and the corresponding description and contact the LAUDA Constant Temperature Equipment Service department. You will find the contact information here Ä... - Page 148 Code Message Description User action No water No cooling water connected Provide a supply of cooling water No actual value from the Pt100 T ext Pt100 Check the temperature probe module No actual value from the analog inter- T ext analog Check the temperature probe face No actual value from the serial inter-...
-
Page 149: Troubleshooting
10.3 Troubleshooting Before informing the LAUDA Service department, please check whether you can solve the problem with the following instructions. Table 43: Process thermostat Fault Cause ð Possible remedy The device cools very slowly or not at all. The cooling unit is switched off ð switch on the cooling unit. - Page 150 The viscosity of the heat transfer liquid is too high ð change to another heat transfer liquid or increase the (Pump motor monitoring: overload, blockage). set temperature. The pump is blocked ð inform the LAUDA Service department Ä Chapter 14.4 “Contact LAUDA” on page 160 Display: Low level (pump) No liquid in system.
- Page 151 Fault Cause ð Possible remedy Display: Gage pressure Pump level is too high ð select a lower pump level. When pressure control is active, the set pressure is too (Outflow pressure too high) high ð reduce the set pressure. The maximum pressure is too low ð increase the max- imum pressure, but only if your application, hoses, etc.
- Page 152 Cooling water temperature is higher than 80°C and for In the event of a blockage of the high-temperature longer than 8 seconds. valve, inform the LAUDA Service Ä Chapter 14.4 Cooling water temperature is higher than 85 °C. “Contact LAUDA” on page 160.
-
Page 153: Decommissioning
Do not drain the heat transfer liquid in a hot state above 90°C or in a cold state below 0°C! Observe the regulations for the disposal of used heat transfer liquid. Ä Chapter 4.4 “LAUDA heat transfer liquids” on page 40, Ä Chapter 12.4 “Disposing of heat transfer liquid and liquids” on page 158 Ä... - Page 154 Protective equipment: Safety glasses Protective gloves Protective work clothing The drain taps and drain nozzles are located on the right hand side of all devices. Allow the device and heat transfer liquid to cool or warm up to room temperature. Screw the hose nozzle with a union nut (EOA 078) onto the drain nozzle (3/8"...
- Page 155 After draining, close the drain tap or taps. Internal cleaning After the heat transfer liquid has been drained, residues remain in the device. These residues must be removed to avoid deposits in the device during storage. If new heat transfer liquid is added and the device is operated above the thermal load limit for the old heat transfer liquid, deposits can form, espe- cially on the heaters.
-
Page 156: Draining The Cooling Water Circuit
Table 45: Cleaning fluids Suitable cleaning fluid for heat transfer liquid Kryo 20 Kryo 51 Ethanol (solvent) Kryo 65 It is essential to observe the relevant safety Kryo 70 measures for handling ethanol! Kryo 95 Ultra 350 Water Kryo 30 11.3 Draining the cooling water circuit This section is relevant for:... -
Page 157: Disposal
Disposal 12.1 Disposing of packaging The following applies for EU member states: Disposal of the packaging must proceed according to regulation 94/62/EC. 12.2 Disposing of refrigerant Disposal of refrigerant must proceed according to regulation 2015/2067/EU in combination with regulation 517/2014/EU. CAUTION! Uncontrolled escape of refrigerant Impacts, cutting... -
Page 158: Disposing Of Heat Transfer Liquid And Liquids
Refer to the relevant safety data sheet for the liquid for information on correct disposal. The link to the LAUDA safety data sheets can be found in Ä Chapter 4.4 “LAUDA heat transfer liquids” on page 40. Use the original containers of the liquids when transporting them for disposal. -
Page 159: Accessories
Accessories The following optional accessories are available for the Integral devices. Table 46: Module bay 51 mm x 27 mm Accessories Cat. No. Analog interface module LRZ 912 RS 232/485‑interface module LRZ 913 Contact interface module with 1 input and 1 output LRZ 914 Contact interface module with 3 inputs and 3 outputs LRZ 915... -
Page 160: General
The manufacturer reserves the right to make technical modifications to the device. 14.3 Warranty conditions LAUDA offers a standard 12 month manufacturer's warranty on Integral process thermostats from the date of purchase. 14.4 Contact LAUDA Contact the LAUDA Service in the following cases:... -
Page 161: Technical Data
Technical data 15.1 General data Specification Value Unit Display type TFT, white font on black background --- Display size 3.5 Inches Display resolution 320 x 240 Pixels Setting resolution 0.01 °C Display resolution 0.01 °C Display accuracy, internal/outflow ±0.2 °C Entry via eight keys --- Installation and use... - Page 162 R-452A 2.37 m³/kg R-23 1.48 m³/kg R-508B 4.0 m³/kg Integral T Table 1 Unit IN 130 T IN 230 T IN 230 TW IN 530 T °C -30 – 120 -30 – 120 -30 – 120 -30 – 120 ACC area À...
- Page 163 Table 1 Unit IN 130 T IN 230 T IN 230 TW IN 530 T ‑ Right ‑ Left Table 2 Unit IN 530 TW IN 1030 T IN 1330 TW IN 1830 TW °C -30 – 120 -30 – 150 -30 –...
- Page 164 Integral XT Table 3 Unit IN 150 XT IN 250 XTW IN 280 XT IN 280 XTW °C -45 – 220 -45 – 220 -80 – 220 -80 – 220 ACC area À Temperature stability Á ±0.05 ±0.05 ±0.05 ±0.05 Device dimensions 560 x 550 x 560 x 550 x...
- Page 165 Table 4 Unit IN 550 XT IN 550 XTW IN 590 XTW IN 750 XT dB(A) Noise level 60 Hz  Weight 176.5 176.5 279.0 175.5 Distance between device and environment ‑ Front ‑ Back ‑ Right ‑ Left Table 5 Unit IN 950 XTW IN 1590 XTW...
-
Page 166: Heating Output And Power Supply
Depending on the country-specific version, the maximum current con- sumption may already be limited ex works. Limited current consumption values are shown in brackets. Integral T Table 1 Unit IN 130 T IN 230 T IN 230 TW Heating output 230 V; 50 Hz 200 V; 50/60 Hz... - Page 167 Table 1 Unit IN 130 T IN 230 T IN 230 TW 208-220 V; 60 Hz 2.4 – 2.6 2.4 – 2.6 2.4 – 2.6 Current consumption 16.0 (13.0) 16.0 (13.0) 16.0 (13.0) Table 2 Unit IN 530 T IN 530 TW...
-
Page 168: Cooling Output
All water-cooled devices are equipped with the following cooling water con- nection: Exterior thread (male) G ¾ inch Integral T with air-cooled cooling unit Table 49: Cooling output Unit IN 130 T IN 230 T IN 530 T IN 1030 T Cooling output at 100 °C 1.40... - Page 169 Unit IN 230 TW IN 530 TW IN 1330 TW IN 1830 TW Cooling water temperature °C 10/30 10/30 10/30 10/30 minimum/maximum Recommended cooling °C water temperature Recommended cooling water pressure difference Minimum cooling water pressure difference* Maximum cooling water pressure difference Maximum cooling water pressure...
- Page 170 IN 1850 Unit IN 250 XTW IN 550 XTW IN 950 XTW Pump level 100 °C 2.20 5.80 9.50 20.00 20 °C 2.10 5.80 9.50 20.00 10 °C 2.00 5.80 8.50 15.00 0 °C 1.80 5.40 6.20 11.50 -10 °C 1.40 4.00 4.30...
- Page 171 Unit IN 2560 XTW IN 2560 XTW Pump level -40 °C 8.70 9.50 -50 °C 5.00 5.40 -60 °C 3.00 3.30 Cooling water flow rate l/min 29.0 29.0 Cooling water temperature °C 10/30 10/30 minimum/maximum Recommended cooling water °C temperature Recommended cooling water pressure difference Minimum cooling water pres-...
- Page 172 Unit IN 2050 PW Pump level IN 2560 PW IN 2560 PW Pump level Recommended cooling water tem- °C perature Recommended cooling water pres- sure difference Minimum cooling water pressure differ- ence* Maximum cooling water pressure differ- ence Maximum cooling water pressure * only approved for a max.
- Page 173 Unit IN 280 XT IN 280 XTW IN 590 XTW Pump level Recommended cooling water °C temperature Recommended cooling water pressure difference Minimum differential pressure of cooling water Á Maximum cooling water pressure difference Maximum cooling water pressure Pump level 4 À...
-
Page 174: Refrigerant And Filling Weight
* only approved for a max. cooling water temperature of 20 °C Fig. 91: Cooling water pressure difference 15.4 Refrigerant and filling weight The device contains fluorinated greenhouse gases. Integral T Table 1 Unit IN 130 T IN 230 T IN 230 TW IN 530 T Refrigerant R-449A R-449A R-449A... - Page 175 Table 2 Unit IN 530 TW IN 1030 T IN 1330 TW IN 1830 TW 1397 1397 1397 1397 (100a) equivalent Integral XT with single-stage cooling unit Table 3 Unit IN 150 XT IN 250 XTW IN 550 XT IN 550 XTW Refrigerant R-449A R-449A...
-
Page 176: Technical Data Of The High-Temperature Thermostats
Global Warming Potential (GWP), CO comparison = 1.0 * Time frame 100 years - according to IPCC IV 15.5 Technical data of the high-temperature thermostats Table 1 Unit IN 4 XTW IN 8 XTW Working temperature range °C 25 – 320 25 –... - Page 177 Table 2 Unit IN 4 XTW IN 8 XTW Pump level 200 °C with thermal oil 150 °C with thermal oil 100 °C with thermal oil 50 °C with thermal oil Cooling medium Water Water Connecting thread of cooling Inches G3/4“...
-
Page 178: Pump Characteristics For Integral T
Pump characteristics for Integral T measured with water for IN 130 T, IN 230 T, IN 230 TW Fig. 92: IN 130 T, IN 230 T, IN 230 TW measured with water for IN 530 T, IN 530 TW Fig. 93: IN 530 T, IN 530 TW... -
Page 179: Pump Characteristics For Integral Xt
measured with water for IN 1030 T, IN 1330 TW, IN 1830 TW Fig. 94: IN 1030 T, IN 1330 TW, IN 1830 TW 15.7 Pump characteristics for Integral XT Pump levels 1 - 8, measured with water Fig. 95: all devices smaller than IN 1850 XT Integral Process Thermostats and High-Temperature Thermostats 179 / 198... - Page 180 Pump levels 1 - 8, measured with water Fig. 96: IN 1850 XT, IN 2050 PW Pump levels 4 - 8, measured with water Fig. 97: IN 2560 XTW, IN 2560 PW 180 / 198 Integral Process Thermostats and High-Temperature Thermostats...
-
Page 181: Pump Characteristics For High-Temperature Thermostats
15.8 Pump characteristics for high-temperature thermostats Pump levels 1 - 8, measured with water Fig. 98: IN 4 XTW, IN 8 XTW Integral Process Thermostats and High-Temperature Thermostats 181 / 198... -
Page 182: Declaration Of Conformity And Certificates
15.9 Declaration of Conformity and certificates 182 / 198 Integral Process Thermostats and High-Temperature Thermostats... - Page 183 Fig. 99: Declaration of Conformity Integral Process Thermostats and High-Temperature Thermostats 183 / 198...
- Page 184 Fig. 100: Declaration of Conformity 184 / 198 Integral Process Thermostats and High-Temperature Thermostats...
- Page 185 The certificate is only valid for devices with cTUVus certification marks on the rating label. Integral Process Thermostats and High-Temperature Thermostats 185 / 198...
- Page 186 186 / 198 Integral Process Thermostats and High-Temperature Thermostats...
- Page 187 Integral Process Thermostats and High-Temperature Thermostats 187 / 198...
-
Page 188: Modular Mimic Displays
15.10 Modular mimic displays Fig. 101: Modular mimic display for Integral T 188 / 198 Integral Process Thermostats and High-Temperature Thermostats... - Page 189 Fig. 102: Modular mimic display for Integral XT (without IN 2560 XTW/PW) Integral Process Thermostats and High-Temperature Thermostats 189 / 198...
- Page 190 Fig. 103: Modular mimic display for Integral IN 2560 XTW/PW 190 / 198 Integral Process Thermostats and High-Temperature Thermostats...
-
Page 191: Product Returns And Clearance Declaration
Product Returns and Clearance Declaration Product Returns Would you like to return a LAUDA product you have purchased to LAUDA? For the return of goods, e.g. for repair or due to a complaint, you will need the approval of LAUDA in the form of a Return Material Authorization (RMA) or processing number. -
Page 192: Glossary
Glossary Auto IP Auto IP is a standardized procedure where two or more participants agree on the same network configuration. DHCP Client (Dynamic Host Configu- A DHCP client facilitates the automatic integration of an Ethernet ration Protocol Client) interface in an existing network. As a result, the interface does not have to be manually integrated in the existing network. - Page 193 Process Interface A process interface on the LAUDA constant temperature equipment is the interface that makes it possible to control or monitor the con- stant temperature equipment via Ethernet using LAUDA interface command sets. TCP (Transmission Control Protocol) This network protocol define how data is exchanged between network components.
-
Page 194: Index
Index Overtemperature protection ....144 Tmax ....... 144 Accessories . - Page 195 Draining Cooling water circuit ....144, 156 Damping time ......83 Device .
- Page 196 Disposal ......157 LAUDA Service ......160 Personal protective equipment (overview) .
- Page 197 pressure pump ......74 Softkey bar (display) ......65 Program Software version .
- Page 198 Version (software) ......107 Viewer ....... . . 116 Viewing configuration data (device) .
- Page 200 Manufacturer LAUDA DR. R. WOBSER GMBH & CO. KG ◦ Laudaplatz 1 ◦ 97922 Lauda-Königshofen Telephone: +49 (0)9343 503-0 ◦ Fax: +49 (0)9343 503-222 E-mail: info@lauda.de ◦ Internet: https://www.lauda.de...
Need help?
Do you have a question about the IN 130 T and is the answer not in the manual?
Questions and answers