Table of Contents
Advertisement
Operating Instructions
ECO GOLD
Heating and Cooling Thermostats with control head GOLD
Immersion thermostat
ECO GOLD
Heating thermostats
E 4 G, E 10 G, E 15 G, E 20 G, E 25 G, E 40 G,
ET 6 G, ET 12 G, ET 15 G, ET 20 G
Cooling thermostats
RE 415 G, RE 420 G, RE 620 G, RE 630 G, RE 1225 G, RE 2025 G, RE 1050 G
LAUDA DR. R. WOBSER GMBH & CO. KG
Version 04/2010 b4
Postfach 1251
replaces version 02/2010 b3
97912 Lauda-Königshofen
Germany
YACE0088
Valid from:
Phone: (+49) 09343/ 503-0
Software Control System from Version 1.20
Fax: (+49) 09343/ 503-222
Software Safety System from Version 1.20
e-mail
info@lauda.de
Software Chilling System from Version 1.20
Internet
http://www.lauda.de
Advertisement
Table of Contents

Related Manuals for Lauda E 4 G


Summary of Contents for Lauda E 4 G
-
Page 1: Operating Instructions
Immersion thermostat ECO GOLD Heating thermostats E 4 G, E 10 G, E 15 G, E 20 G, E 25 G, E 40 G, ET 6 G, ET 12 G, ET 15 G, ET 20 G Cooling thermostats RE 415 G, RE 420 G, RE 620 G, RE 630 G, RE 1225 G, RE 2025 G, RE 1050 G LAUDA DR. - Page 3 ECO GOLD First some safety information Before you put the device into operation, read all the instructions and safety informa- tion thoroughly. If you have any queries, please feel free to call us. Follow the instructions about siting, setting up and operation as only then can im- proper handling of the device be eliminated and the full warranty coverage main- tained.
-
Page 4: Table Of Contents
ECO GOLD Table of contents SAFETY INFORMATION ............................7 ........................... 7 ENERAL SAFETY INFORMATION ..........................8 THER SAFETY INFORMATION MENU STRUCTURE..............................9 OPERATING AND FUNCTIONAL CONTROLS....................11 DEVICE DESCRIPTION ............................17 ............................17 MBIENT CONDITIONS ..............................17 EVICE TYPES ................................... 17 ................................. - Page 5 ECO GOLD 7.8.2 Creating or changing a program (editing) ....................53 7.8.3 Starting the program............................56 7.8.4 Interrupting, continuing or terminating the program ..................56 7.8.5 Defining the number of program loops (Loops) ..................57 ............................58 ONTROL PARAMETERS 7.9.1 Internal control variable (internal temperature sensor)................58 7.9.2 External control variable..........................60 7.9.2.1...
- Page 6 ECO GOLD Special symbols: Caution: This sign is used when improper handling can lead to personal injury or damage to property. Note: Here, something in particular needs the reader's atten- tion. In certain circumstances this includes a note about a hazard. Reference Refers to further information in other chapters.
-
Page 7: Safety Information
ECO GOLD Safety information General safety information A laboratory thermostat is used to heat, cool and circulate liquids as specified. Hazards arise from this due to high or low temperatures, fire and the general hazards due to the application of electrical en- ergy. -
Page 8: Other Safety Information
ECO GOLD Other safety information • Check the device carefully for shipping damage before putting into operation. The device should not be put into operation if shipping damage has been found. • Only connect devices to earthed mains sockets. • At higher operating temperatures parts of the bath cover can take on surface temperatures of over 70 °C. -
Page 9: Menu Structure
ECO GOLD Menu structure Menu structure of Control Head GOLD Stage 6 Stage 5 internal Pt100 Stage 4 external Pt100 Stage 3 Stage 2 internal Pt100 Stage 1 external Pt100 Control Variable manual/autom. Control parameter Control para. sets Offset source Setpoint offset Diff.set/actual value Correction limit. - Page 10 ECO GOLD Continued from previous page Menu Online graph Record Start Freeze Graph Start Setpoint Value Tset Tint Text Setup Tset Tint Programmer Tset Text Interfaces Section 8.2 Tint Text Graph Tint Clock Text Standby Tset Mode Displayed Value Sample Time 2 s (max.2h10min) Time Axis 10 s (max.11h5min)
-
Page 11: Operating And Functional Controls
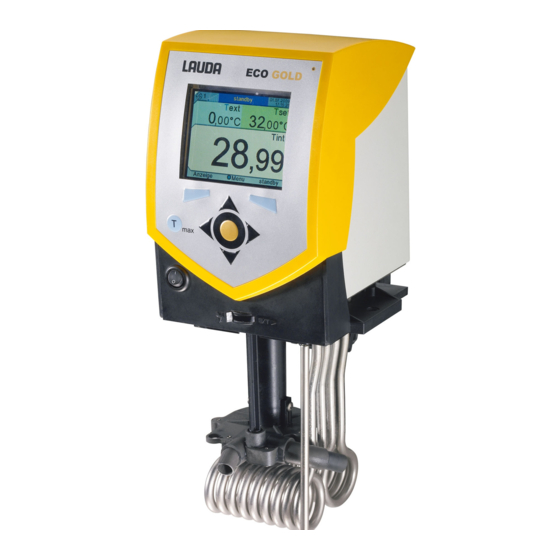
ECO GOLD Operating and functional controls Control Head ECO GOLD (can be used as immersion thermostat with screw clamp) Mains switch Light sensor for automatic control of display brightness Colour TFT display Control panel (refer to page 16) Selector switch for dividing up the external and internal pump flow Pump output for internal bath circulation Pump output for bath circulation or connection to the pump connection set Pt100 temperature sensor... - Page 12 ECO GOLD Rear view of Control Head ECO GOLD Mini-USB interface ( 4.6) 2 Upper module receptacle approx. 51x27 mm for analogue, RS 232/485, Profibus module and contact modules Lower module receptacle approx. 51x17 mm for Pt100/LiBus module Connection for control cable of cooling underpart for RE 1050 G Connection of power supply between the control head and cooling underpart Rating label Mains connecting lead...
- Page 13 ECO GOLD Heating Thermostats ECO GOLD Cooling coil connections Pump connection: outflow and return (as standard only with E 4 G and ET 15 G) Bath cover (as standard only with E 4 G) Four feet Rating label Mains connecting lead...
- Page 14 ECO GOLD Cooling Thermostats ECO GOLD Pump connection with thread M16x1 (stainless steel) Bath cover Front grip recess Ventilation grill (both sides) Front panel (removable without tools ( 6.1) ) Four feet Operating and functional controls 28.04.10/ YACE0088...
- Page 15 ECO GOLD Connecting lead between the control head and cooling underpart Back grip recess Rating label Control cable for cooling underpart (only with RE 1050 G) Bath drain tap Bath drain point Ventilation grill Operating and functional controls 28.04.10/ YACE0088...
- Page 16 ECO GOLD Control panel and display ECO GOLD Display Control panel Display Control panel Expanded status display Soft keys, left and right Status display Enter key or soft key, centre Cursor keys Display of the internal or external temperature value (T or T Cursor keys for Up, Down, Left and Right.
-
Page 17: Device Description
ECO GOLD Device description Ambient conditions Use of the thermostating unit is only admissible under the conditions stated in DIN EN 61010-1:2001 and DIN EN 61010-2-010:2003 : − Operation only indoors. − Elevation up to 2000 m above seal level. −... -
Page 18: Materials
The following modules are currently available: 1. Analogue Module (LAUDA order no. LRZ 912) with two inputs and two outputs on a six-pole DIN socket. The inputs and outputs can be set independently of one another as a 4...20 mA or 0...10 V interface. -
Page 19: Chiller
ECO GOLD Chiller The chiller mainly consists of a fully hermetically sealed compressor. The dissipation of the condensation and motor heat takes place via a fan-ventilated lamellar condenser. Here, atmospheric air is drawn in at the front of the device, heated up and discharged at the back and sides. To ensure proper air circulation the ventilation openings must not be covered up. -
Page 20: Unpacking
Bath Cover RE 1225 RE 1225 G HDQ 131 Bath Cover RE 2025 RE 2025 G RE (cooling) devices, E 4 G, ET 15 G LCZ 0716 Pump Connection Set HKO 026 Olive Ø 13 mm RE (cooling) devices, E 4 G, ET 15 G... -
Page 21: Preparations
ECO GOLD Preparations Assembly and siting a) Immersion thermostat − Push the screw clamp on the underside of the control head into the guide rails. − Insert the thermostat with the screw clamp into the tempering vessel ( 10) and screw the clamp tightly to the bath edge by turning the knurled screw. - Page 22 ECO GOLD Operation with external load (circulation thermostat) ( 6.2.) − Carefully attach the immersion thermostat so that it cannot fall into the bath. − If this should occur however, do not reach into the bath. Withdraw the mains plug im- mediately.
- Page 23 ECO GOLD c) Cooling bath and circulation thermostats − Do not tilt the device and never turn it upside down. − If possible after transport, site the device two hours before putting it into operation. − Do not cover the ventilation openings at the back of the device and on the lower part of the device.
- Page 24 ECO GOLD Ways of adjusting the pump flow ( 6.2) The circulation of the heat transfer liquid by the pump can be divided between internal (INT) and external (EXT) with the aid of the selector switch at the front on the control head (flow distribution). The adjustment is continu- ously variable and is possible during operation.
-
Page 25: Connection Of External Loads
10) for the connection of an external load. This set is included as standard with cooling thermostats and with the heating ther- mostats E 4 G and ET 15 G. Withdraw the mains plug before cleaning, servicing, installing or removing modules or moving the thermostat. - Page 26 ECO GOLD − Select the division of the pump flow to suit the thermostat- ing task using the selector switch on the front of the con- trol head ( 6.1). − The position EXT signifies the greatest flow in the external circuit.
-
Page 27: Filling And Emptying
ECO GOLD Filling and emptying Filling − Withdraw the drain tap. − Maximum filling level is 20 mm below the bath bridge. − Optimum operation with 20-40 mm below the bath bridge. − Operation down to 60 mm below the bath bridge is possible. −... -
Page 28: Heat Transfer Liquids And Hoses
ECO GOLD Heat transfer liquids and hoses Heat transfer liquids – approved by LAUDA Operating Vis- Viscosity LAUDA Chemical Fire Container size temperature cosity (kin) at designation designation point Catalogue number range (kin) temperature mm²/s °C mm²/s °C 10 L 20 L (20 °C) - Page 29 Internal dia- Temperature Type of hose meter Application range Order number range °C Ø mm For all LAUDA heat trans- EPDM hose 10...120 fer liquids except Ultra RKJ 111 uninsulated 350 and mineral oils For all LAUDA heat trans- EPDM hose 10...120...
-
Page 30: Cooling The Heating Thermostats
Temperatures below room temperature: A LAUDA through-flow cooler DLK 10, DLK 25, DLK 45 or DLK 45 LiBus can be connected to the pump connections ( 10). The through-flow cooler is built into the return line from the load to the thermostat. -
Page 31: Putting The Device Into Operation
An acoustic signal sounds for approx. 1 s. (Example: depends on device type and equipment). − The adjacent display appears for approx. five seconds with LAUDA the corresponding version numbers of the software. − The displayed versions are: Control and Safety. If present, Cool and External Pt100 are displayed. - Page 32 ECO GOLD − The current bath temperature (Tint), status display, expanded 27.10.2009 status display and the soft-key bar at the bottom edge of the 10:55 display appear. Text Tset − Pump starts up provided "Standby" has not been set. 00°C - - - °C Tint ...
-
Page 33: Display Representation
ECO GOLD Display representation The ECO GOLD thermostats offer simple menu guidance in plain text. Information and possible entries are represented differently in the display. In the following the possible window views and the symbols used are explained. 7.3.1 Basic window The following information is displayed depending on the operating 27.10.2009 status:... - Page 34 ECO GOLD Examples of display representation: Main menu In the main menu the following information is displayed: − Main Menu The selected menu point is displayed inversely. − Setpoint Value In front of each menu point symbols are displayed which sup- ►...
-
Page 35: Entry Window
ECO GOLD 7.3.3 Entry window Values are input using the entry window. In the entry window the following information is displayed: − In the first line the short form of the parameter is located whose value is to be entered. In the example shown this is Tset −... -
Page 36: Basic Setup
ECO GOLD Basic setup 7.4.1 Setting the overtemperature switch-off point T − Press the key and keep it pressed during the com- Tmax plete setup; simultaneously press . The entry window appears. The T value is underlined. The maximum and Max. -
Page 37: Setting The Pump Level
With small thermostats (e.g. E 4 G, RE 415 G, RE 420 G) without an external load, power levels 1 to 3 are practi- cable and sufficient. -
Page 38: Setting Up Standby
ECO GOLD 7.4.4 Setting up standby Standby operation: Pump, heating and chiller are switched off; the operating display remains active. There are two ways of selecting the standby mode. 27.10.2009 Standby 10:57:05 − Text Tset 1. Confirm Standby by pressing 00°C - - - °C Tint... -
Page 39: Other Settings
ECO GOLD Other settings 7.5.1 Defining temperature limits With this function it is possible to define a minimum and maximum temperature within which the controller operates. If, for example, you are using water as the heat transfer liquid, +95 °C would be practicable as the maximum temperature and +5 °C the minimum temperature. -
Page 40: Restoring Factory Settings
ECO GOLD 7.5.2 Restoring factory settings − Access to the main menu level is obtained by pressing Factory Setting ► all default ► Control − Selection and confirmation of Setup Factory Setting. The adjacent menu window appears. − all default is selected, a display appears in which a choice between "no"... -
Page 41: Selecting The Menu Language
ECO GOLD 7.5.4 Selecting the menu language The ECO GOLD thermostats offer you the possibility of selecting the menu languages of English, Ger- man, French, Spanish and Russian. − Access to the main menu level is obtained by pressing Language English −... -
Page 42: Setting The Display Brightness
ECO GOLD 7.5.6 Setting the display brightness The ECO GOLD thermostats have a sensor which automatically adapts the display brightness accord- ing to the ambient light level. However, the automatic adaptation can be deactivated and the brightness set manually. − Access to the main menu level is obtained by pressing Brightness automatic... -
Page 43: Defining The Starting Mode (Autostart)
ECO GOLD 7.5.8 Defining the starting mode (Autostart) Usually it is required that the thermostat starts operating again after a power interruption. However, if this is not desired due to safety considerations, you can insert a manual activation step. − Access to the main menu level is obtained by pressing Basic setup ►... -
Page 44: Limiting The Mains Current Consumption
ECO GOLD 7.5.9 Limiting the mains current consumption If your mains fusing is below 16 A, the current consumption can be reduced in steps from 16 A to 8 A. The maximum heating power is then also reduced correspondingly. Here, take into consideration whether other loads are connected to the same fused circuit or whether your ECO thermostat is the only load. -
Page 45: Entering The Offset Of The Displayed Temperature (Calibration)
Entering the offset of the displayed temperature (calibration) If a deviation is found when checking with a calibrated reference thermometer, e.g. from the LAUDA DigiCal series, the offset of the internal measuring chain can be adjusted with the following function. -
Page 46: Restoring The Factory Setting Of The Internal Temperature Sensor (Factory Calibration)
ECO GOLD 7.5.11 Restoring the factory setting of the internal temperature sensor (factory calibration) If the offset has been adjusted, the factory setting can be restored again. − Access to the main menu level is obtained by pressing Calibration Calibration ►. -
Page 47: Graphical Display Of Temperature Measurements
ECO GOLD Graphical display of temperature measurements − From the basic window you access the graphics window by pressing (display). − The temperature traces are shown in different colours. The red line is the temperature set-point Tset; the green line is the internal bath temperature Tint; the blue line is the external bath temperature Text. - Page 48 ECO GOLD With "Rec. Interval" you can define the time interval at which Rec. Interval the temperature measurements are to be recorded. The values in brackets give the maximum recording time. 2 s (max.2h10min) 10 s (max.11h5min) In the menu five possibilities are offered. 30 s (max.33h20min) 1 min (max.66h40min) 2 min (max.133h)
- Page 49 ECO GOLD With "Temperature Limits" you can manually input the tempera- Temperature Limits ture limits for the graphical display. Temp.Scale Min 0.0°C. − As well as Temp.Scale Min the momentary minimum value is Temp.Scale Max50.0 °C displayed. − As well as Temp.Scale Max the momentary maximum value is displayed.
-
Page 50: External Control
ECO GOLD External control The devices can also be controlled via an external Pt100 temperature sensor, which is connected at the back of the control head. However, the connection is not included in the items supplied with standard production devices. It is necessary to install an external Pt100/LiBus module ( 8) for external control ( 7.9.2). -
Page 51: Setpoint Offset Operating Mode (Diff.set/Actual)
ECO GOLD 7.7.2 Setpoint offset operating mode (Diff.set/actual) It is possible to apply an offset value to the temperature, which is provided by an external temperature sensor and to process it as the set value. The bath temperature can therefore be operated, for example, -15 °C below the temperature of a reactor measured by the external temperature sensor. -
Page 52: Programmer
ECO GOLD Programmer The programming function enables you to save five temperature/time programs. The programs consist of several temperature/time segments. This also includes how often the program is to be run (loops). The sum of all segments of all programs can be up to 150. Step changes in temperature, i.e. the time is zero, or also temperature holding phases, i.e. -
Page 53: Creating Or Changing A Program (Editing)
ECO GOLD Edited programming example (refer to dashed curve in graph 1) Tend Tolerance Pump Start 30.00 Start 50.00 50.00 70.00 70.00 60.00 30.00 Insert new segment ( 7.8.2) Change segment time or tolerance ( 7.8.2) The field "Tolerance" (Refer to programming table above and graph below): −... - Page 54 ECO GOLD − New segments and be inserted and existing ones changed, also the currently ac- tive segment, even when a program is currently being executed. Furthermore, ex- cept for the currently active segment, all segments can be deleted at any time. −...
- Page 55 ECO GOLD − The programmer edit window contains the following parameters: No.: Program segment number Tend: Final temperature to be attained Time in hours (hh) in which the specified temperature is to be attained Time in minutes (mm) in which the specified temperature is to be attained −...
-
Page 56: Starting The Program
ECO GOLD 7.8.3 Starting the program − The submenu Status appears by selecting and confirming Programmer Programmer Program ► Status − With the menu Status you can carry out the following with Edit the program Loops Info 1. start Start 2. -
Page 57: Defining The Number Of Program Loops (Loops)
ECO GOLD 7.8.5 Defining the number of program loops (Loops) − Programs can be processed many times. Programmer − Select the menu point Loops with and confirm ► Status Edit with Loops Info − Enter the required number with and confirm with −... -
Page 58: Control Parameters
ECO GOLD Control parameters The control parameters have been optimised at the factory for operation as a bath thermostat (with water as the heat transfer liquid) with internal control. The standard parameters are set as default also for the temperature stabilisation of external applications with external control. Depending on the appli- cation, the configuration can be adapted from case to case as required. - Page 59 ECO GOLD intern Pt100 − Access to the menu level is obtained by pressing 10.0 − Selection and confirmation of Setup Control Control parameter intern Pt100. The adjacent menu Tv manual/auto auto window appears. Apart from the control parameters the 24(auto) currently set values are displayed.
-
Page 60: External Control Variable
ECO GOLD 7.9.2 External control variable Only change the control parameters if you have appropriate knowledge of control techniques. Continue reading here only if you have connected a temperature sensor or the actual temperature is read in from a module (and you have activated it as in section 7.7 as a control variable). The control system for external actual values is realised as a two-stage cascade controller to improve the response to setpoint changes. - Page 61 ECO GOLD Extern Pt100 − Access to the menu level is obtained by pressing − Selection and confirmation of Setup Control Control parameter extern Pt100. The adja- cent menu window appears. Apart from the control parame- Tv manual/auto auto ters the currently set values are displayed. 83(auto) −...
-
Page 62: Setting The Correcting Quantity Limit
ECO GOLD 7.9.2.1 Setting the correcting quantity limit − Access to the menu level is obtained by pressing Control − Selection and confirmation of Setup Control. ► Control Variable Adjacent menu window appears. Control parameter ► Control para. sets ► Setpoint offset Correction limit. -
Page 63: Procedure For Setting The Control Parameters For External Control
ECO GOLD 7.9.2.2 Procedure for setting the control parameters for external control Activating external control ( 7.7.1). Set the slave controller: 2.1. Parameter to auto Xpf in dependence of: − Check or adjust device type ( 9.3.4). − Select heat transfer liquid with as low-viscosity and with as high a thermal capacity as possible. Ranking list: Water, water/glycol, oils, Fluorinert®. -
Page 64: Interface Modules
ECO GOLD Interface modules Installation of modules The ECO GOLD heating and cooling thermostats can be supplemented with further interface modules which are inserted at the rear of the control head in two different module slots. Upper module receptacle (approx. 51 x 27 mm) for: −... - Page 65 ECO GOLD − Plug in the bus connecting lead (red plug in the red socket). − Introduce the module into the appropriate receptacle and fasten it using the two cross-head screws. − Insert the mains plug again and switch on the thermo- stat.
-
Page 66: Menu Structure Of The Modules
ECO GOLD Menu structure of the modules All existing menu points are shown. Modules and menu points which cannot be realised are however masked out. More extensive information can be found in the following sections. Setpoint temperature Calibration external actual temperature Factory calibration Pump power Status... -
Page 67: Analogue Module
ECO GOLD Analogue module Analogue Module (LAUDA order no. LRZ 912) has two inputs and two outputs, which are brought out to a six-pole DIN socket to Namur Recommendation (NE28). The inputs and outputs can be set independently of one another as a 0...20 mA and 4...10 V interface, Various functions can be selected for the inputs... -
Page 68: Rs 232/485 Interface Module
RS 232/485 interface module RS 232/485 Interface Module (LAUDA order no. LRZ 913) with nine-pole SUB-D socket. Electrically isolated using optocouplers. With the LAUDA instruction set, extensively compatible to Ecoline, Proline and Integral series. The RS 232 interface can be connected directly to the PC with a 1:1 connected cable (catalogue no. -
Page 69: Rs 232 Protocol
ECO GOLD 8.4.2 RS 232 protocol − The interface operates with one stop bit, no parity bit and with eight data bits. − Transfer speed alternatively: 2400, 4800, 9600 (factor setting) or 19200 baud. − The RS 232 interface can be operated with or without hardware-handshake (RTS/CTS). -
Page 70: Rs 485 Protocol
ECO GOLD 8.4.4 RS 485 protocol − The interface operates with one stop bit, no parity bit and with eight data bits. − Transfer speed alternatively: 2400, 4800, 9600 (factor setting) or 19200 baud. − The device address always precedes the RS 485 commands. Up to 127 ad- dresses are possible. -
Page 71: Usb Interface
The connecting lead is not included in the items supplied. When connecting up, make sure the correct plug is used. Mini-USB interface LAUDA makes the drivers specially produced for the USB interface available free of charge for download at http://www.lauda.de. Important First install the driver and then connect the thermostat to the PC. -
Page 72: Connecting The Thermostat To The Pc
ECO GOLD Key Continue Key Finish Driver installation is installed 8.5.3 Connecting the thermostat to the PC If an ECO thermostat is connected via the USB interface, it is automatically assigned to a free COM port. The PC unambiguously identifies the thermostat via a serial number internal to the thermostat and always assigns the same COM port to this thermostat. - Page 73 ECO GOLD Switch on the thermostat at the mains switch. For the first time, after installation on the PC, a wizard opens to search for new hardware. Please fol- low the wizard instructions. Key Continue Key Continue This window is covered by the following window "Hardware installation"...
-
Page 74: Where Is The Eco Virtual Com Port
ECO GOLD click on Continue installation click on the key Finish 8.5.4 Where is the ECO Virtual COM Port? The thermostat can be operated via conventional communication programs (e.g. Hyperterminal) as a COM port. Further settings, such as baud rate, are not needed. Interface modules 28.04.10/ YACE0088... - Page 75 ECO GOLD Click on the tab Hardware with the mouse and then on the Device manager . Interface modules 28.04.10/ YACE0088...
-
Page 76: Commands And Error Messages Applicable To The Rs 232/485 Interface Module And To The Usb Interface
ECO GOLD Commands and error messages applicable to the RS 232/485 interface mod- ule and to the USB interface 8.6.1 Write commands (data issued to the thermostat) Command Meaning OUT_PV_05_XXX.XX Specify external temperature via interface OUT_SP_00_XXX.XX Set-value transfer with max. 3 places before the decimal point and max. 2 places after it. -
Page 77: Read Commands (Data Request From The Thermostat)
ECO GOLD Admissible data formats: -XXX.XX -XXX.X -XXX. -XXX XXX.XX XXX.X XXX. -XX.XX -XX.X -XX. XX.XX XX.X -X.XX -X.X X.XX -.XX 8.6.2 Read commands (data request from the thermostat) Command Meaning IN_PV_00 Interrogation of external temperature. IN_PV_01 Interrogation of controlled temperature (int./ext., Pt/ext., Analog/ ext. serial). IN_PV_03 Interrogation of external temperature TE (Pt100). - Page 78 ECO GOLD Command Meaning IN_MODE_04 Setpoint offset source: 0 = normal/ 1 = ext. Pt/ 2 = ext. Analog/ 3 = ext. Serial. TYPE Interrogation of device type. VERSION_R Interrogation of the software version number of the control system. VERSION_S Interrogation of the software version number of the protection system.
-
Page 79: Error Messages
(http://sine.ni.com/apps/we/nioc.vp?cid=1381&lang=US) an easy-to-use individual control or automa- tion software program can be produced for operating ECO devices. In order to be able to address from the program the RS 232/485 interface that is used LAUDA makes the drivers specially produced ®... -
Page 80: Contact Module
ECO GOLD Contact module 8.7.1 Contact module LRZ 914 with 1 input and 1 output Contact module (order no. LRZ 914) with connectors to NAMUR NE28, with 1 output and 1 input on each of 2 DIN sockets. The inputs provide the following functions: −... -
Page 81: Contact Module Lrz 915 With 3 Inputs And 3 Outputs
ECO GOLD Contact outputs and inputs Output Input − View of flanged plug (front) or − View of socket (front) or solder side coupling-socket solder side of plug − Max. 30 V; 0.2 A − Signal approx. 5 V, 10 mA, do not assign Contact 3! Coupling plug catalogue no. -
Page 82: Maintenance
Warnings are normally not relevant to safety. The device continues to run. Errors: If a malfunction occurs, switch off the unit at the mains switch. If the malfunction recurs after switching on the device, contact LAUDA Service Constant Temperature Equip- ment ( 9.6) or your local service organisation. -
Page 83: Low Level Protection Alarm And Low Level Protection Check
ECO GOLD − If the bath temperature increases above the overtempera- ture switch-off point: Two-tone alarm signal sounds. "Overtemperature" appears in the display. No. Alarm Overtemperature Heating switches off on both poles. Pump and chiller are switched off via the electronics. −... -
Page 84: Cleaning
− If irregularities occur during the check of the safety equipment, switch off the device im- mediately and withdraw the mains plug. − Contact LAUDA Service Constant Temperature Equipment ( 9.6). Cleaning Withdraw the mains plug before cleaning the unit. -
Page 85: Error Store
ECO GOLD 9.3.1 Error store With the ECO GOLD thermostats there is an error store in which up to 140 errors and alarm messages can be stored for the analysis and localisation of errors. − Access to the menu level is obtained by pressing −... -
Page 86: Displaying And Changing The Device Type
ECO GOLD 9.3.4 Displaying and changing the device type The device type ( 4.2) without the suffix "G" (GOLD) is shown in the menu under Setup Device Status Type. A type change can be carried out here in this menu point. The type change is linked to a 3 second key depression delay to prevent an unintentional type change. -
Page 87: Servicing And Repair
ECO GOLD Servicing and repair 9.4.1 Servicing intervals to VDI 3033 Device part Frequency Remarks Each time device is put into operation and then: Complete device External condition of device Monthly Heat transfer liquid Analysis of heat transfer liquid ( 9.4.2) Bath vessel with drain tap Sealing... -
Page 88: Disposal Information
ECO GOLD Disposal information 9.5.1 Disposal of the coolant The cooling circuit is filled with a CFC-free HFC coolant. The type and amount used are stated on the rating label. Repair and disposal are only to be carried out by refrigeration specialists. The Global Warming Potentials (GWP) = 1.0] Coolant... -
Page 89: Ordering Replacement Parts
Phone: +49 (0)9343/ 503-236 (English and German) Fax: +49 (0)9343/ 503-283 e-mail service@lauda.de We are available at any time for queries, ideas and critique. LAUDA DR. R. WOBSER GMBH & CO. KG Postfach 1251 97912 Lauda-Königshofen Germany Phone: +49 (0)9343/ 503-0... -
Page 90: Accessories
ECO GOLD Accessories Immersion thermostat Accessory Suitable for Catalogue number ECO GOLD, Cooling coil set (small) LCZ 0720 bath vessels up to 6 litres ECO GOLD, Cooling coil set (large) LCZ 0721 bath vessels from 6 litres Pump connection set (outflow and return nozzles) with olive ECO GOLD LCZ 0716 13 mm (plastic) - Page 91 ECO GOLD Cooling thermostats Accessory Suitable for Catalogue number LCZ 0716 Pump connection set (outflow and return nozzles) All cooling thermostats with olive 13 mm (plastic) For all devices Accessory Catalogue number For upper module receptacle approx. 57 x 27 mm: Analogue module LRZ 912 RS 232/485 interface module...
-
Page 92: Technical Data And Graphs
ECO GOLD Technical data and graphs The figures were determined according to DIN 12876. Data applicable to all ECO thermostats Ambient temperature range °C 5 ... 40 Setting resolution °C 0.01 Display resolution °C 0.01 Absolute accuracy ±0,2 Relative humidity maximum relative humidity 80 % at 31 °C and decreasing linearly to 50 % up to 40 °C Temperature for storage... - Page 93 ECO GOLD Immersion thermostat GOLD Working temperature range °C 20…200 Working temperature range with water °C 20…200 cooling Operating temperature range °C -20…200 Interface Mini-USB Bath depth At least 150 Overall dimensions 130 x 135 x 325 (W x D x H) Weight Mains connection Catalogue number...
- Page 94 ECO GOLD Heating thermostats with stainless steel bath E 4 G E 10 G E 15 G E 20 G E 25 G E 40 G Working temperature range °C 20…200 Working temperature range °C 20…200 with water cooling Operating temperature range °C...
- Page 95 ECO GOLD Heating thermostats with transparent bath ET 6 G ET 12 G ET 15 G ET 20 G Working temperature range °C 20…100 Working temperature range with water cooling °C 20…100 Operating temperature range °C -20…100 Temperature stability ±K 0.01 Bath volume 5…6...
- Page 96 ECO GOLD Cooling thermostats RE 415 G RE 420 G RE 620 G RE 630 G RE 1050 G RE 1225 G RE 2025 G Working temperature - ACC °C -15…200 -20…200 -20…200 -30…200 -50…200 -25…200 -25…200 range* Ambient temperature range °C 5...40 Temperature stability...
- Page 97 ECO GOLD Pump characteristic ECO GOLD Measured with water Pumpenkennlinien gemessen mit Wasser Stage 6 Stage 5 Stage 4 Stage 3 Stage 2 Stage 1 Förderstrom [L/min] Flow rate in L/min Heating curve for ECO GOLD heating thermostats with transparent bath ET 6 G ET 12 G ET 15 G...
- Page 98 ECO GOLD Heating curve for ECO GOLD heating thermostats with stainless steel bath E 15 G E 20 G E 25 G E 4 G E 10 G Heat transfer liquid: Tempering liquid: Therm 240, bath closed Therm 240, bath closed...
-
Page 99: Index
ECO GOLD Index Accessories ..............90 Factory calibration ............46 Acoustic signals............40 Factory settings............40 Alarms ..............82, 83 Filling................27 Ambient conditions............. 17 Flow distribution (pump) ..........24 Ambient temperature ..........17 Analogue module..........18, 67 Assembly ..............21 Gain ................ - Page 100 ECO GOLD Proportional range..........58, 60 Pump ................17 Td ................58 Pump characteristic............. 97 Tde ................60 Pump level ..............37 Technical data ............. 92 Temperature ambient temperature..........23 Rating label ............. 12, 13, 15 room temperature ............ 23 Repair................
-
Page 101: Confirmation
/ Personne responsable Hiermit bestätigen wir, daß nachfolgend aufgeführtes LAUDA-Gerät (Daten vom Typenschild): We herewith confirm that the following LAUDA-equipment (see label): Par la présente nous confirmons que l’appareil LAUDA (voir plaque signalétique): Serien-Nr. Type / Type Serial no. / No. de série:...
Need help?
Do you have a question about the E 4 G and is the answer not in the manual?
Questions and answers