
Subscribe to Our Youtube Channel
Related Manuals for Jetter JetWeb JetMove 203-230


Summary of Contents for Jetter JetWeb JetMove 203-230
- Page 1 JetMove 203-230 Drive User Manual Article # 60865160 / Edition 1.10 November 2006 / Printed in Germany...
- Page 2 JetWeb Edition 1.10 Jetter AG reserves the right to make alterations to its products in the interest of technical progress. These alterations need not be documented in every single case. This manual and the information contained herein have been compiled with due diligence.
- Page 3 This User Manual is an Integral Part of the JetMove 203-230: Type: Serial No.: Year of Manufacture: Order No: To be entered by the customer: Inventory No: Place of operation: © Copyright 2006 by Jetter AG. All rights reserved. Jetter AG...
- Page 4 Missing or inadequate knowledge of the manual results in the loss of any claim of liability on part of Jetter AG. Therefore, the operating company is recommended to have the instruction of the persons concerned confirmed in writing.
- Page 5 Note · / - Enumerations are marked by full stops, strokes or scores. Operating instructions are marked by this arrow. Automatically running processes or results to be achieved are marked by this arrow. Jetter AG...
- Page 6 PC and user interface keys. This symbol refers to further information (data sheets, literature, etc.) on the subject or product or the like that is being dealt with. Further, this text provides helpful hints for your guidance through the manual. Jetter AG...
-
Page 7: Table Of Contents
Safety Instructions for Commissioning Operating Conditions Physical Dimensions Technical Data Electrical Specification Motor Protection 5.2.1 Thermal sensor integrated in the motor 5.2.2 I²t calculation 5.2.3 Motor overload calculation according to UL Drive Controller Structure Description of Connections Power Supply Motor Connection Jetter AG... - Page 8 Resolver cable with mating connector HIPERFACE Connection 7.4.1 Specification 7.4.2 HIPERFACE cable with mating connector Digital Inputs, Logic Power Supply Jetter System Bus 7.6.1 Specification of the Jetter system bus cable Status Monitoring Diagnostics Error Messages WARNINGS Wiring Diagrams Analog Input (Option) 11.1 Function 11.2...
-
Page 9: Safety Instructions
If the digital servo amplifier JetMove 203-230 is to be run under operating conditions, which differ from the conditions mentioned in chapter 3 "Operating Conditions", page 27, the manufacturer is to be contacted beforehand. Jetter AG... -
Page 10: Who May Operate The Servo Amplifier Jetmove 203-230
JetMove 203-230 and its functions are allowed. Any modifications to the servo amplifier JetMove 203-230 not expressly authorised by the manufacturer will result in a loss of any liability claims to Jetter AG. The original parts are specifically designed for the servo amplifier JetMove 203-230. -
Page 11: Decommissioning And Disposing Of The Jetmove 203-230
You can disassemble the servo amplifier JetMove 203-230 into its main components by unscrewing it (aluminium heat sink and side plate, steel casing cover, electronic boards). Jetter AG... -
Page 12: Ensure Your Own Safety
Secure the servo amplifier JetMove 203-230 against misuse or accidental use. 1.2.2 Information signs and labels Writings, information signs, and labels always have to be observed and kept readable. Damaged or unreadable information signs and labels are to be exchanged. Jetter AG... -
Page 13: Earthing Procedure
A durable connection with the power supply of the digital servo amplifier JetMove 203-230 must be provided. • Correct cabling of the PE bus according to the connection diagram (cf. chapter 10 "Wiring Diagrams", page 71) must be carried out. Jetter AG... - Page 14 If, in spite of this, an earth-leakage current breaker is installed, it will switch off the digital servo amplifier JetMove 203-230, although there is no fault. When a leakage current screen needs to be installed in the JetMove 203-230, an isolating transformer must be used. Jetter AG...
-
Page 15: Residual Dangers
Do by no means touch the enclosure of the digital servo amplifier JetMove 203-230 near the internal heat sink during operation and during the cooling-off period after switching off the device. Please make sure that no temperature-sensitive parts have been connected or fastened to the servo amplifier JetMove 203-230. Jetter AG... - Page 16 Make sure that hazards to persons are precluded even when the drive is moving unintentionally. Do not dismount any necessary protective covers. Do not wear gloves, lest they should get caught in the rotating drive shaft. Warning Never touch a rotating drive shaft. Jetter AG...
-
Page 17: Hazards After Power Is Turned Off
Always wait at least 10 minutes after switching off the device before taking the following actions: – Touching the screws of the terminals X1 and X62; – Disconnecting the terminals and touching the contacts. Jetter AG... -
Page 18: Instructions On Emi
JetMove 203-230 must be kept as short as possible. Please follow the instructions given in Application Note 016 "EMC- Compatible Installation of the Electric Cabinet" published by Jetter AG. The following instructions are excerpts from Application Note 016: Screw the enclosure of the digital servo amplifier JetMove 203-230 onto a highly conducting, earthed panel. - Page 19 Shield and cable strap must be connected with low impedance to earthed surfaces. Earthing must be done in a way that keeps the unshielded part of the signal lines as short as possible (see Fig. 3). Jetter AG...
- Page 20 1 Safety Instructions JetWeb Mating Connector Cable Strap Motor Cable Fig.3: EMC-conformous shielding for terminal screws Jetter AG...
-
Page 21: Installing The Jetmove 203-230
Circuit-breaker, see chapter 5 "Technical Data", page 35. • Isolating transformer or autotransformer • Mounting screws, 2 pcs.; please refer to Fig. 4, page 23. Note! If you are not sure which mounting accessories you require, please contact Jetter Jetter AG... -
Page 22: Mechanical Installation
Drill the holes and cut the thread into the panel. Screw the corresponding fitting bolts into the thread by approximately half of their length. By means of the oblong holes in the rear plate, hang up the JetMove 203-230 by the fitting bolts; then screw them tightly. Jetter AG... - Page 23 JetMove 203-230 2.2 Mechanical Installation 33.8 DETAIL A 4:1 Fig.4: Rear and front view of the enclosure with mounting holes Jetter AG...
-
Page 24: Electrical Installation
Verify that all earthing cables are connected (double earthing). To connect resolvers or power units you can use prefabricated cables available from Jetter or opt for self-made cables. Please refer to chapter 7 "Description of Connections", page 45. To ensure that installation is carried out in conformance with EMC regulations, the following items have to be observed especially: –... -
Page 25: Checking The Installation
Consider the warnings of residual dangers in chapter 1.3.2 "Hazards after POWER is turned OFF", page 17. Before carrying out installation and maintenance jobs, separate the servo amplifier JetMove 203-230 and all connected devices from the mains (pull out the mains plug). Jetter AG... -
Page 26: Safety Instructions For Commissioning
For this, the measures listed in chapter 1.2.3 "Earthing procedure", page 13 must be taken. Each commissioning, even a short functional test, must always be carried out with a PE bus correctly connected. Jetter AG... -
Page 27: Operating Conditions
Pollution degree DIN EN 50178 Corrosion immunity / No special protection against Chemical resistance corrosion. Ambient air must be free from higher concentrations of acids, alcaline solutions, corrosive agents, salts, metal vapours, or other corrosive or electroconductive contaminants Jetter AG... - Page 28 Measures to avoid damages in transit and storage: The packaging material and the storage place are to be chosen in a way that the values given in the above table “Operating Parameters Mechanical Parameters" on page 28 are kept to. Jetter AG...
- Page 29 This is a product of restricted availability according to IEC/EN 61800-3. This module can cause radio interferences in residential areas. In this case, the user must take adequate measures to prevent this. Additional line filters can be helpful here. See "Line filter" on page 36. Jetter AG...
- Page 30 2 kV (launching phase conductor against ground potential) (Second surroundings, restricted availability) Guided radio Frequency 0.15 - 80 MHz DIN EN 61800-3 disturbances Test voltage 10 V DIN EN 61000-4-6 AM 80 % with 1 kHz Criterion A (Second surroundings, restricted availability) Jetter AG...
- Page 31 EMI - Immunity to Interference Signal Interfaces Parameters Value(s) Standard Specification(s) Referred to Burst (fast transients) Test voltage 1 kV DIN EN 61800-3 Repetition rate 5 kHz DIN EN 61000-4-4 Capacitive interference Criterion B (Second surroundings, restricted availability) Jetter AG...
- Page 32 Operating Parameters EMI - Immunity to Interference Signal Interfaces Guided radio Frequency 0.15 - 80 MHz DIN EN 61800-3 disturbances Test voltage 10 V DIN EN 61000-4-6 AM 80 % with 1 kHz Criterion A (Second surroundings, restricted availability) Jetter AG...
-
Page 33: Physical Dimensions
JetMove 203-230 Physical Dimensions Fig.5: Mounting dimensions of the JetMove 203-230 For installation, please also refer to Fig. 4 on page 23 Jetter AG... - Page 34 4 Physical Dimensions JetWeb Jetter AG...
-
Page 35: Technical Data
See "Note 2!" on page 37. Continuous power of motor 0.5 kW Short-circuit protection, motor side Designed for • phase to phase • phase to earth Motor overload protection See "Motor Protection" on page 39. Jetter AG... - Page 36 Cross-sectional area of motor Min. 0.75 mm , 50 m length max. supply cable (if you need greater lengths, please contact Jetter AG) in a Line filter Line filter ensuring unrestricted EMC residential environment to DIN EN 61800-3. The following filters can be applied with input circuits: –...
- Page 37 If, after running the drive by means of engine power (speed and torque at the motor), the power supply has been switched off, the inrush current limitation must Important cool down for 2-3 minutes. If this is not given heed to, the component causing the inrush current limitation can be destroyed. Jetter AG...
- Page 38 5 Technical Data JetWeb DANGER resulting from electric shock! In order to prevent electric shocks, ground the digital servo amplifier JetMove 203-230 by all means via two positions; for this, refer to chapter 1.2.3 "Earthing procedure", page 13. Warning Jetter AG...
-
Page 39: Motor Protection
5.2 Motor Protection Compatible Synchronous Servo Motors Motor types Jetter motors of the JL, JK and JH series, as well as Bautz motors of the M and F series Note! In case you intend to use motors other than the above mentioned types, please contact Jetter AG. - Page 40 As, after activating, the I²t calculation always starts with value zero, the motor load can only be calculated correctly, if, at activating the servo amplifier JetMove 203-230 (i.e. it has been connected to the 24 V logic power supply and parametering the I²t function has been completed) is cold. Important Jetter AG...
-
Page 41: Motor Overload Calculation According To Ul
As, after activating, the motor overload calculation to UL always starts with value zero, the motor load can only be calculated correctly, if, at activating the servo amplifier JetMove 203-230 (i.e. it has been connected to the 24 V logic power supply) is cold. Important Jetter AG... - Page 42 5 Technical Data JetWeb Jetter AG...
-
Page 43: Drive Controller Structure
JetMove 203-230 Drive Controller Structure Fig.6: Block diagram of drive controller structure Jetter AG... - Page 44 12 bits per revolution – Sampling interval 62.5 µs Sine-cosine sensor (multi- and single-turn): – Interface HIPERFACE – Resolution of absolute position 15 bits per revolution – Resolution of velocity pickup 20 bits per revolution – Sampling interval 62.5 µs Jetter AG...
-
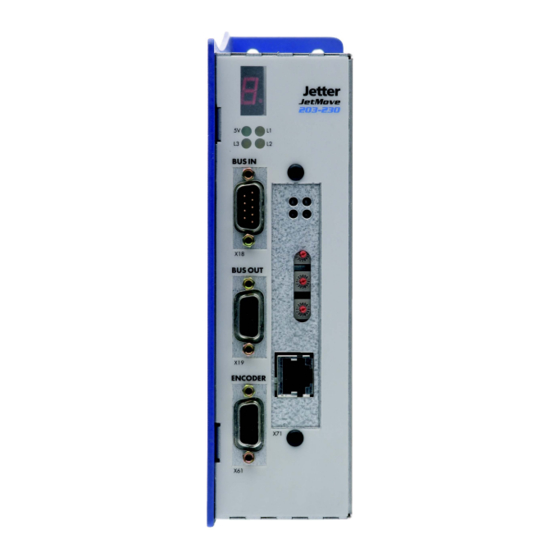
Page 45: Description Of Connections
/ green core 1 mains phase 1 core 2 mains phase 2 core 3 mains phase 3 Autotransformer or Fuse or isolating overcurrent transformer circuit breaker or motor current circuit breaker Fig.7: Connection of the 3-phase supply line Jetter AG... - Page 46 2 neutral core 3 mains phase Fuse or overcurrent circuit breaker or motor current circuit breaker Fig.8: Connection of the 1-phase supply line One-phase connection is only possible up to a motor rating of 0.5 kW. Note Jetter AG...
-
Page 47: Motor Connection
Important! Measures to avoid oscillation and blocking of the motor: Avoid mixing-up of phase cables, resp. be sure to connect the phase cables according to pin assignment. Jetter AG... -
Page 48: Assignment And Specification
JM203-230 housing Free-wheeling diode, if not Brake + integrated into the Brake - motor green / yellow core 1 phase 1 Motor core 2 phase 2 core 3 phase 3 X 62 Fig.9: Connection of motor lines Jetter AG... -
Page 49: Motor Power Cable With Mating Connector Sc
The motor connector with mating connector SC (female connector) suitable for the Jetter motor series JL2, JL3, JL4, JK4, JK5, JK6 and for the Bautz motor series M25, M40, F50, F63, F80 can be ordered from Jetter AG by supplying the... - Page 50 Connect both sides of the shield with the greatest possible surface area! Metallized enclosure necessary! Wire number Signal X62.U2 Phase 1 X62.V2 Phase 2 X62.W2 Phase 3 X62.PE Yellow-green PE conductor The measurements of the motor mating connector have been specified in millimeters. Jetter AG...
- Page 51 Metallized enclosure necessary! Wire number Signal X62.U2 Phase 1 X62.V2 Phase 2 X62.W2 Phase 3 X62.PE Yellow-green PE conductor X10.BRAKE2 Brake + X10.GND Brake - The measurements of the motor mating connector have been specified in millimeters. Jetter AG...
-
Page 52: Connection Assignment Of Terminal Box
Cores have to be shielded and twisted in pairs and must be included in an overall shielding • The shield must be connected to the connector housings on both ends of the cable with the greatest possible surface area. • Material: Copper • Temperature class: 60 °C • Maximum cable length: 50 m Jetter AG... -
Page 53: Resolver Cable With Mating Connector
7.3.2 Resolver cable with mating connector Note! The resolver respectively HIPERFACE mating connector of the synchronous servo motor series JL and JK can be ordered from Jetter AG by supplying the following particulars: Article # 15100069 Resolver / HIPERFACE The complete resolver cable connecting the servo amplifier series JetMove 2xx... - Page 54 S4 (sine -) yellow S2 (sine +) green R1R (exciter pink winding +) R2L (exciter gray winding -) white (thermal sensor) brown (thermal sensor) unassigned 9 - 12 The measurements of the resolver mating connector have been specified in millimeters. Jetter AG...
-
Page 55: Hiperface Connection
7.4.2 HIPERFACE cable with mating connector Note! The resolver respectively HIPERFACE mating connector of the synchronous servo motor series JL and JK can be ordered from Jetter AG by supplying the following particulars: Article # 15100069 Resolver / HIPERFACE The complete HIPERFACE cable between the servo amplifier series JetMove 2xx and the synchronous servo motor series JL and JK can be ordered from Jetter AG.. - Page 56 7 Description of Connections JetWeb HIPERFACE mating connector (solder side) Fig.12: RC series HIPERFACE mating connector (internal thread M23) Jetter AG...
- Page 57 DATA - (RS-485) gray DATA + (RS-485) pink blue Voltage supply (7 through 12 volts) Thermo sensor black Thermo sensor Pin 9 and Pin 12 are short-circuited Dimensions of the HIPERFACE mating connector are specified in millimeters. Jetter AG...
-
Page 58: Digital Inputs, Logic Power Supply
Depending on the • DC 24 V parameter setting, this • 7.5 mA max. input can be used for • Operating point: quick stop, position < 6 V low, capture or referencing > 15 V high without stop. Jetter AG... - Page 59 A free-wheeling diode is of the logic. necessary if not integrated in the motor already. *) is connected to the ground of the control system. Jetter AG...
-
Page 60: Jetter System Bus
The JetMove 203-230 is interlinked with the controller, additional JetMove amplifiers, or Jetter peripheral modules by means of the Jetter system bus. The system bus input BUS-IN is a 9-pin male Sub-D connector, and the bus output BUS-OUT is a 9-pin female Sub-D connector. - Page 61 JetMove 203-230 7.6 Jetter System Bus Permissible Cable Lengths Baud rate Max. cable Max. stub line Max. overall stub length length line length 1 MBaud 30 m 0.3 m 500 kBaud 100 m 39 m 250 kBaud 200 m 78 m...
- Page 62 7 Description of Connections JetWeb Jetter AG...
-
Page 63: Status Monitoring
The drive controller can be switched READY TO BE SWITCHED Drive controller has been disabled by software command. The drive controller can be switched SWITCHED ON DC link monitoring is activated. OPERATION_ENABLED The drive controller has been enabled. Jetter AG... - Page 64 M < 0, n < 0 --> quadrant III Mode of operation - Motor M > 0, n < 0 --> quadrant IV Mode of operation - Generator The positive current limit has been reached The negative current limit has been reached Jetter AG...
-
Page 65: Diagnostics
DC link A DC link voltage – Immediate – Check input voltage overvoltage of> 480 V has been pulse disable supply detected – If the motor is used as a generator, reduce the regenerating power – Acknowledge failure Jetter AG... - Page 66 If necessary, modify parameters – Acknowledge failure of the F 11 Current overrange A current – Immediate – Reduce K temporarily too high pulse disable current controller by has been detected 10 to 20 % – Acknowledge failure Jetter AG...
- Page 67 – Check destination limit switch switch was activated max. current position (torque) – Check reference position – Acknowledge failure – Run axis back inside the range of hardware limits (software limit switches will be active automatically at leaving the switch) Jetter AG...
- Page 68 – Return the amplifier limit for repair F 29 Mains power too The average mains – Immediate – Acknowledge failure high power is too high pulse disable – Reduce the average load of the motor Jetter AG...
-
Page 69: Warnings
If the dot in the 7-segment display is flashing, one or several warnings have been recognized. Please check in the motion setup or by making enquiries in the PLC program which warning is active by means of the motion commands. Jetter AG... - Page 70 9 Diagnostics JetWeb Jetter AG...
-
Page 71: Wiring Diagrams
U1 V1 W1 PE L1’ L2' Filter 24 V free-wheeling Contactor diode, if not integrated in the motor Fig.13: Connection diagram JetMove 203-230, 1-phase connection, type of position transducer: resolver Also refer to chapter 7 "Description of Connections", page 45 Jetter AG... - Page 72 3 x AC 230 V Motor U1 V1 W1 PE L1’ L2' Filter 24 V free-wheeling Contactor diode, if not integrated in the motor Fig.14: Connection diagram JetMove 203-230, 1-phase connection, type of position transducer: HIPERFACE Jetter AG...
- Page 73 3 x AC 230 V Motor U1 V1 W1 PE L1’ L2' L3’ Filter 24 V free-wheeling Contactor diode, if not integrated in the motor Fig.15: Connection diagram JetMove 203-230, 3-phase connection, type of position transducer: resolver Jetter AG...
- Page 74 3 x AC 230 V Motor U1 V1 W1 PE L1’ L2' L3’ Filter 24 V Contactor free-wheeling diode, if not integrated in the motor Fig.16: Connection diagram JetMove 203-230, 3-phase connection, type of position transducer: HIPERFACE Jetter AG...
- Page 75 Line filter (optional) (refer to “Line filter" on page 36) Overload protection of the mains cable (see “Overload protection" on page 35) Motor Motor brake (optional) Position transducer (resolver or absolute encoder with HIPERFACE) Motor-temperature protection Isolating transformer or autotransformer Jetter AG...
- Page 76 10 Wiring Diagrams JetWeb Jetter AG...
-
Page 77: Analog Input (Option)
0 .. 32767 (resolution in steps of 8) Electrical isolation none Accuracy Offset error max. ± 5 LSB (± 40 values) correspond to ± 12.2 mV Gain error max. ± 10 LSB (± 80 values) correspond to ± 24.4 mV Jetter AG... -
Page 78: Description Of Connections
Shielding Shield Connect shield with the greatest possible surface area! Metallized enclosure necessary! Signal Analog signal (0 - 10 V to pin 6) 6 - 9 Analog GND (connected to earth in device) 2 - 5 Keep unoccupied Jetter AG... - Page 79 JetMove 203-230 Appendix Appendices Jetter AG...
- Page 80 Appendices JetWeb Jetter AG...
-
Page 81: Appendix A: Recent Revisions
Requirements to the power supply network in detail Important remarks on the time between switching off and on again Important remarks on activating the PFC fusing Particulars on continuous power Motor overload protection Value of the internal ballast resistor Jetter AG... - Page 82 Significance of the seven- segment display in normal operation Chapter 9 Error table Chapter 10 Wiring diagrams HIPERFACE connection Cascaded arrangement Chapter 11 Analog input (option) Appendix Recent revisions Glossary List of abbreviations (now in the glossary) Addresses Addresses Jetter AG...
-
Page 83: Appendix B: Glossary
International Protection JetMove JetMove is the product designation of a digital servo amplifier series produced by Jetter AG. e.g. JetMove 203-230 with – 203 identifies a rated current of 3 A; – 230 identifies the operating voltage of the rated... - Page 84 Appendices JetWeb Jetter system bus The Jetter system bus is a system-bus system of a cable length of 200 m max. , and of fast data transmission rates of 1 Mbit/s. In addition to this, the Jetter system bus is highly immune to interferences.
- Page 85 Milliampere (1 mA = 10 Decibel Gram Hour Hertz kelvin Meter Centimeter (1 cm = 10 Millimeter (1 mm = 10 second Volt µV Microvolt (1 µV = 10 Watt Ω °C degrees centigrade (temperature unit) ° Degrees (angular dimension) Jetter AG...
-
Page 86: Appendix C: List Of Illustrations
Fig. 14: Connection diagram JetMove 203-230, 1-phase connection, type of position transducer: HIPERFACE Fig. 15: Connection diagram JetMove 203-230, 3-phase connection, type of position transducer: resolver Fig. 16: Connection diagram JetMove 203-230, 3-phase connection, type of position transducer: HIPERFACE Jetter AG... -
Page 87: Appendix D: Index
Operating parameters Connected load Electrical Safety Earthing procedure Emitted Interference Earth-leakage current breaker Interference Immunity Electrical specification Environment Error message table JetMove 2xx-xxx Mechanical Parameters Oscillating of the motor HIPERFACE cable Physical Dimensions Cable confection # 723 PWM Frequency Jetter AG... - Page 88 Terminal box of the motor Electric shock High operating voltage Hot surfaces Mech. force Usage as Agreed Upon Potentially explosive atmosphere 16 Usage other than agreed upon Resolver cable Cable confection # 23 Warnings Wiring diagram scope of delivery Wiring diagrams Servicing Jetter AG...
- Page 89 JetMove 203-230 Appendix Jetter AG...
- Page 90 Hotline: +49 7141 2550-444 Internet: http://www.jetter.de E-Mail: sales@jetter.de Jetter Subsidiaries Jetter Asia Pte. Ltd. Jetter (Schweiz) AG Jetter USA Inc. 32 Ang Mo Kio Industrial Park 2 Münchwilerstraße 19 165 Ken Mar Industrial Parkway #05-02 Sing Industrial Complex CH-9554 Tägerschen...
Need help?
Do you have a question about the JetWeb JetMove 203-230 and is the answer not in the manual?
Questions and answers