Table of Contents
Advertisement
Quick Links
Advertisement
Table of Contents

Related Manuals for Danfoss VACON 1000


Summary of Contents for Danfoss VACON 1000
- Page 1 Operating Guide VACON® 1000 drives.danfoss.com...
-
Page 3: Table Of Contents
Automatic Bypass Cabinet 3.3.7.3 Synchronous Transfer Cabinet System Operation 3.4.1 Main Circuit 3.4.2 Power Cells 3.4.3 Control System Type Code Description Available Options 3.6.1 Cabinet Bypass 3.6.2 Input Devices 3.6.3 Output Devices 3.6.4 Mechanical Options Danfoss A/S © 2021.06 AQ363633621020en-000201/172F3117 | 3... - Page 4 Power Cable Entry of Line-up Cabinet 6.5.3 Power Cable Termination 6.5.4 Control Cable Entry Grounding Power Cable Selection Additional Instructions for Cable Installation Control Wiring 6.9.1 Control Cable Selection 6.9.2 Control Power Wiring 6.9.3 Control Circuit Wiring 4 | Danfoss A/S © 2021.06 AQ363633621020en-000201/172F3117...
- Page 5 Event Log Administration Tool Settings 7.9.1 Language 7.9.2 Software Version 7.9.3 HMI Set Commissioning Safety Checks before Starting the Commissioning Personnel Requirements Commissioning Checks Commissioning Report Operating the Drive 8.5.1 Powering the Drive Danfoss A/S © 2021.06 AQ363633621020en-000201/172F3117 | 5...
- Page 6 Reforming with a DC Supply Dielectric Withstand Test 9.9.1 Testing Input and Output Together 9.9.2 Testing Input and Output Separately Fault Tracing 10.1 Fault Types 10.2 Fault Response Configuration 10.3 Faults and Alarms 6 | Danfoss A/S © 2021.06 AQ363633621020en-000201/172F3117...
- Page 7 VACON® 1000 Operating Guide Contents Specifications 11.1 Technical Data 11.2 Power Ratings and Dimensions 11.2.1 IEC Ratings 11.2.2 UL Ratings 11.3 Internal Cables and Terminals 11.4 Replacement Fuses 11.5 Standards 11.6 Abbreviations Danfoss A/S © 2021.06 AQ363633621020en-000201/172F3117 | 7...
-
Page 8: Introduction
The VACON® 1000 Application Guide provides greater detail on how to work with the application and how to set the parame- ters of the AC drive. • User guides for product options. Supplementary publications and manuals are available from Danfoss. See www.danfoss.com for listings. 1.3 Manual Version This manual is regularly reviewed and updated. -
Page 9: Safety
Before doing any work on the drive, follow proper lock out and tag out procedure. Before connecting the drive to mains, make sure that all covers are installed on the drive and the enclosure doors are closed. Danfoss A/S © 2021.06 AQ363633621020en-000201 / 172F3117 | 9... -
Page 10: Cautions And Notices
NOTE: In IEC/EN 60364-5-54 cl. 543.7 and some application standards (for example IEC/EN 60204-1), the limit for requiring reinforced protective earthing conductor is 10 mA leakage current. 2.4 Cautions and Notices 10 | Danfoss A/S © 2021.06 AQ363633621020en-000201 / 172F3117... - Page 11 The EMC level requirements for the AC drive depend on the installation environment. An incorrect EMC level can damage the drive. Before connecting the AC drive to the mains, make sure that the EMC level of the AC drive is correct for the mains. Danfoss A/S © 2021.06 AQ363633621020en-000201 / 172F3117 | 11...
- Page 12 N O T I C E PERSONAL PROTECTIVE EQUIPMENT AND APPROVED TOOLS When doing electrical work on the AC drive, always use personal protective equipment (PPE) and tools which are approved for work with medium-voltage devices. 12 | Danfoss A/S © 2021.06 AQ363633621020en-000201 / 172F3117...
-
Page 13: Product Overview
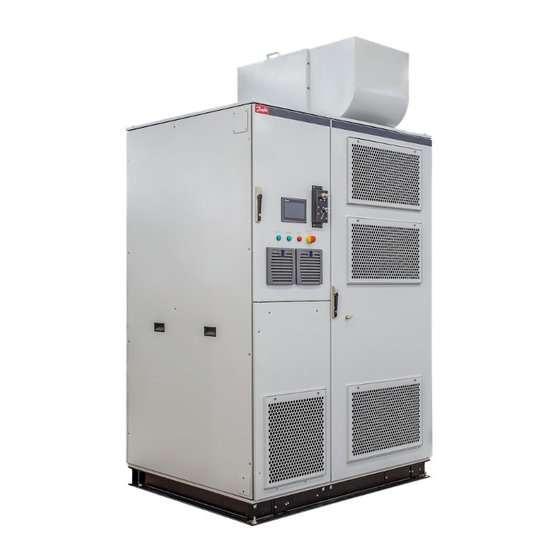
3 Product Overview 3.1 Product Characteristics The VACON® 1000 medium-voltage drive is an alternating current speed regulating device from Danfoss. The drive features include excellent performance, easy and convenient operation, and a wide range of applications using IGBT power devices and complete digital control. -
Page 14: System Hardware
Line-up type with current ratings 215–680 A (IEC ratings up to 11 kV, UL ratings up to 6.9 kV) Illustration 1: Standalone System Structure Control cabinet Junction cabinet Power cell cabinet Transformer cabinet 14 | Danfoss A/S © 2021.06 AQ363633621020en-000201 / 172F3117... -
Page 15: Control Cabinet
Illustration 2: Line-up System Structure Control cabinet Transformer cabinet Power cell cabinet Junction cabinet 3.3.1 Control Cabinet The control cabinet includes: • Main control system • • • Battery • Other accessories Danfoss A/S © 2021.06 AQ363633621020en-000201 / 172F3117 | 15... - Page 16 Operating Guide Product Overview Illustration 3: Control Cabinet in VACON® 1000 Standalone Systems Control rack Airflow pressure switch Terminal block Isolation transformer Illustration 4: Control Cabinet in VACON® 1000 Line-up Systems 16 | Danfoss A/S © 2021.06 AQ363633621020en-000201 / 172F3117...
-
Page 17: Controls And Indicators
• Human-machine interface: See 7 Human-Machine Interface. • Mechanical interlocking system: Standard in UL type drives and available as option +MMKI for IEC type drives. See 8.6.2 Mechan- ical Interlocking System. Danfoss A/S © 2021.06 AQ363633621020en-000201 / 172F3117 | 17... -
Page 18: Power Cell Cabinet
3.3.2 Power Cell Cabinet The power cell cabinet contains the power cells and their accessories. Illustration 7: Power Cell Cabinet in VACON® 1000 Standalone Systems Cooling fan Output current Hall sensor 18 | Danfoss A/S © 2021.06 AQ363633621020en-000201 / 172F3117... - Page 19 Illustration 8: Power Cell Cabinet in VACON® 1000 Line-up Systems Cooling fan Power cell The power cells in the cabinet have the same electrical and mechanical parameters and can be replaced by each other. Illustration 9: Power Cell Danfoss A/S © 2021.06 AQ363633621020en-000201 / 172F3117 | 19...
-
Page 20: Transformer Cabinet
In standalone systems, the same fan is used to cool the transformer and power cell cabinets. Illustration 10: Transformer Cabinet in VACON® 1000 Standalone Systems Cooling fan Input current Hall sensor Phase-shift transformer 20 | Danfoss A/S © 2021.06 AQ363633621020en-000201 / 172F3117... -
Page 21: Junction Cabinet
KM51 bypass, and the drive can function normally. The main electrical components of the start-up cabinet are a high-voltage switch (vacuum contactor or vacuum breaker) and a cur- rent-limiting resistor. Danfoss A/S © 2021.06 AQ363633621020en-000201 / 172F3117 | 21... - Page 22 Even if it is not required, a start-up cabinet can still be installed to: • Reduce inrush current. • Reduce stresses in the electrical installation during the drive power-up operation. 22 | Danfoss A/S © 2021.06 AQ363633621020en-000201 / 172F3117...
-
Page 23: Output Filter Cabinet
Install the output filter cabinet between the drive and motor. The filter consists of a reactor and paralleling damping resistors. The reactor decreases the rising edge of the PWM. The resistor damps the resonance caused by the reactor and stray inductance. Danfoss A/S © 2021.06 AQ363633621020en-000201 / 172F3117 | 23... -
Page 24: Bypass Cabinet
The type of the motor. • The type of the motor cable. • The length of the motor cable. To evaluate if a dU/dt Filter is required, contact Danfoss. 3.3.7 Bypass Cabinet Different bypass cabinets are available as options: • Manual bypass cabinet •... -
Page 25: Automatic Bypass Cabinet
KM41 and KM42 are closed. • KM43 is open. When the drive is bypassed: • KM41 and KM42 are open. • KM43 is closed. When maintenance is performed on the drive: Danfoss A/S © 2021.06 AQ363633621020en-000201 / 172F3117 | 25... - Page 26 VF switching to working frequency. It can be more convenient to calibrate the machine on site according to the status of the electric motor and load, to switch speed reasonably to avoid an overcurrent malfunction be- cause of the electric motor remanence. 26 | Danfoss A/S © 2021.06 AQ363633621020en-000201 / 172F3117...
- Page 27 • Forbidden: If the production conditions do not allow the switching to working-frequency bypass, this mode can be selected to prevent incorrect operation. Illustration 21: Working Mode Selection Switch SF1 Danfoss A/S © 2021.06 AQ363633621020en-000201 / 172F3117 | 27...
-
Page 28: Synchronous Transfer Cabinet
Phase lock: KM41 is closed. The drive runs to grid frequency and starts to lock phase to grid voltage. • Synchronous transfer: After phase lock, KM42 is closed and the load transfer to the drive is started. • Synchronous transfer finished: After the load transfer, KM43 is opened. 28 | Danfoss A/S © 2021.06 AQ363633621020en-000201 / 172F3117... -
Page 29: System Operation
System cell number Output phase voltage (V) Output line voltage (V) 2.4 kV 1385 2400 3 kV 1732 3000 3.3 kV 1905 3300 4.16 kV 2400 4160 6 kV 3464 6000 Danfoss A/S © 2021.06 AQ363633621020en-000201 / 172F3117 | 29... -
Page 30: Power Cells
PWM1 PWM2 PWM3 PWM4 PWM5 PWM6 Time (ms) Illustration 25: Output and Phase-Voltage Diagrams 30 | Danfoss A/S © 2021.06 AQ363633621020en-000201 / 172F3117... -
Page 31: Control System
IGBTs to the cell control board, such as short-circuit protection. 3.4.3 Control System An example structure diagram of the control system is shown in Illustration 28. The number of power cells depends on the nominal voltage of the drive. Danfoss A/S © 2021.06 AQ363633621020en-000201 / 172F3117 | 31... - Page 32 The HMI (Human-machine interface) is based on a high-definition liquid-crystal touch-type screen. It is easy to operate and is used to set functional parameters, display and record the system status, operation status, and faults through the connection to the PLC. 7 Human-Machine Interface. 32 | Danfoss A/S © 2021.06 AQ363633621020en-000201 / 172F3117...
-
Page 33: Type Code Description
For example, -040 = 40 A. See the available output currents in 11.2 Power Ratings and Dimensions. 4. Nominal system voltage Table 3: Available System Voltages Code Voltage (V) Frequency (Hz) 2400 3000 3300 4160 6000 6600 6900 10000 11000 Danfoss A/S © 2021.06 AQ363633621020en-000201 / 172F3117 | 33... -
Page 34: Available Options
Fieldbus options +S_E2 Modbus RTU +S_E5 PROFIBUS DP-V0 +S_E6 CANopen +S_E7 DeviceNet ™ +S_EC EtherCAT +S_EI Modbus TCP +S_EL POWERLINK +S_EN ControNet ™ +S_EP PROFINET I/O +S_EQ EtherNet/IP ™ User interface 34 | Danfoss A/S © 2021.06 AQ363633621020en-000201 / 172F3117... - Page 35 Heater + Humidity sensor +MMKI Mechanical key interlock (standard for UL, optional for IEC variants) Input voltage options +I023 Input voltage: 2300 V +I024 Input voltage: 2400 V +I030 Input voltage: 3000 V Danfoss A/S © 2021.06 AQ363633621020en-000201 / 172F3117 | 35...
-
Page 36: Cabinet Bypass
+QFNO No-load FAT If this option is selected, it can impact the overall dimensions and weight of the product. 3.6.1 Cabinet Bypass 3.3.7 Bypass Cabinet. 3.6.2 Input Devices 3.3.5 Start-up Cabinet. 36 | Danfoss A/S © 2021.06 AQ363633621020en-000201 / 172F3117... -
Page 37: Output Devices
In addition to these functions, the VACON® 1000 PC Tool also provides commissioning auxiliary functions and DSP program update functions. Minimum requirements for the VACON® 1000: • Operating system: Windows 10 • Processor: Intel Core i5-6300U CPU @2.40 GHz 2.50 GHz ® ™ • RAM: 8.00 GB Danfoss A/S © 2021.06 AQ363633621020en-000201 / 172F3117 | 37... -
Page 38: Receiving The Delivery
Keep the equipment sealed in its packaging until installation. In its packaging, the drive can be stored in a dry and ventilated place for more than one year. If the drive is required to be stored for a longer period, contact Danfoss. - Page 39 Illustration 32: Lifting Ropes Spread with a Block of Wood Lift the cabinet slowly and without jerking. Lower in the same manner to a standstill position. Danfoss A/S © 2021.06 AQ363633621020en-000201 / 172F3117 | 39...
-
Page 40: Lifting The Line-Up Cabinets
Lift the cabinet slowly and without jerking. Lower in the same manner to a standstill position. 4.3.3 Using a Forklift The forklift must be able lift and bear the weight of the cabinet. 40 | Danfoss A/S © 2021.06 AQ363633621020en-000201 / 172F3117... - Page 41 Illustration 35: Using a Forklift to move a Cabinet Block of wood Center of gravity Lift the cabinet slowly and reduce vibration as much as possible. Consider the center of gravity of the cabinet before lifting. Danfoss A/S © 2021.06 AQ363633621020en-000201 / 172F3117 | 41...
-
Page 42: Mechanical Installation
For line-up cabinets, secure the power cell cabinet with control part and the transformer cabinets with junction part to each other. Install the optional cabinets on the right side of the transformer cabinet in sequence. For standalone cabinets, install the optional cabinets on the left side of the cabinet. 42 | Danfoss A/S © 2021.06 AQ363633621020en-000201 / 172F3117... - Page 43 If the cabinet is placed against the wall or the depth of the cabinets is different, the hexagonal spacers cannot be used for at- taching the back side of the cabinet. In this case, use angle steel parts to connect the cabinets. Danfoss A/S © 2021.06 AQ363633621020en-000201 / 172F3117 | 43...
-
Page 44: Mounting The Cabinets
5.3 Installing the Power Cells At least two persons are required for cooperation during the installation. A power cell lifting cart is available from Danfoss as an option. Once the power cell is removed from the package, make sure that it is not damaged. -
Page 45: Dimensions Of The Enclosed Drive
Make sure that the temperature of the cooling air does not become higher than the maximum ambient operating temperature or lower than the minimum ambient operating temperature of the drive. See 5.1 Operating Environment. Danfoss A/S © 2021.06 AQ363633621020en-000201 / 172F3117 | 45... -
Page 46: Air Ducting Guidelines
The power loss of the AC drive can change significantly, when the load, the output frequency or the switching frequency changes. It is useful to know the power loss, when planning the cooling equipment in an electrical room. To calculate the power loss, use the ecoSmart tool. See http://ecosmart.danfoss.com/#/app/intro. 5.5.1 Air Ducting Guidelines Air ducts can be used to direct the warm outlet air from the VACON®... -
Page 47: Electrical Installation
The connections between the LV and MV de- vices are done either through optical fibers or are electrically isolated. 6.4 Terminals 6.4.1 Terminal Locations in the Standalone Cabinet Danfoss A/S © 2021.06 AQ363633621020en-000201 / 172F3117 | 47... -
Page 48: Terminal Locations In The Line-Up Cabinet
Power connection terminal Transformer input terminal Grounding connection between cabinets Transformer output terminal System grounding terminal 6.4.2 Terminal Locations in the Line-up Cabinet Illustration 44: Terminals in the Control and Power Cell Cabinets 48 | Danfoss A/S © 2021.06 AQ363633621020en-000201 / 172F3117... -
Page 49: Cable Entry And Termination
6.5.1 Power Cable Entry of Standalone Cabinet Bottom entry and top entry are possible to the input/output cabinet. The cable routing is assembled for bottom entry or top entry according to customer requirement. Danfoss A/S © 2021.06 AQ363633621020en-000201 / 172F3117 | 49... -
Page 50: Power Cable Entry Of Line-Up Cabinet
If it is necessary to change the cable entry way on site, rotate the position of two mechanical parts by 180°: • The output busbar (part B) • The cable clamp and supporting bracket (part D) 50 | Danfoss A/S © 2021.06 AQ363633621020en-000201 / 172F3117... -
Page 51: Power Cable Termination
6.5.4 Control Cable Entry Both bottom entry and top entry are possible to the control cabinet. No modifications are required. Once cable routing is finished, tie the control cables on the wire duct/bracket. Danfoss A/S © 2021.06 AQ363633621020en-000201 / 172F3117 | 51... - Page 52 Wire duct for bundling cable Bottom cable entry Illustration 49: Control Cable Entry to Line-up Cabinet Top cable entry Wire duct for bundling cable Bracket for bundling cable Bottom cable entry 52 | Danfoss A/S © 2021.06 AQ363633621020en-000201 / 172F3117...
-
Page 53: Grounding
1 AWG ≤190 A 70 mm 1/0 AWG ≤240 A 95 mm 2/0 AWG ≤270 A 120 mm 4/0 AWG ≤310 A 150 mm 250 kcmil ≤350 A 185 mm 350 kcmil Danfoss A/S © 2021.06 AQ363633621020en-000201 / 172F3117 | 53... -
Page 54: Additional Instructions For Cable Installation
Connect L and N of the control power to terminals 1 and 7 in terminal block X12. See Table Table 7: Connections to Terminal Block X12 Terminal Definition Description 220 V AC, 1-phase, 50 Hz 230 V AC, 1-phase, 60 Hz 600 V AC, 1-phase, 50/60 Hz 54 | Danfoss A/S © 2021.06 AQ363633621020en-000201 / 172F3117... -
Page 55: Control Circuit Wiring
Normal open: Effective by closing Standard configuration Ramp stop Normal open: Effective by closing Standard configuration Reset Normal open: Effective by closing Standard configuration MCB closed/open sta- Normal open: Effective by closing Optional tus 2 Danfoss A/S © 2021.06 AQ363633621020en-000201 / 172F3117 | 55... - Page 56 Analog Output 2 load impedance must be higher than 20 kΩ. If the analog output signal is current type, the load impedance must be lower than 500 Ω. Analog Output 3 56 | Danfoss A/S © 2021.06 AQ363633621020en-000201 / 172F3117...
- Page 57 Cabinet) Grid to drive (to PLC) Normal open: Effective by closing Optional – – – Encoder PE – Optional Encoder A- – Optional Encoder A+ – Optional Encoder B- – Optional Danfoss A/S © 2021.06 AQ363633621020en-000201 / 172F3117 | 57...
- Page 58 – – – Spare – – – Spare – – – Spare – – – Spare – – – Spare – – – Spare – – – Spare – – – 58 | Danfoss A/S © 2021.06 AQ363633621020en-000201 / 172F3117...
-
Page 59: Application Wiring Example
– – – Spare – – – Spare – – – Spare – – – Spare – – – Spare – – – Spare – – – 6.9.4 Application Wiring Example Danfoss A/S © 2021.06 AQ363633621020en-000201 / 172F3117 | 59... -
Page 60: Plc Configuration
DIDO2: Fan control 2 • DIDO3: Fan control 3 • TM2: Transformer • T32 temperature monitoring Standard option modules • DIDO4: Synchronous Transfer • DIDO5: Multi-motor selection/speed ramps selection/others • DIDO6: Excitation cabinet 60 | Danfoss A/S © 2021.06 AQ363633621020en-000201 / 172F3117... -
Page 61: Options And Customized Designs
C7: RS485 to EtherCAT • C8: RS485 to ControNet Customized design • C9: RS485 to POWERLINK. C1 must change to Modbus RTU master. • C10: RS485 extension module, maximum 2 ports. Danfoss A/S © 2021.06 AQ363633621020en-000201 / 172F3117 | 61... - Page 62 RS485 bus Customized Standard option design Illustration 53: PLC Configuration Example 1 DI_M DO_M DIDO1 Basic Drive Customized RS485 bus design Customized Standard option design Illustration 54: PLC Configuration Example 2 62 | Danfoss A/S © 2021.06 AQ363633621020en-000201 / 172F3117...
-
Page 63: Human-Machine Interface
Emergency stop: The emergency Stop button on the control cabinet is pressed down. • MCB close allowed: The system is ready, but the HV breaker is not closed. The MCB can be closed. Danfoss A/S © 2021.06 AQ363633621020en-000201 / 172F3117 | 63... -
Page 64: Dashboard
Make the speed setting by numerical setting or slider. • To reset the fault status of the drive, press the RESET button. When the drive is running, this button is disabled. Illustration 56: Control Panel 64 | Danfoss A/S © 2021.06 AQ363633621020en-000201 / 172F3117... -
Page 65: Status
The Graphs & reports submenu shows historical graphs of selected parameters. Four channels are available. Each channel can show different parameters, such as: • Input voltage • Output voltage • Input current • Output current • Reference speed Danfoss A/S © 2021.06 AQ363633621020en-000201 / 172F3117 | 65... -
Page 66: Setup & Service
The Setup & Service button in the HMI menu opens a submenu with the following system function settings: • Operation mode • Motor parameter • Functions • Protections • I/O configuration • System configuration • PID setup • Commissioning Illustration 59: Setup & Service Submenu 66 | Danfoss A/S © 2021.06 AQ363633621020en-000201 / 172F3117... -
Page 67: Operation Mode
Speed operation configuration Set the rotation direction, maximum speed, and minimum speed for different motors. • Auto tuning parameter Check the parameters regarding auto tuning. • Speed controller • Flux controller Danfoss A/S © 2021.06 AQ363633621020en-000201 / 172F3117 | 67... -
Page 68: Functions
PID Output: The display of the actual PID output results. • SV: The expected values of the user set. • PV: The real value of the system output. • Output Enable/Disable switch • Start/Stop switch 68 | Danfoss A/S © 2021.06 AQ363633621020en-000201 / 172F3117... -
Page 69: System Configuration
A fault stops the drive immediately. Reset the drive and find a solution to the problem. Do not operate the system until the problem has been found and corrected. This page only shows general faults. To check the actual faults, see the "Event Log". Danfoss A/S © 2021.06 AQ363633621020en-000201 / 172F3117 | 69... -
Page 70: Event Log
To delete the event log, push the Delete button in the upper right corner. This operation needs higher operation authority. Illustration 63: Event Log Submenu Delete event log Save event log 70 | Danfoss A/S © 2021.06 AQ363633621020en-000201 / 172F3117... -
Page 71: Administration
5 minutes. The required passwords are delivered during the commissioning of the drive. If a password is lost, contact Danfoss. Danfoss A/S © 2021.06 AQ363633621020en-000201 / 172F3117 | 71... -
Page 72: Tool Settings
This menu shows the software version information for the HMI, PLC, and DSP. Also the power cell version and optical fiber board version are available. 7.9.3 HMI Set To adjust the brightness of the HMI screen, select Brightness. To adjust the date and time setting, select Date/Time. 72 | Danfoss A/S © 2021.06 AQ363633621020en-000201 / 172F3117... - Page 73 VACON® 1000 Operating Guide Human-Machine Interface Illustration 67: HMI Set Submenu Danfoss A/S © 2021.06 AQ363633621020en-000201 / 172F3117 | 73...
-
Page 74: Commissioning
8 Commissioning 8.1 Safety Checks before Starting the Commissioning Only qualified and trained engineers authorized by Danfoss are allowed to do the commissioning of the VACON® 1000 medium- voltage drive. Functional tests, commissioning, and primary parameter calibration must be executed by professional engineers in coordination with the end users to make sure that the final test and performance are according to the end users requirements. - Page 75 QF12, and QF13. Use a 2500 V insulation resistance tester. The insulation resistance must be higher than 1 MΩ. Provide an auxiliary AC supply. Make sure that the installation follows EMC guidelines. Danfoss A/S © 2021.06 AQ363633621020en-000201 / 172F3117 | 75...
-
Page 76: Commissioning Report
After the commissioning is finished, the user and the commissioning engineer from Danfoss must accept and sign the commission- ing report. The Danfoss commissioning engineer must write two duplicate commissioning reports, one copy is for the user and the other for Danfoss. -
Page 77: Stopping The Drive
After the power cells finish discharging, power off the control power. C A U T I O N Do not cut off the control power when the drive is powered on or the LED indicators of the power cells are on. Danfoss A/S © 2021.06 AQ363633621020en-000201 / 172F3117 | 77... -
Page 78: Interlocking System
• The drive cannot be restarted until all the door keys are returned to the key exchange box and the main key is removed and taken to the isolating means. 78 | Danfoss A/S © 2021.06 AQ363633621020en-000201 / 172F3117... -
Page 79: Maintenance
Do not conduct any service, spare parts replacements, or other related operations which are not described in this manual. Do not revise the system software or connect other equipment with the drive. If changes are required, contact Danfoss. Do not modify or scratch the labels and markings of the drive, as these are provided for the safety of the users and for the use of the product. -
Page 80: Standard Maintenance Process
Environment Daily Check that the temperature inside the drive cabinets is -5...+40°C, preferably 25°C. Check that humidity is below 95% and that there is no condensation. 80 | Danfoss A/S © 2021.06 AQ363633621020en-000201 / 172F3117... -
Page 81: Yearly Maintenance
Check that the output voltage of the UPS is 25±0.5 V DC. Check that the relay works normally and there is no abnormal sound. Check that the indicators work normally. Check that the electromagnetic interlocks work normally. Danfoss A/S © 2021.06 AQ363633621020en-000201 / 172F3117 | 81... -
Page 82: Replacing The Air Filters
Raise the input voltage gradually to wait until the capacitors are charged properly. 9.4 Replacing the Air Filters 9.4.1 Air Filters of Standalone Cabinets Procedure Loosen the screws on the air filter cover. Illustration 69: Releasing the Filter Cover Screws 82 | Danfoss A/S © 2021.06 AQ363633621020en-000201 / 172F3117... -
Page 83: Air Filters Of Transformer And Power Cell Cabinets
Reinstall the filter cover and tighten the screws. Note the filter replacement date. 9.4.2 Air Filters of Transformer and Power Cell Cabinets Procedure Loosen the screws on the air filter cover. Illustration 72: Air Filter Replacement Danfoss A/S © 2021.06 AQ363633621020en-000201 / 172F3117 | 83... -
Page 84: Air Filters Of Control Cabinet
Note the filter replacement date. 9.5 Replacing the HMI Battery Procedure Remove the screws at the back side of the HMI. Illustration 74: Locations of the HMI Cover Mounting Screws Cover mounting screws 84 | Danfoss A/S © 2021.06 AQ363633621020en-000201 / 172F3117... -
Page 85: Replacing The Cooling Fans
Finish the installation of the fan power and cable interface before fastening the cooling fan mounting screws. If there is an air duct, restore and fix the interface of the air duct. Danfoss A/S © 2021.06 AQ363633621020en-000201 / 172F3117 | 85... -
Page 86: Diagram Of The Cooling Fan Replacement
Note the polarity of the battery, and make sure that the wires are connected correctly. 9.7.2 UPS Battery Maintenance If the UPS battery is not used in the long term, a scheduled periodical maintenance of the battery is highly recommended. 86 | Danfoss A/S © 2021.06 AQ363633621020en-000201 / 172F3117... -
Page 87: Power Cells
Connect a 3-phase power to the power cell input terminals though a 3-phase current-limiting resistor. Different power cells have different mechanical designs. Connect to the hung-up side of the fuses. Power Current-limiting resistors Illustration 78: Power Cell Circuit Diagram Danfoss A/S © 2021.06 AQ363633621020en-000201 / 172F3117 | 87... -
Page 88: Replacing The Power Cells
The status of the power cell is normal if the indicators PWR and COM are on. If any other LED indicators are on, further inspection is necessary. Contact Danfoss. Keep the power cell powered up for one hour. ... -
Page 89: Diagram Of The Power Cell Replacement
• M6 screws: 7.8±0.2 Nm. • M8 screws: 9.8±0.2 Nm. Connect the fiber optical wiring on the power cell. 9.8.2.1 Diagram of the Power Cell Replacement Illustration 81: Power Cell Replacement Danfoss A/S © 2021.06 AQ363633621020en-000201 / 172F3117 | 89... -
Page 90: Reforming The Power Cell Capacitors
Make sure that the wiring for the reforming is done correctly. Check that the power cell fuses are OK. If there still are problems, contact Danfoss for assistance. Procedure Isolate the power cell from earth ground and separate it from personnel. Make sure that no wires are connected to the power cell output. -
Page 91: Reforming With A Dc Supply
Make sure that the wiring for the reforming is done correctly. Check that the power cell fuses are OK. If there still are problems, contact Danfoss for assistance. Procedure Isolate the power cell from earth ground and separate it from personnel. Make sure that no wires are connected to the power cell output. -
Page 92: Testing Input And Output Together
Disconnect the short circuit wire between the output terminal to ground, and short the input terminal to ground. Repeat the measurements in steps 2–4 for the output terminals. 92 | Danfoss A/S © 2021.06 AQ363633621020en-000201 / 172F3117... - Page 93 VACON® 1000 Operating Guide Maintenance After the test, restore the drive to its original state. Restore the wiring connections and remove the shorting. Danfoss A/S © 2021.06 AQ363633621020en-000201 / 172F3117 | 93...
-
Page 94: Fault Tracing
Check the input current. • Check the set value. 10.3.2 Fault Code 2 - Input Phase Loss Cause One or more high-voltage input cables cannot supply primary power to the input transformer. 94 | Danfoss A/S © 2021.06 AQ363633621020en-000201 / 172F3117... - Page 95 Constant torque: When the output current is higher than 150% of the rated current, allow for 1 minute overload every 10 minutes. Variable torque: When the output current is higher than 120% of the rated current, allow for 1 minute overload every 10 minutes. Danfoss A/S © 2021.06 AQ363633621020en-000201 / 172F3117 | 95...
- Page 96 Check if the load of motor is too light. 10.3.15 Fault Code 15 - Electronic Motor Thermal Protection Cause The calculated temperature or temperature rise is higher than the setting value. 96 | Danfoss A/S © 2021.06 AQ363633621020en-000201 / 172F3117...
- Page 97 • Check the analog circuit. 10.3.21 Fault Code 21 - Encoder Abnormal Cause The encoder signal is lost or the error between encoder speed and estimated speed is higher than 5%. Danfoss A/S © 2021.06 AQ363633621020en-000201 / 172F3117 | 97...
- Page 98 System default operation: Trip Troubleshooting • Check the status of switches. 10.3.28 Fault Code 28 - Auto Tuning Failure Cause During auto tuning, a fault occurs or a stop command is received. 98 | Danfoss A/S © 2021.06 AQ363633621020en-000201 / 172F3117...
- Page 99 “Current error threshold of synchronous transfer” (P0353) “Maximum load transfer time of synchronous transfer” (P0779) 10.3.32 Fault Code 32 - Failure Of Motor Selection Cause The serial number of selected motor is wrong. Danfoss A/S © 2021.06 AQ363633621020en-000201 / 172F3117 | 99...
- Page 100 System default operation: Alarm Troubleshooting • Check the wiring and voltage of the back-up control power. • Check that the corresponding switches are closed. • Check that the corresponding relays work normally. 100 | Danfoss A/S © 2021.06 AQ363633621020en-000201 / 172F3117...
- Page 101 If the drive cabinet door is opened during operation, the system stops immediately. Troubleshooting • Check the state of the drive cabinet doors. • Check the position switch of the cabinet door and its contacts. Danfoss A/S © 2021.06 AQ363633621020en-000201 / 172F3117 | 101...
- Page 102 • Check if the air filter is clogged. • Check if the drive is in overload operation for a long time. • Check if the temperature sensor is in good condition. 102 | Danfoss A/S © 2021.06 AQ363633621020en-000201 / 172F3117...
- Page 103 Troubleshooting • Check the communication circuit. 10.3.55 Fault Code 55 - Upstream Main Circuit Breaker Abnormal Open Cause When running, the drive receives the open signal of the high-voltage circuit breaker. Danfoss A/S © 2021.06 AQ363633621020en-000201 / 172F3117 | 103...
- Page 104 System default operation: Trip Troubleshooting • Check the wiring of the communication circuit. 10.3.61 Fault Code 61 - Auto Bypass Failure Cause Bypass cabinet switches did not operate correctly after receiving auto bypass signal. 104 | Danfoss A/S © 2021.06 AQ363633621020en-000201 / 172F3117...
- Page 105 Troubleshooting • Check that the power cell fault indicator is working normally. 10.3.67 Fault Code 67 - Power Cell Input Phase Loss Cause One of the three input phases is lost. Danfoss A/S © 2021.06 AQ363633621020en-000201 / 172F3117 | 105...
- Page 106 Check that the DC-link capacitors are in good condition. 10.3.73 Fault Code 73 - Upstream Fiber Communication Fault Cause The optical fiber communication board has not received the signals from the power cell unit. 106 | Danfoss A/S © 2021.06 AQ363633621020en-000201 / 172F3117...
- Page 107 Operating Guide Fault Tracing System default operation: Trip. System operation is configurable. Troubleshooting • Check if the optical fibers are damaged. • Check if the joints of the optical fibers are loose. Danfoss A/S © 2021.06 AQ363633621020en-000201 / 172F3117 | 107...
-
Page 108: Specifications
3x PT100, one in each winding former windings Grounding Grounding system As per IEC61936-1 Ground busbar Tin-plated grounding busbar section Output voltage range 2.4–11 kV Output Output current THDi (1st… <2% at rated speed 49th) 108 | Danfoss A/S © 2021.06 AQ363633621020en-000201 / 172F3117... - Page 109 150% for 1 min every 10 min (constant torque applications) For other overload capacity requirements, contact Danfoss. Start-up torque >120% rated torque If higher start-up torque is required, contact Danfoss. Frequency resolution 0.01 Hz Speed control range 1–100% (with Closed-loop Vector Control) 5–100% (with Sensorless Vector Control)
- Page 110 0°C...+40°C (normal operation) ment tion) +40°C...+50°C (derated operation) Ambient temperature (stor- -40°C...+70°C age/transportation) Relative humidity (operation) 5–95%, no condensation Relative humidity (storage/ 10–95%, no condensation transportation) Altitude <1000 m (standard) 1000–2000 m (derating) 110 | Danfoss A/S © 2021.06 AQ363633621020en-000201 / 172F3117...
-
Page 111: Power Ratings And Dimensions
In the control cabinet Power cell bypass Automatic via IGBT, 1 ms bypass time (optional, +PPCB) UPS for control voltage (DC) 30 min running time 11.2 Power Ratings and Dimensions 11.2.1 IEC Ratings Danfoss A/S © 2021.06 AQ363633621020en-000201 / 172F3117 | 111... - Page 112 ED-190-030+G2CE VACON1000- 1110 1910 1250 2888 4500 ED-215-030+G2CE VACON1000- 1290 3810 1400 2796 5100 ED-250-030+G2CE VACON1000- 1580 1150 4110 1400 2796 5500 ED-305-030+G2CE VACON1000- 1810 1330 4110 1400 2796 5800 ED-350-030+G2CE 112 | Danfoss A/S © 2021.06 AQ363633621020en-000201 / 172F3117...
- Page 113 VACON1000- 1220 1910 1250 2888 4700 ED-215-033+G2CE VACON1000- 1420 1040 4110 1400 2796 5300 ED-250-033+G2CE VACON1000- 1740 1270 4110 1400 2796 5800 ED-305-033+G2CE VACON1000- 2000 1460 4110 1400 2796 6100 ED-350-033+G2CE Danfoss A/S © 2021.06 AQ363633621020en-000201 / 172F3117 | 113...
- Page 114 1540 1130 1910 1250 2888 4900 ED-215-041+G2CE VACON1000- 1800 1310 4610 1400 2796 6150 ED-250-041+G2CE VACON1000- 2190 1600 4610 1400 2796 6850 ED-305-041+G2CE VACON1000- 2520 1840 4610 1400 2796 7450 ED-350-041+G2CE 114 | Danfoss A/S © 2021.06 AQ363633621020en-000201 / 172F3117...
- Page 115 2230 1630 3010 1250 2888 6000 ED-215-060+G2CE VACON1000- 2590 1900 5160 1400 2796 7700 ED-250-060+G2CE VACON1000- 3160 2310 5160 1400 2796 8600 ED-305-060+G2CE VACON1000- 3630 2660 5160 1400 2796 9200 ED-350-060+G2CE Danfoss A/S © 2021.06 AQ363633621020en-000201 / 172F3117 | 115...
- Page 116 2450 1790 3010 1250 2888 6200 ED-215-066+G2CE VACON1000- 2850 2090 5410 1400 2796 8800 ED-250-066+G2CE VACON1000- 3480 2540 5410 1400 2796 9800 ED-305-066+G2CE VACON1000- 4000 2920 5410 1400 2796 10700 ED-350-066+G2CE 116 | Danfoss A/S © 2021.06 AQ363633621020en-000201 / 172F3117...
- Page 117 3720 2710 4660 1250 2888 11100 ED-215-100+G2CE VACON1000- 4330 3160 6560 1400 2796 11600 ED-250-100+G2CE VACON1000- 5280 3860 6560 1400 2796 13100 ED-305-100+G2CE VACON1000- 6060 4430 6760 1400 2796 14400 ED-350-100+G2CE Danfoss A/S © 2021.06 AQ363633621020en-000201 / 172F3117 | 117...
- Page 118 4090 2990 4660 1250 2888 11500 ED-215-110+G2CE VACON1000- 4760 3480 6810 1400 2796 12950 ED-250-110+G2CE VACON1000- 5810 4240 7010 1400 2796 14750 ED-305-110+G2CE VACON1000- 6660 4870 7010 1400 2796 16750 ED-350-110+G2CE 118 | Danfoss A/S © 2021.06 AQ363633621020en-000201 / 172F3117...
-
Page 119: Ul Ratings
1250 2888 4350 ED-160-024+GAUL VACON1000- 1910 1250 2888 4400 ED-180-024+GAUL VACON1000- 1110 1910 1250 2888 4500 ED-215-024+GAUL VACON1000- 1190 3810 1400 2796 4600 ED-230-024+GAUL VACON1000- 1290 3810 1400 2796 4700 ED-250-024+GAUL Danfoss A/S © 2021.06 AQ363633621020en-000201 / 172F3117 | 119... - Page 120 [kg] que) que) P [kVA] P [kVA] W [mm] D [mm] H [mm] VACON1000- 1210 1250 2796 2100 ED-036-030+GAUL VACON1000- 1210 1250 2796 2125 ED-040-030+GAUL VACON1000- 1210 1250 2796 2150 ED-050-030+GAUL 120 | Danfoss A/S © 2021.06 AQ363633621020en-000201 / 172F3117...
- Page 121 1580 1150 4110 1400 2796 5500 ED-305-030+GAUL VACON1000- 1680 1230 4110 1400 2796 5600 ED-325-030+GAUL VACON1000- 1810 1330 4110 1400 2796 5800 ED-350-030+GAUL VACON1000- 1960 1430 4710 1400 2796 6450 ED-378-030+GAUL Danfoss A/S © 2021.06 AQ363633621020en-000201 / 172F3117 | 121...
- Page 122 ED-061-033+GAUL VACON1000- 1210 1250 2796 2300 ED-070-033+GAUL VACON1000- 1610 1250 2888 3000 ED-077-033+GAUL VACON1000- 1610 1250 2888 3050 ED-090-033+GAUL VACON1000- 1610 1250 2888 3075 ED-095-033+GAUL VACON1000- 1610 1250 2888 3100 ED-100-033+GAUL 122 | Danfoss A/S © 2021.06 AQ363633621020en-000201 / 172F3117...
- Page 123 2500 1830 5010 1400 2796 7450 ED-438-033+GAUL VACON1000- 2710 1980 5010 1400 2796 7900 ED-475-033+GAUL VACON1000- 2940 2150 5010 1400 2796 8200 ED-515-033+GAUL VACON1000- 3200 2340 5010 1400 2796 8700 ED-560-033+GAUL Danfoss A/S © 2021.06 AQ363633621020en-000201 / 172F3117 | 123...
- Page 124 VACON1000- 1610 1250 2888 3320 ED-105-041+GAUL VACON1000- 1610 1250 2888 3325 ED-116-041+GAUL VACON1000- 1610 1250 2888 3350 ED-120-041+GAUL VACON1000- 1610 1250 2888 3375 ED-128-041+GAUL VACON1000- 1000 1610 1250 2888 3400 ED-140-041+GAUL 124 | Danfoss A/S © 2021.06 AQ363633621020en-000201 / 172F3117...
- Page 125 4030 2950 5810 1400 2796 10700 ED-560-041+GAUL VACON1000- 4320 3170 5810 1400 2796 10950 ED-600-041+GAUL VACON1000- 4610 3370 5810 1400 2796 11450 ED-640-041+GAUL VACON1000- 4890 3580 5810 1400 2796 11950 ED-680-041+GAUL Danfoss A/S © 2021.06 AQ363633621020en-000201 / 172F3117 | 125...
- Page 126 1400 2796 8600 VACON1000-ED-325-060+GAUL 3370 2470 5160 1400 2796 8800 VACON1000-ED-350-060+GAUL 3630 2660 5160 1400 2796 9200 VACON1000-ED-370-060+GAUL 3840 2810 6010 1400 2796 10200 VACON1000-ED-390-060+GAUL 4050 2970 6410 1400 2796 10500 126 | Danfoss A/S © 2021.06 AQ363633621020en-000201 / 172F3117...
- Page 127 2310 1250 2796 3675 ED-065-063+GAUL VACON1000- 2310 1250 2796 3700 ED-070-063+GAUL VACON1000- 2710 1250 2888 4950 ED-085-063+GAUL VACON1000- 1030 2710 1250 2888 5000 ED-100-063+GAUL VACON1000- 1190 2710 1250 2888 5050 ED-115-063+GAUL Danfoss A/S © 2021.06 AQ363633621020en-000201 / 172F3117 | 127...
- Page 128 3920 2870 6810 1400 2796 11650 ED-378-063+GAUL VACON1000- 4240 3100 6810 1400 2796 12250 ED-408-063+GAUL VACON1000- 4550 3330 6810 1400 2796 13050 ED-438-063+GAUL VACON1000- 4930 3610 7010 1400 2796 13750 ED-475-063+GAUL 128 | Danfoss A/S © 2021.06 AQ363633621020en-000201 / 172F3117...
- Page 129 3800 ED-070-066+GAUL VACON1000- 2710 1250 2888 5050 ED-080-066+GAUL VACON1000- 1140 2710 1250 2888 5100 ED-100-066+GAUL VACON1000- 1370 1000 2710 1250 2888 5150 ED-120-066+GAUL VACON1000- 1600 1160 2710 1250 2888 5200 ED-140-066+GAUL Danfoss A/S © 2021.06 AQ363633621020en-000201 / 172F3117 | 129...
- Page 130 5000 3660 6810 1400 2796 13050 ED-438-066+GAUL VACON1000- 5420 3970 7010 1400 2796 13750 ED-475-066+GAUL VACON1000- 5880 4300 7010 1400 2796 14550 ED-515-066+GAUL VACON1000- 6400 4680 7610 1600 2796 15050 ED-560-066+GAUL 130 | Danfoss A/S © 2021.06 AQ363633621020en-000201 / 172F3117...
- Page 131 1430 1050 2710 1250 2888 5400 ED-120-069+GAUL VACON1000- 1670 1210 2710 1250 2888 5450 ED-140-069+GAUL VACON1000- 1790 1310 3010 1250 2888 6100 ED-150-069+GAUL VACON1000- 1910 1390 3010 1250 2888 6150 ED-160-069+GAUL Danfoss A/S © 2021.06 AQ363633621020en-000201 / 172F3117 | 131...
- Page 132 5230 3830 7010 1400 2796 13350 ED-438-069+GAUL VACON1000- 5670 4150 7010 1400 2796 14250 ED-475-069+GAUL VACON1000- 6150 4500 7010 1400 2796 15050 ED-515-069+GAUL VACON1000- 6690 4890 7610 1600 2796 16050 ED-560-069+GAUL 132 | Danfoss A/S © 2021.06 AQ363633621020en-000201 / 172F3117...
-
Page 133: Internal Cables And Terminals
12.0–15.0 5 AWG TLK25-8 M8×25 12.0–15.0 2 AWG TLK35-8 M8×25 12.0–15.0 2/0 AWG TLK70-8 M8×25 12.0–15.0 3/0 AWG TLK95-10 M10×35 30.0–50.0 4/0 AWG TLK120-10 M10×35 30.0–50.0 250 kcmil TLK150-10 M10×35 30.0–50.0 Danfoss A/S © 2021.06 AQ363633621020en-000201 / 172F3117 | 133... - Page 134 12.0–15.0 2/0 AWG TLK70-8 M8×25 12.0–15.0 3/0 AWG TLK95-10 M10×35 30.0–50.0 4/0 AWG TLK120-10 M10×35 30.0–50.0 250 kcmil TLK150-10 M10×35 30.0–50.0 300 kcmil TLK185-10 M10×35 30.0–50.0 400 kcmil TLK240-10 M10×35 30.0–50.0 134 | Danfoss A/S © 2021.06 AQ363633621020en-000201 / 172F3117...
-
Page 135: Replacement Fuses
700 V AC, 160 A 170M2616 700 V AC, 160 A 170M4812 1000 V AC, 160 A 100 A 170M1371 700 V AC, 250 A 170M2618 700 V AC, 250 A Danfoss A/S © 2021.06 AQ363633621020en-000201 / 172F3117 | 135... -
Page 136: Standards
FU14 Supplemental fuse 600 V AC/ 2 A FU15 Class CC or equivalent 600 V AC/ 1 A FU16, FU17 Class CC or equivalent 600 V AC/ 20 A 11.5 Standards 136 | Danfoss A/S © 2021.06 AQ363633621020en-000201 / 172F3117... - Page 137 Semiconductor converters – General requirements and line commutated converters – Part 1-1: Specifi- cation of basic requirements IEC 60146-1-2:2011 Semiconductor converters - General requirements and line commutated converters - Part 1-2: Applica- tion guide Danfoss A/S © 2021.06 AQ363633621020en-000201 / 172F3117 | 137...
- Page 138 - Section 1: Storage IEC 60721-3-2 Classification of environmental conditions - Part 3: Classification of groups of environmental parame- ters and their severities - Section 2: Transportation 138 | Danfoss A/S © 2021.06 AQ363633621020en-000201 / 172F3117...
- Page 139 Motors and Generators: Part 30 Application Considerations for Constant Speed Motors Used on a Si- nusoidal Bus with Harmonic Content and General Purpose Motors Used With Adjustable-Voltage or Adjustable-Frequency Controls or Both ASCE/SEI 7-10 Minimum Design Loads for Buildings and Other Structures Danfoss A/S © 2021.06 AQ363633621020en-000201 / 172F3117 | 139...
-
Page 140: Abbreviations
Ingress protection, for example, IP00, IP21, or IP54 Light emitting diode Low voltage Mains circuit breaker Medium voltage Printed circuit board Protective earth Proportional integral derivative Programmable logic controller Personal protective equipment Polyvinyl chloride 140 | Danfoss A/S © 2021.06 AQ363633621020en-000201 / 172F3117... - Page 141 VACON® 1000 Operating Guide Specifications Term Definition Pulse width modulation SLVC Sensorless Vector Control Space Vector Control Total harmonic distortion Uninterruptible power supply Universal serial bus Volatile corrosion inhibitor XLPE Cross-linked polyethylene Danfoss A/S © 2021.06 AQ363633621020en-000201 / 172F3117 | 141...
- Page 142 Events....................... 69 Main circuit..................... 47 Main circuit breaker..................47 Maintenance....................80 Fault response configuration..............94 Manual bypass cabinet................24 Fault tracing....................94 Manual version....................8 Functions......................68 Mechanical interlocking system............37, 78 Fuses.......................135 Mechanical options..................37 Medium-voltage section................47 142 | Danfoss A/S © 2021.06 AQ363633621020en-000201/172F3117...
- Page 143 Type code......................33 Powering the drive..................76 Protections......................68 UPS battery Replacement..................86 Qualified personnel................... 8, 9 Maintenance..................87 USB storage....................70 Reference set....................67 Reforming capacitors..................90 Warning & fault..................... 69 Weights....................111, 119 Safety.....................9, 10, 79 Danfoss A/S © 2021.06 AQ363633621020en-000201/172F3117 | 143...
- Page 144 Danfoss can accept no responsibility for possible errors in catalogues, brochures and other printed material. Danfoss reserves the right to alter its products without notice. This also applies to products already on order provided that such alterations can be made without subsequential changes being necessary in specifications already agreed.
Need help?
Do you have a question about the VACON 1000 and is the answer not in the manual?
Questions and answers