Sign In
Upload
Download
Table of Contents
Contents
Add to my manuals
Delete from my manuals
Share
URL of this page:
HTML Link:
Bookmark this page
Add
Manual will be automatically added to "My Manuals"
Print this page
×
Bookmark added
×
Added to my manuals
Manuals
Brands
AXIOMTEK Manuals
Industrial PC
IPC960A Series
User manual
AXIOMTEK IPC960A Series User Manual
Industrial computers
Hide thumbs
1
2
3
4
5
6
Table Of Contents
7
8
9
10
11
12
13
14
15
16
17
18
19
20
21
22
23
24
25
26
27
28
29
30
31
32
33
34
35
36
37
38
39
40
41
42
43
44
45
46
47
48
49
50
51
52
53
54
55
56
57
58
59
60
61
62
63
64
65
66
67
68
69
70
71
72
73
74
75
76
77
78
79
80
81
82
83
84
85
86
87
88
89
90
91
92
93
94
95
96
97
98
99
100
101
102
103
104
105
106
107
108
109
110
111
112
113
114
115
116
117
118
119
120
121
122
123
124
125
126
127
page
of
127
Go
/
127
Contents
Table of Contents
Bookmarks
Table of Contents
Safety Precautions
Classification
General Cleaning Tips
Cleaning Tools
Scrap Computer Recycling
Table of Contents
Section 1 Introduction
General Description
System Specifications
System Features
CPU Level
Specification
Operating Temperature
Certification
System Dimensions
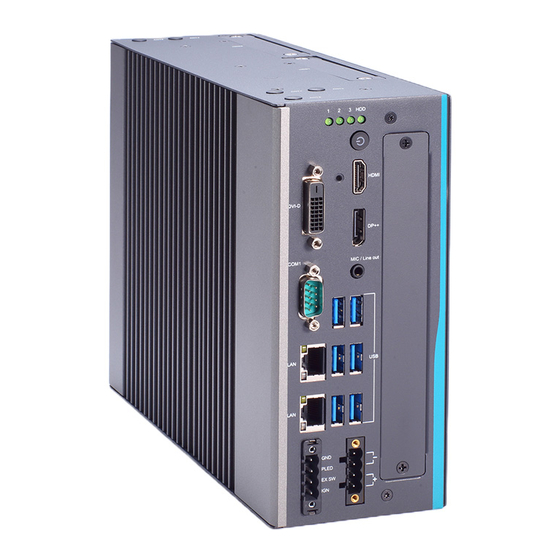
System Outlets
Packing List
M/B Block Diagram
Jumper Settings
Restore BIOS Optimal Defaults (SW2)
Connectors
MINI Card Slot (CN7)
Lan+Usb3.2 (Cn8, Cn9)
DVI-D Connector (DVI1)
DP++ Connector (CN2)
HDMI Connector (CN1)
USB 3.2 Connector (H610E Only Support USB2.0) (CN6)
Audio Connector (CN4)
DC-In Phoenix Power Connector (CN13)
COM Port Connector (COM1 )
2280 Key M Nvme SSD (CN5)
SATA Power Connector (SATAPWR1~2)
SATA Connector (SATA1~SATA2)
Power On/Off Button & LED (SW2)
Extended Control Connector (CN12)
MIO530 Module Kit, M.2 Key B+M.2 Key E (IPC964A Only)
Flexible IO - AX93511
Flexible IO - AX93512
Flexible IO - AX93516
Flexible IO - AX93519
Flexible IO - MIO160
Riser Card - EIO121, EIO122, EIO141, EIO142
Section 2 Hardware Installation
Installing the Processor
Procedure of Installation
Installing the Memory Module
Installing the Hard Disk Drive
Installing the Extension I/O Module
Installing the Fan Module
Installing PCI or Pcie Card
The Limitation of an Add-On Card
Installing the Mini Card Module
Installing the 5G Wireless Module
Installing the M.2 Key E Wireless Module
Installing the Nvme SSD Module
Mounting
Section 3 Ami Bios Utility
Starting
Navigation Keys
Main Menu
Advanced
Chipset Menu
Security Menu
Boot Menu
Save & Exit Menu
Appendix Awatchdog Timer
About Watchdog Timer
Sample Program
APPENDIX Bwake on LAN
How to Set up Wake on LAN
Appendix Dhdd Hot-Swappable
Removing Hot-Swappable Storage
Advertisement
Quick Links
Download this manual
IPC960A series
IPC962A series
IPC964A series
Industrial Computers
User's Manual
Table of
Contents
Previous
Page
Next
Page
1
2
3
4
5
Advertisement
Table of Contents
Need help?
Do you have a question about the IPC960A Series and is the answer not in the manual?
Ask a question
Questions and answers
Related Manuals for AXIOMTEK IPC960A Series
Industrial PC AXIOMTEK IPC962-512-FL Series User Manual
Industrial and fanless computer (104 pages)
Industrial PC AXIOMTEK IPC932-230-FL Series User Manual
Industrial and fanless computers (54 pages)
Industrial PC AXIOMTEK IPC932-230-FL Quick Installation Manual
(2 pages)
Industrial PC AXIOMTEK IPC910H Series User Manual
Embedded system (64 pages)
Industrial PC AXIOMTEK IPC974-519-FL User Manual
Industrial and fanless computers (107 pages)
Industrial PC AXIOMTEK IPC960-525 Series User Manual
Industrial computers (124 pages)
Industrial PC AXIOMTEK IPC962-525 Series User Manual
Industrial computers (124 pages)
Industrial PC AXIOMTEK IPC922-215-FL Quick Installation Manual
(2 pages)
Industrial PC AXIOMTEK IPC970 User Manual
Industrial and fanless computer (91 pages)
Industrial PC AXIOMTEK IPC950 User Manual
(72 pages)
Industrial PC AXIOMTEK IPC972 User Manual
(94 pages)
Industrial PC AXIOMTEK IPC962A Series User Manual
Industrial computers (127 pages)
Industrial PC AXIOMTEK IPC964A Series User Manual
Industrial computers (127 pages)
Industrial PC AXIOMTEK IPC920 Series User Manual
Industrial computers (99 pages)
Industrial PC AXIOMTEK IFB112 Hardware User Manual
(24 pages)
Industrial PC AXIOMTEK ICO300-83B User Manual
Robust din-rail fanless embedded system (57 pages)
This manual is also suitable for:
Ipc962a series
Ipc964a series
Ipc962a
Ipc964a
Table of Contents
Print
Rename the bookmark
Delete bookmark?
Delete from my manuals?
Login
Sign In
OR
Sign in with Facebook
Sign in with Google
Upload manual
Upload from disk
Upload from URL


Need help?
Do you have a question about the IPC960A Series and is the answer not in the manual?
Questions and answers