Otto Bock C1000 SF Instructions For Use Manual
Hide thumbs
Also See for C1000 SF:
- Instructions for use manual (36 pages) ,
- Instructions for use manual (24 pages)

Related Manuals for Otto Bock C1000 SF


Summary of Contents for Otto Bock C1000 SF
- Page 1 C1000 SF Instructions for use (user) ..................
- Page 2 [ ] Direction indicator, left [ ] Warning flasher [ ] Light [ ] Horn [ ] Other: [ ] S1: Stand-up function [ ] S2: Tilt function [ ] S3: Prone function (half-prone position) *See the section "Use" for more information. C1000 SF...
-
Page 3: Table Of Contents
Control panel ............................. 6.7.2 Buttons and display functions ....................... Driving functions ..........................6.8.1 Safety instructions ..........................6.8.2 Driving notes ............................6.8.3 Switching on and off ..........................6.8.4 Selecting the speed levels ........................6.8.5 Driving ............................... 6.8.6 Range ..............................C1000 SF... - Page 4 ..............6.17.1 Required accessories .......................... 6.17.2 Using the product in the vehicle ......................6.17.3 Restrictions for use ..........................6.18 Care ..............................6.18.1 Safety instructions ..........................6.18.2 Cleaning ............................6.18.3 Disinfection ............................Maintenance and repair ........................... Safety instructions ..........................C1000 SF...
- Page 5 Behaviour in case of breakdowns ......................Disposal ................................Safety instructions ..........................Disposal information ..........................Legal information .............................. Liability .............................. CE conformity ............................. Warranty ............................Service life ............................Technical data ..............................Appendices ................................ 11.1 Threshold values for wheelchairs transportable by train ................C1000 SF...
-
Page 6: Foreword
The wheelchair can be used on solid ground both indoors and outdoors. The powerful drive system with two 12 V gel batteries combined with spring-mounted drive wheels allows obstacles to be crossed easily (Category B according to EN 12184) and offers safe operating performance. C1000 SF... -
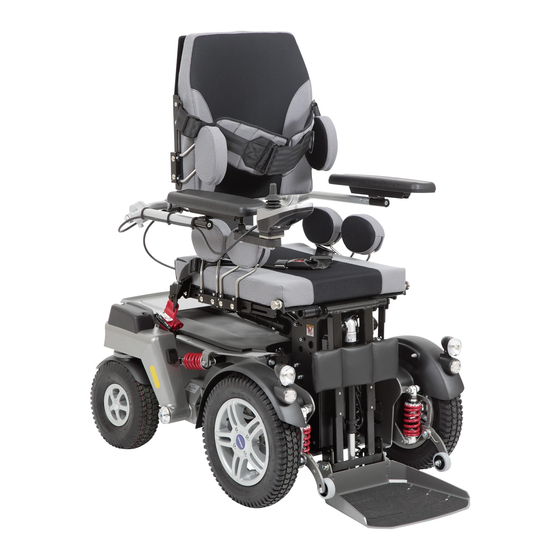
Page 7: Product Overview
1 Back support 7 Foot support 2 Arm support (side panel) 8 Control panel with joystick 3 Seat cushion 9 Anti-tipper 4 Motor with brake release 10 Suspension 5 Caster wheel 11 Posterior lower leg support 6 Drive wheel C1000 SF... -
Page 8: Safety
► Do not expose the product to any extreme temperatures (e.g. direct sunlight, sauna, extreme cold). NOTICE Use under incorrect environmental conditions Damage to the product due to excessively high or low temperatures ► Only use the product within a temperature range of -15 °C to +40 °C (5 °F to +104 °F). C1000 SF... -
Page 9: Effects Of Electromagnetic Interference On The Product And On The User
Other types of hand-held devices, such as cordless phones, laptop computers, AM/FM radios, TV sets, CD players, and cassette players, and small appliances, such as electric shavers and hair dryers, so far as we know, are not likely to cause EMI problems to your powered wheelchair. C1000 SF... -
Page 10: Nameplate And Warning Labels
* VVV = version; S = speed code; YY = year of manufacture; WW = week of manufacture; PP = production site; XXX = sequential production number ** YYYY = year of manufacture; MM = month of manufacture; DD = day of manufacture C1000 SF... -
Page 11: Warning Labels
45 % and 85 %. • Store the power wheelchair in a dry, enclosed room with sufficient air circulation and protection from external influences. • Protect the wheels against ground frost, e.g. by relieving them completely through assembly blocks or wooden boards. C1000 SF... -
Page 12: Preparation For Use
The specialist dealer ships the power wheelchair fully assembled and ready to use. The following additional tasks may be required: • Adjusting the settings (see next section) • Activating the circuit breaker (see Page 13) • Folding up the backrest (see Page 14) C1000 SF... -
Page 13: Settings
The armrests offer the user additional support for the forearms. To make getting into the wheelchair easier, the armrests can be folded up. 6.2.1 Folding away the arm supports The arm supports can be folded up if necessary to make getting in from the side easier. C1000 SF... -
Page 14: Footplate
► Do not reach into the danger area with your fingers when folding the backrest up or down. The backrest provides pressure redistribution and support for the upper body. 6.4.1 Folding the backrest up/down The wheelchair may be delivered with the backrest folded down. It has to be folded up and secured prior to use. C1000 SF... -
Page 15: Getting In And Transferring
► Do not reach into the danger area with your fingers when folding the footplate up or down. INFORMATION If the power wheelchair is equipped with the power lowering foot support, which is available as an option, this function can make getting in easier as well. Further information: see Page 39 C1000 SF... -
Page 16: Belts/Belt Systems
► Note that only the lap belt offered with the product may be used for additional stabilisation of the person sit ting in a vehicle for transporting persons with reduced mobility. ► The chest belt and knee pad cannot be applied during transportation in a vehicle for transporting persons with reduced mobility. C1000 SF... -
Page 17: Lap Belt
► The lap belt must be put on when getting into the product and used at all times while using the product. ► Ensure that the buckle lies in the middle of the body. ► Remove any objects or clothing which get caught. C1000 SF... -
Page 18: Chest Belt
WARNING! Ensure that the chest belt lies against the chest evenly on both sides and is not too tight. It should be possible to slide two fingers comfortably between the chest belt and upper body. C1000 SF... -
Page 19: Use
The legs have to be supported on the footplate and lie straight against the leg pad while sitting. • Make sure that the lower leg length is adjusted correctly. • The knee pad should lie flat on the lower legs below the knee caps. Possible positioning errors • The lower leg length is incorrectly adjusted. C1000 SF... -
Page 20: Use
Allow the belts to air dry. Ensure that the belts and pads are completely dry before installation. • Do not expose the belts to direct heat (e.g. sunshine, stove or radiator). • Do not iron or bleach the belts. C1000 SF... -
Page 21: Control Unit
The speed and driving direction are controlled with the joystick (see Page 27). When a power seat option is activated, the joystick adjusts this seat option (see Page 40). [On/off] button Holding this button turns the power wheelchair on or off (see Page 27). C1000 SF... - Page 22 Selected speed level (LCD screen with connected separate LCD monitor) After turning the control panel on, the LCD screen displays the battery symbol in the Driving menu. Additional information is only shown on the LCD monitor: see Page 42). C1000 SF...
-
Page 23: Driving Functions
• Section "Troubleshooting": see Page 59 6.8 Driving functions 6.8.1 Safety instructions Hazards while driving CAUTION Lack of riding experience Collision, falling due to errors in handling the product ► Practise using the product on level, open ground first. C1000 SF... - Page 24 ► The seat and back support upholstery as well as seat cushions, padding and covers fulfil the normative requirements for flame resistance. However, they may still ignite if fire is handled improperly or negligently. ► Keep away from all ignition sources, especially lit cigarettes. C1000 SF...
-
Page 25: Driving Notes
Driving backwards should be limited to manoeuvring or short distances on level ground. Obstacles (steps, curbs, tracks): • Always approach obstacles directly from the front (never at an angle with only one front wheel). • Always reduce speed to cross over obstacles (e.g., select speed level 1 or 2). C1000 SF... - Page 26 Note however that, due to the variety of variants and settings, not every specific power wheelchair meets all minimum requirements (for more information see the section "Appendix" > "Threshold values for wheel chairs transportable by train": see Page 65). C1000 SF...
-
Page 27: Switching On And Off
► Only cross obstacles or negotiate ascents or descents that are within the permitted maximums. For more information, see the section "Technical data" (see Page 63). ► Do not cross over any obstacles while ascending or descending inclines. ► Avoid embarking and disembarking on inclines and slopes. ► Do not drive over stairs. C1000 SF... -
Page 28: Range
► While the control unit is turned on, press and hold the [Mode] button for at least 5 seconds. → A short beep confirms that the drive-away lock was activated. INFORMATION: If keypress beeps are activated, then the drive-away lock is only active after the second beep. → The control unit turns itself off. C1000 SF... -
Page 29: Steering Lock
• Turning is not possible when the steering lock is activated. • The warning flasher lights flash when the steering lock is activated (standard programming). Activating the steering lock 1) Bring the power wheelchair to a full stop. C1000 SF... -
Page 30: Adjusting The Driving Characteristics
It is possible to push the power wheelchair in case of control unit failure or insufficient battery charge level. To do so, the brake is deactivated via the mechanical release. The brake releases are located on the right and left of the driving motors. C1000 SF... -
Page 31: Batteries/Charging Process
The batteries are located in a battery case under the seat of the power wheelchair. Prolonged driving when the battery is low results in deep discharge and battery damage. If the power wheelchair is being driven when the battery is low the control unit switches to creep speed to save power. C1000 SF... -
Page 32: Battery Charging Information
Risk of electric shock due to contact with live components ► Do not touch live electrical components. The battery charger and its cables are live when the charger is on. ► Do not remove any insulation or protective covers. C1000 SF... - Page 33 6) Disconnect the battery charger mains plug. 7) Disconnect the battery charger plug from the char ging receptacle. 8) Close the charging receptacle cover (protection against moisture and dirt). 9) Turn the power wheelchair control device on. The power wheelchair is ready to use. C1000 SF...
-
Page 34: Seat
Detailed information regarding adjustment, use, main tenance and repair can be found in the included manu facturer's instructions for use. 6.12 Power seat functions The power wheelchair can be equipped with a range of different optional power seat functions. C1000 SF... -
Page 35: Safety Instructions
► Observe the following guidelines: at maximum load capacity, 10 seconds of activation time must be followed by approx. 90 seconds of idle time. The power seat functions are considered independently of the driving function for this purpose. ► Only activate the power seat functions if no fault or error is present. C1000 SF... -
Page 36: Electric Stand-Up Function
Creep speed is indicated on the control panel and separate LCD monitor as follows: Display Information Restricted speed (creep speed): Top: Display on LCD screen • Bottom: Display on LCD monitor (if present) • C1000 SF... -
Page 37: Important Instructions For Use
► Use the seat tilt feature only with the backrest in the upright position. ► Drive in street traffic only with the seat tilt lowered. ► When driving with the seat tilt activated, even at home, fasten the belts and do not lean out beyond the seat surface. C1000 SF... -
Page 38: Power Back Angle Adjustment
► Please also observe the generally applicable safety instructions in the section "Power seat functions" > "Safety instructions" (see Page 35). ► Observe the instructions for use in the sections "Controlling power seat functions" (see Page 40) and "Joy stick functions" (see Page 41). C1000 SF... -
Page 39: Power Lowering Footplate
6.12.7 Power prone functions WARNING Incorrect handling of the prone function Falling, tipping, collision with persons or nearby objects due to user error ► Never drive in the prone position since you cannot see your surroundings in this position. C1000 SF... -
Page 40: Controlling Power Seat Functions
• Holding the [Mode] button again (approx. 2 seconds) deactivates the seat function in the selected position. The driving function is available again and the speed level indicator on the LCD screen is lit. C1000 SF... -
Page 41: Joystick Functions
The lights, left and right direction indicators and warning flashers are turned on and off using the control panel. Information on replacing broken lamps: see Page 59. Front lights An LED headlight (top) and LED direction indicator light (bottom) are attached to the right and left splash guards of the drive wheels, respectively. C1000 SF... -
Page 42: Control Unit Accessories
The LCD monitor is the interface to the connected special controls. The input devices of the special controls (e.g. sip-and-puff control, chin control) can also be used for infrared functions. Detailed information can be found in the "Special Controls" instructions for use, article number 647G636=*. C1000 SF... - Page 43 If the power wheelchair is turned on via the LCD monitor, the Main menu is displayed there first. Now the joystick has to be moved 2 x in order to drive: ► After moving the joystick forward, the Driving menu is shown. ► Move the joystick a second time in order to start driving the power wheelchair. C1000 SF...
- Page 44 1) First movement to the right: Select function 2) First movement to the front: Select option 3) Second movement to the right: Activate/deactivate option; adjust option 4) Further deflection movements to the right/front: Select/adjust further sub-functions (specific to each LCD screen) C1000 SF...
- Page 45 Select speed level Menu Joystick function Next action: Move the joystick to the front Next action: Move joystick to the right until the desired speed level is highlighted Next action: Move the joystick forward/back to select the speed level C1000 SF...
- Page 46 > e.g. CD player Hi-Fi function Further LCD screen functions Further information on the LCD monitor is covered in the following sections: • Section "Drive-away lock": see Page 28 • Section "Power seat functions": see Page 34 • Section "Troubleshooting": see Page 59 C1000 SF...
-
Page 47: Control Panel For Attendant
Red/orange/green flashing Charging process/drive-away lock alternately [Mode] button Switch between speed level 1 and 2 by pressing the button briefly. Push and hold the button (at least 2 seconds) to switch the control unit to the power seat functions. C1000 SF... -
Page 48: Push-Button Module
► Programming of the push-button module may only be performed by trained, qualified personnel. Power wheelchairs with enAble50 control units can be equipped with optional push-button modules. The push-button module lets the user select additional power seat functions directly during normal driving opera tion. C1000 SF... - Page 49 The respective function (function up/down) is activated using the buttons [Selected function up] and [Selected function down] (see item 4). INFORMATION The function of the [Selected function up/down] buttons can be programmed according to the user's wishes (but ton [Selected function up] = function up or function down – depending on programming). C1000 SF...
-
Page 50: Special Controls
6.15.2 Comfort knee pad The power wheelchair can be equipped with a comfort knee pad (only for the "Standard legrest" version). The optional comfort knee pad is used to stabilise and secure the feet instead of the knee pad (see Page 19). C1000 SF... -
Page 51: Control Panel Holder
The power wheelchair can be equipped with a special control panel holder which allows for height adjustment of the control panel. Adjusting the height 1) Loosen the mounting screws. 2) Adjust the height of the control panel holder. 3) Tighten the mounting screws. C1000 SF... -
Page 52: Adjusting The Control Panel Position
1) Pull the release bolt and lift the luggage carrier slightly at the rear (see fig. 39). 2) Pull or push the luggage carrier to the next locking point. 3) Push the luggage carrier down until the release bolt engages. C1000 SF... -
Page 53: Overview Of Additional Options
► Ensure that the seat is lowered all the way and the backrest is in a vertical position prior to loading and for transporting the power wheelchair. 6.16.2 Reducing the transportation size The transportation size can be reduced in a few steps to make transporting the product easier. C1000 SF... -
Page 54: Preparing For Transport
If the power wheelchair was not ordered for such use, consult the qualified personnel that delivered the power wheelchair or the manufacturer's service (see inside back cover or back page for address). During transport in vehicles for transporting persons with reduced mobility, the product must be sufficiently secured with attachment straps. C1000 SF... -
Page 55: Required Accessories
Therefore, release the seat retaining straps immediately after use in a vehicle for transporting persons with reduced mobility so power seat adjustment is possible again. 2) Engage the attachment straps at the front and rear before tightening them (). C1000 SF... -
Page 56: Restrictions For Use
Headrest with mounting kit Tray, angle-adjustable * The options identified below are not offered for all versions of the C1000 SF. ** The lap belt can be used to position the passenger during transportation. Using the personal restraint system is nevertheless required (see Page 54). -
Page 57: Care
► Inspect the seat adjustment features for visible signs of damage at least 1 x per month and ensure all screw connections are tight. ► Maintain sufficient air pressure in the tyres. The correct tyre pressure is printed on the tyre casing and listed in the section "Technical data". C1000 SF... -
Page 58: Maintenance
(inform qualified personnel of any LED error messages) Check plug connections Brake When brake is disengaged: check whether the indicator on the control panel is flashing When brake is engaged: check braking function by try ing to push the chair C1000 SF... -
Page 59: Repair
Based on the saved data, the specialist dealer determines future ser vice and maintenance intervals. 7.4.1 Types of notifications Warning A warning indicates a status or malfunction of one or several components of the power wheelchair. The function of components without errors is not restricted. C1000 SF... -
Page 60: Wheelchair Control Unit Error Overview
Back angle adjustment Faulty cabling or plug Check cabling/plug con motor fault contacts tacts Defective actuator Contact specialist deal Seat tilt motor fault Faulty cabling or plug Check cabling/plug con contacts tacts Defective actuator Contact specialist deal C1000 SF... -
Page 61: Attendant Control Error Overview
Check cabling/plug con tact tacts Defective actuator Contact specialist dealer 2 LEDs below the seat bot Stand-up function motor Faulty cabling or plug con Check cabling/plug con tom are flashing fault tact tacts Defective actuator Contact specialist dealer C1000 SF... -
Page 62: Behaviour In Case Of Breakdowns
Further information on the warranty terms and conditions can be obtained from the qualified personnel that has fit ted this product or the manufacturer's service (see inside back cover for addresses). 9.4 Service life Expected service life: 5 years. C1000 SF... -
Page 63: Technical Data
Adjust the tyre pressure according to the specifications on the tyre sidewall to prevent injuries or damage to the product: • 14" drive wheel: 3.5 bar/350 kPa/50 PSI • 10" caster wheel: 3.5 bar/350 kPa/50 PSI * The specified weights vary according to the selected options and model. C1000 SF... - Page 64 (user). **** The braking distance can be correspondingly longer due to user weight, installed options and condition of the tyres, and due to weather and surface conditions. Corrosion protection Corrosion protection Coated frame C1000 SF...
-
Page 65: Appendices
60 mm (2.4") under the foot rest for going for ward at the end of the slope Maximum inclination angle on which the 6° (dynamic stability in all directions) wheelchair will remain stable 9° (static stability in all directions, also when wheel lock engaged) C1000 SF... - Page 66 C1000 SF...
- Page 67 · www.ottobock.de 143441 Moscow Region/Krasnogorskiy Rayon info@ottobock.com.co · www.ottobock.com.co Russian Federation Otto Bock Healthcare Products GmbH Otto Bock de Mexico S.A. de C.V. T +7 495 564 8360 · F +7 495 564 8363 Brehmstraße 16 · 1110 Wien · Austria Prolongación Calle 18 No. 178-A info@ottobock.ru · www.ottobock.ru F +43 1 5267985...
- Page 68 Ihr Fachhändler | Your specialist dealer Otto Bock Mobility Solutions GmbH Lindenstraße 13 · 07426 Königsee-Rottenbach/Germany www.ottobock.com...
Need help?
Do you have a question about the C1000 SF and is the answer not in the manual?
Questions and answers
Включилась черепаха что делать?