Otto Bock C1000 SF Instructions For Use Manual
Hide thumbs
Also See for C1000 SF:
- Instructions for use manual (36 pages) ,
- Instructions for use manual (68 pages)

Subscribe to Our Youtube Channel
Related Manuals for Otto Bock C1000 SF


Summary of Contents for Otto Bock C1000 SF
- Page 1 C1000 SF Instructions for use (qualified personnel) ..............
- Page 2 C1000 SF...
-
Page 3: Table Of Contents
................................Final inspection ..........................Transport to the customer ........................7.2.1 Reducing the transportation size ......................7.2.2 Preparing for transport ......................... Handing over the product ........................Maintenance and repair ........................... Disposal ................................Disposal information ..........................Information on re-use ........................... C1000 SF... - Page 4 Table of contents Legal information .............................. 10.1 Liability .............................. 10.2 Warranty ............................10.3 Service life ............................Technical data ..............................Appendices ................................ 12.1 Required tools ............................ 12.2 Torque values of the screw connections ....................C1000 SF...
-
Page 5: Foreword
The tasks described below may only be carried out by qualified personnel. Compliance with all manufacturer spe cifications and all applicable legal provisions is required. Please contact the manufacturer’s service department for further information (see inside or outside of rear cover for addresses). C1000 SF... -
Page 6: Safety
► Any time you loosen a screw connection with thread lock, replace it with a new screw connection with thread lock or secure the old screw connection with medium strength thread locker (e.g. Loctite 241). ► Always replace self-locking screws and nuts with new self-locking screws and nuts after disassembly. C1000 SF... -
Page 7: Programming Safety Instructions
The serial number required for enquiries and orders can be found on the nameplate. For explanations of the nameplate, see the section "Nameplate" (see Page 7). 3.7 Nameplate The nameplates are found on the side of the frame under the seat. C1000 SF... -
Page 8: Delivery
The maximum load capacity (see print on the nameplate; see Page 7) is thereby respectively reduced by the weight of the retrofitted options. 4.3 Storage NOTICE Deep discharge Battery damage due to standby current ► Deactivate the circuit breaker if the product is not used for more than three days. C1000 SF... -
Page 9: Preparing The Product For Use
► Ensure that the cooling fins/ventilation slots on the back of the device are not covered. CAUTION Wearing of unsuitable work clothing Chemical burns due to insufficient protection ► Wear suitable work clothing (for example, gloves and protective eyewear) when working on the batteries. C1000 SF... -
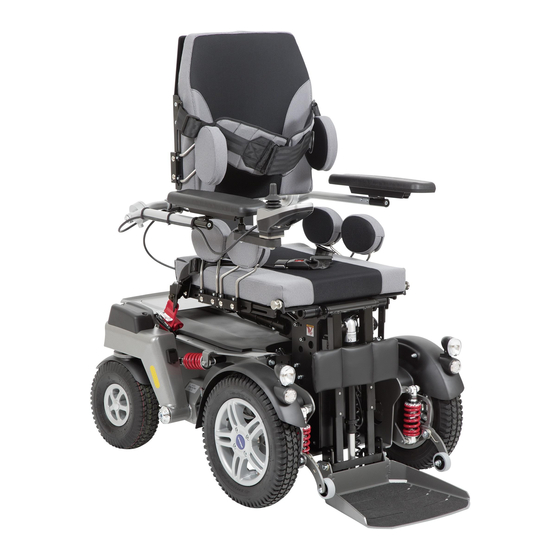
Page 10: Folding The Back Support Up/Down
The backrest height can be adapted to the height of the user. Depending on anatomic back compensation, the backrest moves down when bringing it in the upright position. In the standing position the back strap should be tight. C1000 SF... -
Page 11: Adjusting The Seat And Back Support Width
3) Retighten the two screws. 6.6 Adjusting the pads The position of the supports (optional) can be adapted to the requirements of the user. C1000 SF... -
Page 12: Adjusting The Foot Plate
The required footplate height depends on the lower leg length of the user. The angle of the footplate in the sitting position affects the foot angle in the standing position. Adjusting the height for the lower leg length Two methods can be used to set the height. C1000 SF... -
Page 13: Adjusting The Stand-Up Function
4) Retighten the Allen head screw using only minimal torque. INFORMATION: The line spacing on the scale is 10 mm. Move the ring by 5 mm at a time and test the effect. Gradually approach the desired position. C1000 SF... -
Page 14: Adjusting The Belts
WARNING! The chest belt is intended to sup port the area over the sternum (breastbone) from the front. 6.10 Adjusting the head support INFORMATION See the provided manufacturer documentation for information on adjusting the head support if necessary. C1000 SF... -
Page 15: Adapting The Seat Cushion
The power wheelchair can be ordered and equipped with an attendant control. It may be necessary to fit the already installed attendant control to the actual body size of the attendant. The instructions for use (user) contain information on operating and troubleshooting the attendant control. C1000 SF... -
Page 16: Push-Button Module
Damage to the product caused by transportation using incorrect packaging ► Use only the original packaging for delivery of the product. 7.2.1 Reducing the transportation size The instructions for use (user) contain information on reducing the transportation size. C1000 SF... -
Page 17: Preparing For Transport
► Observe the information printed on the batteries by the manufacturer. ► Note that the batteries may not be disposed of as household waste. All components of the product must be disposed of properly in accordance with the respective national environ mental regulations. C1000 SF... -
Page 18: Information On Re-Use
Angle of the seat surface 0°–6° Angle of leg to seat 90°–170° Distance from arm support to seat 225–325 mm Front position of the arm supports 300–580 mm Arm support height 160–260 mm Arm support length 370 mm C1000 SF... - Page 19 2 x 130 A Force for operating the joystick on the 1.6 N standard control panel Control unit accessories Model Push-button module for enAble50 control unit Protection rating IPX4 Driving data Speed* 6 km/h [3.7 mph], 10 km/h [6.2 mph] (see nameplate for precise information) C1000 SF...
- Page 20 12.2 Torque values of the screw connections Unless otherwise specified, screw connections are tightened with the following torque values: • Thread diameter M4: 3 Nm • Thread diameter M5: 5 Nm • Thread diameter M6: 10 Nm • Thread diameter M8: 25 Nm C1000 SF...
- Page 21 C1000 SF...
- Page 22 C1000 SF...
- Page 23 · www.ottobock.de 143441 Moscow Region/Krasnogorskiy Rayon info@ottobock.com.co · www.ottobock.com.co Russian Federation Otto Bock Healthcare Products GmbH Otto Bock de Mexico S.A. de C.V. T +7 495 564 8360 · F +7 495 564 8363 Brehmstraße 16 · 1110 Wien · Austria Prolongación Calle 18 No. 178-A info@ottobock.ru · www.ottobock.ru F +43 1 5267985...
- Page 24 Ihr Fachhändler | Your specialist dealer Otto Bock Mobility Solutions GmbH Lindenstraße 13 · 07426 Königsee/Germany www.ottobock.com...
Need help?
Do you have a question about the C1000 SF and is the answer not in the manual?
Questions and answers