Siemens SIMATIC ET 200S Operating Instructions Manual
Hide thumbs
Also See for SIMATIC ET 200S:
- Manual (652 pages) ,
- Operating instructions manual (418 pages) ,
- Installation and operating manual (216 pages)
Table of Contents
Advertisement
Quick Links
Advertisement
Table of Contents

Related Manuals for Siemens SIMATIC ET 200S


Summary of Contents for Siemens SIMATIC ET 200S
- Page 1 ___________________ Technological Functions Preface ___________________ 1Count24V ___________________ 1Count5V SIMATIC ___________________ 1SSI ET 200S ___________________ Technological Functions 2PULSE Operating Instructions 06/2010 A5E00124867-07...
- Page 2 Note the following: WARNING Siemens products may only be used for the applications described in the catalog and in the relevant technical documentation. If products and components from other manufacturers are used, these must be recommended or approved by Siemens. Proper transport, storage, installation, assembly, commissioning, operation and maintenance are required to ensure that the products operate safely and without any problems.
-
Page 3: Table Of Contents
Table of contents Preface ..............................7 1Count24V..............................9 Product Overview...........................9 Isochronous Mode ........................12 Brief instructions on commissioning the 1Count24V ..............13 Terminal Assignment Diagram.....................16 Operating modes and application areas of the 1Count24V............17 Count Modes..........................19 2.6.1 Overview ............................19 2.6.2 Endless Counting.........................21 2.6.3 Once-Only Counting ........................23 2.6.4 Periodic Counting.........................26... - Page 4 Table of contents Position feedback........................90 2.9.1 Overview ............................. 90 2.9.2 Position Detection ........................92 2.9.3 Gate Functions for Position Detection ..................93 2.9.4 Latch Function..........................96 2.9.5 Synchronization........................... 99 2.9.6 Assignment of the Feedback and Control Interface for Position Feedback......101 2.9.7 Assigning Parameters for Position Feedback ................
- Page 5 Table of contents Fast mode ..........................197 3.8.1 Overview ............................197 3.8.2 Fast mode ..........................198 3.8.3 Gate function in the case of fast mode ..................198 3.8.4 Synchronization..........................199 3.8.5 Assignment of feedback interface for fast mode................201 3.8.6 Assigning parameters for fast mode ..................203 Position feedback........................204 3.9.1 Overview ............................204...
- Page 6 Table of contents 2PULSE..............................265 Product Overview........................265 Isochronous mode........................267 Example: Starting 2PULSE ....................... 268 Modes and Functions........................ 271 5.4.1 Overview ........................... 271 5.4.2 "Pulse output" operating mode....................273 5.4.3 "Pulse width modulation" operating mode ................279 5.4.4 "Pulse train" operating mode..................... 289 5.4.5 "On/Off-delay"...
-
Page 7: Preface
ET 200S Distributed I/O System This manual is supplementary to the operating instructions. The ET 200S Distributed I/O System (http://support.automation.siemens.com/WW/view/en/1144348) operating instructions provide comprehensive information pertaining to the hardware configuration, installation, wiring, commissioning, diagnostics and technical specifications of the ET 200S distributed I/O system. - Page 8 Additional support If you have any further questions about the use of products described in this manual and do not find the right answers here, contact your local Siemens representative (http://www.siemens.com/automation/partner): A guide to the technical documentation for the various products and systems is available on the Internet: ●...
-
Page 9: 1Count24V
1Count24V Product Overview Order Number 6ES7 138-4DA04-0AB0 Compatibility The 1Count24V with the order number 6ES7 138-4DA04-0AB0 replaces the 1Count24V/100kHz with the order number 6ES7 138-4DA03-0AB0 with full compatibility. In STEP 7 version V5.3 SP2 and later, you can use it in non-isochronous and isochronous modes. - Page 10 1Count24V 2.1 Product Overview Position feedback: – Position detection – Fast mode ● Gate control, synchronization or latch function via digital input (P or M switch) ● One real digital output for direct control or output of the comparison result ●...
- Page 11 Restart the firmware update and wait until it has completed successfully. Identification Data ● Hardware release status ● Firmware release status ● Serial number See also ET 200S Distributed I/O operating instructions (http://support.automation.siemens.com/WW/view/en/1144348), "Identification data" section. Technological Functions Operating Instructions, 06/2010, A5E00124867-07...
-
Page 12: Isochronous Mode
2.2 Isochronous mode Isochronous mode Note For basic information on isochronous mode, refer to the Isochronous mode (http://support.automation.siemens.com/WW/view/en/15218045) function manual. Hardware Requirements You will require the following for the 1Count24V in isochronous mode: ● A CPU that supports isochrone mode ●... -
Page 13: Brief Instructions On Commissioning The 1Count24V
1. Install and wire the TM-E15S24-01 terminal module (see Figure). 2. Plug the 1Count24V into the terminal module. Detailed instructions are provided in the ET 200S Distributed I/O Device (http://support.automation.siemens.com/WW/view/en/1144348) operating instructions. Figure 2-1 Terminal Assignment for the Example Technological Functions... - Page 14 1Count24V 2.3 Brief instructions on commissioning the 1Count24V Configuring with STEP 7 using HW Config You must first adapt the hardware configuration of your existing ET 200S station. 1. Open the relevant project in SIMATIC Manager. 2. Open the HW Config configuration table in your project. 3.
- Page 15 1Count24V 2.3 Brief instructions on commissioning the 1Count24V Description Network 3: Read from the feedback interface //Read 8 bytes from the 1Count24V //Configured start address of inputs PED 256 DB1.DBD8 PED 260 DB1.DBD12 Testing Use "Monitor/Modify Variables" to monitor the count value and the gate. 1.
-
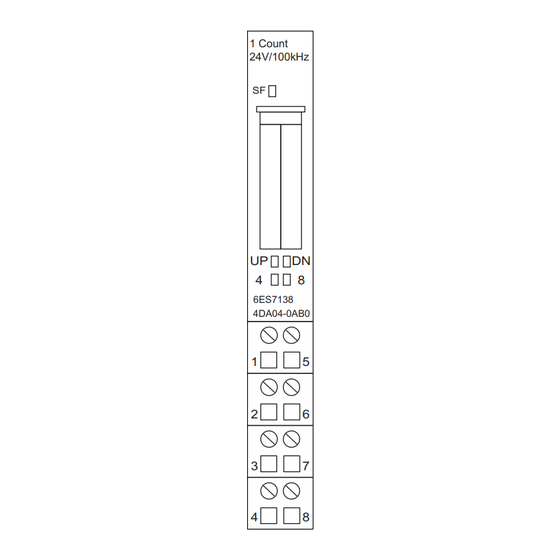
Page 16: Terminal Assignment Diagram
The cables (terminals 1 and 5 and terminals 2 and 8) must be shielded. The shield must be supported at both ends. To do this, use the shield contact (see the ET 200S Distributed I/O System (http://support.automation.siemens.com/WW/view/en/1144348) operating instructions). Terminal assignment of the 1Count24V... -
Page 17: Operating Modes And Application Areas Of The 1Count24V
1Count24V 2.5 Operating modes and application areas of the 1Count24V Operating modes and application areas of the 1Count24V Introduction To begin with, decide how you want to use the 1Count24V. You can choose between the following modes: Counting modes Measuring modes Position feedback Fast mode Count continuously... - Page 18 1Count24V 2.5 Operating modes and application areas of the 1Count24V Integrate the 1Count24V with the GSD file Integrate the 1Count24V with the GSD file (only in non-isochronous mode) Select an entry in the GSD file that corresponds to the operating mode you want. For counting modes, select For measuring modes, select For position feedback, select...
-
Page 19: Count Modes
1Count24V 2.6 Count Modes Count Modes 2.6.1 Overview Principle The counting modes are used in counting applications (for counting of items, for example). For the "Counting modes" parameter, you can select from the following modes: ● Count continuously (for position detection with incremental encoders, for example) ●... - Page 20 T A count controlled by hardware input signals can only be transferred in the same cycle if the input signal occurred before time T (See Isochronous Mode (http://support.automation.siemens.com/WW/view/en/15218045) function manual) Technological Functions Operating Instructions, 06/2010, A5E00124867-07...
-
Page 21: Endless Counting
1Count24V 2.6 Count Modes 2.6.2 Endless Counting Definition In this mode, the 1Count24V counts continuously starting from the load value: ● If the 1Count24V reaches the high count limit when counting up, and another count pulse then comes, it will jump to the low count limit and continue counting from there without losing a pulse. - Page 22 1Count24V 2.6 Count Modes Influencing the Behavior of the Digital Outputs via: ● Hysteresis ● Pulse duration (see section "Behavior Types of the Outputs in Count Modes (Page 37)") Changing values during operation The following values can be changed during operation: ●...
-
Page 23: Once-Only Counting
1Count24V 2.6 Count Modes 2.6.3 Once-Only Counting Definition In this mode, the 1Count24V counts once only, depending on the assigned main count direction ("Main count direction" parameter). ● When there is no main count direction: – Counts starting from the load value. –... - Page 24 1Count24V 2.6 Count Modes The internal gate is automatically closed in the event of an overflow/underflow at the count limits. To restart counting, you have to open the gate again. Figure 2-3 Count Once Without Main Count Direction; Canceling Gate Function With an interrupting gate function, the 1Count24V remains at the underflow when the gate is started.
- Page 25 1Count24V 2.6 Count Modes Function of the Digital Input For the "Function DI" parameter, select one of the following functions for the digital input: ● Input ● HW gate (see section "Gate Functions in Count Modes (Page 30)") ● Latch function (see section "Latch Function (Page 32)") ●...
-
Page 26: Periodic Counting
1Count24V 2.6 Count Modes 2.6.4 Periodic Counting Definition In this mode, the 1Count24V counts periodically, depending on the assigned main count direction ("Main count direction" parameter). ● When there is no main count direction: – Counts starting from the load value. –... - Page 27 1Count24V 2.6 Count Modes Figure 2-6 Periodic Counting with Up as the Main Count Direction Function of the Digital Input For the "Function DI" parameter, select one of the following functions for the digital input: ● Input ● HW gate (see section "Gate Functions in Count Modes (Page 30)") ●...
- Page 28 1Count24V 2.6 Count Modes Values that Can Be Changed During Operation ● Load value (LOAD_PREPARE) ● Counter status (LOAD_VAL) ● Comparison value 1 (CMP_VAL1) ● Comparison value 2 (CMP_VAL2) ● Function and behavior of the digital outputs (C_DOPARAM) (see sections "Behavior Types of the Outputs in Count Modes (Page 37)" and "Assignment of the Feedback and Control Interface for the Count Modes (Page 45)") Technological Functions Operating Instructions, 06/2010, A5E00124867-07...
-
Page 29: Behavior Of The Digital Input
1Count24V 2.6 Count Modes 2.6.5 Behavior of the Digital Input Digital input of the 1Count24V The DI digital input can be operated with different sensors (P switch and series mode or M switch). Note If you have selected the 24V M switch setting for the "Sensor A, B, DI" parameter, you must use M-switching sensors. -
Page 30: Gate Functions In Count Modes
1Count24V 2.6 Count Modes 2.6.6 Gate Functions in Count Modes Software Gate and Hardware Gate The 1Count24V has two gates ● A software gate (SW gate), which is controlled by the SW_GATE control bit. The software gate can only be opened by a positive edge of the SW_GATE control bit. It is closed when this bit is reset. - Page 31 T . (See Isochronous Mode (http://support.automation.siemens.com/WW/view/en/15218045) function manual) Gate Control by Means of the SW Gate and HW Gate If the SW gate opens when the HW gate is already open, counting continues starting from the current count status.
-
Page 32: Latch Function
1Count24V 2.6 Count Modes 2.6.7 Latch Function Introduction There are two latch functions: ● The Latch and Retrigger function ● The Latch function The Latch and Retrigger Function Requirement In order to use this function, you must first select it with the "Latch and Retrigger on Positive Edge"... - Page 33 1Count24V 2.6 Count Modes The latch value is preassigned with its RESET state. It is not changed when the SW gate is opened. Direct loading of the counter does not cause the indicated stored counter status to be changed. If you close the SW gate, counting is only interrupted; this means that when you open the SW gate again, counting is continued.
- Page 34 1Count24V 2.6 Count Modes Direct loading of the counter does not cause the indicated stored counter status to be changed. In isochronous mode, the counter status that was latched at the time of the last positive edge before T is displayed in the feedback interface. When you close the SW gate, the effect is either canceling or interrupting, depending on the parameter assignment.
-
Page 35: Synchronization
1Count24V 2.6 Count Modes 2.6.8 Synchronization Requirement In order to use this function, you must first select it with the "Synchronize on Positive Edge" Function DI parameter. Description Figure 2-11 Once-Only and Periodic Synchronization If you have configured synchronization, the rising edge of a reference signal on the input sets the 1Count24V to the load value. - Page 36 1Count24V 2.6 Count Modes The following conditions apply: ● The counting mode must have been started with the SW gate. ● The "Enable synchronization CTRL_SYN" control bit must be set. ● Synchronize once only: If the enable bit is set, the first edge loads the 1Count24V with the load value.
-
Page 37: Behavior Types Of The Outputs In Count Modes
1Count24V 2.6 Count Modes 2.6.9 Behavior Types of the Outputs in Count Modes Introduction The 1Count24V allows you to store two comparison values, which are assigned to the digital outputs. The outputs can be activated, depending on the counter status and the comparison values. - Page 38 1Count24V 2.6 Count Modes Counter status ≤ Comparison Value and Counter Status ≥ Comparison Value If the comparison conditions are fulfilled, the respective comparator switches on the output. The status of the output is indicated by STS_DO1 and STS_DO2. The control bits CTRL_DO1 or CTRL_DO2 must be set for this. The comparison result is indicated by the status bits STS_CMP1 or STS_CMP2.
- Page 39 1Count24V 2.6 Count Modes Switch at Comparison Values The comparator switches the output when the following conditions are met: ● The two comparison values must be loaded using the load functions CMP_VAL1 and CMP_VAL2, and ● After the comparison values are loaded, the DO1 output must be enabled with CRTL_DO1.
- Page 40 1Count24V 2.6 Count Modes Isochronous mode: In isochronous mode, as well, the DO1 output is switched as soon as the comparison condition is fulfilled and is therefore independent of the bus cycle. The status of the virtual output DO2 is signaled at time T Figure 2-12 V2 <...
- Page 41 1Count24V 2.6 Count Modes Method of Operation with Counter Status ≤ Comparison Value and Counter Status ≥ Comparison Value The diagram below provides an example of how hysteresis works. The figure shows the differences in the behavior of an output when hysteresis of 0 (= switched off) is assigned as opposed to hysteresis of 3.
- Page 42 1Count24V 2.6 Count Modes Method of Operation when the Comparison Value Is Reached and the Pulse Duration = 0 The diagram below provides an example of how hysteresis works. The figure shows the various responses of an output with a hysteresis of 0 (= switched off) as opposed to hysteresis of 3.
- Page 43 1Count24V 2.6 Count Modes Method of Operation when the Comparison Value Is Reached, Output Pulse Duration The diagram below provides an example of how hysteresis works. The figure shows the various responses of an output with a hysteresis of 0 (= switched off) as opposed to hysteresis of 3.
- Page 44 1Count24V 2.6 Count Modes Controlling the Outputs Simultaneously with the Comparators If you have selected a comparison function for the outputs, you can continue to control the outputs with SET_DO1 or SET_DO2. This allows you to simulate the effect of the comparison functions on your control program: ●...
-
Page 45: Assignment Of The Feedback And Control Interface For The Count Modes
1Count24V 2.6 Count Modes 2.6.10 Assignment of the Feedback and Control Interface for the Count Modes Note For the 1Count24V, the following data of the control and feedback interface are consistent: Bytes 0 to 3 Bytes 4 to 7 Bytes 8 to 11 (modified user data interface) Use the access or addressing mode for data consistency over the entire control and feedback interface on your master (only for configuration using the GSD file). - Page 46 1Count24V 2.6 Count Modes Table 2- 4 Control Interface (Outputs) Address Assignment Bytes 0 to 3 Load value direct, preparatory, comparison value 1 or 2 Byte 0 Behavior of DO1, DO2 of the 1Count24V Bit 2 Bit 1 Bit 0 Function DO1 Output Switch on at counter status ≥...
- Page 47 1Count24V 2.6 Count Modes Notes on the Control Bits Table 2- 5 Notes on the Control Bits Control bits Notes C_DOPARAM Change function and behavior of DO1, DO2 The values from bytes 0 to 2 are applied as new function, hysteresis, and pulse duration of DO1, DO2.
- Page 48 1Count24V 2.6 Count Modes Notes on the Feedback Bits Table 2- 6 Notes on the Feedback Bits Feedback bits Notes ERR_24V Short circuit of the encoder supply The error bit must be acknowledged by the EXTF_ACK control bit Diagnostic message if assigned. ERR_DO1 Short circuit/wire break/overtemperature due to overload at output DO1 The error bit must be acknowledged by the EXTF_ACK control bit...
- Page 49 1Count24V 2.6 Count Modes Access to the Control and Feedback Interface in STEP 7 Programming Table 2- 7 Access to the Control and Feedback Interface in STEP 7 Programming Configuring with STEP 7 Configuring with STEP 7 using the GSD file using HW Config (Hardware catalog\PROFIBUS-DP\Additional (Hardware catalog\PROFIBUS-...
- Page 50 1Count24V 2.6 Count Modes Acceptance of Values with the Load Function Figure 2-18 Acceptance of Values with the Load Function Note Only one of the following control bits can be set at a particular time: CMP_VAL1 or CMP_VAL2 or LOAD_VAL or LOAD_PREPARE or C_DOPARAM. Otherwise, the ERR_LOAD error is reported until all the specified control bits are deleted again.
- Page 51 1Count24V 2.6 Count Modes Acknowledgment Principle in Isochronous Mode In isochronous mode, exactly 4 bus cycles are always required to reset the status bits and to accept values during the load function. Figure 2-19 Acknowledgment Principle in Isochronous Mode Error Detection The program errors must be acknowledged.
-
Page 52: Parameter Assignment For The Count Modes
Parameter Assignment for the Count Modes Introduction You can use either of the following to assign parameters for the 1Count24V: ● STEP 7 V5.3 SP2 or later ● A GSD file (http://www.automation.siemens.com/csi/gsd) Parameter List for Counting Modes Table 2- 8 Parameter List for Counting Modes... - Page 53 1Count24V 2.6 Count Modes Parameters Value range Default Mode Counting mode Continuous counting/ Count continuously Once-only counting/ Periodic counting Gate function Cancel counting/ Cancel counting Interrupt counting Input signal HW gate Normal/Inverted Normal Function DI Input / Input HW gate / Latch and retrigger at positive edge / Synchronization at positive edge / Latch at positive edge...
-
Page 54: Measurement Modes
1Count24V 2.7 Measurement Modes Measurement Modes 2.7.1 Overview Introduction For the "Measuring Mode" parameter, you can select from the following modes: ● Frequency measurement ● Period measurement ● Rotational speed measurement For the "Measuring Method" parameter, you can select from the measurement methods: ●... -
Page 55: Sequence Of Continuous-Action Measurement
1Count24V 2.7 Measurement Modes 2.7.2 Sequence of continuous-action measurement Measuring Principle The 1Count24V counts each positive edge of a pulse and assigns it a time value in µs. The update time indicates the time interval at which the measured value is updated by the module in the feedback interface. - Page 56 1Count24V 2.7 Measurement Modes If the "1 Pulse per dynamic measuring time" estimated measured value is less than the last measured value during the frequency and speed measurement, this estimated measured value is output as the new measured value. With the period measurement, the dynamic measuring time is output as the estimated period if the dynamic measuring time is greater than the last measured period.
- Page 57 1Count24V 2.7 Measurement Modes The following figure illustrates the principle of continuous measurement using frequency measurement as an example. Figure 2-22 Principle of Continuous Measurement (Frequency Measurement Example) Gate Control To control the 1Count24V, you have to use the gate functions. Isochronous Mode In isochronous mode, the 1Count24V accepts control bits and control values from the control interface in each bus cycle and reports back the response in the same cycle.
- Page 58 1Count24V 2.7 Measurement Modes Integration Time and Update Time in Isochronous Mode If the integration time/update time lasts several T cycles, you can recognize the new measured value in the user program at the bit STS_CMP1 status bit (measurement completed) of the feedback interface. This enables monitoring of the measuring operation or a synchronization with the measuring operation.
-
Page 59: Frequency Measurement With Integration Time
1Count24V 2.7 Measurement Modes 2.7.3 Frequency measurement with integration time Definition In frequency measurement mode, the 1Count24V counts the pulses that arrive within a set integration time. Integration time Your preset the integration time with the integration time parameter (see table). Table 2- 9 Calculation of the Integration Time Boundary Conditions... - Page 60 1Count24V 2.7 Measurement Modes Limit-Value Monitoring The following value ranges are permitted for limit-value monitoring: Low limit f High limit f 0 to 99,999,999 × 10 +1 to 100,000,000 × 10 Possible Measuring Ranges with Error Indication Integration time ± absolute error ±...
-
Page 61: Continuous Frequency Measurement
1Count24V 2.7 Measurement Modes 2.7.4 Continuous Frequency Measurement Definition In frequency measurement mode, the 1Count24V counts the pulses that arrive within a dynamic measuring period. Update Time The 1Count24V updates the measured values cyclically. You preset the update time with the Update Time parameter (see table). - Page 62 1Count24V 2.7 Measurement Modes Limit-Value Monitoring The following value ranges are permitted for limit-value monitoring: Encoder type Low limit f High limit f 24-V encoders 0 to 99,999,999 × 10 +1 to 100,000,000 × 10 Possible Measuring Ranges with Error Indication Frequency f Absolute error 0.1 Hz...
-
Page 63: Rotational Speed Measurement With Integration Time
1Count24V 2.7 Measurement Modes 2.7.5 Rotational speed measurement with integration time Definition In rotational speed measurement mode, the 1Count24V counts the pulses that arrive from a tachometer generator within a set integration time and calculates the speed of the connected motor. - Page 64 1Count24V 2.7 Measurement Modes Limit-Value Monitoring The following value ranges are permitted for limit-value monitoring: Low limit n High limit n 0 to 24 999 999 x10 /min +1 to 25 000 000 x10 /min Possible Measuring Ranges with Error Indication Table 2- 12 Possible Measuring Ranges with Error Indication (Number of Pulses per Encoder Revolution = 60)
-
Page 65: Continuous Rotational Speed Measurement
1Count24V 2.7 Measurement Modes 2.7.6 Continuous Rotational Speed Measurement Definition In rotational speed measurement mode, the 1Count24V counts the pulses that are received from a tachometer generator within a dynamic measuring time, and calculates the speed from this value with the number of pulses per encoder revolution. Update time The 1Count24V updates the measured values cyclically. - Page 66 1Count24V 2.7 Measurement Modes Limit-Value Monitoring The following value ranges are permitted for limit-value monitoring: Low limit n High limit n 0 to 24 999 999 x10 /min +1 to 25 000 000 x10 /min Possible Measuring Ranges with Error Indication Table 2- 14 Possible Measuring Ranges with Error Indication (Number of Pulses per Encoder Revolution = 60)
-
Page 67: Period Measurement With Integration Time
1Count24V 2.7 Measurement Modes 2.7.7 Period measurement with integration time Definition In period measurement mode, the 1Count24V measures the time between two positive edges of the counting signal by counting the pulses of an internal quartz-accurate reference frequency (16 MHz) within a preset integration time. Integration Time You preset the integration time with the Integration Time parameter (see table). - Page 68 1Count24V 2.7 Measurement Modes Limit-Value Monitoring The following value ranges are permitted for limit-value monitoring: 1 µs resolution Low limit T High limit T 0 to 119 999 999 µs +1 to 120 000 000 µs 1/16 µs resolution Low limit T High limit T 0 to 1 919 999 999 µs +1 to 1 920 000 000 µs...
-
Page 69: Continuous Period Measurement
1Count24V 2.7 Measurement Modes 2.7.8 Continuous Period Measurement Definition In period measurement mode, the 1Count24V indicates the dynamic measuring time as a period. If the period is less than the update time, then an average is calculated for the period. Update Time The 1Count24V updates the measured values cyclically. - Page 70 1Count24V 2.7 Measurement Modes Limit-Value Monitoring The following value ranges are permitted for limit-value monitoring: 1 µs resolution Low limit T High limit T 0 to 119 999 999 µs +1 to 120 000 000 µs 1/16 µs resolution Low limit T High limit T 0 to 1 919 999 999 µs +1 to 1 920 000 000 µs...
- Page 71 1Count24V 2.7 Measurement Modes Function of the Digital Input For the "Function DI" parameter, select one of the following functions for the digital input: ● Input ● HW gate (see section "Gate Functions in Measurement Modes (Page 72)") Function of the Digital Output DO1 For the "Function DO1"...
-
Page 72: Gate Functions In Measurement Modes
1Count24V 2.7 Measurement Modes 2.7.9 Gate Functions in Measurement Modes Software Gate and Hardware Gate The 1Count24V has two gates ● A software gate (SW gate), which is controlled by the SW_GATE control bit. The software gate can only be opened by a positive edge of the SW_GATE control bit. It is closed when this bit is reset. -
Page 73: Behavior Of The Output In Measurement Modes
1Count24V 2.7 Measurement Modes 2.7.10 Behavior of the Output in Measurement Modes Introduction The various ways of setting the behavior of the output are described in this section. Behavior of the Output in Measuring Modes You can assign parameters for the digital output of the 1Count24V. You can store a high and a low limit for frequency measurement, rotational speed measurement or period measurement. - Page 74 1Count24V 2.7 Measurement Modes Limit-Value Monitoring Figure 2-29 Limit-Value Monitoring After the integration time elapses, the measured value obtained (frequency, rotational speed, or period) is compared with the assigned limit values. If the current measured value is under the assigned low limit (measured value <low limit), the STS_UFLW = 1 bit is set in the feedback interface.
-
Page 75: Assignment Of The Feedback And Control Interfaces For The Measurement Modes
1Count24V 2.7 Measurement Modes 2.7.11 Assignment of the Feedback and Control Interfaces for the Measurement Modes Note For the 1Count24V, the following data of the control and feedback interface are consistent: Bytes 0 to 3 Bytes 4 to 7 Bytes 8 to 11 (modified user data interface) Use the access or addressing mode for data consistency over the entire control and feedback interface on your master (only for configuration using the GSD file). - Page 76 1Count24V 2.7 Measurement Modes Table 2- 18 Control Interface (Outputs) Address Assignment Bytes 0 to 3 Low limit or high limit Function of DO1 Byte 0: Bit 1 Bit 0 Function DO1 Output Measured value outside the limits Measured value under the low limit Measured value over the high limit Bytes 1 to 3: Reserve = 0...
- Page 77 1Count24V 2.7 Measurement Modes Notes on the Control Bits Table 2- 19 Notes on the Control Bits Control bits Notes C_DOPARAM Change function of DO1 The value from byte 0 is adopted as the new function of DO1. C_INTTIME Change integration time The value from bytes 0 and 1 is adopted as the new integration time for the next measurement.
- Page 78 1Count24V 2.7 Measurement Modes Notes on the Feedback Bits Table 2- 20 Notes on the Feedback Bits Feedback bits Notes ERR_24V Short circuit of the encoder supply The error bit must be acknowledged by the EXTF_ACK control bit. Diagnostic message if assigned. ERR_DO1 Short circuit/wire break/overtemperature at output DO1 The error bit must be acknowledged by the EXTF_ACK control bit.
- Page 79 1Count24V 2.7 Measurement Modes Access to the Control and Feedback Interface in STEP 7 Programming Table 2- 21 Access to the Control and Feedback Interface in STEP 7 Programming Configuring with STEP 7 Configuring with STEP 7 using the GSD file using HW Config (Hardware catalog\PROFIBUS-DP\Additional (Hardware catalog\PROFIBUS-...
- Page 80 1Count24V 2.7 Measurement Modes Acceptance of Values with the Load Function Figure 2-31 Acceptance of Values with the Load Function Note Only one of the following control bits can be set at a particular time: LOAD_VAL or LOAD_PREPARE or C_DOPARAM or C_INTTIME. Otherwise, the ERR_LOAD error is reported until all the specified control bits are deleted again.
- Page 81 1Count24V 2.7 Measurement Modes Acknowledgment Principle in Isochronous Mode In isochronous mode, exactly 4 bus cycles are always required to reset the status bits and to accept values during the load function. Figure 2-32 Acknowledgment Principle in Isochronous Mode Error Detection The diagnostic errors must be acknowledged.
-
Page 82: Parameter Assignment For Measurement Modes
Parameter Assignment for Measurement Modes Introduction You can use either of the following to assign parameters for the 1Count24V: ● STEP 7 V5.3 SP2 or later ● A GSD file (http://www.automation.siemens.com/csi/gsd) Parameter List for Measuring Modes Table 2- 22 Parameter List for Measuring Modes... - Page 83 1Count24V 2.7 Measurement Modes Parameter Value Range Default Mode Measuring mode Frequency measurement/ Frequency measurement Rotational speed measurement/ Period measurement Measuring method With integration time/continuous With integration time Resolution of period 1 µs 1 µs 1/16 µs Function DI Input/HW gate Input Input signal HW gate Normal/Inverted...
-
Page 84: Fast Mode
1Count24V 2.8 Fast mode Fast mode 2.8.1 Overview Introduction This mode is suitable for position detection is especially short isochronous cycles. This mode encompasses a subset of the functionality of the continuous counting mode. It is intended for isochronous mode and differs from continuous counting by having a lower TDP Module and a TWA equal to zero. -
Page 85: Fast Mode
1Count24V 2.8 Fast mode 2.8.2 Fast mode Definition In this mode, the 1Count24V counts continuously starting from the start value: When counting up, if the 1Count24V reaches the maximum value that can be represented with 25 bits (all bits of the counter are set) and another count pulse arrives, the count value jumps to "0"... -
Page 86: Synchronization
1Count24V 2.8 Fast mode 2.8.4 Synchronization Introduction In order to use this function, you must first select it with the "Synchronize on Positive Edge" Function DI parameter. If you have assigned synchronization, the positive edge of a reference signal on the input sets the 1Count24V to the start value. -
Page 87: Assignment Of Feedback Interface For Fast Mode
1Count24V 2.8 Fast mode 2.8.5 Assignment of feedback interface for fast mode Note For the 1Count24V, the following data of the feedback interface are consistent: Bytes 0 to 3 Use the access or addressing mode for data consistency over the entire control and feedback interface on your master (only for configuration using the GSD file). - Page 88 1Count24V 2.8 Fast mode Access to the Feedback Interface in STEP 7 Programming Configuring with STEP 7 using HW Config Feedback interface Load command, e.g. L PID Error Detection in Fast Mode The encoder supply short circuit error is detected by the 1Count24V and indicated in the feedback interface (EXTF).
-
Page 89: Assigning Parameters For Fast Mode
1Count24V 2.8 Fast mode 2.8.6 Assigning parameters for fast mode Introduction You use the following to assign parameters for the 1Count24V: ● STEP 7 Version 5.4 or higher; if necessary, the HSP (hardware support package) must be downloaded from the Internet Parameter List for Fast Mode Parameter Value Range... -
Page 90: Position Feedback
1Count24V 2.9 Position feedback Position feedback 2.9.1 Overview Description This mode encompasses a subset of the functionality of the continuous counting mode. It is intended for isochronous mode and differs from continuous counting by a smaller T Module and a T equal to zero. - Page 91 1Count24V 2.9 Position feedback Isochronous mode In isochronous mode, the 1Count24V accepts control bits and control values from the control interface in each bus cycle and reports back the response in this mode in the same cycle or in the next cycle. In each cycle, the 1Count24V transfers the count or latch value that was valid at time T the status bits valid at time T A count controlled by hardware input signals can only be transferred in the same cycle if the...
-
Page 92: Position Detection
1Count24V 2.9 Position feedback 2.9.2 Position Detection Definition In this mode, the 1Count24V counts continuously starting from the load value: ● If the 1Count24V reaches the high count limit when counting up, and another count pulse then comes, it will jump to the low count limit and continue counting from there without losing a pulse. -
Page 93: Gate Functions For Position Detection
1Count24V 2.9 Position feedback 2.9.3 Gate Functions for Position Detection Software Gate and Hardware Gate The 1Count24V has two gates ● A software gate (SW gate), which is controlled by the SW_GATE control bit. The software gate can only be opened by a positive edge of the SW_GATE control bit. It is closed when this bit is reset. - Page 94 1Count24V 2.9 Position feedback Canceling- and Interrupting-Type Gate Function When assigning the gate function, you can specify whether the internal gate is to cancel or interrupt counting. When counting is canceled, after the gate is closed and restarted, counting starts again from the beginning. When counting is interrupted, after the gate is closed and restarted, counting continues from the previous value.
- Page 95 1Count24V 2.9 Position feedback Gate Control Gate control by means of the SW gate only When the gate is opened, one of the following occurs, depending on the parameter assignment: ● Counting continues from the current counter status ● Counting starts from the load value If the SW gate is opened in isochronous mode in bus cycle "n"...
-
Page 96: Latch Function
1Count24V 2.9 Position feedback 2.9.4 Latch Function Overview There are two latch functions: ● The Latch and Retrigger function ● The Latch function The Latch and Retrigger Function In order to use this function, you must first select it with the "Latch and Retrigger on Positive Edge"... - Page 97 1Count24V 2.9 Position feedback If you close the SW gate, it only interrupts counting; this means that when you open the SW gate again, counting is continued. The digital input DI remains active even when the SW gate is closed. Counting is also latched and triggered in isochronous mode with each edge on the digital input.
- Page 98 1Count24V 2.9 Position feedback Modified User Data Interface If the 1Count24V is inserted behind an IM 151 that supports the reading and writing of broader user data interfaces, the current count value can be read from bytes 8 to 11 of the feedback interface.
-
Page 99: Synchronization
1Count24V 2.9 Position feedback 2.9.5 Synchronization Synchronization In order to use this function, you must first select it with the "Synchronize on Positive Edge" Function DI parameter. Figure 2-39 Once-Only and Periodic Synchronization If you have configured synchronization, the positive edge of a reference signal on the input sets the 1Count24V to the load value. - Page 100 1Count24V 2.9 Position feedback The following conditions apply: ● The counting mode must have been started with the SW gate. ● The "Enable synchronization CTRL_SYN" control bit must be set. ● Synchronize once only: If the enable bit is set, the first edge loads the 1Count24V with the load value.
-
Page 101: Assignment Of The Feedback And Control Interface For Position Feedback
1Count24V 2.9 Position feedback 2.9.6 Assignment of the Feedback and Control Interface for Position Feedback Note For the 1Count24V, the following data of the control and feedback interface are consistent: Bytes 0 to 3 Bytes 4 to 7 Bytes 8 to 11 (modified user data interface) Use the access or addressing mode for data consistency over the entire control and feedback interface on your master (only for configuration using the GSD file). - Page 102 1Count24V 2.9 Position feedback Table 2- 25 Control Interface (Outputs) Address Assignment Bytes 0 to 3 Load value direct, preparatory, comparison value 1 or 2 Byte 0 Behavior of DO1, DO2 of the 1Count24V Bit 2 Bit 1 Bit 0 Function DO1 Output Switch on at count ≥...
- Page 103 1Count24V 2.9 Position feedback Notes on the Control Bits Table 2- 26 Notes on the Control Bits Control bits Notes CTRL_SYN You use this bit to enable synchronization. EXTF_ACK Error acknowledgment The error bits must be acknowledged with the EXTF_ACK control bit after the cause is removed. LOAD_PREPARE Load counter preparatory The value from bytes 0 to 3 is applied as the load value.
- Page 104 1Count24V 2.9 Position feedback Access to the Control and Feedback Interface in STEP 7 Programming Table 2- 28 Access to the Control and Feedback Interface in STEP 7 Programming Configuring with STEP 7 Configuring with STEP 7 using the GSD file using HW Config (Hardware catalog\PROFIBUS-DP\Additional (Hardware catalog\PROFIBUS-...
- Page 105 1Count24V 2.9 Position feedback Acceptance of Values with the Load Function Figure 2-41 Acceptance of Values with the Load Function Note Only one of the following control bits can be set at a particular time: LOAD_VAL or LOAD_PREPARE. Otherwise, the ERR_LOAD error is reported until all the specified control bits are deleted again.
- Page 106 1Count24V 2.9 Position feedback Acknowledgment Principle in Isochronous Mode In isochronous mode, exactly 4 or 6 bus cycles are always required to reset the status bits and to accept values during the load function. Figure 2-42 Acknowledgment Principle in Isochronous Mode Error Detection The program errors must be acknowledged.
-
Page 107: Assigning Parameters For Position Feedback
Assigning Parameters for Position Feedback Introduction You can use either of the following to assign parameters for the 1Count24V: ● STEP 7 V5.3 SP2 or later ● A GSD file (http://www.automation.siemens.com/csi/gsd) Parameter List for Position Feedback Table 2- 29 Parameter List for Position Feedback... -
Page 108: Evaluation Of Count And Direction Signal
1Count24V 2.10 Evaluation of count and direction signal 2.10 Evaluation of count and direction signal Signal Evaluation A, B Signal evaluation by means of A, B allows you to count directionally. Different evaluation modes are possible depending on the parameter assignment: ●... - Page 109 1Count24V 2.10 Evaluation of count and direction signal Pulse and Direction The level at direction input B is used as the direction setting. An unwired input corresponds to the "Up" count direction if you have selected "Pulse/direction" for the "Signal evaluation" parameter. Figure 2-45 Signals of a 24-V Pulse Generator with Direction Indicator Rotary Encoder...
- Page 110 1Count24V 2.10 Evaluation of count and direction signal Double Evaluation Double evaluation means that the positive and negative edge of the A signal are evaluated. Whether up or down count pulses are generated depends on the level of the B signal. The diagram below illustrates the double evaluation of the signals.
-
Page 111: Diagnostics
1Count24V 2.11 Diagnostics 2.11 Diagnostics 2.11.1 Diagnostics using the LED display LED display on the 1Count24V ① Group error (red) ② Status display for counting direction (green) ③ Status display for digital input/digital output (green) Status and error displays by means of LEDs on the 1Count24V The table below shows the status and error displays on the 1Count24V. -
Page 112: Error Types
1Count24V 2.11 Diagnostics 2.11.2 Error types For information on the structure of the channel-related diagnostics, refer to the manual on the interface module used in your ET 200S station. 1Count24V error types The following table shows the error types on the 1Count24V. Error type Meaning Remedy... -
Page 113: Behavior At Cpu-Master-Stop
1Count24V 2.12 Behavior at CPU-Master-STOP 2.12 Behavior at CPU-Master-STOP Setting the response to CPU/master STOP You can configure the reaction of the 1Count24V to failure of the higher-level controller. Parameter Status of the 1Count24V at CPU/master What Happens if STOP New Parameters Have Been Assigned? Turn off DO1 The current mode is canceled, the gate... - Page 114 1Count24V 2.12 Behavior at CPU-Master-STOP Automatic New Parameter Assignment A new parameter assignment of the ET 200S station is made by your CPU/ DP master: ● Upon power on of the CPU/DP master ● Upon power on of the IM 151/IM 151 FO ●...
-
Page 115: Technical Specifications
1Count24V 2.13 Technical Specifications 2.13 Technical Specifications Technical specifications General technical specifications Dimensions and Weight Dimensions W x H x D (mm) 15x81x52 Weight Approx. 40 g Data for Specific Modules Number of Channels Counter range 32 bits Voltages, Currents, Potentials Rated load voltage L+ 24 VDC Reverse polarity protection... - Page 116 1Count24V 2.13 Technical Specifications General technical specifications Data for the Digital Output Output voltage Rated value 24 VDC 0 signal ≤ 3V 1 signal ≥ L+ (-1V) Output current 0 signal (residual current) ≤ 0.5 mA 1 signal ...
- Page 117 1Count24V 2.13 Technical Specifications General technical specifications Isochronous Times of the Module in counting modes 380 µs 320 µs 55 µs 900 µs in measuring modes 465 µs 280 µs 50 µs 995 µs in position feedback 370 µs 0 µs 0 µs 815 µs Technological Functions...
- Page 118 1Count24V 2.13 Technical Specifications Technological Functions Operating Instructions, 06/2010, A5E00124867-07...
-
Page 119: 1Count5V
1Count5V Product Overview Order Number: 6ES7 138-4DE02-0AB0 Compatibility The 1Count5V with the order number 6ES7 138-4DE02-0AB0 replaces the 1Count5V/500kHz with the order number 6ES7 138-4DE01-0AB0 with full compatibility. In STEP 7 version V5.3 SP2 and later, you can use it in non-isochronous and isochronous modes. - Page 120 1Count5V 3.1 Product Overview ● Operating modes of the 1Count5V: Counting modes: – Count continuously – Count once – Count periodically Measuring modes: – Frequency measurement – Rotational speed measurement – Period measurement Position feedback: – Position detection – Fast mode ●...
- Page 121 Restart the firmware update and wait until it has completed successfully. Identification Data ● Hardware release status ● Firmware release status ● Serial number See also ET 200S Distributed I/O operating instructions (http://support.automation.siemens.com/WW/view/en/1144348), "Identification data" section. Technological Functions Operating Instructions, 06/2010, A5E00124867-07...
-
Page 122: Clocked Mode
3.2 Isochronous mode Isochronous mode Note For basic information on isochronous mode, refer to the Isochronous mode (http://support.automation.siemens.com/WW/view/en/15218045) function manual. Hardware Requirements You will require the following for the 1Count5V in isochronous mode: ● A CPU that supports isochronous mode ●... -
Page 123: Brief Instructions On Commissioning The 1Count5V
1. Install and wire the TM-E30S44-01 terminal module (see Figure). 2. Plug the 1Count5V into the terminal module. Detailed instructions are provided in the ET 200S Distributed I/O Device (http://support.automation.siemens.com/WW/view/en/1144348) operating instructions. Figure 3-1 Terminal Assignment for the Example Technological Functions... - Page 124 1Count5V 3.3 Brief instructions on commissioning the 1Count5V Configuring with STEP 7 using HW Config You must first adapt the hardware configuration of your existing ET 200S station. 1. Open the relevant project in SIMATIC Manager. 2. Open the HW Config configuration table in your project. 3.
- Page 125 1Count5V 3.3 Brief instructions on commissioning the 1Count5V Description Network 3: Read from the feedback interface //Read 8 bytes from the 1Count5V PED 256 //Configured start address of the inputs DB1.DBD8 PED 260 DB1.DBD12 Testing Use "Monitor/Modify Variables" to monitor the count value and the gate. 1.
-
Page 126: Terminal Assignment Diagram
The cables (terminals 1 and 8 and terminals 15 and 16) must be shielded. The shield must be supported at both ends. To do this, use the shield contact (see the ET 200S Distributed I/O System (http://support.automation.siemens.com/WW/view/en/1144348) operating instructions). Table 3- 1... -
Page 127: Operating Modes And Application Areas Of The 1Count5V
1Count5V 3.5 Operating modes and application areas of the 1Count5V Operating modes and application areas of the 1Count5V Introduction To begin with, decide how you want to use the 1Count5V. You can choose from the following operating modes: Counting modes Measuring modes Position feedback Fast mode... - Page 128 1Count5V 3.5 Operating modes and application areas of the 1Count5V Integrate the 1Count5V with the GSD file Integrate 1Count5V with the GSD file (only in non-isochronous mode) Select an entry in the GSD file that corresponds to the operating mode you want. Select the entry C 6ES7 138-4DE02- Select the entry M 6ES7 138-4DE02- Select the entry W 6ES7 138-4DE02-...
-
Page 129: Count Modes
1Count5V 3.6 Count Modes Count Modes 3.6.1 Overview Introduction The counting modes are used in counting applications (for counting of items, for example). For the "Counting Mode" parameter, you can select from the following modes: ● Count continuously (for position detection with incremental encoders, for example) ●... - Page 130 T A count controlled by hardware input signals can only be transferred in the same cycle if the input signal occurred before time T (See Isochronous Mode (http://support.automation.siemens.com/WW/view/en/15218045) function manual) Technological Functions Operating Instructions, 06/2010, A5E00124867-07...
-
Page 131: Endless Counting
1Count5V 3.6 Count Modes 3.6.2 Endless Counting Definition In this mode, the 1Count5V counts continuously starting from the load value: ● If the 1Count5V reaches the high count limit when counting up, and another count pulse then comes, it will jump to the low count limit and continue counting from there without losing a pulse. - Page 132 1Count5V 3.6 Count Modes Influencing the Behavior of the Digital Outputs via ● Hysteresis ● Pulse duration (see section "Behavior of the Outputs in Count Modes (Page 147)") Values that Can Be Changed During Operation ● Load value (LOAD_PREPARE) ● Counter status (LOAD_VAL) ●...
-
Page 133: Once-Only Counting
1Count5V 3.6 Count Modes 3.6.3 Once-Only Counting Definition In this mode, the 1Count5V counts once only, depending on the assigned main count direction ("Main count direction" parameter). ● When there is no main count direction: – Counts starting from the load value. –... - Page 134 1Count5V 3.6 Count Modes The internal gate is automatically closed in the event of an overflow/underflow at the count limits. To restart counting, you have to open the gate again. Figure 3-3 Count Once Without Main Count Direction; Canceling Gate Function With an interrupting gate function, the counter status remains at the underflow when the gate is started.
- Page 135 1Count5V 3.6 Count Modes Function of the Digital Input For the "Function DI" parameter, select one of the following functions for the digital input: ● Input ● HW gate (see section "Gate Functions in Count Modes (Page 139)") ● Latch function (see section "Latch Function (Page 141)") ●...
-
Page 136: Periodic Counting
1Count5V 3.6 Count Modes 3.6.4 Periodic Counting Definition In this mode, the 1Count5V counts periodically, depending on the assigned main count direction ("Main count direction" parameter). ● When there is no main count direction: – Counts starting from the load value. –... - Page 137 1Count5V 3.6 Count Modes Figure 3-6 Periodic Counting with Up as the Main Count Direction Function of the Digital Input For the "Function DI" parameter, select one of the following functions for the digital input: ● Input ● HW gate (see section "Gate Functions in Count Modes (Page 139)") ●...
-
Page 138: Behavior Of The Digital Inputs
1Count5V 3.6 Count Modes Values that Can Be Changed During Operation ● Load value (LOAD_PREPARE) ● Counter status (LOAD_VAL) ● Comparison value 1 (CMP_VAL1) ● Comparison value 2 (CMP_VAL2) ● Function and behavior of the digital outputs (C_DOPARAM) (see sections "Behavior of the Outputs in Count Modes (Page 147)" and "Assignment of the Feedback and Control Interface for the Count Modes (Page 155)") 3.6.5 Behavior of the Digital Inputs... -
Page 139: Gate Functions In Count Modes
1Count5V 3.6 Count Modes 3.6.6 Gate Functions in Count Modes Software Gate and Hardware Gate The 1Count5V has two gates: ● A software gate (SW gate), which is controlled by the SW_GATE control bit. The software gate can only be opened by a positive edge of the SW_GATE control bit. It is closed when this bit is reset. - Page 140 T . (See Isochronous Mode (http://support.automation.siemens.com/WW/view/en/15218045) function manual) Gate control by means of the SW gate and HW gate If the SW gate opens when the HW gate is already open, counting continues starting from the current counter status.
-
Page 141: Latch Function
1Count5V 3.6 Count Modes 3.6.7 Latch Function Introduction There are two latch functions: ● The Latch and Retrigger function ● The Latch function The Latch and Retrigger Function In order to use this function, you must first select it with the "Latch and Retrigger on Positive Edge"... - Page 142 1Count5V 3.6 Count Modes Counting is also latched and triggered in isochronous mode with each edge on the digital input. The counter status that was valid at the time of the last edge before T is displayed in the feedback interface. The Latch Function In order to use this function, the Function DI parameter must be set to "Latch on Positive Edge".
-
Page 143: Synchronization
1Count5V 3.6 Count Modes 3.6.8 Synchronization Introduction You can synchronize the 1Count5V by two methods: ● Synchronization with DI ● Synchronization with DI and zero mark Synchronization with DI In order to use this function, you must first select it with the "Synchronize on Positive Edge" Function DI parameter. - Page 144 1Count5V 3.6 Count Modes If you have configured synchronization, the positive edge of a reference signal on the input sets the 1Count5V to the load value. You can select between once-only and periodic synchronization ("Synchronization" parameter). The following conditions apply: ●...
- Page 145 1Count5V 3.6 Count Modes Synchronization with DI and Zero Mark In order to be able to use this function, you must have selected it from the digital input function parameters. Figure 3-12 Once-Only and Periodic Synchronization If you have configured synchronization with DI and zero mark, the DI serves as the HW enable.
- Page 146 1Count5V 3.6 Count Modes ● Synchronize once only: If the enable bit is set and the HW enable is present, the first zero mark loads the 1Count5V with the load value. ● Synchronization periodically: If the enable bit is set and the HW enable is present, the first and every further zero mark loads the 1Count5V with the load value.
-
Page 147: Behavior Of The Outputs In Count Modes
1Count5V 3.6 Count Modes 3.6.9 Behavior of the Outputs in Count Modes Introduction The 1Count5V allows you to store two comparison values, which are assigned to the digital outputs. The outputs can be activated, depending on the counter status and comparison values. - Page 148 1Count5V 3.6 Count Modes Counter Status ≤ Comparison Value and Counter Status ≥ Comparison Value If the comparison conditions are fulfilled, the respective comparator switches on the output. The status of the output is indicated by STS_DO1 and STS_DO2. The control bits CTRL_DO1 or CTRL_DO2 must be set for this. The comparison result is indicated by the status bits STS_CMP1 or STS_CMP2.
- Page 149 1Count5V 3.6 Count Modes Switch at comparison values The comparator switches the output when the following conditions are met: ● The two comparison values must be loaded using the load functions CMP_VAL1 and CMP_VAL2, and ● After the comparison values are loaded, the DO1 output must be enabled with CRTL_DO1.
- Page 150 1Count5V 3.6 Count Modes Isochronous mode: In isochronous mode, as well, the DO1 output is switched as soon as the comparison condition is fulfilled and is therefore independent of the bus cycle. Figure 3-13 V2 < V1 at the Start of Counting Figure 3-14 V2 >...
- Page 151 1Count5V 3.6 Count Modes Method of Operation with Counter Status ≤ Comparison Value and Counter Status ≥ Comparison Value The diagram below provides an example of how hysteresis works. The figure shows the various responses of an output with a hysteresis of 0 (= switched off) as opposed to hysteresis of 3.
- Page 152 1Count5V 3.6 Count Modes Method of Operation when the Comparison Value Is Reached and the Pulse Duration = 0 The diagram below provides an example of how hysteresis works. The figure shows the differences in the behavior of an output when hysteresis of 0 (= switched off) is assigned as opposed to hysteresis of 3.
- Page 153 1Count5V 3.6 Count Modes Method of Operation when the Comparison Value Is Reached, Output Pulse Duration The diagram below provides an example of how hysteresis works. The figure shows the various responses of an output with a hysteresis of 0 (= switched off) as opposed to hysteresis of 3.
- Page 154 1Count5V 3.6 Count Modes Controlling the Outputs Simultaneously with the Comparators If you have selected a comparison function for the outputs, you can continue to control the outputs with SET_DO1 or SET_DO2. This allows you to simulate the effect of the comparison functions on your control program: ●...
-
Page 155: Assignment Of The Feedback And Control Interface For The Count Modes
1Count5V 3.6 Count Modes 3.6.10 Assignment of the Feedback and Control Interface for the Count Modes Note For the 1Count5V, the following data of the control and feedback interface are consistent: Bytes 0 to 3 Bytes 4 to 7 Bytes 8 to 11 (modified user data interface) Use the access or addressing mode for data consistency over the entire control and feedback interface on your DP master (only for configuration using the GSD file). - Page 156 1Count5V 3.6 Count Modes Address Assignment Designation Byte 6 Bit 7: Zero-crossing in the count range when counting without a main count direction STS_ND Bit 6: Low count limit STS_UFLW Bit 5: High count limit STS_OFLW Bit 4: Comparator 2 status STS_CMP2 Bit 3: Comparator 1 status STS_CMP1...
- Page 157 1Count5V 3.6 Count Modes Address Assignment Byte 4 EXTF_ACK Bit 7: Error diagnostics acknowledgment CTRL_DO2 Bit 6: Enable DO2 SET_DO2 Bit 5: Control bit DO2 CTRL_DO1 Bit 4: Enable DO1 SET_DO1 Bit 3: Control bit DO1 RES_STS Bit 2: Start resetting of status bit CTRL_SYN Bit 1: Enable synchronization SW_GATE...
- Page 158 1Count5V 3.6 Count Modes Control bits Notes RES_STS Start resetting of status bit The status bits are reset by means of the acknowledgment process between the RES_STS bit and the RES_STS_A bit. SET_DO1 Control bit DO1 Switches the DO1 digital output on and off when CTRL_DO1 is set. SET_DO2 Control bit DO2 Switches the DO2 digital output on and off when CTRL_DO2 is set.
- Page 159 1Count5V 3.6 Count Modes Feedback bits Notes STS_DI DI status The status of the DI is indicated in all modes with the STS_DI bit in the feedback interface. STS_DO1 DO1 status The STS_DO1 status bit indicates the status of the DO1 digital output. STS_DO2 DO2 status The STS_DO2 status bit indicates the status of the DO2 digital output.
- Page 160 1Count5V 3.6 Count Modes Resetting of the Status Bits STS_SYN, STS_CMP1, STS_CMP2, STS_OFLW, STS_UFLW, STS_ND Figure 3-18 Resetting of the Status Bits Acceptance of Values with the Load Function Figure 3-19 Acceptance of Values with the Load Function Technological Functions Operating Instructions, 06/2010, A5E00124867-07...
- Page 161 1Count5V 3.6 Count Modes Note Only one of the following control bits can be set at a particular time: CMP_VAL1 or CMP_VAL2 or LOAD_VAL or LOAD_PREPARE or C_DOPARAM. Otherwise, the ERR_LOAD error is reported until all the specified control bits are deleted again.
- Page 162 1Count5V 3.6 Count Modes Error Detection The program errors must be acknowledged. They have been detected by the 1Count5V and are indicated at the feedback interface. Channel-specific diagnostics are performed if you have enabled group diagnostics in your configuration (see device manual of the interface module used). The parameter assignment error bit is acknowledged by means of correct parameter assignment.
-
Page 163: Parameter Assignment For The Count Modes
Parameter Assignment for the Count Modes Introduction You can use either of the following to assign parameters for the 1Count5V: ● STEP 7 V5.3 SP2 or later ● A GSD file (http://www.automation.siemens.com/csi/gsd) Parameter List for Counting Modes Table 3- 9 Parameter List for Counting Modes... - Page 164 1Count5V 3.6 Count Modes Parameter Value Range Default Mode Counting mode Continuous counting/ Count continuously Once-only counting/ Periodic counting Gate function Cancel counting/ Cancel counting Interrupt counting Input signal HW gate Normal/inverted Normal Function DI Input/ Input HW gate/ Latch and retrigger at positive edge/ Synchronization at positive edge/ Latch at positive edge/ HW enable for synchronization...
-
Page 165: Measurement Modes
1Count5V 3.7 Measurement Modes Measurement Modes 3.7.1 Overview Introduction For the "Measuring Mode" parameter, you can select from the following modes: ● Frequency Measurement ● Period Measurement ● Rotational Speed Measurement For the "Measuring Method" parameter, you can select from the measurement methods: ●... -
Page 166: Sequence Of Continuous-Action Measurement
1Count5V 3.7 Measurement Modes 3.7.2 Sequence of continuous-action measurement Measuring Principle The 1Count5V counts each positive edge of a pulse and assigns it a time value in µs. The update time indicates the time interval at which the measured value is updated by the module in the feedback interface. - Page 167 1Count5V 3.7 Measurement Modes If the "1 Pulse per dynamic measuring time" estimated measured value is less than the last measured value during the frequency and speed measurement, this estimated measured value is output as the new measured value. With the period measurement, the dynamic measuring time is output as the estimated period if the dynamic measuring time is greater than the last measured period.
- Page 168 1Count5V 3.7 Measurement Modes The following figure illustrates the principle of continuous measurement using frequency measurement as an example. Figure 3-23 Principle of Continuous Measurement (Frequency Measurement Example) Gate Control To control the 1Count5V, you have to use the gate functions. Isochronous Mode In isochronous mode, the 1Count5V accepts control bits and control values from the control interface in each bus cycle and reports back the response in the same cycle.
- Page 169 1Count5V 3.7 Measurement Modes Integration Time/Update Time in Isochronous Mode If the integration time/update time lasts several T cycles, you can recognize the new measured value in the user program at the bit STS_CMP1 status bit (measurement completed) of the feedback interface. This enables monitoring of the measuring operation or a synchronization with the measuring operation.
-
Page 170: Frequency Measurement With Integration Time
1Count5V 3.7 Measurement Modes 3.7.3 Frequency measurement with integration time Definition In frequency measurement mode, the 1Count5V counts the pulses that arrive within a set integration time. Integration time You preset the integration time with the integration time parameter (see table). Table 3- 10 Calculation of the Integration Time Boundary conditions... - Page 171 1Count5V 3.7 Measurement Modes Limit-Value Monitoring The following value ranges are permitted for limit-value monitoring: Low limit f High limit f 0 to 499,999,999 × 10 +1 to 500,000,000 × 10 Possible Measuring Ranges with Error Indication Integration time ± absolute error ±...
-
Page 172: Continuous Frequency Measurement
1Count5V 3.7 Measurement Modes 3.7.4 Continuous Frequency Measurement Definition In frequency measurement mode, the 1Count5V counts the pulses that arrive within a dynamic measuring period. Update Time The 1Count5V updates the measured values cyclically. You preset the update time with the Update Time parameter (see table). - Page 173 1Count5V 3.7 Measurement Modes Limit-Value Monitoring The following value ranges are permitted for limit-value monitoring: Encoder type Low limit f High limit f 5-V encoders 0 to 499,999,999 × 10 +1 to 500,000,000 × 10 Possible Measuring Ranges with Error Indication Frequency f Absolute error 0.1 Hz...
- Page 174 1Count5V 3.7 Measurement Modes Function of the Digital Output DO1 For the "Function DO1" parameter, select one of the following functions for the DO1 digital output: ● Output (no switching by the limit-value monitoring) ● Measured value outside the limits ●...
-
Page 175: Rotational Speed Measurement With Integration Time
1Count5V 3.7 Measurement Modes 3.7.5 Rotational speed measurement with integration time Definition In rotational speed measurement mode, the 1Count5V counts the pulses that arrive from a tachometer generator within a set integration time and calculates the speed of the connected motor. - Page 176 1Count5V 3.7 Measurement Modes Limit-Value Monitoring The following value ranges are permitted for limit-value monitoring: Low limit n High limit n 0 to 24 999 999 × 10 /min +1 to 25 000 000 × 10 /min Possible Measuring Ranges with Error Indication Table 3- 13 Possible Measuring Ranges with Error Indication (Number of Pulses per Encoder Revolution = 60)
-
Page 177: Continuous Rotational Speed Measurement
1Count5V 3.7 Measurement Modes 3.7.6 Continuous Rotational Speed Measurement Definition In rotational speed measurement mode, the 1Count5V counts the pulses that are received from a tachometer generator within a dynamic measuring time, and calculates the speed from this value with the number of pulses per encoder revolution. Update time The 1Count5V updates the measured values cyclically. - Page 178 1Count5V 3.7 Measurement Modes Limit-Value Monitoring The following value ranges are permitted for limit-value monitoring: Low limit n High limit n 0 to 24 999 999 × 10 /min +1 to 25 000 000 × 10 /min Possible Measuring Ranges with Error Indication (Number of Pulses per Encoder Revolution = 60) Rotational speed n Absolute error 1 /min...
- Page 179 1Count5V 3.7 Measurement Modes Changing Values during Operation The following values can be changed during operation: ● Low limit (LOAD_PREPARE) ● High limit (LOAD_VAL) ● Function of the digital output DO1 (C_DOPARAM) ● Integration time/update time (C_INTTIME) (see sections "Behavior of the Outputs in Measurement Modes (Page 186)" and "Assignment of the Feedback and Control Interfaces for the Measurement Modes (Page 188)") Technological Functions...
-
Page 180: Period Measurement With Integration Time
1Count5V 3.7 Measurement Modes 3.7.7 Period measurement with integration time Definition In period measurement mode, the 1Count5V measures the time between two positive edges of the counting signal by counting the pulses of an internal quartz-accurate reference frequency (16 MHz) within a preset integration time. Integration Time You preset the integration time with the Integration Time parameter (see the table below). - Page 181 1Count5V 3.7 Measurement Modes Limit-Value Monitoring The following value ranges are permitted for limit-value monitoring: 1 μs resolution Low limit T High limit T 0 to 119 999 999 µs +1 to 120 000 000 µs 1/16 µs resolution Low limit T High limit T 0 to 1 919 999 999 µs +1 to 1 920 000 000 µs...
-
Page 182: Continuous Period Measurement
1Count5V 3.7 Measurement Modes 3.7.8 Continuous Period Measurement Definition In period measurement mode, the 1Count5V indicates the dynamic measuring time as a period. If the period is less than the update time, then an average is calculated for the period. Update Time The 1Count5V updates the measured values cyclically. - Page 183 1Count5V 3.7 Measurement Modes Limit-Value Monitoring The following value ranges are permitted for limit-value monitoring: 1 μs resolution Low limit T High limit T 0 to 119 999 999 µs +1 to 120 000 000 µs 1/16 µs resolution Low limit T High limit T 0 to 1 919 999 999 µs +1 to 1 920 000 000 µs...
- Page 184 1Count5V 3.7 Measurement Modes Function of the Digital Input For the "Function DI" parameter, select one of the following functions for the digital input: ● Input ● HW gate (see section "Gate Functions in Measurement Modes (Page 185)") Function of the Digital Output DO1 For the "Function DO1"...
-
Page 185: Gate Functions In Measurement Modes
1Count5V 3.7 Measurement Modes 3.7.9 Gate Functions in Measurement Modes Software Gate and Hardware Gate The 1Count5V has two gates ● A software gate (SW gate), which is controlled by the SW_GATE control bit. The software gate can only be opened by a positive edge of the SW_GATE control bit. It is closed when this bit is reset. -
Page 186: Behavior Of The Outputs In Measurement Modes
1Count5V 3.7 Measurement Modes 3.7.10 Behavior of the Outputs in Measurement Modes Introduction The various ways of setting the behavior of the outputs are described in this section. Behavior of the Outputs in Measurement Modes You can assign parameters for the digital outputs of the 1Count5V. You can store a high and a low limit for frequency measurement, rotational speed measurement or period measurement. - Page 187 1Count5V 3.7 Measurement Modes Limit-Value Monitoring Figure 3-30 Limit-Value Monitoring After the integration time elapses, the measured value obtained (frequency, rotational speed, or period) is compared with the assigned limit values. If the current measured value is under the assigned low limit (measured value < low limit), bit STS_UFLW = 1 is set in the feedback interface.
-
Page 188: Assignment Of The Feedback And Control Interfaces For The Measurement Modes
1Count5V 3.7 Measurement Modes 3.7.11 Assignment of the Feedback and Control Interfaces for the Measurement Modes Note For the 1Count5V, the following data of the control and feedback interface are consistent: Bytes 0 to 3 Bytes 4 to 7 Bytes 8 to 11 (modified user data interface) Use the access or addressing mode for data consistency over the entire control and feedback interface on your master (only for configuration using the GSD file). - Page 189 1Count5V 3.7 Measurement Modes Table 3- 16 Control Interface (Outputs) Address Assignment Bytes 0 to 3 Low limit or high limit Function of DO1 Byte 0: Bit 1 Bit 0 Function DO1 Output Measured value outside the limits Measured value under the low limit Measured value over the high limit Bytes 1 to 3: Reserve = 0...
- Page 190 1Count5V 3.7 Measurement Modes Notes on the Control Bits Table 3- 17 Notes on the Control Bits Control bits Notes C_DOPARAM Change function of DO1 The value from byte 0 is adopted as the new function of DO1. C_INTTIME Change integration time The value from bytes 0 and 1 is adopted as the new integration time for the next measurement.
- Page 191 1Count5V 3.7 Measurement Modes Notes on the Feedback Bits Table 3- 18 Notes on the Feedback Bits Feedback bits Notes ERR_24V Short circuit of the encoder supply The error bit must be acknowledged by the EXTF_ACK control bit. Diagnostic message if assigned. ERR_DO1 Short circuit/wire break/overtemperature at output DO1 The error bit must be acknowledged by the EXTF_ACK control bit.
- Page 192 1Count5V 3.7 Measurement Modes Access to the Control and Feedback Interface in STEP 7 Programming Table 3- 19 Access to the Control and Feedback Interface in STEP 7 Programming Configuring with STEP 7 Configuring with STEP 7 using the GSD file using HW Config (Hardware catalog\PROFIBUS-DP\Additional (Hardware catalog\PROFIBUS-...
- Page 193 1Count5V 3.7 Measurement Modes Acceptance of Values with the Load Function Figure 3-32 Acceptance of Values with the Load Function Note Only one of the following control bits can be set at a particular time: LOAD_VAL or LOAD_PREPARE or C_DOPARAM or C_INTTIME. Otherwise, the ERR_LOAD error is reported until all the specified control bits are deleted again.
- Page 194 1Count5V 3.7 Measurement Modes Acknowledgment Principle in Isochronous Mode In isochronous mode, exactly 4 bus cycles are always required to reset the status bits and to accept values during the load function. Figure 3-33 Acknowledgment Principle in Isochronous Mode Error Detection The diagnostic errors must be acknowledged.
-
Page 195: Parameter Assignment For Measurement Modes
Parameter Assignment for Measurement Modes Introduction You can use either of the following to assign parameters for the 1Count5V: ● STEP 7 V5.3 SP2 or later ● A GSD file (http://www.automation.siemens.com/csi/gsd) Parameter List for Measuring Modes Table 3- 20 Parameter List for Measuring Modes... - Page 196 1Count5V 3.7 Measurement Modes Parameter Value Range Default High limit Frequency measurement: Low limit+1 to f Rotational speed measurement: Low limit+1 to n Period measurement: Low limit+1 to T Integration time [n*10ms] Frequency measurement: 1...1000 Rotational speed measurement: 1...1000 Period measurement: 1...
-
Page 197: Fast Mode
1Count5V 3.8 Fast mode Fast mode 3.8.1 Overview Introduction This mode is suitable for position detection is especially short isochronous cycles. This mode encompasses a subset of the functionality of the continuous counting mode. It is intended for isochronous mode and differs from continuous counting by having a lower TDP Module and a TWA equal to zero. -
Page 198: Fast Mode
1Count5V 3.8 Fast mode 3.8.2 Fast mode Definition In this mode, the 1Count5V counts continuously starting from the start value: When counting up, if the 1Count5V reaches the maximum value that can be represented with 25 bits (all bits of the counter are set) and another count pulse arrives, the count value jumps to "0"... -
Page 199: Synchronization
1Count5V 3.8 Fast mode 3.8.4 Synchronization Introduction In order to use this function, you must first select it with the "Synchronize on Positive Edge" Function DI parameter. If you have assigned synchronization, the positive edge of a reference signal on the input sets the 1Count5V to the start value. - Page 200 1Count5V 3.8 Fast mode Synchronization with DI and Zero Mark In order to use this function, you must first select it with the "HW enable for synchronization" Function DI parameter. If you have assigned synchronization with DI and zero mark, the DI serves as the HW enable.
-
Page 201: Assignment Of Feedback Interface For Fast Mode
1Count5V 3.8 Fast mode 3.8.5 Assignment of feedback interface for fast mode Note For the 1Count5V, the following data of the feedback interface are consistent: Bytes 0 to 3 Use the access or addressing mode for data consistency over the entire control and feedback interface on your master (only for configuration using the GSD file). - Page 202 1Count5V 3.8 Fast mode Access to the Feedback Interface in STEP 7 Programming Configuring with STEP 7 using HW Config Feedback interface Load command, e.g. L PID Error Detection in Fast Mode The encoder supply short circuit and short circuit/encoder signal wire break faults are detected by the 1Count5V and indicated in the feedback interface (EXTF).
-
Page 203: Assigning Parameters For Fast Mode
1Count5V 3.8 Fast mode 3.8.6 Assigning parameters for fast mode Introduction You use the following to assign parameters for the 1Count5V: ● STEP 7 Version 5.4 or higher; if necessary, the HSP (hardware support package) must be downloaded from the Internet Parameter List for Fast Mode Parameter Value Range... -
Page 204: Position Feedback
1Count5V 3.9 Position feedback Position feedback 3.9.1 Overview Description This mode encompasses a subset of the functionality of the continuous counting mode. It is intended for isochronous mode and differs from continuous counting by a smaller T Module and a T equal to zero. - Page 205 1Count5V 3.9 Position feedback Isochronous mode In isochronous mode, the 1Count5V accepts control bits and control values from the control interface in each bus cycle and reports back the response in this mode in the same cycle or in the next cycle. In each cycle, the 1Count5V transfers the count or latch value that was valid at time T the status bits valid at time T A count controlled by hardware input signals can only be transferred in the same cycle if the...
-
Page 206: Position Detection
1Count5V 3.9 Position feedback 3.9.2 Position detection Definition In this mode, the 1Count5V counts continuously starting from the load value: ● If the 1Count5V reaches the high count limit when counting up, and another count pulse then comes, it will jump to the low count limit and continue counting from there without losing a pulse. -
Page 207: Gate Functions For Position Detection
1Count5V 3.9 Position feedback 3.9.3 Gate Functions for Position Detection Software Gate and Hardware Gate The 1Count5V has two gates ● A software gate (SW gate), which is controlled by the SW_GATE control bit. The software gate can only be opened by a positive edge of the SW_GATE control bit. It is closed when this bit is reset. - Page 208 1Count5V 3.9 Position feedback Canceling- and Interrupting-Type Gate Function When assigning the gate function, you can specify whether the internal gate is to cancel or interrupt counting. When counting is canceled, after the gate is closed and restarted, counting starts again from the beginning. When counting is interrupted, after the gate is closed and restarted, counting continues from the previous value.
- Page 209 1Count5V 3.9 Position feedback Gate Control Gate control by means of the SW gate only When the gate is opened, one of the following occurs, depending on the parameter assignment: ● Counting continues from the current count, or ● Counting starts from the load value If the SW gate is opened in isochronous mode in bus cycle "n"...
-
Page 210: Latch Function
1Count5V 3.9 Position feedback 3.9.4 Latch Function Overview There are two latch functions: ● The Latch and Retrigger function ● The Latch function The Latch and Retrigger Function In order to use this function, you must first select it with the "Latch and Retrigger on Positive Edge"... - Page 211 1Count5V 3.9 Position feedback If you close the SW gate, it only interrupts counting; this means that when you open the SW gate again, counting is continued. The digital input DI remains active even when the SW gate is closed. Counting is also latched and triggered in isochronous mode with each edge on the digital input.
- Page 212 1Count5V 3.9 Position feedback Expanded Feedback Interface If the 1Count5V is inserted behind an IM 151 that supports the reading and writing of broader user data interfaces, the current count value can be read from bytes 8 to 11 of the feedback interface.
-
Page 213: Synchronization
1Count5V 3.9 Position feedback 3.9.5 Synchronization Synchronization In order to use this function, you must first select it with the "Synchronize on Positive Edge" Function DI parameter. Figure 3-40 Once-Only and Periodic Synchronization If you have configured synchronization, the positive edge of a reference signal on the input sets the 1Count5V to the load value. - Page 214 1Count5V 3.9 Position feedback The following conditions apply: ● The counting mode must have been started with the SW gate. ● The "Enable synchronization CTRL_SYN" control bit must be set. ● Synchronize once only: If the enable bit is set, the first edge loads the 1Count5V with the load value.
-
Page 215: Assignment Of The Feedback And Control Interface For Position Feedback
1Count5V 3.9 Position feedback 3.9.6 Assignment of the Feedback and Control Interface for Position Feedback Note For the 1Count5V, the following data of the control and feedback interface are consistent: Bytes 0 to 3 Bytes 4 to 7 Bytes 8 to 11 (modified user data interface) Use the access or addressing mode for data consistency over the entire control and feedback interface on your master (only for configuration using the GSD file). - Page 216 1Count5V 3.9 Position feedback Table 3- 23 Control Interface (Outputs) Address Designation Assignment Bytes 0 to 3 Load value direct, preparatory, comparison value 1 or 2 Byte 4 EXTF_ACK Bit 7: Error diagnostics acknowledgment Bit 6: Reserve = 0 Bit 5: Reserve = 0 Bit 4: Reserve = 0...
- Page 217 1Count5V 3.9 Position feedback Notes on the Feedback Bits Table 3- 25 Notes on the Feedback Bits Feedback Bits Notes ERR_24V Short circuit of the encoder supply The error bit must be acknowledged by the EXTF_ACK control bit. Diagnostic message if assigned. ERR_LOAD Load function error The LOAD_VAL, LOAD_PREPARE, CMP_VAL1, CMP_VAL2, and C_DOPARAM bits cannot be set...
- Page 218 1Count5V 3.9 Position feedback Resetting of the Status Bits STS_SYN, STS_OFLW, STS_UFLW, STS_ND Figure 3-41 Resetting of the Status Bits Acceptance of Values with the Load Function Figure 3-42 Accepting Values with the Load Function (LOAD_VAL; LOAD_PREPARE; C_DOPARAM; C_INTTIME) Technological Functions Operating Instructions, 06/2010, A5E00124867-07...
- Page 219 1Count5V 3.9 Position feedback Note Only one of the following control bits can be set at a particular time: LOAD_VAL or LOAD_PREPARE. Otherwise, the ERR_LOAD error is reported until all the specified control bits are deleted again. The ERR_LOAD error bit is only deleted when the following is carried out correctly. Acknowledgment Principle in Isochronous Mode In isochronous mode, 4 or 6 bus cycles are required to reset the status bits and to accept values during the load function in this mode.
- Page 220 1Count5V 3.9 Position feedback Error Detection The program errors must be acknowledged. They have been detected by the 1Count5V and are indicated at the feedback interface. Channel-specific diagnostics are performed if you have enabled group diagnostics in your configuration (see device manual of the interface module used).
-
Page 221: Assigning Parameters For Position Feedback
Assigning Parameters for Position Feedback Introduction You can use either of the following to assign parameters for the 1Count5V: ● STEP 7 V5.3 SP2 or later ● A GSD file (http://www.automation.siemens.com/csi/gsd) Parameter list for Position Feedback Table 3- 27 Parameter list for Position Feedback... -
Page 222: Evaluation Of Count And Direction Signal
1Count5V 3.10 Evaluation of count and direction signal 3.10 Evaluation of count and direction signal Signal Evaluation A, B Signal evaluation by means of A, B allows you to count directionally. Different evaluation modes are possible depending on the parameter assignment: Rotary Encoder The 1Count5V can count the edges of the signals. - Page 223 1Count5V 3.10 Evaluation of count and direction signal Double Evaluation Double evaluation means that the positive and negative edge of the A signal are evaluated. Whether up or down count pulses are generated depends on the level of the B signal. The diagram below illustrates the double evaluation of the signals.
-
Page 224: Diagnostics
1Count5V 3.11 Diagnostics 3.11 Diagnostics 3.11.1 Diagnostics using the LED display LED display on the 1Count5V ① Group error (red) ② Status display for the digital output (green) ③ Status display for digital input (green) ④ Status display for synchronization (green) ⑤... -
Page 225: Error Types
1Count5V 3.11 Diagnostics 3.11.2 Error types For information on the structure of the channel-related diagnostics, refer to the manual on the interface module used in your ET 200S station. 1Count5V error types The following table shows the error types on the 1Count5V. Error class Meaning Remedy... -
Page 226: Behavior At Cpu-Master-Stop
1Count5V 3.12 Behavior at CPU-Master-STOP 3.12 Behavior at CPU-Master-STOP Setting the response to CPU/master STOP You can configure the reaction of the 1Count5V to failure of the higher-level controller. Parameters Status of the 1Count5V at CPU/master What Happens if STOP New Parameters Have Been Assigned? Turn off DO The current mode is terminated, the gate... - Page 227 1Count5V 3.12 Behavior at CPU-Master-STOP Automatic New Parameter Assignment A new parameter assignment of the ET 200S station is made by your CPU/ DP master: ● Upon power on of the CPU/DP master ● Upon power on of the IM 151/IM 151 FO ●...
-
Page 228: Technical Specifications
1Count5V 3.13 Technical Specifications 3.13 Technical Specifications Technical specifications General technical specifications of the 1Count5V Dimensions and Weight Dimensions W x H x D (mm) 30×81×52 Weight Approx. 65 g Data for Specific Modules Number of Channels Counter range 32 bits Voltages, Currents, Potentials Rated load voltage L+ 24 VDC... - Page 229 1Count5V 3.13 Technical Specifications General technical specifications of the 1Count5V Encoder Signals Level In accordance with RS 422 Terminating resistance 330 Ω Differential input voltage 1 V, minimum Maximum counting frequency 500 kHz Galvanic isolation from ET200S bus Shielded cable length 50 m, maximum Data for the Digital Outputs Output voltage...
- Page 230 1Count5V 3.13 Technical Specifications General technical specifications of the 1Count5V Measuring Ranges in the Measuring Modes Maximum measuring range Frequency measurement 0.1 Hz to 500 kHz Rotational Speed Measurement 1/min ... 25000 /min Period measurement 10 µs ... 120 s Response Times Update rate of the counting modes Non-isochronous mode...
-
Page 231: 1Ssi
1SSI Product Overview Order Number 6ES7 138-4DB03-0AB0 Compatibility The 1SSI with order number 6ES7 138-DB03-0AB0 replaces the 1SSI with the following order numbers: ● 6ES7 138-4DB02-0AB0 ● 6ES7 138-4DB01-0AB0 ● 6ES7 138-4DB00-0AB0 and is fully compatible. Features ● The 1SSI is an interface between an absolute encoder (SSI) and the higher-level controller. - Page 232 You can use either of the following to configure the 1SSI: ● STEP 7 V5.4 SP2 and later, or with the HSP (hardware support package, available online) STEP 7 V5.3 SP2 and later. ● A GSD file (http://www.automation.siemens.com/csi/gsd) Technological Functions Operating Instructions, 06/2010, A5E00124867-07...
-
Page 233: Isochronous Mode
4.2 Isochronous Mode Isochronous Mode Note For basic information on isochronous mode, refer to the Isochronous mode (http://support.automation.siemens.com/WW/view/en/15218045) function manual. Hardware Requirements You will require the following for the 1SS in isochronous mode: ● A CPU that supports isochronous mode ●... -
Page 234: Example: Starting 1Ssi
Installation, Wiring and Fitting 1. Install and wire the TM-E15S24-01 terminal module (see Figure). 2. Plug the 1SSI into the terminal module. Detailed instructions are provided in the ET 200S Distributed I/O Device (http://support.automation.siemens.com/WW/view/en/1144348) operating instructions. Figure 4-1 Terminal Assignment for the Example... - Page 235 1SSI 4.3 Example: Starting 1SSI Configuring with STEP 7 using HW Config You must first adapt the hardware configuration of your existing ET 200S station. 1. Open the relevant project in SIMATIC Manager. 2. Open the HW Config configuration table in your project. 3.
- Page 236 1SSI 4.3 Example: Starting 1SSI Testing Use Monitor/Modify Variables to monitor the encoder value and the direction indicator. 1. Select the "Block" folder in your project. Choose the "Insert > S7 Block > Variable Table" menu command to insert the VAT 1 variable table, and then confirm with OK. 2.
-
Page 237: Terminal Assignment Diagram
The cables (terminals 1 and 5 and terminals 4 and 8) must be shielded, twisted-pair cables. The shield must be supported at both ends. To do this, use the shield contact (see the ET 200S Distributed I/O System (http://support.automation.siemens.com/WW/view/en/1144348) operating instructions). - Page 238 1SSI 4.4 Terminal Assignment Diagram Terminal Assignment You will find the terminal assignment for the 1SSI in the table below. Table 4- 1 Terminal Assignment of the 1SSI View Terminal Assignment Remarks Terminals 1 to 8: 1/5: Data from the SSI encoder 2/6: Power supply for absolute encoder and switch 3: Chassis ground...
-
Page 239: Configuring Standard Mode And Fast Mode
1SSI 4.5 Configuring standard mode and fast mode Configuring standard mode and fast mode Introduction In order to take full advantage of the functionality of the 1SSI for the application in question, choose between fast mode and standard mode, depending on your automation task. Areas of Application Mode Closed-loop control applications such as position controls with path position as... -
Page 240: Functions Of The 1Ssi
1SSI 4.6 Functions of the 1SSI Functions of the 1SSI 4.6.1 Overview of 1SSI functions Operating Principle The 1SSI records the signals of the connected position encoder cyclically and forwards them, depending on the parameter assignment, to the feedback interface by means of the following functions: ●... -
Page 241: Encoder Value Detection
1SSI 4.6 Functions of the 1SSI 4.6.2 Encoder Value Detection Description The absolute encoder transfers its encoder values in message frames to the 1SSI. The transmission of message frames is initiated by the 1SSI. The following alternatives are available for encoder value detection: ●... -
Page 242: Gray/Binary Converter
1SSI 4.6 Functions of the 1SSI 4.6.3 Gray/Binary Converter Description When Gray is set, the encoder value supplied by the absolute encoder in gray code is converted to binary code. When Binary is set, the supplied encoder value is not converted. NOTICE If you selected the Gray setting, the 1SSI always converts the total encoder value (13 to 25 bits). - Page 243 1SSI 4.6 Functions of the 1SSI Normalization Example Presettings: You use a single-turn encoder with 2 (corresponds to 9 bits) = 512 steps/revolution (resolution/360°) with the following parameter assignment: ● Encoder type: SSI-13 bit ● Number of trailing bits: 4 places ●...
-
Page 244: Detection Of Direction And Reversal Of The Direction Of Rotation
1SSI 4.6 Functions of the 1SSI 4.6.5 Detection of Direction and Reversal of the Direction of Rotation Direction Detection The 1SSI needs the following information to detect the direction of movement of the encoder correctly: ● Encoder type ● Total steps of the absolute encoder ●... -
Page 245: Comparator (Only In Standard Mode)
1SSI 4.6 Functions of the 1SSI 4.6.6 Comparator (Only in Standard Mode) Description The encoder position that is detected can be compared with up to two loadable values (without hysteresis). Both comparison results are stored in the feedback interface. The appropriate comparator becomes active only after the comparison value is loaded. - Page 246 1SSI 4.6 Functions of the 1SSI Loading the Comparison Value Figure 4-2 Value Transfer Comparator in Isochronous Mode In isochronous mode, the comparison values are loaded at time T and are effective as of time T in the same bus cycle. Technological Functions Operating Instructions, 06/2010, A5E00124867-07...
-
Page 247: Latch Function (Only In Standard Mode)
1SSI 4.6 Functions of the 1SSI 4.6.7 Latch Function (Only in Standard Mode) Description You use the latch function to freeze the current encoder value of the 1SSI at an edge at the digital input (DI). The encoder value can thus be evaluated on an event-dependent basis. A frozen encoder value is identified by the set bit 31 and is preserved until the termination of the latch function. - Page 248 1SSI 4.6 Functions of the 1SSI Terminating the Latch Function The latch function must be acknowledged. When the controller program acknowledges the acceptance of the encoder value, bit 31 is deleted and the encoder value is updated again. Freezing is then possible again. Figure 4-3 Latch Function Technological Functions...
-
Page 249: Error Detection In Standard Mode
1SSI 4.6 Functions of the 1SSI 4.6.8 Error Detection in Standard Mode Description The absolute value encoder and sensor supply short circuit errors must be acknowledged. They have been detected by the 1SSl and are indicated at the feedback interface. Channel- specific diagnostics are performed if you have enabled group diagnostics in your configuration (see device manual of the interface module used). -
Page 250: Behavior At Cpu/Master Stop
1SSI 4.7 Behavior at CPU/master STOP Behavior at CPU/master STOP Description The 1SSI detects the CPU/master STOP. The reaction to this is to stop the active operation. Exiting the CPU/master STOP status The feedback interface of the 1SSI remains current. Without reassigning the parameters of the ET 200 ... -
Page 251: Setting Parameters For The 1Ssi
1SSI 4.8 Setting parameters for the 1SSI Setting parameters for the 1SSI Overview You set the parameters for the 1SSI by means of the GSD file for the ET 200S or using the STEP 7 parameter assignment software. It is not possible to reassign the parameters by means of the user program. - Page 252 1SSI 4.8 Setting parameters for the 1SSI Parameters Value Range Note Encoder type 13 bits: 16 to 8192 Total steps of the If you find "Total steps - highword" and "Total steps - absolute encoder lowword" in your parameter assignment software Encoder type 14 bits: 16 to 16384 ...
- Page 253 1SSI 4.8 Setting parameters for the 1SSI Parameters Value Range Note Encoder sampling rate No limitation, 0.1 kHz to 6.3 kHz (in 0.1- Any encoder sampling rate to be taken into account is kHz steps) set here. This parameter is only active in isochronous mode.
-
Page 254: Diagnostics
1SSI 4.9 Diagnostics Diagnostics 4.9.1 Diagnostics using the LED display LED display on the 1SSI ① Group error (red) ② Status display for change in sensor value (green) ③ Status display for result of comparison ④ Status display for digital input (green) Status and error displays by means of LEDs on the 1SSI The table below shows the status and error displays on the 1SSI. -
Page 255: Error Types
1SSI 4.9 Diagnostics 4.9.2 Error types For information on the structure of the channel-related diagnostics, refer to the manual on the interface module used in your ET 200S station. 1SSI error types The following table shows the error types on the 1SSI. Error class Meaning Remedy... -
Page 256: Control And Feedback Interfaces In Standard Mode
1SSI 4.10 Control and Feedback Interfaces in Standard Mode 4.10 Control and Feedback Interfaces in Standard Mode Note For the 1SSI, the following data of the control and feedback interface are consistent: Byte 0 to 3 Byte 4 to 7 Use the access or addressing mode for data consistency over the entire control and feedback interface on your master (only for configuration using the GSD file). - Page 257 1SSI 4.10 Control and Feedback Interfaces in Standard Mode Table 4- 4 Assignment of the Control Interface (Outputs) Address Assignment Bytes 0 to 3 Comparison value 1 or 2 (double word) Byte 4 Bit 7: Error acknowledgment EXTF_ACK Bit 6: Acknowledgment of latch function LATCH_ACK Bit 5: Reserved = 0 Bit 4: Reserved = 0 Bit 3: Reserved = 0...
- Page 258 1SSI 4.10 Control and Feedback Interfaces in Standard Mode Bits Notes STS_UP Status direction down; for encoder value change from larger to smaller encoder positions (including zero crossover) The parameter assignment of the 1SSI is correct, and the module is executing its functions. The displayed feedback is valid.
-
Page 259: Feedback Interface In Fast Mode
1SSI 4.11 Feedback Interface in Fast Mode 4.11 Feedback Interface in Fast Mode Description Refer to the table below for the assignment of the feedback interface (inputs): Table 4- 5 Assignment of the Feedback Interface (Inputs) Address Assignment Bytes 0 to 3 Bit 31: Reserved = 0 or sign of life LZ Bit 30: Ready for operation (feedback is valid) RDY Bit 29: Parameter assignment error ERR_PARA;... - Page 260 1SSI 4.11 Feedback Interface in Fast Mode Access to the Feedback Interface in STEP 7 Programming Configuring with STEP 7 using the GSD Configuring with STEP 7 using HW Config File Feedback interface Read with SFC 14 "DPRD_DAT" Load command (e.g. L PID) Technological Functions Operating Instructions, 06/2010, A5E00124867-07...
-
Page 261: Technical Specifications
1SSI 4.12 Technical Specifications 4.12 Technical Specifications Overview General technical specifications Dimensions and Weight Dimensions W x H x D (mm) 15 x 81 x 52 Weight Approx. 40 g Voltages, Currents, Potentials Rated load voltage L+ 24 VDC Reverse polarity protection ... - Page 262 1SSI 4.12 Technical Specifications General technical specifications Interrupts Status display for digital input DI LED 7 (green) Status display of first comparator CMP CMP LED (green) Encoder value change Up UP LED (green) Encoder value change Down DN LED (green) Group error SF LED (red) Encoder Value Inaccuracy in Non-Isochronous Mode...
- Page 263 1SSI 4.12 Technical Specifications General technical specifications Response Times in Non-Isochronous Mode Update rate of the 1SSI In standard mode 1 ms In fast mode 700 µs Isochronous Times for the Module In standard mode 125 µs + Frame runtime (in µs) 125 µs 0 µs 400 µs + Frame runtime if frame runtime >...
- Page 264 1SSI 4.12 Technical Specifications Technological Functions Operating Instructions, 06/2010, A5E00124867-07...
-
Page 265: 2Pulse
2PULSE Product Overview Order number 6ES7 138-4DD01-0AB0 Compatibility The 2PULSE with the order number 6ES7 138-4DD01-0AB0 replaces the 2PULSE with the order number 6ES7 138-4DD00-0AB0 compatibly. In STEP 7 as of Version V5.4 SP4 + HSP 2072, you can use it in non-isochronous and isochronous modes. Features ●... - Page 266 In order to configure the 2PULSE use one of the following options ● STEP 7 as of Version V5.4 SP4 with the HSP 2072 (Hardware Support Package from the Internet) ● A GSD file (http://www.automation.siemens.com/csi/gsd) Firmware update In order to extend the functionality and eliminate errors, firmware updates can be downloaded to the operating system memory of the 2PULSE by means of the STEP 7 HW Config software.
-
Page 267: Isochronous Mode
5.2 Isochronous mode Isochronous mode Note For basic information on isochronous mode, refer to the Isochronous mode (http://support.automation.siemens.com/WW/view/en/15218045) function manual. Hardware requirements You will require the following for the 2PULSE in isochronous mode: ● A CPU that supports isochronous mode ●... -
Page 268: Example: Starting 2Pulse
1. Install the TM-E15S24-01 terminal module (see the figure below). 2. Plug the 2PULSE into the terminal module. Detailed instructions are provided in the ET 200S Distributed I/O Device (http://support.automation.siemens.com/WW/view/en/1144348) operating instructions. It is not necessary to wire the 2PULSE for this example. Figure 5-1... - Page 269 2PULSE 5.3 Example: Starting 2PULSE Configuring with STEP 7 using HW Config You must first adapt the hardware configuration of your existing ET 200S station. 1. Open the relevant project in SIMATIC Manager. 2. Open the HW Config configuration table in your project. 3.
- Page 270 2PULSE 5.3 Example: Starting 2PULSE Testing Start a pulse output with SW_ENABLE = 1 and monitor the STS_ENABLE and STS_DO feedback bits using "Monitor/Modify Variables". 1. Select the "Block" folder in your project. Choose the "Insert > S7 Block > Variable Table" menu command to insert the VAT 1 variable table, and then confirm with OK.
-
Page 271: Modes And Functions
2PULSE 5.4 Modes and Functions Modes and Functions 5.4.1 Overview Principle The 2PULSE has two channels. You can select a separate mode for each channel. Configuration of the operating mode is carried out using HW Config. The mode that has been assigned parameters can then no longer be changed with your control program. - Page 272 2PULSE 5.4 Modes and Functions ● Parallel connection of both channels to achieve a higher output current. ● Response to CPU/master STOP; the 2PULSE recognizes the CPU/master STOP for both channels and responds in accordance with your parameter assignment. Figure 5-2 Operating principle of the 2PULSE Interfaces to the Control Program and Process To run the modes and execute functions, the 2PULSE has as an interface to the process of...
-
Page 273: Pulse Output" Operating Mode
2PULSE 5.4 Modes and Functions 5.4.2 "Pulse output" operating mode Definition For the pulse duration you set, the 2PULSE outputs a pulse at the DO digital output (output sequence) on expiration of the set on-delay. Figure 5-3 Block diagram for the "Pulse output" operating mode Starting the Output Sequence You must always issue the enable for the output sequence by means of the software enable (SW_ENABLE 0 →... - Page 274 2PULSE 5.4 Modes and Functions Pulse Diagram Figure 5-4 Output Sequence for Pulse Output Canceling the Output Sequence Deleting the software enable (SW_ENABLE = 0) during the on-delay or the pulse output cancels the output sequence, and STS_ENABLE and the DO digital output are canceled. You will then have to restart the output sequence.
- Page 275 2PULSE 5.4 Modes and Functions Setting times using a time base By means of the time base that can be assigned parameters, you can select the resolution and range of the pulse duration and the on-delay. Time base = 0.1 ms: You can set times from 0.2 ms to 6.5535 s with a resolution of 0.1 ms.
- Page 276 2PULSE 5.4 Modes and Functions Parameters of the "Pulse output" operating mode Parameter Meaning Value Range Default Pulse output Mode Set the "Pulse output" operating Pulse width mode. modulation Pulse-width modulation Pulse train On/Off-delay Frequency output ...
- Page 277 2PULSE 5.4 Modes and Functions Control and Feedback Meaning Value range Channel Channel Signals Address Address Control signals when the long control interface is used (12 bytes) Software enable Starting and canceling of the 0 = SW_ENABLE canceled Byte 4: Byte 10: SW_ENABLE output sequence.
- Page 278 2PULSE 5.4 Modes and Functions Input and output signals of "Pulse output" operating mode Input and Output Signals Meaning Value range Channel Channel 1 Terminal Terminal Input Signal HW enable You can select the HW enable 0 = HW enable cleared with the "Function DI"...
-
Page 279: Pulse Width Modulation" Operating Mode
2PULSE 5.4 Modes and Functions 5.4.3 "Pulse width modulation" operating mode Definition You specify an output value for the 2PULSE. The 2PULSE generates continuous pulses on this basis. The output value determines the pulse/interpulse ratio within a period (pulse-width modulation). The period can be adjusted. The pulse train is output on expiration of the assigned on-delay on the DO digital output of the 2PULSE (output sequence). - Page 280 2PULSE 5.4 Modes and Functions Pulse Diagram Figure 5-6 Pulse-Width Modulation Output Sequence Canceling the output sequence Deleting the software enable (SW_ENABLE = 0) during the on-delay or the pulse output cancels the output sequence, and STS_ENABLE and the DO digital output are canceled. You will then have to restart the output sequence.
- Page 281 2PULSE 5.4 Modes and Functions Minimum Pulse Duration and Minimum Interpulse Period The minimum pulse duration and minimum interpulse period are superimposed on the proportional output characteristic. You assign the minimum pulse duration and minimum interpulse period using the "Minimum pulse duration"...
- Page 282 2PULSE 5.4 Modes and Functions Setting and Changing the Output Value You select the range of the output value with the "Output format" parameter. ● Output format "Per mill": Value range between 0 and 1000 The 2PULSE uses this specified output value to calculate the pulse duration: Pulse duration = (output value/1000) x time period.
- Page 283 2PULSE 5.4 Modes and Functions Isochronous mode Generally applicable information is available in the section "Isochronous mode (Page 267)". The following particular aspects apply to isochronous mode in the "Pulse width modulation" operating mode: ● The output always begins without an on-delay, a configured on-delay is ignored. ●...
- Page 284 The correlation between the and the DP cycle is represented graphically below. The pulse- pause ratio is shown in the examples with 50% each. For additional information, refer to the Isochronous Mode (http://support.automation.siemens.com/WW/view/en/15218045) function manual. ● The time period is equal to the DP cycle ●...
- Page 285 2PULSE 5.4 Modes and Functions Time period at configuration with short control interface You specify the time period in the parameters as a numerical value depending on the time base: ● With time base 1 ms: from 1 to 65535 ●...
- Page 286 2PULSE 5.4 Modes and Functions Parameters of the "Pulse width modulation" operating mode Parameter Meaning Value range Default Pulse output Operating mode Set the "Pulse width modulation" Pulse width operating mode. modulation Pulse-width modulation Pulse train On/Off-delay ...
- Page 287 2PULSE 5.4 Modes and Functions Control and feedback signals of the "Pulse width modulation" operating mode Control and feedback Meaning Value range Channel 0 Channel 1 signals address address Control signals when the short control interface is used (8 bytes) Software enable Starting and canceling of the 0 = SW_ENABLE canceled...
- Page 288 2PULSE 5.4 Modes and Functions Control and feedback Meaning Value range Channel 0 Channel 1 signals address address Feedback signals STS_ENABLE Indicates an output sequence is 0 = Pulse output blocked Byte 0: Byte 4: running. 1 = Pulse output running Bit 0 Bit 0 STS_DO...
-
Page 289: Pulse Train" Operating Mode
2PULSE 5.4 Modes and Functions 5.4.4 "Pulse train" operating mode Definition The 2PULSE outputs the number of pulses you specified as a pulse train at the DO digital output on expiration of the set on-delay (output sequence). The period duration and pulse duration of the pulses can be adjusted. - Page 290 2PULSE 5.4 Modes and Functions Pulse diagram Figure 5-9 Output Sequence of the Pulse Train Canceling the output sequence Deleting the software enable during the on-delay or the pulse train terminates the output sequence, and STS_ENABLE and the DO digital output are deleted. You will then have to restart the output sequence.
- Page 291 2PULSE 5.4 Modes and Functions Setting and Changing the Number of Pulses Set the number of pulses directly as a numerical value between 0 and 65535 with your control program. If you change the number of pulses on expiration of the on-delay, the new value takes effect immediately: ●...
- Page 292 2PULSE 5.4 Modes and Functions Parameters of the "Pulse train" operating mode Parameter Meaning Value range Default Pulse output Operating mode Set the "Pulse train" operating Pulse width mode. modulation Pulse width modulation Pulse train On/Off-delay Frequency output ...
- Page 293 2PULSE 5.4 Modes and Functions Control and feedback signals of the "Pulse train" operating mode Control and feedback Meaning Value range Channel 0 Channel 1 signals address address Control signals when the short control interface is used (8 bytes) Software enable Starting and canceling of the 0 = SW_ENABLE cleared.
- Page 294 2PULSE 5.4 Modes and Functions Control and feedback Meaning Value range Channel 0 Channel 1 signals address address Feedback signals STS_ENABLE Indicates an output sequence is 0 = pulse output blocked Byte 0: Byte 4: running. 1 = pulse output running Bit 0 Bit 0 STS_DO...
-
Page 295: On/Off-Delay" Operating Mode
2PULSE 5.4 Modes and Functions 5.4.5 "On/Off-delay" operating mode Definition The signal pending at the digital input DI is output with an on/off-delay at the digital output DO by the 2PULSE. Figure 5-10 Block diagram for "On/Off-delay" mode Output Sequence Enable You must always issue the enable for the output sequence by means of the software enable (SW_ENABLE 0 →... - Page 296 2PULSE 5.4 Modes and Functions Pulse Diagram SW_ENABLE is set, while DI = 0: Figure 5-11 Output sequence on/off-delay (at the start DI = 0) SW_ENABLE is set, while DI = 1: If SW_ENABLE is set while DI = 1, the first edge at DI (falling edge) is ignored. Figure 5-12 Output sequence on/off-delay (at the start DI = 1) Canceling the Output Sequence...
- Page 297 2PULSE 5.4 Modes and Functions Truth Table Software enable Digital input DI Digital output DO STS_ENABLE Output SW_ENABLE sequence 0 → 1 0, if on-delay > 0 Start 1, if on-delay = 0 1 → 0 1, if off-delay > 0 Start 0, if off-delay = 0 Any status...
- Page 298 2PULSE 5.4 Modes and Functions The Interpulse Period of the Digital Input DI Is Too Short The 2PULSE detects an interpulse period that is too short on the positive edge on the digital input DI if: Interpulse period + on-delay ≤ Off-delay. Response of the 2PULSE to a interpulse period that is too short: ●...
- Page 299 2PULSE 5.4 Modes and Functions Retriggering the current Off-delay The 2PULSE starts a new off-delay on the negative edge on the digital input DI if: Off-delay > pulse duration + interpulse period. This deletes the current on-delay. The digital output DO is only deleted if signal level 0 is present on the digital input DI longer than the off-delay.
- Page 300 2PULSE 5.4 Modes and Functions Isochronous mode Generally applicable information is available in the section "Isochronous mode (Page 267)". In the "On/Off-delay" operating mode, isochronous mode does not have any influence on the functionality. Parameters for the "On/Off-delay" operating mode Parameter Meaning Value Range...
- Page 301 2PULSE 5.4 Modes and Functions Control and feedback signals of the "On/Off-delay" operating mode Control and Feedback Meaning Value range Channel 0 Channel 1 Signals address address Control signals when the short control interface is used (8 bytes) Software enable You must always issue the 0 = SW_ENABLE cleared.
- Page 302 2PULSE 5.4 Modes and Functions Control and Feedback Meaning Value range Channel 0 Channel 1 Signals address address Feedback signals STS_ENABLE Indicates the status of the 0 = software enable blocked Byte 0: Byte 4: software enable (SW_ENABLE). 1 = software enable issued Bit 0 Bit 0 STS_DO...
-
Page 303: Frequency Output" Operating Mode
2PULSE 5.4 Modes and Functions 5.4.6 "Frequency output" operating mode Definition A square wave signal with a specified frequency is output at the digital output of the 2PULSE. The output sequence is started on expiration of the configured on-delay on the DO digital output of the 2PULSE. - Page 304 2PULSE 5.4 Modes and Functions Pulse diagram Figure 5-18 Output sequence frequency output Canceling the output sequence Deleting the software enable (SW_ENABLE = 0) during the on-delay or the frequency output cancels the output sequence, and STS_ENABLE and the DO digital output are canceled. You will then have to restart the output sequence.
- Page 305 2PULSE 5.4 Modes and Functions Setting Times Using a Time Base Use the configured time base to select the resolution and the value range of the on-delay. Time base = 0.1 ms: You can set times from 0.2 ms to 6.5535 s with a resolution of 0.1 ms. Time base = 1 ms: You can set times from 1 ms to 65.535 s with a resolution of 1 ms.
- Page 306 2PULSE 5.4 Modes and Functions Parameters of the "Frequency output" operating mode Parameter Meaning Value range Default Pulse output Operating mode Set the "Frequency output" Pulse width operating mode. modulation Pulse-width modulation Pulse train On/Off-delay Frequency output ...
- Page 307 2PULSE 5.4 Modes and Functions Control and feedback signals of the "Frequency output" operating mode Control and feedback Meaning Value range Channel 0 Channel 1 signals address address Control signals when the short control interface is used (8 bytes) Software enable Starting and canceling of the 0 = SW_ENABLE canceled Byte 2:...
- Page 308 2PULSE 5.4 Modes and Functions Control and feedback Meaning Value range Channel 0 Channel 1 signals address address Feedback signals STS_ENABLE Indicates an output sequence is 0 = pulse output blocked Byte 0: Byte 4: running. 1 = pulse output running Bit 0 Bit 0 STS_DO...
-
Page 309: Sequence Counter
2PULSE 5.4 Modes and Functions 5.4.7 Sequence counter The 2PULSE has a sequence counter for each channel with which the completed output sequences are counted. You can monitor the completion of an output sequence with the sequence counter SEC_CNT in the feedback interface. The counter has a width of 4 bits. -
Page 310: Function: Measurement Of Current
2PULSE 5.4 Modes and Functions 5.4.8 Function: Measurement of current The measurement of current can be set in a variety of applications for control and diagnostics purposes. You can read the measured value of the current from the feedback interface. Principle of operation A measurement of current only takes place during the pulse output in the "Pulse width modulation"... -
Page 311: Function: Direct Control Of The Do Digital Output
2PULSE 5.4 Modes and Functions 5.4.9 Function: Direct Control of the DO Digital Output Definition You can directly control the digital output DO of the 2PULSE to test the actuator you have connected. To do this, you have to select the function from your control program with the MANUAL_DO control bit set and SW_ENABLE control bit cleared. - Page 312 2PULSE 5.4 Modes and Functions Signals Meaning Value range When the short When the long control interface is control interface is used (8 bytes) used (12 bytes) Channel Channel Channel Channel address address address address Output Signal Digital output The status preset with the 0 = No signal SET_DO control bit is 1 = Signal...
-
Page 313: Function: Error Detection/Diagnostics
2PULSE 5.4 Modes and Functions 5.4.10 Function: Error Detection/Diagnostics Parameter Assignment Error ERR_PARA If the 2PULSE cannot identify the parameters as its own, it generates a parameter assignment error. The two channels are then not assigned parameters. The 2PULSE slot you configure must match the setup. Pulse output error ERR_PULS The 2PULSE detects a channel-specific pulse output error in the pulse output, on/off-delay, and pulse train modes. - Page 314 2PULSE 5.4 Modes and Functions Diagnostic Message If a short circuit occurs in the encoder supply or in the digital output, the 2PULSE generates a diagnostic message for the connected CPU/master. You must enable the "Group diagnostics" parameter in this case. Note Diagnostic messages provide you the information that an error has occurred in one or both channels of the 2PULSE.
-
Page 315: Parallel Connection Of Both Channels
2PULSE 5.4 Modes and Functions 5.4.11 Parallel connection of both channels Definition In order to achieve higher output current, you can connect both channels of the 2PULSE in parallel. You then obtain a rated current of 4 A. This allows you to also operate final controlling elements with a higher power requirement directly at the 2PULSE. - Page 316 2PULSE 5.4 Modes and Functions Pin assignment for the parallel connection The following terminals have to be connected at the terminal module for the parallel connection of both channels of the 2PULSE: ● Terminal 3 and Terminal 7 ● Terminal 4 and Terminal 8 You then connect the load (e.g.
-
Page 317: Behavior At Cpu-Master-Stop
2PULSE 5.4 Modes and Functions 5.4.12 Behavior at CPU-Master-STOP Definition You can configure the reaction of the 2PULSE to failure of the higher-level controller for the two channels together. Response to CPU/master STOP Channel-specific response and status of the 2PULSE Turn off DO Delete the DO digital output Delete STS_ENABLE and... -
Page 318: Parameter Assignment And Compatibility
2PULSE 5.5 Parameter assignment and compatibility Parameter assignment and compatibility 5.5.1 Configuring the 2PULSE Configuring with HW Config There are 3 entries for configuring the 2PULSE in HW Config: ● 2PULSE (6ES7 138-4DD00-0AB0) Select this entry if you want to operate the 2PULSE in compatibility mode (Page 320). ●... - Page 319 2PULSE 5.5 Parameter assignment and compatibility ● The "DO substitute value" parameter may only have a value not equal to 0 if the "Response to CPU/Master stop" parameter is set to "DO switch substitute value". ● Different channel-specific parameters are activated depending on the selected operating mode.
-
Page 320: Compatibility Of The 2Pulse With Predecessor Versions
2PULSE 5.5 Parameter assignment and compatibility 5.5.2 Compatibility of the 2PULSE with predecessor versions Compatibility mode If you ● Have selected the entry 2PULSE (6ES7 138-4DD00-0AB0) when configuring in HW Config ● Have plugged the 2PULSE (6ES7 138-4DD01-0AB0) into a slot that is configured for the 2PULSE (6ES7 138-4DD00-0AB0) The 2PULSE (6ES7 138-4DD01-0AB0) then operates in compatibility mode. -
Page 321: Diagnostics
2PULSE 5.6 Diagnostics Diagnostics 5.6.1 Diagnostics using the LED display LED display at the 2PULSE ① Group error (red) ② Status display for digital input (green) ③ Status display for the digital output (green) Status and error displays by means of LEDs on the 2PULSE The table below shows the status and error displays on the 2PULSE. -
Page 322: Error Types
2PULSE 5.6 Diagnostics 5.6.2 Error types For information on the structure of the channel-related diagnostics, refer to the manual on the interface module used in your ET 200S station. 2PULSE error types The following table shows the error types on the 2PULSE. Error class Meaning Remedy... -
Page 323: Application Examples
2PULSE 5.7 Application Examples Application Examples 5.7.1 Overview Introduction The following application examples give you an overview of possible uses for the 2PULSE in different processes. You use the 2PULSE in various modes according to your process-related requirements. The table below presents the possible modes for selected technological processes: Applications/Technological Processes Mode Filling of liquids... -
Page 324: Example: Filling Liquids
2PULSE 5.7 Application Examples 5.7.2 Example: Filling Liquids Description Filling is started as soon as a container is under the valve. The valve is opened for a preset pulse duration by means of the 24 V control signal. The amount of liquid is proportional to the specified pulse duration. - Page 325 2PULSE 5.7 Application Examples Pulse Output Mode Use channel 0 of the 2PULSE in pulse output mode for the filling process. In this mode, the 2PULSE generates a pulse at the DO digital output (24 V control signal) for the specifiable pulse duration to control the valve.
- Page 326 2PULSE 5.7 Application Examples Parameters The following parameters are required for channel 0 of the 2PULSE to fill liquids in pulse output mode. Table 5- 1 Parameter List for the Filling Process Parameters Set Value Meaning Group diagnosis Enable The following errors trigger a diagnostic message: Short circuit digital output DO ...
- Page 327 2PULSE 5.7 Application Examples Programming/flow diagrams Below you will find a section from a STEP 7 STL program. The configured start address of the inputs and outputs of the 2PULSE is 256. Configured with a short control interface. You use this part of the program to start the filling process. To do this, memory marker M30.0 must be set.
-
Page 328: Example: Heating A Liquid
2PULSE 5.7 Application Examples 5.7.3 Example: Heating a Liquid Description A liquid is heated with an electrical heating element. The energy needed to do this is supplied to the heating element by a switching element (a contactor, for example). The 2PULSE generates a 24 V control signal on its digital output for the switching element. The temperature of the heating element is determined by the on/off length of the 24 V control signal. - Page 329 2PULSE 5.7 Application Examples 2. Monitoring heating process: The error detection/diagnostic function allows you to check via the program that the heating element is being controlled correctly. Software enable (SW_ENABLE) 24 V control signal (DO digital output) STS_ENABLE Heating process starts Figure 5-24 Flow Diagram for Heating a Liquid Parameters...
- Page 330 2PULSE 5.7 Application Examples Programming/Flow Diagram Below you will find a section from a STEP 7 STL program. The configured start address of the inputs and outputs of the 2PULSE is 256. Configured with a short control interface. This program section starts the heating process. To do this, memory bit M30.0 must be set. You provide the output value in memory word MW32.
- Page 331 2PULSE 5.7 Application Examples Additional Applications Limit-value monitoring of the temperature: To monitor the limits of the temperature of the medium, use a temperature sensor evaluated by an analog module. You can monitor the temperature with your control program. Temperature control: To control the temperature of the medium, use a temperature sensor evaluated by an analog module.
-
Page 332: Example: Packing Piece Goods
2PULSE 5.7 Application Examples 5.7.4 Example: Packing Piece Goods Description Packing is started as soon as a folding box from conveyor 1 is in the correct position. The 24 V control signal controls the pusher and, when the compartmentalized conveyor is in operation, pushes the piece goods into the folding box. - Page 333 2PULSE 5.7 Application Examples Pulse Train Mode Use channel 0 of the 2PULSE in pulse train mode to pack piece goods. In this mode, the 2PULSE generates a specifiable number of pulses on the digital output DO to control the pusher.
- Page 334 2PULSE 5.7 Application Examples Parameters The following parameters are required for channel 0 of the 2PULSE to pack piece goods in pulse train mode. Table 5- 3 Parameter List for the Packing of Piece Goods Parameter Set Value Meaning Group diagnostics Enable The following errors trigger a diagnostic message:...
- Page 335 2PULSE 5.7 Application Examples Programming/Flow Diagram Below you will find a section from a STEP 7 STL program. The configured start address of the inputs and outputs of the 2PULSE is 256. Configured with a short control interface. You can use this program section to start the packing process (5 pieces). To do this, memory bit M30.0 must be set.
- Page 336 2PULSE 5.7 Application Examples Wiring / Terminal Assignment Diagram Figure 5-29 Terminal Assignment of the 2PULSE for the Packing of Piece Goods Technological Functions Operating Instructions, 06/2010, A5E00124867-07...
-
Page 337: Example: Applying A Protective Layer
2PULSE 5.7 Application Examples 5.7.5 Example: Applying a Protective Layer Description Metal parts are to be covered with a wax layer. The conveyor belt moves at a constant speed. As soon as a metal part passes the initiator, the valve is opened. The distance the item and the wax have to cover is proportional to the time. - Page 338 2PULSE 5.7 Application Examples On/Off-Delay Mode Use channel 0 of the 2PULSE in on/off-delay mode to control the valve. In this mode, the 2PULSE generates a 24 V control signal at its DO digital output to control the valve. This 24 V control signal is switched on and off with the 24 V enable signal.
- Page 339 2PULSE 5.7 Application Examples Parameters The following parameters are required for channel 0 of the 2PULSE to apply a protective layer in on/off-delay mode. Table 5- 4 Parameter List for Applying a Protective Layer Parameters Set Value Meaning Group diagnosis Enable The following errors trigger a diagnostic message:...
- Page 340 2PULSE 5.7 Application Examples Programming/Flow Diagram Below you will find a section from a STEP7 STL program. The configured start address of the inputs and outputs of the 2PULSE is 256. Configured with a short control interface. You use this part of the program to start the process. To do this, memory marker M30.0 must be set.
-
Page 341: Current Regulation Of A Valve
2PULSE 5.7 Application Examples 5.7.6 Current regulation of a valve Preliminary remark In order to successfully design a control loop for current regulation of a valve, corresponding knowledge of control technology and the concrete control task is required. Description A proportional valve is used to control the pressure in a vessel. In order to compensate for thermal effects in the valve, it is addressed with a controlled current. - Page 342 2PULSE 5.7 Application Examples Requirements ● A valve suitable for controlling (proportional valve) ● Suitable electric data of the valve (24 V, max. 2 A or 4 A with parallel connection of both channels of the 2PULSE) ● When designing the control loop, take the additional data of the valve into consideration, in particular the time constant of the contained inductance and the manufacturer's recommendation regarding the time period of the PWM signal.
- Page 343 STEP 7 in the "PID Control Blocks" directory. Detailed information about FB 41 is available in the System and Standard Functions (http://support.automation.siemens.com/WW/view/en/1214574) reference manual. ● The following example program does not provide for an explicit enable. The controller starts operating immediately after the CPU start.
- Page 344 2PULSE 5.7 Application Examples First, you have to initialize the controller at a restart with the following STL program in OB 100. Adapt the parameters of the FB 41 as required. The program furthermore sets the factor for the time period to "10" (meaning that the active factor is 1.0) and sets the SW_ENABLE bit to "1".
- Page 345 2PULSE 5.7 Application Examples Afterwards, you have to call the control block cyclically in a cyclic interrupt OB (OB 30 to OB 38). The cycle time of the cyclic interrupt OB has to be made known to the FB 41 using the parameter CYCLE, in the above example 5 ms.
- Page 346 2PULSE 5.7 Application Examples Monitoring and setting the control With a variable table, you can monitor or set all the important parameters of the control. If, for example, you change the DB1.SP_INT setpoint, you see how the measured value of the current in DB1.PV responds.
-
Page 347: Technical Specifications Of The 2Pulse, Terminal Assignment
2PULSE 5.8 Technical Specifications of the 2PULSE, Terminal Assignment Technical Specifications of the 2PULSE, Terminal Assignment Overview General technical specifications Dimensions and Weight Dimensions W x H x D (mm) 15 × 81 × 52 Weight Approx. 40 g Data for Specific Modules Number of Channels Voltages, Currents, Potentials Rated load voltage L+ (from the power module) - Page 348 2PULSE 5.8 Technical Specifications of the 2PULSE, Terminal Assignment General technical specifications Data for the Digital Outputs Output voltage with "1" signal Minimum L+ - 1 V Output current with "1" signal – Rated value (4 A at parallel connection) –...
- Page 349 2PULSE 5.8 Technical Specifications of the 2PULSE, Terminal Assignment The figures below show you the maximum permissible output current in relation to the ambient temperature and the frequency. Figure 5-35 Resistive Load - both channels independent, PWM 50/50 Figure 5-36 Resistive Load - both channels independent, PWM 90/10 Technological Functions Operating Instructions, 06/2010, A5E00124867-07...
- Page 350 2PULSE 5.8 Technical Specifications of the 2PULSE, Terminal Assignment Figure 5-37 Resistive Load – only one channel, PWM 50/50 Figure 5-38 Resistive Load – only one channel, PWM 90/10 Technological Functions Operating Instructions, 06/2010, A5E00124867-07...
- Page 351 2PULSE 5.8 Technical Specifications of the 2PULSE, Terminal Assignment Figure 5-39 Resistive Load – both channels in parallel, PWM 50/50 Figure 5-40 Resistive Load – both channels in parallel, PWM 90/10 Technological Functions Operating Instructions, 06/2010, A5E00124867-07...
- Page 352 The cables (terminals 1 and 2 and terminals 5 and 6) must be shielded. The shield must be supported at both ends. To do this, use the shield contact (see the appendix of the ET 200S Distributed I/O System (http://support.automation.siemens.com/WW/view/en/1144348) operating instructions).
-
Page 353: Technical Specifications For Programming, Reference Lists
2PULSE 5.9 Technical Specifications for Programming, Reference Lists Technical Specifications for Programming, Reference Lists Assignment of the short control interface (8 bytes) Address Assignment Channel 0 Channel 1 Word 0 Word 4 Depending on the mode Pulse output: Pulse duration ... - Page 354 2PULSE 5.9 Technical Specifications for Programming, Reference Lists Assignment of the long control interface (12 bytes) Address Assignment Channel 0 Channel 1 Word 0 Word 6 Depending on the mode Pulse output: Pulse duration Pulse-width modulation: Output value Pulse train: Number of pulses ...
- Page 355 2PULSE 5.9 Technical Specifications for Programming, Reference Lists Assignment of the Feedback Interface Address Assignment Channel 0 Channel 1 Byte 0 Byte 4 Bit 7: ERR_24V Bit 6: ERR_DO Bit 5: ERR_PARA Bit 4: ERR_PULS Bit 3: ACK_SW_ENABLE Bit 2: STS_DI Bit 1: STS_DO Bit 0: STS_ENABLE Byte 1...
- Page 356 2PULSE 5.9 Technical Specifications for Programming, Reference Lists Control Signal Notes "Pulse train" operating mode: Number of pulses 1) 2) Number of pulses that are output at the DO digital output on expiration of the on-delay. Time period factor ...
- Page 357 2PULSE 5.9 Technical Specifications for Programming, Reference Lists Notes on the feedback signals Checkback signal Notes ACK_SW_ENABLE Indicates the status of the software enable pending at the 2PULSE. ERR_24V Indicates a short circuit or drop of the encoder supply. ERR_DO Indicates a short circuit at the digital output.
- Page 358 2PULSE 5.9 Technical Specifications for Programming, Reference Lists Parameter List Parameters Value Range Default Group diagnostics Disable/enable Disable Response to CPU/master STOP Turn off DO/ Turn off DO Continue working mode/ DO substitute a value/ DO keep last value Parallel connection Channel 0 and Off/on Channel 0 Diagnostics DO...
-
Page 359: Index
Index 1Count24V Brief instructions on commissioning Counting modes, 19 1Count24V, 13 Isochrone mode, 12 1Count5V, 123 Measuring modes, 54 1SSI, 234 Operating modes, 17 2PULSE, 268 Technical specifications, 115 Terminal assignment, 16 1Count5V Counting modes, 129 Comparator of the 1SSI, 245 Isochronous mode, 122 Control and feedback interface Measuring Modes, 165... - Page 360 Index Feedback interface Parameters 1Count24V counting modes, 45 1Count24V counting modes, 52 1Count24V measuring modes, 75 1Count24V measuring modes, 82 1Count24V position feedback, 101 1Count24V position feedback, 107 1Count5V counting modes, 155 1Count5V counting modes, 163 1Count5V measuring modes, 188 1Count5V measuring modes, 195 1Count5V position feedback, 215 1Count5V position feedback, 221...
Need help?
Do you have a question about the SIMATIC ET 200S and is the answer not in the manual?
Questions and answers