MINN KOTA ULTREX Installation Instructions Manual
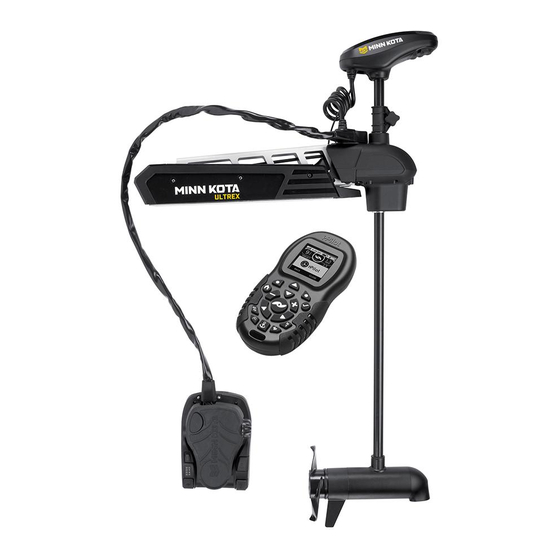
Bow-mount trolling motor
Hide thumbs
Also See for ULTREX:
- Installation instructions manual (76 pages) ,
- Owner's manual (13 pages) ,
- Manual (13 pages)
Table of Contents
Advertisement
Available languages
Available languages
Advertisement
Table of Contents

Related Manuals for MINN KOTA ULTREX


Summary of Contents for MINN KOTA ULTREX
- Page 1 ULTREX™ BOW-MOUNT TROLLING MOTOR INSTALLATION INSTRUCTIONS...
-
Page 2: Serial Number
Countless hours of research and testing provide you the Minn Kota advantage that can truly take you “Anywhere. Anytime.” We don’t believe in shortcuts. We are Minn Kota. And we are never done helping you catch more fish. - Page 3 WARNING You are responsible for the safe and prudent operation of your vessel. We have designed your Minn Kota product to be an accurate and reliable tool that will enhance boat operation and improve your ability to catch fish. This product does not relieve you from the responsibility for safe operation of your boat.
- Page 4 KNOW YOUR BOAT Port Starboard Inboard Outboard Keel Port Starboard Gunwale Transom Stern Gunwale Stern Hull 4 | minnkotamotors.com ©2016 Johnson Outdoors Marine Electronics, Inc.
- Page 5 INSTALLING THE ULTREX Your new Ultrex comes with everything you’ll need to directly install it to the boat. This motor can be directly mounted to the boat or coupled with a Minn Kota quick release bracket for ease of mounting and removal. For installation with a quick release bracket, refer to the installation instructions provided with the bracket.
- Page 6 ASSEMBLY OF MOTOR TO MOUNT MOUNTING CONSIDERATIONS It is recommended that the motor be mounted as close to the keel or centerline of View accessories the boat as possible. Make sure the area under the mounting location is clear to drill available for your holes and install nuts and washers.
- Page 7 INSTALLING THE BOw-MOUNT e. Reinstall the 5/16" Allen Screw and Lock Washer Allen Screw with and tighten to 18 to 20 ft-lbs with a Torque Lock Washer Wrench. NOTE: The 5/16" Allen Screw must be tightened when installed and periodically tightened to 18 to 20 ft-lbs.
- Page 8 INSTALLING THE BOw-MOUNT INSTALLING THE BOw-MOUNT c. The Mount can be installed on either the Port or Starboard side of the boat based on personal preference. Test the placement of the Hold-Down Strap to be sure it can hold the Mount as placed. The placement of the buckle on the Hold-Down Strap either inboard or outboard is based on Deck of Boat...
- Page 9 INSTALLING THE GAS SPRING PIN ITEM(S) NEEDED #4 x 6 #5 x 6 #6 x 6 Put a 1/4-20 x 3 1/2" Screw (Item #4) in each Screw of the drilled locations. The Screw should pass through the Mount Plate and the boat deck. k.
- Page 10 INDEXING THE MOTOR ITEM(S) NEEDED #26 x 2 #25 x 2 #27 x 1 c. Locate the upper Gas Spring Pin (Item #27) and Gas Spring Phillips Screw Spacers (Item #26) in the bag assembly. Align the end Cylinder Outer Arm of the Gas Spring with the holes in the Outer Arm.
- Page 11 INDEXING THE MOTOR a. Turn the Power Switch "on" and steer the motor so that the Control Head is in line with the keel of Control Head the boat. This can be done by steering the motor with the Foot Pedal, turning the motor with the remote, or manually turning the head of the Pedal Control Sleeve Assembly...
- Page 12 INDEXING THE MOTOR e. Remove the two screws that hold the Wrap Drum Screws Steering Steering Motor Cover in place with a #1 Phillips Screwdriver. Module Connection Plug Steering Motor Once removed, lift the Wrap Drum Cover away Connection Plug from the Steering Module.
- Page 13 INDEXING THE MOTOR h. While holding the Wrap Drum just above the Steering Motor Steering Wrap Drum Cable Gear, and maintaining tension on the Module Connection Wire Steering Cables, carefully rotate the Wrap Drum right or left until the top of the Foot Pedal is parallel with the deck of the boat.
- Page 14 INDEXING THE MOTOR k. Reconfirm that the Steering Cables are tight Wrap Drum Cover and then carefully thread the Steering Motor Steering Motor Connection Wire through the top of the Wrap Connection Wire Drum Cover. The male plug comes from the Cable Anchor through the opening at the bottom of the Wrap Drum Cover.
- Page 15 Orientate the Pedal Control Sleeve Assembly for a Starboard Mount By default, the Pedal Control Sleeve Assembly is factory set so that when your Ultrex is installed on the port side of your boat, the Pedal Control Sleeve Assembly points inboard. Should you choose to install your Ultrex on the Starboard side of your boat, it is recommended that the default mounting location be changed so that the Pedal Control Sleeve Assembly points inboard.
- Page 16 ORIENTATE THE PEDAL CONTROL SLEEvE ASSEMBLY FOR A STARBOARD MOUNT c. Remove the Connector Cover from the Wrap Flat Drum Cover using a 1/8” wide Flat Screwdriver Screwdriver to release it. Release it by pressing the flat part of the screwdriver in the slot closest to the center of the Connector Cover and prying upwards.
- Page 17 ORIENTATE THE PEDAL CONTROL SLEEvE ASSEMBLY FOR A STARBOARD MOUNT g. The Cable Anchor functions to hold the Steering Cables in place. The cables run from the Cable Anchor and wrap around the Wrap Drum. The Cable Anchor is secured to the Steering Module with two screws.
- Page 18 ORIENTATE THE PEDAL CONTROL SLEEvE ASSEMBLY FOR A STARBOARD MOUNT Secure the Cable Anchor to the inboard side Screws Steering of the Steering Module by loosely securing the Module screws in place using a #2 Phillips screwdriver. k. Once the Cable Anchor is secured, finish prying the Wrap Drum straight up, off of the Cable Gear Cable Anchor until the Wrap Drum is free of the Cable Gear.
- Page 19 ORIENTATE THE PEDAL CONTROL SLEEvE ASSEMBLY FOR A STARBOARD MOUNT n. Re-tighten the two screws that fasten the Cable Screws Steering Anchor to the top of the Steering Module using a Module #2 Phillips screwdriver. Tighten to 25 in-lbs. Cable Anchor o.
- Page 20 The Bow-Mount Stabilizer Bracket can be installed on the left or right side of the Steering Module. When mounting the bracket onto the Ultrex, the two Nylock Nuts (Item #16) are discarded because the bolts are secured directly into the Steering Module.
- Page 21 PLACING THE BOw-MOUNT STABILIZER ITEM(S) NEEDED #17 x 2 #18 x 2 c. Determine the desired orientation of the Steering Module Stabilizer Bracket and attach it to the bottom of the Steering Module. Place a Lock Washer (Item Lock Washer and Cap Screw #18) on each of the two 5/16"...
- Page 22 MOUNTING THE FOOT PEDAL h. Replace the Bottom Bumper on the Aluminum Stabilizer Bracket Rod, opposite from the threads. Thread the Aluminum Rod into the Stabilizer Bracket with the Bottom Bumper towards the Jam Nut boat deck. Adjust the Aluminum Rod up or down in the Stabilizer Bracket so that the Bottom Bumper Aluminum Rod just touches the support surface.
- Page 23 CONNECTING UNIvERSAL SONAR Connecting Universal Sonar Your trolling motor is pre-installed with a Universal Sonar transducer system. Universal Sonar is a 2D sonar transducer with a temperature sensor that is integrated into the lower unit of the trolling motor. It has an operating frequency of 83/200 kHz. Connecting this transducer to a compatible fish finder* gives you a 2D sonar view of what is happening directly below your trolling motor.
- Page 24 Universal Sonar. If two cables are present, one is to connect the Universal Sonar, and the other is to connect the i-Pilot Link connection. Please follow the Minn Kota recommendations on routing the cables to optimize mobility and maximize functionality.
- Page 25 ROUTING UNIvERSAL SONAR & -PILOT LINK CABLES ITEM(S) NEEDED #24 x 1 a. Place the motor in the stowed position. b. Locate the Universal Sonar and i-Pilot Link Control Head Cable Connection, if equipped, at the base of the Control Head. Universal i-Pilot Link Cable Sonar...
- Page 26 ROUTING UNIvERSAL SONAR & -PILOT LINK CABLES d. Grasp the opposite ends of the extension cables for the Universal Sonar, and i-Pilot Link, if Tie Wrap Cable Placement equipped. Control Head Universal e. Start at the top of the Coil Cord, where it is Sonar Universal Coil...
- Page 27 INSTALLING THE PROP Installing the Prop ITEM(S) NEEDED #7 x 1 #9 x 1 #10 x 1 #8 x 1 CAUTION Drive Pin Armature Shaft Disconnect the motor from the battery before beginning any prop work. Propeller a. Take the Drive Pin (Item #10) and slide it through the Hole in the Armature Shaft.
- Page 28 CA UTION These guidelines apply to general rigging to support your Minn Kota motor. Powering multiple motors or additional electrical devices from the same power circuit may impact the recommended conductor gauge and circuit breaker size. If you are using wire longer than that provided with your unit, follow the conductor gauge and circuit breaker sizing table below.
- Page 29 Review your charger’s manual carefully or consult the manufacturer prior to use to ensure your charger is compatible. Minn Kota recommends using Minn Kota brand chargers to recharge the batteries connected to your Minn Kota trolling motor, as they have been engineered to work with motors that include a bonding wire.
- Page 30 CONNECTING THE BATTERIES IN SERIES The negative (-) connection must be connected to the negative terminal of the same battery that the trolling motor negative lead connects to. In the diagrams below this battery is labeled “Low Side” Battery. Connecting to any other trolling motor battery will input positive voltage into the “ground”...
- Page 31 Keep leadwire wing nut connections tight and solid to battery terminals. • Locate battery in a ventilated compartment. This completes the installation of your Ultrex. A complete Owner’s Manual can be downloaded at minnkotamotors.com. minnkotamotors.com | 31 ©2016 Johnson Outdoors Marine Electronics, Inc.
-
Page 32: Recommended Accessories
Stop buying new batteries and start taking care of the ones you’ve got. Many chargers can actually damage your battery over time – creating shorter run times and shorter overall life. Digitally controlled Minn Kota chargers are designed to provide the fastest charge that protect and extend battery life. - Page 33 ULTREX™ MOTEUR DE PÊCHE À LA TRAÎNE MONTÉ SUR L’ÉTRAVE INSTRUCTIONS D'INSTALLATION...
- Page 34 à amarrer votre embarcation. C’est pourquoi nous construisons les propulseurs électriques les plus intelligents, les plus solides et les plus faciles à utiliser. Chaque aspect d’un propulseur électrique Minn Kota est réfléchi et étudié jusqu’à ce qu’il soit digne de porter notre nom.
- Page 35 AVERTISSEMENT Vous seul êtes responsable de la navigation sécuritaire et prudente sur votre bateau. Nous avons conçu votre Minn Kota pour qu’il soit un outil précis et fiable qui vous permettra d’améliorer l’utilisation de votre bateau et d’accroître votre capacité de pêcher des poissons.
- Page 36 CONNAISSEZ VOTRE BATEAU Étrave Bâbord Tribord En-bord Hors-bord Quille Bâbord Tribord Plat-bord Tableau Arrière Stern Plat-bord Étrave Poupe Coque 36 | minnkotamotors.com ©2016 Johnson Outdoors Marine Electronics, Inc.
- Page 37 INSTALLATION DE ULTREX Votre nouveau Ultrex est offert avec tout ce dont vous aurez besoin pour le montage direct au bateau. Ce moteur peut être monté directement sur le bateau ou couplé avec un support à dégagement rapide Minn Kota pour un montage et un démontage simples. Pour l’installation avec un support à...
- Page 38 Envisagez l’installation d’un électrique sur support à dégagement rapide ou un adaptateur. Pour la liste complète des minnkotamotors.com. accessoires Minn Kota, veuillez visiter minnkotamotors.com. OUTILS ET RESSOURCES NÉCESSAIRES • Tournevis Phillips nº 2 •...
- Page 39 INSTALLATION DU SUPPORT à L’ÉTRAvE e. Reposez la vis hexagonale 5/16 po (7,94 mm) et Vis Hexagonale la rondelle de blocage puis serrez entre 18 et 20 Avec Rondelle de pi-lb (24,4 et 27,1 Nm) avec une clé de serrage. Blocage REMARQUE: La vis hexagonale 5/16...
- Page 40 INSTALLATION DU SUPPORT à L’ÉTRAvE c. Le support peut être installé soit sur le côté bâbord ou tribord du bateau selon la préférence personnelle. Faites un test de l’emplacement de la courroie de retenue pour s’assurer qu’elle peut retenir le support tel s’installé. On peut placer la boucle sur la courroie de retenue soit en-bord Pont du Bateau Courroie de Retenue...
- Page 41 INSTALLATION DE LA GOUPILLE DU RESSORT à GAZ ARTICLE(S) REQUIS #4 x 6 #5 x 6 #6 x 6 Mettre une vis 1/4-20 x 3 1/2 po (0,635-20 x 88,9 mm) (Article n° 4) dans chaque trou percé. La vis devrait traverser la plaque de support et le pont du bateau.
- Page 42 INDEXATION DU MOTEUR ARTICLE(S) REQUIS #26 x 2 #25 x 2 #27 x 1 c. Localisez la goupille du ressort à gaz supérieure Cylindre Vis Cruciforme (Article n° 27) et les entretoises (Article n° 26) dans Ressort à Gaz Bras Externe le sachet d’assemblage.
- Page 43 INDEXATION DU MOTEUR a. Activez le commutateur de mise sous tension et dirigez le moteur de manière à ce que la Tête de Contrôle tête de contrôle soit en ligne avec la quille du bateau. On peut faire ceci en dirigeant le moteur avec la pédale, en tournant le moteur avec la Ensemble du Manchon de...
- Page 44 INDEXATION DU MOTEUR e. Retirez les deux vis qui retiennent le couvercle Module du Fiche de du tambour couvert en place avec un tournevis Gouvernail Connexion Fiche de cruciforme n° 1. Une fois retiré, soulevez le du Moteur du Connexion Gouvernail couvercle du tambour couvert hors du module du du Moteur du...
- Page 45 INDEXATION DU MOTEUR h. Tout en tenant le tambour couvert juste au- Fil de Connexion Module du Tambour dessus de l’engrenage de câble et en maintenant Gouvernail du Moteur du Couvert Gouvernail la tension sur les câbles du gouvernail, tournez méticuleusement le tambour couvert à...
- Page 46 INDEXATION DU MOTEUR k. Reconfirmez que les câbles du gouvernail sont Couvercle de serrés puis enfilez délicatement le câble de Tambour Couvert connexion du moteur du gouvernail par le dessus Fil de Connexion du Moteur du Gouvernail du couvercle du tambour couvert. La fiche mâle provient de l’ancre du câble par l’ouverture au bas du couvercle du tambour couvert.
- Page 47 Tribord Par défaut, l’ensemble du manchon de pédale de commande est réglé en usine afin que lorsque votre Ultrex est installé sur le côté bâbord de votre bateau, il pointe vers l’en-bord. Si vous choisissez d’installer votre Ultrex sur le côté tribord de votre bateau, il est recommandé...
- Page 48 ORIENTER L’ENSEMBLE DU MANCHON DE PÉDALE DE COMMANDE à UN SUPPORT SUR TRIBORD c. Retirez le couvercle du connecteur du couvercle Tournevis du tambour couvert à l’aide d’un tournevis plat Plat de 1/8 po (3,17 mm) pour le dégager. Dégagez-le en appuyant la partie plate du tournevis dans la fente la plus proche du centre du couvercle du Couvercle...
- Page 49 ORIENTER L’ENSEMBLE DU MANCHON DE PÉDALE DE COMMANDE à UN SUPPORT SUR TRIBORD g. L’ancre du câble fonctionne afin de tenir les câbles du gouvernail en place. Les câbles sont acheminés de l’ancre du câble et s’enroulent autour du tambour couvert. L’ancre du câble est fixée au module du gouvernail avec deux vis.
- Page 50 ORIENTER L’ENSEMBLE DU MANCHON DE PÉDALE DE COMMANDE à UN SUPPORT SUR TRIBORD Fixez l’ancre de câble sur le côté en-bord du Module du module du gouvernail en fixant lâchement les vis gouvernail en place à l’aide d’un tournevis cruciforme n° 2. k.
- Page 51 ORIENTER L’ENSEMBLE DU MANCHON DE PÉDALE DE COMMANDE à UN SUPPORT SUR TRIBORD n. Resserrez les deux vis qui fixent l’ancre du câble Module du au-dessus du module du gouvernail à l’aide d’un Gouvernail tournevis n° 2. Serrez à 25 po-lb (2,82 Nm). Ancre de Câble o.
- Page 52 La ferrure du stabilisateur peut être installée sur le côté gauche ou sur le côté droit du module du gouvernail. Lors du montage de la ferrure sur l’Ultrex, les deux écrous Nylock (article n° 16) sont jetés parce que les boulons sont fixés directement dans le module du gouvernail.
- Page 53 PLACER LE STABILISATEUR DU SUPPORT à L’ÉTRAvE ARTICLE(S) REQUIS #17 x 2 #18 x 2 c. Déterminez l’orientation souhaitée de l’ensemble Module du de stabilisateur pour le fixer à la partie inférieure Gouvernail du module du gouvernail. Pour placez une Rondelle de Frein et rondelle de blocage (article n°...
- Page 54 MONTAGE DE LA PÉDALE h. Remettez le pare-chocs inférieur sur la tige en Ferrure de aluminium, à l’opposée du filetage. Stabilisation Filetez la tige en aluminium dans la ferrure du stabilisateur avec le pare-chocs inférieur orienté Contre-écrou vers le pont du bateau. Ajustez la tige en aluminium vers le haut ou vers le bas dans la ferrure du stabilisateur de sorte que Tige en...
- Page 55 CONNEXION DE L’UNIvERSAL SONAR Connexion de l’Universal Sonar Un transducteur sonar universel est déjà installé sur votre propulseur électrique. Le Universal Sonar est un transducteur sonar 2D, doté d’un capteur de température intégré dans le module inférieur du propulseur électrique. Il se caractérise par une fréquence de fonctionnement de 83/200 kHz.
- Page 56 Sonar. Si deux câbles sont présents, un connecte l’Universal Sonar et l’autre connecte l’i-Pilot Link. Veuillez suivre les recommandations de Minn Kota sur l’acheminement des câbles afin d’optimiser et maximiser la fonctionnalité. L’acheminement sera le même, peu importe le nombre de câbles présents. Utiliser les directives suivantes pour correctement acheminer les câbles.
- Page 57 ACHEMINEMENT DES CâBLES DE L’UNIvERSAL SONAR ET -PILOT LINK ARTICLE(S) REQUIS #24 x 1 a. Placez le moteur dans la position d’arrimage. b. Localisez la connexion de câble de l’Universal Tête de Contrôle Sonar et du i-Pilot Link, si équipé, à la base de la tête de contrôle.
- Page 58 ACHEMINEMENT DES CâBLES DE L’UNIvERSAL SONAR ET -PILOT LINK d. Saisissez les extrémités opposées des rallonges Emplacement pour l’Universal Sonar et l’i-Pilot Link, si équipé. de l’attache Rapide du Câble Tête de e. Commencez en haut du cordon enroulé, où il Universal Contrôle est fixé...
- Page 59 INSTALLATION DE L’HÉLICE Installation de l’Hélice ARTICLE(S) REQUIS #7 x 1 #9 x 1 #10 x 1 #8 x 1 MISE EN GARDE Ergot Arbre Armature d’Entraînement Débranchez le moteur de la batterie avant d’effectuer tout travail ou entretien sur l’hélice. Hélice a.
- Page 60 MISE EN GARDE Ces lignes directrices s’appliquent au gréement général pour soutenir le moteur de Minn Kota. L’alimentation de multiples moteurs ou d’autres appareils électriques, à partir du même circuit d’alimentation, peut infl uer sur le gabarit de conducteurs et le dimensionnement des disjoncteurs recommandé.
- Page 61 Consultez le “Tableau des dimensions de gabarit des conducteurs et disjoncteurs” dans la section précédente pour trouver le disjoncteur ou fusible approprié convenant à votre moteur. Pour les moteurs nécessitant un disjoncteur de 60 A, le disjoncteur Minn Kota MKR-19 60 A est recommandé.
- Page 62 CONNEXION DES BATTERIES EN SÉRIE La connexion négative (-) doit être connectée à la borne négative de la même batterie à laquelle la borne négative du propulseur électrique est connectée. Sur le tableau, cette batterie est appelée batterie « côté inférieur ». La connexion à une autre batterie du propulseur électrique fera entrer une tension positive dans la «...
- Page 63 Gardez le serrage des écrous de papillon de raccordement solide et bien serré autour des bornes de la batterie. • Installez la batterie dans un compartiment ventilé. Ceci termine l'installation de votre Ultrex. Manuel du propriétaire complet peut être téléchargé à l'adresse minnkotamotors.com. minnkotamotors.com | 63...
- Page 64 Plusieurs chargeurs peuvent en fait endommager les batteries à la longue, pouvant entraîner une autonomie réduite et une durée de vie plus courte. Les chargeurs Minn Kota à commande numérique assurent une charge rapide pour une protection et une durée de vie prolongée.
Need help?
Do you have a question about the ULTREX and is the answer not in the manual?
Questions and answers
Do you have templates available for the mounting and the removable mount?
Yes, MINN KOTA provides templates for mounting the ULTREX and the removable mount. The context mentions using a template to drill holes and align parts during installation.
This answer is automatically generated