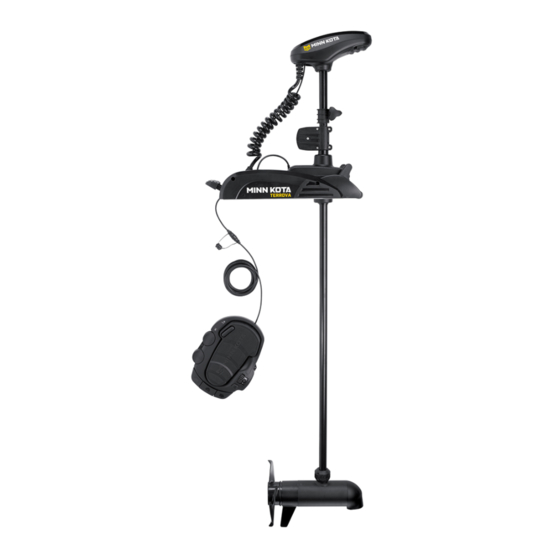
MINN KOTA TERROVA Installation Instructions Manual
Bow-mount trolling motor
Hide thumbs
Also See for TERROVA:
- Owner's manual (62 pages) ,
- Installation instructions manual (49 pages) ,
- User manual (23 pages)
Table of Contents
Advertisement
Advertisement
Table of Contents

Related Manuals for MINN KOTA TERROVA


Summary of Contents for MINN KOTA TERROVA
- Page 1 TERROVA BOW-MOUNT TROLLING MOTOR Installation Instructions...
-
Page 2: Motor Information
Thank you for choosing Minn Kota. We believe that you should spend more time fishing and less time positioning your boat. That’s why we build the smartest, toughest, most intuitive trolling motors on the water. Every aspect of a Minn Kota trolling motor is thought out and rethought until it’s good enough to bear our name. -
Page 3: Safety Considerations
WARNING You are responsible for the safe and prudent operation of your vessel. We have designed your Minn Kota product to be an accurate and reliable tool that will enhance boat operation and improve your ability to catch fish. This product does not relieve you from the responsibility for safe operation of your boat. -
Page 4: Know Your Boat
KNOW YOUR BOAT Port Port Starboard Starboard Inboard Inboard Outboard Outboard Keel Keel Starboard Starboard Port Port Gunwale Gunwale Transom Transom Stern Stern Gunwale Gunwale Stern Stern Hull Hull 4 | minnkotamotors.com ©2023 Johnson Outdoors Marine Electronics, Inc. -
Page 5: Installation
INSTALLING THE TERROVA Your new Terrova comes with everything you’ll need to directly install it to the boat. This motor can be directly mounted to the boat or coupled with a Minn Kota quick release bracket for ease of mounting and removal. For installation with a quick release bracket, refer to the installation instructions provided with the bracket. - Page 6 INSTALLING THE TERROVA MOUNTING CONSIDERATIONS It is recommended that the motor be mounted as close to the centerline of the boat as possible. Make sure the area under the mounting location is clear to drill holes and install View accessories nuts and washers.
- Page 7 INSTALLING THE TERROVA Remove the Right Sideplate. Swing the Left Sideplate out and away from the Base Extrusion. Base Extrusion Base Extrusion Left Sideplate Left Sideplate Right Sideplate Right Sideplate Make sure that the Power Cables from the battery are disconnected or that the breaker, if equipped,...
- Page 8 INSTALLING THE TERROVA ITEM(S) NEEDED #4 x 6 When the motor is in the deployed position, make sure that the Shaft is 1-1/2" out past the Gunwale of the boat. The lower unit, when stowed and deployed must not encounter any obstructions.
- Page 9 INSTALLING THE TERROVA ITEM(S) NEEDED #1 x 6 #3 x 6 #4 x 6 #2 x 6 Put a 1/4-20 x 2" (Item #1) Screw into each of the drilled locations. The Screw should pass through Screw Screw the Base Extrusion and the boat deck. If the Rubber Washers (Item #4) are used, they should sit between the Base Extrusion and boat deck.
-
Page 10: Installing The Foot Pedal
INSTALLING THE FOOT PEDAL Replace the four sideplate screws using a #3 Phillips Screwdriver. Two of these screws will be located on each side of the mount. Sideplate Screw Sideplate Screw Installing the Foot Pedal ITEM(S) NEEDED #13 x 5 #EE x 1 Take the Foot Pedal (Item #EE) and turn it over. - Page 11 Feature & Cable Identification The Terrova is pre-installed with Advanced GPS Navigation - including the ability to connect via Ethernet to a Humminbird unit. It may also be installed with sonar, either Dual Spectrum CHIRP or Built-in MEGA Down Imaging. These features may be installed on their own or in combination with another feature.
- Page 12 CRITICAL CABLE ROUTING If TWO connectors are present below the Control Head, the trolling TWO Connectors Control Control motor will be equipped with: Head Head Advanced GPS Advanced GPS Ethernet Ethernet Advanced GPS Navigation & Dual Spectrum CHIRP or Built-in Connector Connector MEGA Down Imaging - If Advanced GPS Navigation is pre-...
- Page 13 FEATURE & CABLE MANAGEMENT Feature & Cable Management DUAL SPECTRUM CHIRP Your trolling motor may be pre-installed with a transducer system Dual Spectrum CHIRP featuring Humminbird’s Dual Spectrum CHIRP. CHIRP stands for “Compressed High Intensity Radar Pulse.” Dual Spectrum CHIRP is a 2D sonar transducer with a temperature sensor that is integrated into the lower unit of the trolling motor.
- Page 14 DUAL SPECTRUM CHIRP The integrated design of the Dual Spectrum CHIRP transducer protects it in the lower unit of the trolling motor from underwater hazards and prevents tangles and damage to the transducer cables. In certain situations, air bubbles may adhere to the surface of the Dual Spectrum CHIRP transducer and affect the performance.
- Page 15 If using cable ties, do not over-tighten. Any excess cable should be bundled in a loose loop of no less than 4” in diameter. The connection cable should be routed to the fish finder following Minn Kota recommendations on routing the cables to optimize mobility and maximize functionality.
- Page 16 DUAL SPECTRUM CHIRP Verify the length of your motor shaft to determine if Shafts 60 inches or more Shafts less than 60 inches Critical Cable Routing applies to your trolling motor. Shaft Shaft Shaft Shaft If the trolling motor shaft is 60 inches or more, adjust the Dual Spectrum CHIRP Cable to exit the Coil Dual Dual...
- Page 17 DUAL SPECTRUM CHIRP ITEM(S) NEEDED #17 or 18 x 1 If installing directly to a Helix Adapter Cable, align Fourteen Pin Fourteen Pin Receptacle Receptacle the pins on the accessory cable or extension cable Connector Connector with the receptacle on the Helix Adapter Cable (Item #17 or 18).
- Page 18 BUILT-IN MEGA DOWN IMAGING Considerations for Connecting and Routing Built-in MEGA Down Imaging If Built-in MEGA Down Imaging is pre-installed on your trolling motor, one Built-in MEGA Down Imaging accessory cable will exit the base of the Control Head and run down the center of the Coil Cord. Built-in MEGA Down Imaging requires cables to be connected to an output device such as a Humminbird®...
- Page 19 BUILT-IN MEGA DOWN IMAGING CAUTION Failure to follow the recommended wire routing for installed features, if equipped, may cause damage to the product and void your product warranty. Route cables away from pinch points or other areas that may cause them to bend in sharp angles. Routing the cables in any way other than directed may cause damage to the cables by being pinched or severed.
- Page 20 BUILT-IN MEGA DOWN IMAGING Verify the length of your motor shaft to determine if Shafts 60 inches or more Shafts less than 60 inches Critical Cable Routing applies to your trolling motor. Shaft Shaft Shaft Shaft If the trolling motor shaft is 60 inches or more, Built-in Built-in MEGA...
- Page 21 BUILT-IN MEGA DOWN IMAGING ITEM(S) NEEDED #17 or 18 x 1 If installing directly to a Helix Adapter Cable, align Receptacle Receptacle Fourteen Pin Fourteen Pin the pins on the accessory cable or extension cable Connector Connector with the receptacle on the Helix Adapter Cable (Item #17 or 18).
- Page 22 ADVANCED GPS NAVIGATION Your Minn Kota trolling motor and Humminbird fish finder communicate with each other to change the way you fish. Advanced GPS Navigation offers a large array of features including controlling speed, steering, Spot-Lock, and the ability to record and retrace paths on the water, all at your fingertips.
- Page 23 (if equipped) (if equipped) Coil Cord Coil Cord NOTICE: Terrova trolling motors with Advanced GPS Navigation may also be equipped with Sonar. Sonar is pre-installed from the factory and may be either Dual Power Leads Power Leads Spectrum CHIRP or Built-in MEGA Down Imaging. If...
- Page 24 ADVANCED GPS NAVIGATION ITEM(S) NEEDED #14 x 1 Identify the keyed Receptacle on the Ethernet Advanced GPS Advanced GPS Control Control Cable (Item #14). It will be keyed to fit with the Eight Ethernet Ethernet Head Head Advanced GPS Advanced GPS Pin Advanced GPS Ethernet Connector below the Connector Connector...
- Page 25 Receptacle to the Advanced GPS Ethernet Cable Ethernet Cable Ethernet Connector. Advanced Advanced Critical Critical NOTICE: Minn Kota recommends routing the Ethernet Cable Cable Ethernet Ethernet Cable through the Coil Cord when making the Ethernet Routing Routing Connector Connector connection.
- Page 26 ADVANCED GPS NAVIGATION If Sonar is present, take the Sonar Cable and unwind it from the inside of the Coil Cord, working Control Head Control Head from the Mount towards the Control Head. Once loose, the Sonar Cable will run parallel to the Advanced GPS Advanced GPS Coil Cord, but hang freely.
- Page 27 Cable Cable Helix Adapter Cable Helix Adapter Cable Cable to secure the connection. NOTICE: Minn Kota provides one Helix Adapter Cable (AS EC QDE - Ethernet Adapter Cable - 720074-1) with every trolling motor equipped with Advanced GPS Navigation. Ethernet...
- Page 28 SECURING ACESSORY CABLES Securing Accessory Cables NOTICE: If only one cable is present below the Control Before securing the cables, please review the "Identifying Trolling Head, this installation is not applicable. Motor Features and Their Associated Cables" section of this document.
- Page 29 SECURING ACESSORY CABLES Confirm all Accessory Cables are connected to an output device as desired. With the motor in the deployed position, locate the Advanced GPS Sonar Cable Sonar Cable Ethernet Connector below the Control Head. Starting just below the Control Head, take both the Advanced Advanced GPS Ethernet...
- Page 30 SECURING ACESSORY CABLES Follow the Cables from the Control Head to the Control Control Mount and place additional Cable Ties every 4 Head Head First First inches around the Cables after the first Cable Approximately Approximately Cable Tie Cable Tie 4 inches 4 inches Tie.
- Page 31 Accessory Cables to exit the Coil Cord three coils before the Motor Base. Review the “Critical Cable Routing” section of this document for more details. NOTICE: Minn Kota recommends routing the Accessory Cables through the Coil Cord. Shafts 60 inches or more Shafts less than 60 inches...
- Page 32 SECURING ACESSORY CABLES Look at the placement of the Cable Ties and make Accessory Cables Accessory Cables sure that at least 2 Cable Ties are present on the Tied Together Tied Together Accessory Cables after they exit the Coil Cord. If additional Cable Ties are needed, is may be Cable Cable...
-
Page 33: Installing The Prop
INSTALLING THE PROP Installing the Prop CAUTION Prop Prop Drive Drive Washer Washer Disconnect the motor from the battery before Prop Prop beginning any prop work or maintenance. While holding the Shipping Spacer with a pliers or vise grip, remove the Prop Nut, Red Shipping Shipping Shipping Washer, Prop Washer and Spacer, being careful... - Page 34 INSTALLING THE PROP Holding the end of the Armature Shaft with a Flat Blade Screwdriver, tighten the Prop Nut with a 9/16" Box End or Open End Wrench. Prop Nut Prop Nut Tighten the Prop Nut 1/4 turn past snug to Prop Washer Prop Washer 25-35 in-lbs.
-
Page 35: Battery & Wiring Installation
CAUTION These guidelines apply to general rigging to support your Minn Kota motor. Powering multiple motors or additional electrical devices from the same power circuit may impact the recommended conductor gauge and circuit breaker size. If you are using wire longer than that provided with your unit, follow the conductor gauge and circuit breaker sizing table below. -
Page 36: Selecting The Correct Batteries
(flooded, AGM or GEL). Lithium-Ion batteries maintain higher voltages for longer periods of time than lead-acid. Therefore, running a Minn Kota trolling motor at speeds higher than 85% for a prolonged period could cause permanent damage to the motor. -
Page 37: Connecting The Batteries
Additional Accessories Connected to Trolling Motor Batteries Significant damage to your Minn Kota motor, your boat electronics, and your boat can occur if incorrect connections are made between your trolling motor batteries and other battery systems. Minn Kota recommends using an exclusive battery system for your trolling motor. -
Page 38: Connecting The Batteries In Series
CONNECTING THE BATTERIES IN SERIES CONNECTING THE BATTERIES IN SERIES (IF REQUIRED FOR YOUR MOTOR) 24-Volt Systems Two 12-volt batteries are required. The batteries must be wired in +24 Volts to trolling motor series, only as directed in the wiring diagram, to provide 24 volts. To trolling motor negative positive (or circuit breaker) 1. - Page 39 Keep leadwire wing nut connections tight and solid to battery terminals. • Locate battery in a ventilated compartment. This completes the installation of your Terrova. A complete Owner’s Manual can be downloaded at minnkotamotors.com. minnkotamotors.com | 39 ©2023 Johnson Outdoors Marine Electronics, Inc.
-
Page 40: Recommended Accessories
Stop buying new batteries and start taking care of the ones you’ve got. Many chargers can actually damage your battery over time – creating shorter run times and shorter overall life. Digitally controlled Minn Kota chargers are designed to provide the fastest charge that protect and extend battery life. MK212PCL...
Need help?
Do you have a question about the TERROVA and is the answer not in the manual?
Questions and answers