MINN KOTA ULTREX Owner's Manual
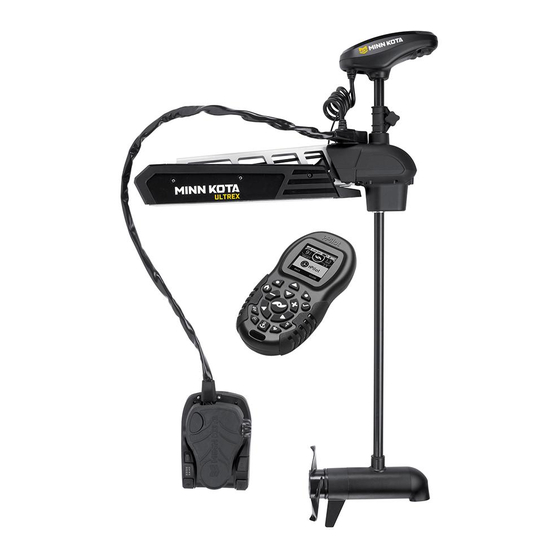
Bow-mount trolling motor
Hide thumbs
Also See for ULTREX:
- Installation instructions manual (76 pages) ,
- Manual (13 pages) ,
- Installation instructions manual (65 pages)
Advertisement
Quick Links
Advertisement

Related Manuals for MINN KOTA ULTREX


Summary of Contents for MINN KOTA ULTREX
- Page 1 ULTREX ™ BOW-MOUNT TROLLING MOTOR Owner's Manual...
- Page 2 Table Of CONTeNTs SAFETY CONSIDERATIONS ....................4 WARRANTY ........................5 KNOW YOUR BOAT ......................6 FEATURES ........................7 INSTALLATION ......................... 8 Assembly of Motor to Mount ..................9 Installing the Bow-Mount ..................10 Installing the Gas Spring Pin ..................12 Indexing the Motor ....................
- Page 3 KNOW YOUR bOaT Port Starboard Inboard Outboard Keel Port Starboard Gunwale Transom Stern Gunwale Stern Hull 6 | minnkotamotors.com ©2018 Johnson Outdoors Marine Electronics, Inc.
- Page 4 feaTURes i-Pilot/ i-Pilot Link Control Pull Grip and Cable Mono-Arm Depth Collar Knob Steering Module Lift-Assist Momentary On Button Speed Control Lifetime Warranty Flexible Composite Shaft Power Switch Spot-Lock AutoPilot Heel Block Constant High-Impact Indicator Panel On Button Composite Material Power AutoPilot Cool Quiet...
- Page 5 INSTALLING THE ULTREX Your new Ultrex comes with everything you’ll need to directly install it to the boat. This motor can be directly mounted to the boat or coupled with a Minn Kota quick release bracket for ease of mounting and removal. For installation with a quick release bracket, refer to the installation instructions provided with the bracket.
- Page 6 ASSEMBLY OF MOTOR TO MOUNT MOUNTING CONSIDERATIONS It is recommended that the motor be mounted as close to the keel or centerline of the boat as possible. Make sure the area under the mounting location is clear to drill holes and install nuts and washers.
- Page 7 INSTALLING THE BOW-MOUNT Reinstall the 5/16" Allen Screw and Lock Washer and Allen Screw with tighten to 18 to 20 ft-lbs with a Torque Wrench. Lock Washer NOTICE: The 5/16" Allen Screw must be tightened when installed and periodically tightened to 18 to 20 ft-lbs. This will allow the motor to be stowed properly.
- Page 8 INSTALLING THE BOW-MOUNT The Mount can be installed on either the Port or Starboard side of the boat based on personal preference. Test the placement of the Hold-Down Strap to be sure it can hold the Mount as placed. The placement of the buckle on the Hold-Down Strap either inboard or outboard is based on personal Deck of Boat Hold Down Strap...
- Page 9 INSTALLING THE GAS SPRING PIN ITEM(S) NEEDED #6 x 6 #5 x 6 #4 x 6 Put a 1/4-20 x 2 1/2" Screw (Item #4) in each of the Screw drilled locations. The Screw should pass through the Mount Plate and the boat deck. Place a Flat Washer (Item #5) and then a Nylock Nut (Item #6) at the end of each screw as shown and secure.
- Page 10 INDEXING THE MOTOR ITEM(S) NEEDED #25 x 2 #26 x 2 #27 x 1 Locate the upper Gas Spring Pin (Item #27) and Gas Spring Phillips Screw Spacers (Item #26) in the bag assembly. Align the end Cylinder Outer Arm of the Gas Spring with the holes in the Outer Arm.
- Page 11 INDEXING THE MOTOR Turn the Power Switch "on" and steer the motor so Control Head that the Control Head is in line with the keel of the boat. This can be done by steering the motor with the Foot Pedal, turning the motor with the remote, or manually turning the head of the motor.
- Page 12 INDEXING THE MOTOR Remove the two screws that hold the Wrap Drum Screws Steering Motor Cover in place with a #1 Phillips Screwdriver. Once Connection Steering Motor Plug removed, lift the Wrap Drum Cover away from the Connection Steering Module. Plug Steering CAUTION...
- Page 13 INDEXING THE MOTOR While holding the Wrap Drum just above the Cable Steering Steering Motor Gear, and maintaining tension on the Steering Module Connection Wire Wrap Drum Cables, carefully rotate the Wrap Drum right or left until the top of the Foot Pedal is parallel with the deck of the boat.
Need help?
Do you have a question about the ULTREX and is the answer not in the manual?
Questions and answers
does the ultrex read down and side imaging
Yes, the Minn Kota Ultrex has models that support both down imaging (DI) and side imaging (SI). Some versions, like the SI/DI/2D Ultrex, include built-in Mega Down Imaging and Mega Side Imaging capabilities.
This answer is automatically generated
does the ultrasound read down imaging and side as well
Yes, the Minn Kota Ultrex offers models with both Down Imaging (DI) and Side Imaging (SI). Some versions come with built-in MEGA Down Imaging, while others support both MEGA Side Imaging and MEGA Down Imaging.
This answer is automatically generated
1. Where is the data plate on an Ultrex 36v Maxxum Pro with iPilot? 2. Can this motor be paired with a Humminbird H10 Chirp MDI GPS G2N to "Follow the Contour"?