MINN KOTA ULTERRA Installation Instructions Manual
Bow-mount trolling motor
Hide thumbs
Also See for ULTERRA:
- User manual ,
- Owner's manual (98 pages) ,
- Installation instructions manual (84 pages)
Table of Contents
Advertisement
Available languages
Available languages
Advertisement
Table of Contents

Subscribe to Our Youtube Channel
Related Manuals for MINN KOTA ULTERRA


Summary of Contents for MINN KOTA ULTERRA
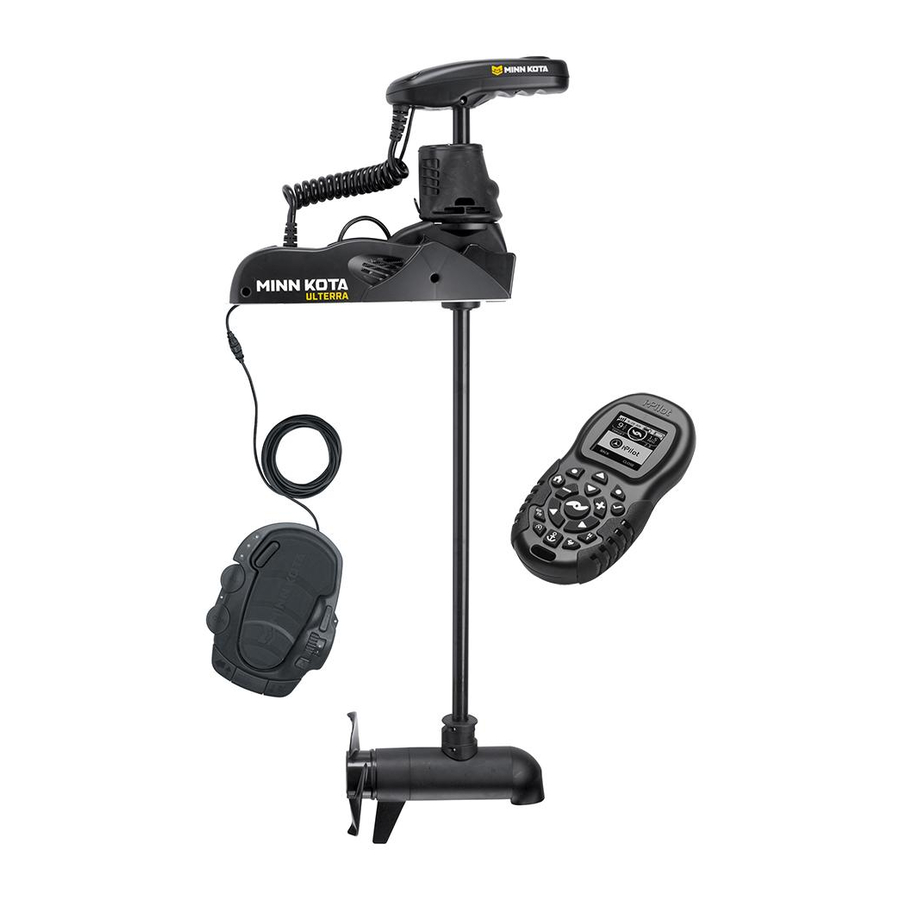
- Page 1 ULTERRA™ BOW-MOUNT TROLLING MOTOR INSTALLATION INSTRUCTIONS...
-
Page 2: Serial Number
Countless hours of research and testing provide you the Minn Kota advantage that can truly take you “Anywhere. Anytime.” We don’t believe in shortcuts. We are Minn Kota. And we are never done helping you catch more fish. -
Page 3: Safety Considerations
WARNING You are responsible for the safe and prudent operation of your vessel. We have designed your Minn Kota product to be an accurate and reliable tool that will enhance boat operation and improve your ability to catch fish. This product does not relieve you from the responsibility for safe operation of your boat. -
Page 4: Know Your Boat
KNOW YOUR BOAT Port Starboard Inboard Outboard Keel Port Starboard Gunwale Transom Stern Gunwale Stern Hull 4 | minnkotamotors.com ©2016 Johnson Outdoors Marine Electronics, Inc. -
Page 5: Installation
INSTALLING THE ULTERRA Your new Ulterra comes with everything you’ll need to directly install it to the boat. This motor can be directly mounted to the boat or it may be coupled with a Minn Kota quick release bracket for ease of mounting and removal. For installation with a quick release bracket, refer to the installation instructions provided with the bracket. - Page 6 INSTALLING THE ULTERRA MOUNTING CONSIDERATIONS It is recommended that the motor be mounted as close to the keel or centerline of View accessories the boat as possible. Make sure the area under the mounting location is clear to drill available for your holes and install nuts and washers.
- Page 7 Deck of Boat installation section. NOTE: The Emergency Strap (Item #9) is used for Manually Stowing the Ulterra. The Emergency Keel Strap is not secured during installation. Store it on your boat in the event that you would need to manually stow the motor. To learn how, please refer to the "Manually Stowing the Ulterra"...
- Page 8 INSTALLING THE ULTERRA ITEM(S) NEEDED #8 x 6 WARNING Do not deploy the motor until it is fully mounted to the boat. Illustrations are for reference only. Deploying your motor before it is mounted to the boat may cause injury.
- Page 9 Base Extrusion when installing Nylock Nut are not used when installing the and tightening the motor mounting bolts. Ulterra with a Quick Release Bracket. minnkotamotors.com | 9 ©2016 Johnson Outdoors Marine Electronics, Inc.
- Page 10 Rubber Washer and into place. NOTE: The Short Bolts are not used when installing the Ulterra directly to the boat. p. Slide the Base Extrusion into place under the Bolts that were just installed. q. If installing with a Quick Release Bracket,...
- Page 11 Flat Washer (Item #6) and then securing with Long Bolts a Nylock Nut (Item #7). Clipped Washer NOTE: The Short Bolts are not used when installing the Ulterra directly to the boat. Rubber Washer Flat Washer Nylock Nut Boat Deck Mounting Holes minnkotamotors.com | 11...
- Page 12 INSTALLING THE ULTERRA v. At this point in the installation process the Mount should be secured to the deck of the boat, and the Motor can now be reassembled. The Extension Damper can be slid back in place on the Motor. This should be done so the shaft on the Damper is pointing inboard.
- Page 13 Universal Sonar. If two cables are present, one is to connect the Universal Sonar, and the other is to connect the i-Pilot Link connection. Please follow the Minn Kota recommendations on routing the cables to optimize mobility and maximize functionality.
- Page 14 ROUTING UNIvERSAL SONAR & -PILOT LINK CABLES a. Place the motor in the deployed position. Control Head b. Locate the Universal Sonar and/or the i-Pilot Link i-Pilot Link cable(s), at the base of the Control Head. Universal Sonar CAUTION Not following the recommended wire routing for the Coil Cord Universal Sonar and/or i-Pilot Link cable(s), if equipped, may cause damage to the product and void your product...
- Page 15 The Universal Sonar Cable may not be long enough to reach the fish finder. If the cable length does not reach the desired fish finder installation location, a 14.5’ extension cable is available. Minn Kota recommends using the MKR-US2-11. a. Place the motor in the deployed position.
- Page 16 INSTALLING THE PROP Installing the Prop ITEM(S) NEEDED #19 x 1 #21 x 1 #20 x 1 #18 x 1 CAUTION Drive Pin Armature Shaft Disconnect the motor from the battery before beginning any prop work. Propeller a. Take the Drive Pin (Item #18) and slide it through the Hole in the Armature Shaft.
- Page 17 Once batteries are charged, attempt to stow motor again. NOTE: To stow and deploy the Ulterra with the i-Pilot or i-Pilot Link remote, please refer to the corresponding product literature.
- Page 18 DEPLOYING THE MOTOR wITH I-PILOT Deploying the Motor with i-Pilot a. Press the Home button. b. Use the Menu Up and Menu Down buttons to find the Deploy menu at the bottom of the display screen. NOTE: The Deploy menu at the bottom of the display screen can only be found when the motor is stowed.
- Page 19 NOTE: The Ulterra button can only be found in the Content Area with the Home Control Buttons on i-Pilot Link systems on an Ulterra motor. Certain Home Screen Buttons may be locked out while the motor is stowed because those functions require the motor to be deployed to operate.
- Page 20 DEPLOYING THE MOTOR wITH I-PILOT LINK d. Once in the Ulterra Menu, find the Deploy button and select it. The Deploy button requires a double press to engage. WARNING As soon as the Deploy button is selected, the motor will automatically deploy.
- Page 21 Content Area with the Home Control Buttons on i-Pilot Link systems on an Ulterra motor. The motor can only be stowed when it is currently deployed. d. Once in the Ulterra Menu, find the Stow button and select it. NOTE: The Stow button can only be found when the motor is deployed.
-
Page 22: Battery & Wiring Installation
CA UTION These guidelines apply to general rigging to support your Minn Kota motor. Powering multiple motors or additional electrical devices from the same power circuit may impact the recommended conductor gauge and circuit breaker size. If you are using wire longer than that provided with your unit, follow the conductor gauge and circuit breaker sizing table below. -
Page 23: Additional Considerations
Minn Kota recommends using Minn Kota brand chargers to recharge the batteries connected to your Minn Kota trolling motor, as they have been engineered to work with motors that include a bonding wire. - Page 24 CONNECTING THE BATTERIES IN SERIES The negative (-) connection must be connected to the negative terminal of the same battery that the trolling motor negative lead connects to. In the diagrams below this battery is labeled “Low Side” Battery. Connecting to any other trolling motor battery will input positive voltage into the “ground”...
- Page 25 Keep leadwire wing nut connections tight and solid to battery terminals. • Locate battery in a ventilated compartment. This completes the installation of your Ulterra. A complete Owner’s Manual can be downloaded at minnkotamotors.com. minnkotamotors.com | 25 ©2016 Johnson Outdoors Marine Electronics, Inc.
- Page 26 NOTES 26 | minnkotamotors.com ©2016 Johnson Outdoors Marine Electronics, Inc.
-
Page 27: Recommended Accessories
Stop buying new batteries and start taking care of the ones you’ve got. Many chargers can actually damage your battery over time – creating shorter run times and shorter overall life. Digitally controlled Minn Kota chargers are designed to provide the fastest charge that protect and extend battery life. - Page 28 ULTERRA™ PROPULSEUR ÉLECTRIQUE MONTÉ SUR L’ÉTRAVE INSTRUCTIONS D’INSTALLATION...
- Page 29 Pour le service : communiquer avec Minn Kota au (800) 227-6433; retourner le moteur au Centre de service de l’usine de Minn Kota; envoyer ou apporter le moteur à un centre de service agréé de Minn Kota. Une liste de centres de service agréés est disponible sur notre site Web, à...
-
Page 30: Consignes De Sécurité
à mesure que les situations se présentent. Vous devez toujours être prêt à reprendre le contrôle manuel de votre bateau. Apprenez à utiliser votre Minn Kota dans une zone exempte de dangers et d’obstacles. -
Page 31: Connaissez Votre Bateau
CONNAISSEZ VOTRE BATEAU Étrave Bâbord Tribord En-bord Hors-bord Quille Bâbord Tribord Plat-bord Tableau Arrière Stern Plat-bord Étrave Poupe Coque minnkotamotors.com | 31 ©2016 Johnson Outdoors Marine Electronics, Inc. -
Page 32: Installation
INSTALLATION DE L’ULTERRA Votre nouveau Ulterra est offert avec tout ce dont vous aurez besoin pour le montage au bateau. Ce moteur peut être monté directement sur le bateau ou couplé avec un support à dégagement rapide Minn Kota pour un montage et un démontage simples. - Page 33 INSTALLATION DE L’ULTERRA FACTEURS DE MONTAGE Il est recommandé de monter le moteur aussi près que possible de l’axe du bateau. Découvrez les Vérifiez que la zone sous l’emplacement pour percer des trous et installer des rondelles accessoires et des écrous est dégagée. Assurez-vous que le support du moteur est positionné...
- Page 34 Pont du Bateau REMARQUE: la sangle d’urgence (article n° 9) est utilisée pour arrimer manuellement le moteur Ulterra. La sangle d’urgence n’est pas Quille fixée pendant l’installation. Rangez-la sur votre bateau au cas où vous en auriez besoin pour arrimer manuellement le moteur. Pour apprendre comment, veuillez consulter la section «...
- Page 35 INSTALLATION DE L’ULTERRA ARTICLE(S) REQUIS #8 x 6 AVERTISSEMENT Ne déployez pas le moteur tant que l’installation n’est pas terminée sur le bateau. Les illustrations sont à titre de Extrusion de Base référence seulement. Le déploiement de votre moteur avant l’installation au bateau pourrait entraîner des blessures.
- Page 36 REMARQUE: Les boulons longs, les rondelles plates et l’écrou Nylock ne sont pas utilisés lors de l’installation de l’Ulterra avec un support à dégagement rapide. 36 | minnkotamotors.com ©2016 Johnson Outdoors Marine Electronics, Inc.
- Page 37 REMARQUE: Les boulons courts ne sont pas utilisés lors de l’installation de l’Ulterra directement au bateau. p. Faites glisser en place l’extrusion de base sous les boulons que vous venez d’installer.
- Page 38 REMARQUE: Les boulons longs, les rondelles Boulon à Tête Hexagonale plates et l’écrou Nylock ne sont pas utilisés lors Rondelle de l’installation de l’Ulterra avec un support à Taillée dégagement rapide. u. Si l’installation est directement sur le Trous de pont du bateau, installez le moteur à...
- Page 39 INSTALLATION DE L’ULTERRA v. À ce stade du processus d’installation, le support devrait être fixé au pont du bateau; le moteur peut maintenant être rassemblé. La prolongation de l’amortisseur peut être glissée à sa place sur le moteur. Cela doit se faire de façon à ce que l’arbre de l’amortisseur pointe vers l’intérieur du bateau.
- Page 40 Sonar. Si deux câbles sont présents, un connecte l’Universal Sonar et l’autre connecte l’i-Pilot Link. Veuillez suivre les recommandations de Minn Kota sur l’acheminement des câbles afin d’optimiser et maximiser la fonctionnalité. L’acheminement sera le même, peu importe le nombre de câbles présents. Utilisez les directives suivantes pour effectuer correctement l’acheminement des câbles.
- Page 41 ACHEMINEMENT DES CâBLES DE L’UNIvERSAL SONAR ET -PILOT LINK a. Placez le moteur dans la position déployée. Tête de Contrôle b. Trouvez la connexion des câbles de l’Universal i-Pilot Link Sonar ou du i-Pilot Link, si équipé, à la base de la tête de contrôle.
- Page 42 Le câble de l’Universal Sonar pourrait ne pas être assez long pour atteindre le détecteur de poissons. Si la longueur du câble n’est pas suffisante pour atteindre l’emplacement désiré du détecteur de poissons, une rallonge d’une longueur de 14,5 pi (4,3 m) est offerte. Minn Kota recommande d’utiliser le MKR-US2-11. a. Placez le moteur dans la position déployée.
- Page 43 INSTALLATION DE L’HÉLICE Installation de l’Hélice ARTICLE(S) REQUIS #21 x 1 #19 x 1 #20 x 1 #18 x 1 MISE EN GARDE Ergot Arbre Armature d’Entraînement Débranchez le moteur de la batterie avant d’effectuer tout travail ou entretien sur l’hélice. Hélice a.
- Page 44 SPOT-LOCK passe alors en mode Ulterra. AUTOPILOT MODE SPOT-LOCK MODE REMARQUE: Le mode Ulterra doit être activé MODE MODE pour pouvoir arrimer et déployer le moteur. CONSTANT CONSTANT d. Pour déployer le moteur lorsqu’il est arrimé, appuyez deux fois sur le bouton Arrimer/déployer.
- Page 45 ARRIMAGE ET DÉPLOIEMENT DU MOTEUR AvEC LA PÉDALE Déploiement du Moteur avec i-Pilot a. Appuyez sur le bouton Accueil . b. Utilisez la flèche vers le haut et la flèche vers le pour trouver le menu Déployer (Deploy) au bas de l’écran. REMARQUE: Le menu Déployer (Deploy) au bas de l’écran n’est disponible que lorsque le...
- Page 46 à l’aide des boutons Accueil (Home) Contrôle (Control) sur les systèmes i-Pilot Link sur un moteur Ulterra. Certains boutons d’écran d’accueil peuvent être verrouillés lors de l’arrimage du bateau, parce que ces fonctions nécessitent que le moteur soit déployé...
- Page 47 ARRIMAGE ET DÉPLOIEMENT DU MOTEUR AvEC LA PÉDALE d. Lorsque vous êtes au Menu Ulterra, trouvez le bouton Déployer (Deploy) et sélectionnez- le. L e bouton Déployer (Deploy) doit être poussé deux fois pour activer. AVERTISSEMENT Dès que le bouton Déployer (Deploy) est sélectionné, le moteur se déploiera automatiquement.
- Page 48 Accueil (Home) et Contrôle (Control) sur les systèmes i-Pilot Link sur un moteur Ulterra. Le moteur peut seulement être arrimé lorsqu’il est déployé. d. Lorsque vous êtes au Menu Ulterra, trouvez le bouton Arrimage (Stow) et sélectionnez-le. REMARQUE: Le bouton Arrimage (Stow) trouve seulement lorsque le moteur est déployé.
-
Page 49: Installation Des Batteries Et Du Câblage
MISE EN GARDE Ces lignes directrices s’appliquent au gréement général pour soutenir le moteur de Minn Kota. L’alimentation de multiples moteurs ou d’autres appareils électriques, à partir du même circuit d’alimentation, peut infl uer sur le gabarit de conducteurs et le dimensionnement des disjoncteurs recommandé. - Page 50 Consultez le “Tableau des dimensions de gabarit des conducteurs et disjoncteurs” dans la section précédente pour trouver le disjoncteur ou fusible approprié convenant à votre moteur. Pour les moteurs nécessitant un disjoncteur de 60 A, le disjoncteur Minn Kota MKR-19 60 A est recommandé.
- Page 51 CONNExION DES BATTERIES EN SÉRIE La connexion négative (-) doit être connectée à la borne négative de la même batterie à laquelle la borne négative du propulseur électrique est connectée. Sur le tableau, cette batterie est appelée batterie « côté inférieur ». La connexion à une autre batterie du propulseur électrique fera entrer une tension positive dans la «...
- Page 52 Gardez le serrage des écrous de papillon de raccordement solide et bien serré autour des bornes de la batterie. • Installez la batterie dans un compartiment ventilé. L’installation de votre Ulterra est terminée. Un manuel complet du propriétaire peut être téléchargé à minnkotamotors.com. 52 | minnkotamotors.com...
- Page 53 REMARQUES minnkotamotors.com | 53 ©2016 Johnson Outdoors Marine Electronics, Inc.
-
Page 54: Accessoires Recommandés
Plusieurs chargeurs peuvent en fait endommager les batteries à la longue, pouvant entraîner une autonomie réduite et une durée de vie plus courte. Les chargeurs Minn Kota à commande numérique assurent une charge rapide pour une protection et une durée de vie prolongée.
Need help?
Do you have a question about the ULTERRA and is the answer not in the manual?
Questions and answers