
Summary of Contents for Accumetrics VerifyNow
-
Page 1: User Manual
User Manual 3985 Sorrento Valley Blvd. San Diego, California 92121 U.S.A. Telephone (for US): 1-800-643-1640 Outside US: +1 858 643 1600 Email address: support@accumetrics.com Website: www.accumetrics.com... - Page 2 VerifyNow System User Manual Limited Warranty and Disclaimer Accumetrics warrants that for one year from the time of shipment, the Products (a) are of good quality and free from defects, whether patent or latent, in design, materials or workmanship, (b) are fit and sufficient for the use they are intended for, as such intended use...
-
Page 3: Table Of Contents
3.1.1 Sample Collection and Handling .......... 21 3.1.2 Instrument Operation............21 Reagent Storage and Handling ..............23 Storage and Stability................23 Quality Controls................... 25 Electronic Quality Control ..............26 Wet Quality Control................29 VerifyNow System User Manual Page 3 14340.J... - Page 4 Set the Date and Time ............... 73 Set Time Out ..................74 Enable Patient ID................75 Set Operator ID and Password ............77 8.6.1 Operator Authority Log ............78 Set EQC Frequency................79 VerifyNow System User Manual Page 4 14340.J...
- Page 5 Instrument Software – Assay and QC ..........119 11.7 Instrument Software – Settings and Logs ......... 120 11.8 VerifyNow Instrument Cleaning and Maintenance Schedule ..... 121 11.9 Compliance with CLIA Control Requirements ........123 11.9.1 Description of the VerifyNow System Control Measures..123 References ....................
-
Page 6: About This Manual
ABOUT THIS MANUAL About this Manual This user manual is the place to begin if you are not familiar with the VerifyNow Instrument. It includes information on the Aspirin, P2Y12, and IIb/IIIa assays. For help with use of this instrument, please contact your laboratory supervisor or your Accumetrics customer support representative. - Page 7 ABOUT THIS MANUAL VerifyNow System User Manual Page 7 14340.J...
-
Page 9: Introduction
INTRODUCTION - 1 Introduction Before you begin to use the VerifyNow System, it is appropriate to review the purpose of the test. Platelet Function Testing In general, platelet function testing measures the activity of platelets. Therapies that inhibit platelet function have been used extensively to prevent the clinical complications of atherothrombosis. -
Page 10: Aspirin Assay
- by inhibiting the modification of the glycoprotein IIb/IIIa receptor— aggregation. The VerifyNow P2Y12 assay is a whole blood assay used in the laboratory or point of care setting to measure P2Y12 receptor blockade. The assay incorporates the agonist ADP to activate platelets. -
Page 11: Iib/Iiia Assay
GP IIb/IIIa receptors. If IIb/IIIa inhibitors have produced the expected antiplatelet effect, such aggregation will be reduced. The VerifyNow IIb/IIIa assay reports the extent of platelet aggregation in platelet aggregation units (PAUs). Typically, a baseline sample can... -
Page 12: Test Procedure
GP IIb/IIIa inhibitor was administered within the past 10 days. Test Procedure The VerifyNow system has been developed to provide a simple, accurate and reliable means to measure platelet aggregation. This section provides an overview of the test procedure. -
Page 13: Overview Of System Components
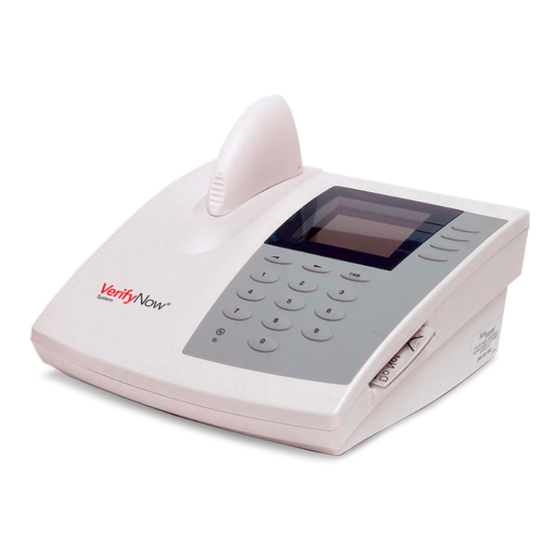
Instrument The VerifyNow instrument provides the platform for an automated assay. It receives an assay device and sample collection tube inserted into the assay device port. Then, it automatically draws the blood sample into the assay device and proceeds with the analysis of the sample. -
Page 14: Assay Device Port And Cover
2.1.1 Assay Device Port and Cover The assay device port holds a VerifyNow assay device during the test. When seated in the port, the assay device is aligned with optical detection components to measure the agglutination of the sample using light transmittance through wells in the assay device. -
Page 15: Icon Keys
In stand-by mode, the screen will be blank and the green LED indicator on the keypad will be illuminated. Pressing any key will return the instrument to the VerifyNow instrument Main Menu. See section 9.4 to adjust this setting. -
Page 16: Bar Code Scanner
8.8 for instructions on enabling the printer. Assay Device The VerifyNow System uses disposable assay devices to conduct the test. There are three types of assay devices relating to the appropriate platelet function test: Aspirin, P2Y12, and GP IIb/IIIa inhibitors (specifically for monitoring abciximab or... -
Page 17: Humidity Indicator
VerifyNow System User Manual Page 17 14340.J... -
Page 18: Sample Collection Tubes
The Electronic Quality Control (EQC) is the primary quality control mechanism for the VerifyNow instrument. It consists of a re-usable device that is inserted by the operator into the assay port and is used to perform a comprehensive testing routine that confirms instrument performance. -
Page 19: Assay Wet Quality Controls (Wqc)
Figure 2-7 Wet Quality Controls Refer to Chapter 5, Quality Controls for more information on quality control tests and detailed descriptions of the procedures. VerifyNow System User Manual Page 19 14340.J... -
Page 21: Precautions
VerifyNow instrument. Safe Operating Procedures The VerifyNow System is for in vitro diagnostic use only. Read the contents of this user manual completely. The VerifyNow instrument and its components should only be used as directed in this user manual. In particular, observe the following guidelines when collecting and handling samples and operating the instrument: 3.1.1... - Page 22 PRECAUTIONS - 3 • Do not remove sample tubes from used assay devices. Discard used assay devices and attached sample tubes as a single unit. VerifyNow System User Manual Page 22 14340.J...
-
Page 23: Reagent Storage And Handling
When removed from refrigeration, write the discard date on the pouches and/or kit box VerifyNow Assay WQC pellets and 15-30ºC (59-86ºF) diluents Assay devices and quality control materials are suitable for use until the expiration date printed on the label. - Page 24 REAGENT STORAGE AND HANDLING - 4 VerifyNow System User Manual Page 24 14340.J...
-
Page 25: Quality Controls
• Environmental conditions • Variations in operator performance The extensive quality control features of the VerifyNow system are outlined in the Appendix. Accumetrics’ recommendations for frequency of external control (Electronic Quality Control, Wet Quality Control levels 1 and 2) testing are stated in the individual assays’... -
Page 26: Electronic Quality Control
Electronic Quality Control Electronic Quality Control (EQC) is the primary quality control mechanism for the VerifyNow Instrument. It consists of a re-usable device that is inserted by the operator into the assay port and is used to perform a comprehensive testing routine that confirms performance of key instrument components. - Page 27 Open the cover and using the finger grip, insert the EQC device into the assay device port until it clicks (Figure 5-3). The instrument will produce two audible beeps. Close the cover to the assay port. NOTE: Do not open the cover until the test has completed. VerifyNow System User Manual Page 27 14340.J...
- Page 28 Figure 5-5 Remove Device After the EQC device is completely removed from the port, a calculation screen will display briefly prior to displaying the final result. Wait for the electronic quality control results to display. VerifyNow System User Manual Page 28 14340.J...
-
Page 29: Wet Quality Control
(negative control), and the other represents a patient who demonstrates a significant amount of aggregation (positive control). NOTE: VerifyNow Assay WQC also may be used as a tool for activities other than routine quality control requirements. These activities include: proficiency testing, laboratory personnel competency evaluation, establishment and verification of system performance specifications and analytical system quality assessment. - Page 30 A flashing message will display while the instrument is warming up. During this time the icon keys are inactive and you will be unable to start an assay. Go to the next step when the warm-up message no longer displays. VerifyNow System User Manual Page 30 14340.J...
- Page 31 NOTE: Do not try to re-attach any assay device needles that may inadvertently removed. If this occurs, discard the device and use a new one Figure 5-9 ). Do not twist the sheath, as this may remove the needle. VerifyNow System User Manual Page 31 14340.J...
- Page 32 An audible beep will be heard when the instrument reads the information. Press the Retry key if you are unable to scan the bar code the first time. VerifyNow System User Manual Page 32 14340.J...
- Page 33 The instrument will produce two audible beeps when the tube has been fully inserted (Figure 5-13). Figure 5-13 Insert Tube VerifyNow System User Manual Page 33 14340.J...
- Page 34 Back key. Wait for the prompt before removing the assay device and tube. When the results display, record the results or print the results, if your instrument has an attached printer (Figure 5-16). VerifyNow System User Manual Page 34 14340.J...
- Page 35 Figure 5-18 Interpreting WQC Level 1 Results Control Level 1 Range Compare the WQC result to the Control Level 1 range, and verify the result falls within the expected range. If the result falls within the expected range, the VerifyNow System User Manual Page 35 14340.J...
-
Page 36: Level 2 Wqc
WQC procedure with a new assay device. If the EQC is not OK, follow the instructions in Chapter 10, Troubleshooting. If the WQC result fails on the second attempt, contact Accumetrics Customer Support. Press the Next key to return to the main menu. - Page 37 Remove the needle’s protective sheath by pulling directly up on the sheath. Do not twist the sheath, as this may remove the needle (Figure 5-21). Figure 5-21 Inspect Humidity Indicator and Prepare Needle Humidity Indicator VerifyNow System User Manual Page 37 14340.J...
- Page 38 NOTE: If you are experiencing difficulty with the bar code scanner scanning the label, try adjusting the angle of the scan by raising the corner of the instrument. VerifyNow System User Manual Page 38 14340.J...
- Page 39 Replace the cap on the diluent tube by pressing and turning simultaneously. Immediately after replacing the cap, gently invert the tube five times to mix the reagents (Figure 5-26). Control material should be used within 15 minutes of reconstitution.Figure 5-26 Invert Sample VerifyNow System User Manual Page 39 14340.J...
- Page 40 During this time the screen will flash an icon of the assay device indicating that the sample is processing. Do not open the cover until the assay has completed and a result displays. A calculator will display when the assay is near completion (Figure 5-29). VerifyNow System User Manual Page 40 14340.J...
- Page 41 (Figure 5-31). Do not separate the tube from the assay device. Close the cover. Discard the assay device and tube in a biohazard waste in accordance with institutional guidelines. Figure 5-31 Remove Device VerifyNow System User Manual Page 41 14340.J...
- Page 42 If the EQC is not OK, follow the instructions in Chapter 10, Troubleshooting. If the WQC result fails on the second attempt, contact Accumetrics’ Customer Support. Press the Next key to return to the main menu. VerifyNow System User Manual Page 42 14340.J...
-
Page 43: Patient Testing
PATIENT TESTING - 6 Patient Testing The VerifyNow System has been developed to provide a simple, accurate and reliable means to measure platelet function from a patient’s blood sample. This section provides instructions on performing the test procedure. The test procedure includes patient preparation, sample collection, sample handling, preparing the instrument for use and running a test. - Page 44 Gently invert the tube at least 5 times to ensure complete mixing of the contents. Samples with evidence of clotting should not be used. VerifyNow System User Manual Page 44 14340.J...
-
Page 45: Indwelling Catheter
Discard the first 5 mL from an indwelling catheter to clear the line. Ensure the catheter is free of clots. If drawing for a CBC at the same time, fill the CBC tube last to avoid contamination by EDTA. VerifyNow System User Manual Page 45 14340.J... -
Page 46: Sample Handling
Sample Handling Fresh whole blood samples in the appropriate Greiner partial-fill collection tubes are required for use with the VerifyNow instrument. Keep samples at room temperature. Do not centrifuge, separate, freeze or refrigerate sample. Table 6-1 provides the amount of time blood must incubate at room temperature after collection and before assay. -
Page 47: Performing An Assay
Operator ID and Password, if required. Use the keypad to enter the Operator ID number at the prompt. Press the Tab key to advance to the Password prompt to enter the password number. VerifyNow System User Manual Page 47 14340.J... - Page 48 At the desired screen, press the (← ← ← ← ) or (→ → → → ) to move to the desired character. VerifyNow System User Manual Page 48 14340.J...
- Page 49 (Figure 6-7). Remove the needle’s protective sheath by pulling directly up on the sheath. Do not twist the sheath, as this may remove the needle (Figure 6-7). VerifyNow System User Manual Page 49 14340.J...
- Page 50 Move the pouch both towards and away from the instrument. An audible beep will be heard when the instrument reads the information. Press the Retry key if you are unable to scan the bar code the first time. VerifyNow System User Manual Page 50 14340.J...
- Page 51 (Figure 6-11). The instrument will produce two audible beeps when the tube has been fully inserted. VerifyNow System User Manual Page 51 14340.J...
- Page 52 It typically takes 3 to 5 minutes for the assay to complete. When the results display, record or print the results, if your instrument has an attached printer. VerifyNow System User Manual Page 52 14340.J...
- Page 53 Close the cover. Discard the assay device and tube in a biohazard waste in accordance with institutional guidelines. Figure 6-14 Remove Device Press the Next key to return to the main menu. VerifyNow System User Manual Page 53 14340.J...
-
Page 54: Interpreting Assay Results
ADP channel. Press the key to display the percent inhibition. Figure 6-16 P2Y12 Results VerifyNow System User Manual Page 54 14340.J... -
Page 55: Iib/Iiia Assay Results
GP IIb/IIIa inhibitor (10 minutes). Percent inhibition is calculated using the following formula: % Inhibition = (pre-drug PAU – post-drug PAU) X 100 pre-drug PAU Use the following procedure to calculate percent inhibition. VerifyNow System User Manual Page 55 14340.J... - Page 56 Press the Next key to return to the Results screen (Figure 6-17). Press the Retrieve key to retrieve past assay results. Refer to Chapter 7, Retrieving Test Results for more information on retrieving results. VerifyNow System User Manual Page 56 14340.J...
-
Page 57: Shutting Down The Instrument
PATIENT TESTING - 6 Shutting down the Instrument Prior to shutting down the instrument, ensure that all operations involving the VerifyNow instrument are complete. Power off the instrument using the power switch on the back panel (“O” designates off). VerifyNow System User Manual Page 57 14340.J... -
Page 59: Retrieving Test Results And Performance Data
Patient Information Stored by Date/Time From the main menu, enter Operator ID and Password, if required. Use the keypad to enter the Operator ID number at the prompt. Press the Tab key to advance VerifyNow System User Manual Page 59 14340.J... -
Page 60: Patient Information Stored By Patient Id
At the desired screen, press the (← ← ← ← ) or (→ → → → ) to move to the desired character. • Press the Text key to select the character. It will then show up at the Text: ___ prompt. VerifyNow System User Manual Page 60 14340.J... -
Page 61: Assay Results Log
This feature is available when patient identification is activated. Assay Result Displays the numerical result. Assay Type Displays a symbol indicating the type of assay performed. IIb/IIIa assay (PAU result) Aspirin assay (ARU result) VerifyNow System User Manual Page 61 14340.J... -
Page 62: Retrieving Quality Control
The instrument stores the last 100 EQC and WQC results in its memory. You can retrieve and print information about the earlier EQC parameters, WQC results, assay type, date and time, and operator identification (when configured). Use the following procedure to view the quality control results. VerifyNow System User Manual Page 62 14340.J... -
Page 63: Electronic Quality Control Results Log
Date and Time Displays the date and time by month, day, hour (24 hr clock Stamp format), and minute using the following notation, “MMDD HHMM.” Parameter Displays the result for the following measured parameters: VerifyNow System User Manual Page 63 14340.J... -
Page 64: Wet Quality Control Results Log
Wet Quality Control Results Log The cursor is positioned on the most recent assay result (Figure 7-5). Navigate up and down an individual list using the (← ← ← ← , → → → → ) keys. VerifyNow System User Manual Page 64 14340.J... - Page 65 ← ← ← ← key, and Results select this icon to print all WQC results in the log that are forward of the cursor position. Back Select this icon to return to the previous screen. VerifyNow System User Manual Page 65 14340.J...
-
Page 66: View Instrument Usage Log
WQC assay run using a specific (IIb/IIIa) assay device. Error/Attention Lists the quantity of errors or alerts (attentions) logged during List operation arranged chronologically by event number (e.g. errors, alerts). The left column of the list provides the error/attention VerifyNow System User Manual Page 66 14340.J... -
Page 67: View Event Log
Refer to the Appendix for information on navigating within the Maintenance section. Press the Event Log key to retrieve the appropriate usage information. See Section 7.4.1 for a description of the event log. VerifyNow System User Manual Page 67 14340.J... -
Page 68: Alarm And Error/Attention Log
← ← ← ← key, and Results select this icon to print all results in the selected log that are forward of the cursor position. Back Select this icon to return to the Main Menu. VerifyNow System User Manual Page 68 14340.J... -
Page 69: Transfer Network Data
RETRIEVING TEST RESULTS - 7 Transfer Network Data The VerifyNow network integration package is an optional accessory to the instrument. This software package enables an operator to transfer a data file from the instrument to a computer connected to the network. The data file contains all assay results, WQC and EQC results, and error reports stored in the instrument’s... - Page 70 RETRIEVING TEST RESULTS - 7 VerifyNow System User Manual Page 70 14340.J...
-
Page 71: Instrument Settings
Refer to Section 9.9. Adjust Contrast The contrast can be adjusted to improve visibility of the screen - depending on the ambient lighting in the room where the VerifyNow instrument is located. From the main menu, enter Operator ID and Password, if required. -
Page 72: Adjust Backlight
Main Menu. Adjust Backlight The backlight can be toggled on or off to improve visibility of the screen - depending on the ambient lighting in the room where the VerifyNow Instrument is located. From the main menu, enter Operator ID and Password, if required. -
Page 73: Set The Date And Time
Save Setting Time Date Back Record the new time stamp according to a 24-hour clock format. Press the Tab key to move between the settings. For example, 1:30 pm is equivalent to 13:30 in VerifyNow System User Manual Page 73 14340.J... -
Page 74: Set Time Out
EQC be performed. Set Time Out The VerifyNow Instrument has been designed with features that restrict instrument access after a specified time period. If the instrument is idle for a longer period, the display screen will go blank. When an operator presses a key, the instrument automatically returns to the Main Menu and requires user login, if applicable. -
Page 75: Enable Patient Id
Enable Patient ID The VerifyNow Instrument supports patient result traceability. This includes a feature that assigns a patient identification (ID) to each patient sample. The instrument’s default setting does not assign patient ID; however, use the following procedure to... - Page 76 Press the Save key to keep the new setting and return to the Maintenance menu. Press the Back key twice to return to the Main Menu without saving the changes. VerifyNow System User Manual Page 76 14340.J...
-
Page 77: Set Operator Id And Password
INSTRUMENT SETTINGS - 8 Set Operator ID and Password The VerifyNow Instrument has been designed with features that restrict instrument access. If this feature is enabled, a user identification number and a matching password must be entered before an operator can use the instrument. In addition, it is also possible to assign different authority levels to each user, depending upon the instrument functions delegated to each user (e.g. -
Page 78: Operator Authority Log
Back Feature Description Enable Displays whether operator identification is enabled. A “Yes” Operator indicates that operator ID and password is required to log in. A Identification “No” indicates this feature is not active. VerifyNow System User Manual Page 78 14340.J... -
Page 79: Set Eqc Frequency
Set EQC Frequency Electronic Quality Control (EQC) is the primary quality control mechanism for the VerifyNow Instrument. This setting specifies the frequency at which the instrument will require an EQC test to be performed. NOTE: When the established interval has elapsed, the user is locked out from... -
Page 80: Enable Printer
Enable Printer The VerifyNow printer is an optional accessory to the instrument. The printer enables an operator to print assay results, QC results, and instrument usage statistics. To enable the VerifyNow instrument to output this information to the printer, the printer feature must be set to “Yes.”... -
Page 81: Enable Network
Contact Customer Support for more information. To enable the VerifyNow instrument to transfer data, the network feature must be switched on and the baud rate for data transfer set. Use the following procedure to... - Page 82 Main Menu without saving the changes. In order to activate the saved baud rate, turn the VerifyNow instrument off and then on again. NOTE: Unless a Network connection has been established, the network setting should always be set to NONE.
-
Page 83: Cleaning And Maintenance
The VerifyNow Instrument does not require frequent maintenance by the user. However, it is important to perform light cleaning and simple maintenance on a routine basis in order to maintain the reliability of the VerifyNow instrument. Table 9- 1Error! Reference source not found. lists a recommended cleaning schedule. - Page 85 Figure 9-1 Cleaning Device Finger Grip Tape NOTE: Accumetrics recommends you have at least 3 cleaning devices on hand for routine use. Refer to the Appendix for ordering information. Grasp the cleaning device using the finger grip and remove the clear plastic tape.
-
Page 86: Clean Exterior Surfaces
Wipe the EQC device with a damp cloth moistened with isopropyl alcohol. CAUTION: Do not spray or pour cleaning fluids near the assay device port or other openings. Introduction of fluids into the interior can damage the VerifyNow instrument. VerifyNow System User Manual Page 86 14340.J... -
Page 87: Replace The Fan Filter
Housingner Fan Retainer Materials • Replacement fan filter (Accumetrics Catalog No. 37056) • Replacement fan filter retainer (Accumetrics Catalog No. 37050) Procedure Use the following procedure to remove and clean the fan filter: Power off the instrument (“O” designates off). - Page 88 If necessary, replace it with a new filter. Gently replace the fan filter and plastic filter retainer. Do not position the instrument so that airflow to the fan is obstructed. Power on the instrument (“I” designates on). VerifyNow System User Manual Page 88 14340.J...
-
Page 89: Troubleshooting
Troubleshooting Occasionally, an unanticipated event occurs which interrupts the operation of the VerifyNow instrument. The VerifyNow System is equipped to detect events due to system malfunction, adverse environmental conditions, and variations in operator technique. This section covers the resolution of minor events that may be experienced during use of the VerifyNow instrument. -
Page 91: Messages
If possible, please have the numerical code that was displayed on the screen available when contacting Customer Support. WARNING: The VerifyNow Instrument is not intended to be serviced by the user. Instruments in need of repair are required to be returned to the manufacturer. - Page 92 (before GP IIb/IIIa inhibitor administration) using the VerifyNow (IIb/IIIa assay only) System. Refer to VerifyNow IIb/IIIa package insert. This message appears if the entered baseline is outside the reference range. A baseline result is entered that is not within the 1) Verify that the baseline result entered was correct.
-
Page 93: Attention, Error And Alarm Messages
(see Section 5.1). If EQC is OK, try length or type the assay again. 3) If the EQC is not OK or the problem continues, call Customer Support. VerifyNow System User Manual Page 93 14340.J... - Page 94 4) If the EQC is OK, run a Wet QC Level 1 (see Section 5.2.1) and verify the result falls within expected range. 5) If the EQC is not OK, call Customer Support and have the assay device handy. VerifyNow System User Manual Page 94 14340.J...
- Page 95 3) If the EQC is OK, verify the authority level of the original user (see Section 8.6), and update, if necessary. 4) If the EQC is not OK or the problem continues, call Customer Support. VerifyNow System User Manual Page 95 14340.J...
- Page 96 Testing). log. 3) Perform an EQC test (see Section 5.1). If the EQC is OK, attempt the assay again. 4) If the EQC is not OK or the problem continues, call Customer Support. VerifyNow System User Manual Page 96 14340.J...
- Page 97 1) Perform an EQC test (see Section 5.1). If the EQC is OK, run internal controls. WQC Level 2 (see Section 5.2.2). 2) If the EQC is not OK or the problem continues, call Customer Support. VerifyNow System User Manual Page 97 14340.J...
- Page 98 Call Customer Support if the EQC device had been removed during a Failed EQC, completely at the end of the EQC and it fails. and is logged as Error 29 in the event log. VerifyNow System User Manual Page 98 14340.J...
- Page 99 NOTE: Make sure to gently invert the sample as specified in Section 6.4 to avoid bubbles. 3) If the problem continues, call Customer Support and have the assay device handy. VerifyNow System User Manual Page 99 14340.J...
-
Page 101: Alarm Messages
Power instrument off and back on. If alarm occurred during EQC, use alternate EQC device. Emitter problem associated with an EQC If no alternate EQC device is available, or alarm reoccurs, call filter Customer Support. VerifyNow System User Manual Page 101 14340.J... -
Page 102: Eqc Diagnostic Messages
1) Use the cleaning device (see Section Error! Reference source not found.) then perform an EQC (see Section 5.1). 2) Repeat if necessary. 3) Call Customer Support if EQC does not pass after three attempts. VerifyNow System User Manual Page 102 14340.J... - Page 103 (refer to installation guidelines). Call Customer Support if the EQC device had been removed completely at the end of EQC and it fails. VerifyNow System User Manual Page 103 14340.J...
- Page 104 TROUBLESHOOTING - 10 VerifyNow System User Manual Page 104 14340.J...
-
Page 105: Appendix
14°-113° F / -10°-45°C (0-95% RH, non-condensing) Shipping/Storage Pressure -1,000 ft to 15,000 ft. Calibration Factory set Display Dot matrix liquid crystal NOTES: The printer accessory is recommended with the system but is not included in current dimensions. VerifyNow System User Manual Page 105 14340.J... -
Page 106: Explanation Of Symbols
85064 VerifyNow IIb/IIIa Assay – kit of 25 IIb/IIIa assay devices 85011 VerifyNow Assay WQC – kit of 6 wet quality controls (for Level 1 or 2 wet 85047 quality control) Greiner Bio-One Vacuette Coagulation, Lithium heparin, 3 mL, 50 pcs,... -
Page 107: Spare Parts And Accessories
Fan Filter Retainer – 1 replacement plastic cover for the filter 37060 EQC Device 70068 VerifyNow Printer Labels - pack of 10 rolls 85022 VerifyNow Instrument Cleaning Device Kit - kit of 10 cleaning devices 85062 VerifyNow System User Manual Page 107 14340.J... -
Page 108: Glossary
Alarm A type of message that displays after an unexpected event. Alarms are likely system problems, and in general not serviceable by the customer. VerifyNow System User Manual Page 108 14340.J... - Page 109 (specifically abciximab or eptifibatide). Each single-use, assay device consists of a sample well, staging well, and four detection wells Assay device The assay device port holds a VerifyNow assay device during the port test. Attention A type of message that displays after an unexpected event. These events may be simple issues that can be easily addressed by the customer.
- Page 110 APPENDIX - 11 Term Description Date extension When Accumetrics issues a date extension notification for a specific lot of assay devices, these devices can be used after the original expiration date. Detection well The detection wells of an assay device contain a lyophilized preparation of human fibrinogen coated beads and platelet agonist.
- Page 111 Selecting an icon key displays another screen or directs the instrument to perform an action. Inhibitor, GP IIb/IIIa inhibitors block platelet aggregation by preventing glycoprotein fibrinogen and other adhesion molecules (vWF) from binding to (GP) IIb/IIIa the IIb/IIIa integrin on platelets. VerifyNow System User Manual Page 111 14340.J...
- Page 112 A feature that assigns a number and matching password number identification to each operator. When enabled, identification is required to use the instrument. The maximum pressure level parameter reported during electronic quality control diagnostics. See electronic quality control. VerifyNow System User Manual Page 112 14340.J...
- Page 113 A hygroscopic substance provided in the Assay WQC kit and used in Level 2 wet quality control testing. The active ingredient is a peptide that gives results that mimic platelet function in an uninhibited sample. VerifyNow System User Manual Page 113 14340.J...
- Page 114 PGE1 The VerifyNow P2Y12 assay uses PGE1 to increase intraplatelet cAMP and reduce the contribution of the P2Y1 receptor on activation. This makes the assay more specific for the effects of ADP on the P2Y12 receptor.
- Page 115 The maximum leak rate parameter reported during electronic quality control diagnostics. See electronic quality control. VerifyNow A platelet function test developed by Accumetrics. The VerifyNow system is a whole blood, point-of-care assay, which consists of a turbidimetric-based optical detection instrument, single-use assay devices, and associated quality controls.
-
Page 116: Software Icons
Select this icon to remove the highlighted (where cursor is positioned) information from the setting. Edit Record When adding or changing operator information, select this icon to add information to the operator list. VerifyNow System User Manual Page 116 14340.J... - Page 117 Select this icon to begin a quality control test (either Level 1 or 2). Retrieve Patient Select this icon to retrieve the last 150 patient VerifyNow System User Manual Page 117 14340.J...
- Page 118 (ID) when starting a patient test. Usage Statistics Select this icon to view the quantity and type of assays performed on the instrument. WQC Log Select this icon to view the last 100 WQC results. VerifyNow System User Manual Page 118 14340.J...
-
Page 119: Instrument Software - Assay And Qc
Processing Measuring Calculating Start screen Main menu Scan barcode Close cover WQC results device tube sample sample result Run an electronic quality control Remove assay Calculating Diagnostics Start EQC Measuring device result result VerifyNow System User Manual Page 119 14340.J... -
Page 120: Instrument Software - Settings And Logs
Menu 1 Menu 2 Menu 3 Menu 4 Menu 5 Menu 6 Time and Date Parameters Contrast EQC Log Usage Log Setting Operator Network Data Backlight Event Log WQC Log Authority Log Transfer VerifyNow System User Manual Page 120 14340.J... -
Page 121: Verifynow Instrument Cleaning And Maintenance Schedule
APPENDIX - 11 11.8 VerifyNow Instrument Cleaning and Maintenance Schedule Month_________ Year______ TASK Daily Maintenance Run Electronic Quality Control (EQC) Bi-Weekly Maintenance (every other week) Use the cleaning device Check the fan filter for cleanliness; clean or replace if needed... - Page 122 APPENDIX - 11 VerifyNow System User Manual Page 122 14340.J...
-
Page 123: Compliance With Clia Control Requirements
QC procedures, the Wet Quality Controls (WQC) are run according to Accumetrics’ recommendations. This system provides more comprehensive quality control than can be provided by external quality control testing alone. The quality control features of the VerifyNow System are described in detail on the following pages. 11.9.1... - Page 124 As an additional security feature, various instrument display screens may be set to time out after a default time period set by Accumetrics (2 to 5 minutes), or a time period set by the user (from 0 to 255 minutes). If the instrument is idle for a longer period, it will automatically return to the Main Menu and require re-entry of User ID if applicable.
- Page 125 • The required EQC testing frequency is input into the VerifyNow Instrument by the user. Accumetrics recommends that the EQC be run at least on a daily basis, although the institution may select their preferred EQC testing frequency. When the established interval has elapsed, the user is locked out from running a patient test until the EQC test has been successfully completed.
- Page 126 In the case of repeated failures of the Assay Device Internal Control, to rule out degradation of assay device reagents as the cause of the failure. • VerifyNow Assay WQC may be used as a tool for other types of activities required by the CLIA Regulation, other than the daily quality control requirements.
- Page 127 Testing includes multiple replicates of previously qualified lots of WQC control materials. • Each lot of VerifyNow Assay devices is tested against a previously qualified lot of assay devices. Testing includes multiple replicates of WQC and blood from several normal donors.
- Page 128 APPENDIX - 11 VerifyNow System User Manual Page 128 14340.J...
-
Page 129: References
1. Centers for Disease Control. Perspectives in Disease Prevention and Health Promotion Update: Universal Precautions for Prevention of Transmission of Human Immunodeficiency, Hepatitis B Virus, and Other Bloodborne Pathogens in Health-Care Settings. MMRW 1988;37(24): 377-388. VerifyNow System User Manual Page 129 14340.J... - Page 130 REFERENCES - 12 VerifyNow System User Manual Page 130 14340.J...
-
Page 131: Index
61, 71, 74, 75, 76, 106 label, 68 events, 21, 24, 30, 37, 53, 60, 61, 62, scanner, 13, 27, 28, 33, 46, 99 65, 66, 68-76, 80, 83, 87, 98, 99, 100, 102, 106, 115 VerifyNow System User Manual Page 131... - Page 132 53-62, 71, 76, 83-85, 102, 106, (PAU) pellet, 16, 31, 33, 34, 102, 103. See log-in, 80, 85, 106 also wet quality control:Level 2 low optical signal level, 57, 75 percent inhibition, 9, 50, 103 VerifyNow System User Manual Page 132...
- Page 133 15, 39, 40, 41, 96, 100 spot code, 11, 14, 15, 68, 105 WQC. See wet quality control. See wet stand-by, 12, 81 quality control temperature, 16, 19, 21, 42, 43, 95, 96, 113, 115, 116 VerifyNow System User Manual Page 133...
- Page 134 INDEX - 13 VerifyNow System User Manual Page 134...
-
Page 135: Customer Support
Accumetrics and its distribution partners are available to assist with technical support, service, and ordering. Technical Support and Service For US customers or direct customers outside the US, contact Accumetrics for technical support and service at: • Accumetrics: 3985 Sorrento Valley Blvd. San Diego, California 92121 USA •... - Page 136 CUSTOMER SUPPORT Refer to the Appendix for a complete listing of parts, accessories, and consumables. VerifyNow System User Manual Page 136...
- Page 138 Website: www.stago.org Accumetrics and the Accumetrics logo are registered trademarks of Accumetrics, Inc.. 7X is a registered trademark of Linbro Chemical. Aggrastat is a registered trademark of Merck & Co., Inc.. Celebrex is a registered trademark of GD Searle, LLC. Cidex is a registered trademark of Johnson & Johnson. Greiner and Vacuette are registered trademarks of Greiner Bio-One.
Need help?
Do you have a question about the VerifyNow and is the answer not in the manual?
Questions and answers
How long does it typically take a test to complete on the analyzer?
It typically takes 3 to 5 minutes to complete a test on the Accumetrics VerifyNow analyzer.
This answer is automatically generated