Table of Contents
Advertisement
Quick Links
Advertisement
Table of Contents
Troubleshooting

Related Manuals for NEC UNIVERGE DT700


Summary of Contents for NEC UNIVERGE DT700
- Page 1 DT700 Phone User Manual For UNIVERGE 3C Communications and SIP@Net Platforms...
- Page 3 ........DT700 Phone User Manual For UNIVERGE 3C Communications and SIP@Net Platforms H T T P : / / W W W .
-
Page 4: Notices
For warranty information, see the License Agreement included with the software. NEC, the NEC logo, UNIVERGE, and UNIVERGE 3C (hereinafter referred to as the “3C”) are trademarks or registered trademarks of NEC Corporation. Spreed, struktur, and icoya are registered trademarks of Struktur AG. -
Page 5: Document Revision History
D O C U M E N T R E V I S I O N H I S T O R Y 610-210r1 September 2010 Initial release, NEC Std SIP 1.x 610-210r2 December 2010 Revisions for phone firmware version NEC Std SIP 1.2.x and later 610-210r3 August 2011 Revisions for Sphericall release for v7.0.3, NEC Std SIP 1.1 610-210r4 September 2011 Revisions for phone firmware version NEC Std SIP 2.0.x and later... -
Page 6: Document Feedback
Please use the local regional contact information listed above for contact information. When contacting NEC TAC, please have the following information available: D O C U M E N T I N F O R M A T I O N... - Page 7 Fax: 214-262-5566 Website: www.necam.com W O R L D W I D E O F F I C E S For the latest information on offices in your area, visit www.nec.com and select your area. DT700 Phone User Guide P/N 610-210r9...
- Page 8 viii P/N 610-210r9 DT700 Phone User Guide...
-
Page 9: Table Of Contents
Supported Phone Models ................1-1 Introduction to the DT700 and DT730G Phones .....2-3 DT700 and DT730G Series Phones ..............2-3 Platform Compatibility..................2-3 NEC IP PHone Lineup...................2-3 Keys and Parts ....................2-5 To display the Menu List using the Menu Key .........2-32 Optional Equipment..................2-36 Gigabit Ethernet Adapter ................2-38... - Page 10 C O N T E N T S 8LK-L Module Installation ................3-55 To install the 8LK-L Module ..............3-55 To install 8LK-L Line Key Card (Optional) ..........3-56 DCL-60 Console (Type A) Installation ............3-56 Prepare the phone ...................3-56 Prepare the DCL-60 Console..............3-58 Connect the DCL-60 Console to the phone ..........3-58 To install DCL-60 Line Key Card (Optional)..........3-59 Basic Settings/Configuration..........4-61...
- Page 11 C O N T E N T S DT700 Security Features ............6-95 Secure Calls ....................6-95 Secure Signaling..................6-95 Secure Media...................6-95 Errors and Debugging .................6-98 Basic Phone Operation ............7-101 Basic Call Operation ..................7-103 Answering Calls..................7-103 To answer an incoming call ..............7-103 To reject an incoming call ..............7-103 Placing Calls....................7-104 To place an external call ................7-104 To place an internal call .................7-105...
- Page 12 C O N T E N T S Programmable Keys ..............8-121 The Help key ....................8-122 Using the Help key.................8-122 The Menu Key....................8-123 Speed Dial and Programmable Keys ............8-124 Programmable Key Management..............8-124 DCL-60 Console (Type A) .................8-126 Speed Dial Key Configuration ..............8-127 Speed Dial Key Numbering..............8-128 Speed Dial Key Numbering for ITL-8LD Phones ........8-129 Speed Dial Key Numbering for Expansion Modules ......8-130...
- Page 13 C O N T E N T S Handset Forwarding ..................9-180 To set a Handset Forwarding Condition ..........9-181 To set Handset forwarding using star codes..........9-185 To set Conditional Handset forwarding - No Answer using star codes..9-185 To set Conditional Handset forwarding - Busy using star codes ...9-185 To clear Handset Forwarding Conditions..........9-185 To clear Handset forwarding using star codes........9-186 Call Recording ...................9-187...
- Page 14 C O N T E N T S DT730G Color Microbrowser and Enhanced Programmable Keys ..........10-213 Using the Microbrowser ................10-213 Feature Key with the Microbrowser ............10-213 To view the Microbrowser Home page ..........10-214 Hot Desking .....................10-217 To Login using Hot Desking..............10-217 To Logout of Hot Desking session ............10-220 Handset Forwarding ................10-221 To set a Handset Forwarding Condition ..........10-222...
- Page 15 C O N T E N T S Call History, and the Corporate and Personal Directories ............11-253 The Help key ....................11-254 Using the Help key................11-254 The Menu Key.....................11-255 Call History....................11-256 Access Call History using the Menu Key ..........11-257 Access Call History using the Cursor Pad ...........11-257 To clear the Missed Calls icon and Message ........11-258 To view Missed Calls ................11-258 To view Received Calls................11-259...
- Page 16 C O N T E N T S Network Connections ..................12-297 My phone cannot register on the network..........12-297 My phone indicates that the network cable is unplugged ....12-297 My phone cannot reconnect to the network after a local settings change ................12-298 I cannot connect to the network through the PC port on the back of the phone ..............12-298 My device connected to the PC Port lost its network connection ..12-298...
- Page 17 C O N T E N T S SIP@Net System Features ........... B-319 Programmable Keys / Speed Dial keys ............ B-319 Example ....................B-319 SIP@Net Prefixes..................B-320 Message Waiting Indication..............B-320 Desk Sharing and User Portability............B-320 To log on to a Desk Sharing Terminal ..........B-320 To log out of a Desk Sharing Terminal ..........
- Page 18 C O N T E N T S Notices ................... E-341 Third Party Software Disclaimer and Limitations ......... E-341 Open Source License Acknowledgement..........E-341 OpenSSL Redistribution Conditions ............. E-341 libSRTP Redistribution Conditions............E-342 NetBSD Foundation's (TNF) License............ E-343 BSD license: ..................E-343 Audio Coding Licenses................
-
Page 19: Overview
This document details the entire line of phones in the DT700 model lineup. Not all phones listed in this document may be supported in all regions. For information on specific models supported in your country or region, contact your NEC reseller or support organization. - Page 20 O V E R V I E W DT700 Phone User Guide...
-
Page 21: Introduction To The Dt700 And Dt730G Phones
Appendix B, “SIP@Net System Features.” N E C I P P H O N E L I N E U P This section describes the currently supported lineup of NEC IP phones: For supported languages and other system requirements, please refer to the Note: System Requirements document. - Page 22 I N T R O D U C T I O N T O T H E D T 7 0 0 A N D D T 7 3 0 G P H O N E S DT700 and DT730G Series Phones Table 2.2 DT730 Phone models Phone Name...
-
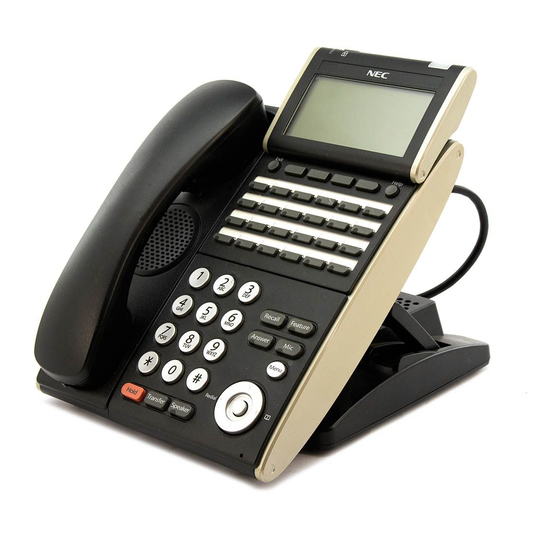
Page 23: Keys And Parts
I N T R O D U C T I O N T O T H E D T 7 0 0 A N D D T 7 3 0 G P H O N E S DT700 and DT730G Series Phones Table 2.3 DT730G Phone models Phone Name... - Page 24 I N T R O D U C T I O N T O T H E D T 7 0 0 A N D D T 7 3 0 G P H O N E S DT700 and DT730G Series Phones Figure 2.1 ITL-24CG (DT730G Series) 12 13 14...
- Page 25 I N T R O D U C T I O N T O T H E D T 7 0 0 A N D D T 7 3 0 G P H O N E S DT700 and DT730G Series Phones Programmable Keys The first programmable key is reserved as the Line Key.
- Page 26 I N T R O D U C T I O N T O T H E D T 7 0 0 A N D D T 7 3 0 G P H O N E S DT700 and DT730G Series Phones I T L - 1 2 C G ( D T 7 3 0 G S E R I E S ) P H O N E L A Y O U T A N D P A R T S Figure 2.2 ITL-12CG (DT730G Series)
- Page 27 I N T R O D U C T I O N T O T H E D T 7 0 0 A N D D T 7 3 0 G P H O N E S DT700 and DT730G Series Phones Help key Press the Help key and then press a softkey to display information about that softkey.
- Page 28 I N T R O D U C T I O N T O T H E D T 7 0 0 A N D D T 7 3 0 G P H O N E S DT700 and DT730G Series Phones I T L - 2 4 D G ( D T 7 3 0 G S E R I E S ) P H O N E L A Y O U T A N D P A R T S Figure 2.3 ITL-24DG (DT730G Series)
- Page 29 I N T R O D U C T I O N T O T H E D T 7 0 0 A N D D T 7 3 0 G P H O N E S DT700 and DT730G Series Phones Help key Press the Help key and then press a softkey to display information about that softkey.
- Page 30 I N T R O D U C T I O N T O T H E D T 7 0 0 A N D D T 7 3 0 G P H O N E S DT700 and DT730G Series Phones I T L - 1 2 D G ( D T 7 3 0 G S E R I E S ) P H O N E L A Y O U T A N D P A R T S Figure 2.4 ITL-12DG (DT730G Series)
- Page 31 I N T R O D U C T I O N T O T H E D T 7 0 0 A N D D T 7 3 0 G P H O N E S DT700 and DT730G Series Phones Help key Press the Help key and then press a softkey to display information about that softkey.
- Page 32 I N T R O D U C T I O N T O T H E D T 7 0 0 A N D D T 7 3 0 G P H O N E S DT700 and DT730G Series Phones I T L - 3 2 D ( D T 7 3 0 S E R I E S ) P H O N E L A Y O U T A N D P A R T S Figure 2.5 ITL-32D (DT730 Series) Phone Layout...
- Page 33 I N T R O D U C T I O N T O T H E D T 7 0 0 A N D D T 7 3 0 G P H O N E S DT700 and DT730G Series Phones Table 2.8 ITL-32D (DT730 Series) Keys and Parts Call Indicator Lamp...
- Page 34 I N T R O D U C T I O N T O T H E D T 7 0 0 A N D D T 7 3 0 G P H O N E S DT700 and DT730G Series Phones Speaker key Controls the built-in speaker which can be used for Hands Free dialing and conversations.
- Page 35 I N T R O D U C T I O N T O T H E D T 7 0 0 A N D D T 7 3 0 G P H O N E S DT700 and DT730G Series Phones Table 2.9 ITL-24D (DT730 Series) Keys and Parts Call Indicator Lamp...
- Page 36 I N T R O D U C T I O N T O T H E D T 7 0 0 A N D D T 7 3 0 G P H O N E S DT700 and DT730G Series Phones Speaker key Controls the built-in speaker which can be used for Hands Free dialing and conversations.
- Page 37 I N T R O D U C T I O N T O T H E D T 7 0 0 A N D D T 7 3 0 G P H O N E S DT700 and DT730G Series Phones Table 2.10 ITL-12D (DT730 Series) Keys and Parts Call Indicator Lamp...
- Page 38 I N T R O D U C T I O N T O T H E D T 7 0 0 A N D D T 7 3 0 G P H O N E S DT700 and DT730G Series Phones Speaker key Controls the built-in speaker which can be used for Hands Free dialing and conversations.
- Page 39 I N T R O D U C T I O N T O T H E D T 7 0 0 A N D D T 7 3 0 G P H O N E S DT700 and DT730G Series Phones Table 2.11 ITL-8LD (DT730 Series) Keys and Parts Call Indicator Lamp...
- Page 40 I N T R O D U C T I O N T O T H E D T 7 0 0 A N D D T 7 3 0 G P H O N E S DT700 and DT730G Series Phones Speaker key Controls the built-in speaker which can be used for Hands Free dialing and conversations.
- Page 41 I N T R O D U C T I O N T O T H E D T 7 0 0 A N D D T 7 3 0 G P H O N E S DT700 and DT730G Series Phones Table 2.12 ITL-6DE (DT710 Series) Keys and Parts Call Indicator Lamp...
- Page 42 I N T R O D U C T I O N T O T H E D T 7 0 0 A N D D T 7 3 0 G P H O N E S DT700 and DT730G Series Phones Speaker key Controls the built-in speaker which can be used for Hands Free dialing and conversations.
- Page 43 I N T R O D U C T I O N T O T H E D T 7 0 0 A N D D T 7 3 0 G P H O N E S DT700 and DT730G Series Phones Table 2.13 ITL-2E (DT710 Series) Keys and Parts Call Indicator Lamp...
- Page 44 I N T R O D U C T I O N T O T H E D T 7 0 0 A N D D T 7 3 0 G P H O N E S DT700 and DT730G Series Phones C U R S O R P A D Figure 2.11 Cursor pad Up/Down Keys...
- Page 45 I N T R O D U C T I O N T O T H E D T 7 0 0 A N D D T 7 3 0 G P H O N E S DT700 and DT730G Series Phones Right Go to the screen which corresponds to the highlighted menu item.
- Page 46 I N T R O D U C T I O N T O T H E D T 7 0 0 A N D D T 7 3 0 G P H O N E S DT700 and DT730G Series Phones Table 2.14 Icons Icon...
- Page 47 I N T R O D U C T I O N T O T H E D T 7 0 0 A N D D T 7 3 0 G P H O N E S DT700 and DT730G Series Phones Icon Feature Description...
- Page 48 I N T R O D U C T I O N T O T H E D T 7 0 0 A N D D T 7 3 0 G P H O N E S DT700 and DT730G Series Phones Icon Feature Description...
- Page 49 I N T R O D U C T I O N T O T H E D T 7 0 0 A N D D T 7 3 0 G P H O N E S DT700 and DT730G Series Phones Registration Icon Media Security Icon Signaling...
-
Page 50: To Display The Menu List Using The Menu Key
I N T R O D U C T I O N T O T H E D T 7 0 0 A N D D T 7 3 0 G P H O N E S DT700 and DT730G Series Phones Figure 2.16 Menu Key To display the Menu List using the Menu Key •... -
Page 51: Directory Key
I N T R O D U C T I O N T O T H E D T 7 0 0 A N D D T 7 3 0 G P H O N E S DT700 and DT730G Series Phones Figure 2.18 Use Menus and Cursor Pad to access the Personal Directory 1. - Page 52 I N T R O D U C T I O N T O T H E D T 7 0 0 A N D D T 7 3 0 G P H O N E S DT700 and DT730G Series Phones Figure 2.20 DT730 and DT730DG softkeys Softkeys Figure 2.21 DT710 (ITL-6DE) softkeys...
- Page 53 I N T R O D U C T I O N T O T H E D T 7 0 0 A N D D T 7 3 0 G P H O N E S DT700 and DT730G Series Phones Reject - Transfers call to your Voice Mail or forwarding conditions.
-
Page 54: Optional Equipment
I N T R O D U C T I O N T O T H E D T 7 0 0 A N D D T 7 3 0 G P H O N E S Optional Equipment Figure 2.24 Help key Press the softkey for which you want to see Help information. -
Page 55: Key Module
I N T R O D U C T I O N T O T H E D T 7 0 0 A N D D T 7 3 0 G P H O N E S Optional Equipment Figure 2.27 ITL-24D Phone with Key Kit Internal Key Module (Programmable... -
Page 56: Gigabit Ethernet Adapter
I N T R O D U C T I O N T O T H E D T 7 0 0 A N D D T 7 3 0 G P H O N E S Optional Equipment Supported Internal Key Modules Model Name Commercial Name Key Kit Type... -
Page 57: Side 2 Connector Mode Support
I N T R O D U C T I O N T O T H E D T 7 0 0 A N D D T 7 3 0 G P H O N E S Optional Equipment All DT730G phones support Gigabit Ethernet on both the LAN and PC ports. Gigabit Ethernet is enabled by setting the Speed and Duplex setting for each port to AutoNegotiate. - Page 58 I N T R O D U C T I O N T O T H E D T 7 0 0 A N D D T 7 3 0 G P H O N E S Optional Equipment Speed Dial keys can be configure on the DCL-60 Console to allow the phone to monitor the status or presence of other users.
-
Page 59: Jabra Headset Support
I N T R O D U C T I O N T O T H E D T 7 0 0 A N D D T 7 3 0 G P H O N E S Optional Equipment D C L - 6 0 I N S T A L L A T I O N For more information on installing a DCL-60 console on the phone, see “DCL-60 Console (Type A) Installation”... - Page 60 I N T R O D U C T I O N T O T H E D T 7 0 0 A N D D T 7 3 0 G P H O N E S Optional Equipment 2-42 DT700 Phone User Guide...
-
Page 61: Installation
Ch 3 - Installation NSTALLATION ........B E F O R E Y O U B E G I N •... -
Page 62: To Lower Tilt Leg
I N S T A L L A T I O N Figure 3.2 Raise Tilt Leg Tilt Leg To lower tilt leg Turn the phone upside down. While lifting the center of the stopper, adjust the tilt leg in the direction of the arrow until you hear it click. -
Page 63: To Attach Tilt Leg
I N S T A L L A T I O N Figure 3.4 Remove Tilt Leg Stopper Tilt While pushing the two hooks, slide the tilt leg downward. Remove the tilt leg from the terminal. Figure 3.5 Remove Tilt Leg Hook Hook To attach tilt leg... -
Page 64: Connecting The Phone
I N S T A L L A T I O N Figure 3.6 Tilt Leg Attach Fit the indicated portions (a and b) of the stopper into grooves (A and B) on the tilt leg. Figure 3.7 Tilt Leg Attach C O N N E C T I N G T H E P H O N E To attach the handset Insert the coiled cord plug into the HANDSET connector on the back of the phone, until... -
Page 65: To Connect Lan Cable To The Phone
I N S T A L L A T I O N Figure 3.8 Handset Connection Modular Plug Phone Coiled Cord Groove HANDSET Connector To connect LAN cable to the phone You will need a 10 BASE-T/100 BASE-T/TX LAN cable (Straight) to connect the phone to your network. -
Page 66: To Connect A Headset (Optional)
I N S T A L L A T I O N Figure 3.10 AC Adapter Connection Connector for AC Adapter Phone Adapter Plug Groove AC Adapter Cord To connect a headset (Opt ional) For information on connecting a Jabra Bluetoothe headset to your phone, see Note: Appendix D, “Jabra Bluetooth®... -
Page 67: To Connect A Computer (Optional)
I N S T A L L A T I O N Figure 3.13 Enable Headset Press Enter on the cursor pad or the OK softkey to accept the setting. Connect the headset to the phone: Insert the headset cord plug into the HEADSET connector on the back of the phone, until you hear a click. -
Page 68: Installing A Directory Card (Optional)
I N S T A L L A T I O N Figure 3.15 LAN Cable Connection PC Connector Phone LAN Cable LAN Cable Plug Thread the LAN cable through the groove on the back of the phone. Figure 3.16 LAN Cable Connection Phone Groove LAN Cable... -
Page 69: Installing/Removing Line Key Card (Optional)
I N S T A L L A T I O N To remove the directory card, pinch the two sides of the directory card holder Note: inward, until the tabs release, and pull the holder out of the grooves. Figure 3.18 Directory Card Connection Cover Directory Card... -
Page 70: To Install Line Key Card
I N S T A L L A T I O N To install Line Key Card Align the holes in the Line Key Card with the buttons on the phone. Align the holes in the Line Key Panel with the Line Key buttons on the phone, and then push the four corners of the panel until the panel clicks into place. -
Page 71: Wall Mounting Clearance Requirements
I N S T A L L A T I O N Wall Mounting Clearance Requirements The phone should be mounted to allow for the following clearances for the phone with the DT730 (ITL-24D) shown as an example. Figure 3.21 Wall Mounting Clearance Diagram 25 mm 15 mm 25 mm... - Page 72 I N S T A L L A T I O N Figure 3.22 Mount hanger piece Hanger piece Phone Turn the phone upside down, and flatten the tilt leg and stopper, or remove the tilt leg (see “To remove tilt leg” on page 3-44). Attach the wall mount to the wall directory or the wall plate.
-
Page 73: To Install The 8Lk-L Module
I N S T A L L A T I O N Tuck the excess cord into the wall mount unit. Figure 3.25 Wall Mount Install Wall Tab Slots Tabs 8 L K - L M O D U L E I N S T A L L A T I O N TO PREVENT POSSIBLE DAMAGE TO THE PHONE WARNING! TERMINAL DURING INSTALLATION OR REMOVAL,... -
Page 74: To Install 8Lk-L Line Key Card (Optional)
I N S T A L L A T I O N Figure 3.27 Connect the 8LK-L Cable Connection Side 1 Cable Connector Port Cover Connect the cable from the 8LK-L to the side option connector on the terminal and close the cover. - Page 75 I N S T A L L A T I O N Figure 3.28 Side 2 Connector Mode Select DCL-60. Figure 3.29 Enable DCL-60 Press the OK softkey. Press the Exit softkey. Press the Exit softkey. Press the Yes softkey to restart the phone. You must restart the phone to fully enable the DCL-60 connector mode.
-
Page 76: Prepare The Dcl-60 Console
I N S T A L L A T I O N Figure 3.31 Attach connection bracket to phone Prepare the DCL-60 Console Connect the 10 pin connector cable to the DCL-60. Position the cable through the cable groove. Figure 3.32 Press the cable into groove Groove Connect the DCL-60 Console to the phone Press the tab on the port cover on the left side of the back of the phone to release the... -
Page 77: To Install Dcl-60 Line Key Card (Optional)
I N S T A L L A T I O N Figure 3.34 Screw DCL-60 module to the connector bracket Connect the 10 pin connector to the SIDE 2 port on the back of the phone. Figure 3.35 Serial Cable Installed Cable Port Port Cover... - Page 78 I N S T A L L A T I O N 3-60 DT700 Phone User Guide...
-
Page 79: Basic Settings/Configuration
Ch 4 - Basic Settings/Configuration ASIC ETTINGS ONFIGURATION ........This chapter describes how to customize your phone. -
Page 80: Basic Setup With The Cursor Pad Or Up/Down Keys
B A S I C S E T T I N G S / C O N F I G U R A T I O N Basic Setup with the Cursor Pad or Up/Down Keys B A S I C S E T U P W I T H T H E C U R S O R P A D O R . -
Page 81: To Adjust The Headset Ringing Volume
B A S I C S E T T I N G S / C O N F I G U R A T I O N Basic Setup with the Cursor Pad or Up/Down Keys Figure 4.6 Adjust Soft Ring volume To adjust the headset ringing volume •... -
Page 82: To Adjust The Call Volume (Speaker)
B A S I C S E T T I N G S / C O N F I G U R A T I O N Basic Setup with the Menus and Cursor Pad Figure 4.9 Adjust Headset call volume To adjust the call volume (speaker) •... - Page 83 B A S I C S E T T I N G S / C O N F I G U R A T I O N Basic Setup with the Menus and Cursor Pad Select Ringtone. Figure 4.12 Ringtone menu Select Internal Ringtone.
-
Page 84: To Select An External Ringtone
B A S I C S E T T I N G S / C O N F I G U R A T I O N Basic Setup with the Menus and Cursor Pad To select an External Ringtone Press the Menu key. -
Page 85: To Enable An External Headset
B A S I C S E T T I N G S / C O N F I G U R A T I O N Basic Setup with the Menus and Cursor Pad Figure 4.17 Unavailable External Ringtone selection To enable an external headset There is no connector for a headset on the DT710 phones. -
Page 86: To Set External Headset Ringing (Optional)
B A S I C S E T T I N G S / C O N F I G U R A T I O N Basic Setup with the Menus and Cursor Pad Figure 4.20 Headset Options Select Enable. -
Page 87: To Set The Call Waiting Volume
B A S I C S E T T I N G S / C O N F I G U R A T I O N Basic Setup with the Menus and Cursor Pad Figure 4.23 Headset ringing options Do one of the following: •... -
Page 88: To Set The Hold Reminder Volume
B A S I C S E T T I N G S / C O N F I G U R A T I O N Basic Setup with the Menus and Cursor Pad Figure 4.26 Tone Volumes options Select Call Waiting Volume. -
Page 89: To Change The Display Language
B A S I C S E T T I N G S / C O N F I G U R A T I O N Basic Setup with the Menus and Cursor Pad Figure 4.29 Select Headset options Select Tone Volumes. -
Page 90: To Set The Date Format
B A S I C S E T T I N G S / C O N F I G U R A T I O N Basic Setup with the Menus and Cursor Pad Select User Settings. Select Language. Figure 4.33 Select Language options Select the desired language and press Enter on the cursor pad or the OK softkey to... -
Page 91: To Set The Time Format
B A S I C S E T T I N G S / C O N F I G U R A T I O N Basic Setup with the Menus and Cursor Pad Figure 4.35 Select Date options You can also press the Cancel softkey to exit without making any changes. -
Page 92: To Adjust The Lcd Contrast
B A S I C S E T T I N G S / C O N F I G U R A T I O N Basic Setup with the Menus and Cursor Pad Figure 4.37 Select Time format Select 12 Hour or 24 Hour. -
Page 93: To Change The Lcd Backlight Timeout
B A S I C S E T T I N G S / C O N F I G U R A T I O N Basic Setup with the Menus and Cursor Pad Use the + and - softkeys to adjust the LCD contrast. Figure 4.41 Adjust LCD Contrast settings Press Enter on the cursor pad or the OK softkey to accept the setting. -
Page 94: To Enable Or Disable The Backlight Fade (Dt730G Itl-12Cg Only)
B A S I C S E T T I N G S / C O N F I G U R A T I O N Basic Setup with the Menus and Cursor Pad Figure 4.44 Set Backlight Timeout Press Enter on the cursor pad or the OK softkey to accept the setting. -
Page 95: To Edit The Dial Preference
B A S I C S E T T I N G S / C O N F I G U R A T I O N Basic Setup with the Menus and Cursor Pad Figure 4.46 LCD Low Power Mode settings Select Enable or Disable. -
Page 96: To Clear User Settings
B A S I C S E T T I N G S / C O N F I G U R A T I O N Basic Setup with the Menus and Cursor Pad Figure 4.48 Dial Preference options •... -
Page 97: To Clear Personal Directory
B A S I C S E T T I N G S / C O N F I G U R A T I O N Basic Setup with the Menus and Cursor Pad Figure 4.49 Clear User Settings The confirmation screen manage the following events: Table 4.2 Clear Confirmation softkeys... -
Page 98: To Clear Call History
B A S I C S E T T I N G S / C O N F I G U R A T I O N Basic Setup with the Menus and Cursor Pad Figure 4.50 Clear Personal Directory The confirmation screen manage the following events: Table 4.4 Clear Confirmation softkeys... - Page 99 B A S I C S E T T I N G S / C O N F I G U R A T I O N Basic Setup with the Menus and Cursor Pad Select Clear Settings or Clear Settings. The number of the menu item may differ based on the Edit Before Dialing Note: settings on your phone.
-
Page 100: To Restart Your Phone
B A S I C S E T T I N G S / C O N F I G U R A T I O N Basic Setup with the Menus and Cursor Pad To restart your phone Any devices connected to the phone’s PC port will momentarily disconnect Note: from the network when the phone is rebooted. -
Page 101: To View The Firmware Information For Your Phone
B A S I C S E T T I N G S / C O N F I G U R A T I O N Basic Setup with the Menus and Cursor Pad Figure 4.54 Status options Select Terminal Information to view the hardware and firmware information for your phone, or select Network Information to view the network information for your... -
Page 102: To View The Maximum Numbers Of Calls You Can Handle On Your Phone
B A S I C S E T T I N G S / C O N F I G U R A T I O N Basic Setup with the Menus and Cursor Pad Figure 4.56 Select Network Information ... -
Page 103: Speed Dial And Personal Directory Character Sets
B A S I C S E T T I N G S / C O N F I G U R A T I O N Speed Dial and Personal Directory Character Sets Figure 4.59 MaxCalls Press the Exit softkey to return to the Status menu. You cannot change these settings on your phone. - Page 104 B A S I C S E T T I N G S / C O N F I G U R A T I O N Speed Dial and Personal Directory Character Sets Uppercase Characters Æ Œ Ç Ø ¿...
- Page 105 B A S I C S E T T I N G S / C O N F I G U R A T I O N Speed Dial and Personal Directory Character Sets You can switch between character sets by pressing the key.
- Page 106 B A S I C S E T T I N G S / C O N F I G U R A T I O N Speed Dial and Personal Directory Character Sets 4-88 DT700 Phone User Guide...
-
Page 107: Dt730 Itl-8Ld With Display
Ch 5 - DT730 ITL-8LD with Display DT730 ITL-8LD WITH ISPLAY ........The following symbols represent the DT700’s directional cursor pad and key pad: User actions/Keys Digit key... -
Page 108: Dt730 Itl-8Ld Desi-Less Display
D T 7 3 0 I T L - 8 L D W I T H D I S P L A Y DT730 ITL-8LD DESI-Less Display ............D T 7 3 0 I T L - 8 L D D E S I - L E S S D I S P L A Y S T A R T U P D I S P L A Y All the startup display messages on the DESI-Less phone are shown on the 1st LCD. - Page 109 D T 7 3 0 I T L - 8 L D W I T H D I S P L A Y DT730 ITL-8LD DESI-Less Display Figure 5.3 ITL-8LD (a) Monitor Icons Table 5.1 Monitor Presence Icons for ITL-8LD phones Programmable LED/ Type...
- Page 110 D T 7 3 0 I T L - 8 L D W I T H D I S P L A Y DT730 ITL-8LD DESI-Less Display Programmable LED/ Type Status Key LED DESI-Less Icon Idle LED is not lit Ringing (SIP@Net) Blinking Red Ringing (3C system)
-
Page 111: The Scroll Key
D T 7 3 0 I T L - 8 L D W I T H D I S P L A Y DT730 ITL-8LD DESI-Less Display (c) Page Number Table 5.3 Page Numbers on DT730 ITL-8LD phones Page Number Programmable Keys Behavior Programmable Keys 2 - 9... -
Page 112: Speed Dial Key Numbering For Itl-8Ld Phones
D T 7 3 0 I T L - 8 L D W I T H D I S P L A Y DT730 ITL-8LD DESI-Less Display For more information about configuring programmable keys as Speed Dial Note: Keys on ITL-8LD phones, see “Speed Dial Key Programming Examples” on page 8-135. -
Page 113: Dt700 Security Features
Ch 6 - DT700 Security Features DT700 S ECURITY EATURES ........See the Administrator’s Guide for information on security settings for DT700 Note: phones. - Page 114 D T 7 0 0 S E C U R I T Y F E A T U R E S Figure 6.1 Secure Media Icon (Secure Media, Secure Signaling) White Background Black Background Color The following table provides the details for possible scenarios with secured and unsecured signaling and media.
- Page 115 D T 7 0 0 S E C U R I T Y F E A T U R E S Figure 6.2 Connecting The Connecting screen is displayed when the DT700 is re-sending “EAPOL Start” requests after receiving an “EAPOL Success” response from the switch (authenticator).
-
Page 116: Errors And Debugging
D T 7 0 0 S E C U R I T Y F E A T U R E S E R R O R S A N D D E B U G G I N G T L S E R R O R S The DT700 phone closes the TLS connection and logs an appropriate error on sending or receiving any of the following fatal alert messages defined in RFC 2246. - Page 117 D T 7 0 0 S E C U R I T Y F E A T U R E S Error Message Cause(s) TLS Unknown CA. • Unknown CA TLS Unknown Certificate. • Certificate unknown TLS Unsupported Cert. • Unsupported certificate 8 0 2 .
- Page 118 D T 7 0 0 S E C U R I T Y F E A T U R E S 6-100 DT700 Phone User Guide...
-
Page 119: Basic Phone Operation
Ch 7 - Basic Phone Operation ASIC HONE PERATION ........These procedures encompass both the economy and value phones in the DT700 series lineup. - Page 120 B A S I C P H O N E O P E R A T I O N Figure 7.2 DT730 (ITL-8LD, ITL-12D, ITL-24D, ITL-32D) and DT730G (ITL-12DG) softkeys Softkeys Figure 7.3 DT710 softkeys (ITL-6DE) Softkeys D T 7 1 0 ( I T L - 6 D E ) E C O N O M Y P H O N E D I S P L A Y The DT710 (ITL-6DE) LCD area shows three lines of information, while the DT730 and DT730G phones are capable of showing five lines of information.
-
Page 121: Basic Call Operation
B A S I C P H O N E O P E R A T I O N Basic Call Operation ............B A S I C C A L L O P E R A T I O N A N S W E R I N G C A L L S Figure 7.6... -
Page 122: Placing Calls
B A S I C P H O N E O P E R A T I O N Basic Call Operation configuration parameters. For more information about the incoming call ringing tones for your system, contact your system administrator. Soft Ring is only valid for SIP@Net platforms. -
Page 123: To Place An Internal Call
B A S I C P H O N E O P E R A T I O N Basic Call Operation The call proceeds to the dialed party. You can also dial the number, then lift the telephone handset or press the Note: Headset softkey to initiate a call. -
Page 124: Call Duration
B A S I C P H O N E O P E R A T I O N Basic Call Operation S T A R C O D E S A N D P I N C O D E S I N P L A C E D C A L L S PIN code masking may be enabled on your phone. -
Page 125: Redialing A Number
B A S I C P H O N E O P E R A T I O N Basic Call Operation R E D I A L I N G A N U M B E R To redial the last number that was dialed from the phone, press the Redial key. Figure 7.17 Redial Key for DT710 (ITL-2E) phones Figure 7.18 Redial from Cursor Pad for DT710 (ITL-6DE) and DT730 (ITL- 8LD, ITL-12D, ITL-24D and ITL-32D) phones... -
Page 126: Using A Headset To Make And Receive Calls
B A S I C P H O N E O P E R A T I O N Basic Call Operation If you have problems reconnecting to a call after it is put on hold, press the EndCall softkey to terminate the call. U S I N G A H E A D S E T T O M A K E A N D R E C E I V E C A L L S If you have a headset attached to your phone and your phone has been configured for the headset (see “To enable an external headset”... -
Page 127: To Transfer The Current Call To Your Headset
B A S I C P H O N E O P E R A T I O N Call Waiting/Concurrent Calls Figure 7.23 Headset icon and Headset softkey If you want to transfer the call to your telephone handset, lift the telephone handset to continue the call. -
Page 128: To Place A Second Call (Concurrent Call)
B A S I C P H O N E O P E R A T I O N Call Waiting/Concurrent Calls Do one of the following: • To review the caller information before answering the call: Press the Line Key, and then press the Answer key to take the call, or press the Reject softkey to reject the call. -
Page 129: To Switch Between Calls
B A S I C P H O N E O P E R A T I O N Call Transferring and Conferencing Figure 7.29 Enter number for second call Press the Dial softkey to initiate the call, or wait a few seconds for the call to be automatically dialed. -
Page 130: To Conference Two Calls
B A S I C P H O N E O P E R A T I O N Call Transferring and Conferencing Conference Reminder Tone A Conference Reminder tone may be enabled on your phone. If enabled, a reminder tone is played periodically when you have established a 3-party conference call from your telephone. -
Page 131: To Hold/Resume A Conference Call
B A S I C P H O N E O P E R A T I O N Call Transferring and Conferencing H O L D / R E S U M E C O N F E R E N C E C A L L To hold/resume a conference call While on a conference call, press the Hold key, or press the Hold softkey to put the call on hold. -
Page 132: To Switch Between Two Calls
B A S I C P H O N E O P E R A T I O N Call Transferring and Conferencing Figure 7.38 Split softkey Each party is now treated as a separate phone call. After you have split a conference, you cannot rejoin the calls in a conference Note: without having one party hang up so you can start a new 3-way conference call. -
Page 133: Hang Up While Conferencing
B A S I C P H O N E O P E R A T I O N Call Transferring and Conferencing After you have connected to the second call, press the Shuttle softkey to switch between calls without joining them in a conference. Figure 7.42 Shuttle softkey The LCD will display the information for call you are currently on. -
Page 134: Blind Transfer
B A S I C P H O N E O P E R A T I O N Call Transferring and Conferencing Figure 7.43 Transfer Key This puts the current call on hold so you can start to transfer the call. Use the key pad to dial the telephone number to which the call is to be transferred. -
Page 135: Unattended Transfer
B A S I C P H O N E O P E R A T I O N Call Transferring and Conferencing The call is immediately transferred when the number is dialed. You will be disconnected from both callers. If your system administrator has enabled forwarding to external numbers, you may be able to transfer calls to external numbers. -
Page 136: To Split Calls Into Two Calls When Transferring (Transfer Split)
B A S I C P H O N E O P E R A T I O N Call Transferring and Conferencing Figure 7.49 Transfer Shuttle You will be connected to the original caller. To continue to switch between the two callers, press the Shuttle softkey. -
Page 137: Advanced Messaging Features
B A S I C P H O N E O P E R A T I O N Advanced Messaging Features ............A D V A N C E D M E S S A G I N G F E A T U R E S M E S S A G E W A I T I N G I N D I C A T I O N The DT700 phones have a call indicator lamp at the right top corner of the unit that... - Page 138 B A S I C P H O N E O P E R A T I O N Advanced Messaging Features Figure 7.55 Voicemail softkey from Call screen 7-120 DT700 Phone User Guide...
-
Page 139: Programmable Keys
Ch 8 - Programmable Keys ROGRAMMABLE ........These procedures outline some of the advanced features available on the economy and value phones in the DT700 series lineup. -
Page 140: The Help Key
P R O G R A M M A B L E K E Y S The Help key Figure 8.2 DT710 (ITL-6DE) softkeys Softkeys D T 7 1 0 ( I T L - 6 D E ) E C O N O M Y P H O N E D I S P L A Y The DT710 (ITL-6DE) LCD area shows three lines of information, while the DT730 and DT730G phones are capable of showing five lines of information. -
Page 141: The Menu Key
P R O G R A M M A B L E K E Y S The Menu Key Figure 8.5 Help key Press the softkey for which you want to see Help information. Figure 8.6 Press a softkey for Additional Help ... -
Page 142: Speed Dial And Programmable Keys
P R O G R A M M A B L E K E Y S Speed Dial and Programmable Keys Figure 8.8 Menu Key ............S P E E D D I A L A N D P R O G R A M M A B L E K E Y S P R O G R A M M A B L E K E Y M A N A G E M E N T D T 7 1 0 ( I T L - 2 E ) P R O G R A M M A B L E K E Y... - Page 143 P R O G R A M M A B L E K E Y S Speed Dial and Programmable Keys Figure 8.10 DT710 and DT730 Programmable Keys Programmable Key/ Speed Dial Key 2 Programmable Key/ Speed Dial Key 3 Line Key etc.
-
Page 144: Dcl-60 Console (Type A)
P R O G R A M M A B L E K E Y S Speed Dial and Programmable Keys O P T I O N A L P R O G R A M M A B L E K E Y M O D U L E Additional Programmable Keys may also be added by installing the optional Programmable Key Module. -
Page 145: Speed Dial Key Configuration
P R O G R A M M A B L E K E Y S Speed Dial and Programmable Keys index associated with the first and last DCL-60 Console key. All the keys from key 1 to key 60 are numbered sequentially. DCL-60 DCL-60 Product... -
Page 146: Speed Dial Key Numbering
P R O G R A M M A B L E K E Y S Speed Dial and Programmable Keys Digit Map. The SIP server interprets the digits. This allows for arbitrary dial strings (including star codes) to be defined as a Speed Dial. D T 7 1 0 ( I T L - 2 E ) S P E E D D I A L C O N F I G U R A T I O N In the case of the ITL-2E there are is only one Programmable Key. -
Page 147: Speed Dial Key Numbering For Itl-8Ld Phones
P R O G R A M M A B L E K E Y S Speed Dial and Programmable Keys Figure 8.15 24 Key Phone Speed Dial Key Numbering Figure 8.16 12 Key Phone Speed Dial Key Numbering Figure 8.17 DT710 (ITL-6DE) Speed Dial Key Numbering Speed Dial Key Numbering for ITL-8LD Phones For details on the Speed Dial Key numbering for the ITL-8LD phone, see the example below. -
Page 148: Speed Dial Key Numbering For Expansion Modules
P R O G R A M M A B L E K E Y S Speed Dial and Programmable Keys Figure 8.18 DT730 (ITL-8LD) Speed Dial Key Numbering Page Page Page Page Page Page Page Page Line Key Speed Dial Key Numbering for Expansion Modules For supported expansion modules (8LK-L and DCL-60), Speed Dial Key numbering for the expansion model starts at the next available number. -
Page 149: Duplicate Entries In Speed Dials
P R O G R A M M A B L E K E Y S Speed Dial and Programmable Keys Programmable Type Status Key LED Speed Dial Key Not Available LED is not lit (No Monitoring) Idle LED is not lit Ringing (SIP@Net) Blinking Red Ringing (3C system) -
Page 150: Using The Feature Key
P R O G R A M M A B L E K E Y S Speed Dial and Programmable Keys Using the Feature Key Network configuration determines how the Feature key behaves on your Note: network. Contact your system administrator. The Feature key on the telephone is used to program Speed Dial Keys and access the Microbrowser (if supported). -
Page 151: To View Speed Dial Key Information For Programmed Speed Dial Keys
P R O G R A M M A B L E K E Y S Speed Dial and Programmable Keys After you press the Program softkey, you will see a help screen. Figure 8.23 Programmable Key Help screen You can still answer incoming calls while your phone is in the programmable mode using the telephone handset or by pressing the Speaker or Answer key on your telephone. -
Page 152: Speed Dial Key Operation
P R O G R A M M A B L E K E Y S Speed Dial and Programmable Keys Figure 8.27 Exit softkey Do one of the following: • To return to the main phone screen without making any changes to the entry, press the Exit softkey or the Feature Key. -
Page 153: Speed Dial Key Programming Examples
P R O G R A M M A B L E K E Y S Speed Dial and Programmable Keys Using a headset • Press the desired Speed Dial Key. • Press the Feature Key, then press the Speed Dial Key to view the Speed Dial details, then press the Dial softkey. -
Page 154: To Add A Programmable Key/Speed Dial Key Without A Personal Directory Entry
P R O G R A M M A B L E K E Y S Speed Dial and Programmable Keys Directory. If an entry is not added to the Personal Directory, it will not show up when you view or search the Personal Directory. For example, if you are programming a Speed Dial entry for a star or hash code, you may not want to add the entry to your Personal Directory. - Page 155 P R O G R A M M A B L E K E Y S Speed Dial and Programmable Keys If the Speed Dial has already been programmed, the name and number Note: information displays. You will need to press the Exit softkey and select another programmable key.
- Page 156 P R O G R A M M A B L E K E Y S Speed Dial and Programmable Keys keypad to enter the other Programmable Key number and press Enter on the cursor pad or the OK softkey. Figure 8.37 Select Speed Dial Number The number of available Sped Dial Keys and their associated numbers depend on your model of DT700 phone.
- Page 157 P R O G R A M M A B L E K E Y S Speed Dial and Programmable Keys Table 8.3 Monitor Presence Icons Type Status Icon Line Key Registered Unregistered Speed Dial Key Not Available (No Monitoring) Idle Ringing (SIP@Net) Ringing (3C system)
- Page 158 P R O G R A M M A B L E K E Y S Speed Dial and Programmable Keys Figure 8.40 Save softkey If the Speed Dial number is already used for another entry, you will see an error when you try to save the entry.
-
Page 159: To Add A Programmable Key As A Speed Dial Key With A Personal Directory Entry Using The Feature Key
P R O G R A M M A B L E K E Y S Speed Dial and Programmable Keys Directory entry, or set it up using the Feature Key and select to show the entry in the Personal Directory. The Speed Dial information will be listed in the Personal Directory similar to all other Personal Directory entries, and you can also view the entry information using the Feature Key. - Page 160 P R O G R A M M A B L E K E Y S Speed Dial and Programmable Keys Figure 8.48 Speed Dial Name Screen Up to 24 characters may be entered for the name. • Press the Delete softkey to delete the last character entered, or press the Cancel softkey to return to the previous screen.
- Page 161 P R O G R A M M A B L E K E Y S Speed Dial and Programmable Keys Figure 8.50 Select Speed Dial Number The number of available Sped Dial Keys and their associated numbers depend on your model of DT700 phone.
- Page 162 P R O G R A M M A B L E K E Y S Speed Dial and Programmable Keys Type Status Icon Speed Dial Key Not Available (No Monitoring) Idle Ringing (SIP@Net) Ringing (3C system) Subscription Failed Online (3C system) (Phone is Online) On the Phone (Phone is in use)
-
Page 163: To Add A Programmable Key As A Speed Dial Key With A Personal Directory Entry From The Personal Directory
P R O G R A M M A B L E K E Y S Speed Dial and Programmable Keys Figure 8.54 Speed Dial In Use Menu Display To change the Speed Dial Key number for the entry, select Speed Dial and enter a new Speed Dial Key number. - Page 164 P R O G R A M M A B L E K E Y S Speed Dial and Programmable Keys Use the telephone keypad to enter the name and press Enter on the cursor pad or the OK softkey. Figure 8.58 Personal Directory Name Screen Up to 24 characters may be entered for the name.
- Page 165 P R O G R A M M A B L E K E Y S Speed Dial and Programmable Keys Figure 8.60 Select Speed Dial Number The number of available Sped Dial Keys and their associated numbers depend on your model of DT700 phone.
- Page 166 P R O G R A M M A B L E K E Y S Speed Dial and Programmable Keys Type Status Icon Speed Dial Key Not Available (No Monitoring) Idle Ringing (SIP@Net) Ringing (3C system) Subscription Failed Online (3C system) (Phone is Online) On the Phone (Phone is in use)
- Page 167 P R O G R A M M A B L E K E Y S Speed Dial and Programmable Keys Programmable Type Status Key LED Idle LED is not lit Ringing (SIP@Net) Blinking Red Ringing (3C system) Blinking Green Subscription Failed LED is not lit Online (3C system)
-
Page 168: To Add A Speed Dial Key To An Existing Personal Directory Entry
P R O G R A M M A B L E K E Y S Speed Dial and Programmable Keys Figure 8.63 Confirm Addition to Personal Directory Entries are uniquely defined by the combination of number and name. For the purpose of uniquely defining an entry, the name is case insensitive. - Page 169 P R O G R A M M A B L E K E Y S Speed Dial and Programmable Keys Figure 8.66 More Soft and Edit softkeys Select Speed Dial. Use the telephone keypad to enter a Speed Dial number for the entry and press Enter on the cursor pad or the OK softkey.
- Page 170 P R O G R A M M A B L E K E Y S Speed Dial and Programmable Keys Option Visual and Soft Ring is only valid for SIP@Net platforms. Contact Note: your system administrator to determine if Soft Ring is available on your system.
- Page 171 P R O G R A M M A B L E K E Y S Speed Dial and Programmable Keys Programmable Type Status Key LED Idle LED is not lit Ringing (SIP@Net) Blinking Red Ringing (3C system) Blinking Green Subscription Failed LED is not lit Online (3C system)
- Page 172 P R O G R A M M A B L E K E Y S Speed Dial and Programmable Keys Figure 8.70 Confirm Addition to Personal Directory Entries are uniquely defined by the combination of number and name. For the purpose of uniquely defining an entry, the name is case insensitive.
-
Page 173: To Configure A Programmable Key As A Speed Dial Key For A Star/Hash Code
P R O G R A M M A B L E K E Y S Speed Dial and Programmable Keys To configure a Programmable Key as a Speed Dial Key for a star/hash code Enter the programmable mode for your phone. The Feature key LED lights a steady red. Figure 8.73 Feature Key For information on how to enter the programmable mode for your phone, see Note:... - Page 174 P R O G R A M M A B L E K E Y S Speed Dial and Programmable Keys Up to 24 characters may be entered for the name. • Press the Delete softkey to delete the last character entered, or press the Cancel softkey to return to the previous screen.
- Page 175 P R O G R A M M A B L E K E Y S Speed Dial and Programmable Keys Figure 8.79 Select Speed Dial Number The number of available Sped Dial Keys and their associated numbers depend on your model of DT700 phone.
- Page 176 P R O G R A M M A B L E K E Y S Speed Dial and Programmable Keys Figure 8.82 Save softkey If the Speed Dial number for a new Personal Directory entry is already used for another entry, you will see an error when you try to save the Personal Directory entry.
-
Page 177: Editing Speed Dial Keys
P R O G R A M M A B L E K E Y S Speed Dial and Programmable Keys E D I T I N G S P E E D D I A L K E Y S You can edit Speed Dial Key settings using the Feature Key if they are set up as just Speed Dial entries, or Speed Dial entries with associated Personal Directory entries. - Page 178 P R O G R A M M A B L E K E Y S Speed Dial and Programmable Keys Use the Telephone Keypad Use the telephone keypad to select the number of the field you want to edit. Use the softkeys ...
- Page 179 P R O G R A M M A B L E K E Y S Speed Dial and Programmable Keys • To enter special characters, press the key. For a list of special characters, see “Speed Dial and Personal Directory Character Sets”...
- Page 180 P R O G R A M M A B L E K E Y S Speed Dial and Programmable Keys • You can also press the Delete softkey to delete the last character entered, or press the Cancel softkey to return to the previous screen. Press Enter on the cursor pad or the OK softkey.
- Page 181 P R O G R A M M A B L E K E Y S Speed Dial and Programmable Keys Type Status Icon Idle Ringing (SIP@Net) Ringing (3C system) Subscription Failed Online (3C system) (Phone is Online) On the Phone (Phone is in use) Held (3C system) Busy...
- Page 182 P R O G R A M M A B L E K E Y S Speed Dial and Programmable Keys Programmable Type Status Key LED Idle LED is not lit Ringing (SIP@Net) Blinking Red Ringing (3C system) Blinking Green Subscription Failed LED is not lit Online (3C system)
- Page 183 P R O G R A M M A B L E K E Y S Speed Dial and Programmable Keys there will be an entry for this information. If you receive an incoming call from this number, it will show the name and number from the saved Speed Dial. Press Enter on the cursor pad or the OK softkey.
-
Page 184: Deleting Speed Dial Keys
P R O G R A M M A B L E K E Y S Speed Dial and Programmable Keys Figure 8.100 Speed Dial Edit Confirmation Do one of the following: • To edit more Speed Dial Keys, press the Speed Dial Key for that entry and repeat steps 3 through 7. - Page 185 P R O G R A M M A B L E K E Y S Speed Dial and Programmable Keys Pressing the Delete softkey in the Speed Dial Key Entry screen will delete the Note: entire Speed Dial and Personal Directory entry. Do not use the Delete softkey in the Speed Dial Key Entry screen if you want to keep the Personal Directory entry information for a Speed Dial.
- Page 186 P R O G R A M M A B L E K E Y S Speed Dial and Programmable Keys Press the Delete softkey to delete the Speed Dial Key number and then press the OK softkey. Figure 8.107 Delete Speed Dial Number Press the Save softkey to save the entry.
-
Page 187: To Delete An Entire Speed Dial And Personal Directory Entry
P R O G R A M M A B L E K E Y S Speed Dial and Programmable Keys Figure 8.110 Exit softkey If you go to the Personal Directory, you will still see the name and number as an entry, but if you view the details for the entry, you will see that the Speed Dial has been deleted and the Monitor setting is now “None.”... -
Page 188: To Delete A Speed Dial Only Entry
P R O G R A M M A B L E K E Y S Speed Dial and Programmable Keys The entry will be deleted from your Personal Directory. Press Enter on the cursor pad or the OK softkey to return to the Personal Directory. Figure 8.114 Delete Entry Complete Menu Display For Directory entries that are set as read-only by your system administrator, an Note:... - Page 189 P R O G R A M M A B L E K E Y S Speed Dial and Programmable Keys ITL-8LD Phones: • Press the Scroll Key to scroll to the desired page, then press the Speed Dial Key that you want to delete.
- Page 190 P R O G R A M M A B L E K E Y S Speed Dial and Programmable Keys • To delete more Speed Dial entries, press the Speed Dial Key for that entry and repeat steps 3 through 5. •...
-
Page 191: Dt700 Microbrowser And Enhanced Programmable Keys
DT700 M ICROBROWSER AND Ch 9 - DT700 Microbrowser and Enhanced Programmable Keys NHANCED ROGRAMMABLE ........ -
Page 192: To View The Microbrowser Home Page
D T 7 0 0 M I C R O B R O W S E R A N D E N H A N C E D P R O G R A M M A B L E K E Y S Using the Microbrowser If you don’t press a softkey within 2 seconds, the Microbrowser will automatically open. -
Page 193: Hot Desking
D T 7 0 0 M I C R O B R O W S E R A N D E N H A N C E D P R O G R A M M A B L E K E Y S Using the Microbrowser You may see different menu items on your home page, depending on the Note:... -
Page 194: To Login Using Hot Desking
D T 7 0 0 M I C R O B R O W S E R A N D E N H A N C E D P R O G R A M M A B L E K E Y S Using the Microbrowser The Hot Desking menu items do not appear if your phone is not enabled for Hot Desking. - Page 195 D T 7 0 0 M I C R O B R O W S E R A N D E N H A N C E D P R O G R A M M A B L E K E Y S Using the Microbrowser Figure 9.5 Hot Desking Login...
- Page 196 D T 7 0 0 M I C R O B R O W S E R A N D E N H A N C E D P R O G R A M M A B L E K E Y S Using the Microbrowser Hard Key Features: Explanation...
-
Page 197: To Logout Of Hot Desking Session
D T 7 0 0 M I C R O B R O W S E R A N D E N H A N C E D P R O G R A M M A B L E K E Y S Using the Microbrowser To Logout of Hot Desking session Press the Feature Key. - Page 198 D T 7 0 0 M I C R O B R O W S E R A N D E N H A N C E D P R O G R A M M A B L E K E Y S Using the Microbrowser H O T D E S K I N G S T A T U S U P D A T E S Depending on the speed of your system and the processes that are running...
-
Page 199: Handset Forwarding
D T 7 0 0 M I C R O B R O W S E R A N D E N H A N C E D P R O G R A M M A B L E K E Y S Using the Microbrowser •... - Page 200 D T 7 0 0 M I C R O B R O W S E R A N D E N H A N C E D P R O G R A M M A B L E K E Y S Using the Microbrowser Hard Key Features: Explanation...
- Page 201 D T 7 0 0 M I C R O B R O W S E R A N D E N H A N C E D P R O G R A M M A B L E K E Y S Using the Microbrowser To set forwarding after 30 seconds Forwarding after 30 seconds will forward the call only after it has rung on your...
- Page 202 D T 7 0 0 M I C R O B R O W S E R A N D E N H A N C E D P R O G R A M M A B L E K E Y S Using the Microbrowser Soft Key Features: Explanation...
-
Page 203: To Set Handset Forwarding Using Star Codes
D T 7 0 0 M I C R O B R O W S E R A N D E N H A N C E D P R O G R A M M A B L E K E Y S Using the Microbrowser Hard Key Features: Explanation... -
Page 204: To Clear Handset Forwarding Using Star Codes
D T 7 0 0 M I C R O B R O W S E R A N D E N H A N C E D P R O G R A M M A B L E K E Y S Using the Microbrowser Press the Feature Key. -
Page 205: Call Recording
D T 7 0 0 M I C R O B R O W S E R A N D E N H A N C E D P R O G R A M M A B L E K E Y S Using the Microbrowser This only clears the handset forwarding settings applied to the phone. -
Page 206: Supervise A Call
D T 7 0 0 M I C R O B R O W S E R A N D E N H A N C E D P R O G R A M M A B L E K E Y S Using the Microbrowser •... - Page 207 D T 7 0 0 M I C R O B R O W S E R A N D E N H A N C E D P R O G R A M M A B L E K E Y S Using the Microbrowser Figure 9.20 Group detail screen This screen handles the following events:...
- Page 208 D T 7 0 0 M I C R O B R O W S E R A N D E N H A N C E D P R O G R A M M A B L E K E Y S Using the Microbrowser If you press the Monitor soft key on a call that you are already monitoring, a Monitor screen appears.
-
Page 209: View System Call History
D T 7 0 0 M I C R O B R O W S E R A N D E N H A N C E D P R O G R A M M A B L E K E Y S Using the Microbrowser Hard Key Features: Explanation... -
Page 210: To View The Conference Listing
D T 7 0 0 M I C R O B R O W S E R A N D E N H A N C E D P R O G R A M M A B L E K E Y S Using the Microbrowser Figure 9.23 Call Log page The Call History page handles the following events:... - Page 211 D T 7 0 0 M I C R O B R O W S E R A N D E N H A N C E D P R O G R A M M A B L E K E Y S Using the Microbrowser Select List Conferences.
- Page 212 D T 7 0 0 M I C R O B R O W S E R A N D E N H A N C E D P R O G R A M M A B L E K E Y S Using the Microbrowser In the example above, Conference Bridge 5 currently has a conference call in progress.
-
Page 213: Search Directory/Corporate Directory
D T 7 0 0 M I C R O B R O W S E R A N D E N H A N C E D P R O G R A M M A B L E K E Y S Using the Microbrowser Hard Key Features: Explanation... - Page 214 D T 7 0 0 M I C R O B R O W S E R A N D E N H A N C E D P R O G R A M M A B L E K E Y S Using the Microbrowser Figure 9.28 Search Directory page The Search Directory search string can be a name or a number.
- Page 215 D T 7 0 0 M I C R O B R O W S E R A N D E N H A N C E D P R O G R A M M A B L E K E Y S Using the Microbrowser Numeric characters Maximum number of search results: 64...
-
Page 216: Enhanced Programmable Keys
D T 7 0 0 M I C R O B R O W S E R A N D E N H A N C E D P R O G R A M M A B L E K E Y S Enhanced Programmable Keys Figure 9.30 No search results This screen handles the following events:... -
Page 217: Enhanced Programmable Key Support By Phone Model
D T 7 0 0 M I C R O B R O W S E R A N D E N H A N C E D P R O G R A M M A B L E K E Y S Enhanced Programmable Keys •... - Page 218 D T 7 0 0 M I C R O B R O W S E R A N D E N H A N C E D P R O G R A M M A B L E K E Y S Enhanced Programmable Keys Supported Key Enhanced Programmable...
-
Page 219: Using Enhanced Programmable Keys
D T 7 0 0 M I C R O B R O W S E R A N D E N H A N C E D P R O G R A M M A B L E K E Y S Using Enhanced Programmable Keys . -
Page 220: To Place A Call To A Member Of Your Workgroup
D T 7 0 0 M I C R O B R O W S E R A N D E N H A N C E D P R O G R A M M A B L E K E Y S Using Enhanced Programmable Keys •... -
Page 221: To Pick Up A Ringing Call To A Member Of Your Workgroup
D T 7 0 0 M I C R O B R O W S E R A N D E N H A N C E D P R O G R A M M A B L E K E Y S Using Enhanced Programmable Keys Figure 9.32 Transfer Key •... -
Page 222: Park Extension Key
D T 7 0 0 M I C R O B R O W S E R A N D E N H A N C E D P R O G R A M M A B L E K E Y S Using Enhanced Programmable Keys Your current call is placed on hold, and the phone attempts the transfer. -
Page 223: To Pickup A Call On A Park Extension
D T 7 0 0 M I C R O B R O W S E R A N D E N H A N C E D P R O G R A M M A B L E K E Y S Using Enhanced Programmable Keys To pickup a call on a Park Extension •... -
Page 224: Monitor/Supervise Key
D T 7 0 0 M I C R O B R O W S E R A N D E N H A N C E D P R O G R A M M A B L E K E Y S Using Enhanced Programmable Keys Figure 9.40 CB Reset soft key M O N I T O R / S U P E R V I S E K E Y... -
Page 225: Record Key
D T 7 0 0 M I C R O B R O W S E R A N D E N H A N C E D P R O G R A M M A B L E K E Y S Using Enhanced Programmable Keys To stop the recording a call •... -
Page 226: Hot Desk Key
D T 7 0 0 M I C R O B R O W S E R A N D E N H A N C E D P R O G R A M M A B L E K E Y S Using Enhanced Programmable Keys H O T D E S K K E Y To log in to a Hot Desk session... -
Page 227: To Seize A Trunk To Place A Call
D T 7 0 0 M I C R O B R O W S E R A N D E N H A N C E D P R O G R A M M A B L E K E Y S Using Enhanced Programmable Keys T R U N K P R E S E N C E L E D S A N D I C O N S Table 9.4... -
Page 228: To Set Do Not Disturb For Your Phone
D T 7 0 0 M I C R O B R O W S E R A N D E N H A N C E D P R O G R A M M A B L E K E Y S Using Enhanced Programmable Keys Call Control Home Screen... -
Page 229: To Set Forwarding For Your Phone
D T 7 0 0 M I C R O B R O W S E R A N D E N H A N C E D P R O G R A M M A B L E K E Y S Using Enhanced Programmable Keys H A N D S E T F O R W A R D I N G L E D S A N D I C O N S Table 9.6... - Page 230 D T 7 0 0 M I C R O B R O W S E R A N D E N H A N C E D P R O G R A M M A B L E K E Y S Using Enhanced Programmable Keys 9-212 DT700 Phone User Guide...
-
Page 231: Dt730G Color Microbrowser And Enhanced Programmable Keys
DT730G C OLOR ICROBROWSER AND Ch 10 - DT730G Color Microbrowser and Enhanced Programmable Keys NHANCED ROGRAMMABLE ........The DT730G ITL-12CG and ITL-24CG phones support a color Microbrowser on the LCD screen that uses icons. -
Page 232: To View The Microbrowser Home Page
D T 7 3 0 G C O L O R M I C R O B R O W S E R A N D E N H A N C E D P R O G R A M M A B L E K E Y S Using the Microbrowser Figure 10.3 Microbrowser Home page You can still answer incoming calls while you are using the Microbrowser using the... - Page 233 D T 7 3 0 G C O L O R M I C R O B R O W S E R A N D E N H A N C E D P R O G R A M M A B L E K E Y S Using the Microbrowser Figure 10.5 Microbrowser Home page You may see different menu items on your home page, depending on the...
- Page 234 D T 7 3 0 G C O L O R M I C R O B R O W S E R A N D E N H A N C E D P R O G R A M M A B L E K E Y S Using the Microbrowser Icon: Menu Items:...
-
Page 235: Hot Desking
D T 7 3 0 G C O L O R M I C R O B R O W S E R A N D E N H A N C E D P R O G R A M M A B L E K E Y S Using the Microbrowser Soft Key Features: Explanation... - Page 236 D T 7 3 0 G C O L O R M I C R O B R O W S E R A N D E N H A N C E D P R O G R A M M A B L E K E Y S Using the Microbrowser Figure 10.7 Log in The Hot Desking Extension field has focus when entering the Hot Desking Login...
- Page 237 D T 7 3 0 G C O L O R M I C R O B R O W S E R A N D E N H A N C E D P R O G R A M M A B L E K E Y S Using the Microbrowser Figure 10.8 Hot Desking login success Figure 10.9 Hot Desking login failure...
-
Page 238: To Logout Of Hot Desking Session
D T 7 3 0 G C O L O R M I C R O B R O W S E R A N D E N H A N C E D P R O G R A M M A B L E K E Y S Using the Microbrowser Hard Key Features: Explanation... -
Page 239: Handset Forwarding
D T 7 3 0 G C O L O R M I C R O B R O W S E R A N D E N H A N C E D P R O G R A M M A B L E K E Y S Using the Microbrowser This page handles the following events: Soft Key Features:... -
Page 240: To Set A Handset Forwarding Condition
D T 7 3 0 G C O L O R M I C R O B R O W S E R A N D E N H A N C E D P R O G R A M M A B L E K E Y S Using the Microbrowser H A N D S E T C A L L F O R W A R D I N G S E T T I N G S O N T H E 3 C S Y S T E M... - Page 241 D T 7 3 0 G C O L O R M I C R O B R O W S E R A N D E N H A N C E D P R O G R A M M A B L E K E Y S Using the Microbrowser Figure 10.12 Handset Forwarding This menu handles the following events:.
- Page 242 D T 7 3 0 G C O L O R M I C R O B R O W S E R A N D E N H A N C E D P R O G R A M M A B L E K E Y S Using the Microbrowser Option Description...
- Page 243 D T 7 3 0 G C O L O R M I C R O B R O W S E R A N D E N H A N C E D P R O G R A M M A B L E K E Y S Using the Microbrowser Figure 10.15 Forwarding after 30 seconds Hard Key Features:...
- Page 244 D T 7 3 0 G C O L O R M I C R O B R O W S E R A N D E N H A N C E D P R O G R A M M A B L E K E Y S Using the Microbrowser The Handset Forwarding settings pages handles the following events: Soft Key Features:...
-
Page 245: To Set Handset Forwarding Using Star Codes
D T 7 3 0 G C O L O R M I C R O B R O W S E R A N D E N H A N C E D P R O G R A M M A B L E K E Y S Using the Microbrowser Figure 10.17 Handset forwarding added (success) The Handset Status screens handles the following events:... -
Page 246: To Set Conditional Handset Forwarding - Busy Using Star Codes
D T 7 3 0 G C O L O R M I C R O B R O W S E R A N D E N H A N C E D P R O G R A M M A B L E K E Y S Using the Microbrowser Dial *62+ <forwarding number>. -
Page 247: To Clear Handset Forwarding Using Star Codes
D T 7 3 0 G C O L O R M I C R O B R O W S E R A N D E N H A N C E D P R O G R A M M A B L E K E Y S Using the Microbrowser Soft Key Features: Explanation... -
Page 248: Supervise A Call
D T 7 3 0 G C O L O R M I C R O B R O W S E R A N D E N H A N C E D P R O G R A M M A B L E K E Y S Using the Microbrowser Hard Key Features: Explanation... - Page 249 D T 7 3 0 G C O L O R M I C R O B R O W S E R A N D E N H A N C E D P R O G R A M M A B L E K E Y S Using the Microbrowser Selecting Supervise invokes the following XML page, allowing the user to select an address group they have the right to supervise.
- Page 250 D T 7 3 0 G C O L O R M I C R O B R O W S E R A N D E N H A N C E D P R O G R A M M A B L E K E Y S Using the Microbrowser Soft Key Features: Explanation...
- Page 251 D T 7 3 0 G C O L O R M I C R O B R O W S E R A N D E N H A N C E D P R O G R A M M A B L E K E Y S Using the Microbrowser Soft Key Features: Explanation...
- Page 252 D T 7 3 0 G C O L O R M I C R O B R O W S E R A N D E N H A N C E D P R O G R A M M A B L E K E Y S Using the Microbrowser Figure 10.22 Monitor detail This screen handles the following events:...
-
Page 253: View System Call History
D T 7 3 0 G C O L O R M I C R O B R O W S E R A N D E N H A N C E D P R O G R A M M A B L E K E Y S Using the Microbrowser The Select Call page automatically updates every 30 seconds. -
Page 254: List Conferences
D T 7 3 0 G C O L O R M I C R O B R O W S E R A N D E N H A N C E D P R O G R A M M A B L E K E Y S Using the Microbrowser The Call Log page handles the following events: Soft Key Features:... - Page 255 D T 7 3 0 G C O L O R M I C R O B R O W S E R A N D E N H A N C E D P R O G R A M M A B L E K E Y S Using the Microbrowser Figure 10.25 List conferences Use the up and down cursor pad keys to browse the conference bridges on the system.
- Page 256 D T 7 3 0 G C O L O R M I C R O B R O W S E R A N D E N H A N C E D P R O G R A M M A B L E K E Y S Using the Microbrowser Hard Key Features: Explanation...
-
Page 257: Search Directory/Corporate Directory
D T 7 3 0 G C O L O R M I C R O B R O W S E R A N D E N H A N C E D P R O G R A M M A B L E K E Y S Using the Microbrowser Hard Key Features: Explanation... - Page 258 D T 7 3 0 G C O L O R M I C R O B R O W S E R A N D E N H A N C E D P R O G R A M M A B L E K E Y S Using the Microbrowser Figure 10.28 Search System Directory Enter your search string and press the OK soft key.
- Page 259 D T 7 3 0 G C O L O R M I C R O B R O W S E R A N D E N H A N C E D P R O G R A M M A B L E K E Y S Using the Microbrowser Lowercase characters &...
- Page 260 D T 7 3 0 G C O L O R M I C R O B R O W S E R A N D E N H A N C E D P R O G R A M M A B L E K E Y S Using the Microbrowser Hard Key Features: Explanation...
-
Page 261: Enhanced Programmable Keys
D T 7 3 0 G C O L O R M I C R O B R O W S E R A N D E N H A N C E D P R O G R A M M A B L E K E Y S Enhanced Programmable Keys Hard Key Features: Explanation... -
Page 262: Enhanced Blfs
D T 7 3 0 G C O L O R M I C R O B R O W S E R A N D E N H A N C E D P R O G R A M M A B L E K E Y S Enhanced Programmable Keys Table 10.2 DT700 Enhanced Programmable Keys Support... -
Page 263: To Place A Call To A Member Of Your Workgroup
D T 7 3 0 G C O L O R M I C R O B R O W S E R A N D E N H A N C E D P R O G R A M M A B L E K E Y S Enhanced Programmable Keys •... -
Page 264: To Pickup A Held Call From A Member Of Your Workgroup
D T 7 3 0 G C O L O R M I C R O B R O W S E R A N D E N H A N C E D P R O G R A M M A B L E K E Y S Enhanced Programmable Keys The default type of transfer (blind or consult) for this key is controlled by your Note:... -
Page 265: To Pick Up A Ringing Call To A Member Of Your Workgroup
D T 7 3 0 G C O L O R M I C R O B R O W S E R A N D E N H A N C E D P R O G R A M M A B L E K E Y S Enhanced Programmable Keys •... -
Page 266: Park Extension Key
D T 7 3 0 G C O L O R M I C R O B R O W S E R A N D E N H A N C E D P R O G R A M M A B L E K E Y S Enhanced Programmable Keys P A R K E X T E N S I O N K E Y To park a call to a Park Extension... -
Page 267: Send To Vm Key
D T 7 3 0 G C O L O R M I C R O B R O W S E R A N D E N H A N C E D P R O G R A M M A B L E K E Y S Enhanced Programmable Keys If call recording indication is enabled, a call recording icon is shown in the call... -
Page 268: To Log Out Of Your Hot Desk Session
D T 7 3 0 G C O L O R M I C R O B R O W S E R A N D E N H A N C E D P R O G R A M M A B L E K E Y S Enhanced Programmable Keys To log out of your Hot Desk session While you are in a Hot Desk session, press the Hot Desk Key. -
Page 269: To Set Do Not Disturb For Your Phone
D T 7 3 0 G C O L O R M I C R O B R O W S E R A N D E N H A N C E D P R O G R A M M A B L E K E Y S Enhanced Programmable Keys D N D L E D S A N D I C O N S Table 10.5... -
Page 270: To Set Forwarding For Your Phone
D T 7 3 0 G C O L O R M I C R O B R O W S E R A N D E N H A N C E D P R O G R A M M A B L E K E Y S Enhanced Programmable Keys H A N D S E T F O R W A R D I N G L E D S A N D I C O N S Table 10.6... -
Page 271: Call History, And The Corporate And Personal Directories
ISTORY AND THE ORPORATE AND Ch 11 - Call History, and the Corporate and Personal Directories ERSONAL IRECTORIES ........These procedures outline some of the advanced features available on the economy and value phones in the DT700 series lineup. -
Page 272: The Help Key
C A L L H I S T O R Y, A N D T H E C O R P O R A T E A N D P E R S O N A L D I R E C T O R I E S The Help key Figure 11.2 DT710 (ITL-6DE) softkeys Softkeys... -
Page 273: The Menu Key
C A L L H I S T O R Y, A N D T H E C O R P O R A T E A N D P E R S O N A L D I R E C T O R I E S The Menu Key Figure 11.5 Help key Press the softkey for which you want to see Help information. -
Page 274: Call History
C A L L H I S T O R Y, A N D T H E C O R P O R A T E A N D P E R S O N A L D I R E C T O R I E S Call History Figure 11.8 Menu Key . -
Page 275: Access Call History Using The Menu Key
C A L L H I S T O R Y, A N D T H E C O R P O R A T E A N D P E R S O N A L D I R E C T O R I E S Call History A C C E S S I N G T H E C A L L H I S T O R Y You can use the Menu Key or the Cursor Pad to access the Call History information... -
Page 276: To Clear The Missed Calls Icon And Message
C A L L H I S T O R Y, A N D T H E C O R P O R A T E A N D P E R S O N A L D I R E C T O R I E S Call History Figure 11.13 Call History- Name from the Personal Directory Display Call information must match the Personal Directory entry’s Number... -
Page 277: To View Received Calls
C A L L H I S T O R Y, A N D T H E C O R P O R A T E A N D P E R S O N A L D I R E C T O R I E S Call History Figure 11.16 Missed Calls ... -
Page 278: To View Outgoing Calls
C A L L H I S T O R Y, A N D T H E C O R P O R A T E A N D P E R S O N A L D I R E C T O R I E S Call History Figure 11.19 Received Calls ... -
Page 279: To Dial An Internal Number From The Call History Using The Handset
C A L L H I S T O R Y, A N D T H E C O R P O R A T E A N D P E R S O N A L D I R E C T O R I E S Call History Figure 11.22 Outgoing Calls Use the Up and Down softkeys to scroll through the missed call information. -
Page 280: To Add A Call History Entry To The Personal Directory
C A L L H I S T O R Y, A N D T H E C O R P O R A T E A N D P E R S O N A L D I R E C T O R I E S Call History Figure 11.24 Call History Options If prompted, press the OK softkey. - Page 281 C A L L H I S T O R Y, A N D T H E C O R P O R A T E A N D P E R S O N A L D I R E C T O R I E S Call History Figure 11.26 Options softkey Select...
- Page 282 C A L L H I S T O R Y, A N D T H E C O R P O R A T E A N D P E R S O N A L D I R E C T O R I E S Call History •...
- Page 283 C A L L H I S T O R Y, A N D T H E C O R P O R A T E A N D P E R S O N A L D I R E C T O R I E S Call History Type Status...
- Page 284 C A L L H I S T O R Y, A N D T H E C O R P O R A T E A N D P E R S O N A L D I R E C T O R I E S Call History Programmable Type...
-
Page 285: To Delete A Specific Entry From The Call History
C A L L H I S T O R Y, A N D T H E C O R P O R A T E A N D P E R S O N A L D I R E C T O R I E S Call History D E L E T E C A L L H I S T O R Y I N F O R M A T I O N Call History information is not saved permanently on the phone, it is only... -
Page 286: To Delete Call History For All Missed, Received Or Placed Calls
C A L L H I S T O R Y, A N D T H E C O R P O R A T E A N D P E R S O N A L D I R E C T O R I E S Call History Figure 11.32 Call Deleted To delete Call History for all Missed, Received or Placed Calls... - Page 287 C A L L H I S T O R Y, A N D T H E C O R P O R A T E A N D P E R S O N A L D I R E C T O R I E S Call History Select Call History.
-
Page 288: The Personal Directory
C A L L H I S T O R Y, A N D T H E C O R P O R A T E A N D P E R S O N A L D I R E C T O R I E S The Personal Directory . - Page 289 C A L L H I S T O R Y, A N D T H E C O R P O R A T E A N D P E R S O N A L D I R E C T O R I E S The Personal Directory Figure 11.40 Main Menu Display Using the cursor pad - System Without Corporate Directory...
-
Page 290: To View A Specific Personal Directory Entry
C A L L H I S T O R Y, A N D T H E C O R P O R A T E A N D P E R S O N A L D I R E C T O R I E S The Personal Directory ... -
Page 291: Presence Monitor Settings And The Personal Directory
C A L L H I S T O R Y, A N D T H E C O R P O R A T E A N D P E R S O N A L D I R E C T O R I E S The Personal Directory Figure 11.47 Personal Directory Entry display Press the Exit softkey to exit details screen and return to the Personal Directory. -
Page 292: Incoming Call Display And The Personal Directory
C A L L H I S T O R Y, A N D T H E C O R P O R A T E A N D P E R S O N A L D I R E C T O R I E S The Personal Directory Type Status... -
Page 293: Searching For An Entry In The Personal Directory
C A L L H I S T O R Y, A N D T H E C O R P O R A T E A N D P E R S O N A L D I R E C T O R I E S The Personal Directory S E A R C H I N G F O R A N E N T R Y I N T H E P E R S O N A L D I R E C T O R Y... -
Page 294: Dialing From The Personal Directory
C A L L H I S T O R Y, A N D T H E C O R P O R A T E A N D P E R S O N A L D I R E C T O R I E S The Personal Directory Figure 11.54 Directory Entry Results Menu Display If no matches are found in the Personal Directory, then “Name not found”... -
Page 295: Adding Or Editing A Personal Directory Entry
C A L L H I S T O R Y, A N D T H E C O R P O R A T E A N D P E R S O N A L D I R E C T O R I E S The Personal Directory Figure 11.56 More and Detail softkeys Press the Dial softkey, or Enter... -
Page 296: Duplicate Entries In The Personal Directory
C A L L H I S T O R Y, A N D T H E C O R P O R A T E A N D P E R S O N A L D I R E C T O R I E S The Personal Directory Duplicate Entries in the Personal Directory Entries are uniquely defined by the combination of number and name. - Page 297 C A L L H I S T O R Y, A N D T H E C O R P O R A T E A N D P E R S O N A L D I R E C T O R I E S The Personal Directory •...
- Page 298 C A L L H I S T O R Y, A N D T H E C O R P O R A T E A N D P E R S O N A L D I R E C T O R I E S The Personal Directory Figure 11.64 Monitor Settings Valid options for monitoring are:...
- Page 299 C A L L H I S T O R Y, A N D T H E C O R P O R A T E A N D P E R S O N A L D I R E C T O R I E S The Personal Directory Type Status...
- Page 300 C A L L H I S T O R Y, A N D T H E C O R P O R A T E A N D P E R S O N A L D I R E C T O R I E S The Personal Directory Programmable Type...
-
Page 301: To Edit A Personal Directory Entry
C A L L H I S T O R Y, A N D T H E C O R P O R A T E A N D P E R S O N A L D I R E C T O R I E S The Personal Directory Figure 11.66 Confirm Addition to Personal Directory Entries are uniquely defined by the combination of number and name. - Page 302 C A L L H I S T O R Y, A N D T H E C O R P O R A T E A N D P E R S O N A L D I R E C T O R I E S The Personal Directory Figure 11.69 More and Edit softkeys Do one of the following:...
- Page 303 C A L L H I S T O R Y, A N D T H E C O R P O R A T E A N D P E R S O N A L D I R E C T O R I E S The Personal Directory Figure 11.71 Edit name Up to 24 characters may be entered for the name.
- Page 304 C A L L H I S T O R Y, A N D T H E C O R P O R A T E A N D P E R S O N A L D I R E C T O R I E S The Personal Directory Speed Dial For more information on Speed Dial Keys, see “Speed Dial and Programmable...
- Page 305 C A L L H I S T O R Y, A N D T H E C O R P O R A T E A N D P E R S O N A L D I R E C T O R I E S The Personal Directory Option Visual and Soft Ring is only valid for SIP@Net platforms.
- Page 306 C A L L H I S T O R Y, A N D T H E C O R P O R A T E A N D P E R S O N A L D I R E C T O R I E S The Personal Directory Programmable Type...
-
Page 307: Deleting A Personal Directory Entry
C A L L H I S T O R Y, A N D T H E C O R P O R A T E A N D P E R S O N A L D I R E C T O R I E S The Personal Directory the same name and same number are not allowed. -
Page 308: To Remove Personal Directory Entry Information But Keep Speed Dial Key Information
C A L L H I S T O R Y, A N D T H E C O R P O R A T E A N D P E R S O N A L D I R E C T O R I E S The Personal Directory ... - Page 309 C A L L H I S T O R Y, A N D T H E C O R P O R A T E A N D P E R S O N A L D I R E C T O R I E S The Personal Directory Press the Speed Dial Key that you want to edit.
-
Page 310: The Corporate Directory
C A L L H I S T O R Y, A N D T H E C O R P O R A T E A N D P E R S O N A L D I R E C T O R I E S The Corporate Directory . -
Page 311: To Dial A Number From The Corporate Directory
C A L L H I S T O R Y, A N D T H E C O R P O R A T E A N D P E R S O N A L D I R E C T O R I E S The Corporate Directory Figure 11.90 Directory Entries Menu Display Enter your search criteria and press the OK softkey. -
Page 312: Presence Monitor Settings And The Corporate Directory
C A L L H I S T O R Y, A N D T H E C O R P O R A T E A N D P E R S O N A L D I R E C T O R I E S The Corporate Directory To change the dialing preferences for dialing numbers from the Personal Note:... -
Page 313: Phone Troubleshooting
Ch 12 - Phone Troubleshooting HONE ROUBLESHOOTING ........ -
Page 314: Basic Troubleshooting
P H O N E TR O U B L E S H O O T I N G Basic Troubleshooting Press the Exit softkey to return to the previous screen. Help screens may not be available for all the softkeys on your phone. Note: . -
Page 315: Network Connections
P H O N E TR O U B L E S H O O T I N G Network Connections Press the OK softkey or Enter key on the cursor pad to restart the phone. Figure 12.7 Reboot Phone Display If you cannot the phone using the Menus if your phone is locked up, Note:... -
Page 316: My Phone Cannot Reconnect To The Network After A Local Settings Change
P H O N E TR O U B L E S H O O T I N G Network Connections Figure 12.10 Network Cable Unplugged This icon will only display if you have an AC/DC adapter connected to the Note: phone. -
Page 317: Power
P H O N E TR O U B L E S H O O T I N G Power ............P O W E R •... -
Page 318: The Phone Cannot Make Any Calls
P H O N E TR O U B L E S H O O T I N G Calling Press the Menu key, then go to Status, Network Information and verify that the phone has an IP address, Subnet Mask, Default Gateway, and DNS Server listed. If any of this information is missing, there may be a problem with your connection to the network. -
Page 319: A Speed Dial/Personal Directory Entry Is Not Working Correctly
P H O N E TR O U B L E S H O O T I N G Calling If you are still having problems with your phone, contact your system administrator. A Speed Dial/Personal Directory entry is not working correctly •... -
Page 320: The Phone Does Not Ring
P H O N E TR O U B L E S H O O T I N G Calling Press Enter on the cursor pad or the OK softkey to accept the setting. You can also press the Cancel softkey to exit without making any changes. The phone does not ring Turn up the ringer volume. -
Page 321: Phone Keypad
P H O N E TR O U B L E S H O O T I N G Phone Keypad Figure 12.16 Call on Hold and EndCall softkey If you are in the process of transferring a call or in a conference, press the Split softkey to split the calls, then use the Shuttle softkey to switch to the dropped call, and press the EndCall softkey to terminate that call. -
Page 322: Phone Softkeys
P H O N E TR O U B L E S H O O T I N G Phone Softkeys Feature Icon Keypad in all lowercase entry mode Keypad in numeric entry mode For more information on the character sets, see “Speed Dial and Personal Directory Character Sets”... -
Page 323: Lcd Screen/Display
P H O N E TR O U B L E S H O O T I N G LCD Screen/Display Select Reboot. Press the OK softkey or Enter key on the cursor pad to restart the phone. If you cannot the phone using the Menus, unplug the phone from power Note: restart... -
Page 324: I Need To Reset The Language On My Phone
P H O N E TR O U B L E S H O O T I N G LCD Screen/Display Figure 12.20 Set Backlight Timeout Press Enter on the cursor pad or the OK softkey to accept the setting. You can also press the Cancel softkey to exit without making any changes. -
Page 325: The Name Shown On The Lcd Of My Phone Is Wrong
P H O N E TR O U B L E S H O O T I N G Audio The name shown on the LCD of my phone is wrong The name that shows up on the main screen of your phone is configured by your system administrator. -
Page 326: There Is No Audio To My Headset
P H O N E TR O U B L E S H O O T I N G Audio There is no audio to my headset Verify that the headset is firmly plugged into the HEADSET jack on the back of the telephone. -
Page 327: System Features
Some areas of the product may refer to Sphere, Sphericall, Sphericall Voice Mail, or Sphericall Desktop, and are understood as part of the UNIVERGE 3C system. UNIVERGE supports a variety of media gateways and other media devices, including NEC’s UNIVERGE DT700 SIP phones, PhoneHub, COHub, BranchHub, and MeetingHub. Table A.1... -
Page 328: Call Pickup
3 C S Y S T E M F E A T U R E S Product Name Hereinafter referred to as: UNIVERGE 3C Voice Mail 3C Voice Mail UNIVERGE UNIVERGE 3C Web UNIVERGE 3C Web Administration application Administration application UNIVERGE Media Gateways or •... - Page 329 3 C S Y S T E M F E A T U R E S Figure A.2 Extn softkey Enter the number of the extension you want to pick up. Figure A.3 Enter extension Press the Pickup softkey. You will connect to the call. To answer a call from a Pickup Zone: Press the Zone softkey.
-
Page 330: 3 C V O I C E M A I L
3 C S Y S T E M F E A T U R E S To answer a call from your Pickup Group: Press the Group softkey. Figure A.6 Group softkey You will connect to the call. To exit the Pickup options: Press the Cancel softkey. -
Page 331: System Telephone Set Star Code Commands
3 C S Y S T E M F E A T U R E S Figure A.9 Voicemail softkey Figure A.10 Voicemail softkey from Call screen When prompted, enter your extension, followed by the key. When prompted, enter your password, followed by the key. - Page 332 3 C S Y S T E M F E A T U R E S Action Analog SIP Star Code Explanation Star Code Conditional Handset Incoming calls are forwarded to another extension if Forwarding - No + number + number the ringing call is not answered in 30 seconds.
- Page 333 3 C S Y S T E M F E A T U R E S Action Analog SIP Star Code Explanation Star Code Call Forwarding Setup Activates the station number to which all calls are to be forwarded. + number + number •...
- Page 334 3 C S Y S T E M F E A T U R E S Action Analog SIP Star Code Explanation Star Code Call Forwarding Clears the telephone unit’s call forwarding Deactivation conditions. Once this star code is invoked, you must add any appropriate forwarding conditions back to the extension.
- Page 335 3 C S Y S T E M F E A T U R E S Action Analog SIP Star Code Explanation Star Code Do Not Disturb Activates Do Not Disturb for all calls bound to this Activation extension. When Do Not Disturb is activated, the station is not alerted to any calls.
- Page 336 3 C S Y S T E M F E A T U R E S A-318 DT700 Phone User Guide...
-
Page 337: Sip@Net System Features
App B - SIP@Net System Features SIP@N YSTEM EATURES ........P R O G R A M M A B L E K E Y S / S P E E D D I A L K E Y S The Programmable Keys / Speed Dial keys can be pre-programmed with an internal telephone number (for example, a colleague’s number) of which the status can be... -
Page 338: Sip@Net Prefixes
S I P @ N E T S Y S T E M F E A T U R E S S I P @ N E T P R E F I X E S The SIP@Net prefixes to activate or de-activate the various features are different per customer's configuration. -
Page 339: To Log Out Of A Desk Sharing Terminal
S I P @ N E T S Y S T E M F E A T U R E S Also, the phone is now configured with the following: User Settings Personal Directory Call History • Ringtone settings • Personal Directory entries •... - Page 340 S I P @ N E T S Y S T E M F E A T U R E S B-322 DT700 Phone User Guide...
-
Page 341: Dt730G Usb Port
App C - DT730G USB Port DT730G USB P ........One USB Port is mounted on this terminal. -
Page 342: To Remove A Usb Device
D T 7 3 0 G U S B P O R T Insert a USB Device connector into the USB Port. Figure C.3 Insert USB connector Make sure you are inserting the plug with the correct orientation, and push the USB connector into the port until it stops. -
Page 343: To Remove The Usb Port Cover
D T 7 3 0 G U S B P O R T To Remove the USB Port Cover The USB Port Cover can be removed. Open the USB Port Cover. Figure C.5 Open USB Port Lift up the USB Port Cover and pull it while sliding it to the left. Figure C.6 Remove USB Port cover Do not pull the cover upward. -
Page 344: To Restart Usb Port Power Supply
D T 7 3 0 G U S B P O R T The USB Port Cover is removed. Figure C.7 Removed USB Port Cover Store the USB Port Cover in a safe location so you can replace it later, if required. U S B P O R T D R A I N This phone has a port drain (over current detection) function for USB Devices connected to the phone. - Page 345 D T 7 3 0 G U S B P O R T For AC Adapter Terminals Disconnect the LAN cable from the back of the phone. Disconnect the AC adapter cable from the back of the phone. Reconnect the LAN cable to the back of the phone. When the LAN cable is reconnected, verify that the cable is connected to the Note: LAN port and not the PC port.
- Page 346 D T 7 3 0 G U S B P O R T C-328 DT700 Phone User Guide...
-
Page 347: Jabra Bluetooth® Headset Support For Dt700 Phones
............S U P P O R T E D E Q U I P M E N T Supported NEC IP Phones • DT730 ITL-8LD •... -
Page 348: Jabra Headset
J A B R A B L U E T O O T H ® H E A D S E T S U P P O R T F O R D T 7 0 0 P H O N E S Jabra Headset •... -
Page 349: Headset Base Station Setup
J A B R A B L U E T O O T H ® H E A D S E T S U P P O R T F O R D T 7 0 0 P H O N E S Jabra Headset will need to enable the connector for the DCL-60 Line Key Module at each phoneset device with a line key module if you change the setting in the master... -
Page 350: To Set External Headset Ringing (Optional
J A B R A B L U E T O O T H ® H E A D S E T S U P P O R T F O R D T 7 0 0 P H O N E S Jabra Headset Figure D.3 Select Headset... -
Page 351: Connect Phone To Headset Base Station
J A B R A B L U E T O O T H ® H E A D S E T S U P P O R T F O R D T 7 0 0 P H O N E S Jabra Headset Figure D.6 Select Headset options... - Page 352 J A B R A B L U E T O O T H ® H E A D S E T S U P P O R T F O R D T 7 0 0 P H O N E S Jabra Headset Figure D.9 Remove SIDE 2 port cover...
- Page 353 J A B R A B L U E T O O T H ® H E A D S E T S U P P O R T F O R D T 7 0 0 P H O N E S Jabra Headset Figure D.11 Connect Jabra EHS Adapter to Side 2 Connector Close the cover the back of your phone.
- Page 354 J A B R A B L U E T O O T H ® H E A D S E T S U P P O R T F O R D T 7 0 0 P H O N E S Jabra Headset Figure D.13 Jabra EHS Adapter connection to Side 2 Connector port and Jabra headset base station AUX port...
- Page 355 J A B R A B L U E T O O T H ® H E A D S E T S U P P O R T F O R D T 7 0 0 P H O N E S Jabra Headset Figure D.14 HEADSET port to Jabra headset base Restart the phone:...
-
Page 356: Using The Jabra Headset
J A B R A B L U E T O O T H ® H E A D S E T S U P P O R T F O R D T 7 0 0 P H O N E S Jabra Headset U S I N G T H E J A B R A H E A D S E T To adjust the headset ringing volume... -
Page 357: Jabra Headset Troubleshooting
J A B R A B L U E T O O T H ® H E A D S E T S U P P O R T F O R D T 7 0 0 P H O N E S Jabra Headset Phone Function... -
Page 358: I Connected The Headset Base, But Nothing Happens On The Headset When I Try To Use My Desk Phone
J A B R A B L U E T O O T H ® H E A D S E T S U P P O R T F O R D T 7 0 0 P H O N E S Jabra Headset •... -
Page 359: Notices
(SLA). The software contains certain third party open source software components which are provided under the terms and conditions designated at http://www.bcom.nec.co.jp/soft-license/DT730G_OSS.html. The terms and conditions of SLA are not applied to such third party open source software components.”... -
Page 360: Libsrtp Redistribution Conditions
N O T I C E S Third Party Software Disclaimer and Limitations Redistributions of any form whatsoever must retain the following acknowledgment: “This product includes software developed by the OpenSSL Project for use in the OpenSSL Toolkit (http://www.openssl.org/)” THIS SOFTWARE IS PROVIDED BY THE OpenSSL PROJECT ``AS IS'' AND ANY EXPRESSED OR IMPLIED WARRANTIES, INCLUDING, BUT NOT LIMITED TO, THE IMPLIED WARRANTIES OF MERCHANTABILITY AND FITNESS FOR A PARTICULAR PURPOSE ARE DISCLAIMED. -
Page 361: Netbsd Foundation's (Tnf) License
N O T I C E S Third Party Software Disclaimer and Limitations G E T T E X T NetBSD Foundation' s (TNF) License Copyright © 2008 The NetBSD Foundation, Inc. All rights reserved. This code is derived from software contributed to The NetBSD Foundation by Redistribution and use in source and binary forms, with or without modification, are permitted provided that the following conditions are met: Redistributions of source code must retain the above copyright notice, this list of... -
Page 362: Audio Coding Licenses
3C system or SIP@Net from NEC is recommended. For an overview of the supported features, refer to the detailed documentation that comes with the system and this terminal, contact your local NEC representative or the support desk of NEC Unified Solutions. -
Page 363: Use Of An Ieee802.3Af Power Supply
N O T I C E S Use of an IEEE802.3af power supply After power has been applied, the terminal will start operating............U S E O F A N I E E E 8 0 2 . -
Page 364: Declaration Of Conformity
Directive 1999/5/EC. http://www.nec-unified.com/doc E S P A Ñ O L Por medio de la presente “NEC Unified Solutions” declara que el “DT700” cumple con los requisitos esenciales y cualesquiera otras disposiciones aplicables o exigibles de la Directiva 1999/5/CE. - Page 365 1999/5/CE. http://www.nec-unified.com/doc Í S L E N S K A Hér með lýsir “NEC Unified Solutions” yfir því að “DT700” er í samræmi við grunnkröfur og aðrar kröfur, sem gerðar eru í tilskipun 1999/5/EC. http://www.nec-unified.com/doc I T A L I A N O Con la presente “NEC Unified Solutions”...
- Page 366 Directiva 1999/5/CE. http://www.nec-unified.com/doc S L O V E N S K O “NEC Unified Solutions” izjavlja, da je ta “DT700” v skladu z bistvenimi zahtevami in ostalimi relevantnimi določili direktive 1999/5/ES. http://www.nec-unified.com/doc S L O V E N S K Y “NEC Unified Solutions”...
-
Page 367: Weee Product Disposal Information
At www.nec-unified.com/weee you can find information about separate disposal and environmentally sound recycling. F O R C O U N T R I E S O U T S I D E T H E E U R O P E A N U N I O N Disposal of electrical and electronic products in countries outside the European Union should be done in line with the local regulations. - Page 368 Geräten im normalen Hausmüll, eine Strafe nach sich ziehen kann. Um bei der separaten Beseitigung von elektrischen und elektronischen Produkten behilflich zu sein und um ein umweltfreundliches Recycling zu ermöglichen, hat NEC Unified Solutions in allen Mitgliedsstaaten der Europäischen Union Vereinbarungen getroffen, die ein lokales Einsammeln und Recycling ermöglichen.
- Page 369 La eliminación de productos eléctricos o electrónicos en países no pertenecientes a la Unión Europea debe ser realizada de acuerdo a la normativa local. Si no existe ningún acuerdo con NEC Unified Solutions o con su distribuidor local, le rogamos contacte con las autoridades locales para obtener más información.
- Page 370 E U R O P É E N N E L’enlèvement des déchets électriques et électroniques doit être fait selon les règles locales en vigueur. S’il n’y a pas d’arrangement avec NEC ou votre fournisseur, vous êtes prié de contacter les autorités locales.
- Page 371 Sul sito www.nec-unified.com/weee potete trovare tutte le informazioni necessarie sulla raccolta differenziata ed il sano riciclo ambientale.
- Page 372 Em www.nec-unified.com/weee pode encontrar informação sobre eliminação selectiva e reciclagem ambiental. P A R A P A Í S E S F O R A D A U N I Ã O E U R O P E I A A eliminação de produtos eléctricos e electrónicos em países fora da união europeia...
- Page 373 överenskommelser som ert företag tecknat då dessa produkter förvärvats. På www.nec-unified.com/wee kan du hitta information om sopsortering och miljövänliga återvinningsåtgärder. F Ö R L Ä N D E R U T A N F Ö R D E N E U R O P E I S K A U N I O N E N Avfallshantering av elektriska och elektroniska produkter i länder utanför den...
- Page 374 N O T I C E S WEEE Product Disposal Information E-356 DT700 Phone User Guide...
- Page 375 NDEX ........Symbols CF Immediate icon 2-29 >>>...
- Page 376 I N D E X Cursor Pad DT700 Lineup details 2-26 2-27 DT710 handset Directory key ITL-2E 11-271 11-292 attach 3-46 ITL-6DE layout and parts 2-24 2-24 ringing volume icon 2-31 ITL-12CG ITL-6DE soft ring volume icon 2-31 ITL-12D 2-20 display 4-61 7-102...
- Page 377 I N D E X Icon Display ITL-6DE keys and parts 2-27 2-31 icons Conf softkey 7-112 7-114 ITL-2E 2-24 2-26 Call Conferencing features ITL-6DE 2-29 2-22 2-24 Call Conferencing Hold keys and parts ITL-12CG 2-29 2-22 Call Count layout ITL-12D 2-28 2-22...
- Page 378 I N D E X Mic key Personal Directory tory entry 11-270 11-294 8-136 ITL-2E 2-25 11-278 star/hash code 8-155 ITL-6DE add from Call History ITL-2E 2-23 11-262 2-25 8-124 ITL-12CG add Speed Dial ITL-6DE 8-150 2-23 8-124 ITL-12D delete entry ITL-12CG 2-19 11-289...
- Page 379 I N D E X shuttle sonal Directory entry Transfer, shuttle (Secondary) 8-166 concurrent calls 7-111 Speed Dial Only entry 8-170 icon 2-29 conference call duplicate entries Transferring Calls 7-114 8-131 7-115 7-118 transfer edit Troubleshooting 7-117 8-159 12-295 12-308 Shuttle softkey ITL-2E AC/DC adapter...
- Page 380 I N D E X volume call handset 4-63 headset 4-63 D-338 speaker 4-64 call icon 2-31 handset ringing icon 2-31 headset icon 2-31 ringing headset 4-62 4-63 D-338 soft ring icon 2-31 speaker icon 2-31 Wall Mounting 3-52 clearance requirements 3-53 WEEE E-349...
Need help?
Do you have a question about the UNIVERGE DT700 and is the answer not in the manual?
Questions and answers