Panasonic KX-NT400 Operating Instructions Manual
Ip proprietary telephone
Hide thumbs
Also See for KX-NT400:
- Operating instructions manual (206 pages) ,
- Brochure & specs (6 pages) ,
- User manual (6 pages)
Table of Contents
Advertisement
Quick Links
Thank you for purchasing an IP Proprietary Telephone (IP-PT).
Please read this manual carefully before using this product and save this manual for future use.
For more details, please refer to the manuals of the PBX.
In this manual, the suffix of each model number is omitted unless necessary.
IP Proprietary Telephone
Model No.
KX-NT400
SD Logo is a
trademark of
SD-3C, LLC.
Advertisement
Table of Contents

Related Manuals for Panasonic KX-NT400


Summary of Contents for Panasonic KX-NT400
- Page 1 IP Proprietary Telephone KX-NT400 Model No. Thank you for purchasing an IP Proprietary Telephone (IP-PT). Please read this manual carefully before using this product and save this manual for future use. For more details, please refer to the manuals of the PBX.
-
Page 2: Feature Highlights
Contacts Chat The large, colour LCD touch screen provides a simple interface for operating the KX-NT400. Common telephone operations such as transferring calls, establishing conferences, and checking messages can be performed simply by pressing buttons on the screen. The touch screen also provides an intuitive interface for managing contacts and call logs. - Page 3 20 cameras. If a registered camera is connected to a doorphone, whenever you make a call to or receive a call from that doorphone, the video feed is automatically displayed on the KX-NT400. In addition, you can register camera information with a contact, and view the camera’s video feed when talking to the contact.
- Page 4 Data Import and Export to SD Memory Card The KX-NT400 contains an SD memory card slot so that you can back up the KX-NT400’s data to an SD memory card. You can back up information such as your personal contacts, chat log, and settings. If you switch phones or data is lost from the KX-NT400, you can recover your data from the SD memory card.
-
Page 5: System Diagram
Web Server Portable Station IMPORTANT • If a PC that has Communication Assistant (CA) installed is connected to the KX-NT400, do not set the extension number in CA to the same extension number that is assigned to the KX-NT400. Operating Instructions... - Page 6 Introduction Notice • When a portable station is configured to share an extension number with the KX-NT400, to apply the configuration you must restart the KX-NT400. Operating Instructions...
-
Page 7: Other Information
2008 Kyoto Software Research, Inc. All rights reserved. You may not modify, decompile, disassemble, or reverse engineer the software. Firmware Notice • The firmware of the KX-NT400 is protected by copyright laws and international treaty provisions, and all other applicable laws. It can not be reverse engineered, decompiled, or disassembled. Operating Instructions... - Page 8 Introduction For Future Reference Record the information in the space below for future reference. Note • The serial number of this product may be found on the label affixed to the side of the unit. You should note the serial number of this unit in the space provided and retain this manual as a permanent record of your purchase to aid in identification in the event of theft.
-
Page 9: For Your Safety
For Your Safety For Your Safety WARNING To reduce the risk of injury, loss of life, electric shock, General Safety fire, malfunction, and damage to equipment or property, always observe the following safety precautions. Do not disassemble this unit. Dangerous electrical shock could result. -
Page 10: Data Security
Memory Card physically unusable before disposal. telephone, not dependent on local power, is • When user information is sent from the KX-NT400 available for use in remote sites in case of to a PC or other external device, the confidentiality emergency. - Page 11 For Your Safety retrieved from it by formatting the hard disk and/or rendering it physically unusable. Preventing Data Disclosure Over the Network • To ensure the security of private conversations, only connect the unit to a secure network. • To prevent unauthorised access, only connect the unit to a network that is properly managed.
-
Page 12: Additional Information
Additional Information Additional Information For Users in New Zealand • This equipment shall not be set to make automatic calls to the Telecom ’111’ Emergency Service. For Users in Australia and the United • The grant of a Telepermit for any item of terminal Kingdom equipment indicates only that Telecom has accepted that the item complies with minimum... - Page 13 Additional Information For Users in Russia and Ukraine Operating Instructions...
- Page 14 These symbols on the products, packaging, and/or accompanying documents mean that used electrical and electronic products and batteries should This product is intended to be connected to a Panasonic not be mixed with general household PBX only. waste. Panasonic System Networks Co., Ltd./Panasonic For proper treatment, recovery and System Networks Company U.K.
-
Page 15: Table Of Contents
Table of Contents Table of Contents Before Operating the Telephone ............18 Accessory Information ....................18 Location of Controls .......................19 Operation Board Angle Adjustment ................25 Hooking the Handset ......................27 Screens & Soft Buttons ....................28 Navigation ........................28 HOME Screen ........................30 Contacts Screen ......................34 Calls Screen ........................39 Calls Screen in Call List Mode ..................39 Calls Screen in Line Buttons Mode ................46... - Page 16 Table of Contents Presence Status Setting ....................82 Call Forwarding/Do Not Disturb ..................83 Advanced Feature Operation ..............85 Network Camera ......................85 Selecting Cameras to View ....................85 Zooming In and Out ......................85 Adjusting the Angle of the Camera .................86 Opening Doors .......................86 Full-Screen Mode ......................86 Chat ..........................87 Making a Call to a Chat Participant ................87 Portal (Web Browser) ......................88...
- Page 17 Installation and Setup ................158 Connections ........................158 Bluetooth Headset Connections ..................161 Installation ........................161 Bluetooth Headset Operation ..................163 Setting Up the KX-NT400 ....................165 Accessing the Start-up Settings ...................165 Language Settings .......................167 IP Address Settings ......................167 IP Port Settings ......................168 Quality of Service (QoS) Settings .................169 Maintenance .........................170...
-
Page 18: Before Operating The Telephone
Before Operating the Telephone Before Operating the Telephone Accessory Information Included Accessories Handset (1) Handset Cord (1) Stylus Pen (1) Optional Accessories AC Adaptor Bluetooth Module Headset • For KX-NT400NE users and KX-NT400RU users: KX-TCA89 • For KX-NT400X users in KX-A420 (PSLP1662) KX-NT307 (PSLP1528) South America:... -
Page 19: Location Of Controls
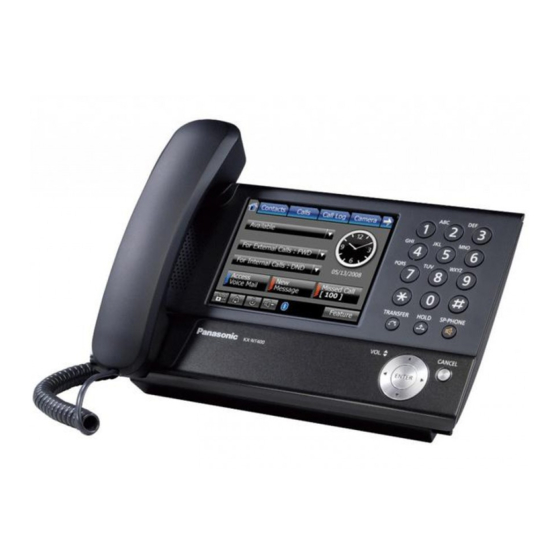
Before Operating the Telephone Location of Controls Front View Note The KX-NT400’s appearance varies by country or area. KX-NT400NE/KX-NT400X KX-NT400RU Operating Instructions... - Page 20 Before Operating the Telephone LCD (Liquid Crystal Display) Message/Ringer Lamp When you receive an intercom call, the lamp flashes green, and on an outside call, the lamp flashes red. When someone has left you a message, the lamp stays on red. SP-PHONE (Speakerphone) Used for performing hands-free operations.
- Page 21 Before Operating the Telephone Right Side View Side Cover SD Memory Card Slot Used to insert an SD memory card. SD memory cards are used to backup and restore personal settings and data. For details, see "SD Memory Cards (Page 190)". USB Port Used to connect a USB keyboard.
- Page 22 Before Operating the Telephone Left Side View Handset Handset Jack Headset Jack Handset Cord For details, see "Connections (Page 158)". Operating Instructions...
-
Page 23: Back View
Before Operating the Telephone Back View Stylus Pen Used to press buttons on the LCD. Back Cover Bluetooth Module Socket For details, see "Bluetooth Headset Connections (Page 161)". Operation Board Angle Adjust Button Used to adjust the angle of the operation board. For details, see "Operation Board Angle Adjustment (Page 25)". - Page 24 Before Operating the Telephone Bottom View LAN Port PC Port DC Jack For details, see "Connections (Page 158)". Operating Instructions...
-
Page 25: Operation Board Angle Adjustment
The angle of the operation board can be set to one of seven angles (level 1 = 30°, level 7 = 60°). IMPORTANT • When you use the KX-NT400 first time, before adjusting the angle of the operation board, press and hold the angle adjustment button, lift the operation board until you hear the lock click, and then release the button. - Page 26 Before Operating the Telephone To lower: Hold down the button as shown in the illustration below. Hold the base of the unit with one hand. Slightly lift the operation board to disengage the lock. While holding down the button, tilt the board to the desired angle and then release the button. Operating Instructions...
-
Page 27: Hooking The Handset
Before Operating the Telephone Hooking the Handset You can hook the handset with following operations. To Hook the Handset During a Conversation Hook the handset over the top edge of the unit. Operating Instructions... -
Page 28: Screens & Soft Buttons
This section explains all of the buttons and icons that appear on each of the screens. Navigation You can navigate among the various screens on the KX-NT400 by using the tabs along the top screen. Navigation details A Tabs and controls... - Page 29 Before Operating the Telephone Soft Button or Icon Description Display the Chat screen (Page 54). Display the Portal screen (Page 56). Display the Options screen (Page 60). Display additional tabs. Operating Instructions...
-
Page 30: Home Screen
Before Operating the Telephone HOME Screen On the HOME screen, you can perform the following operations: • Checking New Messages (Page 80) • Checking Missed Calls (Page 82) • Accessing Voice Mail (Page 81) • Presence Status Setting (Page 82) •... - Page 31 Before Operating the Telephone HOME Screen Details A Presence and messages Soft Button or Icon Description Change your presence status. The number that is displayed in front of your presence status is your extension number. • Presence Status Setting (Page 82) Change your Call Forwarding settings and Do Not Disturb (DND) settings.
- Page 32 Before Operating the Telephone B Miscellaneous controls Soft Button or Icon Description Lock/Unlock access to all screens except the HOME, Calls, and Feature Key screens. : Access to screens is locked. : Access to screens is unlocked. • Locking Operations (Application Lock) (Page 79) Turn on/off Auto Answer (receiving an incoming call in hands-free mode).
- Page 33 Before Operating the Telephone C Buttons available in Call List mode The buttons in the following table appear on the HOME screen only when the Calls screen is set to Call List mode. Soft Button or Icon Description Redial the last number you dialled. You can change the behaviour of this button so that it redials only the last outside number that you dialled.
-
Page 34: Contacts Screen
Before Operating the Telephone Contacts Screen On the Contacts screen, you can view and make calls to contacts in your local directory and contacts stored on an LDAP directory. The following operations are available on this screen: • Making a Call from the Contact List (Page 66) •... - Page 35 Scroll the list on the screen. Scroll to the top/bottom of the list on the screen. Telephone status icons The icons for each directory entry indicate the status of each extension’s telephone. For extensions using KX-NT400 Icon Phone Status Presence Status (Absent Message)
- Page 36 Before Operating the Telephone Icon Phone Status Absent Message Absent message not set (Available) Absent message On or DND for internal call Busy Automatic absent message is set or DND for internal call Absent message not set (Available) Absent message On or DND for internal call Ringing Automatic absent message is set or DND for internal call No Icon...
- Page 37 Before Operating the Telephone Soft Button or Icon Description Switch the character table used for entering characters with the dial keys. • Entering Characters (Page 155) Shows information for the selected contact: • Phone number • Presence status Display the Dial window for pre-dialling. •...
- Page 38 Before Operating the Telephone E LDAP contact list entries Soft Button or Icon Description Shows the contact’s name and registered phone number. Also, you can make a call to and display detailed information for the selected contact. • Making a Call from the LDAP Directory (Page 67) •...
-
Page 39: Calls Screen
Before Operating the Telephone Calls Screen When you start a conversation or you answer a call, the Calls screen appears. On the Calls screen, you can use PBX call handling features. There are 2 modes for operating the Calls screen: •... - Page 40 Before Operating the Telephone Calls Screen in Call List Mode Details A Current call display Soft Button or Icon Description Display information about the current calls. Each entry shows the following information: • For Outgoing Calls – Call status icon –...
- Page 41 Before Operating the Telephone Icon Call Status Parked call Broadcasting No valid call (Reorder tone is heard) B Call operations Note • The buttons in area B change according to the selected call. When there is no available operation for the selected call, no buttons are displayed.
- Page 42 Redirecting Calls (Page 71) For active calls Soft Button or Icon Description Record the current call to voice mail. This feature requires a Panasonic Voice Processing System. • Recording Calls (Two-way Recording) (Page 76) Stop recording the current call. •...
- Page 43 Before Operating the Telephone Soft Button or Icon Description Park the call in an idle parking zone. • Holding a Call in a System Parking Zone (Call Park) (Page 73) Park the call in a specified parking zone. • Holding a Call in a System Parking Zone (Call Park) (Page 73) Transfer the call.
- Page 44 Before Operating the Telephone For calls on hold Soft Button or Icon Description Retrieve the selected call on hold. • Holding a Call (Page 73) For calls in a conference call Soft Button or Icon Description Invite a third party and establish a conference call. •...
- Page 45 Before Operating the Telephone Soft Button or Icon Description Override the selected call. The call will shift to conference mode. This button appears only for internal calls. • Joining an Existing Conversation (Executive Busy Override) (Page 91) For Do Not Disturb calls Soft Button or Icon Description Override Do Not Disturb.
-
Page 46: Calls Screen In Line Buttons Mode
Before Operating the Telephone Calls Screen in Line Buttons Mode Line Buttons mode lets you easily access flexible keys. You can customise the flexible keys to access frequently used functions and destinations. For details, see "Customising the Flexible Buttons (Page 142)". Additionally, to use the Call Waiting Caller ID (Visual Caller ID) function, use Line Buttons mode. - Page 47 Before Operating the Telephone B Feature key page selection Soft Button or Icon Description Change the feature key page. C Feature keys Soft Button or Icon Description You can customise the flexible buttons by assigning functions to them. • Customising the Flexible Buttons (Page 142) D Function buttons Soft Button or Icon Description...
- Page 48 Before Operating the Telephone Soft Button or Icon Description Used to redial the last outside phone number that you dialled. • Redialling the Last Number You Dialled (Last Number Redial) (Page 69) Operating Instructions...
-
Page 49: Call Log Screen
Before Operating the Telephone Call Log Screen On the Call Log screen, you can view a list of your outgoing, incoming, and missed calls. The following operations are available on this screen: • Dialling by Using Call Logs (Page 68) •... - Page 50 Before Operating the Telephone B Call log entries Soft Button or Icon Description Display the status icon, caller’s name, and timestamp of the call. You can make a call, add the party to the local directory, display the caller’s picture, and display detailed information.
-
Page 51: Camera Screen
Before Operating the Telephone Camera Screen On the Camera screen, you can perform operations related to cameras. • Network Camera (Page 85) Camera Screen Details A Camera display Soft Button or Icon Description Shows the selected camera’s video feed. • Adjusting the Angle of the Camera (Page 86) Operating Instructions... - Page 52 Before Operating the Telephone B Camera selection buttons Soft Button or Icon Description Quick-access button for registered cameras. The name you registered for the camera is displayed on the button (e.g., "Back Door", "Front"). • Selecting Cameras to View (Page 85) •...
- Page 53 Description Tilt-scan the view. • Adjusting the Angle of the Camera (Page 86) Mute/unmute outgoing voice and sound from the KX-NT400. : Outgoing voice and sound is muted. : Outgoing voice and sound is not muted. • Mute (Page 76) During a conversation with a doorphone, open the door connected to a doorphone camera.
-
Page 54: Chat Screen
Before Operating the Telephone Chat Screen On the Chat screen, you can participate in a chat session with another KX-NT400 user or Communication Assistant user. You can start a chat session by selecting a contact on the Contacts screen. The following operations are available on this screen: •... - Page 55 Before Operating the Telephone Soft Button or Icon Description Send the message you typed in the message input box. Clear the text in the message input box. Make a call to the other chat participant. End the chat. The other chat participant will be disconnected. Operating Instructions...
-
Page 56: Portal Screen
Before Operating the Telephone Portal Screen On the Portal screen, you can browse Web pages on your organisation’s intranet. • Portal (Web Browser) (Page 88) Portal Screen Details A Portal screen controls Soft Button or Icon Description Select an intranet Web page from the Web page list. •... - Page 57 Before Operating the Telephone Soft Button or Icon Description Display/hide the soft keyboard. : The soft keyboard is not displayed. : The soft keyboard is displayed. • Using the Soft Keyboard (Page 63) Operating Instructions...
-
Page 58: Feature Key Screen
If the Calls screen is set to Call List mode, you can use the Feature Key screen to perform operations in the same way as on a Proprietary Display Telephone. You can access PBX features that are unavailable elsewhere on the KX-NT400. You can assign phone numbers and PBX features to the flexible keys for easy access. See the following section for details: •... - Page 59 Before Operating the Telephone B Feature key page selection Soft Button or Icon Description Change the feature key page. C Feature keys Soft Button or Icon Description You can customise the flexible buttons by assigning functions to them. • Customising the Flexible Buttons (Page 142) Return to the HOME screen.
-
Page 60: Options Screen
Before Operating the Telephone Options Screen From the Options screen, you can access various settings for the KX-NT400. The following operations are available on this screen: • User Options (Page 121) • Administrator Options (Page 130) Options Screen Details A Options screen details... -
Page 61: Basic Operations
Going off- and on-hook button on the Calls screen (in Call List mode), activate hands-free mode as well. These buttons With the KX-NT400 there are several ways to go appear only when you have an incoming call. off-hook and on-hook: •... -
Page 62: Basic Screen Operations
The volume of the Bluetooth headset cannot be adjusted using the KX-NT400’s Navigator key. Adjust the volume on the Bluetooth headset directly. Basic Screen Operations This section explains the basic operations for using the screen. -
Page 63: Entering Text
For details about containing the soft keyboard appears. character tables, see "Entering Characters (Page 155)". Note • The language for the soft keyboard depends on the display language selected for the KX-NT400. For details, see "Language Settings (Page 124)". Operating Instructions... - Page 64 Before Operating the Telephone Using a USB Keyboard If you connect a compatible USB keyboard to the KX-NT400, you can enter text with the USB keyboard instead of the soft keyboard. You can connect the keyboard at any time. User supplied.
-
Page 65: Basic Feature Operation
Dial window. When you finish dialling, the call will You have to seize an outside line before dialling an be connected. outside phone number. The KX-NT400 can seize an To end the call, go on-hook. outside line automatically for certain calls. -
Page 66: Making A Call From The Contact List
"Customising the Flexible Buttons (Page 142)". Making a Call from the Contact List To search for a contact, start entering the contact’s The KX-NT400 provides the following 2 types of contact name. For details about entering characters, see lists: "Entering Text (Page 63)". -
Page 67: Advanced Search
This feature is • You cannot search directories that are not available only when the KX-NT400 is idle. displayed. To display/hide directories, see "Directory List Select Settings (Page 124)". On the Contacts screen, make sure the LDAP directory is displayed. -
Page 68: Dialling By Using Call Logs
Basic Feature Operation • Press Advanced. For details about the icons and buttons on the Contacts screen, see "Contacts Screen (Page 34)". Dialling by Using Call Logs The last 100 incoming calls, outgoing calls, and missed Enter the terms you want to search for, and then calls are stored in their respective logs, in order of press Search. -
Page 69: Redialling The Last Number You Dialled (Last Number Redial)
Basic Feature Operation On the HOME screen, go off-hook, and then press Usage tips Redial. • For details about the buttons and icons on the Call Log screen, see "Call Log Screen (Page 49)". • On the detailed information screen, the following actions are also available: –... -
Page 70: One-Touch Dialling
Basic Feature Operation One-touch Dialling To end the call, go on-hook. You can make a call with One-touch operation if you Usage tips have created a One-touch dialling button for the desired party. • For details about creating One-touch dialling buttons, see "Customising the Flexible Buttons (Page 142)". -
Page 71: Receiving Calls
Close: Close the window. Note • For incoming calls from outside lines, the KX-NT400 can display up to 16 digits of the caller’s phone number. Redirecting Calls You can redirect incoming calls to another destination If you are viewing the Camera screen when an (extension or outside party), or to your mailbox. -
Page 72: During A Conversation
Usage tips buttons appear during an active call. This is • You can configure the KX-NT400 to redirect all applicable only when the Calls screen is set to incoming calls to a specified destination. For Call List mode. For details, see "Calls Screen details, see "Call Forwarding/Do Not Disturb... -
Page 73: Holding A Call
Basic Feature Operation Holding a Call programming that extension as a flexible button. For details about feature numbers for holding You can put a call on hold by either holding the call at and retrieving calls, see "Call Hold your extension (Call Hold) or holding the call in a (Page 98)". -
Page 74: Receiving A Second Call (Answering Call Waiting)
Basic Feature Operation • After you park a call, you can perform other To retrieve a parked call operations. On the Calls screen, select the call you want to retrieve. Receiving a Second Call Press Unpark the call, and go off-hook. (Answering Call Waiting) During a conversation, if a second call arrives, the Call Operation in Line Buttons mode... -
Page 75: Transferring A Call (Call Transfer)
• If the party that you switch to has a camera • You can configure the KX-NT400 so that the Dial associated with his extension, the Camera window appears when you press Transfer the screen is displayed and the feed from that Call. -
Page 76: Mute
• To listen to the recorded conversation, access your mailbox and follow the audio guidance. For details, You can record a conversation if a Panasonic Voice see "Accessing Voice Mail (Page 81)". Processing System (VPS) (e.g., KX-TVM series) is connected. The call is recorded to your mailbox on the VPS. -
Page 77: Conference Call (Multiple Party Conversation)
Basic Feature Operation Operation in Line Buttons mode Conference Call (Multiple Press Party Conversation) Usage tips During a conversation, you can add additional parties • This operation is available only while you are on a to your call and establish a conference call. Conference call with a doorphone. -
Page 78: Removing A Participant From The Conference
Press (TRANSFER) once or twice to establish • You can configure the KX-NT400 so that the Dial a conversation with the party to be disconnected. window appears when you press Make a The other party will be put on hold. -
Page 79: Locking Operations (Application Lock)
Basic Feature Operation Locking Operations To return to a conference (Application Lock) On the Calls screen, select the call on hold. Press Retrieve the Call. The Application Lock feature lets you restrict operation to only a few operation screens. When you set the Application Lock, you can still access some screens, –or–... -
Page 80: Checking Messages
• Messages on the PBX’s built-in voice mail (Simplified Voice Message [SVM]). On the HOME screen, press New Message. • Messages on a Panasonic Voice Processing System (VPS) (e.g., KX-TVM series). Note • Depending on the network and PBX configurations, some message types might not be available. -
Page 81: Accessing Voice Mail
The Access Voice Mail button is displayed if you have set the voice mail system’s extension (VPS) number. For details, see "Dial Number Settings If a Panasonic VPS (e.g., KX-TVM series) is configured (Page 123)". on your network, callers can leave voice messages in your mailbox. -
Page 82: Checking Missed Calls
HOME screen and displays the letting them know whether you are available, in a number of missed calls that you have. The KX-NT400 meeting, away from your desk, etc. can store the information for up to 100 missed calls. -
Page 83: Call Forwarding/Do Not Disturb
Basic Feature Operation Presence Select window, use the Navigator key to Call Forwarding/Do Not select a presence status, and then press . You Disturb can also change the presence settings via the Options screen. For details, see "Presence Settings (Page 127)". You can have incoming calls automatically forwarded •... - Page 84 Basic Feature Operation Advanced Call Forwarding/Do Not • On the Advanced window, you can press Disturb Settings clear the settings. For external calls will be set to Not Assigned, any forwarding destinations you You can set different forwarding destinations as well as have entered will be cleared, and the For both Do Not Disturb for external and internal calls separately.
-
Page 85: Advanced Feature Operation
You can view the video feeds from up to 20 registered • Location list: A list of all cameras that you have Panasonic Network Cameras (e.g., BB-HCM/BL-C registered. series). For details about registering cameras, see "IP •... -
Page 86: Adjusting The Angle Of The Camera
Four arrows will appear along the edges of the video you can open the door from the KX-NT400. display. Press the arrows to pan and tilt the camera. -
Page 87: Chat
Advanced Feature Operation Chat Usage tips • Use the following buttons to perform the chat You can start a text chat with other KX-NT400 users, operations: and users of programmes such as Communication – Send: Send the message you entered to the Assistant. -
Page 88: Portal (Web Browser)
Advanced Feature Operation Portal (Web Browser) Navigating Web Pages The KX-NT400 provides controls along the top of the The KX-NT400 has a feature for browsing intranet Web Portal screen for navigating Web pages. pages, called the portal. Note • The portal is designed only for viewing intranet content. - Page 89 Advanced Feature Operation To call the phone number Do one of the following: • Go off-hook. • Press Note • If you are off-hook when you press a link that points to a phone number, the number will be dialled immediately. •...
-
Page 90: Other Feature Operations
When the dialled party is busy, you can send a call To use this feature you must have a Panasonic Voice waiting notification to let the other party know you are Processing System (VPS). You must also set the calling. -
Page 91: Reserving A Busy Line (Automatic Callback Busy)
Operation in Line Buttons mode Press When the extension becomes idle, your You will join the called party’s conversation and KX-NT400 will ring. When you go off-hook, a call will establish a 3-party conference. be made to the called extension. Usage tips •... -
Page 92: If A Host Pbx Is Connected
Other Feature Operations Operation in Call List mode Access (EFA) mode. For details, consult your administrator. On the Calls screen, press Override the Call. • Available service codes differ depending on your telephone system and services offered by your telephone company. Operation in Line Buttons mode Press Note... -
Page 93: Pbx Feature List
Absent Message To set – (parameter) + You can show the reason you do not answer, if the caller uses a Panasonic display proprietary telephone. To cancel There are eight preprogrammed messages and one for your personal message (16 characters). -
Page 94: Automatic Line Access
PBX Feature List Feature Operation Automatic Line Access + outside phone no. You can select an idle outside line automatically. Note The automatic line access number (default) varies depending on country/area. Background Music (BGM) To set + BGM no. (1 digit) You can listen to the background music through your telephone speaker while on-hook. - Page 95 PBX Feature List Feature Operation To redirect your calls to your message box (Both Calls)/ (Outside Calls)/ (Intercom Calls) (All Calls) + floating extension no. for the SVM feature + (Busy) + floating extension no. for the SVM feature + (No answer) + floating extension no.
- Page 96 PBX Feature List Feature Operation Call Forwarding (CF)—by ISDN To set + outside line no. + + multiple subscriber All calls are forwarded to an outside party using ISDN. no. + (Unconditional)/ (Busy)/ (No Reply) The following types of call forwarding are + phone no.
- Page 97 PBX Feature List Feature Operation Call Forwarding (FWD) To set (Both Calls)/ (Outside Calls)/ You can have your incoming calls forwarded to a specified destination. (Intercom Calls) (All Calls) + phone no. + • Call Forwarding/Do Not Disturb (Page 83) (Busy) + phone no.
- Page 98 PBX Feature List Feature Operation Call Forwarding to Voice Mail (Voice Mail To set Integration) (Both Calls)/ (Outside Calls)/ If a Voice Processing System is connected, you (Intercom Calls) can forward them to your mailbox when you cannot answer calls. (All Calls) + voice mail extension no.
- Page 99 PBX Feature List Feature Operation Calling/Connected Line Identification To show the outside line number Presentation (CLIP/COLP) You can select the telephone number sent, either the number of the line used or the number To show your extension number assigned to your extension. CLIP: When making an outside call, you can present your preprogrammed telephone number to the...
- Page 100 PBX Feature List Feature Operation Call Splitting To alternate between the parties leaving one party on hold temporarily When talking to one party while the other party is (TRANSFER) + extension no. + Talk + on hold, you can swap the calls back and forth (alternately).
- Page 101 PBX Feature List Feature Operation Conference To establish a conference (TRANSFER) + phone no. + Talk + (TRANSFER) You can add one or more parties to your conversation. To disconnect one party in Line Buttons mode (3-party conference only) • Conference Call (Multiple Party Conversation) (Page 77) (TRANSFER) once or twice to establish a conference...
- Page 102 PBX Feature List Feature Operation Direct Inward System Access (DISA) To call an extension (In No Security Mode/Trunk Security Mode) When outside callers access extensions in the DISA phone no. + extension no. PBX, a prerecorded message greets the caller and gives information about how to access an To call an extension (In All Security Mode only) extension.
- Page 103 Notice • After you have exchanged the settings between extensions, the KX-NT400 must be restarted for the change to take effect. See "Manual Restarting (System Reset) (Page 176)". Executive Busy Override phone no.
-
Page 104: Extension Feature Clear
PBX Feature List Feature Operation Extension Feature Clear You can reset the settings of some features on your extension to the default settings with one operation. Extension PIN (Personal Identification To set Number) + extension PIN + + same extension You can assign a password to each extension. -
Page 105: Group Paging
PBX Feature List Feature Operation External Feature Access (EFA) <Example> To hold the current call and then talk to the new party If a host PBX is connected, you can access (TRANSFER) + + service code special features (e.g., Call Waiting) offered by the host PBX or telephone company. - Page 106 PBX Feature List Feature Operation Headset Operation To talk using the headset (SP-PHONE) You can have a conversation using a headset. In this case, you must select "Headset on" in programming mode or set the Headset button on To use the handset during a conversation using the (red) in advance.
- Page 107 PBX Feature List Feature Operation Log-in/Log-out, Wrap-up To set Log-out + ICD group extension no. (Specified)/ You can control your status in an incoming call distribution group. (All) When in the Log-out mode, incoming calls to the group will not ring at your extension. When you To set Log-in return, calls will again ring at your extension + ICD group extension no.
- Page 108 PBX Feature List Feature Operation Message Waiting (for a called extension) To call back As a message receiver, the Message/Ringer Lamp lets you know that a call has been received. If you receive notification, you can call the caller To clear message waiting indications back by a simple operation.
- Page 109 PBX Feature List Feature Operation Primary Directory Number (PDN)/ SDN Direct Dial–Enhanced DSS Key Mode Feature key screen + [SDN] Secondary Directory Number (SDN) Extension SDN Direct Dial–Standard DSS Key Mode Primary Directory Number (PDN) buttons and Feature key screen + [SDN] + [SDN] Secondary Directory Number (SDN) buttons are useful when extension users will handle calls for...
- Page 110 PBX Feature List Feature Operation To unlock Remote Extension Dial Lock + extension no. The manager extension can lock other extensions. To lock + extension no. Remote Setting From another extension + your extension no. + extension PIN + feature You can set the following features on your telephone from another extension or through DISA.
-
Page 111: Walking Extension
Notice • After you have exchanged the settings between extensions, the KX-NT400 must be restarted for the change to take effect. See "Manual Restarting (System Reset) (Page 176)". Depending on your settings, how you access this screen will differ. - Page 112 PBX Feature List • If the Calls screen is set to Call List mode: → Press + Feature. • If the Calls screen is set to Line Buttons mode: → Press the Calls tab. For details about the Calls screen, see "Calls Screen (Page 39)". Operating Instructions...
-
Page 113: Contact Management
Contact Management Contact Management Usage tips • You can add up to 300 personal contacts. You can manage the contacts that are stored locally in Adding a Contact your personal directory. Also, if your extension has sufficient privileges, you can manage the system speed Creating a New Contact dial numbers that are stored on the PBX. -
Page 114: Editing A Contact
Contact Management On the Call Log screen, select the call log you want Select the contact you want to add from the system to add a contact from. speed dialling directory or the extension directory. Note • To display the system speed dialling directory and extension directory, the corresponding check boxes have to be selected in the Directory List Select... -
Page 115: Deleting A Contact
Contact Management Page 2/4—Contact Information Deleting a Contact You can delete contacts from your personal directory. You cannot delete entries from the LDAP directory. On the Contacts screen, make sure the local directory is displayed. Select the contact you want to delete. Press On the confirmation dialogue window, press Yes. - Page 116 Contact Management Camera Login Code Page 1/3—Basic Information Enter the login code for the contact’s camera. • Maximum 15 characters Camera Password Enter the login password for the contact’s camera. • Maximum 15 characters Note • Selecting a camera with the drop-down list only fills in the fields.
- Page 117 Contact Management • Page 1/3—Basic Information Maximum 15 characters Note • Selecting a camera with the drop-down list only fills in the fields. Even if you change the camera’s information, those changes will not be reflected in the contact’s settings. You must update the contact’s settings separately.
-
Page 118: Managing The Pbx's System Speed Dial Entries
Contact Management • Managing the PBX’s Maximum 15 characters Note System Speed Dial • Selecting a camera with the drop-down list only Entries fills in the fields. Even if you change the camera’s information, those changes will not be reflected in the contact’s settings. You must If your extension has sufficient privileges, then you can update the contact’s settings separately. - Page 119 Contact Management contacts, see "Adding a Contact from an LDAP To modify a system speed dial number Directory (Page 114)". On the Contacts screen, make sure the local directory is displayed. To add a system speed dial number from a call Select the system speed dial number you want to modify.
- Page 120 Contact Management • If you do not have sufficient privileges or do not want to modify the system speed dialling directory, you can use your personal speed dialling directory. For details, see "Personal Speed Dialling (Page 108)". However, these contacts do not appear in your local directory.
-
Page 121: Settings And Customisation
"Locking Operations (Application Lock) (Page 79)". You can configure various settings to customise the Details for Password Settings behaviour of the KX-NT400 to fit your work flow. User Options This section explains the settings available in User Options on the Options tab. - Page 122 If you change the Display Colour settings, the KX-NT400 automatically restarts after you press OK. Touch Screen Sound Select whether the KX-NT400 gives audio feedback Details for Display / Operation when you perform operations on the screen. • Default: Off...
-
Page 123: Dial Number Settings
Settings and Customisation • This setting is effective only when the Calls screen Display Calls with Line Buttons: Display a is set to Call List mode. screen that is similar to a conventional IP-PT. • For details, see "Calls Screen in Line Buttons Display Contacts Screen (default): Display Mode (Page 46)". -
Page 124: Language Settings
Select the directories you want to display on the Contacts screen. • If you change the Language settings, the See "Details for Directory List Select Settings KX-NT400 automatically restarts after you (Page 125)". press OK. Press OK. Details for Language Settings Usage tips •... -
Page 125: Ip Camera Settings
Settings and Customisation Details for Directory List Select To edit a camera Settings Select a camera, and then press Enter the camera’s information as necessary. See "Details for IP Camera Settings (Page 125)". Press OK. To delete a camera Press the Options tab > User Options > IP Camera. -
Page 126: Ip Camera Selection Buttons Settings
Settings and Customisation Page 2/3 To assign cameras to the selection buttons Press the Options tab > User Options > IP Camera Selection Buttons. Assign cameras to the buttons as desired. See "Details for IP Camera Selection Buttons Settings (Page 126)". Press OK. -
Page 127: Presence Settings
See "Details for Web Page List Note Settings (Page 127)". • The KX-NT400 does not support the DNS Delete the selected Web page. (Domain Name Server) protocol. Therefore, URLs cannot contain domains such as Set the selected Web page as "www.example.com". - Page 128 Settings and Customisation To add or modify the selected presence Extension Dial Lock feature number to the "Not at My Desk" presence. status Press To do this, configure the settings as follows: See "Details for Presence List Settings (Page 128)". Modify screen (see "Details for Presence List Settings 2/2 (Page 129)") To delete the selected presence status...
-
Page 129: Calls Screen Button (Active Call) Settings
Settings and Customisation displayed as spaces on the KX-NT400 and on For both external calls and internal calls other display PTs. Select this check box if you want to apply the same • settings to both external and internal calls. -
Page 130: Administrator Options
See the following sections for details about the other Page 1/2 items on this screen: • For details about Network, see "Setting Up the KX-NT400 (Page 165)". • For details about Maintenance, see "Data Maintenance (Page 174)". • For details about Programming, see "PT Programming (Page 134)". -
Page 131: Dial Modification Settings
Settings and Customisation Page 2/2 Configure the dial modification settings. See "Details for Dial Modification Settings (Page 131)". Press OK. Setting Example This example illustrates how different numbers are modified for a specific configuration. Dial Modification Settings Digits to Remove Digits to Add Server Logon +8192... - Page 132 Settings and Customisation • Maximum 8 digits – Entry 9: "+7" – Entry 10: "+" International area code Enter the international area code for your country/ For all other values of International area area. code: • Maximum 3 digits – Entry 9: "+[International area code]"...
- Page 133 Settings and Customisation • Maximum 8 digits or symbols • Allowed characters: *, #, P (pause), 0–9 • Default values: If International area code is 1: "1" If International area code is 7: "8" For all other values of International area code: (blank) Operating Instructions...
-
Page 134: Pt Programming
Settings and Customisation PT Programming By using programming mode, you can customise the KX-NT400 beyond the settings that are available on the Options tab. You can access programming mode on the Programming screen. In programming mode, most operations are performed using the Navigator key and dial keys. -
Page 135: Feature Programming
Settings and Customisation Feature Programming The following table explains the features that are available in programming mode and how to programme them. Note • The default values are displayed in bold. Programming Item Selection & Parameter Input Display Language Select the language via the Language settings. Selection Note Changing this setting only... - Page 136 Settings and Customisation Programming Item Selection & Parameter Input No line An idle outside line CO button no. Preferred Line Assignment (01–48) —Outgoing A CO/ICD Group button –or– Which do you prefer to seize when you go off-hook to make (Flexible button) calls? Intercom (On a PDN...
- Page 137 Settings and Customisation Programming Item Selection & Parameter Input Live Call Screening Mode You can monitor the message through the telephone Which service do you prefer speaker. (Hands-free mode) when a calling party is Only an alarm tone is heard. recording a message in your mailbox? (Private mode)
- Page 138 Settings and Customisation Programming Item Selection & Parameter Input FWD N/A Timer To set the timer for "No (0–120) seconds answer" and "Busy/No (Default: 15 seconds) answer" Call Pickup Deny No—Allow Should you prohibit other people from picking up your Yes—Deny calls? No—Headset off...
- Page 139 Settings and Customisation Programming Item Selection & Parameter Input extension PIN (max. 10 digits) + ENTER/STORE + To set an extension PIN same extension Extension PIN (Personal Identification Number) stored extension To set your extension PIN or PIN + change the stored extension new extension To change the stored extension (max.
- Page 140 Settings and Customisation Changing your PIN regularly. Clearing Features You can reset the following features to their default values: Features Default Setting Display Switching Mode Automatic Hot Line Calling Line Identification Restriction (CLIR) Allow Calling/Connected Line Identification Presentation (CLIP/COLP) Caller ID assigned on your extension Preferred Line Assignment—Outgoing Intercom...
- Page 141 Settings and Customisation To reset the features Press the Options tab > Administrator Options > Programming. On the Programming screen, press PROG. Using the dial keys, press Press (ENTER) 2 times. Press EXIT. Usage tips • You can also reset the features on the Feature Key screen or the Calls screen (in Line Buttons mode). For details, see "Feature Key Screen (Page 58)"...
-
Page 142: Customising The Flexible Buttons
Settings and Customisation Customising the Flexible Buttons You can customise the flexible buttons that are displayed on the Feature Key screen or the Calls screen (in Line Buttons mode) by assigning functions to them. They can then be used to make or receive outside calls or as feature buttons. - Page 143 Settings and Customisation Select the page number of the flexible button you want to customise. Press the flexible button you want to customise. Using the dial keys, enter the programming input. See "Programming Input Table (Page 143)". Press (ENTER). Using the dial keys, enter a name for the button. For details on entering characters with the dial keys, see "Entering Characters (Page 155)".
- Page 144 Settings and Customisation Button Description & Programming Input Used to access an idle outside line for making outside calls. Incoming outside calls from any outside line arrive at this button. Programming Input The L-CO button light shows the current status as follows: Loop-CO (L-CO) •...
- Page 145 Settings and Customisation Button Description & Programming Input Used to access an extension with one touch. It is also possible to be changed to the other feature button. Programming Input + Extension no. Direct Station Selection (DSS) For intercom calls, the DSS button light shows the current status as follows: •...
- Page 146 Settings and Customisation Button Description & Programming Input Used to forward all calls to a specified destination or refuse. Call Forwarding (FWD)/Do Not Disturb (DND)—Both Programming Input calls Used to forward outside calls to a specified destination or refuse. Programming Input FWD/DND—Outside calls The FWD/DND button light shows the current status as follows: •...
- Page 147 Settings and Customisation Button Description & Programming Input Used to forward the intercom calls to your group to a specified destination. Programming Input + Incoming call distribution group extension no. Group FWD—Intercom calls The Group FWD button light shows the current status as follows: •...
- Page 148 Settings and Customisation Button Description & Programming Input Used to show the incoming call information. Programming Input Call Log The Call Log button light shows the current status as follows: • Off: No incoming call. Or you have already viewed the call log. •...
- Page 149 Settings and Customisation Button Description & Programming Input Used to switch the wrap-up status, Ready and Not Ready mode. Programming Input Wrap-up The Wrap-up button alternates the setting of Wrap-up mode, Not Ready mode or Ready mode. The Wrap-up button light shows the current status as follows: •...
- Page 150 Settings and Customisation Button Description & Programming Input Used to switch between the CLIP and CLIR services. Programming Input Calling Line Identification Restriction (CLIR) You can change the mode by pressing a preset CLIR button while on-hook. The CLIR button light shows the current status as follows: •...
- Page 151 Settings and Customisation Button Description & Programming Input Used to access an extension connected to other PBXs in the network with one touch. Programming Input Network Direct Station + Another PBX extension no. Selection (NDSS) The NDSS button light will show the current status as follows: •...
- Page 152 Settings and Customisation Button Description & Programming Input Used to show the current status of another extension, call the extension, and pick up or transfer calls to it. Programming Input + Extension no. + + delayed ringing time (0–7) The SDN button light shows the current status as follows: •...
- Page 153 Settings and Customisation Button Description & Programming Input Used to monitor your own voice mailbox while an incoming caller is leaving a message and, if desired, intercept the call. Programming Input Live Call Screening (LCS) The Live Call Screening (LCS) button light shows the feature status as follows: •...
- Page 154 Settings and Customisation On the Programming screen, press PROG. Select the page number of the flexible button you want to clear. Select the flexible button you want to clear. Press Press (ENTER) 2 times. To continue clearing buttons, repeat the procedure from step 3. To exit, press EXIT.
-
Page 155: Entering Characters
Settings and Customisation Entering Characters The dial keys are used to enter characters and numbers. Each of the dial keys has multiple characters assigned to it. To enter a character, press the appropriate dial key until the character you want appears. To enter another character that is assigned to the same key, first press (RIGHT) to move the cursor to the right. - Page 156 Settings and Customisation Table 1 (Standard mode for RU model) " ’ — < > & Note • A space counts as one character. Table 2 (Option mode) Times 10 11 12 13 14 15 Buttons " ä ö ü À...
- Page 157 Settings and Customisation Table 2 (Option mode for RU model) Note • A space counts as one character. Operating Instructions...
-
Page 158: Installation And Setup
Ensure that the headset cord has slack and is not pulled tight during use to prevent damage to the connectors. Notice It is recommended that you use one of the following Panasonic headsets: For KX-NT400NE/KX-NT400RU users KX-TCA89 For KX-NT400X users in South America... - Page 159 Installation and Setup Connect the cables as shown in the following illustration. 35 mm or less Ethernet cable • Use a straight CAT 5 (or higher) Ethernet cable (not included) that is 6.5 mm in diameter or less. • For further information on the connection to a PC, see the documentation for the PBX. When connecting cables •...
- Page 160 Installation and Setup Connections for Handset Connections for a USB Device To a USB device CAUTION When connecting a USB device • Ensure that the USB cable has slack and is not pulled tight during use to prevent damage to the connectors.
-
Page 161: Bluetooth Headset Connections
Remove the cover as shown in the illustration below. Notice • To prevent the KX-NT400 from getting scratched, do not use hard, sharp tools (flat drivers, craft knives, etc.) to open the cover. Install the KX-NT307 Bluetooth module to the Bluetooth module socket (see "Location of Controls (Page 19)"). - Page 162 Installation and Setup Connect the Ethernet cable (and the AC adaptor if necessary) to the KX-NT400. Operating Instructions...
-
Page 163: Bluetooth Headset Operation
If you have already registered a Bluetooth The KX-NT307 Bluetooth module allows third party headset that you do not want to use anymore, Bluetooth headsets to be used with the KX-NT400. It is register the correct headset. not guaranteed that all features of the Bluetooth •... - Page 164 Installation and Setup including interference that may cause undesired On the Programming screen, press PROG. operation of the device. Privacy of communications may not be ensured when using this module. Press Press (ENTER). • Confirm that the displayed ID is the ID of your headset.
-
Page 165: Setting Up The Kx-Nt400
Using the PC Maintenance Console to programme the PBX, you must set the Incoming Call Log Memory for the KX-NT400 to 0. If you Select the item for the settings you want to do not change this setting, missed calls will not configure. - Page 166 IP Address (® Page 167) You must configure the IP address settings in order to connect to the network and use the KX-NT400. IP Port (® Page 168) If your network uses different ports than the default settings, change these settings to match those of your network.
-
Page 167: Language Settings
Language Settings IP Address Settings The Language settings allow you to select the display To properly connect the KX-NT400 to a network, the IP language. address settings must be configured to match the You can select from a list of built-in languages, or, if you settings of the network. -
Page 168: Ip Port Settings
Enter the IP ports of the PTAP server and PTAP client If your network uses a secondary PBX, enter the IP for IP Port 1 that the KX-NT400 will use to communicate address of the secondary PBX. Press Test to verify over the network. -
Page 169: Quality Of Service (Qos) Settings
Installation and Setup 2 that the KX-NT400 will use to communicate over the Quality of Service (QoS) network. Settings To establish voice communications between the telephones, the primary port of the KX-NT400 and the connected PBX must belong to the same VLAN. -
Page 170: Maintenance
Select whether to enable communication via Diffserv. If Network Maintenance screen you enable Diffserv communication, set DS Field for the Primary Port. You can view the MAC addresses of the KX-NT400 and verify the network connection. Primary Port Select whether to use Diffserv to enhance the VoIP network traffic controlling. -
Page 171: Firmware Version Update
Installation and Setup Firmware Version Update screen Firmware Version Update (2/4) You can upgrade the KX-NT400 firmware from an FTP Enter the information for the FTP server to use for server or an SD memory card. downloading the firmware. You can also use the PC Maintenance Console to upgrade the firmware from an FTP server. - Page 172 The upgrade will start, and a window appears Enter the priority for the VLAN. indicating the status of the upgrade. • Default: 7 When the upgrade finishes, the KX-NT400 reboots Upgrading the Firmware via FTP automatically. On the Setup screen, press Firmware Version Note Update.
-
Page 173: Setting Initialise
Installation and Setup Setting Initialise Firmware Version Initialising the settings returns all settings to their default You can view the firmware version of the KX-NT400 on values. this screen. Note Firmware Version screen • The password for the Application Lock will not be initialised. -
Page 174: Error Log
Error Log Maintaining the KX-NT400 You can view the system error messages of the KX-NT400 on this screen. For details about error message meanings, see "Error Codes (Page 203)". Data Maintenance Error Log screen You can delete the call logs, contact lists, and chat log from the KX-NT400. - Page 175 Settings (Page 126)". Network Settings Select the check box to export/import the network settings. For details about network settings, see "Setting Up the KX-NT400 (Page 165)". LDAP Server Settings Select the check box to export/import the LDAP Export Data server settings.
-
Page 176: Initialising The Kx-Nt400
Display / Operation Settings (Page 121) • Language Settings (Page 124) You can initialise the KX-NT400 to reset all settings to their default values. This feature is only accessible from Restarting occurs only when Display Colour is changed. the Setup screen. -
Page 177: Cleaning The Kx-Nt400
If the KX-NT400 becomes particularly dirty, apply a light kitchen cleanser to a soft cloth, wring the cloth thoroughly, and wipe the KX-NT400. When finished, dry the KX-NT400 with a soft and dry cloth. • To avoid damage or discolouration, do not clean the KX-NT400 with the following materials, or with cleaners containing the following materials. -
Page 178: Appendix
Appendix Appendix Specifications Item Specification Display 5.7 inch touch display QVGA (320 ´ 240 pixels) 65,535 colours Feature Buttons VoIP Connection Method IP-PT VoIP Audio Codec G.722, G.711, G.729A LAN Interface IEEE 802.3 (10Base-T/100Base-TX) IP Address Mode Automatic (DHCP), Manual (static) Speaker Microphone IP Network Interface Jack (LAN) -
Page 179: Programming Items
Appendix Programming Items User Options Password For details, see "Password Settings (Page 121)". Parameter Name Description Value Range Default Setting Application Lock Specify whether to use the Application lock Use/Don’t use Don’t use feature. Current Password Enter your current password for the 1–16 characters –... -
Page 180: Dial Number
Appendix Parameter Name Description Value Range Default Setting "Transfer the Call" Select whether the Dial window appears when Display Contacts Display Button and "Make you press either Transfer the Call or Make a Screen, Contacts Screen the conference" conference on the Calls screen. (Applicable Display Dial Popup Button in Calls only when the Calls screen is set to Call List... - Page 181 Appendix Parameter Name Description Value Range Default Setting Speed Dial Specify whether to display the system speed Yes/No dialling directory provided by the PBX. Select whether to display only items that have All, Named Only Named Only names assigned, or to display all items, including those that do not have names assigned.
- Page 182 Appendix Parameter Name Description Value Range Default Setting Enter the URL for the intranet Web page. 1–256 characters – Operating Instructions...
- Page 183 Appendix Presence For details, see "Presence Settings (Page 127)". Presence Button Setting Parameter Name Description Value Range Default Setting Button Name Enter a name for the button. 1–16 characters – Presence Specify whether to set the presence status. Yes/No Presence Mode Specify the type of the presence status setting.
- Page 184 Appendix Firmware Version For details, see "Firmware Version (Page 173)". Parameter Name Description Value Range Default Setting VoIP IPL Version Displays the VoIP IPL Version. – – VoIP Application Displays the VoIP APP Version. – – Version Application Loader Displays the Application Loader Version. –...
-
Page 185: Administrator Options
Administrator Options Network—IP Address These parameters are editable only during setup, after connecting the KX-NT400 to a PBX. On the Options screen, you can only view these parameters. For details about editing these parameters, see "IP Address Settings (Page 167)". - Page 186 0–7.0–7 (Primary Port) Maintenance For more details, see "Maintenance (Page 170)". Parameter Name Description Value Range Default Setting MAC Address Shows the KX-NT400’s VoIP MAC address. – – (VoIP) MAC Address Shows the KX-NT400’s Application MAC – – (Application) address.
- Page 187 Appendix Dial Modification For details about editing these parameters, see "Dial Modification Settings (Page 131)". Parameter Name Description Value Range Default Setting Access Code for Edit the code to make international calls. 0–8 characters International Call International area Edit the international area code (e.g., England 0–3 digits –...
- Page 188 Appendix International area code = other Remove No.1–8 – – No.9 +International area code No.10 Access Code for International Call: Other – Operating Instructions...
-
Page 189: Firmware Version Update
Firmware Version Update Firmware Version Update The firmware can be updated only in the setup procedure after connecting the KX-NT400 to a PBX. You can use a FTP server or an SD memory card to provide the new firmware data. -
Page 190: Sd Memory Cards
To remove the card, gently push the card in to release SD Memory Cards it, and then remove the card. The KX-NT400 allows you to back up and restore your personal contacts and other settings using a CSV file. See "Data Maintenance (Page 174)" for details. -
Page 191: Formatting Sd Memory Cards
AC adaptor while formatting an SD memory card. • Do not move or bump the KX-NT400 while formatting an SD memory card. Format the SD memory card before the first use. Formatting deletes all the data stored on the SD memory card. -
Page 192: Troubleshooting
If you are experiencing trouble, refer to the information in this section. Before troubleshooting, confirm all connections (see "Connections (Page 158)") and confirm that the PoE (Power over Ethernet) device or power outlet to which the KX-NT400 is connected to is receiving power. Common Issues and Solutions... - Page 193 INT' or a PDN button after going off-hook and follow the instructions. • The KX-NT400 does not The settings for the KX-NT400 have been changed via the PC work using the personal Maintenance Console or changes have been made to the Page 176 settings or with other PBX’s configuration.
-
Page 194: Making And Receiving Calls
→ Make sure that you have subscribed to your telephone company’s long distance service. • If the KX-NT400 is connected to a PBX, your extension may not be configured to make long distance phone calls. — → Contact your administrator. - Page 195 • Objects are obstructing the microphone. → Do not obstruct the KX-NT400 during calls. Keep your — hands, as well as common objects such as folders, cups, and coffee pots away from the KX-NT400 during calls.
- Page 196 Try speaking closer to the microphone. • The environment is not suited to speakerphone calls. → Do not use the KX-NT400 within 2 m of projectors, air conditioning devices, fans, or other audible or electrical noise emitting devices. — →...
-
Page 197: Contact List
Refer to the documentation for the camera or consult your administrator. The video feed does not • The camera’s Codec setting on the KX-NT400 is set to display. MPEG4, but the camera’s streaming format is set to a different format. - Page 198 Issue Possible Cause & Solution Reference I cannot initiate a chat. • The other user is not using a KX-NT400 or software programme that supports the chat feature, such as Communication Assistant. Page 35 → You can confirm whether the other user is using a KX-NT400 or Communication Assistant from the icon displayed on the Contacts screen.
- Page 199 Confirm the URL in the Portal settings, and then try connecting again. • You specified a domain name (e.g., "www.panasonic.com") in the URL. Because the KX-NT400 does not support DNS lookup, you can only access URLs by IP address. Page 126 →...
-
Page 200: Bluetooth Headsets
USB Devices Issue Possible Cause & Solution Reference The USB device I • The device is not supported by the KX-NT400. — connected does not work. → The KX-NT400 only supports USB keyboards. The USB keyboard I • The keyboard is not connected properly. -
Page 201: Error Messages
Appendix Error Messages During operation, error messages might appear on the KX-NT400. The following table lists these messages and possible causes and solutions. Message Possible Causes & Solutions Reference The password you • The password you entered is not correct. - Page 202 — Firmware file is invalid. • The SD Card format The SD memory card is not compatible with the KX-NT400. feature does not support → Use an SD memory card that is compatible with the SD Cards larger than 2G KX-NT400.
-
Page 203: Error Codes
0x2003 whether there is a problem with the LAN. If this error is displayed frequently, consult your network administrator. 0x2004 0x0000 KX-NT400 not registered Check the registration status of the KX-NT400. 0x2005 0x0000 Connection refused by the PBX 0x2006 0x**** IP address lease time from DHCP Consult your network administrator. - Page 204 Device error Consult your network administrator. 0x700F 0x**** Acquiring the initial data from the If this error is displayed frequently, PBX failed. KX-NT400 was initialised consult your network administrator. with values for European PBXs. 0x7010– 0x**** Software error If this error is displayed frequently, 0x7018 consult your network administrator.
- Page 205 Transmission error If this error is displayed frequently, consult your network administrator. 0x8007 0x**** 1) The KX-NT400’s extension is 1) Consult your network already in use by another user. administrator. 2) Connection refused by the PBX 2) If this error is displayed frequently, consult your network administrator.
-
Page 206: Index
Index Index Bluetooth Wireless Headset Removal Bottom view Broadcasting Built-in Simplified Voice Message 80, 94 Button Name Absent Message 93, 137 Feature clear Remote setting Cables, Connections AC adaptor Call (button) Connections Call Charge Reference (flexible button) Accented characters Call Forwarding (CF)—by ISDN Access Code for International Call 131, 187 Call Forwarding (FWD) - Page 207 Index Call List mode Codec Line Buttons mode COLR, Connected Line Identification Restriction Calls Screen Button (Active Call) Settings Completion of Calls to Busy Subscriber (CCBS) Calls tab Conference Camera Flexible button Centre point Unattended Changing the angle Conference call Contact integration by ISDN Control...
- Page 208 Index Primary Port Direct Inward System Access (DISA) Feature (button) Direct Station Selection (DSS) (flexible button) Feature clear Directory drop-down list 34, 37 Feature Key screen Directory List Select Feature number Directory List Select Settings 124, 175 and Presence status DISA message Feature Number DISA, Direct Inward System Access...
- Page 209 Index Handset/Headset Selection ® Headset Operation Hands-free LAN port Hands-free Answerback Language Hang up (button) 37, 41 Language Settings 124, 167, 180 Headset Sub-display Bluetooth Last Number Redial 69, 106 Connections Last Number Redial (outside line only) Flexible button LCD (Liquid Crystal Display) Volume adjustment LCD Brightness Headset jack...
- Page 210 Index MCID, Malicious Call Identification Feature clear Message (flexible button) Paging, Group Message for Another Extension Button (flexible Pan scan button) Button Message Lamp Pan/Tilt control (button) Message Waiting 90, 107 Park the call (Automatic) (button) Checking 80, 108 Park the call (Manual) (button) Feature clear Parking zone MIC (microphone)
- Page 211 Index PTAP Server Service-in IP Port 1 Service-out IP Port 2 Set call back (button) Put the call on hold (button) Shift key Side cover Single-CO (S-CO) (flexible button) Soft button (Feature Key screen) 169, 185 Soft keyboard Quick Dialling Chat screen Quick-access button (Camera screen) Contacts screen...
- Page 212 Index Timed Reminder message Voice Processing System (VPS) Toll Restriction/Call Barring Button (flexible button) VoIP Application Version Touch Screen Sound VoIP IP Address Transfer VoIP IPL Version to Voice Mail Volume TRANSFER button Handset/headset/speaker Transfer the Call (button) Ringer Dial window display setting 123, 180 Transfer to VM (button) Trunk Answer From Any Station (TAFAS)
- Page 213 Notes Operating Instructions...
- Page 214 1-62, 4-chome, Minoshima, Hakata-ku, Fukuoka 812-8531, Japan Copyright: This material is copyrighted by Panasonic System Networks Co., Ltd., and may be reproduced for internal use only. All other reproduction, in whole or in part, is prohibited without the written consent of Panasonic System Networks Co., Ltd.
Need help?
Do you have a question about the KX-NT400 and is the answer not in the manual?
Questions and answers