AT&T SB67040 User Manual
Hide thumbs
Also See for SB67040:
- User manual (105 pages) ,
- Quick start manual (18 pages) ,
- Administrator's manual (290 pages)
Table of Contents
Advertisement
Quick Links
Download this manual
See also:
Administrator's Manual
Synapse
User's Guide
™
© 2010-2011 Advanced American Telephones. All Rights Reserved. AT&T, the AT&T logo and the slogan "Your world. Delivered. " are trademarks of AT&T Intellectual
Property licensed to Advanced American Telephones, San Antonio, TX 78219. Synapse™ is a trademark of Advanced American Telephones. Issue 4.0 1/11
Advertisement
Table of Contents
Troubleshooting

Related Manuals for AT&T SB67040


Summary of Contents for AT&T SB67040
- Page 1 Synapse User’s Guide ™ © 2010-2011 Advanced American Telephones. All Rights Reserved. AT&T, the AT&T logo and the slogan “Your world. Delivered. ” are trademarks of AT&T Intellectual Property licensed to Advanced American Telephones, San Antonio, TX 78219. Synapse™ is a trademark of Advanced American Telephones. Issue 4.0 1/11...
-
Page 2: Table Of Contents
Synapse User’s Guide ONTENTS Preface..................................11 Topic Navigation ................................................12 Text Conventions ...............................................14 Deskset and Optional Cordless Handset Menu Navigation..........................15 Additional Documentation ............................................15 Overview .................................. 16 SB67030 Deskset...............................................20 Deskset Description..........................................20 Deskset Idle Screen..........................................21 Deskset Soft Keys.............................................22 Deskset Idle Screen Soft Keys....................................22 Deskset Status Indicators........................................23 Deskset Call Appearances ........................................24 Deskset Call Appearance Icons ....................................25... - Page 3 Synapse User’s Guide [Handset] SB67040 Cordless Handset (Optional) ..................................33 [Handset] Cordless Handset Description..................................34 [Handset] Cordless Handset Liquid Crystal Display (LCD) ..........................36 [Handset] Cordless Handset LCD Screen Types ..............................37 [Handset] Cordless Handset Soft Keys ..................................39 [Handset] Cordless Handset Screen Icons..................................39 [Handset] Using the Cordless Handset Speakerphone............................41 [Handset] Switching Between Deskset and Cordless Handset ........................42 [Handset] To switch a call from Deskset to Handset: ..........................42 [Handset] To switch a call from Handset to Deskset: ..........................42...
- Page 4 Synapse User’s Guide Settings..................................70 Deskset Menu ................................................71 Deskset Settings.................................................72 Display................................................73 Sounds ................................................74 Preferred Audio ............................................75 User Settings................................................76 Greetings ..............................................78 Recording a Greeting........................................79 Call Forward All and Call Forward–No Answer ................................80 Call Fwd All – Mailbox ........................................82 Call Fwd All – Extension ......................................83 Call Fwd All –...
- Page 5 Synapse User’s Guide [Handset] Setting the Cordless Handset to Factory Default .......................... 107 [Handset] Viewing the Product ID....................................108 Accessing Items in Lists ............................109 Accessing Voicemail.............................................. 110 Accessing the Directory ............................................112 Accessing the Call Log ............................................113 The Extension List ..............................................114 Accessing the Extension List ......................................
- Page 6 Synapse User’s Guide Storing Directory Entries from the Call Log or Redial List ..............................140 Deleting a Personal List Entry.......................................... 141 Directory Sort ................................................142 [Handset] Accessing the Directory with the Cordless Handset ............................. 143 [Handset] Accessing the Directory ..................................... 144 Voicemail ................................146 Voicemail Overview ...............................................
- Page 7 Synapse User’s Guide Voicemail Messages in Call Logs....................................184 Storing Call Log Entries............................................185 Deleting Call Log Entries ............................................ 186 [Handset] Accessing the Call Log with the Cordless Handset ............................188 [Handset] Using the Call Log ......................................189 [Handset] Managing Missed Calls....................................190 [Handset] Reviewing the Call Log....................................
- Page 8 Synapse User’s Guide [Handset] Answer a Call with the Cordless Handset ................................214 [Handset] Incoming Call Indication ..................................... 215 [Handset] Answer a Call ........................................216 [Handset] Multiple Incoming Calls....................................217 Call Management..............................218 Call Management..............................................219 Placing a Call on Hold ............................................220 Managing Held Calls ..........................................
- Page 9 Synapse User’s Guide [Handset] Using a Corded Headset ..................................... 242 Call Management Using Headsets ......................................... 243 Paging ..................................244 Paging ..................................................245 [ATA] Single-Zone Overhead Paging ......................................247 [ATA] Multi-Zone Overhead Paging ......................................248 [Handset] Paging ..............................................249 Deskset-Handset Interaction ..........................250 Answering a Call While Another Device is on a Call ................................
- Page 10 Synapse User’s Guide [ATA] Overhead Paging (OHP) Troubleshooting ..............................312 [ATA] Fax Configuration Troubleshooting ................................323 [ATA] Analog Phone Troubleshooting..................................326 [ATA] Group Mailbox Troubleshooting ..................................328 Appendixes ................................329 Appendix A: Soft Keys ............................................329 Deskset Soft Keys..........................................330 [Handset] Cordless Handset Soft Keys ..................................332 Appendix B: Technical Specifications ......................................
-
Page 11: Preface
Synapse User’s Guide REFACE This user’s guide provides instructions for using your Synapse telephone with firmware version 1.6.20, and its optional accessories. See page 99 for instructions on checking the firmware version on the Deskset. Although the Quick Start Guides also include information on using the devices, this guide has information on setting up the devices and more complete information on feature usage. -
Page 12: Topic Navigation
Synapse User’s Guide Topic Navigation This user’s guide allows easy navigation between topics and the ability to return to your original topic. Figure 1 illustrates the navigation conventions within the user’s guide. Back to Table of Contents Click on the page heading to move to the Table of Contents. - Page 13 Synapse User’s Guide Figure 2 illustrates the navigation features of Adobe® Reader. Adobe Reader Find (Ctrl +F) Enter words or phrases that you want to find in this document. Adobe Reader Search Select Edit –> Search... on the Menu bar to Adobe Reader open this tool which Navigation...
-
Page 14: Text Conventions
Synapse User’s Guide Text Conventions Table 1 lists text formats and their uses. Table 1. Description of Text Conventions Text Format Description Screen Identifies text that displays on the screen in a title, menu, or prompt. HARD KEY or DIAL-PAD KEY Identifies a hard key, including the dial-pad keys. -
Page 15: Deskset And Optional Cordless Handset Menu Navigation
Synapse User’s Guide Deskset and Optional Cordless Handset Menu Navigation To access items in the menus, you can either use the Navigation key to highlight the function and press SELECT or press a numeric key on the dial pad. The procedures in this guide use the numeric keypad entry as the preferred method for selecting a function. Additional Documentation Downloadable copies of all Synapse documents, including user’s and administrator’s guides, installation instructions and www.telephones.att.com/synapseguides... -
Page 16: Overview
Synapse User’s Guide H A P T E R VERVIEW The Synapse™ Business Phone System from AT&T is for businesses that need up to 100 extensions. This system is scalable from 1 to 39 outside lines, so as your business grows, your phone system can too. - Page 17 Synapse User’s Guide The Synapse system includes the following components. Each system must include at least one Gateway, and it can be either a PSTN or T1 Gateway. Each PSTN Gateway supports up to four analog telephone lines. Up to four PSTN Gateways can support up to 16 analog telephone lines.
- Page 18 Synapse User’s Guide 7. Web User Interface (WebUI) — The WebUI provides the ability to customize your system for your business from a PC that is on the same Local Area Network. The WebUI resides on the Gateways, ATA, and Desksets, and is updated with the device www.telephones.att.com/smb software updates, which are available online at Install these system components using the instructions in the Synapse...
- Page 19 Synapse User’s Guide The system shown in Figure 3 differs from conventional telephone systems in that calls are not coordinated by a central controller. Instead, the system uses a distributed control system over a new or existing Local Area Network (LAN). Figure 3.
-
Page 20: Sb67030 Deskset
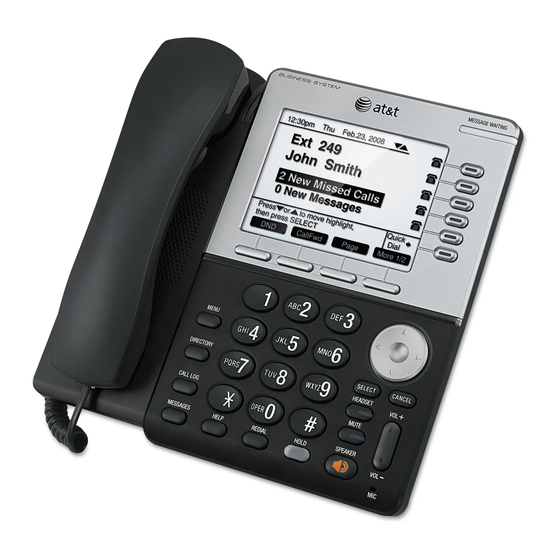
Synapse User’s Guide SB67030 Deskset You can use the Deskset alone, or with the optional accessories: SB67040 Cordless Handset and TL7600 Cordless Headset. Deskset Description Figure 4 identifies and describes the display and key functional areas for the Deskset. Liquid Crystal Display (LCD) Voicemail Indicator Provides controls and Illuminates when there are new... -
Page 21: Deskset Idle Screen
Synapse User’s Guide Deskset Idle Screen Figure 5 identifies the basic elements and describes the call functions displayed on the Idle screen. The Idle screen displays when the system is first turned on and when there is no call activity. The display is backlit when you are using it, but the backlight turns off 30 seconds after the most recent button press. -
Page 22: Deskset Soft Keys
Synapse User’s Guide Deskset Soft Keys The Deskset provides soft keys as illustrated in Figure 4 on page 20. The soft key labels change according to the current task. For example, if you are forwarding a call, the key labels displayed are different from those displayed if you are making a call. Some features have more than four soft key labels available. -
Page 23: Deskset Status Indicators
Synapse User’s Guide Deskset Status Indicators Status indicators appear in the upper right-hand corner of the Deskset display, as shown in Figures 7and 8. Figure 7. Example of Call Forward On Figure 8. Example of DND On Status messages include: Displays when Call Forward All is on. -
Page 24: Deskset Call Appearances
Synapse User’s Guide Deskset Call Appearances The five Call Appearance keys and icons, as shown in Figure 9, allow you to manage your calls. The Deskset presents call information next to the Call Appearance keys at the side of the display. When there is an incoming call, the Call Appearance Light-Emitting Diode (LED) on the key flashes. -
Page 25: Deskset Call Appearance Icons
Synapse User’s Guide Deskset Call Appearance Icons Call Appearance icons show call status. The Deskset displays five Call Appearance icons for the five keys, allowing you to handle up to five simultaneous calls. If a sixth call comes in to a Deskset, that call is forwarded to the destination defined by your system administrator. -
Page 26: Deskset Call Appearance Operation
Synapse User’s Guide Table 3. Deskset Call Appearance Icons (Continued) Icon Status Icon Status Conference On Hold Indicates a conference call. Flashes when the line is on hold. Cordless Handset Conference On Hold This icon indicates that the optional Cordless Flashes when a conference call is on hold. -
Page 27: Deskset Call Appearance Timer
Synapse User’s Guide Deskset Call Appearance Timer The Call Appearance Timer displays the duration of the current state of the call, such as how long the call has been held. Deskset Call Appearance LEDs The Call Appearance LED flash patterns indicate call status as described in Table 4. Table 4. -
Page 28: Deskset Hard Keys
Synapse User’s Guide Deskset Hard Keys The hard keys include the standard telephone numeric keys and a set of function keys defined in Figure 10. Numeric Keys SELECT Navigation Usually selects a highlighted option. Moves the cursor up/down/left/ right on the display. Highlighted phone numbers are dialed. -
Page 29: Deskset Dial-Pad Entry
Synapse User’s Guide Deskset Dial-Pad Entry Use the dialing keys to enter alphabetical characters into a text field. Digits 2, 3, 4, 5, 6, and 8 have three assigned letters, while digits 7 and 9 have four assigned letters, as shown in Figure 11. The keys function as follows: 1. -
Page 30: Deskset Confirmation Screens
Synapse User’s Guide Deskset Confirmation Screens Confirmation screens require that you confirm a choice by pressing , as Messages shown in Figure 13. Are you sure you want to delete all messages? Press to delete all messages. Press to cancel. Figure 13. -
Page 31: Using The Deskset Speakerphone
Synapse User’s Guide Using the Deskset Speakerphone When the speakerphone is active, the SPEAKER hard key is backlit. To use the speakerphone: To initiate a call, press SPEAKER. The key becomes backlit and you hear dial tone. Begin dialing. To end a call, press SPEAKER. The key backlight goes out. During an active call, if you are using the corded handset or any corded or Cordless Headset, pressing SPEAKER switches audio to the speakerphone. -
Page 32: Auto Attendant Information
Synapse User’s Guide Auto Attendant Information The Synapse telephone system features an Auto Attendant that answers incoming calls and automatically transfers them to a Synapse extension or extensions with no action by a person. The targets for these transfers may depend on the time of day. This Auto Attendant supports an interactive voice menu to guide callers to the desired extension. -
Page 33: [Handset] Sb67040 Cordless Handset (Optional)
Synapse User’s Guide [Handset] SB67040 Cordless Handset (Optional) This optional Cordless Handset, shown in Figure 16, supports most functions of the Deskset, including hands-free speakerphone, once it is registered to your Deskset. Use your AT&T SB67030 Deskset to register your Cordless Handset. See “To register the SB67040 Cordless Handset:”... -
Page 34: [Handset] Cordless Handset Description
Synapse User’s Guide [Handset] Cordless Handset Description Figure 17 and Figure 18 on page 35 illustrate and describe the Handset keys and the corded headset jack. Soft Keys Belt Clip Labels in the display change according to the current task. Attaches here. - Page 35 Synapse User’s Guide SELECT Selects an option out of a menu or Liquid Crystal Display (LCD) list. Provides instructions and status information. Navigate Left Scrolls or cycles through list entries. Performs backspace Navigate Up function. Use during message playback to jump back eight Scrolls through list entries.
-
Page 36: [Handset] Cordless Handset Liquid Crystal Display (Lcd)
Synapse User’s Guide [Handset] Cordless Handset Liquid Crystal Display (LCD) The Idle screen shown in Figure 19 displays when the Handset screen is on with no active or held calls. Time and Date. Status for Battery, Do Not 12:30p Feb 23 Disturb, or Call Forward, and Voicemail memory full. -
Page 37: [Handset] Cordless Handset Lcd Screen Types
Synapse User’s Guide [Handset] Cordless Handset LCD Screen Types The Handset provides several types of screens to assist you, as shown in Table 5. Table 5. Cordless Handset Screen Types The highlighted entry in 12:30p Feb 23 INCOMING the Incoming Call screen Mary William s Additional displays name and number... - Page 38 Synapse User’s Guide Table 5. Cordless Handset Screen Types (Continued) Interaction screens display lists Notification screens alert you 12:00a Dec 01 12:00a Dec 01 12:00a Dec 01 12:30p Feb 23 that an action has been of choices you can make. To SETTINGS completed, provide a status EXT 249...
-
Page 39: [Handset] Cordless Handset Soft Keys
Synapse User’s Guide [Handset] Cordless Handset Soft Keys The Handset provides soft keys as illustrated in Figure 19 on page 36. The Handset soft keys provide a variety of functions determined by the current action. If you are forwarding a call, for example, the soft keys displayed are different from those displayed if you are making a call. - Page 40 Synapse User’s Guide Table 6. Cordless Handset Screen Icons (Continued) Icon Function Description Speaker or page Appears when user switches to speakerphone or when paging. Headset in use Appears when a Headset is on a call. Voicemail message Appears in the Call Log to indicate that a caller has left a Voicemail message. Message playback navigation Present during message playback to indicate that there are additional messages before or after this one.
-
Page 41: [Handset] Using The Cordless Handset Speakerphone
Synapse User’s Guide [Handset] Using the Cordless Handset Speakerphone When the speakerphone is active, the SPEAKER hard key is lit. In Idle or Dial mode, this hard key behaves like PHONE, except that audio is from the speakerphone. To use the speakerphone: To initiate a call, press SPEAKER. -
Page 42: [Handset] Switching Between Deskset And Cordless Handset
Synapse User’s Guide [Handset] Switching Between Deskset and Cordless Handset When you are on a call at a Deskset and you need to move away from the Deskset, switch the 12:30p Feb 23 call to the Cordless Handset. EXT 201 [Handset] To switch a call from Deskset to Handset: Deskset in Use. -
Page 43: [Handset] Sb67030 Deskset/Sb67040 Cordless Handset Comparison
Synapse User’s Guide [Handset] SB67030 Deskset/SB67040 Cordless Handset Comparison The following Deskset features are limited on the Handset: Paging You can send pages only to all extensions (not to Paging Zones) from the Cordless Handset, but you cannot receive them. See “[Handset] Paging”... - Page 44 Synapse User’s Guide The following Deskset features are not available on the Handset: Record a Voicemail greeting Copy Call Log entries into your Personal Directory list Copy Redial numbers into your Personal Directory list Create, edit, or delete your Personal Directory list Program Quick-Dial entries Call screening Auto Answer...
-
Page 45: [Handset] Cordless Handset Battery Charging
Synapse User’s Guide [Handset] Cordless Handset Battery Charging Place the Handset in the charger when not in use. When fully charged, the Handset battery provides approximately five hours of talk time or three days of standby time. To charge the Handset battery: Place the Handset in the charger, as shown in 12:00a Jan. -
Page 46: [Handset] Cordless Handset Low Battery Notification
Synapse User’s Guide [Handset] Cordless Handset Low Battery Notification When the battery is low, the Handset emits an alert tone and displays the notification screen shown in Figure 24. To handle low battery notification: 1. Press to exit the notification screen. 12:30p Feb 23 2. -
Page 47: [Handset] Cordless Handset Link Loss Notification
Synapse User’s Guide [Handset] Cordless Handset Link Loss Notification If the Handset leaves the operating range of the Deskset, or if there is radio frequency (RF) interference, a Lost connection with Deskset notification screen displays, as shown in Figure 25, and the Handset searches for the Deskset. If the Deskset is not found within five seconds, the Searching for Deskset…... -
Page 48: [Handset] Searching A List Using The Cordless Handset Dial Pad
Synapse User’s Guide [Handset] Searching a List Using the Cordless Handset Dial Pad To search for a list entry: 1. Press DIR to display the Directory shown in Figure 26. 1/48 ABC Account... 9-503-555-0194 Press OPTIONS, then 4 to display the Extension list. Amy Lee Angela Martin 2. -
Page 49: [Handset] Dial-Pad Entry
Synapse User’s Guide [Handset] Dial-Pad Entry Use the dialing keys to enter alphabetical characters to search the Directory and Extension lists. See “[Handset] Accessing and Managing Items in Lists with the Cordless Handset” on page 123. Digits 2, 3, 4, 5, 6, and 8 have three assigned letters, while digits 7 and 9 have four assigned letters, as shown in Figure 27. -
Page 50: [Headset] Tl7600 Cordless Headset (Optional)
Synapse User’s Guide [Headset] TL7600 Cordless Headset (Optional) This optional Cordless Headset, shown in Figure 28, provides a 500-foot range and easy one-button answering once it is registered to your Deskset. Use your AT&T SB67030 Deskset to register your Cordless Headset. See “To register the TL7600 Cordless Headset:”... -
Page 51: [Headset] Cordless Headset Description
Synapse User’s Guide [Headset] Cordless Headset Description The registration process described in the manual that comes with the Cordless Headset is not appropriate for the SB67030 Deskset, which has a different process. The correct process is described in “To register the TL7600 Cordless Headset:”... -
Page 52: [Headset] Cordless Headset Operation
Synapse User’s Guide [Headset] Cordless Headset Operation Table 7. TL7600 Cordless Headset Operation Function Description Operation Ringtone silencing Press MUTE/ to temporarily silence the ringtone in the FLASH Headset earpiece. This silences the ringtone without disconnecting the call. The next incoming call rings normally at the preset volume. - Page 53 Synapse User’s Guide Table 7. TL7600 Cordless Headset Operation (Continued) Function Description Operation Alert tones Three short beeps. VOLUME +/– keys are pressed when the volume is already at its highest or lowest setting. The Headset is not registered and the Headset ON/OFF button was pressed.
-
Page 54: [Ata] Analog Terminal Adapter (Ata - Optional)
Synapse User’s Guide [ATA] Analog Terminal Adapter (ATA - Optional) The optional ATA, shown in Figure 30, allows the integration of the following non-Synapse devices. The ATA is set up and configured by your system administrator. Analog telephones, including conference phones Users can make and receive calls on these analog telephones, but some features, such as call... -
Page 55: Web Interface
Synapse User’s Guide H A P T E R NTERFACE Use an Internet browser to access the Web User Interface (WebUI) that resides on all the Synapse Gateways, the ATA, and Desksets. Use the WebUI to configure certain system features. To save WebUI changes, click If you type an invalid value into one of the fields on the web page, clicking does not save the page. -
Page 56: Accessing The Web User Interface (Webui)
Synapse User’s Guide Accessing the Web User Interface (WebUI) To access the WebUI: 1. Press MENU on the Deskset. Deskset Information Model No: SB67030 2. Press 4 to display Deskset Information. Status: Synchronized IP Address: 192.168.1.3 3. Find your IP Address, as highlighted in Figure 31. MAC Address: 00:11:A0:00:12:8D Serial No: CBJ003235 4. - Page 57 Synapse User’s Guide To access the WebUI: (Continued) 7. Log in as a user by typing your extension number, and unless you have created a password, leave the password blank. 8. Click You can create or change your user password once you are logged in. The system displays the Basic Settings screen shown in Figure 34 on page Changing a setting does not instantly apply the new value.
-
Page 58: Basic Settings
Synapse User’s Guide Basic Settings To modify the Basic Settings: 1. Log into the WebUI. See “Accessing the Web User Interface (WebUI)” on page 2. Click Extension Settings or Basic Settings in the Navigation Menu at the left side of the screen to display the screen shown in Figure 34 with your Extension Name shown. - Page 59 Synapse User’s Guide To modify the Basic Settings: (Continued) Extension: Enter an extension or select an extension number from the drop-down list. Outside Phone Number: Enter an outside telephone number. For example, enter your cell phone number as the Outside Phone Number to have all calls forwarded to your cell phone.
-
Page 60: Extension Directory
Synapse User’s Guide Extension Directory Your administrator can create a System Directory of names and phone numbers (referred to as System list on the Deskset) to allow easy dialing. You can create a personal Extension Directory (referred to as Personal list on the Deskset) that is only available from your extension. - Page 61 Synapse User’s Guide To add an entry to the Extension Directory: (Continued) to save. The Extension Directory screen 5. Click appears with the entries added, as shown in Figure 38. Figure 38. Extension Directory Web Interface...
- Page 62 Synapse User’s Guide To edit Extension Directory entries: 1. Log into the WebUI. See “Accessing the Web User Interface (WebUI)” on page 2. Click Extension Directory in the Navigation Menu at the left side of the screen to display the screen shown in Figure 39.
- Page 63 Synapse User’s Guide To sort and delete Extension Directory entries: Click Extension Directory in the Navigation Menu at the left side of the screen to display the screen shown in Figure 41. To sort entries by last name, click . The button then changes to .
-
Page 64: Quick-Dial Keys
Synapse User’s Guide Quick-Dial Keys To add or edit Quick-Dial entries: 1. Log into the WebUI. See “Accessing the Web User Interface (WebUI)” on page 2. Click Quick Dial Keys in the Navigation Menu at the left side of the screen to display the screen shown in Figure 42. -
Page 65: Voicemail Distribution
Synapse User’s Guide Voicemail Distribution If you enable the feature, you can leave new messages or forward existing messages to groups that you create in the WebUI. This feature is disabled by default. If you enable this feature, there will be an additional step every time you play Voicemail by pressing MESSAGES. - Page 66 Synapse User’s Guide To view the Voicemail Distribution Lists: 1. Log into the WebUI. See “Accessing the Web User Interface (WebUI)” on page 2. Click Voicemail Distribution in the Navigation Menu at the left side of the screen to display the screen shown in Figure 46.
- Page 67 Synapse User’s Guide To create a Voicemail Distribution List: 1. Log into the WebUI. See “Accessing the Web User Interface (WebUI)” on page 2. Click Voicemail Distribution in the Navigation Menu at the left side of the screen to display the screen shown in Figure 46 on page 3.
- Page 68 Synapse User’s Guide To edit or delete a Voicemail Distribution List: 1. Log into the WebUI. See “Accessing the Web User Interface (WebUI)” on page 2. Click Voicemail Distribution in the Navigation Menu at the left side of the screen to display the screen shown in Figure 46 on page 3.
-
Page 69: Help
Synapse User’s Guide Help To access WebUI Help: 1. Log into the WebUI. See “Accessing the Web User Interface (WebUI)” on page 2. Click Help in the Navigation Menu at the left side of the screen to display the screen shown in Figure 49. 3. -
Page 70: Settings
Synapse User’s Guide H A P T E R ETTINGS You or your system administrator can customize your SB67030 Deskset and SB67040 optional Cordless Handset using the following menus and features: “Deskset Menu” on page 71 “Deskset Settings” on page 72 “User Settings”... -
Page 71: Deskset Menu
Synapse User’s Guide Deskset Menu You can use the Deskset to set up many Deskset features, based on a menu structure presented on the Deskset display. Access the Menu by pressing MENU, and then select options by scrolling down to an option and pressing SELECT, or by pressing the dial-pad key with that option number. -
Page 72: Deskset Settings
Synapse User’s Guide Deskset Settings Use the Deskset Settings menu to access the three functions and the related submenus listed in Table 8 To display the Deskset Settings menu: 1. Press MENU to display the Menu screen shown in Figure 51 on page 2. -
Page 73: Display
Synapse User’s Guide Display Use the Display menu to adjust your Deskset LCD contrast and backlight. To access the Display menu: Press MENU, then 1, and then 1 to access the Display menu shown in Figure 54. Display Press 1 to set the desired Contrast level. 1. -
Page 74: Sounds
Synapse User’s Guide Sounds Use the Sounds menu to set the ring volume, delay the beginning of audible ringing, pick one of nine ringtones, or turn key beeps on and off. To access the Sounds menu: Press MENU, then 1, and then 2 to access the Sounds menu shown in Figure 55. Sounds Press 1 on the dial pad to choose Ring Volume. -
Page 75: Preferred Audio
Synapse User’s Guide Preferred Audio , the call is answered in the Preferred Audio mode. You can set the audio When you press a Call Appearance key or preferences to Headset or Speakerphone by using the Preferred Audio menu. Lifting the corded handset takes first priority in all instances. -
Page 76: User Settings
Synapse User’s Guide User Settings Use the User Settings menu to modify the settings shown in Figure 57 and listed in Table 9. – Table 9. Deskset Menu User Settings Example Screen Function Submenu 1. Current Greeting (Pre-Set/Primary/ “Greetings” on page 78 User Settings Alternate) 2. - Page 77 Synapse User’s Guide To display the User Settings menu: Press MENU and then 2 to display the User Settings menu shown in Figure 58. User Settings If you have set a user password, the User Password screen shown in Figure 59 1.
-
Page 78: Greetings
Synapse User’s Guide Greetings You can have three different greetings for your Voicemail. You can then choose the one that is currently appropriate. You can record a Primary Greeting to use most of the time and an Alternate Greeting for when you are out of the office. The Pre-Set Greeting, “Please leave a message after the tone,”... -
Page 79: Recording A Greeting
Synapse User’s Guide Recording a Greeting You can record a greeting up to 60 seconds long. The procedure for recording a Primary or Alternate Greeting is the same. To record either a Primary or Alternate greeting: 1. Press MENU, then 2, and then 1 to display the Message Greetings menu. Play/Rec Greeting 2. -
Page 80: Call Forward All And Call Forward-No Answer
Synapse User’s Guide Call Forward All and Call Forward–No Answer Call Forward All and Call Forward–No Answer redirect incoming calls. Once a call is forwarded, it cannot be answered by the original extension. Call Forward All is a user setting to redirect calls. Calls are immediately redirected to the assigned phone number, extension, or Voicemail. - Page 81 Synapse User’s Guide To determine the Call Forward settings: 1. Press MENU, then 2, and then 2 to display the Call Forward All menu shown in Call Forward All Figure 64. Mailbox Call Fwd All Target 2. Press the Navigation key to select one of the following destinations: Personal to Mailbox: , as described in...
-
Page 82: Call Fwd All - Mailbox
Synapse User’s Guide Call Fwd All – Mailbox Forwarding all calls to your Personal Mailbox is the default option. To set Call Forward All target to a Mailbox: 1. Press MENU, then 2, and then 2 to display the Call Forward All menu shown in Call Forward All Figure 65. -
Page 83: Call Fwd All - Extension
Synapse User’s Guide Call Fwd All – Extension To set Call Forward All target to a desired extension: 1. Press MENU, then 2, and then 2 to display the Call Forward All menu. Call Forward All 2. Press the Navigation key to change the setting to , as shown in Call Fwd All Target [Ext]... -
Page 84: Call Fwd All - Outside Phone Number
Synapse User’s Guide Call Fwd All – Outside Phone Number To set Call Forward All target to an outside phone number: 1. Press MENU, then 2, and then 2 to display the Call Forward All menu. Call Forward All 2. Press the Navigation key to change the setting to , as shown in Call Fwd All Target... -
Page 85: Automatic Answering
Synapse User’s Guide Automatic Answering You can set the Deskset to automatically answer calls after a delay that you specify. Without touching the Deskset, you can speak to and be heard by people who call you. For example, employees in warehouses or shops may use this feature for quick conversations without having to interrupt what they are doing. -
Page 86: Voicemail Memory
Synapse User’s Guide Voicemail Memory Your Voicemail messages are stored on your Deskset. You can check the amount of available memory. To access the Voicemail Memory screen: 1. Press MENU, then 2, and then 4 to display the Voicemail Memory status screen Voicemail Memory shown in Figure 71. -
Page 87: Name Recording
Synapse User’s Guide Name Recording To record and play a personal name: If callers access the Company Directory when the Auto Attendant is on, they hear this Name Recording recording upon entering your name. 1. Play/Rec Personal Name 1. Press MENU, then 2, and then 5 to display the Name Recording menu shown in 2. - Page 88 Synapse User’s Guide To record and play a personal name: (Continued) 3. Press to record a personal name. The screen shown in Figure 74 appears Play/Rec Name and the key changes to Personal Name Recording You are limited to a 10-second recording; recording stops automatically if the RECORDING limit is exceeded.
- Page 89 Synapse User’s Guide To delete a personal name: 1. Press MENU, then 2, and then 5 to display the Name Recording menu shown in Name Recording Figure 76. 1. Play/Rec Personal Name 2. Press 2 to delete the personal name. A Confirmation screen displays, as shown in 2.
-
Page 90: [Handset] Registering An Optional Cordless Handset
Synapse User’s Guide [Handset] Registering an Optional Cordless Handset You can register only one AT&T SB67040 Cordless Handset and only one AT&T TL7600 Cordless Headset to a Deskset, and up to five Desksets can have cordless accessories. When a Deskset has cordless accessories, they are all part of the same extension, and only one device can be used at a time. - Page 91 Synapse User’s Guide To register the SB67040 Cordless Handset: (Continued) on the Deskset. Registration in Progress... appears while the 4. Press Deskset searches for the Handset. Once found, the Registration in progress... screen appears on the Cordless Handset, as shown in Figure 81. Registration in When registration is complete, Cordless Handset is currently Registered progress...
-
Page 92: [Headset] Registering An Optional Cordless Headset
Synapse User’s Guide [Headset] Registering an Optional Cordless Headset You can register only one AT&T SB67040 Cordless Handset and only one AT&T TL7600 Cordless Headset to a Deskset, and up to five Desksets can have cordless accessories. When a Deskset has cordless accessories, they are all part of the same extension, and only one device can be used at a time. -
Page 93: [Handset, Headset] Deregistering A Cordless Accessory
Synapse User’s Guide [Handset, Headset] Deregistering a Cordless Accessory You must deregister cordless accessories before you can register them to different Desksets. If you remove a Deskset from the system, first deregister any cordless accessories. To deregister a cordless accessory: 1. -
Page 94: [Handset] Cordless Handset Deregistration From The Cordless Handset
Synapse User’s Guide [Handset] Cordless Handset Deregistration from the Cordless Handset Cordless Handsets can also be deregistered from the Handset. This method can be used when the Deskset is unavailable for standard deregistration. To deregister the Handset when the Deskset is not available: 1. -
Page 95: [Handset, Headset] Cordless Accessory Registration And Deregistration Issues
Synapse User’s Guide [Handset, Headset] Cordless Accessory Registration and Deregistration Issues If the Cordless device is registered to another Deskset or telephone, it must be deregistered first. See “[Handset, Headset] Deregistering a Cordless Accessory” on page [Handset, Headset] If a Password is Being Used 97), the User If you have set a user password (see “Change User Password”... -
Page 96: Password
Synapse User’s Guide Password The User Settings menu contains seven entries. To view the Password entry, press the Navigation key. These settings can also be controlled at the WebUI. To access the Password function: If you create a password, you will need to enter it before accessing User Settings, Password Voicemail, and the WebUI. -
Page 97: Change User Password
Synapse User’s Guide Change User Password To change your password: 1. Press MENU, then 2, then 7, and then 1 to access the Set/Change Password Set/Change Password screen shown in Figure 92. Enter Passw ord: 2. Use the dial pad to enter a password. Confirm Passw ord: Passwords can be up to six digits. -
Page 98: Admin Settings
Synapse User’s Guide Admin Settings To display the Admin Settings menu: Menu The Admin Settings, shown in Figure 94, are determined by your system 1. Deskset Settings administrator. Only people with access to the system administrator’s password can change them. 2. -
Page 99: Deskset Information
Synapse User’s Guide Deskset Information Most of the deskset information is only used by your system administrator or the Installer. However, you need the Deskset’s IP Address to use the WebUI. To display Deskset Information: 1. Press MENU and then 4 to display the Deskset Information screen shown in Deskset Information Figure 95. -
Page 100: Using Do Not Disturb (Dnd)
Synapse User’s Guide Using Do Not Disturb (DND) Do Not Disturb silences incoming ringing and paging. Incoming calls can still be answered as long as the Call Appearance LED is flashing. To enable or disable Do Not Disturb: 1. From the Idle screen shown in Figure 97, 12:30PM Thu Feb 25 2010 12:30PM Thu Feb 25 2010 DND ON... -
Page 101: Operator Auto-Attendant Settings
Synapse User’s Guide Operator Auto-Attendant Settings If your Deskset is the operator extension, you can set the status of the Auto Attendant. To display the Auto-Attendant Settings menu: 1. Press MENU to display the Menu with a fifth choice, as shown in Figure 100. Menu 2. -
Page 102: [Handset] Cordless Handset Settings
Synapse User’s Guide [Handset] Cordless Handset Settings Once the optional Cordless Handset has been registered to the Deskset, you can set up the Cordless Handset: “[Handset] Setting Contrast” on page 103 “[Handset] Setting the Sounds” on page 104 “[Handset] Setting the Cordless Handset to Factory Default” on page 107 “[Handset] Viewing the Product ID”... -
Page 103: [Handset] Setting Contrast
Synapse User’s Guide [Handset] Setting Contrast To adjust the display contrast: 1. Press OPTIONS, then 5 to display the Settings menu shown in Figure 102. 12:30p Feb 23 SETTINGS 2. Press 1 to display the Contrast screen shown in Figure 103. EXT 249 1. -
Page 104: [Handset] Setting The Sounds
Synapse User’s Guide [Handset] Setting the Sounds To adjust the sound: 1. Press OPTIONS, then 5 to display the Settings menu shown in Figure 104. 12:30p Feb 23 SETTINGS 2. Press 2 to display the Sounds menu shown in Figure 105. EXT 249 1. -
Page 105: [Handset] Using The Volume Key To Set The Ringer And Voice Volume
Synapse User’s Guide [Handset] Using the VOLUME key to set the Ringer and Voice Volume The Handset also provides a volume control on the right side of the handset. You can increase or decrease the ringer volume only when not on an active call. You can increase or decrease the incoming voice volume during an active call or during message playback. - Page 106 Synapse User’s Guide To adjust the incoming voice volume: During an active call or during message playback: 12:30p Feb 23 Ringer Press VOLUME to increase the incoming voice volume. EXT 249 John Smith 2 Missed Calls Press VOLUME to decrease the incoming voice volume. 5 New MSGs A screen similar to the one shown in Figure 108 displays.
-
Page 107: [Handset] Setting The Cordless Handset To Factory Default
Synapse User’s Guide [Handset] Setting the Cordless Handset to Factory Default To reset the Handset to default settings (factory defaults): 1. Press OPTIONS, then 5 to display the Settings menu shown RESTORE DEFAULT 12:30p Feb 23 in Figure 109. SETTINGS EXT 249 1. -
Page 108: [Handset] Viewing The Product Id
Synapse User’s Guide [Handset] Viewing the Product ID To view the Product ID: 1. Press OPTIONS, then 5 to display the Settings menu shown in Figure 109. PRODUCT ID 2. Press 5 to display the Product ID screen shown in Figure 111. ID #: 013DB18C9C Model #: 67040 This page displays the Handset’s identification information, including serial number, model... -
Page 109: Accessing Items In Lists
Synapse User’s Guide H A P T E R CCESSING TEMS IN ISTS The SB67030 Deskset has lists of phone numbers that are used for making calls and for call management. Some of the lists, like Voicemail, have other features associated with them that are explained elsewhere in this guide. -
Page 110: Accessing Voicemail
Synapse User’s Guide Accessing Voicemail To access an entry from Voicemail: 1. From the Idle screen, press MESSAGES. Messages Graham Bell 10:17a If necessary, use the dial pad to enter your user password and press SELECT. 232-555-0176 Feb 25 Once you have entered your password, you do not have to enter it again while Private 8:05a Mary Williams... - Page 111 Synapse User’s Guide To access an entry from Voicemail: (Continued) [ATA] If your Synapse telephone system features an optional ATA device and your system administrator has assigned a Group Mailbox to you, a list of your Personal Messages Mailbox and the Mailbox List appears, as shown in Figure 114. [1 New , 6 Old] Personal If necessary, press the Navigation key to highlight the desired...
-
Page 112: Accessing The Directory
Synapse User’s Guide Accessing the Directory By default, the Directory screen displays the combination of all three Directory lists. See “Directory” on page 134 for a description of the three lists. You can choose to view only one of the lists. See “Viewing Directory Entries”... -
Page 113: Accessing The Call Log
Synapse User’s Guide Accessing the Call Log To access the Call Log list: 1. From the Idle screen, press CALL LOG to display the screen shown in Figure 116. Call Log You can view the Call Log details screen shown in Figure 117. Graham Bell 9:55a 232-555-0176... -
Page 114: The Extension List
Synapse User’s Guide The Extension List You can access the Extension list illustrated in Figure 118 from Idle, Live Dialing, Transfer, and Conference Setup modes. Highlighted extension number Extensions 1/16 First and last name (if available). position/total number of Amy Lee extensions Douglas Lew is Edgar Williams... -
Page 115: Accessing The Extension List
Synapse User’s Guide Accessing the Extension List To access an extension: 1. From the Idle screen, press and then press Extensions 1/16 Amy Lee Douglas Lew is Edgar Williams When dialing live (off hook), press Gary Keys John Smith The Extension list displays, as shown in Figure 119. Karl Anders Nick Gibson 2. -
Page 116: Accessing The Quick-Dial List
Synapse User’s Guide Accessing the Quick-Dial List The Quick-Dial list shown in Figure 121 provides up to six entries for frequently called numbers and is available in all modes. To access and dial Quick-Dial entries: 1. Press the button to the right of , as shown in Figure 120. -
Page 117: Editing Quick Dial
Synapse User’s Guide Editing Quick Dial After you access a Quick-Dial entry, you can add and edit Quick-Dial entries using the Deskset and from the WebUI. See “Quick- Dial Keys” on page To edit Quick Dial from the Deskset: 1. Press the key to the right of to display the Quick-Dial list shown in 12:30PM Thu Feb 25 2010 Figure 122. -
Page 118: The Redial List
Synapse User’s Guide The Redial List The last 20 phone numbers that you dialed are recorded in the Redial list, as shown in Figure 125. Current Redial entry number and the total Redial 1/12 number of stored Name and number Mary William s 8:55a entries... -
Page 119: Accessing The Redial List
Synapse User’s Guide Accessing the Redial List To access a Redial entry: 1. Press REDIAL to display the Redial List, as shown in Figure 126. Redial 1/12 Press the Navigation key until you highlight the desired entry. Mary William s 8:55a 9-1-888-722-7702 May 23... -
Page 120: Storing Redial Entries
Synapse User’s Guide Storing Redial Entries To store a Redial entry into your Personal list: 1. Press REDIAL to access the Redial list, as shown in Figure 128. Redial 1/12 2. Press the Navigation key until you highlight the desired entry. Mary William s 8:55a 9-1-888-722-7702... -
Page 121: Deleting Redial Entries
Synapse User’s Guide Deleting Redial Entries You can delete a single Redial entry from the Redial list or all Redial entries. Ensure the entry you wish to delete is highlighted. To delete a single entry: 1. Press REDIAL to access the Redial list, as shown in Figure 130. Redial 1/12 Mary William s... -
Page 122: Searching The Directory Or Extension Lists Using The Dial Pad
Synapse User’s Guide Searching the Directory or Extension Lists Using the Dial Pad Use the dial pad to get to the first entry that starts with any letter. To search for a list entry on the Deskset: 1. Select a list to search, such as the Directory shown in Figure 133. Directory 1/48 2. -
Page 123: [Handset] Accessing And Managing Items In Lists With The Cordless Handset
Synapse User’s Guide [Handset] Accessing and Managing Items in Lists with the Cordless Handset You can also access the phone number lists with the optional SB67040 Cordless Handset. All instructions start from the Idle screen. The Cordless Handset provides access to the following lists: Voicemail List —... -
Page 124: [Handset] Accessing The Voicemail List
Synapse User’s Guide [Handset] Accessing the Voicemail List To access a phone number from Voicemail: 1. From the Idle screen, press ENTER PASSWORD If necessary, use the dial pad to enter your user password (if you have created one). Press Enter passw ord: SELECT, as shown in Figure 135. -
Page 125: [Handset] Accessing The Directory
Synapse User’s Guide [Handset] Accessing the Directory To access a Directory entry: 1. Press DIR as shown in Figure 137. The Directory screen displays, as shown in Figure 138. 2. Press the Navigation key to scroll to the desired entry. Press a dial-pad key, as shown in “Deskset Dial-Pad Entry”... - Page 126 Synapse User’s Guide To select the Directory list you see: Your Handset displays All lists (the combination of your Personal list, the System list, and the 1/48 Extension list) when you press DIR. However, you can temporarily view and select from a ABC Account...
-
Page 127: [Handset] Accessing The Call Log
Synapse User’s Guide [Handset] Accessing the Call Log To access the Call Log list: 1. From the Idle screen, press to display the screen shown in Figure 141. CALL LOG Graham Bell 232-555-0176 To access the Call Log when the phone is not idle, press OPTIONS and then scroll down Feb 23 9:55a to Call Log and press SELECT. -
Page 128: [Handset] Cordless Handset Extension List
Synapse User’s Guide [Handset] Cordless Handset Extension List You can access the Extension list illustrated in Figure 142 from Idle, Live Dialing, Transfer, and Conference Setup modes. Highlighted Extension number EXTENSION 1/16 position/quantity of extensions. Amy Lee (100/100 maximum). First and Last Name (if available) and Extension number. -
Page 129: [Handset] Accessing An Extension
Synapse User’s Guide [Handset] Accessing an Extension The following steps display the Extensions list screen shown in Figure 143. To access an extension: 1. From the Idle screen, press OPTIONS and then press 4. EXTENSION 1/16 You can also access the EXTENSION screen from the following: Amy Lee Transfer —... -
Page 130: [Handset] Accessing The Quick-Dial List
Synapse User’s Guide [Handset] Accessing the Quick-Dial List The Quick-Dial list shown in Figure 121 provides up to six entries for frequently called numbers and is available in all modes. The Quick-Dial entries are not associated with the Directory. To access and dial Quick-Dial entries: /QUICK as shown in Figure 144 for at least two seconds. -
Page 131: [Handset] Accessing The Redial List
Synapse User’s Guide [Handset] Accessing the Redial List The last 20 phone numbers that you dialed are recorded in the Redial list. To access and dial a Redial entry: 1. From the Idle screen, press OPTIONS. The menu displays, as shown in Figure 146. 12:30p Feb 23 OPTIONS EXT 249... - Page 132 Synapse User’s Guide To delete entries from the Redial list: 1. From the Idle screen, press OPTIONS. The menu shown in Figure 148 displays. 12:30p Feb 23 OPTIONS EXT 249 Similar menus display when you press OPTIONS during an active or held call. 1.
-
Page 133: [Handset] Searching The Directory Or Extension Lists Using The Dial Pad
Synapse User’s Guide [Handset] Searching the Directory or Extension Lists Using the Dial Pad Use the dial pad to get to the first entry that starts with any letter. To search for a list entry on the optional Cordless Handset: 1. -
Page 134: Directory
Synapse User’s Guide H A P T E R IRECTORY The Synapse system provides three Directory lists. The system defaults to displaying entries from all three lists when you press DIRECTORY (or you press DIR on the optional SB67040 Cordless Handset). See “To view the Directory:”... -
Page 135: Using The Directory
Synapse User’s Guide Using the Directory Access the Directory by pressing DIRECTORY to display the screen shown in Figure 153. The Directory holds up to 250 entries. The Deskset defaults to showing the contents of all three lists — Personal, System, and Extension — but you can limit the display to one list. -
Page 136: Viewing Directory Entries
Synapse User’s Guide Viewing Directory Entries You can view all Directory entries in one list, or you can view just the Personal list, System list, or Extension list. Within a list, you can press a dial-pad key to see the first name that starts with the first letter on that key. If there is no match, the set displays the next entry in the alphabetical list. - Page 137 Synapse User’s Guide To view the Directory: (Continued) to display the third set of Directory soft keys, as shown in 6. Press Directory 1/48 Figure 157. ABC Accountants Personal 9-503-555-0194 7. Press to see names and numbers that are too long to be displayed on the Amy Lee Directory screen.
-
Page 138: Creating A New Personal List Entry
Synapse User’s Guide Creating a New Personal List Entry You can add up to 50 personal entries to the Directory. These personal entries are only visible at your extension. To create a new Personal list entry: 1. Press DIRECTORY to display the Directory, as shown in Figure 159. Directory 1/48 to display the Personal Entry screen with the cursor positioned in... -
Page 139: Editing A Personal List Entry
Synapse User’s Guide Editing a Personal List Entry You can edit any Personal list entry while viewing the Directory. To edit a Personal list entry: 1. Press DIRECTORY to display the Directory, as shown in Figure 161. Directory 1/48 Navigation key to highlight a Personal entry. 2. -
Page 140: Storing Directory Entries From The Call Log Or Redial List
Synapse User’s Guide Storing Directory Entries from the Call Log or Redial List To store a Call Log or Redial entry into your Personal list: 1. Press CALL LOG or REDIAL to access either list. The Redial list is shown in Redial 1/12 Figure 163. -
Page 141: Deleting A Personal List Entry
Synapse User’s Guide Deleting a Personal List Entry You can delete any one of your personal list entries while viewing the Directory. To delete a Personal list entry: 1. Press DIRECTORY to display the Directory, as shown in Figure 165. Directory 1/48 2. -
Page 142: Directory Sort
Synapse User’s Guide Directory Sort The Directory entries are sorted by first or last names. When you use the dial pad to search, the system searches for the names in the sort order. To sort Directory entries: Press DIRECTORY to display the Directory, as shown in Figure 168. Directory 1/48 ABC Accountants... -
Page 143: [Handset] Accessing The Directory With The Cordless Handset
Synapse User’s Guide [Handset] Accessing the Directory with the Cordless Handset You can also access the Directory with the optional SB67040 Cordless Handset. All instructions start from the Idle screen. “To access a Directory entry:” on page 144 “To select the Directory list you see:” on page 145. -
Page 144: [Handset] Accessing The Directory
Synapse User’s Guide [Handset] Accessing the Directory To access a Directory entry: 1. Press DIR as shown in Figure 170. The Directory screen displays, as shown in Figure 171. 2. Press the Navigation key to scroll to the desired entry. Press a dial-pad key, as shown in “[Handset] Dial-Pad Entry”... - Page 145 Synapse User’s Guide To select the Directory list you see: Your Handset displays All lists (the combination of your Personal list, the System list, and the 1/48 Extension list) when you press DIR. However, you can temporarily view and select from a ABC Account...
-
Page 146: Voicemail
Synapse User’s Guide H A P T E R OICEMAIL Your Synapse system records and saves incoming Voicemail messages. You can play, delete, or forward those messages to one or many other extensions. The MESSAGE WAITING LED, 147, lights up when there is at least one new message and # shown in Figure 174 on page New Messages displays on the Idle screen. -
Page 147: Voicemail Overview
Synapse User’s Guide Voicemail Overview When there is at least one new message, the MESSAGE WAITING LED lights up, as shown in Figure 174 and # New MESSAGE Messages displays on the Idle screen, as shown in WAITING LED Figure 175. You can access just your new messages by selecting # New Messages on the Idle screen. -
Page 148: [Ata] Group Mailbox Overview
Synapse User’s Guide [ATA] Group Mailbox Overview If your system has an optional ATA and your system administrator gave you access to a Group Mailbox, the # New Messages count includes your new private messages and any new messages in any Group Mailboxes to which you are assigned. If you select # New Messages, or press Messages 12:30PM Thu Feb 25 2010... - Page 149 Synapse User’s Guide If someone else is listening to a message when you delete it, the message is not deleted until the listener exits the Voicemail session. If you receive an incoming call while playing Group Mailbox Voicemail, the incoming call appears on the Deskset screen accompanied by a call-waiting tone.
-
Page 150: Voicemail Messages
Synapse User’s Guide Voicemail Messages When messages display, they appear in a list similar to the list shown in Figure 179. Pressing the Navigation key cycles through the messages in the list. Pressing the Navigation key cycles through options for dialing. Name and number displayed. -
Page 151: Accessing Your Messages
Synapse User’s Guide Accessing Your Messages Access to your messages is different depending on whether or not you have access to any Group Mailboxes, and whether you have enabled Voicemail distribution. If you do not have access to a Group Mailbox, and you have not enabled Voicemail distribution, you can access just your new messages by selecting # New Messages on the Idle screen. -
Page 152: Message Playback
Synapse User’s Guide Message Playback You can play either a single message or all of the Voicemail messages in a Mailbox. To play a single New Message: 1. Open a New Messages list, as shown in Figure 182. New Messages “Voicemail Messages”... - Page 153 Synapse User’s Guide To play all New Messages: 1. Open a New Messages list, as shown in Figure 182 on page 152. New Messages 2. Press to display the screen shown in Figure 184. Graham Bell 10:17a 232-555-0176 Feb 23 3.
- Page 154 Synapse User’s Guide To play old and new Messages: 1. Press MESSAGES to view the entire Messages list, as shown in Figure 186 and Messages as described in “Accessing Your Messages” on page 151. The list is sorted with Graham Bell 10:17a the newest messages at the top of the list.
-
Page 155: Forwarding A Message
Synapse User’s Guide Forwarding a Message Anyone can forward a message to an extension or extensions. If you have enabled Voicemail Distribution, you can forward a message to a Voicemail Distribution List; You can also record a message and forward it to a Distribution List. If there is at least one Group Mailbox, you can forward a message to a Group Mailbox. -
Page 156: Forwarding A Message To An Extension
Synapse User’s Guide Forwarding a Message to an Extension You can forward a message to one or more extensions. To forward a Voicemail message to an extension: 1. Open a Messages list, such as the one shown in Figure 189 and accessed as Messages described in “Accessing Your Messages”... - Page 157 Synapse User’s Guide To forward a Voicemail message to an extension: (Continued) Highlight the desired extensions using the Navigation key and press Extensions 1/16 SELECT. The Forward Message screen displays, as shown in Figure 192. Amy Lee Douglas Lew is You have the following options: Edgar Williams Gary Keys...
-
Page 158: Forwarding A Message To A Distribution List
Synapse User’s Guide Forwarding a Message to a Distribution List If you have created at least one Distribution List, and enabled Voicemail Distribution, you can forward a message to a list of recipients. See “Voicemail Distribution” on page To forward an existing Voicemail message to a Distribution List: 1. - Page 159 Synapse User’s Guide To forward an existing Voicemail message to a Distribution List: (Continued) 6. Press to display the Distribution Lists, as shown in Figure 197. Forward Message If you have neither created Distribution Lists nor enabled Voicemail Enter a target extension: Distribution, does not appear.
-
Page 160: [Ata] Forwarding A Message To A Group Mailbox
Synapse User’s Guide [ATA] Forwarding a Message to a Group Mailbox If your Synapse telephone system features an optional ATA device and your system administrator has set up Group Mailboxes, you can forward a message to a Group Mailbox. To forward a Voicemail message to a Group Mailbox: 1. -
Page 161: Recording An Introduction To Send With A Forwarded Message
Synapse User’s Guide Recording an Introduction to Send with a Forwarded Message You can record an audio introduction to send with a forwarded message. To begin recording the introduction, press while forwarding a message. To record a message introduction: 1. Press after selecting the destination for a forwarded message. -
Page 162: Create And Send A New Message To A Distribution List
Synapse User’s Guide Create and Send a New Message to a Distribution List If you have created at least one Distribution List, and enabled Voicemail Distribution, you can create a new message and send it to a Distribution List. To create a distribution List, see “Voicemail Distribution”... - Page 163 Synapse User’s Guide To create and send a new Message (Continued) 5. Press to begin recording. The soft key changes to and the word Record Message RECORDING displays, as shown in Figure 207. Message Press to return to the previous screen. 6.
-
Page 164: Deleting Messages
Synapse User’s Guide Deleting Messages You can delete a single Message or all Messages from the Messages list or from message playback. To delete a single message or all Messages: 1. Open a new or complete Messages list, such as the one shown in Figure 209 and Messages described in “Accessing Your Messages”... -
Page 165: New Message Status Indications (! Icons)
Synapse User’s Guide New Message Status Indications (! Icons) You can add a new message indication (! icon) or delete all new indications from the Messages list. Messages display with an exclamation point to indicate that the message has not been played. To clear new Message indications: 1. - Page 166 Synapse User’s Guide To restore a new Message indication: 1. Open a new or complete Messages list, such as the one shown in Figure 215.and Messages described in “Accessing Your Messages” on page 151. Graham Bell 10:17a 232-555-0176 Feb 23 2.
-
Page 167: Personal Voicemail Remote Operations
Synapse User’s Guide Personal Voicemail Remote Operations Remote access allows you to listen to Personal Messages or change the recorded greeting when you are away from work. Follow the voice prompts and press the appropriate dial-pad keys to navigate through the system. The voice prompts in a menu list are repeated three times with a 5-second pause between. - Page 168 Synapse User’s Guide To access Voicemail remotely – listen to messages: Once you have accessed the system, the Main Menu plays. From this menu you can listen to old or new messages as illustrated in Figure 217. You have the following options: To listen to new messages, press 1.
- Page 169 Synapse User’s Guide To access Voicemail remotely – Voicemail greeting setup: 1. To set up the Voicemail greeting, access the system and 2. Begin recording after the tone. press 8. As illustrated in the flow diagram in Figure 218, 3. To end the recording, press 5. you have the following options: Select one of the following options: To record a primary greeting, press 1.
-
Page 170: [Handset] Accessing Personal Voicemail With The Cordless Handset
Synapse User’s Guide [Handset] Accessing Personal Voicemail with the Cordless Handset You can also access your personal Voicemail with the optional SB67040 Cordless Handset: “[Handset] Voicemail Notification” on page 171 “[Handset] Retrieving Personal Voicemail” on page 172 “[Handset] Reviewing Voicemail Records” on page 173 “[Handset] Managing Personal Voicemail”... -
Page 171: [Handset] Voicemail Notification
Synapse User’s Guide [Handset] Voicemail Notification Unanswered incoming calls are handled according to the Call Forward–No Answer setting. The default setting is to send the calls to personal Voicemail. You can also forward a ringing call to your personal Voicemail by pressing , as shown in Figure 219. -
Page 172: [Handset] Retrieving Personal Voicemail
Synapse User’s Guide [Handset] Retrieving Personal Voicemail To retrieve personal Voicemail: 1. Press from the Idle screen shown in Figure 220 on page 171 to retrieve all MESSAGES 1/13 personal Voicemail. The Message Review screen shown in Figure 221 displays. Graham Bell 232-555-0176 Jan. -
Page 173: [Handset] Reviewing Voicemail Records
Synapse User’s Guide [Handset] Reviewing Voicemail Records Reviewing Voicemail records: Press to begin Voicemail message playback, as shown in Message Figure 223. Once message playback starts: Counter soft key becomes The message progress bar indicates how much of the message has played. - Page 174 Synapse User’s Guide Reviewing Voicemail records: (Continued) Press PHONE to exit message playback and call the phone number from the message. For outside phone numbers in Voicemail and CID lists, Synapse dials a 9 or whatever digit, if any, that must be dialed first before outside calls and then dials the number in the display.
-
Page 175: [Handset] Managing Personal Voicemail
Synapse User’s Guide [Handset] Managing Personal Voicemail You can delete a message or forward a message to an internal extension. To delete a message: Press OPTIONS while playing a message. Message playback stops MESSAGES 1/13 MESSAGES 01/12 and the screen shown in Figure 225 displays. You have the following OPTIONS Graham Bell Mary Williams... - Page 176 Synapse User’s Guide To forward a message: 1. From Messages playback mode, press OPTIONS. Message MESSAGES 1/13 EXTENSION 1/16 playback stops and the screen shown in Figure 228 displays. OPTIONS Graham Bell Amy Lee 1. Delete All 2. Press 3 to display the Message Forward screen, shown in 232-555-0176 2.
- Page 177 Synapse User’s Guide To forward a message: (Continued) 4. Press to forward the message to the selected MESSAGES 1/13 MESSAGES 1/13 extension. Graham Bell Graham Bell The confirmation screen shown in Figure 232 displays to 232-555-0176 232-555-0176 Message Jan. 10 12:03pm Jan.
-
Page 178: Call Log
Synapse User’s Guide H A P T E R The Call Log provides available name and number information for the last 50 calls received, Call Log Graham Bell 9:55a whether a message was left or not. The newest entries replace the oldest. 232-555-0176 Feb 25 “Using the Call Log”... -
Page 179: Using The Call Log
Synapse User’s Guide Using the Call Log The Call Log soft keys, as shown in Figure 234, are available whenever the Call Log has at least one entry. Current Call Log entry number/ Call Log Left and right arrows indicate total number of entries dialing options available. - Page 180 Synapse User’s Guide The Voicemail icon replaces the Ring Group icon when both would apply. If your company has caller ID, the caller information displays. If the caller ID information is absent because it is unavailable, UNKNOWN NAME and UNKNOWN NUMBER display. If the caller chooses not to send the information, PRIVATE NAME and PRIVATE NUMBER display.
-
Page 181: Managing Missed Calls
Synapse User’s Guide Managing Missed Calls All incoming calls are recorded in the Call Log unless Call Forward is on. Unanswered calls that have not been reviewed are considered new. To view missed calls: Press CALL LOG. The newest call appears first. 12:30PM Thu Feb 25 2010 New Missed Calls are unanswered calls that have not been reviewed. -
Page 182: Reviewing The Call Log List
Synapse User’s Guide Reviewing the Call Log List To review the Call Log list: 1. Press CALL LOG to display the Call Log, as shown in Figure 237 and Figure 238. Navigation key to scroll to the desired Call Log entry. 2. - Page 183 Synapse User’s Guide To view entry details from the Call Log: 1. Press CALL LOG to display the Call Log. Call Log Graham Bell 9:55a 2. Press then to display the third set of soft keys, shown in 305-555-0134 Feb 23 Figure 239.
-
Page 184: Voicemail Messages In Call Logs
Synapse User’s Guide Voicemail Messages in Call Logs If the caller left a Voicemail message, you can play the message from the Call Log list or from Call Log Details. To play a Voicemail message from the Call Log: 1. Press CALL LOG to display the Call Log, as shown in Figure 241. Call Log Graham Bell 9:55a... -
Page 185: Storing Call Log Entries
Synapse User’s Guide Storing Call Log Entries To store a Call Log entry into your Personal list: 1. Press CALL LOG to display the Call Log, as shown in Figure 243. Call Log , to cycle the Call Log soft key options to the second set of soft keys, Graham Bell 9:55a 2. -
Page 186: Deleting Call Log Entries
Synapse User’s Guide Deleting Call Log Entries The user can delete a single Call Log entry, or all Call Log entries. To delete a single Call Log entry: 1. Press CALL LOG to display the Call Log, as shown in Figure 245. Call Log Graham Bell 9:55a... - Page 187 Synapse User’s Guide You can delete all entries only when viewing the Call Log list from Idle mode. To delete all Call Log entries: 1. Press CALL LOG to display the Call Log, as Call Log Call Log shown in Figure 247. Graham Bell 9:55a 232-555-0176...
-
Page 188: [Handset] Accessing The Call Log With The Cordless Handset
Synapse User’s Guide [Handset] Accessing the Call Log with the Cordless Handset You can also access the Call Log with the optional SB67040 Cordless Handset. “Using the Call Log” on page 179 “Managing Missed Calls” on page 181 “[Handset] Reviewing the Call Log” on page 191 “Deleting Call Log Entries”... -
Page 189: [Handset] Using The Call Log
Synapse User’s Guide [Handset] Using the Call Log The Handset Call Log functions are shown in Figure 251. Current Call Log entry number/ CALL LOG total number of entries Left and right arrows indicate Graham Bell (50/50 maximum). dialing options available. 232-555-0176 Date and time of highlighted call Feb 23 9:55a... -
Page 190: [Handset] Managing Missed Calls
Synapse User’s Guide [Handset] Managing Missed Calls The Handset records incoming call information in the Call Log and displays a notification on the Idle screen. Unanswered calls that have not been reviewed are considered missed. Once you review a call, the new missed-call count goes down by one. If there are no new calls, the Idle screen displays 0 Missed Calls. -
Page 191: [Handset] Reviewing The Call Log
Synapse User’s Guide [Handset] Reviewing the Call Log To review and dial from the Call Log: 1. From the Idle screen, press to display the screen shown in Figure 254. CALL LOG Graham Bell 232-555-0176 To access the Call Log when the phone is not idle, press OPTIONS and then scroll down Feb 23 9:55a to Call Log and press SELECT. -
Page 192: [Handset] Playing Voicemail Messages In The Call Log
Synapse User’s Guide [Handset] Playing Voicemail Messages in the Call Log If the caller left a Voicemail message, you can play the message from the Call Log. To play a Voicemail message from the Call Log: 1. Press to display the Call Log, as shown in Figure 254 on page 191. -
Page 193: [Handset] Deleting Call Log Entries
Synapse User’s Guide [Handset] Deleting Call Log Entries The user can delete a single Call Log entry, or all Call Log entries. To delete a single Call Log entry: 1. Press to display the Call Log, as shown in Figure 257. CALL LOG Graham Bell 2. - Page 194 Synapse User’s Guide You can delete all entries only when viewing the Call Log list from Idle mode. To delete all of the entries in the Call Log: 1. Press to display the Call Log. CALL LOG OPTIONS Graham Bell 2.
-
Page 195: Outgoing Calls
Synapse User’s Guide H A P T E R UTGOING ALLS The SB67030 Deskset and the optional SB67040 Cordless Handset provide several methods for making a call. You can also complete a call that you dialed elsewhere with the optional TL7600 Cordless Headset. -
Page 196: Active Call Screen
Synapse User’s Guide Active Call Screen The Active Call screen, as shown in Figure 260, displays while you are on a call. 12:30PM Thu Feb 25 2010 Called Phone Number. Call-Status Icon. Graham Bell 232-555-0176 2:51 Quick Dial Transfer Transfer Conf Park More 1/3... -
Page 197: Predialing
Synapse User’s Guide Predialing Predial is only available when the Deskset is idle or when all calls are on hold. In Predial mode, there is no dial tone. You can only predial one phone number at a time. To begin Predial, press a dial-pad key. To make a Predial call: 1. -
Page 198: Live Dialing
Synapse User’s Guide Live Dialing You can make a call at any time by going off hook, then dialing a phone number. To dial a live number: 1. Do one of the following to go off hook (to hear the dial tone) from Idle mode: 12:30PM Thu Feb 25 2010 Lift the corded handset. -
Page 199: Making A Call From A List
Synapse User’s Guide Making a Call from a List To make a call from a list: 1. Access the desired list entry. See “Accessing Items in Lists” on page 109. Directory 1/48 For example, press DIRECTORY. The Directory screen displays, as shown in ABC Accountants Personal 9-503-555-0194... -
Page 200: [Handset] Make A Call With The Cordless Handset
Synapse User’s Guide [Handset] Make a Call with the Cordless Handset You can also make calls with the optional SB67040 Cordless Handset. “[Handset] Active Call Screen” on page 201 “[Handset] Predialing” on page 202 “[Handset] Live Dialing” on page 203. Outgoing Calls... -
Page 201: [Handset] Active Call Screen
Synapse User’s Guide [Handset] Active Call Screen The Active Call screen, as shown in Figure 267, displays while you are on a call. 12:30p Feb 23 Phone number 9-503-555-0194 Call timer 00:12 ON A CALL Press to conference the Press to transfer the call XFER CONF call... -
Page 202: [Handset] Predialing
Synapse User’s Guide [Handset] Predialing You can dial a phone number before pressing PHONE or SPEAKER. Pressing a dial-pad key in these cases initiates the Predial mode. In this mode, the Handset produces no dial tone. You can also predial from a list. To Predial a call: 1. -
Page 203: [Handset] Live Dialing
Synapse User’s Guide [Handset] Live Dialing Live dialing refers to dialing when the phone is already off hook (when there is already a dial tone). To make a call off hook: 1. Press PHONE or SPEAKER to initiate a call, as shown in Figure 269. 12:30p Feb 23 You are now off hook and hear a dial tone. -
Page 204: [Headset] Making Calls With The Optional Tl7600 Cordless Headset
Synapse User’s Guide [Headset] Making Calls with the Optional TL7600 Cordless Headset If you have an optional TL7600 Cordless Headset registered to your Deskset, then you can make calls with the Headset. Use the Deskset dial pad to dial the number. After the Deskset determines from the dialed number that this is an outside call, or after a system extension answers, are no longer available. -
Page 205: Incoming Calls
Synapse User’s Guide H A P T E R NCOMING ALLS When a call comes in, the SB67030 Deskset and the optional SB67040 Cordless Handset ring and the incoming call information displays as shown in Figure 272 on page 206. The screen displays the caller’s name and number (if available). -
Page 206: An Incoming Call Screen
Synapse User’s Guide An Incoming Call Screen A Deskset’s Incoming Call and Active Call screens are shown in Figure 272. INCOMING CALL 12:30PM Thu Feb 25 2010 Graham Bell 232-555-0176 2:51 Graham Bell 2325550176 Press Answer Lif t receiv er, or press Answer, SPEAKER, Quick HEADSET, or f lashing Call Appearance. -
Page 207: Incoming Call Indication
Synapse User’s Guide Incoming Call Indication Your extension may be part of a Ring Group, which allows a group of extensions to ring all at once or in a sequence for the same call. When there is an incoming call: INCOMING CALL INCOMING CALL The Deskset rings. - Page 208 Synapse User’s Guide If your company has caller ID, the Incoming Call screen displays caller information. If the caller ID information is absent because it is unavailable, UNKNOWN NAME and UNKNOWN NUMBER display. If the caller chooses not to send the information, PRIVATE NAME and PRIVATE NUMBER display.
-
Page 209: Answering A Call
Synapse User’s Guide Answering a Call To answer a call: Lift the corded handset. 12:30PM Thu Feb 25 2010 Press to answer using the Preferred Audio method. See “Preferred Graham Bell 232-555-0176 2:51 Audio” on page Press SPEAKER to use the speakerphone. Press HEADSET to use the Cordless Headset or corded headset. - Page 210 Synapse User’s Guide To answer a call: (Continued) Once you answer a call: 12:30PM Thu Feb 25 2010 Previous active calls are automatically placed on hold. 9-1-250-5 Graham Bell 232-555-0176 3:34 If you were predialing, that call is canceled. If you were live dialing and you have entered at least two digits, the dialed call goes on hold once you answer the incoming call, as shown in Figure 279.
-
Page 211: Ignoring A Call
Synapse User’s Guide Ignoring a Call You can ignore an incoming call by pressing to silence the ringer. The silenced ringer icon displays. If you are on an active or held call, after the ignored call has been forwarded, the highlight moves back to whatever Call Appearance you were on before the incoming call. -
Page 212: Call Screening
Synapse User’s Guide Call Screening When an incoming call goes to Voicemail, the Message icon ( ) appears to indicate that recording is in progress. You can listen in on the recording session and interrupt it at any time by answering the call. If another incoming call occurs while screening a call, the highlight moves to the new call and there is an abbreviated ring. -
Page 213: Auto Answering
Synapse User’s Guide Auto Answering You can use the Deskset menu settings to set your Deskset to answer calls automatically, without your having to touch the phone to answer. When you enable Auto Answer, appears at the top of the Deskset screen if are not active, since Auto Answer does not work if they are on. -
Page 214: [Handset] Answer A Call With The Cordless Handset
Synapse User’s Guide [Handset] Answer a Call with the Cordless Handset You can also answer calls with the optional SB67040 Cordless Handset. When the extension receives an incoming call, the Handset rings and the incoming call information displays as shown at right. The screen displays the caller’s name and number (if available). Answer the call by pressing PHONE. -
Page 215: [Handset] Incoming Call Indication
Synapse User’s Guide [Handset] Incoming Call Indication Options for an Incoming call: When there is an incoming call: 12:30p Feb. 23 INCOMING The Handset rings. See “[Handset] Using the VOLUME key to set the Ringer and EXT 249 Graham Bell Voice Volume”... -
Page 216: [Handset] Answer A Call
Synapse User’s Guide [Handset] Answer a Call Examples of incoming call screens are shown below. Figure 286 shows a call received when the extension is idle. Figure 287 shows a call received during an active call. Calls received during active calls ring only once. Options for a call received while the extension is idle: Press SELECT, PHONE, or SPEAKER to answer the call. -
Page 217: [Handset] Multiple Incoming Calls
Synapse User’s Guide [Handset] Multiple Incoming Calls If the Handset receives more than one call at a time, the calls display in a list on the screen. The most recent call is added to the bottom of the list and displays as a two-line name and telephone number. The other pending calls display in the list as one-line entries, as shown in Figure 288. -
Page 218: Call Management
Synapse User’s Guide H A P T E R ANAGEMENT The SB67030 Deskset and optional SB67040 Cordless Handset feature various call management options. “Call Management” on page 219 “Placing a Call on Hold” on page 220 “Transferring a Call Overview” on page 222 “Conferencing”... -
Page 219: Call Management
Synapse User’s Guide Call Management The Deskset Call Management functions begin with the Active Call screen shown in Figure 289. The Call Appearance icons are described in “Deskset Call Appearances” on page 12:30PM Thu Feb 25 2010 12:30PM Thu Feb 23 2008 ABC Accou... -
Page 220: Placing A Call On Hold
Synapse User’s Guide Placing a Call on Hold You can place any call on hold. When calls are placed on hold, the soft keys change, as shown in Figure 290 and described in Table 17. 12:30PM Thu Feb 25 2010 Graham Bell 9-1-232-555-0176 0:03 To retriev e held call, press key... -
Page 221: Managing Held Calls
Synapse User’s Guide Managing Held Calls To manage held calls: 1. When you are on an active call, as shown in Figure 291, press HOLD. 12:30PM Thu Feb 23 2008 12:30PM Thu Feb 23 2008 12:30PM Thu Feb 25 2010 The Held Call Appearance icon appears next to the highlighted call, as Graham Bell... -
Page 222: Transferring A Call Overview
Synapse User’s Guide Transferring a Call Overview You can transfer an active or a held call. The transfer recipient does not have to talk to you before receiving the transferred call. (If you do not talk to the transfer recipient before transferring the call, you are making an “unsupervised”... -
Page 223: Transferring A Call
Synapse User’s Guide Transferring a Call To transfer a call to an extension or phone number: 1. Press from the Active Call screen, 12:30PM Thu Feb 25 2010 12:30PM Thu Feb 23 2008 12:30PM Thu Feb 23 2008 12:30PM Thu Feb 25 2010 as shown in Figure 293. - Page 224 Synapse User’s Guide To transfer a call to a Mailbox: You can transfer a call to a Personal Mailbox, or, if your system is configured with Group Mailboxes, you can transfer calls to them. 1. Press from the Active Call screen. 12:30PM Thu Feb 25 2010 The call is automatically put on hold.
-
Page 225: Conferencing
Synapse User’s Guide Conferencing You can set up a conference call with yourself and two telephone numbers (either internal, outside, or with both). To conference: 1. Press from an Active Call screen, 12:30PM Thu Feb 25 2010 12:30PM Thu Feb 25 2010 as shown in Figure 299. -
Page 226: Hold And Cancel A Conference
Synapse User’s Guide Hold and Cancel a Conference To put a conference on hold: When you are participating in a conference call, you can put both calls on hold by 12:30PM Thu Feb 25 2010 pressing HOLD. The other callers can continue communicating with each other. The 232-555-0176 Conference Call held conference icon, as shown in Figure 303, designates a held conference. -
Page 227: Parking A Call
Synapse User’s Guide Parking a Call The Deskset allows you to park either active or held outside calls. Parking a call is similar to putting a call on Hold, but any extension on the system can retrieve a parked call See “Retrieve a Parked Call”... -
Page 228: Retrieve A Parked Call
Synapse User’s Guide Retrieve a Parked Call You can retrieve parked calls from any extension in the system. To retrieve a parked call: If you know the extension number of the parked call, dial it. You will retrieve the 12:30PM Thu Feb 25 2010 parked call. -
Page 229: [Handset] Call Management Using The Cordless Handset
Synapse User’s Guide [Handset] Call Management Using the Cordless Handset You can also manage calls with the optional SB67040 Cordless Handset using the following functions: “[Handset] Call Deck” on page 231 “[Handset] Transferring” on page 232 “[Handset] Conferencing” on page 234 “[Handset] Managing Held Calls”... -
Page 230: [Handset] Active Call Screens
Synapse User’s Guide [Handset] Active Call Screens The Handset Call Management functions begin with one or more active calls, as shown in Figure 310. Figure 310. Active Call Screens Call Management... -
Page 231: [Handset] Call Deck
Synapse User’s Guide [Handset] Call Deck The Call Deck is the list of active, held, parked, and ringing calls. Because the screen is too small to easily display multiple calls at the same time, the Handset stacks them like a deck of cards in order of priority. The top of the display no longer displays the date and time. -
Page 232: [Handset] Transferring
Synapse User’s Guide [Handset] Transferring As with the Deskset, you can transfer an active or held call with the Cordless Handset. [Handset] Transferring to an Extension To transfer an active or held call to an extension with the Cordless Handset: 1. -
Page 233: [Handset] Transferring To An Outside Number
Synapse User’s Guide [Handset] Transferring to an Outside Number To transfer an active or held call to an outside number with the Cordless Handset: 1. From either an active or held call, press . An active call is placed on hold, and the Graham Bell Handset displays the screen shown in Figure 316. -
Page 234: [Handset] Conferencing
Synapse User’s Guide [Handset] Conferencing You can set up a conference call with two other numbers (either internal, outside, or with both). To set up a conference with the Cordless Handset: 1. When you have connected with the first call to be Graham Bell Graham Bell conferenced, press... -
Page 235: [Handset] Placing A Conference Call On Hold
Synapse User’s Guide [Handset] Placing a Conference Call on Hold To put a conference on hold with the Cordless Handset: Press HOLD or PHONE to place the conference on hold. A screen similar to the one shown in 12:30p Feb 23 Figure 322 displays. -
Page 236: [Handset] Ending A Conference Call
Synapse User’s Guide [Handset] Ending a Conference Call To end a conference call with the Cordless Handset: You have the following options: 12:30p Feb 23 To hang up all calls, press OFF. Graham Bell 1:09 To drop one call, press from the conference screen Mary Williams 12:30p Feb 23... -
Page 237: [Handset] Managing Held Calls
Synapse User’s Guide [Handset] Managing Held Calls A maximum of five calls can be held. To place an active call on hold and to retrieve it with the Cordless Handset: Press HOLD. 12:30p Feb 23 12:30p Feb 23 The screen changes from ON A CALL, as shown in Graham Bell Graham Bell Figure 326, to ON HOLD, as shown in Figure 327. - Page 238 Synapse User’s Guide To retrieve a held call when there is more than one call in the Call Deck with the Cordless Handset: Press the Navigation key to review calls in the Call Deck, as shown in NEXT CALL Figure 328. Graham Bell Press when the call you want to retrieve is displayed.
-
Page 239: [Handset] Held Call Options
Synapse User’s Guide [Handset] Held Call Options To view Held Call options with the Cordless Handset: Press OPTIONS with a held call displayed to access the Hold options, as shown in Figure 329 12:30p Feb 23 and listed below. OPTIONS Graham Bell 1. -
Page 240: [Handset] Parking A Call
Synapse User’s Guide [Handset] Parking a Call Placing a call on hold and parking a call are similar operations. The difference is that a held call can only be retrieved at the Deskset or Handset that placed the call on hold, and a parked call can be retrieved at any extension. [Handset] Parking an Active or Held Call To park an active call with the Cordless Handset: 1. -
Page 241: [Handset] Retrieving A Parked Call From Any Extension
Synapse User’s Guide [Handset] Retrieving a Parked Call From Any Extension If you know the number of the parked call, press PHONE and dial the three-digit parked call number. If you don't know the number, find the parked call in the Parked Call list. To retrieve a parked call with the Cordless Handset: To access the Parked Call list: 12:30p Feb 23... -
Page 242: [Handset] Using A Corded Headset
Synapse User’s Guide [Handset] Using a Corded Headset You can use a corded headset with the Cordless Handset, as shown in Figure 334. To use a corded headset with the Cordless Handset: Lift the rubber flap to insert an optional 2.5 mm corded headset into the jack on the left side of the Cordless Handset. -
Page 243: Call Management Using Headsets
Synapse User’s Guide Call Management Using Headsets You can use a corded headset, a Cordless Headset, or a combination of the two with the Deskset. You can register an optional TL7600 Cordless Headset directly to your Synapse Deskset. There are no wires or cords except for the power cord to the Headset charger. -
Page 244: Paging
Synapse User’s Guide H A P T E R AGING When you need to make an announcement to your organization, use the soft key. If your system administrator has set up Paging Zones, you can page all extensions or a zone. [ATA] If your Synapse system includes an optional overhead paging (OHP) system, you may be able to page through loudspeakers. -
Page 245: Paging
Synapse User’s Guide Paging If your system administrator has set up Paging Zones, you can page all extensions or a zone. To page all extensions or a Paging Zone: 1. From Idle or from a held call, press , as shown in Figure 336. It may be 12:30PM Thu Feb 25 2010 necessary to first press from Idle, or to press... - Page 246 Synapse User’s Guide To page all extensions or a Paging Zone: (Continued) At the extensions being paged: Page Desksets involved in active calls, listening to a Voicemail message, or playing or recording a name or greeting do not receive pages. Paging Accounts Press the VOL+ or VOL–...
-
Page 247: [Ata] Single-Zone Overhead Paging
Synapse User’s Guide [ATA] Single-Zone Overhead Paging If your Synapse system includes an optional single-zone overhead paging (OHP) system, your system administrator may have set up an overhead paging option in the Paging Zones list, such as for your warehouse. The OHP speakers are included when you page All Extensions, and they may be included in other Paging Zones. -
Page 248: [Ata] Multi-Zone Overhead Paging
Synapse User’s Guide [ATA] Multi-Zone Overhead Paging If your Synapse system includes an optional multi-zone overhead paging (OHP) system, you have an Overhead Paging option in the Paging Zones list. To page using an optional multi-zone overhead paging system: 1. From Idle or from a held call, press , as shown in Figure 336 on page 245. -
Page 249: [Handset] Paging
Synapse User’s Guide [Handset] Paging You can page all the extensions in the system. Neither zone paging nor (optional) overhead paging is available from the Cordless Handset. To page all extensions with the Cordless Handset: 1. Begin the page: 12:30p Feb 23 OPTIONS From a held call or Idle mode: Graham Bell... -
Page 250: Deskset-Handset Interaction
Synapse User’s Guide H A P T E R ESKSET ANDSET NTERACTION This section identifies similarities and operating interactions between the SB67030 Deskset and the optional SB67040 Cordless Handset. “Answering a Call While Another Device is on a Call” on page 251 “Incoming Calls”... -
Page 251: Answering A Call While Another Device Is On A Call
Synapse User’s Guide Answering a Call While Another Device is on a Call The Deskset, Cordless Handset, and Cordless Headset all share the same extension number. If there is an active call, it must be placed on hold before other calls can be placed or answered by one of the other extension devices. You must also switch control to the device you want to use. -
Page 252: Clocks
Synapse User’s Guide Clocks The Handset and the Deskset show the current date and time. The clocks on each of the devices run independently, and the system updates the real time frequently. Because the clocks are independent, there may be occasions when the time shown on each is slightly different. -
Page 253: Troubleshooting
Synapse User’s Guide H A P T E R ROUBLESHOOTING If you have difficulty operating your system, try the following suggestions in this section: “Common Troubleshooting Procedures” on page 254 “General Troubleshooting” on page 263 “Gateway Troubleshooting” on page 274 “Deskset Troubleshooting”... -
Page 254: Common Troubleshooting Procedures
Synapse User’s Guide Common Troubleshooting Procedures Follow these procedures to resolve common issues. [PSTN] Resolving Audio Echoes The SB67010 PSTN Gateway uses automatic telephone line calibration to ensure optimal audio performance on outside calls. If excessive echo occurs on outside calls consistently, observe the Gateway line calibration data to understand any telephone line issues. - Page 255 Synapse User’s Guide To resolve audio echo issues: (Continued) 4. If the loss number is below 10, the system will most often function normally, but there is an increased likelihood of audio performance issues like echo. If the loss number is below 10 the following procedures can be used to increase the loss value: Unplug that telephone line at the Gateway.
-
Page 256: Resolving General Audio Issues
Synapse User’s Guide Resolving General Audio Issues Check the following if you hear static, sudden silences, gaps in speech, echoes, distorted speech, or garbled speech. To resolve general audio issues: You may be experiencing network problems. Your LAN administrator should ensure the following minimum guidelines are met: A switched network topology, which requires attaching network components to switches rather than hubs, is recommended. -
Page 257: Reintroducing A Deskset Into The System
Synapse User’s Guide Reintroducing a Deskset Into the System If there are no more than 101 Desksets in the system and a Deskset screen displays Synch Failed or Synchronizing... for a long time, you may need to remove the Deskset from the system and reintroduce it. This problem may have been caused by a network disruption, the Deskset having been part of a different network, or by an AC power failure. - Page 258 Synapse User’s Guide To reintroduce a Deskset into the system: (Continued) 3. Perform a complete factory reset to return to the values set at the factory. Unplug the LAN cable. b. Insert a pen or the end of a paper clip into the reset switch, located on the underside of the Deskset, as shown in Figure 346.
- Page 259 Synapse User’s Guide To reintroduce a Deskset into the system: (Continued) 4. If you backed up the Deskset settings in Step 2, restore your settings. Log onto the WebUI as the Administrator at the PC where you stored the back up file. b.
-
Page 260: Reintroducing A Gateway Or Ata Into The System
Synapse User’s Guide Reintroducing a Gateway or ATA Into the System If there are no more than five Gateways in the system (four PSTN Gateways and 1 T1 Gateway), and a Gateway or ATA screen displays Synch Failed or Synchronizing... for more than a few minutes, you may need to remove the Gateway or ATA from the system and reintroduce it. - Page 261 Synapse User’s Guide To reintroduce a Gateway or ATA into the system: (Continued) 4. Complete a factory reset to restore factory values. Insert a pen or the end of a paper clip into the reset switch (located on the front of the Gateway and ATA) and hold it for more than five seconds until the LCD displays Restoring to factory defaults.
-
Page 262: Power Failure Recovery Procedure
Synapse User’s Guide Power Failure Recovery Procedure To recover after a power failure: When AC power returns after a power failure, the system self–assigns a link–local address to the Deskset beginning with number 169.254. If the Deskset is set for automatic IP address configuration, it searches for the DHCP server. If the DHCP server is found, it assigns an IP address. -
Page 263: General Troubleshooting
Synapse User’s Guide General Troubleshooting Symptom Probable Cause Corrective Action General Troubleshooting Unable to access the WebUI The computer is not Verify the IP address. You must correctly enter the IP Log–in page from my connected to the same address of your Deskset into your Internet browser’s computer. - Page 264 Synapse User’s Guide Symptom Probable Cause Corrective Action General Troubleshooting Changes made to System More than one person is Make sure only one person logs on as the administrator Configuration from WebUI using the WebUI to change at a time. are not saved.
- Page 265 Synapse User’s Guide Symptom Probable Cause Corrective Action General Troubleshooting Record a name at the Deskset. Press MENU –> User Outside caller cannot find my The user for that Deskset has Settings –> Name Recording to record a Personal extension in the Auto not recorded a Personal Attendant Directory.
- Page 266 Synapse User’s Guide Symptom Probable Cause Corrective Action General Troubleshooting A call is forwarded or Telephone line to telephone The system administrator cam modify the call forward transferred to an outside line call times have been timing. telephone number and the restricted.
- Page 267 Synapse User’s Guide Symptom Probable Cause Corrective Action General Troubleshooting You hear echoes, distorted At least one of the PSTN Make sure you have a DSL filter plugged in between each speech, or static. lines has DSL, which is not DSL line and the telephone wall jack.
- Page 268 Synapse User’s Guide Symptom Probable Cause Corrective Action General Troubleshooting My PC, which is connected to For PCs connected to the If the PC is connected to the LAN through the Deskset, the LAN through the Deskset, LAN through Desksets, avoid updating software or restoring the Deskset settings briefly loses its network disruption to the Deskset...
- Page 269 Synapse User’s Guide Symptom Probable Cause Corrective Action General Troubleshooting A Synapse device displays The user attempted a Ensure you have Internet connectivity and that your “Host Not Found” after a software upgrade with no connection to your Internet Service Provider is operating user attempts a software outside Internet connection.
- Page 270 Synapse User’s Guide Symptom Probable Cause Corrective Action General Troubleshooting The WebUI is unresponsive. The device encountered an 1. Close the unresponsive web browser, reopen the browser, unexpected problem. and log back in as administrator. 2. If this does not work, try again using the IP address of a Deskset that is connected to the PC you are using.
- Page 271 Synapse User’s Guide Symptom Probable Cause Corrective Action General Troubleshooting A Synapse device upgrade The software version of the 1. As administrator, log into the WebUI using the IP address failed, the WebUI displays device you are currently of a device that does not have updated software and is not having any problems.
- Page 272 Synapse User’s Guide Symptom Probable Cause Corrective Action General Troubleshooting The WebUI displays “Login to The software version of the 1. As administrator, log into the WebUI using the IP address of the device that caused the problem. Click Device target device failed.”...
- Page 273 Synapse User’s Guide Symptom Probable Cause Corrective Action General Troubleshooting Calls directed to the You deleted an old Deskset If you remove a Deskset from the system, any system operator are misdirected. and replaced it with a new settings, such as operator assignment to that extension, one.
-
Page 274: Gateway Troubleshooting
Synapse User’s Guide Gateway Troubleshooting Symptom Probable Cause Corrective Action Gateway Troubleshooting Gateway does not work at There is no power to the Ensure the AC plug is plugged into an electrical outlet not all. device. powered by a wall switch. Verify that the AC power outlet has power, such as plugging in some other AC device. - Page 275 Synapse User’s Guide Symptom Probable Cause Corrective Action Gateway Troubleshooting Gateway screen displays The Gateway was Refer to “Reintroducing a Gateway or ATA Into the Synch Failed. disconnected, then System” on page 260. reconnected after configuration changes were made to the system. The Gateway was configured Reset to factory defaults by using a paper clip to press on another network or has...
- Page 276 Synapse User’s Guide Symptom Probable Cause Corrective Action Gateway Troubleshooting The Gateway may display Synchronizing… for a few Deskset cannot make or The Gateway and the receive phone calls and the Deskset are on different seconds. This is normal and does not indicate a problem. Gateway screen displays subnets.
- Page 277 Synapse User’s Guide Symptom Probable Cause Corrective Action Gateway Troubleshooting I cannot make or receive The Yellow Alarm is a 1. Verify that your T1 cable is connected to the equipment. phone calls and the Remote Alarm Indication. 2. Check the T1 Settings to confirm that the configuration T1 Gateway RAI/LOF/LOS Telephone equipment parameters (Signaling type, Build out) correspond to the...
- Page 278 Synapse User’s Guide Symptom Probable Cause Corrective Action Gateway Troubleshooting I cannot make or receive The system is in Local The LOOPBK LED should only be ON when you have phone calls and the Network or Loopback test activated a Loopback test. If this test should not be T1 Gateway LOOPBK LED is mode.
- Page 279 Synapse User’s Guide Symptom Probable Cause Corrective Action Gateway Troubleshooting Incoming Direct Inward There may be a DID settings Verify that the Deskset is connected to the system and Dialing calls fail, or the caller error or the Deskset is not has power.
- Page 280 Synapse User’s Guide Symptom Probable Cause Corrective Action Gateway Troubleshooting Calls to the Auto Attendant Direct Dial is not enabled Enable Direct Dial. On the administrator WebUI, click System Settings, then Direct Inward Dial, and verify are not directed to the the Current DID Ranges.
- Page 281 Synapse User’s Guide Symptom Probable Cause Corrective Action Gateway Troubleshooting Round Robin extensions do The system time is not All devices’s time settings need to be synchronized. Either set the System Time/Date Options to automatic (if the not ring in the correct order. properly configured.
-
Page 282: Deskset Troubleshooting
Synapse User’s Guide Deskset Troubleshooting For more information about the corrective actions recommended in this troubleshooting section, see the Synapse User’s www.telephones.att.com/synapseguides Guide at Symptom Probable Cause Corrective Action Deskset Troubleshooting My Deskset does not work at There is no power to the Ensure the AC plug is plugged into an electrical outlet not all. - Page 283 Synapse User’s Guide Symptom Probable Cause Corrective Action Deskset Troubleshooting Deskset screen displays The Deskset was Refer to “Reintroducing a Deskset Into the System” on Synch Failed. disconnected, then page 257. reconnected after configuration changes were made to the system. The Deskset has returned to Refer to “Reintroducing a Deskset Into the System”...
- Page 284 Synapse User’s Guide Symptom Probable Cause Corrective Action Deskset Troubleshooting The Deskset may temporarily display Synchronizing… Deskset cannot make or The Deskset is the only receive phone calls and the device on the subnet, or is for a few seconds. This is normal and does not indicate a Deskset screen displays on a different subnet than problem.
- Page 285 Synapse User’s Guide Symptom Probable Cause Corrective Action Deskset Troubleshooting Unable to make outside calls. An outside phone number Ensure that you enter a 9 or whatever digit, if any, that cannot be accessed through must be dialed first to indicate this is an outside call. For the Gateway.
- Page 286 Synapse User’s Guide Symptom Probable Cause Corrective Action Deskset Troubleshooting My Deskset does not receive Incoming call notifications Ensure that the Ethernet cable is securely plugged into incoming calls. have been suppressed or are the network port beneath your Deskset and that the other unable to reach the Deskset.
- Page 287 Synapse User’s Guide Symptom Probable Cause Corrective Action Deskset Troubleshooting I receive only caller ID Your T1 telephone service Talk to the service provider about obtaining PRI-NI2 numbers, not caller ID provider may use DMS-100 signaling. names. or 5ESS signalling protocols, which do not support caller ID name delivery.
- Page 288 Synapse User’s Guide Symptom Probable Cause Corrective Action Deskset Troubleshooting Deskset does not receive Calls are not being directed Verify that Call Forward All is off or is targeted to Voicemail. to Voicemail, or the Voicemail. Voicemail memory is full. Press to turn this feature off.
- Page 289 Synapse User’s Guide Symptom Probable Cause Corrective Action Deskset Troubleshooting Calls are dropped. Restoring Deskset settings or Avoid updating software or restoring Deskset settings updating software while that when a user is likely to be using the phone. extension is in use will cause all calls to be dropped.
- Page 290 Synapse User’s Guide Symptom Probable Cause Corrective Action Deskset Troubleshooting I am unable to manually Calls forwarded to a ring The system administrator can designate a Deskset as a forward a call to Voicemail. group cannot be forwarded forwarding destination if the call is unanswered. If that to Voicemail by a Deskset Deskset does not answer the forwarded call, the call will user.
- Page 291 Synapse User’s Guide Symptom Probable Cause Corrective Action Deskset Troubleshooting DDNs (Directory Dial This system does not support DDNs in the Call Log are treated like all other caller ID Numbers) do not dial out DDN. phone numbers. properly from the Call Log. I am unable to record a The selected Deskset is set Select a different Deskset to record the greeting.
- Page 292 Synapse User’s Guide Symptom Probable Cause Corrective Action Deskset Troubleshooting The system does not respond The system cannot detect Confirm you have entered star, star (**) before entering to remote Voicemail Dual-Tone Multi-Frequency your remote access code (user password). If you have no commands.
- Page 293 Synapse User’s Guide Symptom Probable Cause Corrective Action Deskset Troubleshooting A caller hears, “Invalid The caller entered an Provide callers with the right extension number. extension.” while interfacing extension number that does with the Auto Attendant. not exist in your system. The caller was forwarded to A Deskset may have been unplugged since the Auto an extension number that...
- Page 294 Synapse User’s Guide Symptom Probable Cause Corrective Action Deskset Troubleshooting I am unable to locate the The Cordless Handset’s Charge the Cordless Handset battery. Cordless Handset from the battery is dead or the does not appear on the Deskset Idle screen, Deskset.
-
Page 295: Cordless Handset Troubleshooting
Synapse User’s Guide Cordless Handset Troubleshooting For more information about the corrective actions recommended in this troubleshooting section, see the Synapse User’s www.telephones.att.com/synapseguides Guide at Symptom Probable Cause Corrective Action Cordless Handset Troubleshooting Handset does not work at all There is no power to the Confirm the battery is installed and charged correctly. - Page 296 Synapse User’s Guide Symptom Probable Cause Corrective Action Cordless Handset Troubleshooting Unable to create new This feature is not supported Although you can access the Directory or Quick Dial on Directory or Quick-Dial entry. on the Handset. the Handset, creating, deleting, or editing entries can only be done on the Deskset or WebUI.
- Page 297 Synapse User’s Guide Symptom Probable Cause Corrective Action Cordless Handset Troubleshooting Handset does not receive The incoming call Ensure that the Deskset can receive incoming calls. If it incoming calls. notifications have been cannot, consult “Deskset Troubleshooting” on page 282. suppressed.
- Page 298 Synapse User’s Guide Symptom Probable Cause Corrective Action Cordless Handset Troubleshooting Unable to locate Handset The Handset is not If the soft key does not appear on the Deskset, using on the registered. then the Handset is not registered. On the Deskset, press MENU –>...
- Page 299 Synapse User’s Guide Symptom Probable Cause Corrective Action Cordless Handset Troubleshooting Handset continuously The Handset is out of range Verify that the Deskset is powered and fully functional. If displays Searching for or not registered. the Deskset has no AC power, the Handset will not work. Deskset….
- Page 300 Synapse User’s Guide Symptom Probable Cause Corrective Action Cordless Handset Troubleshooting Calls dropped. Restoring Deskset settings Update software and restore Deskset settings only in Idle while that extension is in use mode with no calls pending. causes all calls to be dropped. Cordless Handset lost link Verify that your Cordless Handset battery is charged and with the Deskset.
- Page 301 Synapse User’s Guide Symptom Probable Cause Corrective Action Cordless Handset Troubleshooting Poor audio quality. Speech is The Handset is almost out of You may be close to being out of range. Try moving closer cutting out. range or is experiencing to the Deskset.
-
Page 302: Cordless Headset Troubleshooting
Synapse User’s Guide Cordless Headset Troubleshooting For more information about the corrective actions recommended in this troubleshooting section, see the Synapse User’s www.telephones.att.com/synapseguides Guide at Symptom Probable Cause Corrective Action Cordless Headset Troubleshooting Headset not responding. The Headset has lost 1. - Page 303 Synapse User’s Guide Symptom Probable Cause Corrective Action Cordless Headset Troubleshooting The TL7600 Headset does The Headset is not getting Verify that the battery is installed and charged correctly. not work at all. power from its battery. Place the Headset into the accessory charger. Ensure the charger is securely plugged into an outlet not controlled by a wall switch.
- Page 304 Synapse User’s Guide Symptom Probable Cause Corrective Action Cordless Headset Troubleshooting Poor audio quality. Speech is The Headset is almost out of You may be close to being out of range. Try moving closer cutting out. range or is experiencing to the Deskset.
- Page 305 Synapse User’s Guide Symptom Probable Cause Corrective Action Cordless Headset Troubleshooting Batteries do not hold a Bad battery or bad battery Make sure that the Headset battery is installed and charge. connection. securely plugged into the connector. Charge the battery for at least six hours. For optimum daily performance, return the Cordless Headset to the charger when not in use.
- Page 306 Synapse User’s Guide Symptom Probable Cause Corrective Action Cordless Headset Troubleshooting A buzzing sound on my Noise interference. Move the Headset at least 12 inches away from the Headset. Deskset. Other electronic products can cause interference with your Cordless Headset. Try installing your Headset as far away from these types of electronic devices as possible: television sets, microwaves, or other cordless telephones.
-
Page 307: Ata Troubleshooting
Synapse User’s Guide ATA Troubleshooting For more information about the corrective actions recommended in this troubleshooting section, see the Synapse User’s www.telephones.att.com/synapseguides Guide at [ATA] General Troubleshooting Symptom Probable Cause Corrective Action ATA General Troubleshooting ATA does not work at all. The There is no power to the Ensure the AC plug is plugged into an electrical outlet not Power LED is off. - Page 308 Synapse User’s Guide Symptom Probable Cause Corrective Action ATA General Troubleshooting ATA screen displays Synch The ATA was disconnected, Refer to “Reintroducing a Gateway or ATA Into the Failed. then reconnected after System” on page 260. configuration changes were made to the system. The ATA was configured on Reset to factory defaults by using a paper clip to press another network or has...
-
Page 309: [Ata] Music On Hold (Moh) Troubleshooting
Synapse User’s Guide [ATA] Music on Hold (MoH) Troubleshooting Symptom Probable Cause Corrective Action ATA MoH Troubleshooting In the WebUI: Click System Settings, then Hold Music on Hold (MoH) is not MoH is disabled. Settings, set Select Port to be ATA: AUX IN and then playing and the AUX IN LED (right of the ATA LCD screen) click... - Page 310 Synapse User’s Guide Symptom Probable Cause Corrective Action ATA MoH Troubleshooting MoH is not playing and If the MoH not properly configured. Verify that the audio source is playing and not muted. AUX IN LED (right of the ATA Set the MoH output volume level by adjusting the LCD screen) is GREEN.
- Page 311 Synapse User’s Guide Symptom Probable Cause Corrective Action ATA MoH Troubleshooting MoH audio is too quiet, The volume on the audio If you can adjust the output volume of your audio source fluctuating, or dropping out. source is too low or too high. (like the headset jack of an MP3 player), call into your If the volume is too high, Synapse system, place the call on hold, listen to MoH on...
-
Page 312: [Ata] Overhead Paging (Ohp) Troubleshooting
Synapse User’s Guide [ATA] Overhead Paging (OHP) Troubleshooting Symptom Probable Cause Corrective Action ATA OHP Troubleshooting Overhead paging (OHP) is You don’t know whether your There are three possible configurations for OHP: not working. OHP is single- or multi-zone Single-zone paging connected to the AUX OUT jack. and whether it needs an FXS Single-zone paging connected to one of the two FXS or an Audio-Out connection. - Page 313 Synapse User’s Guide Symptom Probable Cause Corrective Action ATA OHP Troubleshooting I cannot add a multi-zone Multi-zone paging does not Page multi-zone OHP zones separately from extensions. paging zone to other paging allow a combination of OHP zones. equipment and Desksets within one paging zone.
- Page 314 Synapse User’s Guide Symptom Probable Cause Corrective Action ATA OHP Troubleshooting Single-Zone OHP Connected to AUX OUT Jack For OHP equipment connected to the AUX OUT jack, this Troubleshooting refers to the ATA front-panel AUX OUT LED. This describes the behavior of these LEDs: OFF: There is a problem with the WebUI configuration for OHP.
- Page 315 Synapse User’s Guide Symptom Probable Cause Corrective Action ATA OHP Troubleshooting Single-zone OHP on AUX The OHP is not a member of Ask the system administrator to verify that the OHP OUT is not working and the a Paging Zone. equipment is part of the paging zone that you are trying AUX OUT LED (right of the to page.
- Page 316 Synapse User’s Guide Symptom Probable Cause Corrective Action ATA OHP Troubleshooting 1. As administrator, log into the WebUI and click System In single-zone paging, paging Paging delay is too short. Settings, then Overhead Paging. starts on Desksets before the paging starts on the OHP 2.
- Page 317 Synapse User’s Guide Symptom Probable Cause Corrective Action ATA OHP Troubleshooting Single-Zone OHP Connected to an FXS Port For OHP equipment connected to an FXS port, this Troubleshooting refers to the ATA front-panel FXS LED for the FXS port you are using for the OHP equipment.
- Page 318 Synapse User’s Guide Symptom Probable Cause Corrective Action ATA OHP Troubleshooting Single-zone OHP on FXS is There may be a problem with Ask the system administrator to verify your paging not working. (Continued) the paging equipment or its equipment configuration. Check to see if the OHP system setup.
- Page 319 Synapse User’s Guide Symptom Probable Cause Corrective Action ATA OHP Troubleshooting Single-zone OHP on FXS is A device other than an OHP Ensure that the OHP is connected to the correct ATA port. not working and the FXS LED (such as a fax machine) is Refer to your OHP product documentation for installation (right of the ATA LCD screen) connected to the FXS port...
- Page 320 Synapse User’s Guide Symptom Probable Cause Corrective Action ATA OHP Troubleshooting Multi-Zone OHP Connected to an FXS Port For OHP equipment connected to an FXS port, this Troubleshooting refers to the ATA front-panel FXS LED for the FXS port you are using for the OHP equipment.
- Page 321 Synapse User’s Guide Symptom Probable Cause Corrective Action ATA OHP Troubleshooting The OHP can not be paged a Page the Desksets and OHP separately. the same time as the Desksets. There may be a problem with Verify your paging equipment configuration. Check to see the paging equipment or its if the OHP system has settings that need to be adjusted setup.
- Page 322 Synapse User’s Guide Symptom Probable Cause Corrective Action ATA OHP Troubleshooting Multi-zone OHP is not Someone has initiated a Ask the system administrator to verify the connection working and the FXS LED page, but the OHP between the FXS port and your OHP system. (right of the ATA LCD screen) equipment has not yet Verify your paging equipment configuration.
-
Page 323: [Ata] Fax Configuration Troubleshooting
Synapse User’s Guide [ATA] Fax Configuration Troubleshooting Symptom Probable Cause Corrective Action ATA Fax Configuration Troubleshooting 1. As administrator, log into the WebUI, and click System While using T.38 mode, Incompatible Fax Mode unable to receive faxes or setting. Settings, then Fax Configuration. having persistent fax 2. - Page 324 Synapse User’s Guide Symptom Probable Cause Corrective Action ATA Fax Configuration Troubleshooting The fax is not working and The Gateway and the fax are Ask the system administrator to verify the connection the FXS 1 or FXS 2 LED (right not communicating.
- Page 325 Synapse User’s Guide Symptom Probable Cause Corrective Action ATA Fax Configuration Troubleshooting The fax is not working and The ring voltage is present Toggle the fax mode setting: the FXS LED (right of the ATA and your FXS configuration is As administrator, log into the WebUI, click System LCD screen) that likely wrong.
-
Page 326: [Ata] Analog Phone Troubleshooting
Synapse User’s Guide [ATA] Analog Phone Troubleshooting Symptom Probable Cause Corrective Action ATA Analog Phone Troubleshooting Analog phone connected to The WebUI configuration is Verify that your telephone is connected to FXS 1 or FXS 2. FXS port does not work as If not, plug it in, or change the analog telephone incorrect. - Page 327 Synapse User’s Guide Symptom Probable Cause Corrective Action ATA Analog Phone Troubleshooting Analog phone connected to Analog phone is working Consider the analog phone limitations: FXS port does not work as with Synapse, but does not To make outgoing calls on an analog phone expected.
-
Page 328: [Ata] Group Mailbox Troubleshooting
Synapse User’s Guide [ATA] Group Mailbox Troubleshooting Symptom Probable Cause Corrective Action ATA Group Mailbox Troubleshooting Group Mailbox does not Needs an ATA to be Group mailboxes reside on the ATA. The ATA must be work. available. connected. See the Synapse Installation Guide at www.telephones.att.com/synapseguides Group Mailbox is full even The sum of the quotas for... -
Page 329: Appendixes
Synapse User’s Guide PPENDIXES Appendix A: Soft Keys The Synapse Desksets and Cordless Handsets feature keys below the LCD screen. The bottom of the LCD displays the appropriate label for each key as the function of the key changes. Appendixes... -
Page 330: Deskset Soft Keys
Synapse User’s Guide Deskset Soft Keys Table 18 provides an alphabetical list of the labels that appear above the Deskset soft keys. Table 18. Deskset Soft Key Functions Function Description Function Description Adds an extension destination when forwarding a Deregisters Cordless Handset or Headset in Voicemail message. - Page 331 Synapse User’s Guide Table 18. Deskset Soft Key Functions (Continued) Function Description Function Description Initiates recording of an introduction when Parks a call. forwarding a Voicemail message. Accesses the Park list so you can review or pick Completes conference call setup. up parked calls.
-
Page 332: [Handset] Cordless Handset Soft Keys
Synapse User’s Guide [Handset] Cordless Handset Soft Keys Table 19 provides an alphabetical list of the labels that appear above the Cordless Handset soft keys. Table 19. Cordless Handset Soft Keys Function Function Answer an incoming call and place it in the Access the four viewing options for the Directory: Handset Call Deck. -
Page 333: Appendix B: Technical Specifications
Synapse User’s Guide Appendix B: Technical Specifications Table 20 lists the technical specifications for the SB67010 PSTN Gateway, SB67060 T1 Gateway, SB67050 ATA, SB67030 Deskset, and SB67040 Cordless Handset. Table 20. Technical Specifications Feature Specification Frequency control Crystal controlled PLL synthesizer Transmit Frequency Deskset, Cordless Handset, Cordless Headset: 1921.536–1928.448 MHz Deskset: 1921.536–1928.448 MHz... - Page 334 Synapse User’s Guide Table 20. Technical Specifications (Continued) Feature Specification Power Requirements PSTN Gateway: 5.1V DC @ 1700mA T1 Gateway and ATA: 12V @ 18 Watts Deskset: 5.1V DC @ 1700mA Cordless Handset, Cordless Headset chargers: 6V DC @ 200mA Cordless Handset: 2.4V 550mA Ni–MH battery Cordless Headset: 3.7V 240mAH battery RJ–45 Ethernet...
- Page 335 Synapse User’s Guide Table 20. Technical Specifications (Continued) Feature Specification [ATA] AUX Out 3.5 mm Tip (Signal), Ring (NC) Sleeve (Ground) (TRS) jack Frequency range 300 to 3.4K Hz Output level -15dBm nominal Output impedance less than or equal to 8 ohms AC coupling Deskset Headset Traditional corded handset jack type with 2–conductor wiring...
-
Page 336: Appendix C: Maintenance
Synapse User’s Guide Appendix C: Maintenance Your system contains sophisticated electronic parts, so it must be treated with care. Avoid Rough Treatment Handle the unit gently. Save the original packing materials to protect your equipment if you ever need to ship it. Avoid Water Your unit can be damaged if it gets wet. -
Page 337: Appendix D: Important Safety Instructions
Synapse User’s Guide Appendix D: Important Safety Instructions This symbol alerts you to important operating or servicing instructions in this document. Always follow basic safety precautions when using this product to reduce the risk of injury, fire, or electric shock. When using your telephone equipment, basic safety precautions should always be followed to reduce the risk of fire, electric shock, and injury, including the following: Read and understand all instructions. - Page 338 Synapse User’s Guide Unplug this product from the wall outlet and refer servicing to an authorized service facility under the following conditions: When the power supply cord or plug is damaged or frayed. If liquid has been spilled on the product. If the product has been exposed to rain or water.
-
Page 339: Appendix E: Limited Warranty
Synapse User’s Guide Appendix E: Limited Warranty The AT&T brand is used under license. For customer service, repair, replacement, or warranty service, and all questions about this product, contact the person who installed your system. If your installer is unavailable, visit our web site at www.telephones.att.com/smb 1 (888) 916-2007. - Page 340 Synapse User’s Guide 4. What is not covered by this limited warranty? This limited warranty does not cover: PRODUCT that has been subjected to misuse, accident, shipping or other physical damage, improper installation, abnormal operation or handling, neglect, fire, water or other liquid intrusion; or PRODUCT that has been damaged due to repair, alteration or modification by anyone other than an authorized service representative of the manufacturer;...
- Page 341 Synapse User’s Guide 5. How do you get warranty service? To obtain warranty service, contact the person who installed your system. If your installer is unavailable, visit our web site at www.telephones.att.com/smb 1 (888) 916-2007. 1 (888) 883-2474 or call In Canada, call Before calling for service, please review the user manual.
- Page 342 Synapse User’s Guide 7. Other limitations This warranty is the complete and exclusive agreement between you and the manufacturer of this AT&T-branded PRODUCT. It supersedes all other written or oral communications related to this PRODUCT. The manufacturer provides no other warranties for this PRODUCT.
-
Page 343: Glossary
Synapse User’s Guide LOSSARY This glossary provides definitions that pertain to the Synapse telephone system. 10/100 Ethernet Port: An Ethernet port that supports two different speeds of Ethernet on the same port. The two speeds supported are 10Base-T and 100Base-TX. 10Base-T/100Base-TX: An Ethernet network operating at up to 100 megabits per second active call: An established telephone call that is not on hold analog: A continuously variable signal... - Page 344 Synapse User’s Guide BYPASS port: An RJ-11 jack on the PSTN Gateway that allows for communication during power outages. Plug an analog telephone into the this jack. Call Appearance: The five icons on the right side of the Deskset display and the keys and LEDs associated with those icons. The keys access active and held calls, and calls that are being dialed or predialed.
- Page 345 Synapse User’s Guide DHCP (Dynamic Host Configuration Protocol): A network protocol that automatically assigns computer IP addresses dial pad: The 0 through 9, *, and # keys on the Deskset and Cordless Handset direct dial: Allows callers to directly dial users' extension numbers after the Auto Attendant answers Directory: A list of names and phone numbers Display Names: The names that the system administrator enters to identify each extension number.
- Page 346 Synapse User’s Guide Extension Directory: A private list of names and phone numbers available to only a single extension (referred to as “Personal list” on the Deskset) Extension list: A list of names and extension numbers for the Synapse system telephones extension number: The three-digit or four-digit number representing each individual Deskset factory default: The original product settings FDL (Facility Data Link): A 4-kbps channel provided by the Extended Super Frame (ESF) T1 framing format that allows a service...
- Page 347 Synapse User’s Guide Hold announcement: A recorded message to play while calls are on hold. It can be combined with music on hold. hub: A network hub or repeater hub is a device for connecting electronic devices, making them act as a single link hunt group: A telephone company feature that allows calls to a busy phone number to roll over to the next available line or a Synapse system ring group feature where unanswered calls are forwarded to the next available extension in a predefined group of extensions...
- Page 348 Synapse User’s Guide live dial: Dialing after the phone is off hook MAC address (Media Access Control address): A unique identifier assigned to most network adapters or network interface cards that is required for registering your devices main menu, Auto Attendant: The Auto Attendant messages and actions that are available to callers before the callers take additional actions MDI/MDIX: (Medium-Dependent Interface Crossover): A computer networking technology MoH (Music on Hold): Music or other audio that plays to an outside caller that has been placed on hold by a Synapse user...
- Page 349 Synapse User’s Guide overwrite: Replace existing information P2P (Peer-to-Peer): A telecommunication system architecture in which some resources associated with a device are directly available to other similar system devices page: Broadcasts your voice to all idle extensions that do not have Do Not Disturb turned on page caching: Most web browsers store recently obtained web site data on a local hard drive.
- Page 350 Synapse User’s Guide RF (radio frequency): The communication channel for most Cordless Handsets and Cordless Headsets ring group: Groups of extensions configured by the system administrator to all ring in a predetermined pattern within the group when calls come in for that group router: An electronic device that connects two or more other electronic devices to each other, allowing them to communicate scroll: Causes the screen display to move up, down, or across the screen single-zone paging: Paging to a single set of overhead loudspeakers.
- Page 351 Synapse User’s Guide System list: This list of names and phone numbers is created and maintained by the system administrator. All system users can sort and view this list. system operator: The extension that callers reach by dialing 0 (zero) when the Auto Attendant operator feature is enabled or that system users reach at any time by dialing 0 (zero) T1: A digital signaling standard to transmit voice and data between devices T.38: An analog fax protocol that encodes fax-modem codes over VoIP...