Table of Contents
Advertisement
Quick Links
Download this manual
See also:
User Manual
Advertisement
Table of Contents
Troubleshooting

Related Manuals for Dexcom G4


Summary of Contents for Dexcom G4
- Page 1 Dexcom G4 CONTINUOUS GLUCOSE MONITORING SYSTEM USER’S GUI DE...
- Page 3 Dexcom G4 CONTINUOUS GLUCOSE MONITORING SYSTEM...
- Page 4 Other Notes: © 2013 Dexcom, Inc. All rights reserved. Dexcom, Dexcom G4, Dexcom Studio, SEVEN, Stay Between the Lines and The Glucose Sensor Company are either registered trademarks or trademarks of Dexcom, Inc. in the United States and/or other countries. All other product or company names that may be mentioned in this publication are tradenames, trademarks or registered trademarks of their respective owners.
-
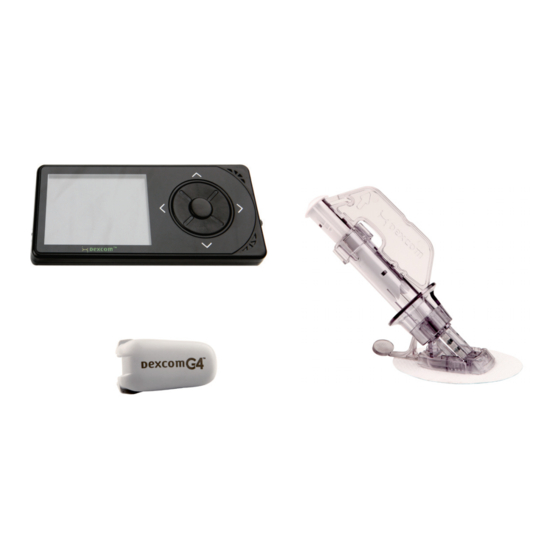
Page 5: System Kit Contents
HELPFUL HINT: Sensors are sold separately. Commercially distributed blood glucose (BG) meter required for use. Make sure to use the correct version of Dexcom Studio with your system. The sensor works with the Dexcom G4 family of products. The Dexcom G4 Sensor, Transmitter, and Receiver are not compatible with the SEVEN/SEVEN PLUS Transmitter and Receiver. -
Page 6: Introduction
Some people have found this to be an effective method of product training. Please review the tutorial on the disc and discuss with your healthcare professional if the Dexcom G4 training tutorial is an appropriate training option for you. -
Page 7: Indications For Use
• The Dexcom G4 Sensor, Transmitter, and Receiver must be removed prior to Magnetic Resonance Imaging (MRI), CT scan, or diathermy treatment. The Dexcom G4 System has not been tested during MRI or CT scans or with diathermy treatment, and it is unknown if there are safety or performance issues. - Page 8 WARNINGS • Do not use the Dexcom G4 CGM System until after you have been trained or viewed the training materials included with your CGM system. • The blood glucose value from your blood glucose meter should be used for treatment decisions, such as how much insulin you should take.
- Page 9 Sensors should not be stored in a freezer. • Keep the USB port cover on the receiver closed whenever the USB cable is not attached. The receiver may malfunction if water gets into the USB port. Dexcom G4 User’s Guide...
-
Page 10: Table Of Contents
2.2.2 Setting Your Receiver Time and Date 2.2.3 Entering Your Transmitter ID 2.2.4 Setting Your Receiver Time Format 2.2.5 Selecting Your Receiver Language 2.3 Checking Information About Your Dexcom G4 System 2.4 Transmitter and Receiver Communication CHAPTER 3: INSERTING A SENSOR AND STARTING A SENSOR SESSION 3.1 Before You Start... -
Page 11: Dexcom G4 User's Guide
CHAPTER 4: CALIBRATING YOUR DEXCOM G4 SYSTEM 4.1 Calibration Overview 4.2 How to Calibrate 4.3 Startup Calibration 4.4 12 Hour Calibration Update 4.5 Other Reasons You May Need to Calibrate CHAPTER 5: SENSOR GLUCOSE READINGS AND TRENDS 5.1 Sensor Glucose Readings 5.2 Rate of Change Arrows... - Page 12 9.8.3 Low Transmitter Battery 9.8.4 Transmitter Failed Error Code 9.9 Out of Range/No Antenna 9.10 Alerts Not Working CHAPTER 10: TAKING CARE OF YOUR DEXCOM G4 SYSTEM 10.1 Maintenance 10.2 Storage 10.3 Cleaning and Disinfection 10.4 Product Disposal CHAPTER 11: TECHNICAL INFORMATION 11.1 Product Specifications...
-
Page 13: Chapter 1: The Dexcom G4 System Basics
THE DEXCOM G4 SYSTEM BASICS Dexcom G4 User’s Guide... - Page 14 Dexcom G4 Continuous Glucose Monitoring System...
-
Page 15: Sensor Overview
The transmitter battery will last at least 6 months. Once you see the transmitter low battery screen shown on the right, replace the transmitter as soon as possible. Your transmitter battery may drain as quickly as one week after this alert appears. Dexcom G4 User’s Guide... -
Page 16: Receiver Overview
Status Area Antenna Trend Arrow High Glucose Alert Setting Glucose Values Glucose Plot of most Target Range recent sensor glucose reading Low Glucose Current Time Alert Setting Trend Graph Hours EXAMPLE: 3-Hour Trend Graph Screen Dexcom G4 Continuous Glucose Monitoring System... - Page 17 Your receiver and transmitter are wirelessly paired together to communicate securely and only with each other. You will need a commercially available blood glucose meter to use with your system. UP button RIGHT button SELECT button LEFT button DOWN button Dexcom G4 User’s Guide...
-
Page 18: Charging Your Receiver Battery
Vista SP2, Microsoft Windows XP SP2 or Microsoft Server 2008 SP2) In order to use a PC cable to charge your receiver, you will need to install the driver for this receiver. Please see the Dexcom Studio installation card for driver installation instructions. - Page 19 • Press down firmly with your thumb when sliding open the USB port cover. 5. The battery charging screen will appear on the receiver. 6. After a few seconds the trend graph will reappear with the battery charging symbol ( ) shown in the upper left corner. Dexcom G4 User’s Guide...
-
Page 20: Charging Your Receiver Battery From Awindows Compatible Computer
1.4.2 CHARGING YOUR RECEIVER BATTERY FROM A WINDOWS COMPATIBLE COMPUTER The Dexcom Studio software must be installed to charge your receiver from a computer. 1. Plug the included USB cable into your computer. 2. Plug other end of the USB cable into the receiver. -
Page 21: Knowing Your Receiver Is Charged
After 3 days you will be prompted to reset your receiver time and date (see Chapter 2, Section 2.2, The Settings Menu). • Only use the Dexcom battery charger provided in the receiver kit. Do not use any other battery charger. - Page 22 Settings To change the time, date and transmitter ID, to look Chapter 2 up your Dexcom G4 System hardware and software version numbers, to view transmitter battery status, last calibration value, sensor insertion time. Shutdown To temporarily turn off all communications between...
-
Page 23: Chapter 2: Dexcom G4 System Setup
DEXCOM G4 SYSTEM SETUP Dexcom G4 User’s Guide... - Page 24 Dexcom G4 Continuous Glucose Monitoring System...
-
Page 25: The Setup Wizard
This chapter will help you when you first set up your Dexcom G4 Continuous Glucose Monitoring System. Read this chapter before you start. THE SETUP WIZARD 1. Before setting up the receiver remove the transmitter from its packaging. It takes 10 minutes for the transmitter to turn on after it is removed from its packaging. - Page 26 • Write your transmitter ID number down in the Important Contacts and Numbers list on page 4. • If you need to change the language, time format, time, date or transmitter ID after you have completed the Setup Wizard see Section 2.2, The Settings Menu. Dexcom G4 Continuous Glucose Monitoring System...
- Page 27 SELECT button to confirm your preferred alert value. The Setup Wizard is now complete. To begin using your Dexcom G4 CGM System you will need to insert a sensor (see Chapter 3, Inserting a Sensor and Starting a Sensor Session).
-
Page 28: The Settings Menu
RIGHT button to move to the next value. The date format is YYYY/MM/DD. After choosing the time, press the SELECT button. You will return to the settings menu. Dexcom G4 Continuous Glucose Monitoring System... -
Page 29: Entering Your Transmitter Id
Continue repeating steps a and b until you have the transmitter ID displayed. c. After entering the fifth number or letter, press the SELECT button. You will return to the settings menu. Dexcom G4 User’s Guide... -
Page 30: Setting Your Receiver Time Format
“Language” and press the SELECT button. 2. Press the DOWN button to scroll and highlight your desired language. 3. Press the SELECT button to set the highlighted language. You will return to the settings menu. Dexcom G4 Continuous Glucose Monitoring System... -
Page 31: Checking Information About Your Dexcom G4 System
CHECKING INFORMATION ABOUT YOUR DEXCOM G4 SYSTEM You can check your receiver for information about your CGM at any time. 1. From the Settings menu, press the DOWN button to scroll to “Device Info” and press the SELECT button. 2. Information about your sensor session and system will appear. -
Page 32: Transmitter And Receiver Communication
The Dexcom G4 Sensor, Transmitter, and Receiver must be removed prior to Magnetic Resonance Imaging (MRI), CT scan, or diathermy treatment. The Dexcom G4 System has not been tested during MRI, CT scans or with diathermy treatment, and it is unknown if there are safety or performance issues. -
Page 33: Chapter 3: Inserting A Sensor And Starting A Sensor Session
INSERTING A SENSOR AND STARTING A SENSOR SESSION Dexcom G4 User’s Guide... - Page 34 Dexcom G4 Continuous Glucose Monitoring System...
-
Page 35: Before You Start
For patients undergoing an MRI with a retained wire broken off from a Dexcom G4 Sensor, in-vitro MRI testing did not detect any safety hazards. There was no significant migration or heating of the wire and imaging artifacts were limited to the area around the wire. - Page 36 Sensors should not be stored in a freezer. REVIEW THE SENSOR APPLICATOR Review the sensor applicator picture below before using a new sensor. Plunger Safety lock Applicator barrel (contains small Collar introducer needle and sensor) Transmitter latch Sensor pod Release tab Dexcom G4 Continuous Glucose Monitoring System...
-
Page 37: Removing The Sensor From Its Packaging
• You may need to shave the area where you plan to put the sensor so that the adhesive patch sticks securely. • Make sure there are no traces of lotions, perfumes or medications on the area. Dexcom G4 User’s Guide... -
Page 38: Placing The Sensor
PLACING THE SENSOR The Dexcom G4 System is a glucose-monitoring device indicated for detecting trends and tracking patterns in persons (age 18 and older) with diabetes. 1. Clean the area first with an alcohol wipe. Make sure the area is clean and completely dry before you insert the sensor. -
Page 39: Sensor Insertion
2 “clicks” or can not pull back any more. This step leaves the sensor under your skin and Pull back the collar - Retract removes the sensor introducer needle from the Needle your body. Dexcom G4 User’s Guide... -
Page 40: Transmitter Attachment
10, Section 10.3, Cleaning and Disinfection. Be careful not to scratch the bottom of the transmitter as scratches may compromise the waterproof seal. 2. Place the transmitter in the sensor pod with the flat side facing down. Install transmitter in sensor pod Dexcom G4 Continuous Glucose Monitoring System... - Page 41 This can lead to inaccurate sensor glucose readings. • Do not remove the transmitter from the sensor pod while the pod is attached to your skin. Dexcom G4 User’s Guide...
-
Page 42: Starting A Sensor Session
• After starting a new sensor session, you will not receive sensor glucose readings or alerts until your 2-hour startup period has ended and you have completed your initial calibrations. See Chapter 4, Section 4.3, Startup Calibration. Dexcom G4 Continuous Glucose Monitoring System... -
Page 43: Sensor Startup Period
At the end of the 2-hour startup period the receiver will let you know that it is time to calibrate your sensor. Chapter 4, Calibrating Your Dexcom G4 System, tells you how to calibrate your sensor. -
Page 44: Taping The Sensor Pod
3. To turn the receiver back on and resume communication with the transmitter, press the SELECT button. It may take up to 20 seconds for the display to turn back on. Dexcom G4 Continuous Glucose Monitoring System... -
Page 45: The Dexcom G4 System And Water
Your sensor session will stop 7 days after you started the sensor session. 3.11 THE DEXCOM G4 SYSTEM AND WATER Your sensor is water resistant when showering, bathing, or swimming if the transmitter is fully snapped in. The sensor has been tested to be water resistant when submerged for up to 2.44 meters for a maximum of 24 hours. - Page 46 THIS PAGE LEFT INTENTIONALLY BLANK Dexcom G4 Continuous Glucose Monitoring System...
-
Page 47: Chapter 4: Calibrating Your Dexcom G4 System
CALIBRATING YOUR DEXCOM G4 SYSTEM Dexcom G4 User’s Guide... - Page 48 Dexcom G4 Continuous Glucose Monitoring System...
-
Page 49: Calibration Overview
The Dexcom G4 System requires you to calibrate the sensor glucose readings to your blood glucose meter. Taking acetaminophen (paracetamol) containing products (such as Tylenol) while wearing the sensor may falsely raise your sensor glucose readings. The level of inaccuracy depends on the amount of acetaminophen (paracetamol) active in your body. -
Page 50: How To Calibrate
3. Use the DOWN button to scroll until you highlight “Enter BG.” 4. Press the SELECT button to choose this option. You will see a screen with a blood drop and a number in mmol/L units. Dexcom G4 Continuous Glucose Monitoring System... - Page 51 “time out” and no blood glucose value will be recorded for calibration. 7. The “Enter BG” processing screen will appear to let you know the blood glucose value is being processed for calibration. Dexcom G4 User’s Guide...
- Page 52 • The accuracy of the blood glucose meter measurement used for calibration may affect the accuracy of sensor glucose readings. • Do not calibrate your Dexcom G4 System when you have acetaminophen (paracetamol) active in your body. Taking acetaminophen (paracetamol) containing products (such as Tylenol) while wearing the sensor may falsely raise your sensor glucose readings.
-
Page 53: Startup Calibration
12 hours, the receiver will ask you to enter a blood glucose value to update its calibration. The following steps show you how to enter this calibration. Your sensor glucose readings may be inaccurate if you calibrate less than every 12 hours. Dexcom G4 User’s Guide... -
Page 54: Other Reasons You May Need To Calibrate
9.2.1, Types of Calibration Prompts. Calibration prompt HELPFUL HINT: If you see these screens they are indicating calibration errors (see Chapter 9, Section 9.3, Calibration Error Troubleshooting). 15 minute calibration 1 hour calibration error screen error screen Dexcom G4 Continuous Glucose Monitoring System... -
Page 55: Chapter 5: Sensor Glucose Readings And Trends
SENSOR GLUCOSE READINGS AND TRENDS Dexcom G4 User’s Guide... - Page 56 Dexcom G4 Continuous Glucose Monitoring System...
- Page 57 HELPFUL HINTS: • The greatest benefit you receive from using your Dexcom G4 System will come from the trending information. It is important that you focus on the trends and rate of change on your receiver, rather than the exact glucose reading.
-
Page 58: Sensor Glucose Readings
• If your low glucose alert is not set and your glucose is 3.1 mmol/L or lower, your glucose value will be red. • If your sensor glucose readings are in between your high and low glucose alert settings, the glucose value will be white. Dexcom G4 Continuous Glucose Monitoring System... - Page 59 6 hours of sensor glucose readings. (Scroll down from the 6-hour graph to reach the 12-hour graph) 12-Hour Trend Graph: The 12-hour trend graph shows your current glucose reading and the last 12 hours of sensor glucose readings. Dexcom G4 User’s Guide...
-
Page 60: Rate Of Change Arrows
The trend arrows appear to the right of your current glucose reading. HELPFUL HINT: • Do not overreact to the rate of change arrows. Consider recent insulin dosing, activity, food intake, your overall trend graph and your blood glucose value before taking action. Dexcom G4 Continuous Glucose Monitoring System... - Page 61 If it continued falling at this rate, your glucose could decrease more than 2.5 mmol/L in 15 minutes. No rate of change information: The receiver cannot calculate how fast your glucose is rising or falling at this time. arrow Dexcom G4 User’s Guide...
-
Page 62: Glucose Status Area Symbols
(see Chapter 4, Section 4.2, How to Calibration Calibrate). Needed This icon means you need to enter one more blood glucose value in order to calibrate the system and start receiving sensor glucose readings. Additional Calibration Needed Dexcom G4 Continuous Glucose Monitoring System... - Page 63 This icon means the receiver has detected a potential problem with the sensor signal. You should wait about 30 minutes for more prompts. Do not enter any blood glucose values when you see this symbol. Wait Dexcom G4 User’s Guide...
- Page 64 THIS PAGE LEFT INTENTIONALLY BLANK Dexcom G4 Continuous Glucose Monitoring System...
-
Page 65: Chapter 6: Alerts, Alarms And Alert Profiles
ALERTS, ALARMS AND ALERT PROFILES Dexcom G4 User’s Guide... - Page 66 Dexcom G4 Continuous Glucose Monitoring System...
-
Page 67: Setting Your Alerts
System’s many alerts and alarms and how to customize them. SETTING YOUR ALERTS 6.1.1 DEFAULT ALERT/ALARM SETTINGS When you receive your Dexcom G4 CGM System the following alerts and alarms are preset on your receiver (see table below). What will I see What does this... - Page 68 HELPFUL HINT: • Your receiver may alert you at other times you need to take action such as low battery, failed sensor, etc. See Chapter 12, Appendix, for a detailed list of these other alerts. Dexcom G4 Continuous Glucose Monitoring System...
-
Page 69: Glucose Alerts
6.1.2 GLUCOSE ALERTS The Dexcom G4 System lets you create your own personal settings for how you want the receiver to tell you what is going on. The low and high glucose alerts will tell you when your sensor glucose readings are outside your target glucose range. -
Page 70: Low Glucose Alert
• When you have both your high and low alerts turned on there will be a gray zone on your trend graphs indicating your target range. • If your high or low alert is turned off this gray zone will not appear. Dexcom G4 Continuous Glucose Monitoring System... -
Page 71: Low Glucose Alarm
6.1.5 LOW GLUCOSE ALARM The Dexcom G4 System also has a fixed low alarm set at 3.1 mmol/L. This alarm is a feature in addition to your personal low and high glucose alerts. You cannot change or turn off this alarm or its re-alarm settings. -
Page 72: High And Low Glucose Alerts
• Your high glucose alert value can be set between 6.7 and 22.2 mmol/L in 0.1 mmol/L increments. • Your low glucose alert value can be set between 3.3 and 5.5 mmol/L in 0.1 mmol/L increments. Dexcom G4 Continuous Glucose Monitoring System... -
Page 73: Advanced Alerts
3. Press the DOWN button to highlight “Alerts” and press the SELECT button. 4. From the alerts menu, press the DOWN button to select “Advanced” and press the SELECT button. Dexcom G4 User’s Guide... -
Page 74: Setting A Snooze Time For Your High And Low Glucose Alerts
Press the SELECT button. If you set the amount of time to zero there will be no re-alerts. 3. When finished, press the LEFT button to return to the alerts menu. Dexcom G4 Continuous Glucose Monitoring System... -
Page 75: Rise And Fall Glucose Rate Alerts
If you set your rise rate to 0.17 mmol/L per minute and your sensor glucose readings rise at this rate or faster, the “RISING double arrow” screen will appear and the receiver will vibrate or beep according to your profile settings. Rapid rise alert Dexcom G4 User’s Guide... - Page 76 “0.11 mmol/L/min” (0.11 mmol/L or more per minute) or “0.16 mmol/L/min” (0.16 mmol/L or more per minute). Press the SELECT button. 5. When finished, press the LEFT button to return to the alerts menu. Dexcom G4 Continuous Glucose Monitoring System...
-
Page 77: Setting The Out Of Range Alert
“On.” If you do not want to receive out of range alerts press the SELECT button to choose “Off.” 3. Next, on the out of range menu, press the DOWN button to choose “Time” and press the SELECT button. Dexcom G4 User’s Guide... -
Page 78: Alert Profiles
ALERT PROFILES The Dexcom G4 System allows you to set profiles to choose the way you want your alerts to behave. This customizable feature is found under the Profiles option on the Main Menu shown to the right. - Page 79 • If the alert is confirmed and your sensor glucose readings continue to be at or below 3.1 mmol/L your system will repeat the alert sequence above in 30 minutes. To confirm any alert press the SELECT button. Dexcom G4 User’s Guide...
-
Page 80: Alert Profile Options
The “Try It” feature is available under the profiles menu and allows you to hear an example of the alert sequence and sound for each individual alert and alarm. Once you hear the sounds, it is easier to understand the alert profile options. Dexcom G4 Continuous Glucose Monitoring System... -
Page 81: Alert Profile Details
All Other 1 long vibrate 1 long 1 long 1 long vibrate 1 long vibrate + 1 vibrate + 1 vibrate + + 1 short medium beep Alerts low beep 1 medium melody beep Dexcom G4 User’s Guide... - Page 82 The profiles menu will appear. 4. Press the DOWN button to scroll to the profile you want to set and press the SELECT button. 5. When finished, press the LEFT button to return to the main menu. Dexcom G4 Continuous Glucose Monitoring System...
-
Page 83: Chapter 7: Events
EVENTS Dexcom G4 User’s Guide... - Page 84 Dexcom G4 Continuous Glucose Monitoring System...
-
Page 85: Events
Dexcom Studio software. EVENTS HELPFUL HINT: • Event markers can be downloaded and viewed in the Dexcom Studio software but cannot be viewed on your receiver. 7.1.1 SELECTING AN EVENT 1. Press the SELECT button to turn on the receiver. -
Page 86: Setting The Date And Time For An Event
RIGHT button to move to the next value. After adjusting the time, press the SELECT button. 2. You will advance to the event confirmation screen. Press the SELECT button to confirm the entry. Dexcom G4 Continuous Glucose Monitoring System... -
Page 87: Carbohydrates
4. You will advance to the event confirmation screen. Press the LEFT RIGHT button to choose either “OK” to confirm or “Cancel” to discard this entry, and then press the SELECT button. You will return to the Events menu. Dexcom G4 User’s Guide... -
Page 88: Insulin
4. You will advance to the event confirmation screen. Press the LEFT RIGHT button to choose either “OK” to confirm this entry or “Cancel” to discard this entry, and then press the SELECT button. You will return to the Events menu. Dexcom G4 Continuous Glucose Monitoring System... -
Page 89: Exercise
5. You will advance to the event confirmation screen. Press the LEFT RIGHT button to choose either “OK” to confirm this entry or “Cancel” to discard this entry, and then press the SELECT button. You will return to the events menu. Dexcom G4 User’s Guide... -
Page 90: Health
You will return to the events menu. DEXCOM STUDIO SOFTWARE The Dexcom Studio software is an optional component of your system. This software allows you to view trends, track patterns and create customizable charts to display your glucose trends. -
Page 91: Chapter 8: Completing A Sensor Session
chapter eight COMPLETING A SENSOR SESSION... - Page 93 (sensor and applicator). • In some cases your sensor session may end before you have completed a full 7-day period. If this happens, see Chapter 9, Section 9.6, Sensor Shut-Off Troubleshooting. Dexcom G4 User’s Guide...
-
Page 94: Automatic Sensor Shut-Off
You will need to remove your sensor and insert a new sensor. Dexcom G4 Continuous Glucose Monitoring System... -
Page 95: Removing A Sensor
1. Place the sensor pod on a table. 2. Hold the rounded edge of the safety lock. 3. Make sure the jagged edge of the safety lock is facing down (the direction away from the removal arrow) as shown below: Dexcom G4 User’s Guide... - Page 96 If you did not save the safety lock, you can simply use your fingers to spread out the tabs at the back of the sensor pod (end closest to the sensor pod tab wings). The transmitter will “pop” out of the sensor pod. Dexcom G4 Continuous Glucose Monitoring System...
-
Page 97: Chapter 9: Troubleshooting
TROUBLESHOOTING Dexcom G4 User’s Guide... - Page 98 Dexcom G4 Continuous Glucose Monitoring System...
-
Page 99: Sensor Insertion Troubleshooting
This chapter provides helpful tips and instructions to resolve issues you may experience while using your Dexcom G4 CGM System. HELPFUL HINT: • If the troubleshooting steps in this chapter do not fix your issue, contact your local distributor. SENSOR INSERTION TROUBLESHOOTING Sensor insertion difficulties •... -
Page 100: Calibration Troubleshooting
• Make sure you have not taken any medications containing acetaminophen (paracetamol) (such as Tylenol). • Make sure your transmitter is fully snapped in to your sensor pod. • See Chapter 4, Calibration, for further information. Dexcom G4 Continuous Glucose Monitoring System... -
Page 101: Types Of Calibration Prompts
12 hour calibration update or any other time you may need to calibrate. The receiver will continue to display this prompt screen every 15 minutes until the receiver accepts the blood glucose values. Calibration prompt To clear this prompt, press the SELECT button. Dexcom G4 User’s Guide... -
Page 102: Status Area Symbols During Calibration Prompts
If you clear this screen by pressing the SELECT button, this symbol will be displayed in the status area. Wait 1 hour calibration error screen Dexcom G4 Continuous Glucose Monitoring System... -
Page 103: System Glucose Error
2-3 minutes. Often the system can correct this problem and continue providing sensor glucose readings. However, if it has been at least 3 hours since your last glucose reading appeared, contact your local distributor. Dexcom G4 User’s Guide... -
Page 104: Sensor Inaccuracies
If one or more of your readings entered was outside of this range, the receiver will not calibrate. You will have to wait until your blood glucose is in this range to calibrate. Dexcom G4 Continuous Glucose Monitoring System... -
Page 105: Sensor Shut-Off Troubleshooting
• Make sure nothing is rubbing the sensor pod (i.e. clothing, seat belts, etc.). • Make sure you have selected a good insertion site (see Chapter 3, Section 3.3, Choosing an Insertion Site). • Make sure your insertion site is clean and dry prior to sensor insertion. Dexcom G4 User’s Guide... -
Page 106: Early Sensor Shut-Off - Sensor Failure
- When you are not in an active sensor session, you will not see the “Stop Sensor” option on the main menu. • Remember to stop your sensor session if you remove your sensor before the end of the full 7 day period. Dexcom G4 Continuous Glucose Monitoring System... - Page 107 3. The stop sensor processing screen will appear to let you know the sensor session is stopping. 4. Once the session has stopped, a red stoplight symbol ( ) will appear in the upper right corner of the trend graph. Dexcom G4 User’s Guide...
-
Page 108: Battery And Charger Troubleshooting
BATTERY AND CHARGER TROUBLESHOOTING Only use the Dexcom cable and battery charger to charge your receiver. 1. Remember to charge your receiver battery as needed. The charge will last approximately 3 days, depending on how often you turn on your receiver, use the alerts, and enter events. -
Page 109: Low Transmitter Battery
• If you see the out of range symbol in the status area for more than 10 minutes, move your receiver and transmitter within 6 meters of each other. Wait 10 minutes and communication should be restored. Dexcom G4 User’s Guide... -
Page 110: Alerts Are Not Working
• If your receiver gets wet or is dropped you need to make sure the speakers and vibrate mode are still working. You can do this by using the Try It option in the profiles menu (see Chapter 6, Section 6.3.1, Alert Profile Options). Dexcom G4 Continuous Glucose Monitoring System... -
Page 111: Chapter 10: Taking Care Of Your Dexcom G4 System
TAKING CARE OF YOUR DEXCOM G4 SYSTEM Dexcom G4 User’s Guide... - Page 112 Dexcom G4 Continuous Glucose Monitoring System...
-
Page 113: Maintenance
• Only use Dexcom-supplied parts (including cables and chargers). Use of non- Dexcom supplied parts may affect safety and performance. There is no repair service available for your Dexcom G4 CGM System. If you experience problems with your system contact your local distributor. -
Page 114: Storage
4. The transmitter is water resistant when snapped into the sensor pod, but do not soak the transmitter by itself in liquid. 5. Do not use soap, nail polish remover, or paint thinner. Only use isopropyl alcohol and water. Dexcom G4 Continuous Glucose Monitoring System... - Page 115 5. Dry the unit with a clean, dry absorbent wipe. 6. Wipe the outside of the device with a 70% isopropyl alcohol wipe to remove any disinfectant residue. 7. Dry the unit with a clean, dry absorbent wipe. Dexcom G4 User’s Guide...
-
Page 116: Product Disposal
10. Remove gloves and dispose of gloves as biohazard waste. 11. Wash hands thoroughly. 10.4 PRODUCT DISPOSAL Consult your local waste management authorities for appropriate procedures for disposal of devices containing electronic waste (transmitter and receiver) or blood contacting components (sensor and applicator). Dexcom G4 Continuous Glucose Monitoring System... -
Page 117: Chapter 11: Technical Information
TECHNICAL INFORMATION Dexcom G4 User’s Guide... - Page 118 Dexcom G4 Continuous Glucose Monitoring System...
-
Page 119: Product Specifications
Humidity: 0% - 95% RH Sterilization Sterile by radiation Transmitter The G4 transmitter (Model 9438-01) has been certified by Nemko Canada to electrical safety requirements of CSA C22.2 No. 60601-1-08, Third Edition, under Certificate of Compliance NA201210179. Dimensions (including Length: 3.8 cm sensor pod) Width: 2.3 cm... - Page 120 Maximum Output Power 1.25 mW EIRP Modulation Minimum Shift Key Data Rate 49.987 Kbits/Sec Total Packet 224 bits 4.48 ms every 5 minutes at each of the Transmit Duty Cycle four TX frequencies. Data Detection Range Dexcom G4 Continuous Glucose Monitoring System...
- Page 121 (50/60 Hz) characteristic of a typical Magnetic Field location in a typical commercial or hospital IEC 61000-4-8 environment. Note: U is the a.c. mains voltage prior to application of the test level. Dexcom G4 User’s Guide...
- Page 122 Storage/Operating Temperature: 0° C - 45° C Conditions Humidity: 10% - 95% RH Operating Altitude -152 to 3657 meters Moisture Protection IP22: vertically falling drops Limited Warranty 1 year Control Classification Class II equipment Dexcom G4 Continuous Glucose Monitoring System...
- Page 123 (50/60 Hz) characteristic of a typical Magnetic Field location in a typical commercial or hospital IEC 61000-4-8 environment. Note: U is the a.c. mains voltage prior to application of the test level. Dexcom G4 User’s Guide...
- Page 124 Guidance and Manufacturer’s Declaration – Electromagnetic Immunity The Dexcom G4 System is intended for use in the electromagnetic environment specified below. The customer or the user of the Dexcom G4 System should ensure that it is used in such an environment.
- Page 125 To assess the electromagnetic environment due to fixed RF transmitters, an electromagnetic site survey should be considered. If the measured field strength in the location in which the Dexcom G4 System is used exceeds the applicable RF compliance level above, the Dexcom G4 System should be observed to verify normal operation.
- Page 126 Guidance and Manufacturer’s Declaration - Electromagnetic Emissions The Dexcom G4 System is intended for use in the electromagnetic environment specified below. The customer or the user of the Dexcom G4 System should ensure that it is used in such an environment.
- Page 127 Note 1: At 80 MHz and 800 MHz, the separation distance for the higher frequency range applies. Note 2: These guidelines may not apply in all situations. Electromagnetic propagation is affected by absorption and reflection from structures, objects and people. Dexcom G4 User’s Guide...
- Page 128 USB charging/download cable for charging using an AC power outlet. Power Supply/Charger Dexcom P/N MT21255 Class Input: AC Input 100-240 Vac, 50/60Hz, 0.2A, 0.2A rms at 100Vac DC Output: 5V DC, 1A (5.0 Watts) Dexcom G4 Continuous Glucose Monitoring System...
-
Page 129: Device Performance Characteristics
Dexcom G4 System performs. The Dexcom G4 System (the System) uses a glucose sensor to continuously measure and monitor your glucose levels. The sensor is “calibrated” using a commercially available blood glucose meter; and once calibrated the System reports glucose readings up to every 5 minutes. - Page 130 YSI Glucose Number Percent Percent Percent Range of paired within 20/20% within 30/30% within 40/40% mg/dL CGM-YSI (mmol/L) Overall 9152 40-80 1351 (2.2-4.4) NOTE: CGM readings are within 40 to 400 mg/dL (2.2-22.2 mmol/L), inclusive. Dexcom G4 Continuous Glucose Monitoring System...
- Page 131 System reads about 9.8% or less different than YSI blood glucose values. The mean percent difference overall is 2.9%, and the median percent difference overall is 1.7%. This shows that the system is biased slightly higher than compared to the YSI. Dexcom G4 User’s Guide...
- Page 132 Hypoglycemic Alert Evaluation – 15 Minutes Before and After Hypoglycemic Hypoglycemia Hypoglycemia True Alert False Alert Alert Level Detection Missed Detection Rate Rate mg/dL (mmol/L) Rate Rate 55 (3.1) 60 (3.3) 70 (3.9) 80 (4.4) 90 (5.0) 100 (5.6) Dexcom G4 Continuous Glucose Monitoring System...
- Page 133 The Hypoglycemia Missed Detection Rate is the % of time the blood glucose was at or below the alert setting, but the device did not alarm within 15 or 30 minutes before or after the blood glucose was at or below the alert setting. Dexcom G4 User’s Guide...
- Page 134 If your alarm sounds, you can expect your blood sugar to be at or above 200 mg/dL (11.1 mmol/L) approximately 8% of the time within the 15 minute period before or after your alarm sounds. Dexcom G4 Continuous Glucose Monitoring System...
- Page 135 Absolute Absolute within within within of Paired Wear Percent Percent 20/20% 30/30% 40/40% CGM-YSI Differences (%) Differences (%) YSI* YSI* YSI* Day 1 3023 16.7% 13.2% Day 4 3108 11.4% 8.2% Day 7 3021 11.9% 8.9% Dexcom G4 User’s Guide...
- Page 136 System Agreement to SMBG within CGM Glucose Ranges Percent Percent Percent CGM Glucose Number of within within within Ranges mg/dL paired 20/20% 30/30% 40/40% (mmol/L) CGM-SMBG SMBG SMBG SMBG 40-400 7508 (2.2-22.2) 40-80 1699 (2.2-4.4) Dexcom G4 Continuous Glucose Monitoring System...
- Page 137 No serious adverse events or device-related serious adverse events occurred during the study. Mild skin irritation, such as erythema or edema, occurred in low frequency around adhesive area. No infection, bruising, or bleeding occurred at the sensor needle insertion area or the adhesive area. Dexcom G4 User’s Guide...
-
Page 138: Fcc Requirements
• Connect the equipment into an outlet on a circuit different from that to which the receiver is connected. • Consult the dealer or an experienced radio/TV technician for help. This portable transmitter with its antenna complies with FCC/IC RF exposure limits for general population/uncontrolled exposure. Dexcom G4 Continuous Glucose Monitoring System... -
Page 139: Chapter 12: Appendix
APPENDIX Dexcom G4 User’s Guide... - Page 140 Dexcom G4 Continuous Glucose Monitoring System...
-
Page 141: Appendix I, Receiver Alerts, Alarm And Prompts
Alerts. Low battery The receiver battery Vibrates once Yes, at 10% alert is low. Charge your at 20% battery battery receiver as soon as capacity left. capacity left. possible when you see this alert. Dexcom G4 User’s Guide... - Page 142 Wait 15 more minutes. If error screen still appears enter 1 more blood glucose value. Wait 15 minutes. If no sensor glucose readings appear on the receiver, the sensor needs to be replaced. Dexcom G4 Continuous Glucose Monitoring System...
- Page 143 5 minutes until calibrate. confirmed. Additional The receiver needs 1 vibrate then Yes, every startup 1 additional blood vibrate/beep every 15 minutes. calibration glucose value to 5 minutes until prompt complete startup confirmed. calibration. Dexcom G4 User’s Guide...
- Page 144 (2 times) or until confirmed. Rapid fall Your glucose levels 3 vibrates then 3 alert are falling fast at vibrates/3 beeps 0.17 mmol/L per every 5 minutes minute or more. (2 times) or until confirmed. Dexcom G4 Continuous Glucose Monitoring System...
- Page 145 5 minutes (2 expiration times). alert Sensor The sensor is not 1 vibrate then Yes, 2 failed alert working properly. vibrate/beep re-alerts in every 5 minutes (2 the next 10 times). minutes for 30 minutes. Dexcom G4 User’s Guide...
- Page 146 Replace the every 5 minutes (2 transmitter as times). soon as possible. Transmitter The transmitter 1 vibrate then failed alert has failed. vibrate/beep Replace the every 5 minutes (2 transmitter times). immediately. Dexcom G4 Continuous Glucose Monitoring System...
- Page 147 • 0-hour sensor expiration alert - You will see this alert in the normal course of using a sensor for seven days. Other alerts and alarms cannot be safely verified by the user. Dexcom G4 User’s Guide...
-
Page 148: Glossary
Sound pattern and volume level settings for your alerts. Range The distance between the receiver and transmitter. Keep the two devices within 6 meters from each other to get glucose information on your receiver. Dexcom G4 Continuous Glucose Monitoring System... - Page 149 A sensor glucose reading shown on your receiver. This reading is given in mmol/L units and is updated every 5 minutes. Transmitter The Dexcom G4 System component that snaps into the sensor pod and wirelessly sends glucose information to your receiver. Transmitter ID Transmitter ID that is entered into your receiver to enable it to communicate with the transmitter.
-
Page 150: Symbols Used In Labeling
These symbols tell you about the proper and safe use of the Dexcom G4 CGM System. Some of these symbols may not have meaning in your region, and are listed for informational purposes only. This table shows what each symbol means. - Page 151 0086 Directive 93/42/EEC Electrical Equipment Do Not Use if Package is Designed Primarily for Damaged Indoor Use Input Ship By Date Marking Certifies that the device meets the Keep Dry CSA-C22.2 No. 60601-1-08, Third Edition Standard Dexcom G4 User’s Guide...
- Page 152 THIS PAGE LEFT INTENTIONALLY BLANK Dexcom G4 Continuous Glucose Monitoring System...
- Page 153 Dexcom G4 User’s Guide...
- Page 154 Dexcom, Inc. MediTech Strategic Consultants B.V. 6340 Sequence Drive Maastrichterlaan 127-129 San Diego, CA 92121 USA NL - 6291 EN Vaals +1.858.200.0200 Tel. +31.43.306.3320 0086 www.dexcom.com Fax. +31.43.306.3338 Outside US: Contact your local distributor LBL-011687 Rev 01 MT21953 Stay Between the Lines...
Need help?
Do you have a question about the G4 and is the answer not in the manual?
Questions and answers