Table of Contents
Advertisement
Quick Links
ALPHA
GNSS Receiver
Operator's Manual
Version 1.1
Last Revised March 23, 2009
All contents in this manual are copyrighted by JAVAD GNSS.
All rights reserved.The information contained herein may not be used, accessed, copied,
stored, displayed, sold, modified, published, or distributed, or otherwise reproduced without express
written consent from JAVAD GNSS.
Advertisement
Table of Contents

Subscribe to Our Youtube Channel
Related Manuals for Javad ALPHA


Summary of Contents for Javad ALPHA
-
Page 1: Gnss Receiver
Version 1.1 Last Revised March 23, 2009 All contents in this manual are copyrighted by JAVAD GNSS. All rights reserved.The information contained herein may not be used, accessed, copied, stored, displayed, sold, modified, published, or distributed, or otherwise reproduced without express... - Page 2 www.javad.com...
-
Page 3: Table Of Contents
ALPHA GNSS Receiver ........ - Page 4 2.1. Installing JAVAD GNSS Software ........
- Page 5 EVENT and 1PPS Connectors ........104 www.javad.com...
- Page 6 Appendix C. Warranty Terms ......... . . 109 www.javad.com...
-
Page 7: Preface
JAVAD GNSS, Inc. (“JAVAD GNSS”) for owners of JAVAD GNSS products. It is designed to assist owners with the use of the ALPHA receiver and its use is subject to these terms and conditions (the “Terms and Conditions”). - Page 8 Software under the terms stated herein and in any case only with a single ALPHA or single computer. You may not assign or transfer the Software or this license without the express written consent of JAVAD GNSS. This license is effective until terminated.
-
Page 9: Regulatory Information
Regulatory Information FCC Class B Compliance SAFETY – Improper use of the ALPHA receiver can lead to injury to persons or property and/or malfunction of the product. The ALPHA receiver should only be repaired by authorized JAVAD GNSS warranty service centers. Users should review and heed the safety warnings in Appendix B on page 105. -
Page 10: Canadian Emissions Labeling Requirements
Canadian Emissions Labeling Requirements This Class B digital apparatus meets all requirements of the Canadian Interference-Causing Equipment Regulations. Cet appareil numérique de la classe B respecte toutes les exigences du Réglement sur le matériel brouilleur du Canada. www.javad.com... -
Page 11: Declaration Of Conformity
(R&TTE) and the mutual recognition of their conformity and carries the CE marking accordingly 1) These products were tested in a typical configuration with JAVAD GNSS, Inc. products San Jose, January 21, 2008 Vladimir Zhukov, Product Regulations Manager European contact for regulatory topics only: ALLSAT GmbH Am Hohen Ufer 3A, 30159 Hannover, Germany USA contact: Javad GNSS, Inc 1731 Technology Drive, San Jose, CA 95110. -
Page 12: Weee Directive
: Notification that an action has the potential to adversely affect system operation, system per- AUTION formance, data integrity, or personal health. Warning: Notification that an action will result in system damage, loss of data, loss of warranty, or personal injury. ANGER NDER NO CIRCUMSTANCES SHOULD THIS ACTION BE PERFORMED www.javad.com... -
Page 13: Screen Captures
This is normal and not a cause for concern. Related Information Technical Assistance If you have a problem and cannot find the information you need in the product documentation, contact your local dealer. Alternatively, request technical support using the JAVAD GNSS World Wide Web site at: www.javad.com www.javad.com... - Page 14 Preface Related Information Technical Assistance www.javad.com...
-
Page 15: Chapter 1. Introduction
Chapter 1 NTRODUCTION Based on the TRIUMPH Chip, ALPHA is a fully integrated package ready for your demanding jobs, offering precise and automatic performance beyond anything that you have experienced so far. An elegant, rugged, light, and hermetically sealed box accommodates all GNSS and modem electronics, and up to 10 hours of rechargeable batteries (Figure 1-1). -
Page 16: Principles Of Operation
• Control – Ground stations located around the Earth that monitor the satellites and upload data, including clock corrections and new ephemerides (satellite positions as a function of time), to ensure the satellites transmit data properly. • User – The community and military that use GNSS receivers to calculate positions. www.javad.com... -
Page 17: Calculating Absolute Positions
• For post-mission applications, the simultaneous measurements from reference and rover stations are normally recorded to the receiver’s internal memory (not sent over communication link). Later, the data are downloaded to computer, combined, and processed. www.javad.com... -
Page 18: Essential Components For Quality Measuring
– Five or more visible satellites for only GPS or only GLONASS; six or more satellites for mixed scenarios. – Satellite Based Augmentation Systems (WAAS, EGNOS, etc.) creates and transmit, along with DGPS corrections, data integrity information (for example, satellite health warnings). – Current ephemerides and almanacs. www.javad.com... -
Page 19: Getting Acquainted
Bluetooth Module A combination of software and hardware technology that makes the ALPHA mobile, wireless, GNSS receiver that supports a point-to-point serial profile. As such, the ALPHA can transfer and ® synchronize files between the receiver and any other Bluetooth wireless technology device that ®... -
Page 20: Modem
This Lithium-Ion battery is 7.2 V, 1.37 Ah. 1.2.2. External Components The ALPHA receiver has three main panels used for data collection and user interface, and to provide connections for external devices. The ALPHA casing includes a user interface, a power port, and ports for configuration. -
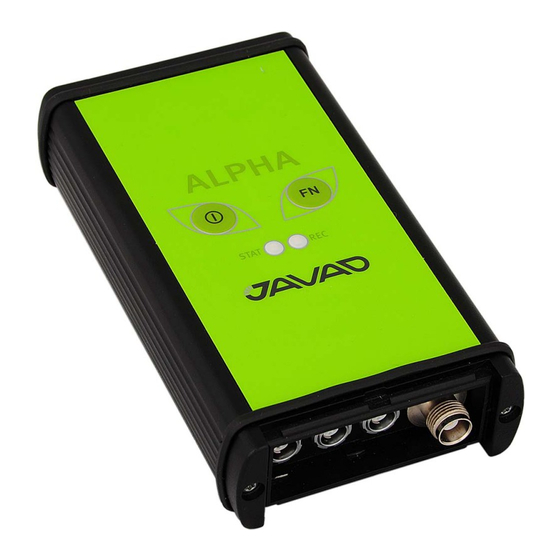
Page 21: Top Panel
Figure 1-2 shows the ALPHA’s top panel with TriPad: Figure 1-2. ALPHA Top Panel TriPad is the simple user interface for the ALPHA receiver. The TriPad consists of two keys and two, three-color LEDs. The STAT (Status) LED displays the number of tracked satellites. -
Page 22: Front Panel
Front Panel The ALPHA receiver has the following ports (Figure 1-3): • Power –used to connect the receiver to an external power source. This port can also be used to charge the batteries. -
Page 23: Back Panel
Figure 1-3. ALPHA Ports Back panel GSM Antenna Bluetooth Antenna Figure 1-4. ALPHA Back Panel • Bluetooth Antenna (optional) – Bluetooth antenna for Bluetooth wireless technology. • GSM Antenna (optional) – This is a SMA female connector for GSM modems. www.javad.com... -
Page 24: Bottom Panel
Figure 1-5. ALPHA Bottom Panel 1.2.3. Cables The ALPHA receiver package includes standard communication and power cables for configuring the receiver and providing a power source to the receiver. Receiver-to-computer RS232 serial cable – connects the receiver’s serial port and an external device (hand-held... -
Page 25: Literature
14-578102-01 Power supply with SAE connector and power/charger cable p/n p/n 22-570101-01 1.2.4. Literature ALPHA literature, including manuals and other product information are available on the JAVAD GNSS website (http://www.javad.com): • ALPHA Operator’s Manual • Functional specifications 1.2.5. Storage Precautions 1. -
Page 26: Option Authorization File (Oaf)
ALPHA receiver according to particular needs, thus only purchasing those options needed. Typically, all ALPHA receivers ship with a temporary OAF that allows the receiver to be used for a predetermined period of time. When the receiver is purchased, a new OAF activates desired, purchased options permanently. -
Page 27: Chapter 2. Pre-Measuring Preparation
Chapter 2 MEASURING REPARATION Before beginning to measuring with the ALPHA receiver, the following software needs to be installed and configurations need to be applied: • Install receiver configuration software. See “Installing JAVAD GNSS Software” on page • Optional: install SIM card. See “Installing the Optional SIM Card” on page 29. -
Page 28: Installing Trivu
2.1.2. Installing ModemVU ModemVU is a Windows® application is a configuration program for the radio modem inside the receiver. ModemVU is available from the JAVAD GNSS website. Note: Refer to the ModemVU Software Manual for full details on installing and using ModemVU Software. -
Page 29: Installing The Optional Sim Card
2. Open the front of the case screwing off 2 self taping screw (Figure 2-1) SIM Card Card Locked Figure 2-1. SIM Card Installation 3. Carefully insert the SIM into the SIM card holder, label side up, and push it forward to lock it well. 4. Close the case. www.javad.com... -
Page 30: Charging The Batteries
Do not disassemble the battery pack. Warning: Do not charge in conditions different than specified. Warning: Do not use other than the specified battery charger. Warning: Do not short circuit the battery pack. Warning: Warning: Do not crush or modify the battery pack. www.javad.com... -
Page 31: Power Supply Requirements
EU countries, it needs also to be a Limited Power Source and rated for Outdoor Use and have an output rated for +7...40 V DC, 3A. This may not be the same range as other JAVAD GNSS products with which you are familiar. -
Page 32: Powering The Receiver
Power supply SAE connector Figure 2-2. Powering ALPHA To check the status of the internal batteries, view the BAT LED on the receiver’s front panel. • Check the BAT LEDs for battery status. If the receiver is on and uses the battery power the BAT LED blinks every 4 seconds: –... -
Page 33: Turning On/Off The Receiver
• a Bluetooth®-enabled external device (computer/controller) • an RS232 cable and a computer/controller • a USB cable and a computer/controller with the JAVAD GNSS USB driver installed Once you have established a connection between the receiver and the computer/controller, you will be able to configure the receiver and its components, send commands to the receiver, download files from the receiver’s memory;... -
Page 34: Establishing An Rs232 Cable Connection
7. Connect to the desired configuration software (TriVU). 2.5.3. Establishing a USB Cable Connection Make sure the computer has JAVAD GNSS’s USB driver for ALPHA receivers installed (available from www.javad.com) before continuing, and you have the proper USB cable to connect ALPHA’s USB port to your PC USB port. - Page 35 • Select No, not this time, and click Next (Figure 2-3). Figure 2-3. New Hardware Wizard - Step 1 • Select Install from a list of specific location and click Next (Figure 2-4). Figure 2-4. New Hardware Wizard - Step 2 www.javad.com...
- Page 36 • Select the USB driver folder and click Next (Figure 2-5). Figure 2-5. Selecting folder with USB driver • Select Continue Anyway (Figure 2-6) Figure 2-6. Warning 4. Repeat all these steps to install driver for virtual serial port. Follow the on-screen instructions to finish installation process. www.javad.com...
- Page 37 5. After Windows finishes installing the driver, you will be able to connect the receiver and the computer via USB ports 6. Connect to the TriVU, select the new generated COM-port from the list and click OK (Figure 2-7): Figure 2-7. Connection Parameters www.javad.com...
-
Page 38: Bluetooth® Module Configuration
3. Click Configuration Receiver (Figure 2-9). Figure 2-9. Configuration->Receiver 4. In the Ports tab select the BLT subtab (Figure 2-10). • Name - The name of the receiver’s Bluetooth® module. Here the user can enter an arbitrary string comprising up to 14 characters. www.javad.com... -
Page 39: Collecting Almanacs And Ephemerides
You will need to collect or update the almanac and ephemerides under the following circumstances: • If the receiver has been off for a long time. • If the last known receiver position, stored in the NVRAM, is different from the present position by several hundred kilometers. www.javad.com... - Page 40 • After loading a new OAF. Note: If 15 minutes have passed and the receiver does not lock on to satellites, clear the NVRAM. See for details. • After loading new firmware. • After clearing the NVRAM. • Before measuring. www.javad.com...
-
Page 41: Chapter 3. Configuration
Set up the Rover receiver to begin collecting RTK data. See “Receiver Setup” on page 65 for more information. When configuring receivers for post-processing measuring, use the following list to ensure the receivers are properly set up: • Perform pre-measuring functions as described in Chapter 2. www.javad.com... -
Page 42: Configuring The Internal Gsm Module
• Displaying information about the module installed in the receiver. • Programming the GSM module’s settings. See the ModemVU Software Manual available on the JAVAD GNSS website for details on configuring the receiver with an internal GSM radio modem. For JAVAD GNSS receiver, the integrated GSM radio modem provides TX/RX communications between a Base and Rover. - Page 43 Configuration Configuring the Internal GSM Module 3. Select the radio type ALPHA (Figure 3-1), and click OK: Figure 3-1. Options window 4. Select the COM port the receiver is connected to (Figure 3-2 on page 43). Click Connect. Figure 3-2. Connect to ModemVU...
-
Page 44: Configuring The Gsm Module For Point-To-Point Radio Link
Parameter Base Receiver Rover Receiver Mode Slave Master Enter a Personal Identification Number (PIN) if required. Figure 3-3. General tab 2. On the Master/Slave tab, set the following parameters (Table 3-2) and click Apply (Figure 3-3 on page 44). www.javad.com... - Page 45 • To ensure reliable and secure modem communication, this parameter must be larger then the period for transmitting differential corrections. Figure 3-4. Master/Slave tab 3. Click Apply, and then click File Disconnect. 4. If needed, launch TriVU and set up the receiver to run as an RTK Base station. www.javad.com...
-
Page 46: Configuring The Gsm Module For Internet Access
PPP button opens the PPP parameters window, that allows user to set up the Point-to-Point protocol parameters. The Point-to-Point Protocol, or PPP, is commonly used to establish a direct connection between two nodes. As usually, information of PPP parameters is given by Internet service provider. www.javad.com... - Page 47 •OFF means service is disabled. •RCV means that modem will receive data from another (remote) JAVAD GNSS receiver configured as a base station. This base station have to be connected with Internet via Ethernet or GPRS and have static IP address.
- Page 48 4. Set up the GSM module making settings in the appropriate subtabs according selected mode. 5. After all settings click Apply, then click File Disconnect. 6. If needed, launch TriVU and set up the receiver to run as an RTK Base station. www.javad.com...
-
Page 49: Settings For The Rcv Subtab
Internet via Ethernet or GPRS. The description of these parameters exceeds the scope of this document, see TriVU Software Manual, available from http:///www.javad.com, for detailed information of base station’s configuration and Ethernet and TCP port settings. -
Page 50: Settings For The Server Subtab
Figure 3-10. SERVER subtab • IP address - The value of this field should match the IP address of the Javad Server to use. • Port - The value of this field should match the IP port the Javad Server is listening on for connections. -
Page 51: Configuring The Receiver
Configuring the GSM module for Internet access 3.2. Configuring the Receiver The ALPHA receiver can be configured in several ways for collecting data for RTK or post- processing. • A static Base station collects measurement information and saves this data to its internal memory. - Page 52 Computer” on page 33. 2. Start TriVU. Select the COM port and click Ok (Figure 3-11). Figure 3-11. Connection Parameters 3. Click Configuration Receiver. Note: Click Apply after making any configuration change; otherwise, the receiver will not register the change. www.javad.com...
- Page 53 Table 3-5. Receiver Parameters for the MinPad Tab Parameter Base Receiver Rover Receiver Recording interval Enter 15 seconds. Elevation mask angle Enter 15 degrees. File name prefix Enter a unique ID, such as the last 3 digits of receiver’s serial number. www.javad.com...
- Page 54 6. Click the Positioning tab and set the Elevation mask to 15 (Figure 3-14), then click Apply. Figure 3-14. Configure Receiver Positioning – Elevation Mask 7. For the Base receiver, click the Base tab and set the following parameters (Figure 3-15 on page 55), then click Apply. • GPS/GLO at one time – enable www.javad.com...
- Page 55 – Delay is for 1 Hz high precision RTK applications. The Rover RTK engine will compute either a delayed RTK position (for the epoch to which the newly received RTCM/CMR message corresponds) or the current standalone position (while waiting for new RTCM/CMR messages coming from the base). www.javad.com...
- Page 56 (Leave the default.) Select the same differential correction format selected for the Base. Output Select the type and format of Select “None”. differential corrections. Period (sec) Enter the interval at which the n/a (Leave the default.) receiver will transmit differential corrections. www.javad.com...
- Page 57 Figure 3-17. Base and Rover Configuration for RTK measurings – Ports 10. Click the Advanced tab and then the Multipath tab. Set the following parameters and click Apply (Figure 3-18 on page 58). • Code multipath reduction – enable www.javad.com...
- Page 58 12. Continue with other configuration activities or click File Disconnect, then File Exit to quit TriVU. Disconnecting before exiting ensures proper port management. Note: Disconnect the receiver from TriVU before exiting to eliminate possible conflicts with the management of the computer’s serial ports. www.javad.com...
-
Page 59: Tripad Configuration
TriPad Configuration Configuring the GSM module for Internet access 3.3. TriPad Configuration The ALPHA’s simple user interface (TriPad) consists of two keys (Power and FN) and two LEDs that control and display the receiver’s operation (Figure 3-19). ON/OFF FN button... - Page 60 • Elevation mask for log file on page 61. • File name prefix on page 61. • Always append to the file on page 62. • Files Creation mode on page 62. • Automatic File Rotation Mode (AFRM) on page 62. www.javad.com...
- Page 61 This parameter specifies what prefix will be added to the names of the receiver files created when pressing FN. The prefix can be up to 20 characters long. The default value is log. Log file names have the following structure: <prefix><month><day><sequential alphabet letter> www.javad.com...
- Page 62 AFRM has been enabled, pressing FN will disable this mode. Automatic File Rotation Mode (AFRM) parameters JAVAD GNSS receivers are capable of automatically rotating log files. During a “file rotation” event, the receiver closes the current file and opens a new one according to a user- defined schedule.
- Page 63 Data logging will not A log file with a default name No file specified; start when power is start when power is will open and data logging will receiver data logging off. restored. restored. start after power is restored. www.javad.com...
- Page 64 Also, if Always is enabled, your receiver will automatically start logging data (to a newly created or an existing file) in the following three cases: • After pressing the Power key to turn on the receiver. • After resetting the receiver (with TriVU). • After taking the receiver out of Sleep Mode. www.javad.com...
-
Page 65: Chapter 4. Setup And Measuring
2. Center the receiver’s external antenna over the point at which data will be collected. For most applications, this should be at a location with a clear view of the sky. To set up the Rover receiver: 1. Attach the ALPHA external antenna to the bipod/range pole. Make sure the antenna locks into place. www.javad.com... -
Page 66: Measure Antenna Height
The offsets are different because of the difference in location between the slant measuring point and the vertical measuring point. 1. Measure the antenna height above the control point or marker, either the slant height or the vertical height. 2. Record the antenna height, point name, and start time in the field notes. www.javad.com... -
Page 67: External Antenna Setup
External Antenna Setup 4.1.3. External Antenna Setup The ALPHA receiver can be used with an external antenna. Follow the steps below to connect an external antenna to ALPHA and measure its offset. 1. Attach the antenna to a tripod or bipod and center it over the point at which data will be collected. -
Page 68: Tripad Operation
To change the baud rate of the receiver’s serial port, press the FN button for 5–8 seconds. This is useful if the data collector does not support the rate that the receiver port is set to. After about five seconds, the REC LED becomes red. Release the FN button during the next three seconds. www.javad.com... -
Page 69: Static Measuring For Base Stations
After the measuring completes, data the receivers collect can be downloaded onto a computer and processed using post-processing software (for example, JAVAD GNSS Justin). 4.4. Kinematic (Stop & Go) Measuring for Rover Stations In a kinematic, stop and go measuring, the stationary receiver (Base station) is set up at a known point such as a measuring monument, or an unknown point. -
Page 70: Real Time Kinematic Measuring
Usually, the receiver will start to output the coordinates of the antenna’s phase center along with the solution type within 10–30 seconds. However, GSM phones may take as long as 60 seconds to synchronize. The geodetic coordinates displayed on the Location tab are always computed in WGS84 and have four solution types. www.javad.com... - Page 71 • Total number of received corrupt messages (dependent on the message type received) If the receiver is not (for some reason) receiving differential corrections, or if none of the ports has been configured to receive differential corrections, the LQ field will either be empty or it will look like this: 100%(999,0000,0000). www.javad.com...
- Page 72 Setup and Measuring Real Time Kinematic Measuring Collect Data www.javad.com...
-
Page 73: Chapter 5. Receiver And File Maintenance
You should download files as soon as possible after collecting data at the jobsite. TriVU provides a File Manager to download files to your computer and delete files from the receiver ALPHA. 1. Connect your receiver and computer. See “Connecting the Receiver and a Computer” on page 33 for this procedure. - Page 74 File Manager, then click the Download path tab on the File Manager dialog box. 4. Navigate to or create (using the Create button) the folder in which to download and store files (Figure 5-2). Figure 5-2. Download path tab www.javad.com...
- Page 75 Figure 5-3. Download Files 7. Click the Download button. During the download, status indicators display next to each file (Figure 5-4 on page 76). • Red indicator – file currently downloading. • Green indicator – file has successfully downloaded. www.javad.com...
-
Page 76: Deleting Files
9. Continue with other operations. Or, click File Disconnect, then File Exit to quit TriVU. 5.2. Deleting Files Use the following steps to delete files from your receiver. 1. Connect your receiver and computer. See “Connecting the Receiver and a Computer” on page 33 for this procedure. www.javad.com... - Page 77 (Figure 5-6). Figure 5-6. Current log files tab 4. To select multiple files, hold down the shift key and click on nonsequential files to select several files at once; or hold down the Ctrl key and click on individual files. www.javad.com...
-
Page 78: Managing Receiver Options
5.3.1. Checking an OAF Note: For a complete list of options and their details, visit the JAVAD GNSS website. You can check the status of your receiver's options, and load any new OAFs, using the RS232 cable, a computer, and TriVU. Refer to the TriVU Software Manual for a more complete description of the TriVU software. - Page 79 • -1 or “-----” – the firmware version does not support this option • 0 – the receiver option is disabled • positive integer – the option is enabled • yes or no – the option is either enabled or disabled. Figure 5-8. View Option manager www.javad.com...
-
Page 80: Loading Oafs
Managing Receiver Options Loading OAFs 5.3.2. Loading OAFs JAVAD GNSS dealers provide customers with OAF files. For any OAF related questions, E-mail at support@javad.com. Please have your receiver ID number available (see “Checking Firmware Version” on page 83). 1. To load a new OAF, follow steps 1-3 in “Checking an OAF” on page 78. -
Page 81: Managing Receiver Memory
Using TriPad to Clear NVRAM 5.4. Managing Receiver Memory When using the ALPHA receiver in static or dynamic applications, you may need to know the amount of memory the receiver’s log file occupies. The specific memory size depends on the type of data being recorded. -
Page 82: Using Trivu To Clear Nvram
1. Connect your receiver and computer. See “Connecting the Receiver and a Computer” on page 33 for this procedure. 2. Start TriVU. Select the COM port and click Ok (Figure 5-7). Figure 5-10. Connection Parameters 3. Click the Tools Clear NVRAM (Figure 5-11). Figure 5-11. Clear NVRAM www.javad.com... -
Page 83: Checking Firmware Version
1. Connect your receiver and computer. See “Connecting the Receiver and a Computer” on page 33 for this procedure. 2. Start TriVU. Select the COM port and click Ok (Figure 5-7). Figure 5-12. Connection Parameters 3. Click on Help About TriVU (Figure 5-13). Figure 5-13. Help->About www.javad.com... -
Page 84: Loading New Firmware
5.7. Loading New Firmware Base and Rover receivers must be loaded with the same firmware version. Use the latest firmware version, available for download from the JAVAD GNSS website, to ensure your receiver has the most recent updates. The receiver uses Firmware Loader to load firmware onto the receiver. - Page 85 Receiver and File Maintenance Loading New Firmware Using TriVU to Clear NVRAM 4. Select the COM port receiver is connected to. Click the Test button to ensure the receiver is connected. Click Next>> (Figure 5-15). Figure 5-15. Connection Parameters www.javad.com...
- Page 86 Receiver and File Maintenance Loading New Firmware Using TriVU to Clear NVRAM 5. Select the ZIP archive, or any file from unzipped set of firmware images, or one image to load. Click Next>> (Figure 5-16). Figure 5-16. Firmware Source www.javad.com...
- Page 87 Receiver and File Maintenance Loading New Firmware Using TriVU to Clear NVRAM 6. Open the required firmware folder. Select the .zip file and click Open (Figure 5-17): Figure 5-17. New firmware package www.javad.com...
- Page 88 Figure 5-18. Files to load 8. Click Exit to quit Firmware Loader. 9. Clear the receiver’s NVRAM (see “Clearing the NVRAM” on page 81) and update the almanac (“Collecting Almanacs and Ephemerides” on page 39) after loading new firmware. www.javad.com...
-
Page 89: Chapter 6. Troubleshooting
• Check all power sources for drained batteries or incorrectly connected cables. • Check that the most current software is downloaded onto the computer and that the most current firmware is loaded into the receiver. Check the JAVAD GNSS website for the latest updates. -
Page 90: Powering Problems
• Charge the batteries overnight. See “Powering the Receiver” on page 32. The receiver may have a defective charger. If, after connecting an external power source, the receiver still does not power up, contact JAVAd GNSS Customer Support for advice. - Page 91 • See “Managing Receiver Options” on page 78 for details on how to check current options. • Order a new OAF with the desired options activated to enable or extend validity of the corresponding receiver options. Contact your dealer or visit the JAVAD GNSS website for details.
- Page 92 • Check that the radio modem’s antenna is securely and properly connected to the antenna connector. • Check that the radio modem’s antenna is undamaged. If damaged, contact your JAVAD GNSS dealer to replace the antenna. The specified baud rate is incompatible with the baud rates the modem supports.
-
Page 93: Technical Support
If the troubleshooting hints and tips in this Operator’s Manual fail to remedy the problem, contact JAVAD GNSS Customer Support. Before contacting JAVAD GNSS Customer support about any problems with the receiver, see “Check This First!” on page 89 for some solutions that may fix the issue. -
Page 94: Website
6.4.1. Website The JAVAD GNSS website provides current information about our line of products. The support area of the website provides access to frequently asked questions, configuration procedures, manuals, e-mail support, etc. To access the JAVAD GNSS website, use: www.javad.com... -
Page 95: Appendix A. Specifications
Appendix A PECIFICATIONS This JAVAD GNSS product is a 216-channel GNSS receiver with an internal radio modem, a Bluetooth® wireless technology module, GMS module, and a rugged aluminum housing complete with TriPad and cable connectors. Note: Performance specifications assume a minimum of 6 GPS Satellites above 15 degrees in elevation and adherence to the procedures recommended in this manual. - Page 96 - Bluetooth® V1.1 Class 2 supporting SPP Slave and Master Profiles Connectors - External GNSS Antenna - Modem Antenna - External power (PWR) - 1PPS output (optional) - Event Marker input (optional) TriPad - Two LEDs (STAT, REC) - Two function buttons (ON/OFF, FN) www.javad.com...
- Page 97 Up to 50 km in the morning and evening. Up to 32 km at noon. Initialize time 5 seconds to 10 min depending on the base line length and multipath conditions Output interval for CMR/RTCM 1, 5, 10, 20, 50, 100 Hz optional www.javad.com...
- Page 98 Horizontal: 1 cm + 1 ppm * base_line_length Vertical: 1.5 cm + 1.5 ppm * base_line_length DGPS < 0.25 m Post Processing, < 0.5 m Real Time Cold Start < 35 sec Warm Start < 5 sec Reacquisition < 1 sec www.javad.com...
-
Page 99: Gnss Board Details
Receiver type Tracking Channels ALPHA - G3: GPS L1, GLONASSL1, Galileo E1, SBAS ALPHA- G2T: GPS L1/L2/L5, Galileo E1/E5A, SBAS ALPHA - G3T: GPS L1/L2/L5, Galileo E1/E5A, GLONASS L1/L2, SBAS Tracking Specifications Standard channels Total 216 channels: all-in-view (GPS L1/L2/L2C/L5,... -
Page 100: Bluetooth® Module Details
14.4 Kbps Asynchronous non-transparent (CSD) up to 9.6 Kbps V.110 Point-to-point mobile originated and mobile terminated SMS Concatenated SMS supported MO/MT Text and PDU modes Cell broadcast One serial port Data and Command port SIM Card 3.0 V, STK 3.1 www.javad.com... -
Page 101: Connector Specifications
Table A-5 gives power connector specifications. Table A-5. Power Connector Specifications Number Signal Name Details Power_INP 10 to 30 volts DC input Power_INP 10 to 30 volts DC input Power_GND Ground, power return Power_GND Ground, power return Not used www.javad.com... -
Page 102: Serial Rs-232C Connector
Figure A-2. RS-232C Connector Table A-6 gives the RS-232C cable connector specifications. Table A-6. RS-232C Cable Connector Specifications Number Signal Name Details Power_OUT Power Output (supplied voltage) Signal ground Clear to send Request to send Receive data Transmit data Not used www.javad.com... -
Page 103: Usb Connector
I/O Data plus USB D- I/O Data minus RS422 and CAN Connector The RS422/CAN connector is a sealed receptacle, M12, 8 pin Male receptacle, FM, M16x1.5, flying lead connector Binder-USA p/n 09-3481-700-08 (Figure A-4) Figure A-4. RS422 and CAN Connector www.javad.com... -
Page 104: Gnss External Antenna Rf Connector
Signal Name Details ANT_IN RF input from LNA, 100 mA at 5.0 volts DC output EVENT and 1PPS Connectors The EVENT and 1PPS connectors are coaxial female receptacles of BNC series, Kings Electronics part number KC-79-108. These connectors are optional. www.javad.com... -
Page 105: Appendix B. Safety Warnings
• Apparatus shall not be exposed to dripping or splashing and no objects filled with liquids, shall be placed on the apparatus. www.javad.com... -
Page 106: General Warnings
Safety Warnings General Warnings General Warnings JAVAD GNSS receivers are designed for measuring and measuring related uses (that is, surveying coordinates, distances, angles and depths, and recording such measurements). This product should never be used: • Without the user thoroughly understanding operator’s manual. -
Page 107: Power Supply
Do not operate the supply if it has received a sharp blow, been dropped, or otherwise damaged. Do not disassemble the supply. Before connecting the external power source and the receiver, make sure that the Warning: power source matches the receiver’s voltage and current requirements. www.javad.com... -
Page 108: Usage Warnings
Do not connect or disconnect equipment with wet hands, you are at risk of electric shock if you The owner should periodically test this product to ensure it provides accurate measurements. Inform JAVAD GNSS immediately if this product does not function properly. Only allow authorized JAVAD GNSS warranty service centers to service or repair this product. www.javad.com... -
Page 109: Appendix C. Warranty Terms
JAVAD GNSS’ Authorized Dealers During the warranty period, JAVAD GNSS will, at its option, repair or replace this product at no additional charge. Repair parts and replacement products will be furnished on an exchange basis and will be either reconditioned or new. - Page 110 1731 Technology Drive, San Jose, CA 95110 USA Phone: +1(408)573-8100 Fax: +1(408)573-9100 www.javad.com Copyright © JAVAD GNSS, Inc., 2009 All rights reserved. No unauthorized duplication.
Need help?
Do you have a question about the ALPHA and is the answer not in the manual?
Questions and answers