LifeShield Home Security Quick Setup Manual
Hide thumbs
Also See for Home Security:
- Setup manual (25 pages) ,
- Quick setup manual (16 pages) ,
- Quick setup manual (9 pages)
Table of Contents
Advertisement
Quick Links
Advertisement
Table of Contents

Related Manuals for LifeShield Home Security


Summary of Contents for LifeShield Home Security
- Page 17 User Manual...
-
Page 18: Important Safety Instructions
11. To reduce risk of electric shock, do not disassemble any components provided in the system. If you are having a problem, please call LifeShield Customer Support. 12. Unplug the system components from the wall outlet and call Customer Support when the following conditions occur: A. -
Page 19: Table Of Contents
List of Contents LifeShield Home Security Introduction..............................1 Overview ......................................1 Features.......................................2 Displays and Menus ...................................3 LifeShield.com .....................................5 Alarm Monitoring....................................7 Installing Your Security System ................................9 Installing the Base ....................................9 Installing the Handset..................................11 Installing the Console..................................14 Installing the Grid Extender ................................19 Installing the Sensor..................................21 Installing the Keychain Remote...............................25... - Page 20 Enable Remote Access/Use Remote Access ..........................90 Supplemental Information..................................91 Expand Your System..................................91 Glossary ......................................92 General Troubleshooting..................................95 System Messages ...................................102 Precautions & Warnings/Warranty ...............................105 Contact Information..................................108 Index ........................................109 [iv] [www.LifeShield.com] L I S T O F C O N T E N T S...
-
Page 21: Lifeshield Home Security Introduction
For alarm monitoring subscribers, the LifeShield Home Security system will send a message to the Alarm Monitoring Center if an alarm occurs (your system is armed, a Sensor detects activity such as a door being opened, and no disarm code is entered). -
Page 22: Features
Features LifeShield Home Security features: LifeShield Home Security System: • Encrypted 2-way digital communications • High-speed data communications over broadband with phone line backup • 24/7 professional monitoring and emergency dispatch • Self-monitoring with event notifications • Anytime, anywhere, web-based control •... -
Page 23: Displays And Menus
Displays and Menus Display Information The Handset and Console displays on your LifeShield Home Security system support 3 lines of information. Refer to Figure 2 and 3 respectively . The various messages that can be displayed are outlined in Tables 8, 9 and 10 on pages... - Page 24 , - ? ! ‘ @ : ; / ( ) (ignored) [www.LifeShield.com] L I F E S H I E L D H O M E S E C U R I T Y I N T R O D U C T I O N...
-
Page 25: Lifeshield.com
Security Tab - When you log into LifeShield online, you will land on the Security tab. This page provides you with event history and Sensor status. From here you can set up the type of event notifications you would like to receive and how you would like to receive them (i.e., email, mobile email, home alerts, etc.). De- tailed instructions for setting up notifications, home alerts and weather alerts can be found in the “Notifications”... - Page 26 If you are not an alarm monitoring subscriber, this information will not apply. (Refer to Figure 10) Home Connect Tab - The Home Connect tab provides information on any LifeShield systems to which you are connected, and allows you to send or accept an invitation to be a Home Connect participant.
-
Page 27: Alarm Monitoring
You can edit your monitoring site profile on the Account tab at www.LifeShield.com, including primary and secondary emer- gency contacts to be called in the event of an alarm. If you are changing your address or need assistance, please call LifeShield Customer Support at 1-888-392-2044. - Page 28 Courtesy Contacts You can edit courtesy contacts on the Account tab at www.LifeShield.com. In the event of an alarm the Alarm Monitoring Center will call the contacts on this list as a courtesy to you, once they have dispatched the proper authorities. (Refer to Figure 13) Dispatch Information You view emergency agency information related to dispatching the authorities on the Account tab at www.LifeShield.com, and edit cross street and general...
-
Page 29: Installing Your Security System
Installing the Base All LifeShield products work together as a system to protect your home. They must be installed in a specific order to work properly. The Base must be installed first followed by the Handset, Console and Grid Extender. - Page 30 Connect the Base to the Internet (and Telephone Line) Connecting the Base Use only LifeShield LS180 a) Connect the Internet cable (provided) between the Internet port on your router and the back of the Base as shown below. Rechargeable Battery Pack supplied with your Base.
-
Page 31: Installing The Handset
TO THE INSTRUCTIONS. c) Replace the Battery cover. Use only the LifeShield LS80 Battery Pack. [11] I N S T A L L I N G Y O U R S E C U R I T Y S Y S T E M... - Page 32 FOR AT LEAST 30 MINUTES PRIOR TO ATTEMPTING ANY SECURITY SYSTEM INSTALLATION. IT MUST BE CHARGED FOR 2 HOURS BEFORE MAKING PHONE CALLS. [12] [www.LifeShield.com] I N S T A L L I N G Y O U R S E C U R I T Y S Y S T E M...
- Page 33 After the initial installation of the LifeShield System, devices may be added to enhance access or performance. The maximum number of devices that can be added to a LifeShield System is shown in the table to the right. * The system will allow a maximum of 8 Handset/Console or Grid Extender combinations.
-
Page 34: Installing The Console
Installing the Console Console Kit Contents KPC1000 LifeShield Console PSC0101 Power Adapter Console will illuminate when battery pack is first connected. LS180 Ni-MH Rechargeable Battery Pack Table Stand Wall Plate Determine the Location RISK OF EXPLOSION IF BAT- The Console may be used on a table top, mounted to the TERY IS REPLACED BY AN IN- CORRECT TYPE. - Page 35 Plug the power adapter into nearby electrical wall outlet that is not controlled by a switch. [15] I N S T A L L I N G Y O U R S E C U R I T Y S Y S T E M [www.LifeShield.com]...
-
Page 36: Wall Mounting
(may require adjustment to achieve a tight fit). [16] [16] [www.LifeShield.com] [www.LifeShield.com] I N S T A L L I N G Y O U R S E C U R I T Y S Y S T E M... - Page 37 Slide the Console with mounting plate onto the wall screws or phone mounting plate. g) Plug the power adapter into nearby electrical wall outlet that is not controlled by a switch. Use only LifeShield LS180 Rechargeable Battery Pack supplied with your Console.
- Page 38 After the initial installation of the LifeShield system, devices may be added to enhance access or performance. The maximum number of devices that can be added to a LifeShield system is * The system will allow a maximum of 8 Handset/Console shown in the table.
-
Page 39: Installing The Grid Extender
Console and Base, such as a second floor location. Having these devices spread throughout the home will maximize sys- tem coverage. A power outlet is required to operate the Grid Extender. 1Use only LifeShield LS80 Install the Grid Extender Rechargeable Battery Pack supplied with your Grid INSTALL BATTERY PACK Extender. -
Page 40: Installing The Grid Extender
After the initial installation of the LifeShield System, components may be added to enhance access or performance. The maximum number of devices that can be added to a LifeShield system are shown in the table. * The system will allow a maximum of 8 Hand- set/Console or Grid Extender combinations. -
Page 41: Installing The Sensor
Example: Spacer added to Magnet to close the gap between the Bracket and Magnet to within 3/4”. Spacers slide on Brackets and Magnets. [21] I N S T A L L I N G Y O U R S E C U R I T Y S Y S T E M [www.LifeShield.com]... - Page 42 Please Wait 30 Seconds CANCEL CANCEL OK 8. Press OK [22] [www.LifeShield.com] I N S T A L L I N G Y O U R S E C U R I T Y S Y S T E M...
- Page 43 Sensor Extension. [23] I N S T A L L I N G Y O U R S E C U R I T Y S Y S T E M [www.LifeShield.com]...
-
Page 44: Test Sensors
Sensor to the same Bracket. You can obtain more Installation for Windows If these retry solutions do not work, call LifeShield Customer troubleshooting instructions in the Troubleshooting section of The process for mounting a Bracket and Support for assistance at the user manual. -
Page 45: Installing The Keychain Remote
3. Wait 5 seconds. When the prompt appears, press all Keychain buttons at the same time. You will have 30 seconds to complete this step. LifeShield will then verify the Keychain Remote is communicating with the system. “Keychain Found & Added” will be displayed when done. -
Page 46: Replacing The Battery
Lithium Battery with the plus (+) up as indicated. 5. Re-assemble the Keychain Remote by reversing Steps 1-3. [26] [www.LifeShield.com] I N S T A L L I N G Y O U R S E C U R I T Y S Y S T E M... -
Page 47: Installing The Siren Detector
4 inches away) and the sound meets certain pre-determined audio requirements, the Siren Detector will report this event back to the LifeShield system. Upon receiving the siren detection message, the LifeShield system will sound an audio alert on all pre-programmed audio alert devices and (if the LifeShield system is actively monitored under a current service plan and is connected to an operating telecommunications circuit) will send a corresponding message to the monitoring center. - Page 48 DETECTORS IN THE PROTECTED PREMISES ARE NOT INTERCON- Prior to adding a Siren Detector it is necessary to first install and activate your LifeShield system and to have a Handset and/or NECTED, A SIREN DETECTOR IS Console available for use in the Siren Detector installation process.
- Page 49 Bracket faces the hazard detector. Press the Bracket onto the ceiling. [29] I N S T A L L I N G Y O U R S E C U R I T Y S Y S T E M [www.LifeShield.com]...
- Page 50 AFTER REMOVING THE BATTERY INSULATOR TAB, PRESS DOWN Once the Siren Detector has been mounted it must then be “added” to the LifeShield system. You will need a Handset ON THE TOP OF THE BATTERY TO or Console to add the Siren Detector.
- Page 51 Siren Det Found Please Wait Note: Once the Siren Detector is “found,” the LifeShield system will require you to perform an audio test to determine if the siren 30 Seconds from the target hazard detector can be detected by the Siren Detector.
-
Page 52: Installing The Motion Sensor
When the Motion Sensor has successfully been added you will hear 4 fast confirmation beeps from the LifeShield system. If there are no confirmation beeps, check to make sure that the battery insulator tab has been removed, re-attach the Front Cover and repeat the steps above. -
Page 53: Installing The Glassbreak Sensor
(b) adjusting the sensitivity, (c) selecting the location and (d) mounting the device prior to before a Glassbreak Sensor moving on to the next step involving integration of this device with your LifeShield system. Please note can be added. -
Page 54: Installing The Smoke Sensor
LifeShield Customer Support at 1-888-392-2044. LifeShield system. If there are no confirmation beeps, check to make sure that the battery insulator tab has been removed, re-attach the Smoke Sensor to the mounting bracket and repeat the steps above. Once the Smoke Sensor has been added to the LifeShield system: 7. -
Page 55: Installing The Flood (Water) And Temperature Sensor
Installing the Flood (Water) and Temperature Sensor LifeShield Supported Operating Modes and Settings Install The Sensor 1. Locate the Honeywell 5821 (red and white) box and remove the white wireless transmitter from the box. 2. Using a flat object such as a screwdriver, pry off the top cover of the transmitter and set it aside. - Page 56 (until it “clicks”) Note: Do not re-attach cover until you have Battery added this device to the LifeShield system [36] [www.LifeShield.com] I N S T A L L I N G Y O U R S E C U R I T Y S Y S T E M...
- Page 57 Add the Sensor to the LifeShield System Once the Temperature and Flood (Water) and Temperature Sensor is installed it must be “added” to the LifeShield system in order to function. You will need a Handset or Console to add it.
-
Page 58: Installing The Camera
Internet Cable (Ethernet) Installing Your LifeShield HomeView Camera(s) Prior to adding the camera it is necessary to first install and activate your LifeShield system. Following system activation you will need a Handset and/or Console available for use in the Camera installation process. - Page 59 Camera labeled “Power.” Plug the other end into an available AC power outlet 3. Follow the steps in “Add the Camera to the LifeShield System” section of this guide b) Second, third and fourth Camera: Repeat the steps above for each additional Camera, making sure to add one camera at a time.
- Page 60 <Add New> until all Cameras are found and If for any reason the LifeShield system is not able to connect to the Camera, resetting the added. In this case it is better to wait until all Cameras are Camera to factory defaults and re-adding it may solve the problem.
-
Page 61: Using Your Security System
Using Your Security System This section will provide you with detailed information on how to use your LifeShield Home Security system and includes the following information: • Controls and functions For detailed information on operating the phone system, • Arming and disarming refer to the Using Your •... -
Page 62: Base Controls And Functions
Base Controls and Functions This section provides descriptions and diagrams of each of the main LifeShield Home Security system components, along with a listing of controls and functions. Base Controls and Functions The Base should be located where you have a Modem/Router The Base is one of three Grid Controllers (GCs) —... -
Page 63: Console Controls And Functions
Place the Console in a location that is convenient for you to arm It also provides controls for managing security and telephone functionality of the LifeShield Home Security system. and disarm your system, such as by your front door or garage door entrance. -
Page 64: Grid Extender Controls And Functions
The Grid Extender includes battery backup for continued operation during power outages. LifeShield recommends that all GCs, including the Grid Extender, be plugged into a phone line to provide backup communications to the Alarm Monitoring Center. -
Page 65: Handset Controls And Functions
The Charging LED is illuminated amber when the Handset is properly seated in the cradle for charging. [45] U S I N G Y O U R S E C U R I T Y S Y S T E M [www.LifeShield.com]... -
Page 66: Keychain Controls And Functions
Keychain Controls and Functions Keychain Remote Controls and Functions The Keychain Remote allows you to communicate with your LifeShield Home Security system from outside your home with a range of approximately 15 feet from any GC. You can use the Keychain Remote to arm and disarm the system, and send Panic alarms to the Alarm Monitoring Center in case of an emergency. -
Page 67: Sensor Controls And Functions
Sensor Controls and Functions Sensor Controls and Functions The standard LifeShield Sensor can protect and monitor doors, windows and cabinets such as liquor, medicine and gun. Sensor configuration is set on the Handset, Console or LifeShield.com. Sensors that monitor interior... -
Page 68: Arm Modes
Arm Modes There are 3 different modes in which you can arm your LifeShield Home Security system: Stay, Away, and Instant Stay. (Refer to Table 1) These are easily set on the Handset, Console or LifeShield.com (Refer to Figure 24) Stay (Staying Home –... -
Page 69: Arming/Disarming Your System
Arming/Disarming Your System Your system can be Armed or Disarmed from your Handset, Console, Keychain Remote, www.LifeShield.com, or from a web enabled mobile device at www.LifeShield.com. To arm your system, the system must read Ready to Arm. (If the system displays Not Ready to Arm, a... - Page 70 Click Edit Change the One Touch Arming selection to Yes Click Continue Click Submit Changes when requested Figure 27. LifeShield System Settings Screen - Edit Auto Stay/One Touch Arming [50] [www.LifeShield.com] U S I N G Y O U R S E C U R I T Y S Y S T E M...
-
Page 71: Bypassing Sensors
Navigate to Security tab then to Sensor Status Check the box next to the Sensor that indicates open Click Bypass Sensors Turning Off Sensor Bypassing (Handset/Console and LifeShield.com) Sensor Bypass can only be deleted by arming and disarming your system. Figure 28. LifeShield -... -
Page 72: Exit Delays
Exit Delay is the time provided between giving the command to arm your system and Sensors being armed. This delay provides time to leave your home before the system is armed. The factory default for Exit Delay is 1 minute. Exit Delays can be set from 45 seconds to 4 minutes. You can change Exit Delays from your Handset, Console or www.LifeShield.com. Editing Exit Delays (Handset/Console) -
Page 73: Entry Delays
Click Continue Click Submit Changes when requested Figure 30. LifeShield Edit Sensor Screen - Entry Delay [53] U S I N G Y O U R S E C U R I T Y S Y S T E M... -
Page 74: Exit And Entry Delay Tones/Alarms
Click Yes or No to enable or disable the tone Click Continue Click Submit when requested Figure 31. LifeShield Edit Grid Controller and Handset Screen - Entry Delay Tone Alarms An Alarm Siren will sound when the following occurs: • When the system is armed, a Sensor has been opened and the Entry delay (if applicable) has expired. -
Page 75: Panic Alarms
Generating a Panic Alarm (Keychain Remote): Press and hold AWAY and STAY at the same time. [55] U S I N G Y O U R S E C U R I T Y S Y S T E M [www.LifeShield.com]... - Page 76 Scroll to the desired device, press SELECT Scroll to Panic Enable, press SELECT Scroll to Enabled or Not Enabled, press SELECT Enabling/Disabling PANIC Alarm Key (via www.LifeShield.com) (Figure 33): Go to www.LifeShield.com Enter your Username and Password Click Settings tab...
-
Page 77: Chime
Click Continue Click Submit when requested Figure 36. LifeShield Edit Grid Controllers Screen - Edit Chime Enabled [57] U S I N G Y O U R S E C U R I T Y S Y S T E M... -
Page 78: User Codes
User Codes User Codes provide individuals (users) access to your LifeShield Home Security system. The system supports 8 User Codes, including 1 Master Code and 7 Normal Codes. Master Code If you forget your Master Code, The system supports 1 Master Code created as part of the activation process. - Page 79 Scroll to the desired edit command, press SELECT Edit Name Edit Code Delete BACK SELECT Upon completion press OK [59] U S I N G Y O U R S E C U R I T Y S Y S T E M [www.LifeShield.com]...
- Page 80 Click Submit Changes when requested Figure 38. LifeShield - Create/Edit User Code Screen Figure 37. LifeShield - User Code Screen To Delete a Keychain Remote from a User via www.LifeShield.com: Go to www.LifeShield.com Enter your User Name and Password Navigate to Settings tab, then to User Codes...
-
Page 81: Suppressing Trouble Sounds
Scroll to the desired setting (The settings range from 0 to 48 hours. Factory default is 24 hours.) Setting the Time of Day when Trouble Sounds are Disabled (via www.LifeShield.com) You can control the hours of the day when Trouble Sounds are disabled/silenced, such as while you are sleeping. Some condi- tions, like No Internet or No AC are brief and corrected quickly by the utility and you may not want to be awakened. -
Page 82: Event Log/Network Configuration
Power Outage Your LifeShield Home Security system operates on AC power and battery backup. In the event that both AC and battery power is lost while the system is armed, your system will automatically return to the armed state when the power is restored. -
Page 83: Home Connect
Example uses include an elderly parent who has special needs or a neighbor that is going on vacation. This same feature allows you to invite someone to look in on your system. The LifeShield Home Connect feature offers 2 levels of access as shown in Table 3:... - Page 84 The display will show the status of the remote system to which you are Home Connected The ARM and DISARM keys on your Handset and Console will control the remote system to which you are Home Connected Figure 42. LifeShield - Home Connect Invitation Acceptance [64] [www.LifeShield.com]...
-
Page 85: Notifications
Home Alert. You can read Home Alert messages via your Handset, Console or LifeShield.com. In addition to events from your home, such as Sensor openings, you can also receive severe As the limit for Home Alerts is weather alerts and reminders. - Page 86 14. Click desired Notification Address(es) or 15. Click Manage Addresses to add additional addresses (up to 4 total plus Home Alert) 16. Click Submit Figure 45. LifeShield - Alarm Notification Example [66] [www.LifeShield.com] U S I N G Y O U R S E C U R I T Y S Y S T E M...
- Page 87 Home Alerts are notifications of system events, reminders or weather alerts that are sent to your home. They can be retrieved from your in-home equipment or from your LifeShield.com Home Alert In-Box on the Security tab. When setting up notifications, you will be able to select a Home Alert as an address location.
-
Page 88: Home Alerts/Weather Updates
Use scroll bar to see your Home Alert messages Weather Updates Your LifeShield Home Security system provides a convenient way to obtain your local 3-day weather forecast through your Console or Handset. The forecast is localized to your monitoring zip code. -
Page 89: Using Your Telephone System
Using Your Telephone System The Handset and Console are not only components of your LifeShield Home Security system, but also provide you with a full featured digital telephone system. In this section you will find information on the following: • Telephone system features •... -
Page 90: Controls And Functions
Soft Key – Changes functions based on menu navigation; active function shown on display above key; Main Display – MENU function allows menu navigation [70] [www.LifeShield.com] U S I N G Y O U R T E L E P H O N E S Y S T E M... - Page 91 10. Soft Key – Changes functions based on menu navigation; active function shown on display above key; Main Display – PHNBK function retrieves phone book entries 11. Handset Earpiece [71] U S I N G Y O U R T E L E P H O N E S Y S T E M [www.LifeShield.com]...
-
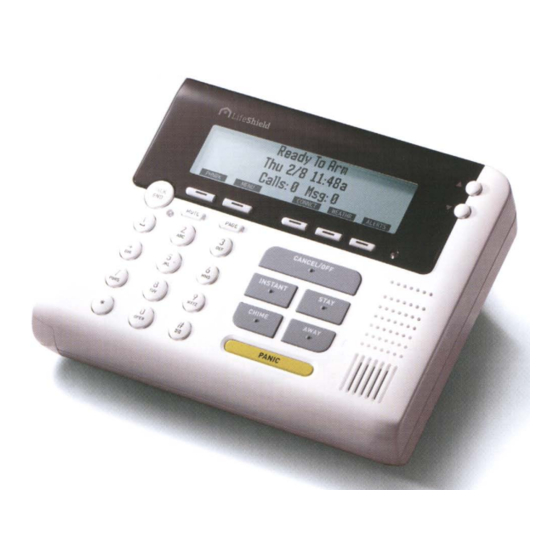
Page 92: Telephone Operations
Ready to Arm Thu 2/8 11:48a Calls: 0 Msg:0 PHNBK MENU Receiving Calls You can receive calls from either the Handset or Console. The LifeShield system will display Ringing during an incoming call. Ready to Arm Thu 2/8 11:48a Ringing IGNORE MENU Selecting IGNORE on the Handset or Console will send an incoming call to the Answering System. - Page 93 Thu 2/8 11:48a Talk hh:mm:ss HOLD FLASH Ending Calls To end a call: Press TALK/END [73] U S I N G Y O U R T E L E P H O N E S Y S T E M [www.LifeShield.com]...
- Page 94 Handset or Console. (Figure 51) The display shows the Volume Level in bars. Volume Scroll HOLD FLASH Buttons [74] [www.LifeShield.com] U S I N G Y O U R T E L E P H O N E S Y S T E M...
- Page 95 Press OK on Handset to stop paging Paging Recent Calls The LifeShield phone system saves 20 of your most recent incoming or outgoing calls for retrieval and redial from either your Handset or Console. Viewing Recent Calls To view a call from your recent call list:...
- Page 96 This message will also appear if you walk out of range while on a call. You have 30 seconds to walk back into range before you will lose the call. [76] [www.LifeShield.com] U S I N G Y O U R T E L E P H O N E S Y S T E M...
- Page 97 SELECT Handset Ring Tones Ringer Volume BACK SELECT Scroll to desired setting, press SELECT [77] U S I N G Y O U R T E L E P H O N E S Y S T E M [www.LifeShield.com]...
-
Page 98: Phone Book Operations
Phone Book Operations The LifeShield Telephone system has built-in Phone Book support available from both the Handset and Console, and can store up to 99 numbers. These entries can be a combination of manual entries and Caller ID inputs. (Refer to Table 4) - Page 99 (Example: The corresponding letters associated with the number 2 on the keypad are A, B and C.) [79] U S I N G Y O U R T E L E P H O N E S Y S T E M [www.LifeShield.com]...
- Page 100 Your system provides you with 10 distinctive tones which you can assign to Phone Book entries. <Default> is the default setting which has assigned your exist- ing standard ring tone. [80] [www.LifeShield.com] U S I N G Y O U R T E L E P H O N E S Y S T E M...
-
Page 101: Answering System Operation
Answering System Operation The LifeShield system includes a built-in, full-featured telephone answering system. You can customize and operate the system through the Handset, Console or remotely from another telephone. The features of the answering system are listed below: Notifications of new messages... - Page 102 Press 4 Delete Message Press 5 Stop/Start Message Table 5: Listening to Your Messages, Options [82] [www.LifeShield.com] U S I N G Y O U R T E L E P H O N E S Y S T E M...
- Page 103 The Answering System has factory settings, but may be customized through the menus on your Handset or Console. See Answering System Settings in Table 6 . Depending on your preferences, you can customize the settings for each LifeShield phone through the menu on your Handset or Console.
- Page 104 On/Off Number of Rings BACK SELECT Press TALK/END to return to the main display [84] [www.LifeShield.com] U S I N G Y O U R T E L E P H O N E S Y S T E M...
- Page 105 Direct to Answ Call Screening BACK SELECT Press TALK/END to return to the main display [85] U S I N G Y O U R T E L E P H O N E S Y S T E M [www.LifeShield.com]...
- Page 106 Answering System Operation Select and Record Greeting The LifeShield Answering System has a prerecorded greeting or you can record your own greeting. To Select Greeting: The greeting must be more than 2 seconds or it will not be recorded. Press MENU Personal Greeting Scroll to Play, Rerecord or Accept;...
-
Page 107: Privacy/Do Not Disturb (Dnd)
Press TALK/END to return to the main display Press TALK/END to return to the main display [87] U S I N G Y O U R T E L E P H O N E S Y S T E M [www.LifeShield.com]... -
Page 108: Setting Up An Intercom Session
Setting Up an Intercom Session The Intercom feature allows a 2-way conversation between 2 LifeShield phones (Handset or Console) in your system. The Intercom is available as long as the receiving phone (Handset or Console) is not in use. Setting Up an Intercom Session... -
Page 109: Setting Up Room Monitoring
TALK button on the With Console in one room (Receiver Phone), place another LifeShield phone (Example: Handset 1) in the room you would Handset or Console, or the like to monitor (Monitored Phone). -
Page 110: Enable Remote Access/Use Remote Access
Disable Remote Access A touch-tone phone is required for To disable remote access on your Handset or Console: Remote Access entry. If the LifeShield Answering Press MENU System is turned off or your tele- Scroll to Security Setup, press SELECT phone service provider’s voice... -
Page 111: Supplemental Information
*The system will support a total combination of 8 Handsets, Consoles or Grid Extenders. The system will support a total combination of 50 Sensors of any kind listed in the table. To purchase additional system components, go to www.LifeShield.com or call LifeShield Customer Support 1-888-392-2044. For instructions on adding additional components to your system see the Device Guides provided inside your device packages. -
Page 112: Glossary
Auto Stay When the system is armed Away, but you don't leave the house, the system defaults back to armed Stay status. To override this default setting Auto Stay can be set to "No" on LifeShield.com. AWAY (Leaving Home) Arm AWAY when leaving your home. All Sensors are monitored (except those designated as a “Non-Monitored Type”). An audible Exit Delay and Entry Delay is supported. - Page 113 Entry Delay. Event Logs The system logs all monitored Events that occur on your system, such as alarms sent to LifeShield Central Monitoring. You can view these Events from your Hand- set, Console or LifeShield.com. Exit Delay The Exit Delay gives you time to leave your home before the system is armed.
- Page 114 "Not Monitored" and there will be NO dispatch of authorities. Remote Access Your LifeShield system allows you to dial in to your home from any cell phone or telephone to arm, disarm or control other aspects of your system. Room Monitor The Room Monitor allows for monitoring sounds in another room by use of LifeShield Handsets and Consoles.
-
Page 115: General Troubleshooting
Check the circuit breaker or fuse box and make sure power to the outlet is on. If the outlet still is not working, contact a qualified electrician for service. [95] S U P P L E M E N T A L I N F O R M A T I O N [www.LifeShield.com]... - Page 116 GC to a new location or add an additional GC to your system. [96] [www.LifeShield.com] S U P P L E M E N T A L I N F O R M A T I O N...
- Page 117 If the subscriber wants to keep the router set up for static addressing, see the enclosed instruction on how to set up a Static IP address on the LifeShield System. If an IP address is assigned, go to the Network Mode, scroll to and select Renew DHCP.
- Page 118 Verify that the contacts on the Base or Charging Cradle are clean. If the outlet is working, allow the battery 24 hours to recharge. If the LowBat condition persists, contact LifeShield Customer Support. Verify that the Handset is properly placed in the Cradle.
- Page 119 5. Add Grid Controller: If you still can not successfully add a Sensor, you may need to add an additional GC. [99] S U P P L E M E N T A L I N F O R M A T I O N [www.LifeShield.com]...
- Page 120 Chime from either the Handset or Console and enter your User Code. Verify that the Chime has been enabled from the LifeShield website for the Sensor in question. If not, go to www.LifeShield.com, go to Settings tab, go to the Sensors panel, click on Edit adjacent to the desired Sensor and enable the Chime for that Sensor.
- Page 121 Possible Solutions Verify the phone line is not being used by someone else within the home. The display on the LifeShield phone will indicate Line in Use. If so, rerun test when the line is not being used. Telephone line did not successfully Comm.
-
Page 122: System Messages
Display Messages Overview The Console and Handset serve as your primary interface to control, configure and view your LifeShield Home Security system. These devices each have a high-resolution digital display with 3 lines of specific message categories, including those shown in the tables that follow. - Page 123 System Messages Secondary Security Display Messages The following table lists and describes the Secondary Security Display Messages of your LifeShield Home Security system. Display Message Display Description Not Monitored Message displayed when the system is Armed but is not being monitored by the Alarm Monitoring Center.
- Page 124 Calls: The number of new calls. Msg: The number of messages. Line in Use Message displayed on the LifeShield phones that are not in use when one of the other phones in your home is being used. Out of Range Message displayed if you are out of range of the LifeShield phone base and try to make a call on your Handset.
-
Page 125: Precautions & Warnings/Warranty
If you do not have modular You will receive instructions on how to ship the Products, at your expense, to a LifeShield jacks, contact your local telephone company for information about their installation. - Page 126 “This product includes software developed by the OpenSSL Project for use in the OpenSSL Toolkit. (http://www.openssl.org/)” Out of Warranty Products. Defects or damages reported to LifeShield after the Warranty Period The names "OpenSSL Toolkit" and "OpenSSL Project" must not be used to endorse or pro- are excluded from coverage.
- Page 127 Contact Information Website: www.LifeShield.com Mail: LifeShield, Inc. Customer Support 770 Township Line Road, Suite 350 Yardley, PA 19067 Phone: 1-888-392-2044 E-mail: support@LifeShield.com [108] [www.LifeShield.com] S U P P L E M E N T A L I N F O R M A T I O N...
-
Page 128: Contact Information
54 handset, 45 maximum per system, 91 Alarm notification delay, 54 Configuration, event network/log, 62 definition, 92 CONNCT, 3f, 43 Alarm notification example (LifeShield.com), 66 Back-up communications, 1 Console, 1f, 4f, 14-18 ALERTS Base, 1, 9-10 controls/functions, 43 console, 43... -
Page 129: Index
6f, 63f system, 63 Exit alarm, 102 security tab, 5f Exit delay, 50, 54–55 settings tab, 5f definition, 93 LifeShield home security platform, features, 2 IGNORE, 72 editing tones/alarms, 54 LifeShield sensor, 47f INSTANT sensor status, 51f console, 43... - Page 130 103 Phone book, 76–80 No Internet addition, 78, 79 Security system commands, 90 display message, 103 calling, 79 Security tab notification setup (LifeShield.com), 65 troubleshooting, 97 definition, 94 Select greeting. See Answering system. No phone line editing/deleting, 79 Sensor, 21-24...
- Page 131 Toll saver, answering system, 83 Top-level menu hierarchy, 4f Troubleshooting, 95–101 Unavailable, display message, 104 Updates, weather, 68 [112] [www.LifeShield.com] S U P P L E M E N T A L I N F O R M A T I O N...
- Page 132 © 2010 LifeShield Inc. All rights reserved. LifeShield is a registered trademark of LifeShield Inc.
Need help?
Do you have a question about the Home Security and is the answer not in the manual?
Questions and answers