KaVo Key Laser III 1243 Instructions For Use Manual
Hide thumbs
Also See for Key Laser III 1243:
- Technician's instructions (180 pages) ,
- Instructions for use manual (80 pages)
Table of Contents
Advertisement
Quick Links
Advertisement
Table of Contents

Related Manuals for KaVo Key Laser III 1243


Summary of Contents for KaVo Key Laser III 1243
- Page 1 Instructions for use KEY Laser III 1243 Always be on the safe side.
- Page 2 Sales: Manufacturer: KaVo Dental GmbH Kaltenbach & Voigt GmbH Bismarckring 39 Bismarckring 39 D-88400 Biberach D-88400 Biberach Tel. +49 7351 56-0 www.kavo.com Fax +49 7351 56-1488...
-
Page 3: Table Of Contents
Instructions for use KEY Laser III 1243 Contents Contents Contents ................................1 1 User notes ..............................4 1.1 Purpose – Proper use ..........................4 1.1.1 Training opportunity ......................... 4 1.1.2 Effects ..............................4 1.1.3 Indications and Contraindikations ....................4 1.2 Important instructions ..........................7 1.2.1 Registration ............................ - Page 4 Instructions for use KEY Laser III 1243 Contents 4.4 Switch on ...............................42 4.4.1 Energy-saving mode ........................43 4.5 Touchscreen operation .......................... 44 4.6 Ready mode ............................45 4.6.1 Triggering laser pulses ........................45 4.6.2 Interruption of ready mode ......................46 4.6.3 Ending the ready mode ........................46 4.7 Setting pulse energy and pulse frequency .....................
- Page 5 Instructions for use KEY Laser III 1243 Contents 7 Accessories ..............................83 7.1 Handpieces ............................83 7.2 Warning signs ............................85 7.3 Laser protective eye wear ........................86 7.4 References .............................87 8 Faults ................................88 8.1 Fault messages ............................88 8.2 Warning ..............................89 8.3 Faults ..............................90 8.4 Troubleshooting .............................91...
-
Page 6: User Notes
The KEY III laser is for use by physicians. The treating physician is exclusively res‐ ponsible for determining the suitability of the device and selecting the corresponding treatment method. Note The current application manual is always available from KaVo. 1.1.1 Training opportunity Training options are available at www.kavo.com "Fortbildung" [Continuing educati‐ on]. - Page 7 Instructions for use KEY Laser III 1243 1 User notes 1.1 Purpose – Proper use treatment Indications Contra-indications Ablation of secondary carious lesi‐ Secondary carious lesions treated Amalgam fillings must be mechani‐ with composites (smaller cavities or cally removed before laser therapy.
- Page 8 Instructions for use KEY Laser III 1243 1 User notes 1.1 Purpose – Proper use treatment Indications Contra-indications Implant exposure Exposure of implant post following None known. trans- or subgingival healing in the alveolus by means of excision or in‐...
-
Page 9: Important Instructions
Duplication and distribution of the User Instructions and Assembly Instructions (UI/ AI)/Service Technician's Instructions (STI) require KaVo's prior consent. All techni‐ cal data, information and properties of the device described in these instructions have been compiled to the best of our knowledge and according to the latest avai‐... -
Page 10: Packages
1.3.2 The German packaging ordinance, 28 August 1998 Note Applies only to the Federal Republic of Germany KaVo transport packaging must be disposed of and recycled by local disposal ser‐ vice providers and recycling companies in accordance with Dual System require‐ ments. - Page 11 64295 Darmstadt The directories of members for collection points for used polystyrene packaging and cartons were passed on in 1991 by KaVo to the dental trade in connection with the above-mentioned customer information sheet. For more information and up-to-date catalogues on polystyrene, Ethafoam and car‐...
-
Page 12: Service
Instructions for use KEY Laser III 1243 1 User notes 1.4 Service 1.4 Service Service hotline: +49 7351 56-2800 Service.Laser@kavo.com Please indicate the product serial number in all requests. Additional information can be obtained at: www.kavo.com To ensure that the KEY Laser 1243 is always ready for use and maintains its value, the recommended maintenance services should be performed once a year, under observance of applicable national regulations. -
Page 13: Safety
Instructions for use KEY Laser III 1243 2 Safety 2.1 Safety instructions 2 Safety 2.1 Safety instructions 2.1.1 Description of danger levels Safety instructions with three hazard levels are used in this document for avoiding personal and property damage. CAUTION indicates a hazardous situation that can lead to property damage or minor to mo‐... -
Page 14: Laser Safety
Instructions for use KEY Laser III 1243 2 Safety 2.2 Laser safety 2.2 Laser safety 2.2.1 Safety instructions Medical Device Law (only applicable for Germany) The KEY Laser 1243 is a II b device according to EC directive 93/42/EEC. In Germany, operators, equipment managers and users are obliged to operate their equipment in accordance with the MPG regulations. - Page 15 Information on the schedule and scope of the safety checks are in the assembly instructions. Requirements for correct operation KaVo shall assume responsibility for the machine's safety, reliability and perfor‐ mance provided that: ▪ Assembly, extensions, adjustments, modifications or repairs are performed by Service Technicians who have successfully completed the KEY Laser 1243 trai‐...
-
Page 16: Safe Use
▶ Put electronic devices such as e.g. computer storage media, hearing aids etc. down during operation . The KaVo product is not permitted to be used in areas subject an explosion hazard. The user must ensure that that the device works properly and is in a satisfactory condition before each use. -
Page 17: Disposal Of Waste And Residue From The Device And Accessories At The End Of Use
Before disassembling / disposing of the product, it must be completely processed (disinfected, sterilized) according to the section "Preparation methods" Additional information can be obtained from KaVo (www.kavo.com) or your dental supplier. The waste that arises must be recycled or disposed of in a manner safe for humans and the environment. -
Page 18: Personal Eye Protection
• Medical electrical devices are subject to special measures regarding electromag‐ netic compatibility and must be operated in accordance with KaVo assembly instructions. • Portable and mobile high-frequency communications devices can influence me‐... - Page 19 Damage from unsuitable accessories The use of other accessories, transformers and lines than those indicated (with the exception of transformers and lines that KaVo sells as replacement parts for inter‐ CAUTION nal components) can increase transmission or reduce the electromagnetic immu‐...
-
Page 20: Safe Laser Range
Instructions for use KEY Laser III 1243 2 Safety 2.4 Safe laser range 2.4 Safe laser range Note Each time the KEY Lasers 1243 is started, the regulations for operating lasers must be observed. The room must be identified by the required warning signs and lights at all points of entry. -
Page 21: Warning Signs
Instructions for use KEY Laser III 1243 2 Safety 2.4 Safe laser range 2.4.2 Warning signs The current warning signs are to be affixed at eye height to the entrance doors to the treatment room in which the KEY Laser 1243 is used and be visible from the outside. -
Page 22: Electromagnetic Transmissions
Instructions for use KEY Laser III 1243 2 Safety 2.5 Electromagnetic Transmissions 2.5 Electromagnetic Transmissions The KEY Laser 1243 is for use in an environment like the one cited below. The operator of the KEY Laser 1243 must ensure that it is operated in such an environ‐... -
Page 23: Guidelines And Manufacturer's Statement - Electromagnetic Immunity
Instructions for use KEY Laser III 1243 2 Safety 2.5 Electromagnetic Transmissions 2.5.2 Guidelines and manufacturer's statement - Electromagnetic im‐ munity The KEY Laser 1243 is for use in an environment like the one cited below. The operator of the KEY Laser 1243 must ensure that it is operated in such an environ‐... -
Page 24: Guidelines And Manufacturer's Statement - Electromagnetic Immunity
Instructions for use KEY Laser III 1243 2 Safety 2.5 Electromagnetic Transmissions 2.5.3 Guidelines and manufacturer's statement - Electromagnetic im‐ munity The KEY Laser 1243 is for use in an environment like the one cited below. The operator of the KEY Laser 1243 must ensure that it is operated in such an environ‐... - Page 25 Instructions for use KEY Laser III 1243 2 Safety 2.5 Electromagnetic Transmissions Within the frequency range of 150 kHz to 80 MHz, the field strength should be less than 3V V/m. 23/99...
- Page 26 Instructions for use KEY Laser III 1243 2 Safety 2.5 Electromagnetic Transmissions 2.5.4 Table 4 The KEY Laser III is intended for use in an electromagnetic environment in which HF disturbances are controlled. The customer or the user of the KEY Laser III can...
-
Page 27: Description Of Instrument
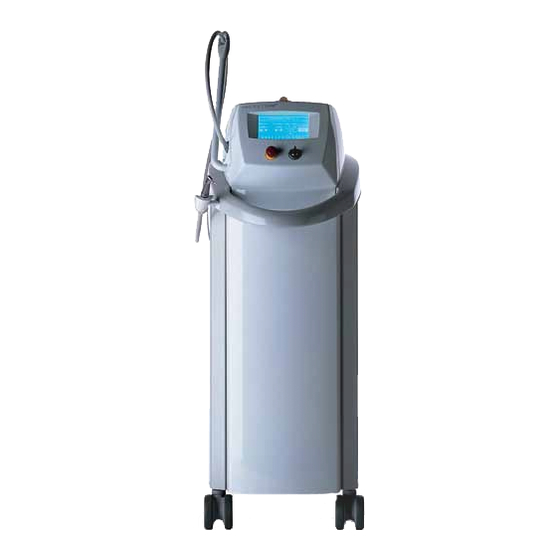
Instructions for use KEY Laser III 1243 3 Description of Instrument 3.1 KEY Laser 1243 (material no. 1.000.5342) 3 Description of Instrument 3.1 KEY Laser 1243 (material no. 1.000.5342) ① Laser tubing ⑥ Key switch (on/off function) ② Swing arm ⑦... -
Page 28: Multifunction Foot Control
Instructions for use KEY Laser III 1243 3 Description of Instrument 3.1 KEY Laser 1243 (material no. 1.000.5342) 3.1.1 Multifunction foot control ① Tread protection hoop ④ Energy setting ② Ready button ⑤ Laser pulse trigger ③ Frequency setting ⑥ Spray button... -
Page 29: Back Of The Laser Unit
Instructions for use KEY Laser III 1243 3 Description of Instrument 3.1 KEY Laser 1243 (material no. 1.000.5342) 3.1.2 Back of the laser unit 27/99... - Page 30 Instructions for use KEY Laser III 1243 3 Description of Instrument 3.1 KEY Laser 1243 (material no. 1.000.5342) Version A (230 V~ / 50 Hz / 60 Hz) ① Connection for external door contact ③ Cold device plug for mains input 230...
-
Page 31: Touch Screen
Instructions for use KEY Laser III 1243 3 Description of Instrument 3.2 Touch screen 3.2 Touch screen The central control is a touchscreen, i.e. a screen whose surface is used actively for controlling functions by touching with the finger. 29/99... -
Page 32: Model And Rating Plate
Instructions for use KEY Laser III 1243 3 Description of Instrument 3.3 Model and rating plate 3.3 Model and rating plate Note The identification and rating plate is located at the back of the KEY Laser 1243. It shows information about the customer's connected loads and about the unit ver‐... -
Page 33: Where To Affix The Laser Warning Signs And Laser Note
Instructions for use KEY Laser III 1243 3 Description of Instrument 3.4 Where to affix the laser warning signs and laser note 3.4 Where to affix the laser warning signs and laser note On the back of the laser unit, there is a triangle warning sign and the reference sign according to IEC 60825-1 + A1 + A2. - Page 34 Instructions for use KEY Laser III 1243 3 Description of Instrument 3.4 Where to affix the laser warning signs and laser note A triangular laser warning symbol and information notice is also mounted at the laser tube coupling. Laser aperture...
-
Page 35: Technical Data And Requirements
Instructions for use KEY Laser III 1243 3 Description of Instrument 3.5 Technical data and requirements 3.5 Technical data and requirements Setup plan No. 111 052 94 003 Electrical lead 230 V Schuko socket Mains power input line 3 m long... - Page 36 Instructions for use KEY Laser III 1243 3 Description of Instrument 3.5 Technical data and requirements Therapy laser Laser type Solid state Er:YAG laser Wave length 2.94 µm (infrared) Laser class Pulse energy at the exit of the laser contra-angle hand 40 - 600 mJ piece 2060 Mat.
- Page 37 Instructions for use KEY Laser III 1243 3 Description of Instrument 3.5 Technical data and requirements Connection to door contact max. 5 V / 10 mA (load on the door con‐ tact) Switching contact for external warning max. 24 V / 1A...
-
Page 38: Operation
Instructions for use KEY Laser III 1243 4 Operation 4.1 Emergency laser stop 4 Operation 4.1 Emergency laser stop The emergency laser stop is intended for emergencies during normal operation. In unclear or dangerous situations, the laser can be immediately switched off com‐... -
Page 39: Filling Spray Water
Instructions for use KEY Laser III 1243 4 Operation 4.2 Filling spray water 4.2 Filling spray water In order to avoid microbial contamination, the spray water reservoir must be reple‐ nished completely at least once a week. If "SPRAY RESERVOIR EMPTY" is displayed on the touchscreen, this indicates that the spray water reservoir is diminishing. -
Page 40: Laser Tube/Handpieces
Instructions for use KEY Laser III 1243 4 Operation 4.3 Laser tube/handpieces 4.3 Laser tube/handpieces 4.3.1 Laser tubing Note If the laser tube is removed when the unit is switched on, the safety switch ensures that the KEY Laser 1243 cannot be switched to the Ready mode. Never allow the laser tube to fall! Ensure that the laser tube couplings are not knocked against anything and are never laid down roughly. - Page 41 Instructions for use KEY Laser III 1243 4 Operation 4.3 Laser tube/handpieces ▶ Remove protective caps ① and ②. ▶ Push handpiece axially so that it will go onto the laser coupling until it is heard to snap in. Note Before the treatment, the spray should be set and a user test performed.
-
Page 42: Disconnection
Instructions for use KEY Laser III 1243 4 Operation 4.3 Laser tube/handpieces 4.3.3 Disconnection Note It is essential to avoid penetration of water into the interior of the handpieces, since this may result in disturbance of the detection and feedback functions. - Page 43 Instructions for use KEY Laser III 1243 4 Operation 4.3 Laser tube/handpieces ▶ Dry the inside of the handpiece coupling. 41/99...
-
Page 44: Switch On
Instructions for use KEY Laser III 1243 4 Operation 4.4 Switch on 4.4 Switch on Note Ensure that the emergency laser stop is not pressed. It can be released or its state checked by rotating the red knob to the right. If it was pressed, it springs out. -
Page 45: Energy-Saving Mode
Instructions for use KEY Laser III 1243 4 Operation 4.4 Switch on Now, the preset values are displayed and the unit switches to the standby mode. Note Never allow the laser unit to stand unattended in the switched-on state See also: 4.19 Switch off, Page 71 4.4.1 Energy-saving mode... -
Page 46: Touchscreen Operation
Instructions for use KEY Laser III 1243 4 Operation 4.5 Touchscreen operation 4.5 Touchscreen operation In general, the following is applicable for operating the touchscreen: All fields which have a rounded border have the same functionality as keys. The key must be touched in the middle almost without any pressure. -
Page 47: Ready Mode
Instructions for use KEY Laser III 1243 4 Operation 4.6 Ready mode 4.6 Ready mode Note Anyone near the laser must wear suitable laser safety eyewear. The laser may be operated only with mounted handpiece. - Never – not even with laser protection goggles – look into the distal end of the... -
Page 48: Interruption Of Ready Mode
Instructions for use KEY Laser III 1243 4 Operation 4.6 Ready mode In Ready mode, you choose the DETECT and FEEDBACK buttons to toggle bet‐ ween modes. See also: 4.9 Modes, Page 50 With the spray key on the foot switch or with the spray key on the touchscreen, the spray media air and water can be changed or combined. -
Page 49: Setting Pulse Energy And Pulse Frequency
Instructions for use KEY Laser III 1243 4 Operation 4.7 Setting pulse energy and pulse frequency 4.7 Setting pulse energy and pulse frequency 4.7.1 Selecting pulse energy 40 to 200 mJ (in 20 mJ steps) and 250 mJ to 600 mJ (in 50 mJ steps) are avaiable. - Page 50 Instructions for use KEY Laser III 1243 4 Operation 4.7 Setting pulse energy and pulse frequency Alternatively, the pulse frequency can also be set via the foot switch by pressing the button. 48/99...
-
Page 51: User Test With Hand Piece 2060
Instructions for use KEY Laser III 1243 4 Operation 4.8 User test with hand piece 2060 4.8 User test with hand piece 2060 Note Ensure that the laser tube is inserted into the input coupling and is screwed tight and that the handpiece 2060 is mounted. -
Page 52: Modes
Instructions for use KEY Laser III 1243 4 Operation 4.9 Modes 4.9 Modes Three modes are available to the user: ▪ Standard therapy mode ▪ DETECT (detection mode) ▪ FEEDBACK (feedback mode) Note Foreign light sources can cause problems with the detection/feedback system by illuminating the optical applicators. -
Page 53: Standard Therapy Mode
Instructions for use KEY Laser III 1243 4 Operation 4.9 Modes After the key has been pressed, the newly activated mode appears bright with dark inscription. Note Detection and feedback mode are disabled relative to one another. Activation of the detection mode thus leads to deactivation of feedback mode, and vice versa. -
Page 54: Feedback Mode
Instructions for use KEY Laser III 1243 4 Operation 4.9 Modes See also: 4.10 Threshold setting, Page 53 4.9.4 Feedback mode The feedback mode combines the detection function of the detection mode with the therapeutic function of the laser beam. -
Page 55: Threshold Setting
Instructions for use KEY Laser III 1243 4 Operation 4.10 Threshold setting 4.10 Threshold setting For working in the feedback mode, it is first necessary to set a threshold value. This threshold value marks the limit above which the laser pulses are output in the ready mode when the laser pulse trigger is pressed. - Page 56 Instructions for use KEY Laser III 1243 4 Operation 4.10 Threshold setting In the start menu, the saved threshold value is now displayed. 54/99...
-
Page 57: Spray Settings
Instructions for use KEY Laser III 1243 4 Operation 4.11 Spray settings 4.11 Spray settings 4.11.1 Medium preselection The spray settings can be entered using the spray key on the start menu or on the foot switch. In the spray menu, the user chooses between the spray settings AIR_and WATER. -
Page 58: Foot Control
Instructions for use KEY Laser III 1243 4 Operation 4.11 Spray settings No spray If the OK key is pressed, the changed spray setting is accepted. If Abort is pressed, you return to the start menu without accepting the changed spray setting. -
Page 59: System Menu
Instructions for use KEY Laser III 1243 4 Operation 4.12 System menu 4.12 System menu The system menu can be opened from the program selection menu by pressing the System menu key. Here, the following settings can be entered: ▪ - the sound volume for the key tone ▪... - Page 60 Instructions for use KEY Laser III 1243 4 Operation 4.12 System menu Note After the end of the language selection using the OK key all texts, including the predefined programs, are reloaded. This means that a program reset is also per‐...
-
Page 61: Programs
Instructions for use KEY Laser III 1243 4 Operation 4.13 Programs 4.13 Programs Preset programs are available for operating the KEY Laser 1243. Additional pro‐ grams can be defined and saved only by the user. 4.13.1 Program selection The start menu shows the currently chosen program in the form of the program selection key at the upper edge of the touchscreen. -
Page 62: System Menu
Instructions for use KEY Laser III 1243 4 Operation 4.13 Programs 4.13.3 System menu The system menu dialogue can be called up by pressing the system menu key. See also: 4.12 System menu, Page 57 4.13.4 Deleting a program The predefined programs cannot be deleted. Only programs defined by the user can be deleted. -
Page 63: Changing A Program Setting
Instructions for use KEY Laser III 1243 4 Operation 4.14 Changing a program setting 4.14 Changing a program setting When the Parameter key is pressed in the program selection menu, the parameter menu appears. Here, it is possible to change the settings for the currently active program. The active program with the preset handpiece appears in the selection list in the start menu, in the parameter menu with bright background and dark characters. - Page 64 Instructions for use KEY Laser III 1243 4 Operation 4.14 Changing a program setting In the feedback or detection mode, the pilot beam brightness cannot be set. Note If, in a selected program, at least one parameter is changed in the start menu and is confirmed with OK, the text in the program selection key of the parameter is displayed in shaded form.
-
Page 65: Handpiece Selection
Instructions for use KEY Laser III 1243 4 Operation 4.15 Handpiece selection 4.15 Handpiece selection The handpiece can be selected by pressing the handpiece selection key in the pa‐ rameter menu. Max. 6 lines can be displayed in the hand piece overview. The selection bar is moved 6 lines up/down using the keys PAGE UP / PAGE DOWN. -
Page 66: New Program
Instructions for use KEY Laser III 1243 4 Operation 4.16 New program 4.16 New program If, in the parameter menu, a new parameter setting has been produced by changing the settings of an existing program this can be saved as a new program. -
Page 67: Deleting A Program
Instructions for use KEY Laser III 1243 4 Operation 4.16 New program If the Abort key is pressed, you return to the program selection menu without saving the new settings. Note The number of the newly definable programs is limited. Once the maximum number of programs is reached, the touchscreen shows the message "ATTENTION Crea‐... -
Page 68: Detector Calibration
4.17 Detector calibration 4.17 Detector calibration KaVo recommends checking the detection function each time before the Key Laser 1243 is used in detection or feedback mode. The hand-piece is held against the reference. If the values on the reference do not correspond with the values on the touchscreen, take the following steps. -
Page 69: Starting The Calibration
If the letter on the touchscreen does not correspond to the letter on the reference, the corresponding reference should be obtained through the Customer Service Center. For this purpose, it is essential to notify the contact person at KaVo of the letter code of the reference value which is displayed on the touchscreen. -
Page 70: Determining The Reference Value
Instructions for use KEY Laser III 1243 4 Operation 4.17 Detector calibration After 5 seconds, the measurement of the zero value begins automatically. Duration of the measurement is 2 seconds. 4.17.4 Determining the reference value The following instruction appears on the touchscreen: "Hold instrument on reference sample"... -
Page 71: Completing The Detector Calibration
Instructions for use KEY Laser III 1243 4 Operation 4.17 Detector calibration 4.17.5 Completing the detector calibration The following information appears on the touchscreen: "The detector calibration was successfully completed!" Pressing the OK key saves the result and returns you to the start of the menu. -
Page 72: Spray Regulation
Instructions for use KEY Laser III 1243 4 Operation 4.18 Spray regulation 4.18 Spray regulation The amount of spray water is of great importance for ensuring that the laser treat‐ ment is performed effectively. During use of the handpiece 2060, the amount of spray water is set so that, when a surface is sprayed, a thin film of water forms on it. -
Page 73: Switch Off
Instructions for use KEY Laser III 1243 4 Operation 4.19 Switch off 4.19 Switch off Turning key counterclockwise causes defined switching off of the KEY Lasers 1243. Hazards from the unsupervised use of lasers Before leaving the treatment room, turn off the KEY Laser 1243 and protect against... -
Page 74: Care
Instructions for use KEY Laser III 1243 5 Care 5.1 Machine cleaning and care 5 Care 5.1 Machine cleaning and care Note Only when the unit has been switched off. During cleaning, ensure that no liquid enters the interior of the unit since this may lead to faults. -
Page 75: Machine Disinfection
▪ 25% glutardialdehyde = 75 mg/100g disinfectant max. ▪ Ethyltexanol = 10mg/100g disinfectant max. ▪ Formaldehyde solution = 10mg/100g disinfectant max. ▪ Glyoxal = 165mg/100g disinfectant max. Note KaVo accepts no responsibility if disinfectants are used with higher ingredient con‐ centrations than those specified here. 73/99... -
Page 76: Care, Sterilisability And Disinfectability Of Handpieces
Instructions for use KEY Laser III 1243 5 Care 5.3 Care, sterilisability and disinfectability of handpieces 5.3 Care, sterilisability and disinfectability of handpieces Information on the care, sterilisation and disinfecting of KaVo handpieces can be found in the handpiece instructions. 74/99... -
Page 77: Cooling Circulation
▶ Never tip the KEY Laser 1243 or lay it on its side! CAUTION Note Please note that an ion exchanger is located inside the cooling circulation. This deionizes the distilled water. The operator cannot intervene here. The KaVo factory customer service therefore checks the cooling system during maintenance. 75/99... -
Page 78: Safety Checks
6 Safety checks Note At least the basic KaVo service kit is required. The safety checks must be carried out after the initial commissioning, the maintenance work and work on the safety- relevant modules, and at intervals of 12 months at the latest. -
Page 79: Manual 'Energy' Safety Check
Instructions for use KEY Laser III 1243 6 Safety checks 6.2 Manual 'energy' safety check 6.2 Manual 'energy' safety check The following test steps must be carried out on KEY Laser 1243 for this purpose: ▪ For each test step, you are required to calculate and document the mean value, minimum, maximum, standard deviation and error (mean value to setpoint va‐... -
Page 80: Handpieces
Instructions for use KEY Laser III 1243 6 Safety checks 6.3 Handpieces 6.3 Handpieces ▶ Check the transmission of the handpieces 2061, 2062 and 2063 according to the instructions accompanying the handpieces. 78/99... -
Page 81: Earthed Conductor Test According To Din Vde 0751-1
Instructions for use KEY Laser III 1243 6 Safety checks 6.4 Earthed conductor test according to DIN VDE 0751-1 6.4 Earthed conductor test according to DIN VDE 0751-1 Perform the earthed conductor test on the laser unit in accordance with VDE 0751-1. -
Page 82: Spare Unit Leakage Current Test According To Din Vde 0751-1
Instructions for use KEY Laser III 1243 6 Safety checks 6.5 Spare unit leakage current test according to DIN VDE 0751-1 6.5 Spare unit leakage current test according to DIN VDE 0751-1 Requirement Before the tester is started, the key switch of the KEY laser should be kept in the on position until the test is complete. -
Page 83: Further Tests
Instructions for use KEY Laser III 1243 6 Safety checks 6.6 Further tests 6.6 Further tests ▪ Visual inspection of unit and accessories ▪ Function test ▪ No visible leaks in the unit ▪ Check internal safety systems – Emergency off switch –... -
Page 84: Safety Check Report
Instructions for use KEY Laser III 1243 6 Safety checks 6.7 Safety check report 6.7 Safety check report Safety checks report For customer service report no..KEY Laser type: KEY Laser serial number: 1243 ..Energy meter no. Sensitivity: .. -
Page 85: Accessories
Instructions for use KEY Laser III 1243 7 Accessories 7.1 Handpieces 7 Accessories Note You must adhere to the above safety instructions. See also: 2.2 Laser safety, Page 12 2.3 Safe use, Page 14 7.1 Handpieces 83/99... - Page 86 Instructions for use KEY Laser III 1243 7 Accessories 7.1 Handpieces The laser hose (Mat. no. 1.000.6774) and handpieces listed below have been tested and approved for use with the KEY Laser 1243: ▪ The accompanying contra-angle handpiece 2060 ① (Mat. no. 1.000.4841).
-
Page 87: Warning Signs
Instructions for use KEY Laser III 1243 7 Accessories 7.2 Warning signs 7.2 Warning signs The KEY Laser 1243 is supplied with three sets of warning signs. They are used for labelling the laser area. Further warning signs can be ordered from KaVo: Warning sign (Mat. -
Page 88: Laser Protective Eye Wear
7.3 Laser protective eye wear 7.3 Laser protective eye wear Laser protective eyewear is supplied with the KEY Laser 1243. Further laser protective eye wear can be ordered from KaVo: Protective laser goggles with side-shield design for the dentist and assistant (replaced by new design since Sept. -
Page 89: References
Instructions for use KEY Laser III 1243 7 Accessories 7.4 References 7.4 References Reference AMat. no. 1.000.9603 Reference BMat. no. 1.000.9604 Reference CMat. no. 1.000.8552 Reference DMat. no. 1.000.9605 Reference EMat. no. 1.000.9606 Reference FMat. no. 1.000.9607 Reference HMat. no. 1.000.9608 Reference LMat. -
Page 90: Faults
Instructions for use KEY Laser III 1243 8 Faults 8.1 Fault messages 8 Faults 8.1 Fault messages The user guidance controlled by a microprocessor helps in the operation of the KEY Laser 1243 by way of the touchscreen. In addition, however, numerous automatic self tests which control the unit are installed in the unit. -
Page 91: Warning
Instructions for use KEY Laser III 1243 8 Faults 8.2 Warning 8.2 Warning If the spray water reservoir is becoming empty during operation, the information appears on the touchscreen only on exiting the ready mode. When the Continue key is pressed, it is possible to continue working in the Ready mode. -
Page 92: Faults
Instructions for use KEY Laser III 1243 8 Faults 8.3 Faults 8.3 Faults When a fault message is displayed on the touchscreen, the unit automatically swit‐ ches off after 30 seconds. ▶ You should therefore switch the unit on again. -
Page 93: Troubleshooting
If you are unable to pinpoint or rectify your problem after reading this troubleshooting documentation, please contact a KaVo-trained Service Technician. Danger when opening the KEY laser The KaVo KEY laser must only be opened and repaired by specially trained Service Technicians. CAUTION ▶... - Page 94 Instructions for use KEY Laser III 1243 8 Faults 8.4 Troubleshooting Malfunction Cause Remedy The entrance doors to the treatment ▶ Close the entrance doors. room are provided with door swit‐ ches and are opened. No door switches are installed and ▶...
-
Page 95: Assembly Notes
The castors may not be used on soft floor coverings (carpeting, etc.). The floor topping, floor covering, adhesive and floor seal must be suitable for chair castors. In the event of improper use on other floor coverings, KaVo shall assume no liability for any damage. 93/99... -
Page 96: Media
Instructions for use KEY Laser III 1243 9 Assembly notes 9.2 Media 9.2 Media 9.2.1 Spray water The KEY Laser 1243 has an internal spray water supply. The spray water reservoir bottle may be filled only with distilled or demineralized water (neutral pH). -
Page 97: Electrical Connection
Instructions for use KEY Laser III 1243 9 Assembly notes 9.3 Electrical connection 9.3 Electrical connection Note The electrical protection and the supply cable must be implemented separately for the KEY Laser 1243 in each case! 9.3.1 Local ▪ The connection must conform to the provisions of VDE 0100 for safety sockets. -
Page 98: Transport And Storage
Instructions for use KEY Laser III 1243 9 Assembly notes 9.4 Transport and storage 9.4 Transport and storage The KEY Laser 1243 is packed in cardboard packaging. The transport and storage information printed on the outside must be observed: Keep upright in transit: with arrow pointing upwards. -
Page 99: Procedure To Follow In The Event Of Damage Caused In Transit
▶ Report the damage to the transport company. ▶ Contact KaVo, Shipping Department, within 4 days. Tel.: 0 73 51 / 56 – 0 ▶ Under no circumstances should you return the damaged product to KaVo without prior consultation. -
Page 100: Installation Plan
Instructions for use KEY Laser III 1243 9 Assembly notes 9.6 Installation plan 9.6 Installation plan The installation plan provides information about: ▪ Space required ▪ treatment position See also: Installation plan 98/99... -
Page 101: Mounting Of Door Switches
Instructions for use KEY Laser III 1243 9 Assembly notes 9.7 Mounting of door switches 9.7 Mounting of door switches Note Door switches do not have to be mounted. Note Door switches have to be fit and installed by an electrician. The connection to the KEY Laser 1243 is performed by a Service Technician who has successfully com‐...
Need help?
Do you have a question about the Key Laser III 1243 and is the answer not in the manual?
Questions and answers