Table of Contents
Advertisement
Advertisement
Table of Contents

Related Manuals for KaVo MASTERsurg LUX Wireless


Summary of Contents for KaVo MASTERsurg LUX Wireless
- Page 1 Instructions for use MASTERsurg LUX Wireless REF 1.009.1200...
- Page 2 Distributed by: Manufacturer: KaVo Dental GmbH Kaltenbach & Voigt GmbH Bismarckring 39 Bismarckring 39 D-88400 Biberach D-88400 Biberach Phone +49 7351 56-0 www.kavo.com Fax +49 7351 56-1488...
-
Page 3: Table Of Contents
3.2 MASTERsurg LUX Wireless ........................14 3.3 Hand-held control panel......................... 16 3.4 Wireless foot control ..........................17 3.5 Rating plates of MASTERsurg LUX Wireless and wireless foot control ..........17 3.6 Technical Specifications MASTERsurg LUX Wireless ................19 3.7 Scope of delivery ........................... 20 4 Commissioning ............................... - Page 4 Instructions for use MASTERsurg LUX Wireless REF 1.009.1200 Table of contents 5.2.9 Setting the date......................... 35 5.2.10 Setting the LCD brightness ....................... 35 5.2.11 Setting the volume ........................35 5.2.12 Setting the key sound volume....................36 5.2.13 Multi-program mode ......................... 36 5.2.14 Exporting settings ........................
- Page 5 Instructions for use MASTERsurg LUX Wireless REF 1.009.1200 Table of contents 7.2.3 Drying............................61 7.2.4 Service, inspection and testing after preparation..............61 7.3 Packaging .............................. 61 7.4 Sterilisation ............................62 7.4.1 Storage ............................. 63 8 Troubleshooting.............................. 64 9 Run a software update ........................... 67 10 Safety checks ("STK") ............................
-
Page 6: User Instructions
For further information, please visit: www.kavo.com 1.3.1 Repair Service KaVo offers a fixed-price service check for the original factory maintenance. You can use a loaner device for the time of the service check. For scheduling or if you have any questions, please call:... -
Page 7: Terms And Conditions Of Warranty
1 User instructions | 1.4 Terms and conditions of warranty 1.4 Terms and conditions of warranty KaVo provides the final customer with a warranty that the product cited in the han- dover certificate will function properly and guarantees zero defects in the material or... -
Page 8: Information On The Packaging: Storage And Transportation
Art. 28). Outside Germany Note KaVo shall not be held liable for damage arising from transportation. The shipment must be checked on arrival. If the packaging is visibly damaged on delivery, please proceed as follows: 1. The recipient of the package must record the loss or damage on the delivery re- ceipt. - Page 9 Instructions for use MASTERsurg LUX Wireless REF 1.009.1200 1 User instructions | 1.5 Transportation and storage Permissible stacking load Temperature range Humidity Air pressure 9 / 76...
-
Page 10: Safety
Instructions for use MASTERsurg LUX Wireless REF 1.009.1200 2 Safety | 2.1 Description of safety instructions 2 Safety 2.1 Description of safety instructions 2.1.1 Warning symbol Warning symbol 2.1.2 Structure DANGER The introduction describes the type and source of the hazard. -
Page 11: Disposal Of Electronic And Electrical Devices
2 Safety | 2.3 Disposal of electronic and electrical devices Note KaVo cannot guarantee the compliance of accessories, cables, and other compon- ents not supplied by KaVo with the EMC requirements of IEC 60601-1-2 (DIN EN 60601-1-2). 2.3 Disposal of electronic and electrical devices... - Page 12 Instructions for use MASTERsurg LUX Wireless REF 1.009.1200 2 Safety | 2.4 Safety instructions CAUTION Electrical sparks in the product. Explosion and/or fire. ▶ Do not use product in areas subject to an explosion hazard. ▶ Do not operate the product in an oxygen-enriched atmosphere.
-
Page 13: Description Of The Product
The MASTERsurg LUX Wireless is approved for use in surgical theatres. This KaVo product is intended only for use in the field of dentistry, for surgery to ex- pose and dissect oral tissue structures or endodontic treatments (e.g. periodontal gap, gingiva, bone, jaw, extractions, implantations) and must be used by expert medical staff only. -
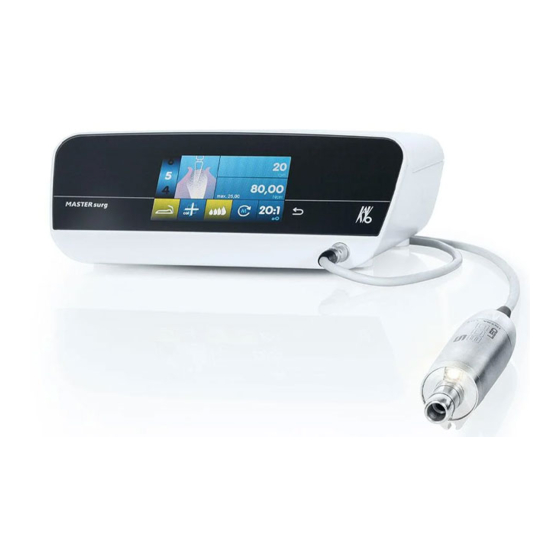
Page 14: Mastersurg Lux Wireless
Any waste which is generated must be recycled or disposed of in strict compliance with all applicable national regulations in a manner which is safe both for people and the environment. If you have any questions regarding proper disposal of the KaVo product, please contact the KaVo branch. Note A recycling pass can be downloaded from www.kavo.com. - Page 15 Instructions for use MASTERsurg LUX Wireless REF 1.009.1200 3 Description of the product | 3.2 MASTERsurg LUX Wireless Rear ① Hose pump locking mechanism ② On-button ③ Power plug ④ Please note the instructions for use ⑤ Follow the instructions for use ⑥...
-
Page 16: Hand-Held Control Panel
Instructions for use MASTERsurg LUX Wireless REF 1.009.1200 3 Description of the product | 3.3 Hand-held control panel 3.3 Hand-held control panel ① Program step ② Display of the activity ③ Maximal torque reached ④ Torque limit ⑤ Speed ⑥ Wireless foot control status indicator / input implant position ⑦... -
Page 17: Wireless Foot Control
④ Direction of motor rotation key (yellow) 3.5 Rating plates of MASTERsurg LUX Wireless and wireless foot control The rating plates of MASTERsurg LUX Wireless and wireless foot control are affixed on the underside of the housing and include the following symbols: CE mark... - Page 18 Instructions for use MASTERsurg LUX Wireless REF 1.009.1200 3 Description of the product | 3.5 Rating plates of MASTERsurg LUX Wireless and wireless foot control Follow the instructions for use Operating mode: continuous operation with intermittent load Alternating current (AC)
-
Page 19: Technical Specifications Mastersurg Lux Wireless
Instructions for use MASTERsurg LUX Wireless REF 1.009.1200 3 Description of the product | 3.6 Technical Specifications MASTERsurg LUX Wireless 3.6 Technical Specifications MASTERsurg LUX Wireless Width 265 mm Depth 255 mm Height 100 mm Weight approx. 2.0 kg Weight of wireless foot control approx. -
Page 20: Scope Of Delivery
Max. elevation for operation up to 3,000 m 3.7 Scope of delivery The scope of delivery of the MASTERsurg LUX Wireless includes the following: ▪ MASTERsurg LUX Wireless unit ▪ Wireless foot control ▪ Surgical motor INTRA LUX S600 LED ▪... -
Page 21: Commissioning
Instructions for use MASTERsurg LUX Wireless REF 1.009.1200 4 Commissioning | 4.1 Unpacking 4 Commissioning 4.1 Unpacking Note You need to keep the cardboard box and all packaging materials to be able to safely ship the unit in the future. - Page 22 Instructions for use MASTERsurg LUX Wireless REF 1.009.1200 4 Commissioning | 4.3 Getting the wireless foot control ready for operation ▶ Pull the button bar ① including the pump button, program button, and motor direc- tion button slightly upwards and take it off the wireless foot control.
- Page 23 Instructions for use MASTERsurg LUX Wireless REF 1.009.1200 4 Commissioning | 4.3 Getting the wireless foot control ready for operation ▶ Plug the button bar ① onto the wireless foot control ② and press it on lightly until the button bar ① snaps into place ③.
-
Page 24: Connecting The Surgical Motor
Instructions for use MASTERsurg LUX Wireless REF 1.009.1200 4 Commissioning | 4.4 Connecting the surgical motor 4.4 Connecting the surgical motor Note The delivered parts are not sterile (except for the coolant hose). Before the first treatment of a patient, the surgical motor, motor cable, and the handpiece tray need to be reprocessed. - Page 25 Instructions for use MASTERsurg LUX Wireless REF 1.009.1200 4 Commissioning | 4.5 Connecting the coolant container and hose set CAUTION Danger of tipping due to the coolant containers being too heavy. Malfunctions. ▶ Use coolant containers with a maximal volume of 1 litre only.
- Page 26 Instructions for use MASTERsurg LUX Wireless REF 1.009.1200 4 Commissioning | 4.5 Connecting the coolant container and hose set ca.10 mm ① Coolant hose ② Clips ③ Hose fixation ④ Lock ⑤ Pump hose ⑥ Insertion needle ⑦ Hose clamp ①...
- Page 27 Instructions for use MASTERsurg LUX Wireless REF 1.009.1200 4 Commissioning | 4.5 Connecting the coolant container and hose set ▶ Close the hose clamp ⑦ of the hose set. ▶ Attach the coolant hose ① to the straight or contra-angle handpiece.
- Page 28 Instructions for use MASTERsurg LUX Wireless REF 1.009.1200 4 Commissioning | 4.5 Connecting the coolant container and hose set ca.10 mm ▶ Open the lock ④ and insert the pump hose ⑤. ▶ Close the lock ④. Note Make sure to place the pump hose in the pump appropriately such that the pump hose does not get clamped or pinched by the lock.
-
Page 29: Electrical Connection
Instructions for use MASTERsurg LUX Wireless REF 1.009.1200 4 Commissioning | 4.6 Electrical connection ▶ Stick the puncture needle ⑥ into the coolant container and hook-in the coolant container on the bottle holder. ▶ Check the sealing and firm seating of the puncture needle ⑥. Prevent fluid from leaking above the device. - Page 30 Instructions for use MASTERsurg LUX Wireless REF 1.009.1200 4 Commissioning | 4.6 Electrical connection Note The unit must be set-up appropriately such that the mains plug and the electrical outlet are easily accessible. Note The protective earth conductor is used as functional earthing (FE) rather than as protective earthing (PE).
-
Page 31: Operation
▶ Turn the device on. ð The device runs a self test. Note Unless the unit is monitored, KaVo recommends turning it off for safety and energy- saving reasons. Note Auto-Off function After 10 minutes of inactivity, the light on the handpiece, the pump and the motor on the unit are turned off. -
Page 32: Setting The Language
Instructions for use MASTERsurg LUX Wireless REF 1.009.1200 5 Operation | 5.2 Device settings ▪ Importing settings ▪ Factory settings ▪ Version ▶ Press the back key for a long time in order to access the device settings. 5.2.1 Setting the language ▶... -
Page 33: Setting The Lux Afterglow Time
Instructions for use MASTERsurg LUX Wireless REF 1.009.1200 5 Operation | 5.2 Device settings 5.2.4 Setting the LUX afterglow time The LUX afterglow time determines how long the handpiece LEDs afterglow after each motor stop. The afterglow time can be set from 0 to 10 seconds. -
Page 34: Connect The Wireless Foot Control
Instructions for use MASTERsurg LUX Wireless REF 1.009.1200 5 Operation | 5.2 Device settings Actuating the pump key gradually increases the coolant flow up to its maximum value. ▶ Touch the symbol to change the operating mode of the pump key on the foot con- trol. -
Page 35: Setting The Date
Instructions for use MASTERsurg LUX Wireless REF 1.009.1200 5 Operation | 5.2 Device settings ▶ Press the plus and minus keys to change the time of day. 5.2.9 Setting the date The date can be set as day, month and year: ▶... -
Page 36: Setting The Key Sound Volume
5.2.14 Exporting settings The export of settings allows the user to export all device settings in a <SURG_MA.SET> file to the SD card. KaVo recommends exporting the settings as soon as the individual basic settings have been made. 5.2.15 Importing settings The import of settings allows the user to import all device settings in a <SURG_MA.SET>... -
Page 37: Factory Settings
Instructions for use MASTERsurg LUX Wireless REF 1.009.1200 5 Operation | 5.3 Surgical Motor INTRA LUX S600 LED 5.2.16 Factory settings Factory settings can be used to re-set the unit to its condition at the time of delivery. All program steps and device settings are re-set to their default values. -
Page 38: Attaching The Straight Or Contra-Angle Handpiece
▶ Pull on the KaVo handpiece to make sure that it is securely attached to the motor. ▶ Route the coolant hose ③ from the unit along the motor cable (clips) and connect it to the straight or contra-angle handpiece ①. -
Page 39: Removing The Straight Or Contra-Angle Handpiece
Instructions for use MASTERsurg LUX Wireless REF 1.009.1200 5 Operation | 5.4 Setting-up multi-program mode 5.3.2 Removing the straight or contra-angle handpiece CAUTION Damage from changing the straight and contra-angle handpieces during operation. Wear to the catch on the straight and contra-angle handpiece and motor. -
Page 40: Setting And Executing Program Steps
5 Operation | 5.5 Setting and executing program steps 5.5 Setting and executing program steps The MASTERsurg LUX Wireless is based on program steps and associated activities and can be operated intuitively using the graphical user interface. Program step 1: Marking The current program step is shown on the display as number ①... - Page 41 Instructions for use MASTERsurg LUX Wireless REF 1.009.1200 5 Operation | 5.5 Setting and executing program steps Programme Icon Activity Speed [rpm] Torque [Ncm] Transmission Coolant flow step ratio Template 200 – 2,000 5 – 20 16:1 0 – 4...
-
Page 42: Exemplary Programme Step Sequences
Instructions for use MASTERsurg LUX Wireless REF 1.009.1200 5 Operation | 5.5 Setting and executing program steps 5.5.2 Exemplary programme step sequences Example 1: Factory setting Step Activity Marking Pilot drilling Template Thread cut- Placing im- Setting Free use Treatment... -
Page 43: Selecting The Program Steps
Instructions for use MASTERsurg LUX Wireless REF 1.009.1200 5 Operation | 5.5 Setting and executing program steps 5.5.3 Selecting the program steps ▶ Select step by touching the program step display. The program step is saved automatically. The program steps can be selected during the treatment using the program key of the wireless foot control. -
Page 44: Limiting The Program Steps
Instructions for use MASTERsurg LUX Wireless REF 1.009.1200 5 Operation | 5.6 Changing default values ▶ Select the desired activity. The activity is saved automatically. 5.5.5 Limiting the program steps The number of program steps can be limited. Program steps that are not needed are deleted from the display. -
Page 45: Setting The Maximum Speed
This may lead to the motor coming to a standstill if the rotating handpiece is blocked. ▶ Select the torque display. Note The torque values can deviate by max. ± 10 % with the KaVo contra-angle hand- pieces SURGmatic S201. Larger deviations are possible with other contra-angle handpieces. 45 / 76... -
Page 46: Setting The Coolant Flow
Instructions for use MASTERsurg LUX Wireless REF 1.009.1200 5 Operation | 5.6 Changing default values ▶ Slide the slider to the desired value or touch the plus or minus area. The value is saved automatically. ▶ Press the back key to close the speed setting. -
Page 47: Changing The Direction Of Motor Rotation
Instructions for use MASTERsurg LUX Wireless REF 1.009.1200 5 Operation | 5.6 Changing default values ▶ Touch the coolant display until the supply rate is set as desired. The value is saved automatically. The coolant flow can be set and switched on or off during the treatment using the pump key of the wireless foot control. -
Page 48: Setting The Transmission Ratio
Instructions for use MASTERsurg LUX Wireless REF 1.009.1200 5 Operation | 5.7 Rinsing function The direction of motor rotation can be changed during the treatment using the direc- tion of motor rotation key of the wireless foot control. The changed direction of motor rotation is shown on the display. -
Page 49: Program Activity Rinsing Function
Instructions for use MASTERsurg LUX Wireless REF 1.009.1200 5 Operation | 5.7 Rinsing function The rinsing function serves to feed liquid and to start-up the illumination on the hand- piece. The motor is not activated during this process. The rinsing function can be called up manually at any time. -
Page 50: Activating The One-Touch Calibration
Note The handpiece must be attached for calibration. One-touch calibration should be carried out only with KaVo surgical handpieces with a transmission ratio of 16:1, 20:1 or 27:1. The one-touch calibration cannot be carried out with third-party handpieces or handpieces with different transmission ratios. -
Page 51: Implant Position
2 5.2.2 Setting the documentation, Page 32 5.10 Documentation The documentation function of the MASTERsurg LUX Wireless allows the date, time, torque, speed, direction of rotation, program name, implant position, activity, transmis- sion ratio, pump level, software version and serial number of the unit to be recorded. -
Page 52: Wireless Foot Control
Instructions for use MASTERsurg LUX Wireless REF 1.009.1200 5 Operation | 5.11 Wireless foot control Note In the modes, "Implant" and "Permanent", please make sure that an SD card is in- serted on the back of the unit. Note Please make sure that the proper implant position is selected. -
Page 53: Selecting The Program Steps
Instructions for use MASTERsurg LUX Wireless REF 1.009.1200 5 Operation | 5.12 Changing the coolant container ▶ Press the direction of motor rotation key of the wireless foot control to set the dir- ection of motor rotation. 5.11.2 Selecting the program steps Program steps can be selected during the treatment using the program key of the wireless foot control. -
Page 54: Decommissioning
Instructions for use MASTERsurg LUX Wireless REF 1.009.1200 6 Decommissioning | 6.1 Disconnecting the electrical connection 6 Decommissioning 6.1 Disconnecting the electrical connection ▶ Turn the device off. ▶ Disconnect the power cable the socket of the supply mains. ▶ Disconnect the power cable from the device. -
Page 55: Disconnecting The Surgical Motor
Instructions for use MASTERsurg LUX Wireless REF 1.009.1200 6 Decommissioning | 6.3 Disconnecting the surgical motor ▶ Remove the hose set from the unit and discard it. 6.3 Disconnecting the surgical motor ▶ Disconnect the plug of the motor cable from the connector on the device. Make sure to grasp the plug as close to the device as possible. - Page 56 Instructions for use MASTERsurg LUX Wireless REF 1.009.1200 6 Decommissioning | 6.4 Decommissioning the wireless foot control ▶ On the underside of the wireless foot control, press down the snap-in lug ① of the speed button ② and take the speed button ② off the wireless foot control.
-
Page 57: Dismantling The Bottle Holder
Instructions for use MASTERsurg LUX Wireless REF 1.009.1200 6 Decommissioning | 6.5 Dismantling the bottle holder 2 2 2 ▶ Plug the button bar ① onto the wireless foot control ② and press it on lightly until the button bar ① snaps into place ③. -
Page 58: Reprocessing Steps In Accordance With Din En Iso 17664
Instructions for use MASTERsurg LUX Wireless REF 1.009.1200 7 Reprocessing steps in accordance with DIN EN ISO 17664 | 7.1 Cleaning 7 Reprocessing steps in accordance with DIN EN ISO 17664 Note The reprocessing steps for surgical motors with motor cable and for the straight and contra-angle handpieces are described in the corresponding Instructions for use. - Page 59 Instructions for use MASTERsurg LUX Wireless REF 1.009.1200 7 Reprocessing steps in accordance with DIN EN ISO 17664 | 7.1 Cleaning ▶ Pull the button bar ① including the pump button, program button, and motor direc- tion button slightly upwards and take it off the wireless foot control.
-
Page 60: Machine Cleaning
The re-processing steps for the handpiece tray are as follows: KaVo recommends washer disinfectors in compliance with EN ISO 15883-1 that are operated with alkaline cleaning agents. The validations were conducted with the VARIO-TD program, the cleaning agent neodisher®... -
Page 61: Automated Disinfection
The re-processing steps for the handpiece tray are as follows: KaVo recommends washer disinfectors in compliance with EN ISO 15883-1 that are operated with alkaline cleaning agents. The validations were conducted with the VARIO-TD program, the cleaning agent neodisher®... -
Page 62: Sterilisation
The user is responsible for observing the regulations and conditions for sterility. The coolant container needs to be disposed and the hoses need to be changed after each patient. KaVo medical devices released for sterilisation are temperature-resistant up to 138 ℃ (280.4 °F). The following parts are released for sterilisation: ▪... -
Page 63: Storage
Instructions for use MASTERsurg LUX Wireless REF 1.009.1200 7 Reprocessing steps in accordance with DIN EN ISO 17664 | 7.4 Sterilisation - at least 10 minutes at 134 °C -1 °C / +4 °C (273 °F -1.6 °F / +7.4 °F) –... -
Page 64: Troubleshooting
8 Troubleshooting Note If malfunctions cannot be located or eliminated using this troubleshooting guide, a technician trained by KaVo must be commissioned to eliminate the problem. Note The permitted work is described in the Technician's Instructions available to the trained service staff. - Page 65 Instructions for use MASTERsurg LUX Wireless REF 1.009.1200 8 Troubleshooting Malfunction Cause Remedy ▶ Turn on the light. No light on the straight or The light is not turned on. contra-angle handpiece See also: 2 5.2.3 Setting the LUX brightness, Page 32 ▶...
- Page 66 Instructions for use MASTERsurg LUX Wireless REF 1.009.1200 8 Troubleshooting Malfunction Cause Remedy ▶ Let the motor rest. If the problem persists, notify Events E36 and E37: Overtemperature on stator. service engineer. Motor overload Over-current > nominal current. ▶ Turn the device off.
-
Page 67: Run A Software Update
Instructions for use MASTERsurg LUX Wireless REF 1.009.1200 9 Run a software update 9 Run a software update Please proceed as follows to update the software: ▶ Download the current firmware file from www.kavo.de/produkte. ▶ Copy the firmware file to an SD card (storage capacity 1 - 32 GB, FAT format). -
Page 68: Safety Checks ("Stk")
The MASTERsurg LUX Wireless must be subjected to a service check including safety check ("STK") every 2 years. The safety check may only be done by a profes- sional trained by KaVo or in a shop trained by KaVo. Perform the safety check ("STK") as described in the KaVo technician's instructions. -
Page 69: Accessories
Instructions for use MASTERsurg LUX Wireless REF 1.009.1200 11 Accessories 11 Accessories The following accessories are approved for the MASTERsurg LUX Wireless: ▪ Hose set sterile S600 (10 pcs.) (Mat. no. 1.009.8757) ▪ Hose set sterilisable S600 (Mat. no. 1.011.0633) ▪... -
Page 70: Information About Electromagnetic Compatibility
12.1 Guidelines and manufacturer's declaration - electromagnetic emission The MASTERsurg LUX Wireless is intended for use in an environment as specified below. The MASTERsurg LUX Wireless customer or user must ensure that the unit is used in an environment matching the description. Measurements of emitted interfer-... -
Page 71: Guidelines And Manufacturer's Statement - Electromagnetic Immunity
12.3 Guidelines and manufacturer's statement - Electromagnetic immunity The MASTERsurg LUX Wireless is intended for use in an environment as specified below. The MASTERsurg LUX Wireless customer or user should ensure that the unit is used in an environment matching the description. -
Page 72: Recommended Safe Distances Between Portable And Mobile Hf Telecommunications Equipment And The Mastersurg Lux Wireless
If the field strength measured at the location at which the MASTERsurg LUX Wireless is used exceeds the conformity levels specified above, the MASTERsurg LUX Wireless should be monitored to confirm that it is func- tioning as intended. Should unusual performance features be observed, additional measures may be required, such as, e.g., a different alignment or another location for... - Page 73 MASTERsurg LUX Wireless imum safe distance between portable and mobile HF-telecommunication devices (transmitters) and the MASTERsurg LUX Wireless - dependent on the output power of the communication device - as given below. Rated power of the trans-...
Need help?
Do you have a question about the MASTERsurg LUX Wireless and is the answer not in the manual?
Questions and answers