
Related Manuals for KaVo FOCUS 215720


Summary of Contents for KaVo FOCUS 215720
- Page 1 FOCUS™ Intraoral X-ray Installation Manual 215720 rev. 11 | 0.805.4950 ENGLISH Dental Excellence...
- Page 3 Code: 215720 rev. 11 Copyright Copyright © 11-2021 by Instrumentarium Dental, PaloDEx Group Oy. All rights reserved. KaVo™ is either registered trademark or trademark of Kaltenbach & Voigt GmbH in the United States and/or other countries. FOCUS™ and OpenMount™ are either registered...
-
Page 5: Table Of Contents
4.2 Installing the mounting device................10 4.2.1 Narrow wall mount plate................11 4.2.2 Wide wall mount plate ................12 4.2.3 Integration to KaVo treatment unit ............13 4.2.4 OpenMount horizontal arm installation............. 16 4.3 Installing the horizontal arm ................17 4.4 Installing the scissors arm................... -
Page 7: Introduction
1 Introduction 1 Introduction 1.1 FOCUS™ Intraoral X-ray FOCUS™ (hereafter called “the unit”) microprocessor controlled intraoral X-ray unit with a HF DC generator, which produces high quality dental images with film or digital sensors. This manual covers the installation of the FOCUS intraoral X-ray unit. -
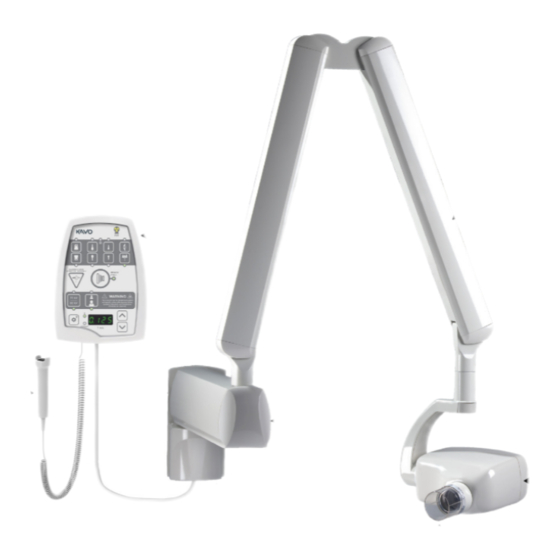
Page 8: Unit Description
2 Unit description 2.1 Main parts 1. Mounting system Options: • Narrow wall mount (default) • Wide wall mount • Adapter for KaVo treatment units 2. Connection box • Mains wiring 3. Horizontal arm Includes an electronics module and internal cables Options: •... - Page 9 2 Unit description 4. Scissors arm Includes main cable and tube head arm 5. Tube head 6. Cone Options: • Short cone, round • Short cone, rectangular • Long cone, round • Long cone, rectangular • Short cone, full metal, rectangular •...
-
Page 10: Cones
2 Unit description 2.2 Cones Short cone, round SSD 229 mm/9”, Ø60 mm Short cone, rectangular SSD 229 mm/9”, 35x45 mm Long cone, round SSD 305 mm/12”, Ø60 mm Long cone, rectangular SSD 305 mm/12”, 35x45 mm Short cone, full metal, rectangular SSD 229 mm/9”, 35x45 mm Long cone, full metal,... -
Page 11: Symbols On Remote Control
2 Unit description 2.3 Symbols on remote control Maxillary molar Maxillary cuspid Maxillary incisors Bitewing Mandibular molar Mandibular cuspid Mandibular incisors Occlusal Exposure button X-ray source assembly: emitting Ready for exposure Patient Size Selection Digital mode selection Voltage selection, 60 or 70 kV Radiation warning Exposure time &... - Page 12 2 Unit description Exposure time control FOCUS...
-
Page 13: Pre-Installation
Mounting on a treatment unit is allowed only when the manufacturer of the treatment unit has tested the mechanical stability and allow the integration. For KaVo treatment unit integration refer the compatibility table of the accessories available. For OpenMount installation, the mounting shall... - Page 14 3 Pre-installation Verify that the unit power is supplied through a circuit breaker with current rating of max. 16 A slow blow. Voltage: Voltage range: 230 VAC line 207 - 253 VAC 115 VAC line 103 - 126 VAC Voltage: Fuse: 230 VAC line 6,25 A Slow blow...
-
Page 15: Tools And Hardware
3 Pre-installation NOTICE! The reaches listed are with the 9-inch (229 mm) cone. Using the optional 12-inch (305 mm) cone will reduce the arm reach by 3 inches (76 mm). 3.2 Tools and hardware NOTICE! All screws, bolts, nuts and washers used in the unit are in metric sizes. -
Page 16: Installation Steps
4 Installation steps 4.1 Installation workflow 4.2 Installing the mounting device The FOCUS™ mounting system comprises a mounting bracket with an adjustment part that mounts to the applicable mounting device with four (4) bolts. There are several supported mounting devices for FOCUS installation: a single stud wall mounting plate (narrow) ... -
Page 17: Narrow Wall Mount Plate
4 Installation steps 4.2.1 Narrow wall mount plate Prior to mounting of the unit, locate the supporting material of the wall or a mounting surface and choose the mounting system according to the following examples. Mount the unit so that the lower edge of the mounting plate is approximately 47 inches (1100 mm) from the floor. -
Page 18: Wide Wall Mount Plate
4 Installation steps Wall type Anchor Thread Screw Washer HSA expansion Concrete anchor wall HKD-S flush Concrete anchor 125-B wall M8x20 Wood frame 125-B wall 8x90 Steel Installing the frame unit directly to steel framing is recommended. Recommended is a 2”x6” backing (2”x4”... -
Page 19: Integration To Kavo Treatment Unit
The adapter kits are available from KaVo as treatment unit accessory. An integration kit with hardware and mains cable is available when mounting FOCUS on the KaVo treatment unit adapter. Only short reach and medium reach configurations of the FOCUS can be installed to treatment unit using the KaVo unit mount adapter. - Page 20 4 Installation steps Install the KaVo unit adapter to the treatment unit's light mounting pole according to the instructions included with the adapter. Attach the long protective ground wire of the adapter to the treatment unit according the instructions with the adapter.
- Page 21 4 Installation steps Install the FOCUS to the KaVo unit mount adapter using four M8x20 mm bolts (DIN912 or similar) with washers and level the wall mounting bracket according to section 4.3 Installing the horizontal arm. The M8x25 mounting screws included with the FOCUS can also be used after the included M8 nuts are first screwed on tightly.
-
Page 22: Openmount Horizontal Arm Installation
4 Installation steps Proceed to setup FOCUS from section 4.4 Installing the scissors arm. 4.2.4 OpenMount horizontal arm installation OpenMount configuration has a fixed shaft mounted to a horizontal arm. The shaft along with the horizontal arm is installed to an adapter or other mounting structure not managed by the X-ray unit manufacturer. -
Page 23: Installing The Horizontal Arm
4 Installation steps Connect the RJ45 coupler to the remote controller cable. NOTICE! For details on how to connect the mains wiring, see chapter 4.10 Connecting mains wiring. Continue the installation according to chapter 4.4 Installing the scissors arm. 4.3 Installing the horizontal arm Lift the horizontal arm to its place and attach the nuts as shown in the image below. - Page 24 4 Installation steps Level and tighten the wall mounting bracket. To adjust the break on the wall end of the horizontal arm first remove the wall mounting bracket cover. Turn the horizontal arm pointing to the left and unscrew the screw of the horizontal arm cover.
-
Page 25: Installing The Scissors Arm
4 Installation steps 4.4 Installing the scissors arm WARNING! Do not remove the safety strap on the scissors arm before the entire unit is assembled because the scissors arm can open with force. Route the cables of the scissors arm through the hole (bearing) on the horizontal arm. -
Page 26: Adjusting The Friction Brakes
4 Installation steps 4.5 Adjusting the friction brakes There are brakes at the both ends of the horizontal arm. The brake at the wall end of the horizontal arm has been factory assembled and adjusted. 4.5.1 Outer end of the horizontal arm Hold the adjustable brake and insert the shorter screw (a) slightly so that the adjustable brake stays in position. - Page 27 4 Installation steps CAUTION! Secure the cables with the cable tie. Attach the horizontal arm cover and fasten it with the screw at the bottom of the cover. FOCUS...
-
Page 28: Leveling The Horizontal Arm
4 Installation steps 4.6 Leveling the horizontal arm NOTICE! These instructions do not apply to OpenMount installation. Adjust the horizontal arm according to the instructions provided with the mounting adapter. Loosen the nuts on both sides of the horizontal arm bracket. Locate the adjuster screw in the adjustment plate below the shaft. -
Page 29: Adjusting The Scissors Arm
4 Installation steps Rotate the adjuster screw observing at the same time the level on the horizontal arm. Perform the adjustment until the arm is horizontal. Tighten the four lock screws on the side of the wall mounting bracket to assure that the horizontal arm stays in position. - Page 30 4 Installation steps Turn the nut inside the scissors arm with a screwdriver to adjust the tension of the springs. increase tension, turn clockwise. To decrease the tension, turn the nut counter clockwise. NOTICE! Use a 3 mm (1/8 Allen key. The tip of the tool must fill the adjustment nut slots.
-
Page 31: Installing The Remote Controller
4 Installation steps Re-attach the covers after the adjustment. NOTICE! Make sure that the covers are placed in the correct orientation. The locking clip should point towards the tubehead. 4.8 Installing the remote controller 4.8.1 Mounting the remote control to the wall Take the remote controller assembly and use it as a template to determine the preferred mounting location. -
Page 32: Mounting The Control Panel To A Treatment Unit
4 Installation steps Screw the mounting screws to the wall. The used screws shall be 4mm pan head screws. Fig 4.2. Mounting screws Hang the remote control on the wall by the mounting screws. 4.8.2 Mounting the control panel to a treatment unit Remove the plastic cover of the remote control by removing the screw at the bottom. - Page 33 4 Installation steps Carefully remove the control panel circuit board by using your hands only. Do not use any sharp or hard tools when you remove the circuit board. NOTICE! Take special care when you handle the circuit board. The circuit board can be easily damaged by excessive use of power.
- Page 34 4 Installation steps Attach the included cable tie anchor to the right side of the control panel frame. Remove the strain relief from the external exposure button by opening the nut from the strain relief. Attach the control panel frame to the optional electronics mounting plate of the treatment unit adapter kit.
- Page 35 4 Installation steps Attach the external exposure button to the cable tie anchor on the control panel frame. Use the included cable tie. Leave approx. 15 centimeters of free cable to connect the control panel circuit board. Trim off the end of the cable tie.
-
Page 36: Using Terminal Strip For Connecting The Control Panel
4 Installation steps 4.8.3 Using terminal strip for connecting the control panel The unit includes remote control panel cable with RJ-45 connector at both ends. In case it is not possible to pull the RJ-45 connector through conduits at the place of installation the following instructions may be used. - Page 37 4 Installation steps RJ-45 connector pin number order Cut the cable from the connection box board end. Route the cable from the remote control panel to the unit X-ray unit. Remove cable tubing carefully about 2" (50mm). Strip the wires about 1/3" (8mm). Attach stripped wires to terminal strip X61 as shown in the table below.
- Page 38 4 Installation steps Cable type 1 (EIA 568A) RJ45 control panel board X21 Connection box board terminal strip X61 1. white/green 1. CS 2. green 2. GND 3. white/orange 3. CLK 4. blue 4. DOUT 5. white/blue 5. BEEP 6. orange 6.
-
Page 39: Setting The Dip Switches
4 Installation steps 4.9 Setting the DIP switches Remote Control Description Remote control and external switch in parallel Remote control and external switch in series Remote control only in use External switch(es) only in use Door switch disabled Connection Box Board Dip switch Position Description... - Page 40 4 Installation steps NOTICE! Connection box board is not used with the OpenMount arm. Door signal can be wired directly to the CPU board in the generator module if needed. NOTICE! If a door switch is not used with the OpenMount configuration, connect...
-
Page 41: Example 1
4 Installation steps 4.9.1 Example 1 1 remote with exposure button disabled, exposure hand / wall switch from Connection Box, one door switch from Connection Box and one door switch from remote. FOCUS... -
Page 42: Example 2
4 Installation steps 4.9.2 Example 2 1 remote with 2 exposure hand / wall switches connected in series, remote exposure button disabled. FOCUS... -
Page 43: Example 3
4 Installation steps 4.9.3 Example 3 2 remotes using a selector switch, exposure hand / wall switch from each remote. FOCUS... -
Page 44: Example 4
4 Installation steps 4.9.4 Example 4 Remote control and external exposure button in series. FOCUS... -
Page 45: Connecting Mains Wiring
4 Installation steps 4.10 Connecting mains wiring 4.10.1 Permanent and non-permanent wiring The unit is classified either as a non-permanently installed equipment or a permanently installed equipment depending on how it has been installed. The non-permanently installed unit is connected with power supply cord and mains plug when electric current (L) passes through both main fuses (F2 and F3) in the wall mounting bracket. -
Page 46: Converting A Non-Permanent (Plug) Wiring To Permanent
4 Installation steps See section 3 Pre-installation for the mains voltage and fuse requirements. Use only approved cables and plugs. Mains connector type: NEMA 5-15P (115 V), NEMA 6-15P (230 V) or similar Hospital Grade Power supply cord type: EU 230V: H05VV-F / 1.5 mm (UL 2587), max. - Page 47 4 Installation steps Remove the cables F3 and F4. Circuit diagram Cable connection permanently installed unit. Plug the cable F32 between the mains switch connector (at the back on the left) and fuse F3. Plug the blue cord of the cable F33 between mains switch connector slot (which is on the same side as the blue cord from the cable F52) and then connector 2 of the terminal block X91.
- Page 48 4 Installation steps Plug the black cord of the cable F33 between the fuse F3 and the connector 1 of the terminal block X91. The narrow cable plugs fit the fuses and the wide ones the mains switch connector. Cable markings are found on the cables. NOTICE! Do not mix the cable F3 and the fuse The power supply cable is connected to the terminal block (X91) as shown in the image...
-
Page 49: Converting A Permanent Wiring To A Non-Permanent (Plug)
4 Installation steps 4.10.3 Converting a permanent wiring to a non-permanent (plug) NOTICE! OpenMount configuration is intended for permanent installation only. Remove the cable F32 from the fuse F3 and from mains switch the connector. Remove also the cable F33 (both cables blue and black) from fuse F3, from the mains switch connector and from the terminal block X91. - Page 50 4 Installation steps Plug the black cord from the cable F3 between the fuse F3 and mains switch connector (at the back on the left side). The narrow cable plugs fit the fuses and the wide ones the mains switch connector slot which is on the same side as the black cord in the cable F52.
-
Page 51: Permanent Installation To 115 Vac
4 Installation steps Connect neutral and phase into the connectors N and L in the terminal block (X91). Connect the protective ground. Use only approved cables and plugs. 4.10.4 Permanent installation to 115 VAC NOTICE! For permanent installation, a separate lockable mains switch (not supplied) is required to be installed. -
Page 52: Replacing The Fuse
4 Installation steps 4.10.5 Replacing the fuse Push upward on the fuse base and twist it counter- clockwise with a screwdriver. The fuse with the base will come out. Remove the fuse from the base and replace it with the new one. Repeat this with each fuse. Fasten the fuses by pushing the base up and twisting it clockwise with the screwdriver. -
Page 53: Finalizing The Installation
5 Finalizing the installation 5 Finalizing the installation 5.1 Fastening the covers Place the small U-shaped cover on top of the adjustment part. If the wire from the remote control is surface mounted, remove a piece from the mounting bracket cover in order to allow the remote control cable to fit in. -
Page 54: System Checks Before Use
5 Finalizing the installation 5.3 System checks before use Check that the device does not move and that the arm is not drifting. Check the local regulations on radiation safety. Carry out the required radiation measurements and inform the local authorities. Move the tube head to up and down to check that the movements are smooth to both directions and that the tube head stays in... -
Page 55: Dimensions
6 Dimensions 6 Dimensions Wide wall mount plate (measures in mm) FOCUS... - Page 56 6 Dimensions Narrow wall mount plate (measures in mm) FOCUS...
- Page 57 6 Dimensions Remote control frame (measures in mm) FOCUS...
- Page 58 6 Dimensions Wall mount installation dimensions FOCUS...
- Page 59 6 Dimensions FOCUS...
- Page 60 6 Dimensions FOCUS...
- Page 61 6 Dimensions FOCUS...
- Page 62 6 Dimensions OpenMount installation dimensions FOCUS...
- Page 63 216457 r4 Headquarters PaloDEx Group Oy Nahkelantie 160 | FI-04300 Tuusula | FINLAND Tel. +358 10 270 2000 | https://www.kavo.com/en/contact www.kavokerr.com Dental Imaging Technologies Corporation 1910 North Penn Road | Hatfield, PA 19440 | USA Tel: 1-215-997-5666 | Fax: 1-215-997-5665 Dental Excellence https://www.kavo.com/en-us/contact-us...
Need help?
Do you have a question about the FOCUS 215720 and is the answer not in the manual?
Questions and answers
o que corresponde o erro1 no RX Kavo Focos