Table of Contents
Advertisement
Quick Links
EDAN Agile PLM Electronic Signature Information
--Signatures related to this document and performed in EDAN Agile PLM.
文件名称(Document Name):Acclarix AX4 使用说明书基础册-英文
文件编号(Number):01.54.457698
版本(Version):1.6
产品型号(Product Model):Acclarix AX4
项目编码(Project Code):2908G004
签批信息(Signature):
作者(Originator) : 谢 菊艳 (xiejuyan)
2019-12-25 09:51:01
审核人(Reviewers) : 李 娟 (lijuan)
2019-12-25 17:51:54
审核人(Reviewers) : 郭 伟娟 (guoweijuan)
2019-12-26 16:30:26
审核人(Reviewers) : 刘 恒 (liuheng)
2019-12-25 14:25:34
审核人(Reviewers) : 熊 文 (xiongwen)
2019-12-26 14:55:23
审核人(Reviewers) : 冀 伟 (jiwei)
2019-12-25 13:46:20
审核人(Reviewers) : 屈 培 (qupei)
2019-12-25 17:25:10
审核人(Reviewers) : 郭 亮 (guoliang)
2019-12-25 13:11:30
审核人(Reviewers) : 张 仁富 (zhangrenfu)
2019-12-26 11:13:53
审核人(Reviewers) : 鲁 应君 (luyingjun)
2019-12-26 10:34:54
批准人(Approvers) : 鲁 应君 (luyingjun)
2019-12-27 14:55:35
版权©深圳市理邦精密仪器股份有限公司 (Copyright©Edan Instrument,Inc.)
Advertisement
Table of Contents

Subscribe to Our Youtube Channel
Related Manuals for EDAN Acclarix AX4


Summary of Contents for EDAN Acclarix AX4
- Page 1 EDAN Agile PLM Electronic Signature Information --Signatures related to this document and performed in EDAN Agile PLM. 文件名称(Document Name):Acclarix AX4 使用说明书基础册-英文 文件编号(Number):01.54.457698 版本(Version):1.6 产品型号(Product Model):Acclarix AX4 项目编码(Project Code):2908G004 签批信息(Signature): 作者(Originator) : 谢 菊艳 (xiejuyan) 2019-12-25 09:51:01 审核人(Reviewers) : 李 娟 (lijuan) 2019-12-25 17:51:54 审核人(Reviewers) : 郭...
- Page 3 Disregarding instructions, particularly warnings and cautions, is considered abnormal use. Caution: Federal law restricts this device to use by, or on the orders of a physician. Contact Information: For sales or service information, please contact your local distributor or the EDAN Service Department at: support@edan.com.cn P/N:01.54.457698 MPN: 01.54.457698016 Release Date: Dec.
- Page 4 Regulatory Approval Remarks Auto OB measurement IS NOT available in the USA and its territories. The following features are not available in Canada at the time of release of this user manual. Consult your local representatives for the availability of these features. ...
-
Page 5: Table Of Contents
Contents Introduction ..........................1 1.1 Intended Use/ Indications for Use ..................1 1.2 Contra-indications ........................1 1.3 Device Description ......................... 1 1.4 Labeling Symbols ........................2 Safety ............................5 2.1 Warnings ..........................5 2.2 Cautions ..........................7 Getting Started ........................11 3.1 System Configuration ...................... - Page 6 5.7.1. TDI Mode Operations ....................47 5.7.2. TDI Touch Screen Controls ..................47 5.8 3D/4D Mode ........................47 5.8.1. Pre-3D/Pre-4D ......................48 5.8.2. 3D Volume Sweeping ....................49 5.8.3. 3D Image Review ...................... 49 5.8.4. 4D Volume Acquisition ....................54 5.8.5.
- Page 7 9.1.3. Store/Print Set-up ..................... 112 9.1.4. Miscellaneous Set-up ....................114 9.1.5. User Set-up ......................115 9.2 Connectivity ........................116 9.2.1. TCP/IP ........................116 9.2.2. DICOM ........................118 9.2.3. Network Store ......................120 9.3 Maintenance ........................122 9.3.1. License ........................122 9.3.2.
-
Page 8: Introduction
Acclarix AX4 Diagnostic Ultrasound System User Manual Introduction 1 Introduction 1.1 Intended Use/ Indications for Use The Ultrasound system is intended for use by a qualified physician or allied health professional for ultrasound evaluations. Specific clinical applications include: Abdominal ... -
Page 9: Labeling Symbols
Acclarix AX4 Diagnostic Ultrasound System User Manual Introduction 1.4 Labeling Symbols The following labels are used on the system: Symbol Definition Serial Number Part Number Date of Manufacture Manufacturer Operating instructions Warning (Background: Yellow; Symbol & outline: Black ) Refer to User Manual (Background: Blue;... - Page 10 Acclarix AX4 Diagnostic Ultrasound System User Manual Introduction Type BF Applied Part Transducer connector Pencil Transducer connector (reserved) ECG signal input connector (reserved) Transducer lock Transducer unlock Network port Trademark Direct current Video Output port USB 2.0 port USB 3.0 port...
- Page 11 Acclarix AX4 Diagnostic Ultrasound System User Manual Introduction Non-sterile. Indicates a medical that has not been subjected to a sterilization process. Conforms to AAMI Std. ES 60601-1, IEC Std. 60601-2-37, IEC Std. 60601-1-6 Certified to CSA Std. No. 60601-1, No 60601-2-37, No.
-
Page 12: Safety
Only use an Edan supplied battery. Read and understand the battery installation instructions prior to changing the battery. Only use Edan supplied transducer. Use of other transducers may result in electric shock or system malfunction. Only use a hospital grade, grounded, power outlet and plug. Do not use with an ungrounded outlet. - Page 13 Install the system according the EMC guidance provided in Chapter 14. Do not stack the system on other electronic equipment. The use of transducer and connecting cable not supplied by EDAN may result in increased emissions or decreased immunity of the equipment.
-
Page 14: Cautions
Do not use a battery that leaks, emits an odor, appears deformed, or discolored. Immediately replace it with a new Edan-supplied battery and dispose of the old battery according to local regulations. Replace a battery that has reached the end... - Page 15 Use only Edan supplied or recommended parts and accessories. Verify measurement results prior to entering them into a report. Contact your local distributor or Edan Service if there is excessive noise from the system speaker or fans.
- Page 16 Always ensure the privacy of patient information and data displayed/stored in the ultrasound system or exported to external storage devices. The software upgrade can only be performed by EDAN-qualified service professionals with upgrade files of known provenance. Confirm that the system boots to imaging after an upgrade.
- Page 17 Acclarix AX4 Diagnostic Ultrasound System User Manual Safety Anti-virus measures such as USB device virus scanning should be carried out prior to using the USB flash drive. Do not connect an USB device with unknown provenance to the ultrasound system.
-
Page 18: Getting Started
Acclarix AX4 Diagnostic Ultrasound System User Manual Getting Started 3 Getting Started 3.1 System Configuration The system is shipped with the following components: 1 main unit 1 rechargeable lithium battery 1 AC adapter 1 power cord ... - Page 19 Only the recommended printers listed above are verified by EDAN. Therefore, it is suggested to only use these printers. Use of other printers should comply with IEC 60950 or standard IEC 60601-1. Edan is not responsible for the accuracy of other printers. - 12 -...
-
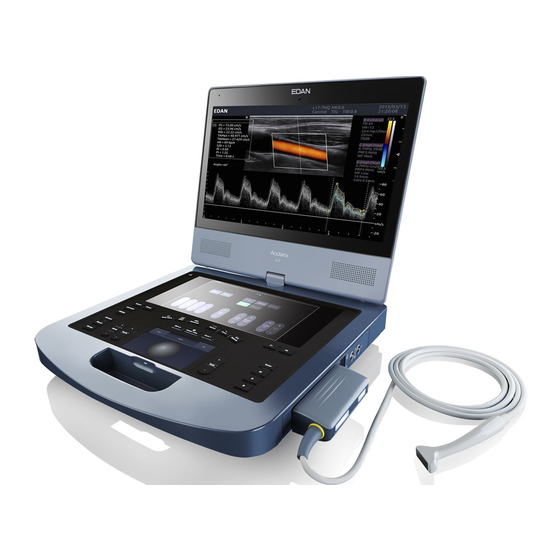
Page 20: System Overview
Acclarix AX4 Diagnostic Ultrasound System User Manual Getting Started The ultrasound system supports the following external DVD drives: SAMSUNG SE-218GN, SAMSUNG SE-208GN, LENOVO DB75, ASUS SDRW-08D2S-U, LITEON eBAU108-11 and PIONEER DVR-XU01C. The system supports the following DVD disks: Philips CD-R 700MB 80min 52x, Sony CD-RW 700MB 1x-4x,Sony DVD-RW 4.7GB 120min 2x/1x,... - Page 21 Acclarix AX4 Diagnostic Ultrasound System User Manual Getting Started Hinge Used to rotate the monitor Transducer locking lever Use to lock or unlock the transducer Used for connecting a transducer to the system main Transducer Port unit TrackPad Use to change the cursor position LEDs indicate battery charge.
-
Page 22: Battery Use
Acclarix AX4 Diagnostic Ultrasound System User Manual Getting Started 3.3 Battery Use The system comes with one lithium-ion battery. When it is fully charged it can run the system for approximately 60 minutes, depending on use. It is automatically charged when the system is plugged in. -
Page 23: Connecting And Disconnecting A Transducer
Acclarix AX4 Diagnostic Ultrasound System User Manual Getting Started Figure 3-4 Battery Removal 3.4 Connecting and Disconnecting a Transducer To connect a transducer: Figure 3-5 Tansducer Locking Handle 1. Align the connector with the transducer port and carefully push into place. - Page 24 Acclarix AX4 Diagnostic Ultrasound System User Manual Getting Started Figure 3-6 Lock the tansducer locking handle To disconnect a transducer: 1. Toggle the locking handle to the top position to unlock the transducer connector. 2. Firmly grasp the transducer connector and carefully remove it from the system port.
-
Page 25: Powering On/ Off
Acclarix AX4 Diagnostic Ultrasound System User Manual Getting Started Figure 3-8 Connect to the MTC Note: Pluging and unpluging the MTC should be done while the system is frozen or turned off. When connecting MTC to the system while in a frozen state, activate the transducer needed. - Page 26 Acclarix AX4 Diagnostic Ultrasound System User Manual Getting Started Note: 1. When both Admin1 and Admin2 password are forgotten, please contact the serviceman for the system password reset. 2. It is not suggested to use Emergency login under non-Emergency situation.
-
Page 27: Screen Layout
Acclarix AX4 Diagnostic Ultrasound System User Manual Getting Started Figure 3-9 Confirmation Dialog Box When Power off (Password protection is enabled) 3.6 Screen Layout ① ④ ③ ⑤ Figure 3-10 Main Screen Display ①Information Field: The top line of this field contains your hospital/institution name. Please see Section 9.1.1 General Set-up for information on customization. - Page 28 Acclarix AX4 Diagnostic Ultrasound System User Manual Getting Started details. ③Mini Report: The left side of the screen displays a “mini-report” which displays measurements performed during the current exam. ④Thumbnail Field: The right side of the screen displays thumbnail images of all statics and clips captured for currently active exam or when in Review.
- Page 29 Acclarix AX4 Diagnostic Ultrasound System User Manual Getting Started Hard drive icon. : Hard drive available : Hard drive data exchange, symbol in green. : Hard drive 95% full, symbol in red. : Hard drive 95% full with data exchange, symbol in red.
-
Page 30: Control Panel
Acclarix AX4 Diagnostic Ultrasound System User Manual Getting Started 3.7 Control Panel Figure 3-12 Control Panel of the System Name Description Invokes the Patient Information Screen typically used to Patient start/end exams or to modify patient information during an exam. See section 4.1. - Page 31 Acclarix AX4 Diagnostic Ultrasound System User Manual Getting Started Press to zoom the image in or out. See section 5.1.5 for Zoom details. Depth Press to adjust the depth of the image displayed. Enters or exits the Body Mark function. See section 7.2 for Body Mark details.
-
Page 32: Touch Screen
Acclarix AX4 Diagnostic Ultrasound System User Manual Getting Started One of three keys that can be configured to store or print Store 2 images or clips, or to set video printers. See section 7.4 for details. Controls the overall gain for the active imaging mode that currently has the UI focus. - Page 33 Acclarix AX4 Diagnostic Ultrasound System User Manual Getting Started Figure 3-13 Touch screen of the System A. Tabs: Each imaging mode that is active has a tab at the top of the touch screen. Usually, the imaging mode that was most recently activated is the top tab and has priority. Pressing on any other tab will bring it to the top and provide access to the controls available for that imaging mode.
-
Page 34: Trackpad
Acclarix AX4 Diagnostic Ultrasound System User Manual Getting Started next page. Radio Button Cluster: There is no restriction on moving a single radio button. However, we suggest that they are grouped adjacent to each other. When they are grouped in this way the system will automatically draw a border around them to indicate they are a related group of radio buttons. -
Page 35: Exam Operation
Acclarix AX4 Diagnostic Ultrasound System User Manual Exam Operation 4 Exam Operation 4.1 How to Start an Exam To start a new exam, press the Patient key and enter patient information, or select a scheduled patient from the modality worklist. -
Page 36: How To Restart An Exam
Acclarix AX4 Diagnostic Ultrasound System User Manual Exam Operation 4.3 How to Restart an Exam Select an exam from the Exam Database within the time limit selected in Patient Set-up menu. For the setting of time limit, refer to section 9.1.2 Patient Set-up. - Page 37 Acclarix AX4 Diagnostic Ultrasound System User Manual Exam Operation The next line shows the current transducer and the preset that will be used for the current exam. See section8.3.1.2 for information on presets. The preset can be changed by clicking the drop-down menu and selecting another preset associated with the current transducer.
-
Page 38: Modality Worklist
Acclarix AX4 Diagnostic Ultrasound System User Manual Exam Operation Figure 4-3 Patient Information Touch Screen Press Start Exam to exit the Patient Page function and return to B-mode imaging with the newly entered demographic data for the active exam. Press Cancel to exit the Patient Information Page without storing any of the entered data. - Page 39 Acclarix AX4 Diagnostic Ultrasound System User Manual Exam Operation Figure 4-4 Modality Worklist Display The worklist is displayed on the left side of the Patient Information Page in two columns labeled patient name and patient ID. Clicking on the header of each column will sort the list for the corresponding column.
-
Page 40: Imaging
Acclarix AX4 Diagnostic Ultrasound System User Manual Imaging 5 Imaging The imaging modes are entered and exited via dedicated hard keys along the right side of the console. Description The B-mode key behaves differently than the other mode keys. B-mode imaging is the baseline state of the system. - Page 41 The Left/Right invert control is indicated by a backward R and is used to toggle the left/right orientation of the image. The Edan E Left/Right orientation marker at the top of the image switches with the left/right invert to match the orientation marker on the transducer.
- Page 42 Acclarix AX4 Diagnostic Ultrasound System User Manual Imaging The Field of View control adjusts the image width. Full, Large, Med. and Small settings are available. As the image becomes narrower, the frame rate increases. The Steer control is only available for linear transducers and steers the B-mode image left or right, without moving the transducer.
-
Page 43: Dual Imaging
Acclarix AX4 Diagnostic Ultrasound System User Manual Imaging Adjusts the acoustic output power of the activate transducer and is only available in live imaging. Higher acoustic power numbers correspond to increased sensitivity in the image with improved Acoustic power penetration, but the ALARA principle should be followed in actual clinical situations. -
Page 44: Panorama
Acclarix AX4 Diagnostic Ultrasound System User Manual Imaging 5.1.4. Panorama Panorama constructs an extended field of view image as the user slides the transducer along its long axis. Panorama is available in live B-mode imaging. To acquire a panoramic image: ... -
Page 45: Pw-Mode
Acclarix AX4 Diagnostic Ultrasound System User Manual Imaging 5.2 PW-mode 5.2.1. PW Touch Screen Controls The following touchscreen controls impact the PW image. The location of the touchscreen controls can be customized (see section 3.8 for details). Name Control Description Scale adjusts the range of velocities that are displayed. - Page 46 Acclarix AX4 Diagnostic Ultrasound System User Manual Imaging Gate adjusts the size of the sample volume gate. Upward Size/Gate presses increase the gate size. Downward presses decrease the Size gate size. Sweep adjusts the sweep speed of the Doppler strip. Options of...
-
Page 47: Hprf
Acclarix AX4 Diagnostic Ultrasound System User Manual Imaging Press one of the three options to specify which side of the Doppler baseline to take measurements from: Auto Trace Up: traces positive portion of waveform (above baseline). Direction Down: traces negative portion of waveform (below baseline). - Page 48 Acclarix AX4 Diagnostic Ultrasound System User Manual Imaging Name Control Description Scale adjusts the range of velocities that are displayed. Upward Scale presses increase scale and downward presses decrease it. The Baseline control adjusts the Doppler baseline. Upward Baseline presses move the baseline up on the screen and downward presses move the baseline down.
-
Page 49: Color Mode
Acclarix AX4 Diagnostic Ultrasound System User Manual Imaging The Dynamic Range, or log compression, adjusts how signal intensities are converted to brightness. A high dynamic range Dynamic will display more shades of gray, while a low dynamic range will Range display fewer shades of gray and a more contrasty Doppler display. - Page 50 Acclarix AX4 Diagnostic Ultrasound System User Manual Imaging The Baseline control adjusts the Color baseline. Upward presses move the baseline up on the scale and downward Baseline presses move the baseline down. Baseline is not available in PDI mode. Normally, signals above the baseline are positive velocities (moving toward the transducer).
-
Page 51: Color Mode Variants
Acclarix AX4 Diagnostic Ultrasound System User Manual Imaging Color Doppler supports image presets for Low Flow, Medium Image Type Flow, and High Flow. To activate split screen with simultaneous live B/Color and live B. the live B image without color and the same live B image with... -
Page 52: M-Mode
Acclarix AX4 Diagnostic Ultrasound System User Manual Imaging 5.5 M-mode 5.5.1. M-mode Touch Screen Controls The following touchscreen controls impact the M-mode image. The location of the touchscreen controls can be customized (see section 3.8 for details). Name Control Description... -
Page 53: Anatomic M Mode
Acclarix AX4 Diagnostic Ultrasound System User Manual Imaging Acoustic Adjusts the acoustic output power of the activated transducer. It power is only available in live imaging. Higher acoustic power numbers correspond to increased sensitivity and penetration in the image, but the ALARA principle should be followed in actual clinical situations. -
Page 54: Tdi Mode
Acclarix AX4 Diagnostic Ultrasound System User Manual Imaging 5.7 TDI Mode Tissue Doppler Imaging (TDI) mode shows information about low-velocity and high-amplitude tissue motion, usually used to evaluate cardiac tissue motion. Only Phased transducers support TDI mode. There are two types of TDI modes available on this system: ... -
Page 55: Pre-3D/Pre-4D
Acclarix AX4 Diagnostic Ultrasound System User Manual Imaging 5.8.1. Pre-3D/Pre-4D The Pre-3D and Pre-4D mode supports defining the 3D and 4D acquisition location and settings. Figure 5-2 shows an example of the pre-3D image. The VOI (Volume of Interest) indicates the portion of the image that will be used for 3D. -
Page 56: Volume Sweeping
Acclarix AX4 Diagnostic Ultrasound System User Manual Imaging Displayed in Pre-4D. Press to switch to Pre-3D. Displayed in Pre-3D. Press to switch to Pre-4D. Start Start an acquisition. Exit Exit 3D/4D Table 5-7 Pre-3D Touch Screen 5.8.2. 3D Volume Sweeping Select Skeleton or Surface on the Pre-3D touch screen and press Start button or Enter key to start image acquisition. - Page 57 Acclarix AX4 Diagnostic Ultrasound System User Manual Imaging Figure 5-4 3D Image Review There are two image modes: Volume imaging mode and multi-slice imaging mode. Figure 5-4 shows Volume Imaging Mode in quad screen with a Baby Face volume rendering.
- Page 58 Acclarix AX4 Diagnostic Ultrasound System User Manual Imaging Press to activate the function of adjusting VOI or clip plane. Use the trackpad to adjust and press Set to switch between VOI and clip plane. This is a folder of cut functions with various cut tools inside.
- Page 59 Acclarix AX4 Diagnostic Ultrasound System User Manual Imaging Four radio buttons used to quickly rotate the image. Quick Rotation Available angles are: 0° /90° /180 ° /270° . Rotation X Rotate the image by the X-axis of the activated window.
- Page 60 Acclarix AX4 Diagnostic Ultrasound System User Manual Imaging Figure 5-5 Multi-slice Imaging Mode In figure 5-5, the first image shows the basis slice, other images are orthogonal to the basis slice and parallel to each other. Lines on the basis slice indicate the locations of the parallel slices. If there are more slices than images then the un-displayed slices are shown with a dotted line.
-
Page 61: Volume Acquisition
Acclarix AX4 Diagnostic Ultrasound System User Manual Imaging Distance Adjust the distance between slices. When there are more slices than can be displayed at once this Next control cycles through the subset of slices displayed. Select multi-slice tint. Options of Gold, Sepia, Blue, Ice and Clear Tint are available. -
Page 62: Live Volume
Acclarix AX4 Diagnostic Ultrasound System User Manual Imaging 5.8.5. 4D Live Volume 4D Live volume continuously sweeps and displays successive 3D volumes. During live 4D imaging the following controls are available: activate any window of A/B/C/3D, Single/Dual/Quad, VOI, Threshold, Bright, Contrast, 3D Smooth/ MPR Smooth, 3D Tint/ MPR Tint, Quick angle rotation, Rotation X, Rotation Y, Rotation Z, Zoom and Gain. -
Page 63: 4D Dataset
Acclarix AX4 Diagnostic Ultrasound System User Manual Imaging Touch screen controls are the same as that of static 3D except for Cine button. Name Control Description cine Switch between 3D and 4D review state Table 5-104D Touch Screen 5.8.7. 3D/4D Dataset This system supports storing 3D and 4D datasets for reviewing and re-editing. -
Page 64: Transducers
Acclarix AX4 Diagnostic Ultrasound System User Manual Transducer 6 Transducers 6.1 Transducer Model No. Model Type Application Abdominal Fetal / Obstetrics C5-2Q Convex Urology Gynecology Musculoskeletal Fetal / Obstetrics Gyncecology E8-4Q Endocavity Trans-vaginal Trans-rectal Urology Small parts L12-5Q Linear Peripheral Vascular... -
Page 65: Name And Function Of Each Part Of The Transducer
Acclarix AX4 Diagnostic Ultrasound System User Manual Transducer 6.2 Name and Function of Each Part of the Transducer Figure 6-1 shows an example of a transducer. Transducer head Transducer cable Transducer connector Figure 6-1 Typical transducer Name Function Converts electrical signals to sound waves, and then converts received echoes Transducer head back to electrical signals. -
Page 66: Disinfection
Acclarix AX4 Diagnostic Ultrasound System User Manual Transducer To clean the transducers: 1. Disconnect the transducer from the system. 2. Wear sterile protective gloves to prevent infection. 3. Remove all residual foreign matters from the transducer using sterile cloth or paper towel immediately after examination. - Page 67 Acclarix AX4 Diagnostic Ultrasound System User Manual Transducer WARNING 1. Unplug the transducer from the system prior to cleaning or disinfecting. 2. To avoid infection, always use protective gloves when performing cleaning and disinfecting procedures. 3. To avoid infection, ensure that expiration date of the disinfecting solution has not passed.
- Page 68 Acclarix AX4 Diagnostic Ultrasound System User Manual Transducer 8. Inspect the transducer to ensure that there is no damage. L17-7SQ E8-4Q Disinfectant Figure 6-2 Depth of the Transducer Immerged into Disinfectant WARNING 1. Do not immerse the transducer connector. If the cable connector is immersed, do not plug the connector into the system.
-
Page 69: Sterilization
Acclarix AX4 Diagnostic Ultrasound System User Manual Transducer 6.3.3. Sterilization Intra-operative transducers must be sterilized after each exam. Sterilizing the transducers: 1. Disconnect the transducer from the system. 2. Wear protective gloves to prevent infection. 3. Clean and dry the transducer according to the methods in section 6.3.1 Cleaning. -
Page 70: Using Transducers
Acclarix AX4 Diagnostic Ultrasound System User Manual Transducer Using Transducers 6.3.5. Proper Use of Transducers To extend the service life and maintain optimum transducer performance, please operate as follows: Inspect AC adapter, socket and acoustical window of the transducer periodically. - Page 71 Acclarix AX4 Diagnostic Ultrasound System User Manual Transducer To install transducer sheath: 1. Place an adequate amount of sterile coupling gel on the acoustic window of the transducer; 2. Insert the transducer into the sheath; 3. Pull the sheath over the transducer and cable until the sheath is fully extended;...
-
Page 72: Features
Acclarix AX4 Diagnostic Ultrasound System User Manual Features 7 Features 7.1 Comments The Comment function allows you add annotation to an image (including an image in review status). The Comment function is invoked by pressing the Comment hard key on the console. - Page 73 Acclarix AX4 Diagnostic Ultrasound System User Manual Features Adding comments You can add either pre-defined comments or use a keyboard. Adding comments using the keyboard 1. Invoke the Comment function. 2. Press the “Keyboard” touch screen key to display a keyboard on the touchscreen.
-
Page 74: Body Mark
Acclarix AX4 Diagnostic Ultrasound System User Manual Features 7.2 Body Mark Body Mark allows you add a bodymarker graphic to an image (including an image in review status) and indicate the location of the transducer using a transducer icon on that graphic. The Body Mark function is invoked by pressing the Body Mark hard key on the console. -
Page 75: Measurements
Acclarix AX4 Diagnostic Ultrasound System User Manual Features the bodymarker graphic. Probe/Graphic button can be used to toggle between moving the transducer icon and moving the bodymarker graphic. The active function is highlighted in yellow. Deleting a body mark: There are two ways of deleting a bodymarker graphic: ... - Page 76 Acclarix AX4 Diagnostic Ultrasound System User Manual Features Tool Options Some measurements can be done with a choice of different tools and each tool has a choice of multiple output result items. The users can configure the default tool and result items for these measurements by Tool Options.
-
Page 77: Generic Measurements
Acclarix AX4 Diagnostic Ultrasound System User Manual Features Figure 7-5 Moving the Measurement Result Window Configuring Measurement Workflow: This system provides two measurement workflows: Workflow A: Press Set key to start and complete measurement while press Switch key to switch the active side. - Page 78 Acclarix AX4 Diagnostic Ultrasound System User Manual Features 7.3.1.1. B-mode Generic Measurements The system supports the following types of generic B-mode measurements: Distance Circ/Area Angle Volume Stenosis Distance: The distance measurement is always done with a caliper pair.
- Page 79 Acclarix AX4 Diagnostic Ultrasound System User Manual Features 6. Press the Set key to complete the trace. To measure Area or Circumference with a Spline: 1. Invoke the measure function on a B-mode image. 2. If Area or Circumference is not the default measurement, select Circ/Area from the touch screen.
- Page 80 Acclarix AX4 Diagnostic Ultrasound System User Manual Features If Caliper is not the default tool, press Tool Options to switch to Caliper. 3. Move the caliper to the desired location. 4. Press the Set key to place that caliper and add the second half of the caliper pair.
- Page 81 Acclarix AX4 Diagnostic Ultrasound System User Manual Features 6. Double press the Set key to complete the first spline. 7. Repeat step 3~6 to complete the second spline and allow you to begin another measurement. 7.3.1.2. Strip Doppler Generic Measurements The system supports the following types of generic strip Doppler measurements: ...
- Page 82 Acclarix AX4 Diagnostic Ultrasound System User Manual Features If Draw is not the default tool, press Tool Options to switch to Draw. 3. Trace can be done with a Draw. Draw will follow your movements 4. Move the caliper to the desired start point.
- Page 83 Acclarix AX4 Diagnostic Ultrasound System User Manual Features TAMax PGmax PGmean PI RI S/D VTI Time AT DT NOTE: Measure trace can only be activated on a frozen image. Auto Trace: Auto Trace is capable of measuring the maximum and/or mean blood flow on a frozen Doppler strip.
- Page 84 Acclarix AX4 Diagnostic Ultrasound System User Manual Features 2. If HR is not the default measurement, select HR from the touch screen. 3. Move the caliper to the first heartbeat. Press the Set key to activate a second caliper. 4. Move the second caliper to position on the next beat.
-
Page 85: Application Measurements And Calculations
Acclarix AX4 Diagnostic Ultrasound System User Manual Features HR: The HR measurement tool can provide the heart rate calculation. To use the HR measurement tool: 1. Invoke the Measure Function on an M-mode strip. 2. If HR is not the default measurement, select HR from the touch screen. - Page 86 Acclarix AX4 Diagnostic Ultrasound System User Manual Features 7.3.2.1. Auto IMT Intima-media thickness (IMT) is a measurement of the thickness of tunica intima and tunica media. The system provides an automatic measurement of the Carotid IMT. Figure 7-6IMT Touch Screen To measure IMT: 1.
- Page 87 Acclarix AX4 Diagnostic Ultrasound System User Manual Features NOTE: 1. Auto IMT measurement can only be activated on a frozen image. 2. Select the Right or Left, Near or Far vessel wall, and vessel segment before generating IMT measurement, otherwise the measurement results may not be accurate.
- Page 88 Acclarix AX4 Diagnostic Ultrasound System User Manual Features 7.3.2.2. Simpson’s Method of Disks (MOD) Simpson’s MOD is a method used to calculate LV diastolic and systolic volumes and ejection fraction. Simpson’s MOD is available in the Cardiac presets. To use the Simpson’s MOD measurement: 1.
- Page 89 Acclarix AX4 Diagnostic Ultrasound System User Manual Features To use PISA measurement in Doppler mode: 1. Freeze a strip image. Invoke the Measure function. 2. Select PISA measurement on the touch screen and then select a measurement label from MR Trace, AR Trace, TR Trace and PR Trace.
- Page 90 Acclarix AX4 Diagnostic Ultrasound System User Manual Features 7.3.2.5. Hip Joint Angle Measurement Hip Joint Angle Measurement is intended to evaluate the development of acetabular roof and the subluxation of femoral head for pediatrics. This measurement is performed by adding three straight lines on the anatomic image, thereby calculating two angles.
-
Page 91: Patient Information Management
Acclarix AX4 Diagnostic Ultrasound System User Manual Features 7.4 Patient Information Management 7.4.1. Storing Images The control panel has three store keys: Store 1, Store 2, and Alt Store. Each store key can be separately configurable to support any of the following functions: ... - Page 92 Acclarix AX4 Diagnostic Ultrasound System User Manual Features Figure 7-9 Review Screen Button Description Page Change the display one page at a time. Change the playing speed of the highlighted clip; the speed range is Speed 12.5%-100%, in increments of 12.5%.The default speed is 50%.
- Page 93 Acclarix AX4 Diagnostic Ultrasound System User Manual Features Export selected images to a removable media currently available. Plug in a USB disk, select an image, press this button and the following confirmation dialog pop-up: Select the export path from destination drop list menu and click OK to confirm.
-
Page 94: Patient Database
Acclarix AX4 Diagnostic Ultrasound System User Manual Features 7.4.3. Patient Database The Patient Database provides a list of recently performed studies. It can be accessed by pressing the Review hard key on the console when there is no active exam. Figure 7-10 shows an example screen shot from the Patient Database screen. -
Page 95: Archiving Studies
Acclarix AX4 Diagnostic Ultrasound System User Manual Features Destination: The location where the highlighted exam(s) shall be exported, including all configured network locations and any writable USB disk or DVD drive currently available. This includes: DICOM server location(s) defined in the DICOM section of Connectivity. (See 9.2.2) ... -
Page 96: Structured Report
Acclarix AX4 Diagnostic Ultrasound System User Manual Features Sending a study to a DICOM server: There are three ways to send a study to a DICOM server. See Section 9.2.2 for details on configuring a DICOM server and choosing one of the following options 1. -
Page 97: Needle Biopsy Guide
If previous use has shown some drift of the needle from the center of the guidelines. 3. The displayed needle guide pathway on the EDAN video monitor is intended for reference during biopsy procedures. A variety of factors outside EDAN’s control, such as changing tissue density, bending of the needle, off-axis pressure by the person holding the transducer, etc., may cause deflection of a needle outside of the... - Page 98 Acclarix AX4 Diagnostic Ultrasound System User Manual Features Screw 螺钉 旋钮1 Knob 1 矩形卡槽 Rectangular slot 圆锥台 Cone 旋钮2 Knob 2 Figure 7-12Structure of Needle Guide Bracket Kit Step 2: Select the correct size guide for the gauge of needle to be used, and secure it to the needle guide holder by tightening knob 1.
- Page 99 Acclarix AX4 Diagnostic Ultrasound System User Manual Features Figure 7-15 Attaching Bracket Kit to Probe Figure 7-16 Turning Knob 2 Clockwise Step 4: Insert the needle into the rectangular hole, as shown in Figure 7-17. Rectangular Hole 矩形孔 Figure 7-17 Inserting Needle into Rectangular Hole Installing needle guide bracket of endocavity probe: Step 1: Take the needle guide bracket kit out of the package.
- Page 100 Acclarix AX4 Diagnostic Ultrasound System User Manual Features Knob Fixing claws Figure 7-18 Structure of Needle Guide Bracket Kit Step 2: Attach the needle guide bracket kit to the transducer by placing the bracket over the head of the probe, ensure that the three fixing claws of the bracket catch in the notches at the probe tip, turn the lock clockwise as the arrow direction shown in Figure 7-21, and then turn knob 1 clockwise until it locks in place, as shown in Figure 7-22.
-
Page 101: Activating Needle Guide Function
Acclarix AX4 Diagnostic Ultrasound System User Manual Features Figure 7-21 Turning the Knob 1 Clockwise Step 3: Insert the needle into the round hole, as shown in Figure 7-22. Round hole Figure 7-22 Insert the Needle into the Round Hole 7.5.2. -
Page 102: To Adjust The Needle Guide Line
Acclarix AX4 Diagnostic Ultrasound System User Manual Features 7.5.3. To Adjust the Needle Guide Line The needle guide bracket was calibrated during manufacture. However, certain events may cause the bracket alignment to shift, and new calibration required. WARNING 1. Calibrate the needle guide under any of the following conditions: a) The first time a needle guide is used with a given transducer. - Page 103 Acclarix AX4 Diagnostic Ultrasound System User Manual Features Angle Line Needle Enhancement Visualization Figure 7-25 Needle Visualization is invoked by pressing the Needle button on B-mode touch screen, and then the Enable button in the Needle Visualization section of the Needle touch screen. The following parameters can be adjusted when it is active.
-
Page 104: Presets
Acclarix AX4 Diagnostic Ultrasound System User Manual Presets 8 Presets 8.1 Preset Organization The system Presets are divided into two levels: the Exam Presets and Application Presets. Exam Preset: Each transducer has its own set of Exam Presets. Each Exam Preset contains: ... -
Page 105: Selecting A Preset
Acclarix AX4 Diagnostic Ultrasound System User Manual Presets 8.2 Selecting a Preset There are two ways to select a preset The Preset Function: The preset function is invoked by pressing the Preset button in the upper left corner of the console. See figure 8-2 for an example preset touchscreen. The currently active transducer is shown at the top of the touchscreen. -
Page 106: Presets
Acclarix AX4 Diagnostic Ultrasound System User Manual Presets Press System to edit overall system settings unrelated to presets. See section 9 for details. Press Presets to do any of the following: o Edit the imaging parameters of an exam preset. - Page 107 Acclarix AX4 Diagnostic Ultrasound System User Manual Presets 8.3.1.1. Editing Image Settings Figure 8-5 shows an example imaging set-up screen for imaging parameters. This example shows the screen for editing the B-mode settings for the C5-2Q Abdomen exam preset. Figure 8-5: Example Set-up Screen for Imaging Parameters Transducer and Exam Preset: There are drop-downs at the top of the screen for selecting the transducer and Exam Preset you want to edit.
- Page 108 Acclarix AX4 Diagnostic Ultrasound System User Manual Presets Figure 8-6 Example Patient Information Configuration Page To change the demographic fields shown with any preset: Select the preset you want to configure. This can either be done at the Preset Definition level before invoking the Patient Information Configuration page, or it can be done directly on this page.
-
Page 109: Comments Presets
Acclarix AX4 Diagnostic Ultrasound System User Manual Presets 8.3.2. Comments Presets Figure 8-7 Comments Preset Adding a new Comment: 1. Move the cursor to a blank field in the comments area and press Set. 2. Enter a new comment through keyboard and press Enter to finish editing. -
Page 110: Bodymarker Presets
Acclarix AX4 Diagnostic Ultrasound System User Manual Presets General Settings: Auto-erase comments when the image is unfrozen: If this option is enabled, the comments will be erased when the image is unfrozen, otherwise the comments will only be erased on demand or at the start of a new exam. - Page 111 Acclarix AX4 Diagnostic Ultrasound System User Manual Presets Pre-defined graphics area Figure 8-10 Bodymarker Preset Deleting a Bodymarker from a Preset: If the selected bodymarker is from a user-defined which does not point to any exam preset, you can delete it with the Delete button.
-
Page 112: Measure Presets
Acclarix AX4 Diagnostic Ultrasound System User Manual Presets Figure 8-11 Bodymaker Preset 8.3.4. Measure Presets The Preset UI of the Measure Presets set-up page is divided into the main screen display and the touchscreen display. The main screen display shows the current measure presets. The list of presets is shown along the left side, and the grid of buttons to the right show the current content of the selected preset. - Page 113 Acclarix AX4 Diagnostic Ultrasound System User Manual Presets Adding a new Measure Preset: A new measure preset can be added by copying an existing preset. The new measure preset contains the same measurements as the copied preset. Select a preset from the list along the left, and then press the Copy As button.
- Page 114 Acclarix AX4 Diagnostic Ultrasound System User Manual Presets Figure 8-14 Measurement Option 8.3.4.1. General Settings Figure 8-15 Measurement General Settings - 107 -...
- Page 115 Acclarix AX4 Diagnostic Ultrasound System User Manual Presets Report Logo The system supports a user-defined report header by importing a logo and setting the logo’s position and size. Report logo settings are as follows: Import: import a bmp format logo from USB disk.
-
Page 116: Utilities
Acclarix AX4 Diagnostic Ultrasound System User Manual Utilities 9 Utilities The Utilities hard key provides access to setup, screen adjust, connectivity and maintenance software. Each of these is described in separate sections below. 9.1 Set-up The Set-up function is divided into several sections, accessed by separate touch screen buttons ... -
Page 117: General Set-Up
Acclarix AX4 Diagnostic Ultrasound System User Manual Utilities 9.1.1. General Set-up Figure 9-1General Set-up Screen Item Options Description Input freely Set hospital name displayed on the top left Hospital of the screen and diagnosis report Chinese, English, German, French, Set the system language(new language is... -
Page 118: Patient Set-Up
Acclarix AX4 Diagnostic Ultrasound System User Manual Utilities √/× Mute Set the system volume. PAL/NTSC Set the output video mode, the selected video mode should be the same as that of Video Mode the s-video printer, otherwise the printer can not work. -
Page 119: Store/Print Set-Up
Acclarix AX4 Diagnostic Ultrasound System User Manual Utilities Item Options Description Weight Unit kg, lbs Set the weight unit of patients Height Unit cm, ft/in Set the height unit of patients Title of custom You can define two additional fields for data entry... - Page 120 Acclarix AX4 Diagnostic Ultrasound System User Manual Utilities Item Options Description Store Image Store static image to internal hard disk Store Clip Store clip to internal hard disk SONY-UP-D25MD, Connect the corresponding printer to print the SONY-UP-D898MD_X898MD current image. Store 3D data set to internal hard disk in 3D Store1/Store2/ mode.
-
Page 121: Miscellaneous Set-Up
Acclarix AX4 Diagnostic Ultrasound System User Manual Utilities 9.1.4. Miscellaneous Set-up Figure 9-4 Miscellaneous Set-up Screen Item Options Description Default review layout 4*4, 2*2, 1*1, 2*3 Set the default review layout √/× Overlay Show or hide overlay icons on thumbnail images Optimize Gain or not when press auto button in √/×... -
Page 122: User Set-Up
Acclarix AX4 Diagnostic Ultrasound System User Manual Utilities 9.1.5. User Set-up Figure 9-5 User Set-up Screen Item Options Description Enable Password Show or hide the login dialog when booting up the system. √/× Protection Password is required to enable password protection function. -
Page 123: Connectivity
Acclarix AX4 Diagnostic Ultrasound System User Manual Utilities Caution 1. For security consideration, a password with high secure intensity is suggested for each user account, and the password should be changed periodically. 2. Please keep your user name and password safe. - Page 124 Acclarix AX4 Diagnostic Ultrasound System User Manual Utilities Figure 9-6 TCP/IP settings Wired Settings: The following settings apply when connecting an system to a wired network via the network port on the side of the system. Get Local IP: Either Manually entered (Static) or DHCP. The correct setting will depend on how your DICOM network is administrated.
-
Page 125: Dicom
Figure 9-7 DICOM Settings Local AE Title: Any 16 characters that uniquely identify this system on your DICOM network. The default “EDAN_STR_SCU” will work unless you have multiple Edan systems on your network. Time Out, Transfer Syntax: These determine how the DICOM messages are configured. - Page 126 Acclarix AX4 Diagnostic Ultrasound System User Manual Utilities DICOM Store: Determines when DICOM images and clips are sent to the server. The options are: Transfer on demand: Images, clips and structured reports are only sent when you manually send them. When there is no exam in progress the Review hard key will show a list of all exams on the hard drive.
-
Page 127: Network Store
Acclarix AX4 Diagnostic Ultrasound System User Manual Utilities Testing the server: There are two tests to ensure that the server information is entered correctly. Click on any field for a given server to make that server selected, then: Ping: A successful Ping means that the system can communicate with the server at a low-level;... - Page 128 Acclarix AX4 Diagnostic Ultrasound System User Manual Utilities Figure 9-8 Network Store Settings FTP Server list: The main interaction in this section is a list of configured servers and directories. It starts off as an empty list, and grows as servers are added. Most sites will only use one, but if the system is moved between locations then multiple entries may be useful.
-
Page 129: Maintenance
The Version screen shows the current version of software, firmware, and selected hardware for the system. This information is only needed if requested by an Edan service engineer. This page also includes an Upgrade, Import Config and Show Config button. Any released upgrade will include instructions regarding use of these buttons. -
Page 130: Demo
Acclarix AX4 Diagnostic Ultrasound System User Manual Utilities 9.3.3. Demo A Demo exam is a special exam with a patient name of “Demo”. It allows you to collect any set of images or clips from multiple exams. To create a Demo exam: 1. -
Page 131: Export/Import
Acclarix AX4 Diagnostic Ultrasound System User Manual Utilities 9.3.4. Export/Import The system supports export/import of user-configured presets and settings to an external storage device. This same UI supports the export of system log files. To export user data: 1. Press Utilities hard key, select MaintenanceExport/ImportExport. -
Page 132: Screen Adjust
Acclarix AX4 Diagnostic Ultrasound System User Manual Utilities To import user data: 1. Press Utilities hard key, select MaintenanceExport/ImportImport. 2. Select an external USB storage device. All the presets on it will be loaded and displayed. The Presets must have been previously exported from a system. - Page 133 Acclarix AX4 Diagnostic Ultrasound System User Manual Utilities Figure 9-13 Screen Adjust Screen - 126 -...
-
Page 134: In Between Exams
After unpacking the device, you should follow the packing list to check the product carefully and to make sure that no damage has occurred during transportation. For installation, please contact your local distributor or the EDAN service department at: support@edan.com.cn. -
Page 135: Order List
EDAN can be only used on EDAN’s systems. Otherwise, the performance and electric shock protection cannot be guaranteed. If electrical or mechanical equipment from other companies need to be connected to the device, please contact EDAN or authorized representatives before connection. - Page 136 Acclarix AX4 Diagnostic Ultrasound System User Manual Order List Footswitch(double button) 01.10.027323 Suitcase 01.56.466102 Multi-Transducer Connector(MTC) 83.63.560232 NOTE: The part name may vary depending on context, but the part number is constant. - 129 -...
-
Page 137: Troubleshooting And Maintenance
Check before the system is switched on, if any system malfunction is experienced, eliminate the malfunction before use, or contact EDAN or authorized representatives for service if needed. Visually inspect all the transducers. Do not use any damaged transducer. -
Page 138: Maintenance
Manual (P/N 01.54.002483), available from your Edan representative. 12.4 Cleaning the System Use only the EDAN-approved substances and methods listed in this chapter to clean the system. The warranty does not cover damage caused by using unapproved substances or methods. -
Page 139: Cleaning The System Surface
Inspect the bracket for damage such as cracks or breakage. If damage is evident, discontinue use of bracket and contact your Edan representative for disposal guidance. 3. Sterilize the bracket before disposal or sending back to manufacturer for repair. - Page 140 Acclarix AX4 Diagnostic Ultrasound System User Manual Troubleshooting and Maintenance residues from the needle guide bracket using a small and soft-bristled brush or other similar devices. Do the cleaning quickly before the needle guide bracket dries out. 3. Soak the needle guide bracket in the cleaning solution (Ethanol 75% or Isopropanol 70%) for at least five minutes.
-
Page 141: Specifications
Acclarix AX4 Diagnostic Ultrasound System User Manual Specifications 13 Specifications 13.1 Electrical Safety Classifications Internally powered equipment, According to the type of protection against electric shock Class I equipment According to the degree of Type BF protection against electric shock... -
Page 142: Display Specifications
Acclarix AX4 Diagnostic Ultrasound System User Manual Specifications 13.4 Display Specifications Display TFT-LCD Diagonal Size 15.6 inches View Angle Right 80° , Left 80° , Up 80° , Down 80° (min) Pixel Number 1920x1080 White Luminance 300 cd/m (typ) Contrast Ratio 700 (typ) 13.5 General Technical Specifications... - Page 143 Acclarix AX4 Diagnostic Ultrasound System User Manual Specifications Depth Adjustment Adjustable in real time in all modes Image Conversion Up/Down flip, Left/Right flip Chinese, English, German, French, Italian, Spanish, Russian, Turkish, Language Display Portuguese. Focus Number Max. 3 Abdomen, Obstetrics, Small Parts, Vascular, Cardiac, Gynecology,...
-
Page 144: Operating, Storage And Transportation Environment
Acclarix AX4 Diagnostic Ultrasound System User Manual Specifications 13.6 Operating, Storage and Transportation Environment 13.6.1.Operating Environment Temperature 0 ° C ~ +40 ° C(+32 ° F~+104 ° F) Relative humidity range 15% RH ~ 95% RH(non-condensing) Atmospheric pressure range 860 hPa ~ 1060 hPa 13.6.2.Storage and Transportation Environment... -
Page 145: Emc Information
Acclarix AX4 Diagnostic Ultrasound System User Manual EMC Information 14 EMC Information Electromagnetic Emissions Guidance and manufacture’s declaration – electromagnetic emission The system is intended for use in the electromagnetic environment specified below. The customer or the user of the system should assure that they are used in such an environment. - Page 146 Acclarix AX4 Diagnostic Ultrasound System User Manual EMC Information Electromagnetic Immunity Guidance and manufacture’s declaration – electromagnetic immunity The system is intended for use in the electromagnetic environment specified below. The customer or the user of the system should assure that they are used in such an environment.
- Page 147 Acclarix AX4 Diagnostic Ultrasound System User Manual EMC Information Electromagnetic Immunity Guidance and manufacture’s declaration – electromagnetic immunity The system is intended for use in the electromagnetic environment specified below. The customer or the user of the system should assure that they are used in such an environment.
- Page 148 Acclarix AX4 Diagnostic Ultrasound System User Manual EMC Information NOTE 1 At 80 MHz and 800 MHz, the higher frequency range applies. NOTE 2 These guidelines may not apply in all situations. Electromagnetic propagation is affected by absorption and reflection from structures, objects and people.
- Page 149 Acclarix AX4 Diagnostic Ultrasound System User Manual EMC Information Table 1 Test specifications for ENCLOSURE PORT IMMUNITY to RF wireless communications equipment Test Band Service Modulation Maximum Distance Immunit frequency (MHz) power (W) y test (MHz) level (V/m) 380-390 TETRA 400...
- Page 150 Acclarix AX4 Diagnostic Ultrasound System User Manual EMC Information Recommended Separation Distances Recommended separation distances between portable and mobile RF communications equipment and the system The system is intended for use in an electromagnetic environment in which radiated RF disturbances are controlled. The customer or the user of the system can help prevent...
- Page 151 - 144 -...
Need help?
Do you have a question about the Acclarix AX4 and is the answer not in the manual?
Questions and answers