
Subscribe to Our Youtube Channel
Related Manuals for EDAN Acclarix LX9 Series


Summary of Contents for EDAN Acclarix LX9 Series
- Page 1 Acclarix LX9 Series Diagnostic Ultrasound System Version 1 .0 User Manual Basic Volume...
- Page 2 Therefore, some of the contents may not apply to your product. If you have any questions, please contact your local EDAN representative. The pictures and interfaces in this manual are for reference only.
- Page 3 Regulatory Approval Remarks: The following features are not available in the CE region at the time of release of this user manual. Consult your local representatives for the availability of these features. eHIP Measurement L12-5HQ Transducer L12-5WQ Transducer ...
-
Page 4: Table Of Contents
Contents Introduction ............................ 1 1.1 Intended Use/ Indications for Use ....................1 1.2 Contra-indications ........................1 1.3 Device Description ........................1 Safety .............................. 2 2.1 Warnings ............................2 2.2 Cautions ............................4 2.3 Labeling Symbols ......................... 7 Getting Started ..........................11 3.1 System Configuration ........................ - Page 5 5.3.2. PW Image Optimization ..................... 52 5.3.3. HPRF ..........................55 5.4 CW Mode ........................... 56 5.4.1. Using CW Mode ......................... 56 5.4.2. CW Image Optimization ..................... 56 5.5 M Mode............................59 5.5.1. Using M Mode ........................59 5.5.2. M-mode Image Optimization ....................59 5.6 Anatomic M Mode ........................
- Page 6 6.2 Using Transducers ........................93 6.3 Transducer Cleaning and Disinfecting ..................96 6.3.1. Cleaning ..........................96 6.3.2. Disinfection ......................... 96 6.3.3. Sterilization ......................... 99 6.3.4. Storage ..........................99 6.4 Needle Biopsy Guide ....................... 100 6.4.1. Installing Needle Guide Bracket ..................100 6.4.2.
- Page 7 8.2.8. Pediatric Measurements ....................164 8.3 Worksheet and Report ......................167 8.3.1. Worksheet ........................167 8.3.2. Report ..........................172 8.4 Measurement Accuracy ......................173 Exam Data Management ......................175 9.1 Storing Images ......................... 175 9.2 Reviewing Images ........................176 9.3 Exam Database ........................178 9.4 Archiving Studies ........................
- Page 8 10.7.4. Demo ..........................206 10.7.5. Transducer Element Check ................... 207 10.8 Screen Adjust ......................... 208 10.9 Stress Echo Set-up ........................ 209 11 eVocal ............................... 210 12 In Between Exams ........................211 12.1 Unpacking ..........................211 12.2 Transport ..........................211 12.3 Storage ............................ 211 13 Troubleshooting and Maintenance ..................
- Page 9 B.4.5 Limits of Acoustic Output ....................226 B.5 Operator Control Features ....................226 B.6 Prudent Use Statement ......................226 B.7 References for Acoustic Output and Safety ................227 B.8 Transducer Acoustic Output Data ..................227 Appendix C Order List ........................228 Appendix D EMC Information ......................
-
Page 10: Introduction
1 Introduction 1.1 Intended Use/ Indications for Use The Acclarix LX9 series Diagnostic Ultrasound System is intended for use by a qualified physician or allied health professional for ultrasound evaluations in hospitals and clinics. Clinical applications include Abdominal, Gynecology, Obstetric, Cardiac, Small parts, Urology, Musculoskeletal, Peripheral vascular, Intra-operative, Pediatric, Neonatal and Adult Cephalic. -
Page 11: Safety
Only use Edan supplied battery. Read and understand the battery installation instructions prior to changing the battery. Only use Edan supplied transducer. Use of other transducers may result in electric shock or system malfunction. Only use a hospital grade, grounded, power outlet and plug. Do not use with an ungrounded outlet. - Page 12 Do not stack the system on other electronic equipment. The use of transducer and connecting cable not supplied by EDAN may result in increased emissions or decreased immunity of the equipment. Refer to Appendix D for recommended separation distances from other equipment, including portable and RF communication devices.
-
Page 13: Cautions
Do not use a battery that leaks, emits an odor, appears deformed, or discolored. Immediately replace it with a new Edan-supplied battery and dispose of the old battery according to local regulations. Replace a battery that has reached the end of its service life. - Page 14 Verify measurement results prior to entering them into a report. Contact your local distributor or Edan Service if there is excessive noise from the system speaker or fans. Please read and understand cleaning instructions prior to use.
- Page 15 Always ensure the privacy of patient information and data displayed/stored in the ultrasound system or exported to external storage devices. The software upgrade can only be performed by EDAN-qualified service professionals with upgrade files of known provenance. Confirm that the system boots to imaging after an upgrade.
-
Page 16: Labeling Symbols
Acclarix LX9 Series Diagnostic Ultrasound System User Manual Safety pursuant to part 15 of the FCC Rules. These limits are designed to provide reasonable protection against harmful interference in a residential installation. This equipment generates uses and can radiate radio frequency energy and, if not installed and used in accordance with the instructions, may cause harmful interference to radio communications. - Page 17 Acclarix LX9 Series Diagnostic Ultrasound System User Manual Safety Authorized Representative in the European Community Disposal method. Indicates that the equipment should be sent to special agencies according to local regulations for separate collection after its useful life. Caution: Federal (U.S.) law restricts this device to sale by or on the order of a physician.
- Page 18 Acclarix LX9 Series Diagnostic Ultrasound System User Manual Safety Microphone input Headphones Alternating Current Battery check Up/Down button, to move the control panel up or down Non-ionizing electromagnetic radiation. Federal Communications Commission: ID:SMQ-LX9EDAN FCC ID:SMQ-LX9EDAN Defibrillation-proof type CF applied part Non-sterile.
- Page 19 Acclarix LX9 Series Diagnostic Ultrasound System User Manual Safety The following labels are used on the wooden packaging: Symbol Definition This way up Fragile, handle with care Keep dry Stacking limit by number Do Not Roll. General Symbol for Recovery / Recyclable Tilt Watch Indicator.
-
Page 20: Getting Started
Acclarix LX9 Series Diagnostic Ultrasound System User Manual Getting Started 3 Getting Started 3.1 System Configuration Standard Configuration: 1 main unit 1 power cord 1 potential equalization conductor 1 bottle of coupling gel 1 basic user manual and 1 advanced user manual Options: ... - Page 21 Acclarix LX9 Series Diagnostic Ultrasound System User Manual Getting Started BGK-010 In-plane For use with the L12-5WQ 44°,53°,64° Supports: 14G-23G BGK-012 In-plane For use with the MC8-4Q 11°,20°,37° Supports:14G-23G BGK-013 In-plane 0.5cm, 1.0cm, 1.5cm, 2.0cm, For use with the ECL12-3Q 2.5cm,...
- Page 22 Only the recommended printers listed above are verified by EDAN. Therefore, it is suggested to only use these printers. Use of other printers should comply with IEC 60950 or IEC 60601-1. Edan is not responsible for the accuracy of other printers.
-
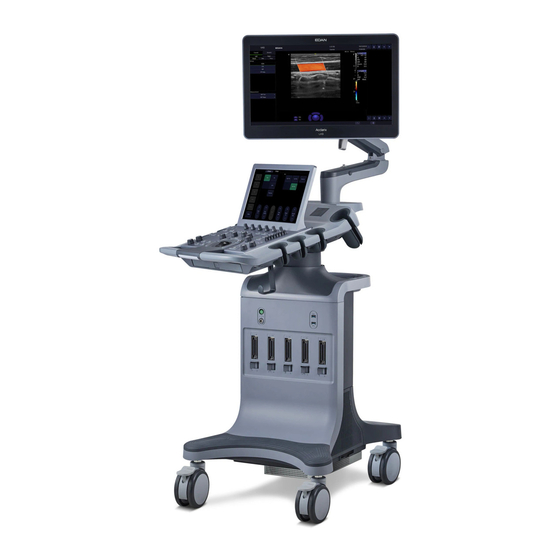
Page 23: System Overview
Acclarix LX9 Series Diagnostic Ultrasound System User Manual Getting Started 3.2 System Overview 3.2.1. Main Unit Figure 3-1 Front View - 14 -... - Page 24 Acclarix LX9 Series Diagnostic Ultrasound System User Manual Getting Started Description Description Pencil Transducer Connector 21.5" Display Monitor (Reserved) 14" Touch Screen Transducer Sockets(five) Coupling Gel Holder / Intra-cavity Transducer Holder Gel warmer(optional) Transducer Holders Handle Control Panel USB Port(two)
- Page 25 Acclarix LX9 Series Diagnostic Ultrasound System User Manual Getting Started Figure 3-3 Left View Description Description Monitor support arm USB port Video Printer/DVD Drive(Optional) System vents Table 3-4 Left View Description CAUTION Ensure system vents are clear and unobstructed. - 16 -...
- Page 26 Acclarix LX9 Series Diagnostic Ultrasound System User Manual Getting Started Figure 3-4 Rear View Description Description Video Printer/DVD Drive Storage tray (Optional) I/O Ports Equipotential Terminal AC Power Switch/Fuse AC Power Socket Table 3-5 Rear View Description CAUTION To facilitate the disconnection from power supply, please do not cover the AC power socket with any object.
- Page 27 Acclarix LX9 Series Diagnostic Ultrasound System User Manual Getting Started Note: Video printer(SONY UP-X898MD) and DVD drive(LITEON eBAU108) can be mounted to the ultrasound system by attaching to the bottom of the storage tray(as shown in figure 3-4) with the use of an optional metal frame.
-
Page 28: Control Panel
Acclarix LX9 Series Diagnostic Ultrasound System User Manual Getting Started Caution 1. The resolution of the external display which connects to DVI port or HDMI port should be 1080P, otherwise the display will be abnormal. 2. If one USB WIFI module is used, it should be connected to the USB port on the rear panel of the ultrasound system. - Page 29 Acclarix LX9 Series Diagnostic Ultrasound System User Manual Getting Started Press to print images via the connected USB video Print printer. Report Press to display the report page. User-defined button. See section 10.1.2 for configuring the user-defined button. The Steer knob control is only available for linear transducers.
- Page 30 Acclarix LX9 Series Diagnostic Ultrasound System User Manual Getting Started Press to enter or exit Color Mode and rotate to adjust Color the gain in Color Mode. Press to get the sample line. Use the trackball to adjust the position of the sample line. Press <Update> key to display the Doppler strip.
- Page 31 Acclarix LX9 Series Diagnostic Ultrasound System User Manual Getting Started In measurement, pressing <Update> switches the active side of calipers. See section 8.1 for details. In Pre-Doppler mode, pressing <Update> invokes Update Spectral Doppler mode. When Spectral Doppler strip is...
-
Page 32: Screen Layout
Acclarix LX9 Series Diagnostic Ultrasound System User Manual Getting Started The Time Gain Compensation control (TGC) adjusts the gain of the image at different depths. Each slider can be adjusted separately. Glide the slide controls to adjust the TGC. Glide the upper segments to adjust the near field gain, and the lower segments to adjust the far field gain;... - Page 33 Acclarix LX9 Series Diagnostic Ultrasound System User Manual Getting Started ① Information Field The top line of this field contains your hospital/institution name. Please see Section 10.1.1 General Set-up for information on customization. The second line of this field contains the patient name, gender, age and ID, as entered through the Patient Information screen.
- Page 34 Acclarix LX9 Series Diagnostic Ultrasound System User Manual Getting Started Previous/Next Views previous or next pages of images. when more than one Images page of images are displayed. ⑤ User Feedback Field The user feedback filed is displayed below image field and above status bar. This field displays: ...
- Page 35 Acclarix LX9 Series Diagnostic Ultrasound System User Manual Getting Started When a red × appears in the icon, the image fails to be exported or the data fails to be transferred to the network server. Clicking on this icon displays a queue of exam or image transfers and as well as the transfer status of each exam or image including pending, active, success and fail.
-
Page 36: Touch Screen
Acclarix LX9 Series Diagnostic Ultrasound System User Manual Getting Started 3.2.4. Touch Screen The Touch Screen contains controls that vary depending on the active imaging mode or function. There are several types of controls used by the touch screen, as illustrated below: Figure 3-8 Touch screen of the System A. -
Page 37: Trackball
Acclarix LX9 Series Diagnostic Ultrasound System User Manual Getting Started new location. Multiple pages: Dragging a control to the side of the screen will move that control to the next page. Radio Button Cluster: There is no restriction on moving a single radio button. However, we suggest that they are grouped adjacent to each other. -
Page 38: System Preparation
Acclarix LX9 Series Diagnostic Ultrasound System User Manual Getting Started 3.3 System Preparation 3.3.1. Battery Use The system may come with two lithium-ion batteries depending on your order. The fully charged batteries together can run the system for approximately 1 hour, depending on use. The batteries are automatically charged when the system is plugged in. - Page 39 Acclarix LX9 Series Diagnostic Ultrasound System User Manual Getting Started 4. To fix the battery, move the battery holder to the middle position (see the figure below). 5. Close the battery door and secure it. WARNING When the battery capacity is ≤20%, the battery status icon turns red, and the system displays a prompt “Low Battery.
-
Page 40: Ac Power Use
Acclarix LX9 Series Diagnostic Ultrasound System User Manual Getting Started 4. Close the battery door and secure it. 3.3.2. AC Power Use When using AC power, position the system so that it is easy to disconnect it from AC power supply. -
Page 41: Powering On/ Off
Acclarix LX9 Series Diagnostic Ultrasound System User Manual Getting Started Ensure the transducer is connected firmly and properly. This is to avoid bad contact between the transducer and transducer socket. Ensure that the system is shut down, or the image is frozen, before connecting and disconnecting transducers. -
Page 42: Monitor Position Adjustment
Acclarix LX9 Series Diagnostic Ultrasound System User Manual Getting Started NOTE: Turn off and unplug the device after use. Please unplug the power cable from the power socket and disconnect the battery prior to storage. Sleep mode The system will enter a sleep mode that maintains exam information while using minimal power. - Page 43 Acclarix LX9 Series Diagnostic Ultrasound System User Manual Getting Started Adjusting the height Move the upper support arm up or down to adjust the height. Rotating the monitor The monitor can be rotated leftwards or rightwards along with the support arm. The upper support arm and lower support arm can be rotated leftwards or rightwards separately.
- Page 44 Acclarix LX9 Series Diagnostic Ultrasound System User Manual Getting Started Tilting the monitor The monitor can be tilted backwards or forwards from the vertical position, as the figure shown below. CAUTION Ensure enough spaces are available before rotating the monitor.
-
Page 45: Control Panel Position Adjustment
Acclarix LX9 Series Diagnostic Ultrasound System User Manual Getting Started 3.5 Control Panel Position Adjustment The control panel can be adjusted in height and rotated leftwards or rightwards. Height Adjusting Lever Rotation Lever Adjusting the Height The height of control panel can be adjusted by the Height Adjusting Lever. Lift up the lever with your finger to move the control panel up. - Page 46 Acclarix LX9 Series Diagnostic Ultrasound System User Manual Getting Started Rotating the control panel The control panel can be rotated to the left or right by the Rotation Lever. While you pressing the Rotation Lever with four fingers, move the control panel leftwards or rightwards to the desired position.
-
Page 47: Exam Operation
Acclarix LX9 Series Diagnostic Ultrasound System User Manual Exam Operation 4 Exam Operation 4.1 How to Start an Exam Press the <Patient> key and enter in patient information, or select a scheduled patient from the modality worklist. If there is no previous exam, pressing the <Patient> key will bring you directly to the Patient Information Page (see figure 4-3 below). -
Page 48: How To End An Exam
Acclarix LX9 Series Diagnostic Ultrasound System User Manual Exam Operation Figure 4-2 Example of Transducer Touch Screen Saving an exam preset: Select the exam preset you want to modify or use as the basis for a new preset. ... -
Page 49: The Patient Information Page
Acclarix LX9 Series Diagnostic Ultrasound System User Manual Exam Operation 4.4 The Patient Information Page The Patient Information Page is used to enter or modify patient demographic data. The following figure is an example: Figure 4-3 Patient Information Page The top three lines are for entering the patient last name, first name, ID, exam accession number, and DOB (Date-of-Birth), gender or age. - Page 50 Acclarix LX9 Series Diagnostic Ultrasound System User Manual Exam Operation G/P/A: G stands for Gravida, P stands for Para and A stands for Aborta. Enter values for each in the fields separated by slashes. Study Description: enter the study description.
-
Page 51: Modality Worklist
Acclarix LX9 Series Diagnostic Ultrasound System User Manual Exam Operation 4.5 Modality Worklist Modality worklist provides a list of scheduled patients derived from a DICOM server. It is available only when a DICOM server is configured and worklist is enabled. -
Page 52: Imaging
Acclarix LX9 Series Diagnostic Ultrasound System User Manual Imaging 5 Imaging 5.1 B-mode 5.1.1. Using B-mode Press <B> on the console to enter B mode. Perform the image scanning. Adjust Image parameters to optimize the image. 5.1.2. B-mode Image Optimization The following touch controls can be used to optimize the B-mode image. - Page 53 Acclarix LX9 Series Diagnostic Ultrasound System User Manual Imaging Frequency allows selection of the fundamental or harmonic frequencies used for imaging. The Harmonic option must be Frequency invoked to access the harmonic frequencies. Frequency selection is available during live imaging.
- Page 54 Color map control will automatically activate it. The Left/Right invert control is indicated by a backward R and is used to toggle the left/right orientation of the image. The Edan E Left/Right orientation marker at the top of the image switches with the left/right invert to match the orientation marker on the transducer.
- Page 55 Acclarix LX9 Series Diagnostic Ultrasound System User Manual Imaging Image Type B-mode supports presets for Detail, General, and Penetration. Adjusts the line density to optimize the lateral resolution for the Line Density best possible image. The higher the line density, the higher the lateral resolution, but the lower the frame rate.
- Page 56 Acclarix LX9 Series Diagnostic Ultrasound System User Manual Imaging Press to invoke the trapezoid imaging and adjust the imaging width. Only available for linear transducers. Trapezoid The imaging width is adjustable with three levels. Off is to disable the trapezoid imaging .
-
Page 57: Color Mode
Acclarix LX9 Series Diagnostic Ultrasound System User Manual Imaging 5.2 Color Mode 5.2.1. Color Mode Variants The system supports 3 types of Color Doppler imaging: Color (Color Doppler): This is velocity Color Doppler that shows direction and velocity of flow. - Page 58 Acclarix LX9 Series Diagnostic Ultrasound System User Manual Imaging Scale adjusts the range of velocities that are displayed. Upward presses increase scale and downward presses decrease it. It is Scale available in Velocity, PDI, and DPDI. It is not available in Freeze/Cine.
- Page 59 Acclarix LX9 Series Diagnostic Ultrasound System User Manual Imaging The smoothness filter determines the spatial filtering that is applied Smooth to the Color image. Higher filter levels create a smoother image. Filter Upward presses increase the filter. Downward presses decrease the filter.
- Page 60 Acclarix LX9 Series Diagnostic Ultrasound System User Manual Imaging The Dynamic Range, or log compression, adjusts how echo intensities are converted to brightness. A high dynamic range Dynamic presents a flatter, less contrasty color display, while a low dynamic Range range presents a more contrasty color display.
-
Page 61: Pw Mode
Acclarix LX9 Series Diagnostic Ultrasound System User Manual Imaging 5.3 PW Mode 5.3.1. Using PW Mode Perform the image scanning to get a good image in B mode or B+Color(DPI/DPDI) mode; Press <PW> on the console to display sample line;... - Page 62 Acclarix LX9 Series Diagnostic Ultrasound System User Manual Imaging Quick-Angle Adjusts the angle correct quickly to one of 60/0/-60. The Filter control removes excessive noise from movement of vessel walls. Options of Low, Med and High are available. Filter Higher wall filter level will suppress more strong single of the vessel walls, but low flow signal will be missing.
- Page 63 Acclarix LX9 Series Diagnostic Ultrasound System User Manual Imaging Changes the relative size of the Doppler strip compared to the Strip Size reference image. Full, Large, Med. and Small are available. Volume adjusts the audio volume of the Doppler strip. This...
-
Page 64: Hprf
Acclarix LX9 Series Diagnostic Ultrasound System User Manual Imaging Press to activate the Auto Trace function on a real-time or frozen PW Doppler strip. Auto Trace The Auto Trace function automatically traces the spectral Doppler waveform and records several measurements on selected waveforms. -
Page 65: Cw Mode
Acclarix LX9 Series Diagnostic Ultrasound System User Manual Imaging 5.4 CW Mode 5.4.1. Using CW Mode CW mode is only available on phased array transducer. Perform the image scanning to get a good image in B mode or B+Color(DPI/DPDI) mode;... - Page 66 Acclarix LX9 Series Diagnostic Ultrasound System User Manual Imaging Strip Doppler supports image presets for Low Flow, Medium Image Type Flow, and High Flow. Adjust the Doppler scale to account for the angle between the Doppler cursor and the blood flow. Upward presses increment Angle Correct the angle.
- Page 67 Acclarix LX9 Series Diagnostic Ultrasound System User Manual Imaging Sweep adjusts the sweep speed of the Doppler strip. Options of Sweep Slow, Low, Med, High and Fast are available. Upward presses Speed increase sweep speed. Downward presses decrease sweep speed.
-
Page 68: M Mode
Acclarix LX9 Series Diagnostic Ultrasound System User Manual Imaging 5.5 M Mode 5.5.1. Using M Mode Perform image scanning to get a good image in B mode; Press <M> to display M strip and sample line; Move the trackball to adjust the sample line;... - Page 69 Acclarix LX9 Series Diagnostic Ultrasound System User Manual Imaging Changes the relative size of the M-mode strip compared to the Strip Size reference image. Full, Large, Med and Small are available. This is an on/off control. When On, the M-Mode strip is Side-by-side displayed side-by-side with the B-mode image.
-
Page 70: Anatomic M Mode
Acclarix LX9 Series Diagnostic Ultrasound System User Manual Imaging 5.6 Anatomic M Mode Anatomic M mode allows you to manipulate the position and angle of M sample line and displays real-time M strip image. Only phased array transducer supports Anatomic M mode. -
Page 71: Curved Anatomic M Mode
Acclarix LX9 Series Diagnostic Ultrasound System User Manual Imaging 5.6.2. Curved Anatomic M Mode In curved Anatomic M mode, the distance/time curve is derived from the curved sample line manually drawn on the image. Using Curved Anatomic M mode: Press Curved AMM button on the M-mode touch screen to invoke the Curved Anatomic M mode. -
Page 72: Color M Mode
Acclarix LX9 Series Diagnostic Ultrasound System User Manual Imaging 5.7 Color M Mode Color M mode superimposes color encoded information on M mode strip to indicate the direction, velocity and timing of cardiac flow and tissue movements. The direction of cardiac tissue movements can be identified by color changes. -
Page 73: Tdi Mode
Acclarix LX9 Series Diagnostic Ultrasound System User Manual Imaging 5.8 TDI Mode Tissue Doppler Imaging (TDI) mode shows information about low-velocity and high-amplitude tissue motion, usually used to evaluate cardiac tissue motion. Only Phased transducer supports TDI mode. There are three types of TDI modes available on this system: ... -
Page 74: 4D Mode
Acclarix LX9 Series Diagnostic Ultrasound System User Manual Imaging 5.9 3D/4D Mode 3D/4D mode is only available on a Wobble transducer. There are two ways to activate pre-3D or Pre- 4D mode: Press the <3D> or <4D> on the console. - Page 75 Acclarix LX9 Series Diagnostic Ultrasound System User Manual Imaging Adjusts the angle of the volume acquisition. Upward presses Angle increment the angle. Downward presses decrement the angle. Surface/ These two radio buttons determine if the acquisition is Skeleton optimized for looking at Skeleton or Surface.
-
Page 76: Volume Sweeping
Acclarix LX9 Series Diagnostic Ultrasound System User Manual Imaging 5.9.2. 3D Volume Sweeping Select Skeleton or Surface on the Pre-3D touch screen and press Start button or <Update> key to start image acquisition. During the process of 3D volume sweeping, the images swept in VOI box are displayed in the image area. - Page 77 Acclarix LX9 Series Diagnostic Ultrasound System User Manual Imaging There are two image modes: Volume imaging mode and multi-slice imaging mode. Figure 5-3 shows Volume Imaging Mode in quad screen with a Baby Face volume rendering. Quadrant A shows a slice through the data that mimics the original ultrasound image....
- Page 78 Acclarix LX9 Series Diagnostic Ultrasound System User Manual Imaging This is a folder of cut functions with various cut tools inside. See below for details. These are two radio buttons. The region inside or outside the trace will be cut. To draw the trace, move the trackball and press <Set>...
- Page 79 Acclarix LX9 Series Diagnostic Ultrasound System User Manual Imaging Displays the average value of all gray values. This is X-ray helpful for viewing tissues with different structure inside or tissues with tumor. Equals to surface rendering mode/skeleton rendering Depth1/ mode. Displays the distance between body tissue and Depth2 body surface in the form of color gradient.
- Page 80 Acclarix LX9 Series Diagnostic Ultrasound System User Manual Imaging Four radio buttons used to quickly rotate the image. Quick Rotation Available angles are: 0° /90° /180° /270° . MPR (multi-planar reconstruction) review function. After this button is activated, the 3D volume is hidden and two perpendicular lines appear on the selected quadrant.
- Page 81 Acclarix LX9 Series Diagnostic Ultrasound System User Manual Imaging Gamma Adjust the Gamma of 3D image. Table 5-8 Volume imaging Mode Touch Screen Image area and touch screen controls in multi-slice imaging mode: Figure 5-4 Multi-slice Imaging Mode In figure 5-4, the first image shows the basis slice, other images are orthogonal to the basis slice and parallel to each other.
- Page 82 Acclarix LX9 Series Diagnostic Ultrasound System User Manual Imaging These three radio buttons determine the layout of the 3*3, 2*2, 3*2 display. Reset the operation of pan, rotate and zoom to the initial Reset condition. Number Select how many slices to use Distance Adjust the distance between slices.
-
Page 83: Volume Acquisition
Acclarix LX9 Series Diagnostic Ultrasound System User Manual Imaging 5.9.4. 4D Volume Acquisition In Pre-4D mode, select Skeleton or Surface first, adjust the VOI box and then press Start button on the touch screen or the <Update> key to begin sweep. -
Page 84: Knobs And Buttons On Control Panel
Acclarix LX9 Series Diagnostic Ultrasound System User Manual Imaging 5.9.7. Knobs and Buttons on Control Panel Knobs and buttons on control panel can also be used to make operation more convenient in 3D/4D mode. Name Control Description Rotate this knob to rotate the image by the X-axis of the Rotation X activated window. -
Page 85: Panorama
Acclarix LX9 Series Diagnostic Ultrasound System User Manual Imaging 5.10 Panorama Panorama constructs an extended field of view image as the user slides the transducer along its long axis. Panorama is available only with Linear and Convex transducers. This system also provides Color Panoramic imaging so that you can get color flow information on the panoramic image. -
Page 86: Elastography
Acclarix LX9 Series Diagnostic Ultrasound System User Manual Imaging 5.11 Elastography Elastography imaging maps the elastic properties of soft tissue with different colors in a region of interest by estimating the strain before and after tissue distortion caused by external or internal forces. -
Page 87: Elastography Image Optimization
Acclarix LX9 Series Diagnostic Ultrasound System User Manual Imaging 5.11.2. Elastography Image Optimization The following touch controls can be used to optimize the Elastography image. Name Control Description Adjusts the opacity feature of Elastography image. Four levels Opacity are available. Higher level provides more opacity. -
Page 88: Ecg
Do not use the ECG function on the patient with pacemaker. Only the ECG module, patient cable and electrodes supplied by EDAN can be used. Only authorized service personnel can service the ECG module. -
Page 89: Ecg Touch Screen Controls
Acclarix LX9 Series Diagnostic Ultrasound System User Manual Imaging 5.12.1. ECG Touch Screen Controls The following touchscreen controls impact the ECG function: Name Control Description Displays or hides ECG waveforms and heart rate value on the main screen. Gain Adjusts the gain of ECG waveform. -
Page 90: Ecg Basic Operations
Acclarix LX9 Series Diagnostic Ultrasound System User Manual Imaging 5.12.2. ECG Basic Operations Invoke ECG function. Invoke a phased array transducer as the currently active transducer, and select the Cardiac exam preset. Press ECG on the touch screen to invoke the ECG function and display ECG controls on the touch screen. -
Page 91: Stress Echo
Acclarix LX9 Series Diagnostic Ultrasound System User Manual Imaging 5.13 Stress Echo The stress echo function provides the ability to perform image acquisition, review, and wall segment scoring for a complete stress echo examination. The stress echo function provides two types of stress exams: exercise and pharmacological stress. - Page 92 Acclarix LX9 Series Diagnostic Ultrasound System User Manual Imaging Assign the cine loops to the four views The assignment of the cine loops to the view can be done after image acquisition. To assign the cine loops to the view, move the trackball to the desired cine loop, press <Set> key to highlight the desired cine loop, and then select the appropriate view on the right top part of the screen.
-
Page 93: Contrast Imaging
Only use the contrast agents which were cleared for use by relevant government regulation and approval. EDAN would not guarantee the safety and reliability of any contrast agent. Read, understand and follow the instruction for use accompanied with the contrast agent. -
Page 94: Using Contrast Imaging
Acclarix LX9 Series Diagnostic Ultrasound System User Manual Imaging 5.14.1. Using Contrast Imaging Invoke C5-1Q or C5-2Q transducer as the currently active transducer. Select ABD exam preset. Perform the 2D image scanning, and obtain the target image. Press Contrast on the touch screen and activate Contrast imaging mode. - Page 95 Acclarix LX9 Series Diagnostic Ultrasound System User Manual Imaging Destroy Adjusts the transmit power provided by the transducer for Power destroying the residual microbubbles. Destroy Adjusts time length destroying residual Time microbubbles. Frequency determines the transmit frequency used by Contrast Frequency Imaging mode.
-
Page 96: Time Intensity Curve (Tic) Analysis
Acclarix LX9 Series Diagnostic Ultrasound System User Manual Imaging The Dynamic Range, or log compression, adjusts how echo Dynamic intensities are converted to brightness. A high dynamic range Range will display more shades of gray, while a low dynamic range will display fewer shades of gray and a more contrasty image. - Page 97 Acclarix LX9 Series Diagnostic Ultrasound System User Manual Imaging Figure 5-11 Example of TIC Analysis Display Name Description Contrast cineloop window Displays contrast cineloop and ROIs. Tissue cineloop window Displays tissue cineloop and ROIs. The ROI indicates sampling position of the TIC. ROIs are ROIs color-coded, and up to 7 ROIs can be displayed.
- Page 98 Acclarix LX9 Series Diagnostic Ultrasound System User Manual Imaging The TIC analysis touch screen displays the following controls: Name Control Description Ellipse tool Ellipse tool for placing ROIs on contrast image. Trace tool Trace tool for placing ROIs on contrast image.
-
Page 99: Transducers And Biopsy
Acclarix LX9 Series Diagnostic Ultrasound System User Manual Transducers and Biopsy 6 Transducers and Biopsy 6.1 Transducer Model Model Type Application Applied Region Small Parts(Thyroid, Testes, Breast) L17-7HQ Linear Peripheral Vascular Body Surface Musculoskeletal Adult Cardiac Abdominal P5-1Q Phased array... - Page 100 Acclarix LX9 Series Diagnostic Ultrasound System User Manual Transducers and Biopsy Adult Cardiac Pediatric Abdominal P7-3Q Phased Array Body Surface Pediatric Cardiac Neonatal Cephalic Abdominal Fetal / Obstetrics C7-2XQ Convex Urology Body Surface Gynecology Musculoskeletal Fetal / Obstetrics Trans-vaginal E10-3BQ...
- Page 101 Acclarix LX9 Series Diagnostic Ultrasound System User Manual Transducers and Biopsy Adult Cardiac Abdominal P5-1XQ Phased array Body Surface Pediatric Cardiac Adult Cephalic Abdominal Biplane ECL12-3Q Gynecology Intra-cavity transducer Urology Table 6-1 Transducer Model & Application - 92 -...
-
Page 102: Using Transducers
Acclarix LX9 Series Diagnostic Ultrasound System User Manual Transducers and Biopsy 6.2 Using Transducers Understanding a Transducer: Figure 6-1 takes L12-5Q transducer to show an example of a transducer. Figure 6-1 Typical transducer Name Function Transducer Converts electrical signals to sound waves, and then converts received head echoes back to electrical signals. - Page 103 Acclarix LX9 Series Diagnostic Ultrasound System User Manual Transducers and Biopsy Image Orientation Mark The image orientation marks on the display screen and on the transducer are shown as below. The side of orientation mark on the transducer corresponds to the side of orientation mark on the display screen.
- Page 104 Acclarix LX9 Series Diagnostic Ultrasound System User Manual Transducers and Biopsy Use of Transducer sheath WARNING Always wear gloves to perform the following steps. To minimize disease transmission, legally marketed, sterile transducer sheath is required to use for intra-cavitary and intra-operative procedures.
-
Page 105: Transducer Cleaning And Disinfecting
Acclarix LX9 Series Diagnostic Ultrasound System User Manual Transducers and Biopsy 6.3 Transducer Cleaning and Disinfecting Transducers should be cleaned and/or disinfected as necessary or between use with a recommended cleanser or disinfectant. Disconnect the transducer from the system prior to cleaning and disinfecting. - Page 106 Acclarix LX9 Series Diagnostic Ultrasound System User Manual Transducers and Biopsy Contact normally sterile tissue Intra-operative Sterilization Immersion Note: LLD=Low-level Disinfection; HLD=High-level disinfection The validated disinfectants for transducer are: Disinfectants Disinfecting Intensity Disinfecting Method Ethanol (75%) Spraying or wiping Isopropanol (70%) Spraying or wiping Cidex OPA (0.55%)
- Page 107 Acclarix LX9 Series Diagnostic Ultrasound System User Manual Transducers and Biopsy 4. Prepare the disinfectant solution (Cidex OPA 0.55% or Cidex Glutaraldehyde 2.4%). Refer to the instructions provided by the disinfectant manufacturer for the concentration of the disinfection solution, method of dilution, method of disinfection, temperature and cautions during use.
-
Page 108: Sterilization
Acclarix LX9 Series Diagnostic Ultrasound System User Manual Transducers and Biopsy 6. The immersion time should not exceed the time that is specified by the disinfectant manufacturer. 7. Patient contact area should be immersed into the solution while using the immersion method, but should not exceed the depth shown in figure 6-3. -
Page 109: Needle Biopsy Guide
If previous use has shown some drift of the needle from the center of the guidelines. 3. The displayed needle guide pathway on the EDAN video monitor is intended for reference during biopsy procedures. A variety of factors outside EDAN‟s control, such as changing tissue density, bending of the needle, off-axis pressure by the person holding the transducer, etc., may cause... - Page 110 Acclarix LX9 Series Diagnostic Ultrasound System User Manual Transducers and Biopsy Structures: Angle Knob Clamp Tab Release Locking Knob Adjusting Knob Needle Guide Path Installation and Use Steps: Place an appropriate amount of gel on transducer surface, and insert transducer into the sheath.
- Page 111 Acclarix LX9 Series Diagnostic Ultrasound System User Manual Transducers and Biopsy After biopsy, press the tab release to remove the needle, and loosen the locking knob to remove the bracket from the transducer. BGK-CR10UA/BGK-006 The installation steps for these brackets are the same. Here we take one bracket for illustration.
- Page 112 Acclarix LX9 Series Diagnostic Ultrasound System User Manual Transducers and Biopsy Properly secure the clamp of bracket with the locking knob. Ensure the backet is firmly attached, and then place the biopsy needle into the needle guide path. BGK-005...
- Page 113 Acclarix LX9 Series Diagnostic Ultrasound System User Manual Transducers and Biopsy Press the left and right side of the clamp as the figure below to attach the bracket to the transducer firmly. Ensure the bracket is firmly attached, and then place the biopsy needle into the needle guide path.
- Page 114 Acclarix LX9 Series Diagnostic Ultrasound System User Manual Transducers and Biopsy Installation and Use Steps: Place an appropriate amount of gel on transducer surface, and insert transducer into the sheath. Loosen the locking knob to open the clamp bracket. Attach the bracket to the transducer by aligning the locating markers on the bracket and the transducer.
- Page 115 Acclarix LX9 Series Diagnostic Ultrasound System User Manual Transducers and Biopsy BGK-013 Structures: Needle guide Structure Adjusting knob Clamp Locking Knob Installation and Use Steps Place an appropriate amount of gel on transducer surface, and insert transducer into the sheath.
-
Page 116: Activating Needle Guide Function
Acclarix LX9 Series Diagnostic Ultrasound System User Manual Transducers and Biopsy 6.4.2. Activating Needle Guide Function To enable the needle guide function: In the B mode imaging, press Needle button on touch screen, A needle touch screen UI is displayed, Press Enable button to active the Needle Guide function. -
Page 117: To Adjust The Needle Guide Line
Acclarix LX9 Series Diagnostic Ultrasound System User Manual Transducers and Biopsy 6.4.3. To Adjust the Needle Guide Line WARNING 1. Calibrate the needle guide under any of the following conditions: The first time a needle guide is used with a given transducer. -
Page 118: Center Line
Acclarix LX9 Series Diagnostic Ultrasound System User Manual Transducers and Biopsy Angle Line Figure 6-6 Needle Enhancement Visualization Needle Visualization is invoked by pressing the Needle button on B-mode touch screen, and then the Enable button in the Needle Visualization section of the Needle touch screen. The following parameters can be adjusted when it is active. -
Page 119: Needle Guide Bracket Cleaning And Sterilization
Inspect the bracket for damage such as cracks or breakage. If damage is evident, discontinue use of bracket and contact your Edan representative for disposal guidance. Sterilize the bracket before disposal or sending back to manufacturer for repair. -
Page 120: Storage
Acclarix LX9 Series Diagnostic Ultrasound System User Manual Transducers and Biopsy 6.7.3. Storage WARNING Dry the bracket after sterilization and store it in sterile environment. Do not use the carrying case for storing the bracket, because the carrying case may become a source of infection. -
Page 121: Features
Acclarix LX9 Series Diagnostic Ultrasound System User Manual Features 7 Features 7.1 Comments The Comments function allows you add annotation to an image. The Comment function is invoked by pressing the <Comment> hard key on the console. Figure 7-1 shows an example touch screen for the Comment function. - Page 122 Acclarix LX9 Series Diagnostic Ultrasound System User Manual Features Adding comments You can add either pre-defined comments or use a keyboard. Adding comments using the keyboard 1. Invoke the Comment function. 2. Use the keyboard of the system or press the “Keyboard...” touch screen key to display a keyboard on the touch screen.
-
Page 123: Body Mark
Acclarix LX9 Series Diagnostic Ultrasound System User Manual Features 7.2 Body Mark Body Mark allows you add a body mark graphic to an image and indicate the location of the transducer using a transducer icon on that graphic. The Body Mark function is invoked by pressing the <Body Mark>... -
Page 124: Split Display
Acclarix LX9 Series Diagnostic Ultrasound System User Manual Features Deleting a body mark: There are two ways of deleting a body mark graphic: Press Delete on the touch screen to delete the graphics on the image area. Press the <Clear> hard key to delete all body marks, comments, and measurements. -
Page 125: Zoom
Acclarix LX9 Series Diagnostic Ultrasound System User Manual Features 7.4 Zoom The system supports three types of zoom: Pan Zoom: enlarges a full image and pans the enlarged image to view the desired area. Spot Zoom: focuses on processing the image of the selected area and enlarges the image with higher resolution. -
Page 126: Full Screen Zoom
Acclarix LX9 Series Diagnostic Ultrasound System User Manual Features 7.4.3. Full Screen Zoom Full screen zoom function can zoom in the image to full screen display. Configure the function of user-defined key <F1> or <F2> as full screen zoom (See section 10.1.2 for details). - Page 127 Acclarix LX9 Series Diagnostic Ultrasound System User Manual Features Adjust the review speed by the Speed paddle key. Press Auto Play button on the touch screen to review the cine within the set region automatically. After freezing the system, rolling the trackball rightwards quickly could play the cine automatically.
-
Page 128: Measurements And Reports
Acclarix LX9 Series Diagnostic Ultrasound System User Manual Measurements and Reports 8 Measurements and Reports The Measurement function lets you perform measurements on a live or frozen image. The Generic Measurement function is invoked by pressing the <Caliper> hard key on the console, and the Application Measurement function is invoked by pressing the <Measure>... - Page 129 Acclarix LX9 Series Diagnostic Ultrasound System User Manual Measurements and Reports Measurement main screen display is divided into three fields: Field 1: Displays measurement labels and attributes: The first line displays labels of Application Measurements and Generic Measurements. Clicking on each of them displays its associated measurement items.
- Page 130 Acclarix LX9 Series Diagnostic Ultrasound System User Manual Measurements and Reports Name Description Measurement Displays application and generic measurement labels. Pressing label on any label will display its associated measurements on the touch screen. Measurement Displays available measurement groups. Selecting one...
- Page 131 Acclarix LX9 Series Diagnostic Ultrasound System User Manual Measurements and Reports Understanding Measurement Result Window The measurement result window is displayed at the upper left corner of the image area by default. The following figure is an example of measurement result window.
-
Page 132: Generic Measurements
Acclarix LX9 Series Diagnostic Ultrasound System User Manual Measurements and Reports 8.1 Generic Measurements Generic measurements is invoked by pressing <Caliper> key on the control panel. Each imaging mode supports different types of generic measurements. This chapter describes all the generic measurements supported in each imaging mode. - Page 133 Acclarix LX9 Series Diagnostic Ultrasound System User Manual Measurements and Reports 5. Move the caliper to the end point. Presses of the <Update> key will toggle between active calipers, allowing you to adjust the position of start point and end point.
- Page 134 Acclarix LX9 Series Diagnostic Ultrasound System User Manual Measurements and Reports Spline Method: 1. Invoke the generic measurement function. 2. Select Circ/Area-> Area Spline. 3. Move the caliper to the desired location. 4. Press the <Set> key to place the first point.
- Page 135 Acclarix LX9 Series Diagnostic Ultrasound System User Manual Measurements and Reports Ellipse+ 1 Distance Method: 1. Invoke the generic measurement function. 2. Select Volume-> Ellipse 1 Dist. 3. Perform one Ellipse measurement following the Ellipse method in section 8.1.1.2 Circumference/Area measurement.
-
Page 136: M-Mode Generic Measurements
Acclarix LX9 Series Diagnostic Ultrasound System User Manual Measurements and Reports Circumference/Area measurement. Measure the normal tissue (Displayed as B=XX%) following the Ellipse method in section 8.1.1.2 Circumference/Area measurement. The system automatically calculates the strain ratio between lesion (A) and normal tissue (B). It is suggest to measure the lesion and normal tissue at the same depth. -
Page 137: Strip Doppler Generic Measurements
Acclarix LX9 Series Diagnostic Ultrasound System User Manual Measurements and Reports 5. Move the caliper to the end point. Presses of the <Update> key will toggle between active calipers, allowing you to adjust the position of start point and end point. - Page 138 Acclarix LX9 Series Diagnostic Ultrasound System User Manual Measurements and Reports Measurement Measurement Item Remark Group Auto Trace Spline Trace Velocity Manual Trace Spline Trace Only available for Cardiac Generic exam Time PGMax PGMean Vessel Vol. Flow Only available for Cardiac...
- Page 139 Acclarix LX9 Series Diagnostic Ultrasound System User Manual Measurements and Reports S/D: measures the velocity at PS and ED points, and calculates S/D result. 1. Invoke the generic measurement function. 2. Select Generic-> PS, ED, RI, S/D. 3. Move the caliper to the PS point.
- Page 140 Acclarix LX9 Series Diagnostic Ultrasound System User Manual Measurements and Reports 3. Move the caliper to the desired location. 4. Press the <Set> key to place the first point. 5. Repeat step 3~4 to place other points. A trace will be created after three points are placed.
- Page 141 Acclarix LX9 Series Diagnostic Ultrasound System User Manual Measurements and Reports 1. In Cardiac exams, invoke the generic measurement function on a Doppler strip. 2. Select Tei Index. 3. Measure COT (Mitral Valve Close-Open Duration ) by caliper pairs. 4. Measure ET (Ventricular Ejection Time) by caliper pairs.
-
Page 142: Application Measurements
Acclarix LX9 Series Diagnostic Ultrasound System User Manual Measurements and Reports 3. The system carries out vessel volume flow measurement and will display the relevant measurement result in the measurement result box in real-time according to the refreshing spectrum. 8.2 Application Measurements Application Measurements have a pre-defined meaning and can be entered into a report. -
Page 143: Abdomen Measurements
Acclarix LX9 Series Diagnostic Ultrasound System User Manual Measurements and Reports 8.2.1. Abdomen Measurements Measurement Measurement Description Method Group Item Section 1: B-mode Measurements Liver L Liver Length Liver W Liver Width Liver Liver H Liver Height Portal Vein Portal Vein Diameter... -
Page 144: Gynecology Measurements
Acclarix LX9 Series Diagnostic Ultrasound System User Manual Measurements and Reports Measurement Measurement Description Method Group Item 2.12 Splenic V Splenic Vein 2.13 Superior Mesenteric Vein 2.14 Inferior Mesenteric Vein 8.2.2. Gynecology Measurements Measurement Measurement Description Method Group Item Section 1: B-mode Measurements... - Page 145 Acclarix LX9 Series Diagnostic Ultrasound System User Manual Measurements and Reports Measurement Measurement Description Method Group Item 3 Distances Residual urine Residual urine Bladder Wall Descend Uterine Descent Max Rectal Ampulla Descent Max Rectocele Depth Rectocele Depth B-mode generic Anal...
- Page 146 Acclarix LX9 Series Diagnostic Ultrasound System User Manual Measurements and Reports Due to the fact that the section of best view of follicles used for follicle size measurement may not show the best view of the ovary, the result of ovary size measured at the section of the best views of follicles is for reference only.
-
Page 147: Obstetrics Measurements
Acclarix LX9 Series Diagnostic Ultrasound System User Manual Measurements and Reports Zone 4: The measurement results displayed in this result window indicate that these measurement results have been entered into the report. To enter the measurement results of a follicle into the report, move the cursor to a follicle and press <Set>... - Page 148 Acclarix LX9 Series Diagnostic Ultrasound System User Manual Measurements and Reports Measurement Measurement Description Method Group Item Thoracic Diameter Anteroposterior Trunk APTD Diameter Transverse Trunk Diameter Cir/Area in B-mode Fetal Trunk Area generic measurements 2-point distance in Crown Rump Length...
- Page 149 Acclarix LX9 Series Diagnostic Ultrasound System User Manual Measurements and Reports Measurement Measurement Description Method Group Item Cerebellum Diameter Nuchal Fold Cistern Magna Lateral Ventricle Width Nasal Bone Amniotic Fluid Index LV Diam Left Ventricular Diameter LA Diam Left Atrium Diameter...
- Page 150 Acclarix LX9 Series Diagnostic Ultrasound System User Manual Measurements and Reports Measurement Measurement Description Method Group Item Manual Trace Fetal Ao Fetal Aorta Spline Trace Desc Aorta Descending Aorta Ductus V Ductus Venosus Fetal Heart Rate Velocity in Doppler 2.10 MV...
- Page 151 Acclarix LX9 Series Diagnostic Ultrasound System User Manual Measurements and Reports Press <Set> key to complete measurement. Procedure 2: Select Early OB or OB exam preset and perform image scanning in B mode. Freeze the image when a standard fetal image or a clip of fetal images is obtained.
-
Page 152: Cardiac Measurements
Acclarix LX9 Series Diagnostic Ultrasound System User Manual Measurements and Reports 8.2.4. Cardiac Measurements Measurement Measurement Description Method Group Item Section 1: B-mode Measurements Left Ventricular apical A4C Dias. four-chamber views End-diastole Left Ventricular apical A4C Sys. four-chamber views Simpson (See... - Page 153 Acclarix LX9 Series Diagnostic Ultrasound System User Manual Measurements and Reports Measurement Measurement Description Method Group Item Left Ventricular Internal Diameter LVIDs at End-systole Interventricular Septal Thickness IVSTd at End-diastole Interventricular Septal Thickness IVSTs at End-systole Left Ventricular Internal Diameter...
- Page 154 Acclarix LX9 Series Diagnostic Ultrasound System User Manual Measurements and Reports Measurement Measurement Description Method Group Item PE to Inf Wall Pericardial Effusion to Inferior Wall Pericardial Effusion to Right PE to RV Ventricular Pericardial Effusion to Right PE to RA...
- Page 155 Acclarix LX9 Series Diagnostic Ultrasound System User Manual Measurements and Reports Measurement Measurement Description Method Group Item Maximum Velocity Pulmonary Valve Stenosis Radius PR Rad Pulmonary Regurgitation Aliasing PR Als. Vel Maximum Velocity Section 2: Doppler Measurements E-wave Velocity/ A-wave Velocity...
- Page 156 Acclarix LX9 Series Diagnostic Ultrasound System User Manual Measurements and Reports Measurement Measurement Description Method Group Item Velocity Time Integral Left ventricular outflow tract LVOT Vmax maximum Velocity Left ventricular outflow tract LVOT Accel Time Acceleration Time Left ventricular outflow tract...
- Page 157 Acclarix LX9 Series Diagnostic Ultrasound System User Manual Measurements and Reports Measurement Measurement Description Method Group Item Pulmonic Vavle Accel Time PV Accel Time Pulmonic Vavle Regurgitation max PR Vmax velocity Right ventricular outflow tract RVOT Diam Diameter Right ventricular outflow tract 2.12...
- Page 158 Acclarix LX9 Series Diagnostic Ultrasound System User Manual Measurements and Reports Measurement Measurement Description Method Group Item Motion Mitral Valve Lateral Late Diastolic Aa Lateral Motion HR in Doppler 2.17 Heart Rate generic measurements Left ventricular outflow tract LVOT Diam...
- Page 159 Acclarix LX9 Series Diagnostic Ultrasound System User Manual Measurements and Reports Measurement Measurement Description Method Group Item Right Ventricular Pre-ejection RV PEP Period AV Cusp Sep Aortic Valve Cusp Separation Mitral Valve E-F slope E-F Slope EPSS E point septal separation...
- Page 160 Acclarix LX9 Series Diagnostic Ultrasound System User Manual Measurements and Reports Draw the trace along the endocardium of the left ventricular. Press <Set> key to fix the end point B and complete the trace. A new caliper positions automatically at the apex (Point D) of the trace, connecting the Point C (Midpoint of point A and B).
- Page 161 Acclarix LX9 Series Diagnostic Ultrasound System User Manual Measurements and Reports WARNING The eLV function is intended for use by the clinician who is qualified to use ultrasound for cardiac function evaluations. The measurement result is for reference only. The accuracy of the measurement result can be affected by the image quality, the cardiac image section and procedures performed.
- Page 162 Acclarix LX9 Series Diagnostic Ultrasound System User Manual Measurements and Reports Item Description Show the heart beats. You may select a different heart beat to show its EF results. The EDV and ESV images(item 7) and EF results(item 8) change accordingly.
- Page 163 Acclarix LX9 Series Diagnostic Ultrasound System User Manual Measurements and Reports Press Finish to run the EF calculation with your changes, or press Reset to cancel the editing 8.2.4.3.2 Auto Strain/SWMI The Strain/SWMI(Segmental Wall Motion Index) is evaluated using three apical planes, four-chamber (4CH), two-chamber (2CH) and three-chamber(3CH) views, to provide fully automatic analysis of the regional (segmental) left ventricular function.
- Page 164 Acclarix LX9 Series Diagnostic Ultrasound System User Manual Measurements and Reports Understanding the Strain screen: ⑬ ⑧ ① ⑭ ⑥ ② ⑦ ③ ④ ⑩ ⑤ ⑨ ⑪ ⑫ Item Description Show the heart beats. You may select a different heart beat to show its Strain results.
- Page 165 Acclarix LX9 Series Diagnostic Ultrasound System User Manual Measurements and Reports Understanding the SWMI screen: ⑬ ⑧ ① ⑭ ⑥ ② ⑦ ③ ④ ⑩ ⑤ ⑨ ⑪ ⑫ Item Description Show the heart beats. You may select a different heart beat to show its Strain results.
-
Page 166: Small Parts Measurements
Acclarix LX9 Series Diagnostic Ultrasound System User Manual Measurements and Reports Editing the Strain/SWMI Results: The system allows you to manually edit the LV border and re-calculates the Strain and SWMI results. For the methods of editing the LV borders, please see section 8.2.4.3.1 Auto EF for details. -
Page 167: Urology Measurements
Acclarix LX9 Series Diagnostic Ultrasound System User Manual Measurements and Reports 8.2.6. Urology Measurements Measurement Measurement Description Method Group Item Section 1: B-mode Measurements Renal L Renal Length Renal W Renal Width Renal Renal H Renal Height Cortex Renal Cortex thickness... -
Page 168: Vascular Measurements
Acclarix LX9 Series Diagnostic Ultrasound System User Manual Measurements and Reports 8.2.7. Vascular Measurements Measurement Measurement Item Description Method Group Section 1: B-mode Measurements Carotid B-mode generic Carotid Artery measurements Bifurcation Intima-Media IMT Far Thickness (Far vessel wall) Common Carotid... - Page 169 Acclarix LX9 Series Diagnostic Ultrasound System User Manual Measurements and Reports Measurement Measurement Item Description Method Group VF Diam. Axillary Artery Axill A IMT Near Brachial Artery Brach A Diam. Area Stenosis Diam. Ulnar Artery Ulnar A Stenosis Area Radial Artery...
- Page 170 Acclarix LX9 Series Diagnostic Ultrasound System User Manual Measurements and Reports Measurement Measurement Item Description Method Group Stenosis Area Basilic Vein Basilic V Ulnar Vein Ulnar V Radial Vein Radial V Median Cubital Vein Subclavian Vein M Cubital V Section 2: Doppler Measurements...
- Page 171 Acclarix LX9 Series Diagnostic Ultrasound System User Manual Measurements and Reports Measurement Measurement Item Description Method Group Peroneal Artery Peron A Dors.PED Dorsalis Pedis Artery Heart Rate Common Iliac Vein External Iliac Vein Internal Iliac Vein Common Femoral Vein Deep Femoral...
- Page 172 Acclarix LX9 Series Diagnostic Ultrasound System User Manual Measurements and Reports Measurement Measurement Item Description Method Group Subclavian Vein SUBC V Axillary Vein Axill V Brachial Vein Brach A Cephalic Vein Cepha V Basilic Vein Basilic V Ulnar Vein Ulnar V...
-
Page 173: Pediatric Measurements
Acclarix LX9 Series Diagnostic Ultrasound System User Manual Measurements and Reports 8.2.8. Pediatric Measurements Measurement Measurement Item Description Group Section 1: B-mode Measurements Left lateral ventricle 2-point distance in Right lateral ventricle Neo-Head B-mode generic LT Tri Left trigone measurements... - Page 174 Acclarix LX9 Series Diagnostic Ultrasound System User Manual Measurements and Reports NOTE: If needed, you can press th Quick Rotation buttons on the touch screen to rotate the image of the hip joint structure by 90 degrees. Use the trackball to move this horizontal straight line to place the baseline. Rotate the Angle knob on the console to adjust the angle of baseline if necessary.
- Page 175 Acclarix LX9 Series Diagnostic Ultrasound System User Manual Measurements and Reports 8.2.8.2. eHIP Measurement The eHIP Measurement function can automatically measure the physiological parameters of neonatal hip joint on a hip joint image for evaluating the development of the hip joint. The physiological parameters can be measured include HIP Angle, HIP d/D, Femoral head length, Femoral head width, and PFD.
-
Page 176: Worksheet And Report
Acclarix LX9 Series Diagnostic Ultrasound System User Manual Measurements and Reports 8.3 Worksheet and Report Worksheet is available at any time during an exam, and is displayed as default on the main screen. Report contains the information from a worksheet but it is formatted in a slightly different manner. - Page 177 Acclarix LX9 Series Diagnostic Ultrasound System User Manual Measurements and Reports Figure 8-8 OB Worksheet Touch Screen Display Name Description VolFlow Press to display Volume Flow Curve graph. It is only available in Vascular Curve exams. IMT Curve Press to display IMT Curve graph. It is only available in Vascular exams.
- Page 178 Acclarix LX9 Series Diagnostic Ultrasound System User Manual Measurements and Reports 8.3.1.2. Editing Worksheet Move the cursor over an editable field such as a measurement result, and press the <Set> key. A touch QWERTY is automatically invoked. Or, you can used the physical keyboard of the system. Type in your changes and press the Enter key to save the changes.
- Page 179 Acclarix LX9 Series Diagnostic Ultrasound System User Manual Measurements and Reports 8.3.1.4. Growth Curve Press the <Report> key to enter the Worksheet, and then press the Growth Curve button on the touch screen to display the Growth Curve Graph. Growth Curve is only available in Obstetric exams.
- Page 180 Acclarix LX9 Series Diagnostic Ultrasound System User Manual Measurements and Reports 8.3.1.5. Findings The findings user interface allows you to quickly create a paragraph of findings for the current exam. It consists of three interactions: Findings preset. It determines the pre-defined findings displayed. The default findings preset is auto linked to current measure preset.
-
Page 181: Report
Acclarix LX9 Series Diagnostic Ultrasound System User Manual Measurements and Reports 8.3.2. Report A report includes: Header, Patient Information, Images, Measurement/Calculation data, Comments, Findings and Sonographer signature. If images are stored in current exam, selecting images displayed on the right side of main screen will add the selected images into the report. -
Page 182: Measurement Accuracy
Acclarix LX9 Series Diagnostic Ultrasound System User Manual Measurements and Reports 8.4 Measurement Accuracy Table 1 Measurement Accuracy Parameter Range Error 1.B Mode Measurement Distance Full Screen < ± 5% Circumference (Ellipse) Full Screen < ± 5% Circumference (Trace) Full Screen <... - Page 183 Acclarix LX9 Super Diagnostic Ultrasound System User Manual Measurements and Reports Table 2 Strain Elastography Imaging Performance and Measurement Accuracy Transducer Max. Spatial Error of Contract ratio of B Range of Strain Error of Strain Repetition Rate of Model Penetration Resolution Geometric image and...
-
Page 184: Exam Data Management
Acclarix LX9 Series Diagnostic Ultrasound System User Manual Exam Data Management 9 Exam Data Management 9.1 Storing Images The system supports storing static images and cine clips. What is displayed in Information area, Image area and Image parameter area on the main screen will be stored. -
Page 185: Reviewing Images
Acclarix LX9 Series Diagnostic Ultrasound System User Manual Exam Data Management Unfreeze the image NOTE: If the image is frozen or a non-image screen is displayed, a static image is always stored when pressing a store key. In panorama mode, a static image is always stored when pressing a store key. - Page 186 Acclarix LX9 Series Diagnostic Ultrasound System User Manual Exam Data Management showing the selected images Print the currently displayed images via the DICOM printer that connects to a DICOM server. DICOM Print Refer to Section 10.6.2.5 for details on configuring DICOM print.
-
Page 187: Exam Database
Acclarix LX9 Series Diagnostic Ultrasound System User Manual Exam Data Management 9.3 Exam Database The Exam Database provides a list of recently performed studies. It can be accessed by pressing the <Review> hard key on the console when there is no active exam. - Page 188 Acclarix LX9 Series Diagnostic Ultrasound System User Manual Exam Data Management Export Format: This location displays export format for files. BMP, JEPG and TIF formats are available for static images. AVI and WMV formats are available for clips. All exam data can be exported as DICOM and RawData files.
-
Page 189: Archiving Studies
Acclarix LX9 Series Diagnostic Ultrasound System User Manual Exam Data Management Exam Date: enter the date range. Query: press to start the query, and all the queried exams will be displayed in the box below. ... -
Page 190: Structured Report
Acclarix LX9 Series Diagnostic Ultrasound System User Manual Exam Data Management Click the shortcut key and the system will start exporting. Note: The image and clip will be exported in JPEG and MP4 format respectively. An instruction dialogue will pop up to guide you to extract the exported image/clip. Use WeChat on your mobile device to scan the QR code step by step. -
Page 191: Image Compare
Acclarix LX9 Series Diagnostic Ultrasound System User Manual Exam Data Management 9.6 Image Compare Image Compare function is comparing images in the same exam of the same patient, in different exams of the same patient and in different exams of different patients. -
Page 192: Utilities
Acclarix LX9 Series Diagnostic Ultrasound System User Manual Utilities 10 Utilities Press Utilities key on the touch screen to open Utilities screen. The Utilities screen provides access to System, Preset, Maintenance, Connectivity, Measure Set-up page and etc. Each of these is described in separate sections. - Page 193 Acclarix LX9 Series Diagnostic Ultrasound System User Manual Utilities Set whether to automatically synchronize Time the system time according to the √/× Synchronization selected time zone when the system is connected to network. Select a configured time server. After the...
-
Page 194: Button Set-Up
Acclarix LX9 Series Diagnostic Ultrasound System User Manual Utilities 10.1.2. Button Set-up Item Options Description F1&F2 Needle Button F1 Define the F1/F2 keys, select one of the pull-down options. The options that are available will depend on what functions Store Long Clip are enabled on the system. -
Page 195: Device Set-Up
Acclarix LX9 Series Diagnostic Ultrasound System User Manual Utilities Non-Live Cine Set the default duration and cardiac cycle Time:1-180s for storing clips in frozen state. Beat:1-300 cycle 10.1.4. Device Set-up Item Options Description Freeze, Image, Clip, Print Set a function for the left key or right key... -
Page 196: User Set-Up
Acclarix LX9 Series Diagnostic Ultrasound System User Manual Utilities 0/12h/24h/48h/72h/unlimited You can define the time limit for Time Limit for restarting exam. Only exams within the time limit can be restart. If 0 is Exam Restart selected, no exam can be restart. -
Page 197: Miscellaneous Set-Up
Acclarix LX9 Series Diagnostic Ultrasound System User Manual Utilities Note: Only the administrator has the permission to add users and change passwords of other users. Operators do not have the permission to add users and can only change their own passwords. -
Page 198: General Preset
Acclarix LX9 Series Diagnostic Ultrasound System User Manual Utilities 10.2.1. General Preset Item Options Description Global Auto zoom image Set whether to zoom in the image at shallow depth automatically when adjusting image √/× linear depth to shallow depth on linear transducer transducer. -
Page 199: Exam Preset
Acclarix LX9 Series Diagnostic Ultrasound System User Manual Utilities 10.2.2. Exam Preset The figure below shows an example of the exam preset page where you can configure which Comment, Measure or Body Mark presets are associated with each transducer‟s exam preset, or adjust the display order of exam presets of each transducer. -
Page 200: Image Preset
Acclarix LX9 Series Diagnostic Ultrasound System User Manual Utilities On the Preset Order page, you can do the following operations; Add and Remove: Move the exam preset into or out of the touch screen display. Change Order: Press "↑", "↓","←" and "→" arrows to adjust the exam preset sequence.... - Page 201 Acclarix LX9 Series Diagnostic Ultrasound System User Manual Utilities Transducer and Exam: There are drop-downs at the top of the screen for selecting the Transducer and Exam Preset you want to edit. Each transducer has its own set of exam presets, and these two drop-downs let you select which exam preset, on which transducer, you want to edit.
-
Page 202: Comment Preset
Acclarix LX9 Series Diagnostic Ultrasound System User Manual Utilities 10.3 Comment Preset Entering Comment screen: Press Utilities-> Comment touch screen buttons to access comment preset screen, as the illustration figure shown below. On the Comment Preset page you can add or edit the comment texts of each Comment preset. -
Page 203: Body Mark Preset
Acclarix LX9 Series Diagnostic Ultrasound System User Manual Utilities General Settings: Auto-erase comments when the image is unfrozen: If this option is enabled, the comments will be erased when the image is unfrozen, otherwise the comments will only be erased on demand or at the start of a new exam. -
Page 204: Measure Set-Up
Acclarix LX9 Series Diagnostic Ultrasound System User Manual Utilities Setting a Default Body Mark for a Preset: Select a Body Mark graphic from pre-defined graphics area and press Set Default, the Body Mark graphic is set as a default Body Mark to the selected preset. - Page 205 Acclarix LX9 Series Diagnostic Ultrasound System User Manual Utilities EDV/ESV: set the author of the formula that is used in EDV/ESV calculation. There are three options: Teichholz, Gibson and Cube. HR Cycle: set the number of heartbeats that are assumed in the HR or FHR measurement calculation.
-
Page 206: Application Parameters
Acclarix LX9 Series Diagnostic Ultrasound System User Manual Utilities 10.5.2. Application Parameters On the Application Parameter page, you can configure the default measurement results of Doppler trace measurement for each exam application. Select one clinic application in the Application drop-down list, for example ABD, and then tick the measurement result items in the list below. -
Page 207: Connectivity
Acclarix LX9 Series Diagnostic Ultrasound System User Manual Utilities Adjust the report layout: Image: Set the image layout in the report as 1*1 or 1*2. Graph: Set the layout of the graphs in the report as 1*1 or 1*2. -
Page 208: Tcp/Ip
Acclarix LX9 Series Diagnostic Ultrasound System User Manual Utilities 10.6.1. TCP/IP This screen configures access to a network. Access can be either wired or wireless. Wired Settings: The following settings apply when connecting a system to a wired network via the network port on the side of the system. -
Page 209: Dicom
Local AE Title: Any 16 characters that uniquely identify this system on your DICOM network. default “EDAN_STR_SCU” will work unless you have multiple Edan systems on your network. Time Out: This determines the time after which this system will stop trying to establish a connection to the DICOM server. - Page 210 Acclarix LX9 Series Diagnostic Ultrasound System User Manual Utilities the exact level of software a second click may be needed to edit that field. The fields are: Name: The name of the server that appears in the drop-down list of the exam database.
- Page 211 Acclarix LX9 Series Diagnostic Ultrasound System User Manual Utilities The dialog box includes the following: Send SR with Images: This will enable the function of sending structured report together with images to a DICOM server. Report Type: This determines the type of structured report. Select Enhanced report or Comprehensive report according to the report type your PACS system requires.
- Page 212 Acclarix LX9 Series Diagnostic Ultrasound System User Manual Utilities MPPS Server: Selects one configured server from the drop-down list as the default server to receive the exam status. 10.6.2.5. DICOM Print Settings Click Print key on the left side of main screen, and the right half screen switches to DICOM Print setup, where you can configuring DICOM Print.
-
Page 213: Network Store
Acclarix LX9 Series Diagnostic Ultrasound System User Manual Utilities The system uses the port information of the storage commitment server to receive storage commitment information from the server by default, and also supports the establishment of a new association for receiving storage commitment information, that is, selecting the box As Server and using the local port information of the ultrasound system to receive storage commitment information. -
Page 214: Maintenance
The Version screen shows the current version of software, firmware, and selected hardware for the system. This information is only needed if requested by an Edan service engineer. This page also includes an Upgrade, Import Config and Show Config and Fan status button. Any released upgrade will include instructions regarding use of this button. -
Page 215: Export/Import
Acclarix LX9 Series Diagnostic Ultrasound System User Manual Utilities Caution 1. Anti-virus measures such as USB device virus scanning should be carried out prior to using USB flash drive. 2. Do not connect an USB device with unknown provenance to the ultrasound system. -
Page 216: Transducer Element Check
Acclarix LX9 Series Diagnostic Ultrasound System User Manual Utilities Delete: Deletes the imported images. 10.7.5. Transducer Element Check Proper performance of the transducer is the prerequisites for acquiring images or signals that provide the intended information for the users. To ensure the proper performance of a transducer, it is suggested to implement the transducer element check each time a transducer is activated for use or at regular transducer performance check. -
Page 217: Screen Adjust
Acclarix LX9 Series Diagnostic Ultrasound System User Manual Utilities the elements are in normal performance. For the linear and convex transducers, the image at the regions under or near the compromised elements may be compromised; for the phased array transducers, the whole image regions may be compromised. -
Page 218: Stress Echo Set-Up
Acclarix LX9 Series Diagnostic Ultrasound System User Manual Utilities 10.9 Stress Echo Set-up Entering Stress Echo Setup Press Utilities-> Stress Echo touchscreen buttons to access Stress Echo setup screen. The following settings can be conducted on the Stress Echo setup screen. -
Page 219: Evocal
Acclarix LX9 Series Diagnostic Ultrasound System User Manual eVocal 11 eVocal The eVocal function enables the user to operate the system by inputting voice commands through a microphone device. To use eVocal Function: 1. Connect the microphone device to the microphone port on the back of the device. -
Page 220: In Between Exams
After unpacking the device, you should follow the packing list to check the product carefully and to make sure that no damage has occurred during transportation. For installation, please contact your local distributor or the EDAN service department at: support@edan.com. -
Page 221: Troubleshooting And Maintenance
Check before the system is switched on, if any system malfunction is experienced, eliminate the malfunction before use, or contact EDAN or authorized representatives for service if needed. Visually inspect all the transducers. Do not use any damaged transducer. -
Page 222: Cleaning And Disinfecting The System
2. Clean the button 13.3 Cleaning and Disinfecting the System Use only the EDAN-approved substances and methods listed in this chapter to clean the system. The warranty does not cover damage caused by using unapproved substances or methods. Edan Instruments has validated the cleaning and disinfection instructions included in this User Manual. -
Page 223: Cleaning And Disinfecting The System Surface
Acclarix LX9 Series Diagnostic Ultrasound System User Manual Troubleshooting and Maintenance 13.3.1. Cleaning and Disinfecting the System Surface System Surface Cleaning The validated cleaning agents for cleaning the system are: Ethanol (75%) Isopropanol (70%) To clean the system surface: Switch off the system and unplug it. - Page 224 Acclarix LX9 Series Diagnostic Ultrasound System User Manual Troubleshooting and Maintenance Rotate clockwise to remove the fixing ring Rotate counterclockwise to mount the fixing ring Figure 13-1 Assembling and Disassembling Trackball X idler wheel Y idler wheel Auxiliary idler wheel...
-
Page 225: Cleaning And Disinfecting The Ecg Cable
Acclarix LX9 Series Diagnostic Ultrasound System User Manual Troubleshooting and Maintenance 13.3.2. Cleaning and Disinfecting the ECG Cable ECG cable cleaning The validated cleaning agents for cleaning the ECG cable are: Ethanol (75%) Isopropanol (70%) To clean the ECG cable: Disconnect ECG cable from the patient and disconnect it from the ultrasound system. -
Page 226: Maintenance
Acclarix LX9 Series Diagnostic Ultrasound System User Manual Troubleshooting and Maintenance 13.4 Maintenance The system should be maintained regularly, at least annually, by a qualified technician who has adequate training, knowledge and experience. That person should be familiar with the Service Manual, available from your Edan representative. -
Page 227: Appendix A Specifications
Acclarix LX9 Series Diagnostic Ultrasound System User Manual Specifications Appendix A Specifications A.1 Electrical Safety Classifications Internally powered equipment, According to the type of protection against electric shock Class I equipment Type BF(transducer) According to the degree of protection against electric shock... -
Page 228: Display Specifications
Acclarix LX9 Series Diagnostic Ultrasound System User Manual Specifications A.5 Display Specifications Display TFT-LCD Diagonal Size 21.5 inch View Angle Right 178° , Left 178° , Up 178° , Down 178° Pixel Number 1920x1080 Contrast Ratio 1000 (Typical) A.6 Technical Specifications... - Page 229 Acclarix LX9 Series Diagnostic Ultrasound System User Manual Specifications Abdomen, Obstetrics, Small Parts, Vascular, Cardiac, Gynecology, Report Packages Urology, Pediatrics Wi-Fi Specifications Standard Conformance IEEE802.11a/b/g/n/ac Frequency Band 2.412-2.472GHz(@2.4GHz band), 5.180-5.825GHz(@5GHz band) Modulation Technique OFDM, CCK, DQPSK, BPSK 802.11b: 12.0 802.11g: 16.5dBm Typical Transmit Power 802.11n: 16.5dBm...
-
Page 230: Operating, Storage And Transportation Environment
Acclarix LX9 Series Diagnostic Ultrasound System User Manual Specifications Range: 40 ms~120 ms QRS Detection Amplitude:0.5 mV~5 mV Patient Leakage < 10 μA Current A.7 Operating, Storage and Transportation Environment A.7.1 Operating Environment Temperature 0 ° C ~ +40 ° C(+32 ° F~+104 ° F) -
Page 231: Configuration Difference
Acclarix LX9 Series Diagnostic Ultrasound System User Manual Specifications 9 Configuration Difference Configuration Difference Feature 1 Feature 2 Feature 3 Models Seminal Testis Single Button Vesicle Meas. Meas. Footswitch √ √ Acclarix LX9 √ √ Acclarix LX9 Exp √ √... -
Page 232: Appendix B Ultrasound Intensity And Safety
Acclarix LX9 Series Diagnostic Ultrasound System User Manual Ultrasound Intensity and Safety Appendix B Ultrasound Intensity and Safety 1 Ultrasound in Medicine The use of diagnostic ultrasound has proved to be a valuable tool in medical practice. Given its known benefits for non-invasive investigations and medical diagnosis, including investigation of the human fetus, the question of clinical safety with regards to ultrasound intensity arises. -
Page 233: Explanation Of Mi/Ti
Acclarix LX9 Series Diagnostic Ultrasound System User Manual Ultrasound Intensity and Safety The acoustic output will be changed with the change of the number of the Line density scanning line (line density). The acoustic power will be changed with the change of PRF. -
Page 234: Display Of Mi/Ti
Acclarix LX9 Series Diagnostic Ultrasound System User Manual Ultrasound Intensity and Safety TIC (Cranial Bone Thermal Index): It provides an estimate of potential temperature rise in the cranial bones or superficial bones. B.3.3 Display of MI/TI The system provides real-time display of MI/TI values in the upper right part of the screen. The start point of MI/TI value is 0.0. -
Page 235: Acoustic Power Default Settings
Acclarix LX9 Series Diagnostic Ultrasound System User Manual Ultrasound Intensity and Safety B.4.4 Acoustic Power Default Settings The ultrasound system allows direct control of acoustic power by the Power paddle key on the touch screen. The range can be adjusted is 10% to 100%. The higher the acoustic power number, the greater the acoustic output. -
Page 236: References For Acoustic Output And Safety
Acclarix LX9 Series Diagnostic Ultrasound System User Manual Ultrasound Intensity and Safety B.7 References for Acoustic Output and Safety “Bioeffects and Safety of Diagnostic Ultrasound” issued by AIUM in 1993 “Medical Ultrasound Safety” issued by AIUM in 1994 IEC 62359:2017, Ultrasonics - Field characterization - Test methods for the determination of thermal and mechanical indices related to medical diagnostic ultrasonic fields. -
Page 237: Appendix C Order List
The following accessories are recommended for use on the system. WARNING Only accessories supplied or recommended by EDAN can be used, the transducers of EDAN can be only used on EDAN‟s systems. Otherwise, the performance and electric shock protection cannot be guaranteed. - Page 238 Acclarix LX9 Series Diagnostic Ultrasound System User Manual Order List 02.01.102963 BGK-CR10UA 02.01.215192 BGK-002 02.01.215193 BGK-003 02.01.215194 BGK-004 02.01.215372 BGK-005 02.01.215373 BGK-006 02.01.215514 BGK-007 02.01.215468 BGK-008 BGK-009 02.01.215834 BGK-010 02.01.215835 BGK-012 02.01.216312 BGK-013 02.01.216659 BGK-P5-1X 02.01.210985 Power Cable, European Standard FG-L23X-003-04 01.13.036638...
- Page 239 Acclarix LX9 Series Diagnostic Ultrasound System User Manual Order List ECG patient cable, 3-lead, AHA, EC03DAS121 01.57.471380 Defib, Snap ECG electrodes, disposable H99SG 01.57.471858 NOTE: The part name may vary depending on context, but the part number is constant. - 230...
-
Page 240: Appendix D Emc Information
Acclarix LX9 Series Diagnostic Ultrasound System User Manual EMC Information Appendix D EMC Information Electromagnetic emissions Guidance and manufacture’s declaration – electromagnetic emission The system is intended for use in the electromagnetic environment specified below; The customer or the user of the system should assure that it is used in such an environment. - Page 241 Acclarix LX9 Series Diagnostic Ultrasound System User Manual EMC Information Electromagnetic immunity Guidance and manufacture’s declaration – electromagnetic immunity The system is intended for use in the electromagnetic environment specified below. The customer or the user of the system should assure that they are used in such an environment.
- Page 242 Acclarix LX9 Series Diagnostic Ultrasound System User Manual EMC Information Electromagnetic immunity Guidance and manufacture’s declaration – electromagnetic immunity The system is intended for use in the electromagnetic environment specified below. The customer or the user of the system should assure that they are used in such an environment.
- Page 243 Acclarix LX9 Series Diagnostic Ultrasound System User Manual EMC Information NOTE 1 At 80 MHz and 800 MHz, the higher frequency range applies. NOTE 2 These guidelines may not apply in all situations. Electromagnetic propagation is affected by absorption and reflection from structures, objects and people.
- Page 244 Acclarix LX9 Series Diagnostic Ultrasound System User Manual EMC Information 2450 2400-2570 Bluetooth, Pulse WLAN, 802.11 modulation b/g/n, RFID 217 Hz 2450, LTE Band 7 5240 5100-5800 WLAN 802.11 Pulse modulation 5500 217 Hz 5785 NOTE If necessary to achieve the IMMUNITY TEST LEVEL, the distance between the transmitting antenna and the ME EQUIPMENT or ME SYSTEM may be reduced to 1 m.
-
Page 245: Appendix E Ultrasound Gel Warmer
Acclarix LX9 Series Diagnostic Ultrasound System User Manual Ultrasound Gel Warmer Appendix E Ultrasound Gel Warmer Ultrasound gel warmer is intended for heating the ultrasound gel. It is installed at the left upper corner of the control panel, as shown in the figure below. - Page 246 Acclarix LX9 Series Diagnostic Ultrasound System User Manual Ultrasound Gel Warmer To use gel warmer: After installing the gel warmer, put a bottle of ultrasound gel inside the gel warmer, and press the power switch on the gel warmer to start heating.
- Page 247 Acclarix LX9 Series Diagnostic Ultrasound System User Manual Ultrasound Gel Warmer To clean gel warmer Switch off the system and disconnect the gel warmer. Rotate to remove the gel warmer bottom cover. Use a sterile cloth dampened with cleaning agent to gently wipe the entire exterior surface(including the bottom cover) and inner surface of the warmer thoroughly until no visible contaminants remain.
- Page 248 P/N: 01.54.458942 MPN: 01.54.458942010 EDAN EDAN INSTRUMENTS, INC. #15 Jinhui Road, Jinsha Community, Kengzi Sub -District Pingshan District, 518122 Shenzhen, P.R.China Email: info@edan.com TEL: +86-755-2689 8326 FAX: +86-755-2689 8330 Website: www.edan.com EC REPRESENTATIVE Shanghai Int ern ational Holding Corp. GmbH...
Need help?
Do you have a question about the Acclarix LX9 Series and is the answer not in the manual?
Questions and answers