Extron electronics TLP Pro 320M User Manual
Touchlink pro touchpanel control systems
Hide thumbs
Also See for TLP Pro 320M:
- User manual (47 pages) ,
- Setup manual (6 pages) ,
- Setup manual (4 pages)
Table of Contents
Advertisement
Quick Links
Download this manual
See also:
Setup Manual
Advertisement
Table of Contents

Subscribe to Our Youtube Channel
Related Manuals for Extron electronics TLP Pro 320M


Summary of Contents for Extron electronics TLP Pro 320M
- Page 1 User Guide TouchLink ® TLP Pro 320M TouchLink Pro Touchpanel Control Systems 68-2515-01 Rev. A 07 15...
-
Page 2: Safety Instructions
Safety Instructions Safety Instructions • English Инструкция по технике безопасности • Русский WARNING: This symbol, , when used on the product, is intended ПРЕДУПРЕЖДЕНИЕ: Данный символ, , если указан to alert the user of the presence of uninsulated dangerous voltage на... - Page 3 Risque d’explosion. Ne pas remplacer la pile par le mauvais type de pile. Débarrassez-vous des piles utilisées selon le mode d’emploi. Copyright © 2015 Extron Electronics. All rights reserved. Trademarks All trademarks mentioned in this guide are the properties of their respective owners.
- Page 4 Conventions Used in this Guide Notifications In this user guide, the following are used: Potential risk of severe injury or death. WARNING: AVERTISSEMENT : Risque potentiel de blessure grave ou de mort. CAUTION: Risk of minor personal injury. ATTENTION : Risque de blessure mineure.
-
Page 5: Table Of Contents
Button Replacement ........27 Panel Features Reference Material ............5 ..........28 TLP Pro 320M Front Panel Features ....5 Network Port Requirements......28 TLP Pro 320M Front Panel Features IP Link Pro Control Processors ..... 28 (Bezel Removed) ..........6 TouchLink Pro Touchpanels ...... - Page 6 TLP Pro 320M • Contents...
-
Page 7: Introduction
The front panel also has eight customizable backlit buttons and a volume control knob. The TLP Pro 320M works with any Extron IP Link Pro control processor and is ideal for any AV application requiring a compact touchpanel with flexible mounting options and a fully customizable interface. -
Page 8: Application Diagram
For a complete list of the requirements for running GUI Designer, Global Configurator Plus and Professional, or Toolbelt, see the Extron Web page for the appropriate software. NOTE: The TLP Pro 320M is not compatible with Global Configurator 3 or GUI Configurator. -
Page 9: Installation Overview
Mount the units. There are several mounting options for Touchlink Pro touchpanels … (see Mounting on page 24). TLP Pro 320M Rear Panel Features Connect cables to the touchpanels (see … page 7). Connect the power cords and power on all devices (see Power connector …... - Page 10 Configure the Touchpanels — the Global Configurator Help File, the Toolbelt Help File, and the GUI Designer Help File provide step-by-step instructions and detailed information. The Global Configurator Help File includes an introduction to that software and sections on how to start a project and configuration. TLP Pro 320M • Installation Overview...
-
Page 11: Panel Features
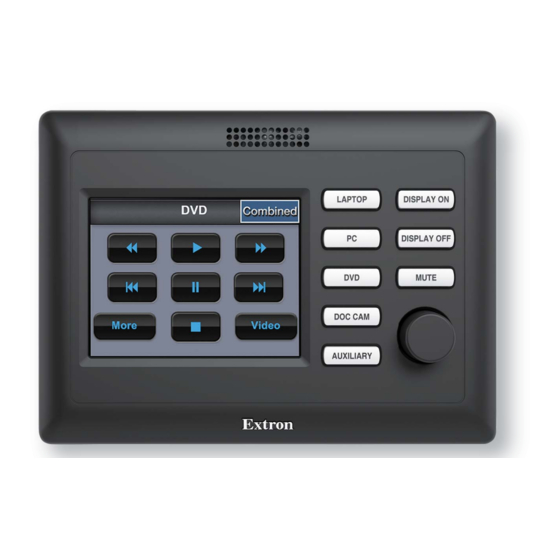
Panel Features This section describes: • TLP Pro 320M Front Panel Features • TLP Pro 320M Front Panel Features (Bezel Removed) • TLP Pro 320M Rear Panel Features TLP Pro 320M Front Panel Features Figure 2. TLP Pro 320M Front Panel with Bezel LCD screen —... -
Page 12: Tlp Pro 320M Front Panel Features (Bezel Removed)
TLP Pro 320M Front Panel Features (Bezel Removed) To release the bezel from the TLP Pro 320M, use the Extron removal tool: Insert the flat edge of the tool into either of the notches in the bottom surface of the bezel... -
Page 13: Tlp Pro 320M Rear Panel Features
Ne branchez pas les écrans tactiles ou les contrôleurs avant d’avoir lu les mises en garde page 8 (source d’alimentation 12 VCC) ou page 10 (injecteur PoE). NOTE: The TLP Pro 320M ships without a power supply. Either the 12 VDC power supply or the power injector must be purchased separately. Power Receptacle Smooth Ridges POWER POWER 1.0A MAX... - Page 14 7) — is in the recessed hole to the left of the Reset LED. Pressing this button initiates one of three reset modes for the unit (see Reset Modes on page 30). TLP Pro 320M • Panel Features...
- Page 15 XTP PI 100 power injector (part number 60-1233-01), which is shown in figure 6 below. ATTENTION: • The TLP Pro 320M can use a 12 VDC desktop power supply and is also Power over Ethernet (PoE 802.3af, class 3) compliant. Do not connect either power supply before reading the Attention notifications on page 8 page •...
- Page 16 Network Environment 0 per IEC TR62101. • Le TLP Pro 320M est conçu pour une connexion à un circuit PoE pour une utilisation intérieure seulement et est considéré comme faisant partie d’un environnement réseau 0 par IEC TR62101.
-
Page 17: Setup Menu
Setup Menu When the TLP Pro 320M is powered on, the currently loaded project is displayed. To access the setup menu, remove the front panel bezel and press the button (see figure 3 , on Menu page 6). There are five available screens: •... -
Page 18: Status Screen
Network there is no connection. The bubble in the Advanced panel is green when a control processor is connected or amber if none is connected. TLP Pro 320M • Setup Menu... -
Page 19: Network Screen
On position. When the slider is on, the IP Address Subnet Mask Gateway DNS Server values cannot be edited (they are shown in white text, with no button and no arrowhead). Only the can be edited. Host Name TLP Pro 320M • Setup Menu... - Page 20 Apply Press to go back to the previous IP address. Revert Repeat step 2 to update the Subnet Mask Gateway , or DNS Server values, as required. TLP Pro 320M • Setup Menu...
- Page 21 When you save changes, you return to the screen. The Network Apply buttons turn red. Revert Press to keep the changes that you have made. Apply Press to go back to the previous Hostname. Revert TLP Pro 320M • Setup Menu...
-
Page 22: Display Screen
— activates the panel from Sleep mode when motion is detected near the Wake Display unit. Toggle between • — provides LED backlighting for the eight front panel buttons next to the Button LED touchscreen. Toggle between TLP Pro 320M • Setup Menu... -
Page 23: Audio Screen
• sets the volume of audio from any audio file playback. Sound To mute any of the volume settings, press the corresponding loudspeaker icon to toggle between mute off and mute on. Mute Mute TLP Pro 320M • Setup Menu... -
Page 24: Advanced Screen
) are read only. Storage section — allows you to enable or disable PIN use. If PIN use is enabled, it allows Menu PIN you to set the pin. By default, PIN use is disabled. TLP Pro 320M • Setup Menu... -
Page 25: Calibration Screen
Follow the on-screen instructions until all five sets of cross hairs have been calibrated (one in each corner and a fifth in the center of the screen). The touchpanel exits the calibration screen once the calibration process is completed. If required, re-attach the bezel. TLP Pro 320M • Setup Menu... -
Page 26: Configuration Software
After assigning the control functions, the project is rebuilt and uploaded to the control processor and touchpanel. The GUI Designer and the Global Configurator Plus and Professional programs provide versatility and adaptability for configuration and control of an AV system as it grows and evolves. TLP Pro 320M • Configuration Software... -
Page 27: Installing Gui Designer, Global Configurator, And Toolbelt
NOTES: • You will need an Extron Insider account to run Global Configurator Plus and Professional. To obtain one, contact the Extron Sales Department. • Ensure you are downloading Global Configurator Plus and Professional. TLP Pro 320M • Configuration Software... -
Page 28: Using The Software
(see page 11) or Toolbelt to configure the touchpanel network settings. Figure 18. TLP Pro 320M Web Page Click the License Information button to view details about third-party packages and associated licensing (and see Licensed Third-Party Software Used in the Touchpanels on page 32). TLP Pro 320M • Configuration Software... -
Page 29: Updating Firmware
Updating Firmware Firmware for the TLP Pro 320M can be upgraded in one of two ways: • Updating Firmware Using the Touchpanel Web Page (see below) • Updating Firmware Using Toolbelt (see below) Before starting, consult your IT team and ensure that the touchpanel has a unique IP address. -
Page 30: Mounting
Ne pas installer le TLP Pro 320M dans un mur résistant au feu ou une cloison. To mount the TLP Pro 320M directly into drywall, follow these steps. The steps are similar if the unit is mounted in furniture (such as a podium or table). - Page 31 TLP Pro 320M Rear Panel Features Plug the cables into the rear panel connectors (see on page 7). Connect the LAN port to the power injector or a PoE enabled switch. • • If you use the LAN port only as a network connection, connect a 12 VDC, 1.0 A power supply to the 2-pole captive screw power input connector.
-
Page 32: Other Mounting Options
Other Mounting Options Extron provides a range of mounting kits for the TLP Pro 320M. These allow the touchpanel to be mounted on glass surfaces, desktops (fixed or swivel mount), rack mounted (see below for important guidelines about rack mounting), and wall mounted, with a wall box. -
Page 33: Button Kits
Button Kits Installing or Replacing Buttons The default set of eight front panel buttons are installed on the TLP Pro 320M. Any or all of these buttons can be replaced if they are assigned different functions when the unit is customized. -
Page 34: Reference Material
Discovery Broadcast network discovery Outbound Inbound 4503 Internal system messaging Outbound 4504 Trace Extron trace messages Inbound 4522 SFTP File transfer Outbound 5555 GVE protocol (configurable) Outbound Various TCP/UDP Drivers Outbound connections for Ethernet device control TLP Pro 320M • Reference Material... -
Page 35: Touchlink Pro Touchpanels
TouchLink for iPad (for IP Link Pro Control Systems) Ports and Protocols for Control Processors Inbound/ Port Protocol Service Description Outbound Inbound/ 4503 Internal system messaging Outbound Inbound 4522 SFTP File transfer Inbound HTTPS File transfer TLP Pro 320M • Reference Material... -
Page 36: Reset Modes
Reset Modes The TLP Pro 320M touchpanel has three reset modes that are initiated by pressing the Reset button. The button is found on the rear panel (see figure on page 7). Reset Use Factory Firmware Activation To start the Use Factory Firmware reset mode and replace firmware: On the rear panel, hold down the button while applying power to the unit. -
Page 37: Reset All Ip Settings
Does everything Reset All IP Settings mode does • Removes button, touchpanel, and user interface configurations Purpose and notes Reset to Factory Defaults mode is useful if you want to start over with configuration and uploading. TLP Pro 320M • Reference Material... -
Page 38: Licensed Third-Party Software Used In The Touchpanels
GPL v2 ncurses netsnmp openssh openssl OpenSSL pcre pexpect popt psmisc GPL v2 python3 LGPL v2.1 socat GPL v2 spawn-fcgi sqlite Public-domain tcpdump tzdata Public-domain uboot GPL v2 udev GPL v2 xinetd zlib zlib TLP Pro 320M • Reference Material... - Page 39 Extron Electronics makes no further warranties either expressed or implied with respect to the product and its quality, performance, merchantability, or fitness for any particular use. In no event will Extron Electronics be liable for direct, indirect, or consequential damages resulting from any defect in this product even if Extron Electronics has been advised of such damage.
Need help?
Do you have a question about the TLP Pro 320M and is the answer not in the manual?
Questions and answers