Table of Contents
Advertisement
Advertisement
Table of Contents

Related Manuals for Dentsply Sirona Orthophos E Ceph


Summary of Contents for Dentsply Sirona Orthophos E Ceph
- Page 1 03.2019 New as of: Orthophos E Orthophos E Ceph Operating Instructions English...
-
Page 2: Table Of Contents
Table of contents Dentsply Sirona Operating Instructions Orthophos E Table of contents General data ......................Dear Customer, … ..................Contact information..................Copyright and trademark ................General information about this operating manual ........1.4.1 Structure of the document.............. 1.4.1.1 Identification of the danger levels ......... - Page 3 Dentsply Sirona Table of contents Operating Instructions Orthophos E Unit description ....................... Certification and registration ................ Technical data....................3.2.1 Unit data..................3.2.2 Transport, storage, and operating conditions ........ 3.2.3 Diagrams..................3.2.4 Requirements on the PC systems ..........Overview of exposure programs ..............
- Page 4 Table of contents Dentsply Sirona Operating Instructions Orthophos E 5.1.2.4 Transversal multi-slice posterior teeth......5.1.2.5 Cephalometric exposures..........5.1.2.6 Pediatric exposure............5.1.3 Releasing the exposure ..............5.1.3.1 Starting the test cycle ........... 5.1.3.2 Releasing the exposure..........5.1.3.3 Data recovery in case of problems with image transfer 5.1.3.4...
-
Page 5: General Data
We are pleased that you have equipped your practice with the Orthophos E X-ray system from Dentsply Sirona. Dentsply Sirona was one of the first inventors of film-based panoramic X-ray systems and since 1996 has been a pioneer of digital X-ray technology. -
Page 6: Copyright And Trademark
1 General data Dentsply Sirona 1.3 Copyright and trademark Operating Instructions Orthophos E Copyright and trademark Copyright © Sirona Dental Systems GmbH. All rights reserved. The information contained in this manual may be changed without notice. The software and all related documentation are protected by copyright. -
Page 7: Structure Of The Document
Dentsply Sirona 1 General data Operating Instructions Orthophos E 1.4 General information about this operating manual 1.4.1 Structure of the document 1.4.1.1 Identification of the danger levels To prevent personal injury and material damage, please observe the warning and safety information provided in these operating instructions. -
Page 8: Other Relevant Documents
According to the X-ray Ordinance of Germany, owners of X-ray equipment must perform constancy tests at regular intervals in order to ensure the safety of operating staff and patients. Dentsply Sirona recommends monthly testing. 67 11 001 D3352... -
Page 9: Intended Use
Dentsply Sirona 1 General data Operating Instructions Orthophos E 1.8 Intended use Intended use The Orthophos E / Ceph is designed for producing different tomographic exposures of the maxillofacial area or of parts of this. Projections of the skull and carpus exposures for orthodontics are also possible with the cephalometric arm. -
Page 10: Safety Instructions
2 Safety instructions Dentsply Sirona 2.1 Basic safety information Operating Instructions Orthophos E Safety instructions Basic safety information NOTE This unit must not be operated in areas subject to explosion hazards. Notes on the unit The following symbols are applied to the unit: This symbol can be found next to the rating plate on the unit. -
Page 11: Condensation
The valid radiation protection regulations and measures must be observed. The statutory radiation protection equipment must be used. In order to reduce radiation exposure, Dentsply Sirona recommends using bismuth or lead shields or aprons, especially for pediatric patients. During an exposure, the operator should move as far away from the X- ray tube assembly as the coiled cable of the release button permits. -
Page 12: Emergency Stop
2 Safety instructions Dentsply Sirona 2.8 Emergency Stop Operating Instructions Orthophos E Emergency Stop If any parts of the unit touch the patient during the rotary movement, let go of the exposure release button (X-Ray) immediately or stop the unit... -
Page 13: Trouble-Free Operation
If any devices not approved by Dentsply Sirona are connected, they must comply with the applicable standards: ● IEC 60950-1 or IEC 62368-1 for information technology equipment ●... -
Page 14: Changes To The Unit
For reasons of product safety, this product may be operated only with original Dentsply Sirona accessories or third-party accessories expressly approved by Dentsply Sirona. The user is responsible for any damage resulting from the use of non-approved accessories. Structural alterations 2.16... -
Page 15: Electrostatic Discharge
Dentsply Sirona 2 Safety instructions Operating Instructions Orthophos E 2.18 Electrostatic discharge Electrostatic discharge 2.18 Protective measures ESD stands for ElectroStatic Discharge. Electrostatic discharge from people can damage electronic components when the components are touched. Damaged components usually have to be replaced. Repairs must be performed by qualified personnel. - Page 16 2 Safety instructions Dentsply Sirona 2.18 Electrostatic discharge Operating Instructions Orthophos E The transient currents resulting from these discharges have a magnitude of over 10 amps. They are not hazardous for humans because they last for only several nanoseconds. Note: nanosecond = 1/1,000,000,000 second = 1 billionth of a second Voltage differentials exceeding 30,000 volts per centimeter may lead to a charge transfer (electrostatic discharge, lightning, spark-over).
-
Page 17: Unit Description
Dentsply Sirona 3 Unit description Operating Instructions Orthophos E 3.1 Certification and registration Unit description Certification and registration The Orthophos E / Ceph X-ray unit complies with IEC 60601-1:2005 + A1:2012 The Orthophos E / Ceph X-ray unit complies with IEC 60601-1-3:2008 +... -
Page 18: Technical Data
3 Unit description Dentsply Sirona 3.2 Technical data Operating Instructions Orthophos E Technical data 3.2.1 Unit data Model name: Orthophos E / Ceph Nominal voltage: 200 – 240 V Permissible fluctuation: ± 10% Permissible drop under load: Rated current: 12 A... - Page 19 Dentsply Sirona 3 Unit description Operating Instructions Orthophos E 3.2 Technical data Marking of focal spot: Source-skin distance > 200 mm (8“) Automatic exposure block- The duration of automatic exposure ing: blocking (cooling period) depends on the set kV/mA level and the actual ex- posure time.
-
Page 20: Transport, Storage, And Operating Conditions
3 Unit description Dentsply Sirona 3.2 Technical data Operating Instructions Orthophos E PAN sensor Digital CCD line sensor, repluggable for panoramic exposure technique Active sensor area, Pan 138 mm x 6.48 mm type: Detail resolution: 0.027 mm pixel size Focus-sensor distance:... -
Page 21: Diagrams
Dentsply Sirona 3 Unit description Operating Instructions Orthophos E 3.2 Technical data 3.2.3 Diagrams Cooling curve for tube housing Cooling curve of X-ray tube Heating curve of tube housing Central X-ray beam and anode angle 67 11 001 D3352 D3352.201.12.01.02 03.2019... -
Page 22: Requirements On The Pc Systems
3 Unit description Dentsply Sirona 3.2 Technical data Operating Instructions Orthophos E 3.2.4 Requirements on the PC systems The requirements on the PC systems can be found in the installation requirements Sidexis 4 REF 66 63 236. Orthophos E REF 67 10 532 67 11 001 D3352 D3352.201.12.01.02 03.2019... -
Page 23: Overview Of Exposure Programs
Dentsply Sirona 3 Unit description Operating Instructions Orthophos E 3.3 Overview of exposure programs Overview of exposure programs Panoramic exposures Panoramic exposure, standard P1 L Panoramic exposure, half-side left P1 R Panoramic exposure, half-side right P1 A Panoramic exposure, artifact-reduced P1 C Panoramic exposure, constant 1.25x magnification... - Page 24 3 Unit description Dentsply Sirona 3.3 Overview of exposure programs Operating Instructions Orthophos E Transversal multi-slice posterior teeth Transversal multi-slice posterior teeth For more information on the MS exposure program, see from page [→ 62] onwards. Cephalometric exposures If the unit is equipped with a cephalometer, you can also take cephalometric images.
-
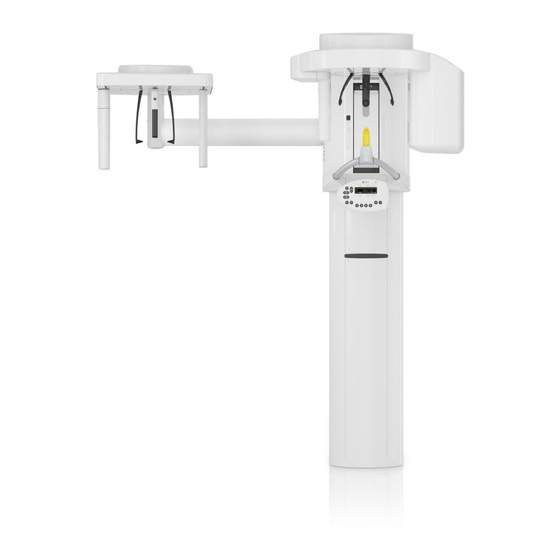
Page 25: Main Components Of The Product
Dentsply Sirona 3 Unit description Operating Instructions Orthophos E 3.4 Main components of the product Main components of the product 3.4.1 Basic unit N M L Main switch Light localizer with height adjustment of the laser line (Frank- furt plane) -
Page 26: Cephalometer
3 Unit description Dentsply Sirona 3.4 Main components of the product Operating Instructions Orthophos E Touch bar for swiveling the control mirror in and out Release button 3.4.2 Cephalometer Projection scale Scale for vertical nose support adjustment Nose support Locking knob for nose support... -
Page 27: Multipad
Dentsply Sirona 3 Unit description Operating Instructions Orthophos E 3.4 Main components of the product 3.4.3 Multipad In addition to the program numbers, help messages, kV/mA combinations and the expected and actual radiation time, the height adjustment setting, forehead support position, info texts and values as well as the help and error messages are also shown on the digital display. -
Page 28: Remote Control
3 Unit description Dentsply Sirona 3.4 Main components of the product Operating Instructions Orthophos E Row of patient symbol keys with LEDs, programmed kV/mA values "R" key for unit return with Ready LED (flashes if the unit is not ready for an exposure). -
Page 29: Spare Parts And Consumables
Dentsply Sirona 3 Unit description Operating Instructions Orthophos E 3.5 Spare parts and consumables Spare parts and consumables 3.5.1 Accessory parts 3.5.1.1 Bite blocks and contact segments The drawer between the handles is provided for the storage of accessory parts and hygienic protective sleeves. -
Page 30: Temple Supports, Forehead Support, And Temporomandibular Joint Supports
3 Unit description Dentsply Sirona 3.5 Spare parts and consumables Operating Instructions Orthophos E 3.5.1.2 Temple supports, forehead support, and temporomandibular joint supports Forehead support and temple supports (1 piece) REF 59 80 383 Contact pads for forehead and temple supports (1 set) -
Page 31: Hygienic Protective Sleeves
Dentsply Sirona 3 Unit description Operating Instructions Orthophos E 3.5 Spare parts and consumables 3.5.2 Hygienic protective sleeves Identification of single use devices Prior to each exposure, the hygienic protective sleeves (single use devices) must be fitted. Single use devices are identified with the symbol shown on the left. -
Page 32: Protective Sleeves For Cephalometer
3 Unit description Dentsply Sirona 3.5 Spare parts and consumables Operating Instructions Orthophos E For bite blocks and contact segments (500 pcs) Order No. 33 14 080 Protective film for handles Order No.: 59 68 255 3.5.2.2 Protective sleeves for cephalometer Protective sleeve for nose support, single use devices (100... -
Page 33: Test Phantom For Acceptance/Constancy Test
Worldwide At regular intervals, perform constancy tests according to the specifications for operating an X-ray unit in order to ensure the safety of operating staff and patients. Dentsply Sirona recommends monthly testing. Exposure phantom, complete, spare (for 2D test) REF 59 85 416... -
Page 34: Installation And Start-Up
4 Installation and start-up Dentsply Sirona 4.1 Replacing accessories on the basic unit Operating Instructions Orthophos E Installation and start-up Please also see the chapter titled: “Cleaning and care [→ 91]“ Replacing accessories on the basic unit 4.1.1 Replacing the bite block, contact segment, or chin rest You will need to replace accessory parts according to the patient or exposure program. -
Page 35: Adjusting/Inserting Accessory Parts On The Cephalometer
Dentsply Sirona 4 Installation and start-up Operating Instructions Orthophos E 4.1 Replacing accessories on the basic unit 4.1.3 Adjusting/inserting accessory parts on the cephalometer Adjusting the holder for ear plugs 1. Grasp the ear plug holders at the very top with both hands. -
Page 36: Moving The Sensor
4 Installation and start-up Dentsply Sirona 4.1 Replacing accessories on the basic unit Operating Instructions Orthophos E 4.1.4 Moving the sensor If the device is operated using a single sensor, the sensor has to be moved to the socket on the panoramic unit or the socket on the cephalometer, depending on the type of exposure being taken. - Page 37 Dentsply Sirona 4 Installation and start-up Operating Instructions Orthophos E 4.1 Replacing accessories on the basic unit Inserting the sensor 1. Hold the sensor firmly. 2. Using both guide pins, insert the sensor into the guide sleeves on the unit and push until it reaches a stop.
-
Page 38: Operation
5 Operation Dentsply Sirona 5.1 Acquiring the X-ray image Operating Instructions Orthophos E Operation Acquiring the X-ray image 5.1.1 Switching the unit on and starting the software 5.1.1.1 Switch on the unit NOTE Fluctuations in temperature can cause condensation to form in the unit. - Page 39 Dentsply Sirona 5 Operation Operating Instructions Orthophos E 5.1 Acquiring the X-ray image 5.1.1.1.1 Readings on the digital display After power-on of the system, running dots initially appear on the digital display for a brief time....
-
Page 40: Enabling Exposure Readiness In Sidexis 4
5 Operation Dentsply Sirona 5.1 Acquiring the X-ray image Operating Instructions Orthophos E 5.1.1.2 Enabling exposure readiness in Sidexis 4 The Sidexis software displays the prepared X-ray exposures on the screen of the PC. As long as there is no connection to Sidexis, error message "H403 –... -
Page 41: Selecting An Exposure Program
Dentsply Sirona 5 Operation Operating Instructions Orthophos E 5.1 Acquiring the X-ray image 5.1.2 Selecting an exposure program 5.1.2.1 Panoramic and bite wing exposure 5.1.2.1.1 Program descriptions 5.1.2.1.1.1 P1 – Panoramic exposure The exposure displays the full tooth region with ascending rami. - Page 42 5 Operation Dentsply Sirona 5.1 Acquiring the X-ray image Operating Instructions Orthophos E 5.1.2.1.1.3 P1 R – Panoramic exposure, half-side right The exposure displays the right tooth region with ascending rami. 5.1.2.1.1.4 P1 A – Panoramic exposure, artifact-reduced The exposure can be taken in an artifact-reduced format to avoid artifacts in the condylar and molar regions, and to reduce shadowing by the opposite jaw.
- Page 43 Dentsply Sirona 5 Operation Operating Instructions Orthophos E 5.1 Acquiring the X-ray image 5.1.2.1.1.5 P1 C - Panoramic exposure at a constant magnification of 1.25x IMPORTANT Please ensure that the 1.25 x enlargement is only guaranteed at the vertical level. As patient positioning can vary, a reference object is to be used at the point where a measurement is to be performed.
- Page 44 5 Operation Dentsply Sirona 5.1 Acquiring the X-ray image Operating Instructions Orthophos E 5.1.2.1.1.7 P12 – Thick slice, anterior tooth region The exposure shows the anterior tooth region with a larger slice thickness, e.g. for implantology. 5.1.2.1.1.8 BW1 – Bitewing exposure in the posterior tooth region The exposure displays the posterior tooth regions with an image height restricted to the bite wing.
- Page 45 Dentsply Sirona 5 Operation Operating Instructions Orthophos E 5.1 Acquiring the X-ray image 5.1.2.1.2 Preparing the exposure Depending on the patient or the exposure program, you may have to replace accessory parts and, if necessary, reconnect the sensor, see "Installation and start-up" [→ 34].
- Page 46 5 Operation Dentsply Sirona 5.1 Acquiring the X-ray image Operating Instructions Orthophos E 5.1.2.1.5 Setting the kV/mA values Setting the kV/mA values via the patient symbols Preset kV/mA combinations are assigned to the patient symbols, which are selected according to the patient's size and weight. The symbols roughly correspond to child, youth/woman, woman/man, hefty persons.
- Page 47 Dentsply Sirona 5 Operation Operating Instructions Orthophos E 5.1 Acquiring the X-ray image 5.1.2.1.6 Positioning the patient The patient is positioned on the unit while standing. Positioning in the seat is also possible without issue. CAUTION The height adjustment motor starts slowly and then increases its speed.
- Page 48 5 Operation Dentsply Sirona 5.1 Acquiring the X-ray image Operating Instructions Orthophos E 5.1.2.1.6.1 Positioning with chin rest and rod for bite block ü The chin rest and bite block segment, as well forehead support and temple supports are inserted in the unit.
- Page 49 Dentsply Sirona 5 Operation Operating Instructions Orthophos E 5.1 Acquiring the X-ray image 6. Check the patient's occlusal plane C. Adjust the unit height using the up (A) and down (B) keys. Ä The occlusal plane is slightly inclined toward the front.
- Page 50 5 Operation Dentsply Sirona 5.1 Acquiring the X-ray image Operating Instructions Orthophos E 14. Press the forehead support adjustment key (H) and the temple support adjustment key (I). Ä The forehead and temple supports stop moving automatically when they come into contact with the patient's head.
- Page 51 Dentsply Sirona 5 Operation Operating Instructions Orthophos E 5.1 Acquiring the X-ray image 5.1.2.1.6.2 Positioning with chin rest and bar ü The patient has no or only a few anterior teeth. ü The chin support and bar, and the forehead support and temple supports are inserted in the unit.
-
Page 52: Temporomandibular Joint Exposure
5 Operation Dentsply Sirona 5.1 Acquiring the X-ray image Operating Instructions Orthophos E 5.1.2.2 Temporomandibular joint exposure 5.1.2.2.1 Program descriptions IMPORTANT Note the information on the two-part exposure programs in the "Releasing the exposure" chapter, see “Two-part exposure programs“. 5.1.2.2.1.1 TM1.1 / TM1.2 –... - Page 53 Dentsply Sirona 5 Operation Operating Instructions Orthophos E 5.1 Acquiring the X-ray image 5.1.2.2.2 Preparing the exposure Depending on the patient or the exposure program, you may have to replace accessory parts and, if necessary, reconnect the sensor, see "Installation and start-up" [→ 34].
- Page 54 5 Operation Dentsply Sirona 5.1 Acquiring the X-ray image Operating Instructions Orthophos E 5.1.2.2.4 Setting the kV/mA values Setting the kV/mA values via the patient symbols Preset kV/mA combinations are assigned to the patient symbols, which are selected according to the patient's size and weight. The symbols roughly correspond to child, youth/woman, woman/man, hefty persons.
- Page 55 Dentsply Sirona 5 Operation Operating Instructions Orthophos E 5.1 Acquiring the X-ray image 5.1.2.2.5 Positioning the patient The patient is positioned on the unit while standing. Positioning in the seat is also possible without issue. CAUTION The height adjustment motor starts slowly and then increases its speed.
- Page 56 5 Operation Dentsply Sirona 5.1 Acquiring the X-ray image Operating Instructions Orthophos E 5.1.2.2.5.1 Positioning for a lateral temporomandibular joint exposure ü The forehead support and temporomandibular joint supports with ear holders are plugged into the unit (1 right, 2 left, see "Changing the temple supports and temporomandibular joint supports".
- Page 57 Dentsply Sirona 5 Operation Operating Instructions Orthophos E 5.1 Acquiring the X-ray image 7. Align the patient with the central laser line G. Ä The laser line reflects in the center of the patient’s anterior teeth or the middle of the face (mid-sagittal).
-
Page 58: Sinus View
5 Operation Dentsply Sirona 5.1 Acquiring the X-ray image Operating Instructions Orthophos E 5.1.2.3 Sinus view 5.1.2.3.1 Program descriptions 5.1.2.3.1.1 S1 – Paranasal sinuses This exposure shows the paranasal sinuses e.g. for the diagnosis of orbital floor fractures. 5.1.2.3.2 Preparing the exposure... - Page 59 Dentsply Sirona 5 Operation Operating Instructions Orthophos E 5.1 Acquiring the X-ray image 5.1.2.3.4 Setting the kV/mA values Setting the kV/mA values via the patient symbols Preset kV/mA combinations are assigned to the patient symbols, which are selected according to the patient's size and weight. The symbols roughly correspond to child, youth/woman, woman/man, hefty persons.
- Page 60 5 Operation Dentsply Sirona 5.1 Acquiring the X-ray image Operating Instructions Orthophos E 5.1.2.3.5 Positioning the patient The patient is positioned on the unit while standing. Positioning in the seat is also possible without issue. CAUTION The height adjustment motor starts slowly and then increases its speed.
- Page 61 Dentsply Sirona 5 Operation Operating Instructions Orthophos E 5.1 Acquiring the X-ray image 5.1.2.3.5.1 Positioning for paranasal sinus exposures ü The blue contact segment and the temporomandibular joint supports with contact pads are inserted into the unit. ü The relevant hygienic protective sleeves are pulled over the accessories.
-
Page 62: Transversal Multi-Slice Posterior Teeth
5 Operation Dentsply Sirona 5.1 Acquiring the X-ray image Operating Instructions Orthophos E 5.1.2.4 Transversal multi-slice posterior teeth 5.1.2.4.1 Program descriptions 5.1.2.4.1.1 MS1 – Program description This exposure shows the posterior tooth region as a multislice with 6 views in one image. - Page 63 Dentsply Sirona 5 Operation Operating Instructions Orthophos E 5.1 Acquiring the X-ray image 5.1.2.4.4 Setting the kV/mA values Setting the kV/mA values via the patient symbols Preset kV/mA combinations are assigned to the patient symbols, which are selected according to the patient's size and weight. The symbols roughly correspond to child, youth/woman, woman/man, hefty persons.
- Page 64 5 Operation Dentsply Sirona 5.1 Acquiring the X-ray image Operating Instructions Orthophos E 5.1.2.4.5 Positioning the patient The patient is positioned on the unit while standing. Positioning in the seat is also possible without issue. CAUTION The height adjustment motor starts slowly and then increases its speed.
- Page 65 Dentsply Sirona 5 Operation Operating Instructions Orthophos E 5.1 Acquiring the X-ray image 5.1.2.4.5.1 Positioning with bite block ü The yellow bite block, the forehead support and temple supports are inserted in the unit. ü The relevant hygienic protective sleeves are pulled over the accessories.
- Page 66 5 Operation Dentsply Sirona 5.1 Acquiring the X-ray image Operating Instructions Orthophos E 6. Press the forehead support adjustment key (D) and the temple support key (E). Ä The forehead and temple supports stop moving automatically when they come into contact with the patient's head.
-
Page 67: Cephalometric Exposures
Dentsply Sirona 5 Operation Operating Instructions Orthophos E 5.1 Acquiring the X-ray image 5.1.2.5 Cephalometric exposures 5.1.2.5.1 Program description Be aware of the different viewing directions in medical and dental radiology. 5.1.2.5.1.1 C1 – Posterior-anterior exposure, symmetrical The program takes a full-format exposure from posterior to anterior. - Page 68 5 Operation Dentsply Sirona 5.1 Acquiring the X-ray image Operating Instructions Orthophos E 5.1.2.5.1.3 C3 – Lateral exposure With this exposure technique, a metal scale integrated in the nose support is displayed on the X-ray exposure. Using this scale, the magnification factor in the median plane can be determined precisely via a measurement.
- Page 69 Dentsply Sirona 5 Operation Operating Instructions Orthophos E 5.1 Acquiring the X-ray image 5.1.2.5.1.4 C4 – Carpus view, symmetrical The program displays a carpus view. The carpus view is used to determine the growth stage of the body or the jaw.
- Page 70 5 Operation Dentsply Sirona 5.1 Acquiring the X-ray image Operating Instructions Orthophos E 5.1.2.5.2 Preparing the exposure NOTE The adjustment of the cephalometer may alter depending on the load. A change in the adjustment may lead to faulty X-rays. ➢ Never lean against the cephalometer or the extension arm.
- Page 71 Dentsply Sirona 5 Operation Operating Instructions Orthophos E 5.1 Acquiring the X-ray image Turn the ear plug holders Note that the holder for the ear plugs must be rotated by 90 degrees for symmetrical exposures and carpus exposures. 1. Grasp the holders at the very top with both hands.
- Page 72 5 Operation Dentsply Sirona 5.1 Acquiring the X-ray image Operating Instructions Orthophos E 5.1.2.5.4 Setting the kV/mA values Setting the kV/mA values via the patient symbols Preset kV/mA combinations are assigned to the patient symbols, which are selected according to the patient's size and weight. The symbols roughly correspond to child, youth/woman, woman/man, hefty persons.
- Page 73 Dentsply Sirona 5 Operation Operating Instructions Orthophos E 5.1 Acquiring the X-ray image 5.1.2.5.5 Positioning the patient The patient is positioned on the unit while standing. Positioning in the seat is also possible without issue. This is the case, for example, if the patient is shorter than approx. 93 cm or taller than 197 cm.
- Page 74 5 Operation Dentsply Sirona 5.1 Acquiring the X-ray image Operating Instructions Orthophos E 5.1.2.5.5.1 Positioning for symmetrical exposures C1, C2 ü Push the ear plug holders apart. ü The nose support is swiveled upwards. ü The ear plug holders are rotated at an angle of 90° towards the sensor and the secondary diaphragm.
- Page 75 Dentsply Sirona 5 Operation Operating Instructions Orthophos E 5.1 Acquiring the X-ray image 5.1.2.5.5.2 Positioning for C3 lateral exposures ü The nose support is swiveled upwards. ü Push the ear plug holders apart. ü The ear plug holders are in a line with the sensor and the secondary diaphragm.
- Page 76 5 Operation Dentsply Sirona 5.1 Acquiring the X-ray image Operating Instructions Orthophos E 7. Optional: Swivel the nose support downward and adjust it in a vertical and horizontal direction, see "Setting/inserting the cephalometer accessories" [→ 35]. Ä The nose support rests on the root of the nose.
- Page 77 Dentsply Sirona 5 Operation Operating Instructions Orthophos E 5.1 Acquiring the X-ray image 5.1.2.5.5.3 Positioning for carpal exposures C4 NOTE The patient may press too forcefully against the carpus support plate. This can damage the carpus support plate. ➢ Instruct the patient to only press lightly on the carpus support plate.
-
Page 78: Pediatric Exposure
(the ALARA principle). Dentsply Sirona offers numerous options for reducing the radiation exposure for adults, and especially for children and adolescents, to a necessary minimum. Furthermore, there are numerous options for simplifying the X-ray applications for children and adolescents. - Page 79 Dentsply Sirona 5 Operation Operating Instructions Orthophos E 5.1 Acquiring the X-ray image Optimized X-ray applications Overview of the options for simplifying X-ray applications for children/adolescents with the Orthophos E: ● Children and adolescents can often be positioned in a stiller and more stable position if they are seated.
-
Page 80: Releasing The Exposure
5 Operation Dentsply Sirona 5.1 Acquiring the X-ray image Operating Instructions Orthophos E 5.1.3 Releasing the exposure 5.1.3.1 Starting the test cycle The test cycle is executed without radiation. The test cycle is used to check that the unit is functioning correctly and to ensure that a complete, uninterrupted cycle is possible. - Page 81 Dentsply Sirona 5 Operation Operating Instructions Orthophos E 5.1 Acquiring the X-ray image CAUTION The exposure memory of the unit is cleared when the unit is switched off. Images that have not been transferred to SIDEXIS are irretrievably lost. The exposure must be repeated.
- Page 82 5 Operation Dentsply Sirona 5.1 Acquiring the X-ray image Operating Instructions Orthophos E 1. Press release button (A) and hold it down until the end of the exposure. Ä The exposure is released. The rotary movement of the selected exposure program is performed automatically. During radiation, the optical radiation indicator B lights up on the Multipad.
- Page 83 Dentsply Sirona 5 Operation Operating Instructions Orthophos E 5.1 Acquiring the X-ray image With the two-part exposure program TM 1 two exposures (TM 1.1 and TM 1.2) are prepared. TM1.2 12.8 71 8 ü The first temporomandibular joint exposure has been released as Prog.
-
Page 84: Data Recovery In Case Of Problems With Image Transfer
5 Operation Dentsply Sirona 5.1 Acquiring the X-ray image Operating Instructions Orthophos E 5.1.3.3 Data recovery in case of problems with image transfer In case of an unexpected network error, there may be problems with image transfer from the X-ray components to Sidexis 4. - Page 85 Dentsply Sirona 5 Operation Operating Instructions Orthophos E 5.1 Acquiring the X-ray image 4. Click on the "Sirona Control Admin Rescue" button. Ä The "Sirona Control Admin Rescue" program opens. Ä The program tries to establish a connection to the X-ray component which is in Rescue state.
- Page 86 5 Operation Dentsply Sirona 5.1 Acquiring the X-ray image Operating Instructions Orthophos E 5.1.3.3.2 Requesting data ü The "Sirona Control Admin Rescue" program is opened. ➢ Click on the "Start rescue..." button. 67 11 001 D3352 D3352.201.12.01.02 03.2019...
-
Page 87: Using The Remote Control
Dentsply Sirona 5 Operation Operating Instructions Orthophos E 5.1 Acquiring the X-ray image 5.1.3.4 Using the remote control On the remote control, exposures are triggered using the release button (D). If it is not possible to maintain visual contact with the patient when releasing the exposure, the release key with the coiled cable (F) on the X-ray unit can be removed and used on the remote control. -
Page 88: Canceling An Exposure
5 Operation Dentsply Sirona 5.1 Acquiring the X-ray image Operating Instructions Orthophos E 5.1.3.5 Canceling an exposure An exposure that has been triggered can be canceled again at any time. CAUTION Pressing the R key moves the unit to the starting position. -
Page 89: Preselecting Basic Settings
Dentsply Sirona 5 Operation Operating Instructions Orthophos E 5.2 Preselecting basic settings Preselecting basic settings 5.2.1 Changing the basic settings and start settings 5.2.1.1 Reprogramming the kV/mA values The factory-programmed kV/mA combinations for each preselected exposure program and for each individual patient symbol key can be overwritten (reprogrammed). -
Page 90: Activating The Info Menu
5 Operation Dentsply Sirona 5.2 Preselecting basic settings Operating Instructions Orthophos E 5.2.1.2 Activating the Info menu The Info menu lists device data that are useful for any discussions with your service engineer. 1. Press and hold the Memory key (A) for at least 2 seconds. -
Page 91: Service
If you do not have access to the Internet, you can order the list in one of the following two ways: ● Order from your local dental depot ● Order from Dentsply Sirona Phone: ++49 (0) 62 51/16-16 70 Fax: ++ 49 (0) 62 51/16-18 18... -
Page 92: Sterilization
6 Service Dentsply Sirona 6.1 Cleaning and care Operating Instructions Orthophos E 6.1.3 Sterilization WARNING Infections can be transmitted from patient to patient. Accessories that are not sterilized correctly can cause illness in patients. ➢ All accessories that are suitable for sterilization should only be sterilized in an autoclave at 132 °C (270 °F), with at least... -
Page 93: Inspection And Maintenance
Dentsply Sirona 6 Service Operating Instructions Orthophos E 6.2 Inspection and maintenance Inspection and maintenance Inspection and preventive maintenance must be performed at scheduled intervals to protect the health and safety of patients, users, and other persons. The information provided in the document Inspection and maintenance and safety-related checks REF 67 10 961 should be helpful here. - Page 94 Radiation Protection Ordinance in accordance with DIN 6868-157. To easily implement the necessary legal requirements, Dentsply Sirona provides the Simocon 2 software. You can find this software and the operating instructions that belong to it on your Sidexis CD under the "Tools"...
-
Page 95: Malfunctions
Dentsply Sirona 7 Malfunctions Operating Instructions Orthophos E 7.1 Help messages Malfunctions Help messages When working with the unit, auxiliary messages are displayed for certain actions (e.g. press H301 for the return key), which call for the user to perform a specific action. These auxiliary messages are listed below. - Page 96 7 Malfunctions Dentsply Sirona 7.1 Help messages Operating Instructions Orthophos E H403 – Switch SIDEXIS to ready for exposure state SIDEXIS is not ready for exposure. ➢ Switch SIDEXIS to a ready-for-exposure state; see the SIDEXIS user manual. H404 – Plug in Ceph sensor The sensor does not match the selected exposure type.
-
Page 97: Error Message Structure
Dentsply Sirona 7 Malfunctions Operating Instructions Orthophos E 7.2 Error message structure Error message structure The error messages are displayed on the device in the form of an error code. The display does not show any plain text error output. -
Page 98: Error Description
7 Malfunctions Dentsply Sirona 7.3 Error description Operating Instructions Orthophos E Error description 7.3.1 Ex – Error type NOTE The unit must not be switched on/off constantly. Constant switching on and off reduces the service life of individual unit components and results in increased power consumption. -
Page 99: Yy - Locality
Dentsply Sirona 7 Malfunctions Operating Instructions Orthophos E 7.3 Error description E6 – Self-check The error occurs spontaneously and without a corresponding operation. 1. Acknowledge the error message. Ä The error no longer occurs. 2. If the error remains, switch the unit off and on again. NOTE! Observe waiting period! -
Page 100: Program Values
8 Program values Dentsply Sirona 8.1 Panoramic exposure Operating Instructions Orthophos E Program values Panoramic exposure Index 4A Index 4A, which specifies a reduced level series for children and adolescents, must be complied with as a minimum requirement in all new installations and systems moved from one location to another in the Federal Republic of Germany since January 1, 1999. - Page 101 Dentsply Sirona 8 Program values Operating Instructions Orthophos E 8.1 Panoramic exposure Index 2A This level series guarantees that the applicable legal regulations which must be complied with since January 1, 1999 are strictly observed. Furthermore, this level series can also be applied worldwide. National regulations must be complied with.
- Page 102 8 Program values Dentsply Sirona 8.1 Panoramic exposure Operating Instructions Orthophos E Index 1A As of 01/01/1999, this level series is no longer admissible in the Federal Republic of Germany. The exposure times indicated represent the corresponding maximum. Slight deviations in time may result from the selection of temple width.
-
Page 103: Cephalometric Exposures
Dentsply Sirona 8 Program values Operating Instructions Orthophos E 8.2 Cephalometric exposures Cephalometric exposures The radiation time ranges from 9.1s to max. 14.9s. Level series for cephalometric exposures Program Max. expo- Factory setting User-defined values sure time – Please enter here –... -
Page 104: Dose Information
Operating Instructions Orthophos E Dose information The dose area product for the parameter combinations proposed by Dentsply Sirona has been calculated already. The DAP value can be used without any further calculations. 8.3.1 Dose area product parameters for Panorama images The dose area product (DAP) values were measured in a CT ionization chamber. - Page 105 Dentsply Sirona 8 Program values Operating Instructions Orthophos E 8.3 Dose information Dose level series index 2A (8 mA series) Specification of the dose area product (DAP/absorbed dose) for panoramic views, temporomandibular joint (TMJ) views and sinus views Program Maximum...
- Page 106 8 Program values Dentsply Sirona 8.3 Dose information Operating Instructions Orthophos E Dose level series index 1A (16 mA series) Specification of the dose area product (DAP/absorbed dose) for panoramic views, temporomandibular joint (TMJ) views and sinus views Program Maximum...
-
Page 107: Dose Area Product Parameters For Ceph-Images
Dentsply Sirona 8 Program values Operating Instructions Orthophos E 8.3 Dose information 8.3.2 Dose area product parameters for Ceph-images The ceph exposure values were measured with a semiconductor detector, as very low dose values are hard to measure in a CT ionization chamber. -
Page 108: Calculate Dosage
Calculation: The values indicated below have been calculated for the parameter combinations proposed by Dentsply Sirona. If other settings are used, with the help of kV/DAP lists, proceed as follows: 1. Select the set kV level from the table of the respective X-ray system and note down the DAP factor. - Page 109 Dentsply Sirona 8 Program values Operating Instructions Orthophos E 8.3 Dose information 2D-images DAP factor DAP factor DAP factor DAP factor Programs program Program program P1/P12/ C1-C4 TM/S/MS1 (mGy x cm /mAs) (mGy x cm /mAs) (mGy x cm /mAs)
-
Page 110: Dismantling And Disposal
9 Dismantling and disposal Dentsply Sirona 9.1 Dismantling and reinstallation Operating Instructions Orthophos E Dismantling and disposal IMPORTANT Please export all test reports that require safekeeping before dismantling the device. Dismantling and reinstallation When dismantling and reassembling the unit, proceed according to the installation instructions for new installation in order to guarantee its functioning and stability. - Page 111 Dentsply Sirona 9 Dismantling and disposal Operating Instructions Orthophos E 9.2 Disposal Prior to disassembly/disposal of the unit, it must be prepared professionally (cleaned/disinfected/sterilized). If your unit is not permanently installed, it will be collected from the practice. If it is permanently installed, it will be picked up curbside at your address by appointment.
- Page 112 We reserve the right to make any alterations which may be required due to technical improvements. © Sirona Dental Systems GmbH Sprache: englisch Printed in Germany D3352.201.12.01.02 03.2019 Ä.-Nr.: 000 000 Sirona Dental Systems GmbH 67 11 001 D3352 Fabrikstr. 31 Order No ...