Table of Contents
Advertisement
Quick Links
Advertisement
Table of Contents

Related Manuals for Dentsply Sirona Primeprint


Summary of Contents for Dentsply Sirona Primeprint
- Page 1 04.2021 New as of: Primeprint Draft Instructions for Use English...
-
Page 2: Table Of Contents
Table of contents Dentsply Sirona Instructions for Use Primeprint Table of contents General data ......................Dear Customer,.................... Contact data....................General information about this operating manual ........General conventions and structure of the document ........1.4.1 Structure of the document.............. 1.4.1.1 Identification of the danger levels ......... - Page 3 Color status of the light strip ......... 5.3.2 Removing the transport safety device and putting the build chamber into operation ..............5.3.3 Preparing the Primeprint box ............5.3.4 Preparing the Primeprint material unit ........... 5.3.5 Switching the unit ON and OFF ............. 67 45 173 D3691 D3691.201.01.01.02 04.2021...
- Page 4 Installing the unit............5.3.6.2 Configuring the device..........Operation ........................ Referencing run ................... Production process ..................6.2.1 Equipping the Primeprint material unit ........... 6.2.2 Loading with material unit .............. 6.2.3 Loading with Primeprint box............6.2.4 Process start .................. Maintenance and cleaning ..................
-
Page 5: General Data
Instructions for Use Primeprint 1.1 Dear Customer, General data Dear Customer, ® Thank you for your purchase of this Primeprint unit from Dentsply Sirona. This unit enables you to use computer aided manufacturing of dental applications. Improper use and handling can create hazards and cause damage. -
Page 6: General Information About This Operating Manual
1 General data Dentsply Sirona 1.3 General information about this operating manual Instructions for Use Primeprint General information about this operating manual Observe the Operating Instructions Please familiarize yourself with the unit by reading through these Operating Instructions before putting it into operation. It is essential that you comply with the specified warning and safety information. -
Page 7: General Conventions And Structure Of The Document
Dentsply Sirona 1 General data Instructions for Use Primeprint 1.4 General conventions and structure of the document General conventions and structure of the document 1.4.1 Structure of the document 1.4.1.1 Identification of the danger levels To prevent personal injury and material damage, please observe the warning and safety information provided in these instructions for use. -
Page 8: Formats And Symbols Used
1 General data Dentsply Sirona 1.5 Scope of these Operating Instructions Instructions for Use Primeprint 1.4.1.2 Formats and symbols used The formats and symbols used in this document have the following meaning: Prerequisite Requests you to do something. 1. First action step 2. -
Page 9: Warranty And Liability
Exclusion of liability If the operator does not meet the obligation to carry out such maintenance or fault messages are ignored, Dentsply Sirona or its authorized dealer does not assume any liability for damage caused. 67 45 173 D3691... -
Page 10: Legend
1 General data Dentsply Sirona 1.7 Legend Instructions for Use Primeprint Legend Year of manufacture 20XX Product disposal symbol (see "Disposal [→ 66]"). Accompanying documents This symbol can be found on the rating plate on the unit. Meaning: Observe the Operating Instructions when operating the unit. - Page 11 Dentsply Sirona 1 General data Instructions for Use Primeprint 1.7 Legend Symbols on the packaging Take note of the following symbols on the packaging: Protect from moisture Fragile; handle with care Do not stack Temperature during storage and transport Relative humidity during storage and transport Air pressure during storage and transport 67 45 173 D3691...
-
Page 12: Safety Instructions
● The maintenance and repair of this unit may be performed only by Dentsply Sirona or by agencies authorized by Dentsply Sirona. ● Components which have failed and influence the safety of the unit must be replaced with original (OEM) spare parts. -
Page 13: Accessories
In order to ensure product safety, this device may be operated only with original Dentsply Sirona accessories or third-party accessories expressly approved by Dentsply Sirona. In particular, only the power cable also supplied or the corresponding original spare part may be used with the unit. -
Page 14: Immunity To Interference
2 Safety instructions Dentsply Sirona 2.2 Electromagnetic compatibility Instructions for Use Primeprint 2.2.2 Immunity to interference The UNIT is intended for operation in the electromagnetic environment specified below. The customer or user of the UNIT should make sure that it is used in such an environment. - Page 15 Dentsply Sirona 2 Safety instructions Instructions for Use Primeprint 2.2 Electromagnetic compatibility Interference immu- DIN EN 61326-1 Test Compliance level Electromagnetic environment – nity tests level guidelines Conducted RF in- d= [1.2] √P terference 150 kHz to 80 MHz IEC 61000-4-6...
-
Page 16: Working Clearances
2 Safety instructions Dentsply Sirona 2.2 Electromagnetic compatibility Instructions for Use Primeprint 2.2.3 Working clearances Recommended working clearances The UNIT is intended for operation in an electromagnetic environment, between portable and mobile RF where radiated RF interference is checked. The customer or the user of... -
Page 17: Electrostatic Charge
Dentsply Sirona 2 Safety instructions Instructions for Use Primeprint 2.3 Electrostatic charge Electrostatic charge 2.3.1 ESD protective measures ESD stands for ElectroStatic Discharge. ESD protective measures ESD protective measures include: ● Procedures for preventing electrostatic charge build-up (e.g. air conditioning, air moistening, conductive floor coverings and non- synthetic clothing) ●... -
Page 18: Connecting The Unit
Perform connection by following the directions given in the present operating instructions. Connection of external equipment If any devices not approved by Dentsply Sirona are connected, they must comply with the applicable standards (see "Standards/ approvals/ certifications [→ 20]"). Ventilation slots Under no circumstances may the ventilation slots on the rear of the unit be covered, since otherwise the air circulation will be obstructed. -
Page 19: Product-Specific Safety Instructions
Do not use the component In rare cases where the component falls from the build platform, it is recommended to carefully remove the component from the Primeprint unit or the transport container using the tweezers supplied with the Primeprint PPU. -
Page 20: General Information On The Device
3 General information on the device Dentsply Sirona 3.1 Standards/ approvals/ certifications Instructions for Use Primeprint General information on the device Standards/ approvals/ certifications CE mark This product bears the CE mark in accordance with the provisions of Council Directives 2014/53/EU (RED), 2006/42/EC (Machinery Directive), 2014/30/EC (EMC Directive) and 2011/65/EU (RoHS) including 2015/863/EC as Annex II. - Page 21 Dentsply Sirona 3 General information on the device Instructions for Use Primeprint 3.1 Standards/ approvals/ certifications Compliance statement Changes or modifications not expressly approved by the manufacturer could void the user’s authority to operate the equipment. This device complies with Part 15 of the FCC rules. Operation is subject...
-
Page 22: Intended Use
The post-processing of all materials validated in the Dentsply Sirona Primeprint 3D printer is performed with the Primeprint PPU of the Dentsply Sirona, REF 6745561 in a validated post-processing process. Observe the separate operating instructions (REF 67 4 5 2 72). -
Page 23: Scope Of Supply
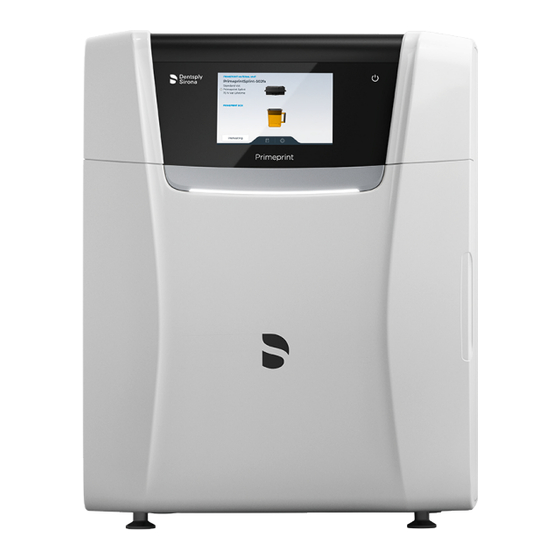
Dentsply Sirona 3 General information on the device Instructions for Use Primeprint 3.3 Scope of supply Scope of supply The detailed scope of supply is specified in the document "Checklist". Technical description (component and interfaces) 3.4.1 Major components 3.4.1.1 Front view... -
Page 24: Connections
3 General information on the device Dentsply Sirona 3.4 Technical description (component and interfaces) Instructions for Use Primeprint 3.4.1.2 Connections USB 1 type A Fuse cover USB 1 Type B Main switch 1 = ON, 0 = OFF Power connection Connected loads: 100 V AC to 240 V AC 50/60 Hz... -
Page 25: Build Chamber
CAUTION Risk of burning The Primeprint 3D printer uses a heating system integrated into the build chamber. Make sure that you do not touch this when loading and or unloading with the material unit or when reaching into the build chamber. -
Page 26: Primeprint Box
3 General information on the device Dentsply Sirona 3.4 Technical description (component and interfaces) Instructions for Use Primeprint 3.4.1.4 Primeprint box NOTE Replace damaged transport containers Damaged (broken, torn etc.) transport containers must not be used any further and must be replaced by a corresponding spare part (REF 6744887). -
Page 27: Primeprint Material Unit
3 General information on the device Instructions for Use Primeprint 3.4 Technical description (component and interfaces) 3.4.1.5 Primeprint material unit B + C Primeprint material unit without cartridge (REF 6744903) Material cartridge Material unit, cover Material unit, vat 67 45 173 D3691 D3691.201.01.01.02 04.2021... -
Page 28: Standard Accessories
● Crossover LAN cable ● Technical Documents ● License stick ● inLab CAM software license voucher ● Primeprint material unit without cartridge ● Primeprint box ● Torque wrench for changing film ● Microfiber cloth for glass ● Lens cleaning cloth for film ●... -
Page 29: Technical Data
Dentsply Sirona 3 General information on the device Instructions for Use Primeprint 3.5 Technical data Technical data Type designation Primeprint Rated line voltage 100 V AC to 240 V AC Rated power frequency 50/60 Hz Nominal current 2.0 A - 0.85 A Permissible line voltage fluctua- ±10% of nominal voltage... -
Page 30: Transportation And Installation
4.1 unpacking Instructions for Use Primeprint Transportation and installation unpacking All products from Dentsply Sirona are carefully checked prior to shipment. Please perform an incoming inspection immediately after delivery. 1. Check the delivery note to ensure that the consignment is complete. -
Page 31: Installation Requirements
4.3.2 Requirements for the storage of the material units At least one Primeprint material unit and one Primeprint box is required to operate the 3D printer. Please observe the following instructions regarding storage. For storage, observe the requirements of the material manufacturer. -
Page 32: Connecting The Unit To The Power Supply And Existing Network
Connect the unit with the network card of your PC using the provided network cable. IMPORTANT If you wish to integrate the Primeprint unit into an existing network, then please contact your responsible IT technician and follow instructions for checking the installation. -
Page 33: Repacking
4 Transportation and installation Instructions for Use Primeprint 4.6 Repacking Repacking ü The Primeprint material unit is removed. ü The Primeprint box is removed. ü The main switch on the back side of the unit is set to the 0 (OFF) position. -
Page 34: Commissioning
5 Commissioning Dentsply Sirona 5.1 Putting the inLab 4 PC into operation Instructions for Use Primeprint Commissioning Putting the inLab 4 PC into operation Observe the following steps in order to put the unit into operation using the inLab 4-PC (optional). -
Page 35: Making Connections
Dentsply Sirona 5 Commissioning Instructions for Use Primeprint 5.1 Putting the inLab 4 PC into operation 5.1.1.2 Making connections NOTE Do not connect and turn on the device yet! First, connect the PC to the monitor, keyboard, and mouse. Follow the instructions in this document exactly in order to successfully perform start-up of your device. -
Page 36: Safety
5 Commissioning Dentsply Sirona 5.1 Putting the inLab 4 PC into operation Instructions for Use Primeprint 5.1.2 Safety The inLab 4-PC is equipped with Windows 10. The Windows Firewall is activated. The software Microsoft Security Essentials is also pre- installed by default. Please activate the automatic update function in the settings of this software for optimal protection. -
Page 37: Installing The Software
Dentsply Sirona 5 Commissioning Instructions for Use Primeprint 5.1 Putting the inLab 4 PC into operation 5.1.3 Installing the software NOTE Initial installation without device Perform the initial installation of the software without the connected device. The software requires the 2.00 firmware version of the license stick. -
Page 38: Connection To The Pc Of The Acquisition Unit
5 Commissioning Dentsply Sirona 5.2 Connection to the PC of the acquisition unit Instructions for Use Primeprint Connection to the PC of the acquisition unit 5.2.1 Connecting to the PC via WLAN (option) Making the connection Connect access point ➢ Connect the LAN port A of the production unit and the access point, using the network cable (10 ... - Page 39 Dentsply Sirona 5 Commissioning Instructions for Use Primeprint 5.2 Connection to the PC of the acquisition unit Positioning the access point 1. As a test, place the access point near the production unit at head level or higher. 2. Perform a communication test as described in the separate instructions (see "Operating MC XL via WLAN in infrastructure...
-
Page 40: Putting The Unit Into Operation
5 Commissioning Dentsply Sirona 5.3 Putting the unit into operation Instructions for Use Primeprint Putting the unit into operation 5.3.1 Functional elements 5.3.1.1 Touch display Unit status Material unit management Configuration These operating instructions describe how to operate the unit by executing and confirming commands via the touch display. -
Page 41: Removing The Transport Safety Device And Putting The Build Chamber Into Operation
5. Insert the cartridge into the media unit. 6. The unit uses an RFID tag on the cartridge and the Primeprint material unit to automatically pair these two components. -
Page 42: Switching The Unit On And Off
5 Commissioning Dentsply Sirona 5.3 Putting the unit into operation Instructions for Use Primeprint 5.3.5 Switching the unit ON and OFF NOTE Do not put the unit into operation at low temperatures! If you move the unit to the operating site from a cold environment, condensation may form and result in a short circuit. -
Page 43: Installing And Configuring The Unit
This is described in the section "Connecting the PC/interfaces". IMPORTANT The Primeprint unit can be operated with both a static as well as an automatically assigned IP address. The Primeprint unit is always configured for operation ex works with a static IP address. - Page 44 5 Commissioning Dentsply Sirona 5.3 Putting the unit into operation Instructions for Use Primeprint 5.3.6.1.3 Updating devices With the "Refresh Devices" button you can ● display the status; e.g. check whether a machine has in the meantime finished producing, or ●...
-
Page 45: Configuring The Device
2. Click on the "Machine and Instrument tray Management" button. 3. Click on the unit that you wish to configure. 5.3.6.2.1 Primeprint – Editing device settings Using the touch display, you can change or view the following settings subsequently via menu item "Settings" : ●... - Page 46 Each CAD/CAM unit of the Dentsply Sirona requires a firmware version that is compatible with the respective version of the inLab CAM software. You start the download of the appropriate firmware for Primeprint via this button. IMPORTANT If a unit does not have the correct firmware version, this is in fact detected by the software, yet it cannot be used for production.
-
Page 47: Operation
Dentsply Sirona 6 Operation Instructions for Use Primeprint 6.1 Referencing run Operation Referencing run NOTE Observe the Operator’s Manual Please also observe the information in the Operator's Manual for inLab CAM SW software. The referencing run is used for the function check of the sensors and the position check of movable parts in the build chamber. -
Page 48: Production Process
Primeprint material unit. 6.2.1 Equipping the Primeprint material unit The Primeprint material unit consists of the lower material unit vat and the upper material unit cover. The desired cartridge is inserted into the Primeprint material unit. The cartridge is supplied with a material unit sticker, which is applied to the left side of the material unit vat. - Page 49 5. Insert a correct material unit. Make sure that the material unit is correctly guided in the guide rails provided. 6. The 3D printer recognizes and checks the Primeprint material unit used. 7. Optional: The touch display prompts you to configure and insert a suitable material unit.
-
Page 50: Loading With Primeprint Box
5.2.5 (Preparing the Primeprint box). 1. Follow the instructions of the 3D printer on the display. 2. Rotate the holder for the Primeprint box by approx. 45° out of the printer. 3. Place the prepared Primeprint box in the guide rails of the holder. -
Page 51: Process Start
Instructions for Use Primeprint 6.2 Production process 5. Rotate the Primeprint box back into the starting position. 6. The 3D printer recognizes and checks the inserted unit and, if necessary, the touch display prompts you to insert a correct build platform into the unit.
Need help?
Do you have a question about the Primeprint and is the answer not in the manual?
Questions and answers