Fronius TPS 320i Operating Instructions Manual
Mig/mag power source
Hide thumbs
Also See for TPS 320i:
- Operating instructions manual (228 pages) ,
- Applications manual (82 pages) ,
- Operating instructions manual (196 pages)

Related Manuals for Fronius TPS 320i


Summary of Contents for Fronius TPS 320i
- Page 1 / Perfect Charging / Perfect Welding / Solar Energy Operating Instructions TPS 320i / 400i / 500i / 600i TPS 400i LSC ADV MIG/MAG Power source 42,0426,0114,EN 018-22072015...
- Page 3 Thank you for the trust you have placed in our company and congratulations on buying this high-quality Fronius product. These instructions will help you familiarise yourself with the product. Reading the instructions carefully will enable you to learn about the many different features it has to offer.
-
Page 5: Table Of Contents
Control panel.............................. General ..............................Safety..............................Control panel............................Connections, switches and mechanical components ................TPS 320i / 400i / 500i / 600i, TPS 400i LSC ADV power source ............Operating concept Input options .............................. General ..............................Turning/pressing the adjusting dial ....................... - Page 6 General ..............................Stipulated mains cables ........................Connecting the mains cable - general ....................Commissioning the TPS 320i / 400i / 500i / 600i, TPS 400i LSC ADV ............Safety..............................General ..............................TPS 320i / 400i / 500i / 600i: Fitting the system components (overview) ..........
- Page 7 General ..............................137 Calling the power source website ......................137 User password ............................137 Settings ..............................138 Language selection..........................138 Fronius ..............................138 Overview ..............................139 Overview ............................... 139 Expand all groups / Reduce all groups ....................139 Save as XML-file........................... 139 Update ...............................
- Page 8 TPS 500i /nc ............................169 TPS 500i /600V/nc ..........................170 TPS 500i /MV/nc ........................... 171 TPS 600i ............................... 172 TPS 600i /nc ............................173 TPS 600i /600V/nc ..........................174 Spare parts list: TPS 320i / 400i / 500i / 600i .................... 175...
-
Page 9: Safety Rules
Safety rules Explanation of DANGER! Indicates immediate and real danger. If it is not avoided, death or se- safety symbols rious injury will result. WARNING! Indicates a potentially dangerous situation. Death or serious injury may result if appropriate precautions are not taken. CAUTION! Indicates a situation where damage or injury could occur. - Page 10 Proper use The device is to be used exclusively for its intended purpose. The device is intended solely for the welding processes specified on the rating plate. Any use above and beyond this purpose is deemed improper. The manufac- turer shall not be held liable for any damage arising from such usage. Proper use includes: carefully reading and following all the instructions given in the operating instructions...
- Page 11 Obligations of Before using the device, all persons instructed to do so undertake: personnel to observe the basic instructions regarding safety at work and accident prevention to read these operating instructions, especially the "Safety rules" section and sign to confirm that they have understood them and will follow them. Before leaving the workplace, ensure that people or property cannot come to any harm in your absence.
- Page 12 harmful welding fumes and gases Anyone working on the workpiece while welding is in progress must wear suit- able protective clothing with the following properties: flame-resistant insulating and dry covers the whole body, is undamaged and in good condition safety helmet trousers with no turn-ups Protective clothing refers to a variety of different items.
- Page 13 If there is any doubt about whether the extraction system is powerful enough, then the measured toxic emission values should be compared with the permis- sible limit values. The following components are responsible, amongst other things, for the de- gree of toxicity of welding fumes: Metals used for the workpiece Electrodes Coatings...
- Page 14 Double the open circuit voltage of a power source can occur between the welding electrodes of two power sources. Touching the potentials of both elec- trodes at the same time may be fatal under certain circumstances. Arrange for the mains cable to be checked regularly by a qualified electrician to ensure the ground conductor is functioning properly.
- Page 15 EMC Device Clas- Devices in emission class A: sifications Are only designed for use in industrial settings Can cause line-bound and radiated interference in other areas Devices in emission class B: Satisfy the emissions criteria for residential and industrial areas. This is also true for residential areas in which the energy is sup- plied from the public low-voltage mains.
- Page 16 Specific hazards Keep hands, hair, clothing and tools away from moving parts. For example: Fans Cogs Rollers Shafts Wirespools and welding wires Do not reach into the rotating cogs of the wire drive or into rotating drive com- ponents. Covers and side panels may only be opened/removed while maintenance or repair work is being carried out.
- Page 17 If the device has a carrying strap or handle, this is intended solely for carrying by hand. The carrying strap is not to be used if transporting with a crane, coun- terbalanced lift truck or other mechanical hoist. All lifting accessories (straps, handles, chains, etc.) used in connection with the device or its components must be tested regularly (e.g.
- Page 18 Safety measures A device toppling over could easily kill someone. Place the device on a solid, at the installation level surface such that it remains stable location and dur- The maximum permissible tilt angle is 10°. ing transport Special regulations apply in rooms at risk of fire or explosion Observe relevant national and international regulations.
- Page 19 Used coolant must be disposed of properly in accordance with the relevant na- tional and international regulations. The coolant safety data sheet may be ob- tained from your service centre or downloaded from the manufacturer's website. Check the coolant level before starting to weld and while the system is still cool.
- Page 20 (e.g. relevant product standards from the EN 60 974 series). Fronius International GmbH declares that the device complies with directive 2014/53/EU. The full text of the EU Declaration of Conformity is available from the following website: http://www.fronius.com Devices with the CSA test mark satisfy the requirements of the relevant stand- ards in Canada and the USA.
-
Page 21: General Information
General information... -
Page 23: General
General Device concept The MIG/MAG power sources TPS 320i, TPS 400i, TPS 500i and TPS 600i are com- pletely digitised, microprocessor-controlled inverter power sources. The modular design and potential for sys- tem add-ons ensure a high degree of flexi- bility. The devices can be adapted to any specific situation. -
Page 24: Fcc Compliance
FCC Compliance This equipment has been tested and found to comply with the limits for a Class A digital device, pursuant to part 15 of the FCC Rules. These limits are designed to provide reasonable protection against harmful interference when the equipment is operated in a commercial environment. This equipment generates, uses, and can radiate radio frequency energy and, if not installed and used in accordance with the instruction manual, may cause harmful interference to radio communications. - Page 25 Safety symbols on the rating plate: Welding is dangerous. The following basic requirements must be met: Welders must be sufficiently qualified Suitable protective equipment must be used All persons not involved in the welding process must be kept at a safe distance Do not use the functions described here until you have thoroughly read and under- stood the following documents: these operating instructions...
-
Page 26: Welding Processes, Processes And Welding Characteristics
Welding processes, processes and welding charac- teristics General TPSi power sources contain a selection of welding processes, procedures and welding characteristics that enable a wide range of materials to be processed in the most effective way. Welding charac- Depending on the material and shielding gas mix, various process-optimised welding teristics characteristics are available when selecting the filler metal. -
Page 27: Summary Of The Pmc Process
Summary of the PMC = Pulse Multi Control PMC process PMC is a pulsed arc welding process with high-speed data processing, precise recording of the process status and improved droplet detachment. Faster welding possible with a sta- ble arc and even fusion penetration. Summary of the LSC = Low Spatter Control LSC / LSC Ad-... -
Page 28: System Components
System components General The power sources can be operated with various system components and options. This makes it possible to optimise procedures and to simplify machine handling and operation, as necessitated by the particular field of application in which the power source is to be used. -
Page 29: Opt/I Safety Stop Pl D Option
+ option must be installed in the TPS320i - 600i power sources. OPT/i TPS dust filter IMPORTANT! Use of the OPT/i TPS dust filter option on TPS 320i - 600i power sources shortens the duty cycle. OPT/i TPS 2nd plus socket PC... -
Page 31: Controls, Connections And Mechanical Components
Controls, connections and mechani- cal components... -
Page 33: Control Panel
Control panel General Welding parameters can be easily changed and selected using the adjusting dial. The parameters are shown on the display while welding is in progress. The synergic function ensures that other welding parameters are also adjusted whenever an individual parameter is changed. NOTE! As a result of firmware updates, you may find that your device has certain functions that are not described in these operating instructions, or vice versa. - Page 34 Function USB port For connecting USB flash drives, hard drives without their own power supply, etc. IMPORTANT! The USB port is not electrically isolated from the welding circuit. Therefore, devices that establish an electrical connection with another device must not be connected to the USB port. Adjusting dial with turn/press function for selecting elements, setting values and scrolling through lists Display (touchscreen)
-
Page 35: Connections, Switches And Mechanical Components
Connections, switches and mechanical components TPS 320i / 400i / 500i / 600i, TPS 400i LSC ADV (10) power source (11) (12) (13) Front Rear Function Mains switch for switching the power source on and off Control panel cover for protecting the control panel... -
Page 37: Operating Concept
Operating concept... -
Page 39: Input Options
Input options General NOTE! As a result of firmware updates, you may find that there are functions available on your device that are not described in these operating instructions or vice versa. Certain illustrations may also differ slightly from the actual controls on your device, but these controls function in exactly the same way. -
Page 40: Pressing Buttons
Pressing buttons Pressing buttons triggers the following functions: When the feeder inching button is pressed, the wire electrode is fed into the torch hosepack with no accompanying flow of gas or current. When the gas test button is pressed, gas will flow out for 30 seconds. Press the button again to stop the gas test flow before the end of this period. -
Page 41: Display And Status Line
Display and status line Display Function Thestatus line provides details on: the current welding process the current operating mode the current welding program (material, shielding gas and wire diameter) active faults time and date Left-hand ribbon The left-hand ribbon contains the following buttons: Welding Welding process Process parameters... -
Page 42: Status Line
Status line The status line is divided into segments and contains the following details: Current welding process Current operating mode Current welding program (material, shielding gas and wire diameter) Time and date... -
Page 43: Installation And Commissioning
Installation and commissioning... -
Page 45: Minimum Equipment Needed For Welding Task
Minimum equipment needed for welding task General Depending on which welding process you intend to use, a certain minimum equipment lev- el will be needed in order to work with the power source. The welding processes and the minimum equipment levels required for the welding task are then described. -
Page 46: Before Installation And Commissioning
Before installation and commissioning Safety WARNING! Operating the equipment incorrectly can cause serious injury and damage. Do not use the functions described until you have thoroughly read and understood the following documents: these operating instructions all the operating instructions for the system components, especially the safe- ty rules Proper use The power source may only be used for MIG/MAG, MMA and TIG welding. -
Page 47: Generator-Powered Operation
Generator-pow- The power source is generator-compatible. ered operation The maximum apparent power S of the power source must be known in order to select 1max the correct generator output. The maximum apparent power S of the power source is calculated as follows: 1max 3-phase devices: Single-phase devices:... -
Page 48: Connecting The Mains Cable
3 x 230 V AWG 10 4 G 4 3 x 460 V AWG 14 4 G 2.5 TPS 320i /600V/nc ** 3 x 575 V AWG 14 TPS 400i /nc 3 x 400 V AWG 10 4 G 4... - Page 49 IMPORTANT! The ground conductor should be approx. 30 mm (1.18 in.) longer than the phase conductors.
-
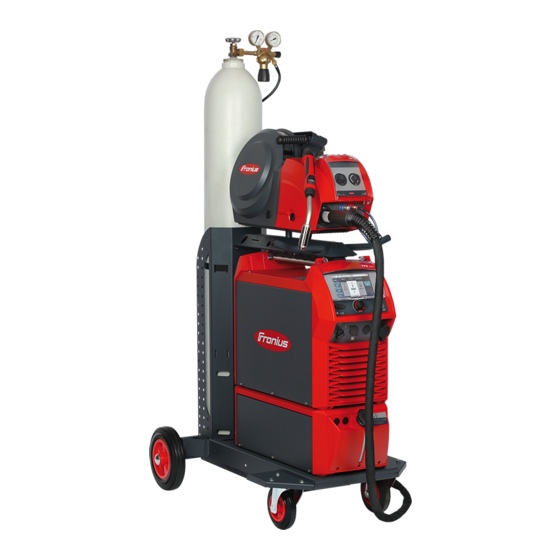
Page 51: Commissioning The Tps 320I / 400I / 500I / 600I, Tps 400I Lsc Adv
A manual water-cooled MIG/MAG application is used to describe how to commission the TPS 320i / 400i / 500i / 600i and TPS 400i LSC ADV power sources. The following illustrations provide an overview of the structure of the individual system components. -
Page 52: Tps 320I / 400I / 500I / 600I: Fitting The System Components (Overview)
TPS 320i / 400i / 500i / 600i: Fitting the system components (overview) -
Page 53: Tps 400I Lsc Adv: Fitting The System Components (Overview)
TPS 400i LSC ADV: Fitting the system components (overview) -
Page 54: Fixing The Strain-Relief Device For The Interconnecting Hosepack
Fixing the strain- relief device for the interconnect- ing hosepack Fixing the strain-relief device to the trolley Fixing the strain-relief device to the wire-feed unit Connecting the NOTE! There is no cooling unit present in the case of gas-cooled systems. There interconnecting is no need to attach the water connections in the case of gas-cooled systems. -
Page 55: Connecting The Gas Cylinder
Connecting the WARNING! If gas cylinders topple over, there is a risk of very serious injury and gas cylinder damage. Place gas cylinders on a solid, level surface so that they remain stable. Secure gas cylinders to prevent them from toppling over. Observe the safety rules of the gas cylinder manufacturer. -
Page 56: Connecting Mig/Mag Welding Torches To The Wire-Feed Unit
Connecting MIG/ Check that all cables, leads and hose- MAG welding packs are undamaged and correctly in- torches to the sulated wire-feed unit Open the wire drive cover Open the clamping lever on the wire drive Check that the welding torch is correc- tly and completely tooled up. -
Page 57: Other Tasks
Other tasks Carry out the following steps in accordance with the wirefeeder operating instructions: Insert the feed rollers into the wirefeeder Insert the wirespool or basket-type spool with adapter into the wirefeeder Feed in the wire electrode Set the contact pressure Adjust the brake IMPORTANT! For optimum welding results, the manufacturer recommends performing an R/L alignment when starting the device for the first time and when any changes are made... -
Page 59: Welding
Welding... -
Page 61: Mig/Mag Modes
MIG/MAG modes General WARNING! Operating the equipment incorrectly can cause serious injury and damage. Do not use the functions described until you have thoroughly read and understood the following documents: these operating instructions all the operating instructions for the system components, especially the safe- ty rules See the Setup menu for information on settings, setting range and units of measurement for the available parameters. -
Page 62: 2-Step Mode
2-step mode "2-step mode" is suitable for Tacking work Short weld seams Automated and robot welding 4-step mode "4-step mode" is suitable for longer weld seams. Special 4-step "Special 4-step mode" is particularly suitab- mode le for welding aluminium materials. The special slope of the welding current curve takes account of the high thermal conducti- vity of aluminium. -
Page 63: Mig/Mag Welding
MIG/MAG welding Safety WARNING! Operating the equipment incorrectly can cause serious injury and damage. Do not use the functions described until you have thoroughly read and understood the following documents: these operating instructions all the operating instructions for the system components, especially the safe- ty rules WARNING! An electric shock can be fatal. -
Page 64: Setting The Welding Process And Operating Mode
Setting the weld- Setting the welding process ing process and operating mode Select the "Welding process" button in the left-hand ribbon Select the "Process" button in the right-hand ribbon An overview of the welding process is displayed. Various welding processes are available depending on the power source type or function package installed. -
Page 65: Selecting The Filler Metal
An overview of the operating modes is displayed: 2-step mode 4-step mode Special 2-step mode Special 4-step mode Select the desired operating mode Selecting the filler metal AlMg 5 Select the "Welding process" button in the left-hand ribbon Select the "Material" button in the right-hand ribbon An overview of the filler metals is displayed. - Page 66 Select the desired filler metal by turning the adjusting dial Press "Next" (or press the adjusting dial) The next step of the filler metal wizard, "Select diameter", is displayed: Select the desired wire diameter by turning the adjusting dial Press "Next" (or press the adjusting dial) The next step of the filler metal wizard, "Select gas", is displayed:...
- Page 67 Select the desired shielding gas by turning the adjusting dial Press "Next" (or press the adjusting dial) The next step of the filler metal wizard, "Selection of available synergic lines per process", is displayed:...
- Page 68 Alternative display of the available characteristics per process, e.g. for steel (with the additional universal, dyna- mic, root and PCS characteristics) The available characteristics per process are not displayed if only one characteristic is available for the selected filler metal. In this case, the confirmation step of the filler metal wizard follows immediately;...
-
Page 69: Setting The Welding Parameters
Press "Store" (or press the adjusting dial) The selected filler metal and associated characteristics per process will be saved. Setting the weld- ing parameters Select the "Welding" button in the left-hand ribbon Select the desired welding parameter by turning the adjusting dial Press the adjusting dial to change the welding parameter The value of the welding parameter is displayed as a horizontal scale: e.g. -
Page 70: Setting The Shielding Gas Flow Rate
Setting the Open the gas cylinder valve shielding gas Press the gas test button flow rate Shielding gas flows out Turn the adjusting screw on the underside of the pressure regulator until the pressure gauge shows the required shielding gas flow rate Press the gas test button The flow of gas stops. -
Page 71: Mig/Mag Welding Parameters
MIG/MAG welding parameters Welding parame- The following welding parameters for MIG/MAG pulse synergic welding and PMC welding ters for MIG/MAG can be set and displayed by pressing the "Welding" button: pulse synergic welding and PMC Current welding Unit Setting range Depends on the welding process and welding program selected Before the start of welding, the device automatically displays a standard value based on the programmed parameters. - Page 72 Welding parame- The following welding parameters for MIG/MAG standard synergic welding and LSC weld- ters for MIG/MAG ing can be set and displayed by selecting the "Welding" menu button: standard syner- gic welding and Current LSC welding Unit Setting range Depends on the welding process and welding program selected Before the start of welding, the device automatically displays a standard value based on the programmed parameters.
-
Page 73: Welding Parameters For Mig/Mag Standard Manual Welding
Welding parame- The following welding parameters for MIG/MAG standard manual welding can be set and ters for MIG/MAG displayed by selecting the "Welding" menu button: standard manual welding Voltage Unit Setting range Depends on the welding process and welding program selected Dynamic For influencing the short-circuiting dynamic at the instant of droplet transfer Setting range... -
Page 74: Easyjob Mode
EasyJob mode General If EasyJob mode has been activated, 5 additional buttons appear on the display. These enable up to 5 operating points to be saved at the touch of a button. The current welding settings are saved. Activating Easy- Job mode Select the "Defaults"... -
Page 75: Storing Easyjob Operating Points
Select the "EasyJobs on" button A tick appears in the "EasyJobs on" tick box. Touch the "OK" button EasyJob mode is activated, the default settings are displayed. Select the "Welding" button in the left-hand ribbon The 5 EasyJob buttons are displayed. Storing EasyJob NOTE! The EasyJobs are stored under job numbers 1 - 5 and can also be re- operating points... -
Page 76: Retrieving Easyjob Operating Points
1 ~ 3 sec. Retrieving Easy- To retrieve a saved EasyJob operating point, touch the corresponding EasyJob button Job operating briefly (< 3 seconds) points The size and colour of the button changes briefly; it is then displayed with a tick. 1 <... -
Page 77: Deleting Easyjob Operating Points
Deleting EasyJob To delete an EasyJob operating point, touch the relevant EasyJob button for approx- operating points imately 5 seconds The button first changes its size and colour; is displayed with a frame after about 3 seconds. The saved operating point is overwritten with the latest settings. is highlighted in red (= delete) after a total of 5 seconds. -
Page 78: Job Mode
Job mode General Up to 1000 jobs can be stored and retrieved in the power source. This eliminates the need for manual documenting of the welding parameters. "Job mode" enhances the quality of automated and manual applications. Jobs can only be stored when in welding mode. When storing jobs, the process parameters and certain machine defaults are taken into account in addition to the present welding set- tings. - Page 79 The next free job number is displayed. Turn the adjusting dial to select the desired location Press the adjusting dial (or touch the "Next" button) The keyboard is displayed. Cancel button OK button (confirm) Delete button (delete) Cursor back button Cursor forward button Upper/lower case button Numbers/special characters button...
- Page 80 Enter a job name using the keyboard Touch "OK" and confirm the job name (or press the adjusting dial) The name is saved and a confirmation that the job has been stored is displayed. To exit, touch the "Finish" button (or press the adjusting dial) NOTE! If an already occupied location is selected when storing a job, a prompt is displayed asking you to confirm that you want to overwrite the existing job.
-
Page 81: Job Welding - Retrieving A Job
Job welding - re- NOTE! Before retrieving a job, make sure that the welding system has been in- trieving a job stalled and set up for the job. Select the "Welding process" button in the left-hand ribbon Select the "Process" button in the right-hand ribbon Select the "Job mode"... -
Page 82: Renaming A Job
Turn the adjusting dial to select the "Job number" welding parameter (white back- ground) To select the desired job, press the adjusting dial (blue background) Turn the adjusting dial to select the desired job number (blue background) The name of the selected job (4) is displayed above the actual value display (5). Press the adjusting dial to accept the selected job number (white background) Start welding IMPORTANT! "Job number"... - Page 83 Turn the adjusting dial to select the job that you want to rename Touch the "Rename Job" button The keyboard is displayed. Cancel button OK button (confirm) Delete button (delete) Cursor back button Cursor forward button Upper/lower case button Numbers/special characters button Space bar Change the job name using the keyboard Touch the "OK"...
-
Page 84: Deleting A Job
The job name is changed, the job list is displayed. To exit, touch the "Cancel" button in the left-hand ribbon Deleting a job Touch "Save as Job" in the right-hand ribbon (also works in "Job mode") The job list is displayed. - Page 85 Turn the adjusting dial to select the job to be deleted Select "Delete Job" in the left-hand ribbon A confirmation prompt asking whether you really want to delete the job is displayed. Touch the "Yes" button to delete the selected job The job name is deleted, the job list is displayed.
-
Page 86: Loading A Job
To exit, touch the "Cancel" button in the left-hand ribbon Loading a job The "Load Job" function can be used to load the data for a saved job or an EasyJob to the welding screen. The relevant data from the job is displayed in the welding parameters and can be changed, saved as a new job or EasyJob, or used to start welding. - Page 87 Turn the adjusting dial to select the job to be loaded Touch the "Load Job" button The "Load Job" information is shown. Touch the "Yes" button The data for the selected job is loaded into the welding screen:...
-
Page 88: Optimising A Job
The data for the loaded job can now be used for welding (no job mode), changed, or be saved as a new job or an EasyJob. Optimising a job Select the "Process parameters" button in the left-hand ribbon Touch the "Optimize Job" button The overview of the most recently optimised job is displayed. - Page 89 Turn the adjusting dial to select either the job or the job welding parameters to be mod- ified The choice between the job and the job welding parameters can also be made by touching the "Job number / Job parameter" button. Select job: Press the adjusting dial The job number is highlighted in blue and can now be changed.
- Page 90 For example: Job no. 10 "left-side-up" is being altered, the welding parameter group Weld-Start / Weld-End is open, the "starting current" welding parameter is currently being changed To finish optimising a job, touch "Exit Job optimizing"...
-
Page 91: Tig Welding
TIG welding Safety WARNING! Operating the equipment incorrectly can cause serious injury and damage. Do not use the functions described until you have thoroughly read and understood the following documents: these operating instructions all the operating instructions for the system components, especially the safe- ty rules WARNING! An electric shock can be fatal. -
Page 92: Tig Welding
TIG welding CAUTION! Risk of injury and damage from electric shock. As soon as the mains switch is in the "I" position, the tungsten electrode of the welding torch is live. Make sure that the tungsten electrode does not touch any persons or electrically conductive or earthed parts (e.g. - Page 93 Press the adjusting dial to change the welding parameter The value of the welding parameter is displayed as a horizontal scale: The value of the selected welding parameter can now be changed. Turn the adjusting dial to change the welding parameter Adjust the process parameters accordingly to make user- or application-specific set- tings on the welding system Open the gas stop valve on the TIG gas-valve torch...
-
Page 94: Igniting The Arc
Igniting the arc The welding arc is ignited by touching the workpiece with the tungsten electrode. Place the gas nozzle on the ignition location so that there is a gap of 2-3 mm (0.08 - 0.12 in.) between the tip of the tungsten electrode and the workpiece Placing the gas nozzle down Gradually tilt the welding torch up until the tungsten electrode touches the workpiece... -
Page 95: Mma Welding
MMA welding Safety WARNING! Operating the equipment incorrectly can cause serious injury and damage. Do not use the functions described until you have thoroughly read and understood the following documents: these operating instructions all the operating instructions for the system components, especially the safe- ty rules WARNING! An electric shock can be fatal. -
Page 96: Mma Welding
CAUTION! Risk of injury and damage from electric shock. As soon as the mains MMA welding switch is in the "I" position, the rod electrode in the electrode holder is live. Make sure that the rod electrode does not touch any persons or electrically conducting or earthed parts (e.g. - Page 97 Select the desired welding parameter by turning the adjusting dial Press the adjusting dial to change the welding parameter The value of the welding parameter is displayed as a horizontal scale: The value of the selected welding parameter can now be changed. Turn the adjusting dial to change the welding parameter To apply the value, press the adjusting dial Adjust the process parameters accordingly to make user- or application-specific set-...
-
Page 98: Welding Parameters For Manual Metal Arc Welding
Welding parame- The following welding parameters for MMA welding can be set and displayed by pressing ters for manual the "Welding" button: metal arc welding Main current Unit Setting range depends on the power source available Before the start of welding, the device automatically displays a standard value based on the programmed parameters. -
Page 99: Process Parameters
Process parameters Overview The "Process parameters" menu button contains the following selection options: Weld-Start / Weld-End Gas-Setup Process control R/L-check / alignment TIG/MMA/SMAW Setup SynchroPulse Components Optimising a job Process parame- The following process parameters can be set and displayed for the start and end of weld- ters for start of ing: welding / end of... - Page 100 Starting current time for setting the length of time the starting current is to be active Unit Setting range off / 0.1 - 10.0 Factory setting Slope 1 for setting the time during which the starting current is decreased or increased to the welding current Unit Setting range...
-
Page 101: Process Parameters For Gas Setup
SFI HotStart For setting a HotStart time in conjunction with the SFI ignition During SFI ignition, a spray arc phase occurs within the set HotStart time. This increases the heat input irrespective of the operating mode, thus ensuring deeper penetration right from the very start of welding. -
Page 102: Process Parameters For Process Control
Process parame- The following process parameters can be set and displayed for the process control: ters for process Penetration stabiliser control Arc length stabiliser Combination of penetration stabiliser and arc length stabiliser Penetration stabi- The penetration stabiliser is used to set the max. permitted change in the wire feed speed liser to ensure that the welding current and hence the fusion penetration is kept stable or con- stant with variable stick out. - Page 103 Penetration stabiliser = n m/min (activated) I [A] [m/min] t [s] < s Specifying a value for the penetration stabiliser ensures a constant arc length without large current variations if the stick out is changed (s ==> s The penetration (x ) remains virtually unchanged and stable.
-
Page 104: Arc Length Stabiliser
Arc length stabi- Arc length stabiliser liser The arc length stabiliser forces short arcs, advantageous for welding, via a short-circuit current control and keeps them stable even with a variable stick out or external interfer- ence. The arc length stabiliser welding parameter is only available on the power source if the WP PMC (Welding Process Pulse Multi Control) option has been enabled. -
Page 105: Combination Of Penetration Stabiliser And Arc Length Stabiliser
Arc length stabiliser with change of weld seam profile and position Arc length stabiliser not activated A change of weld seam profile or welding position can negatively affect the welding result Arc length stabiliser activated Since the number and duration of the short circuits is controlled, the properties of the arc stay the same if the weld seam profile or welding position is changed. -
Page 106: R/L-Check / Alignment
R/L-check / align- Align the welding circuit resistance (R) and welding circuit inductivity (L) if one of the fol- ment lowing components of the welding system is changed: Torch hosepacks Interconnecting hosepacks Grounding (earthing) cables, welding cables Wire-feed units Welding torches, electrode holders Push-pull units Prerequisites for R/L alignment: The welding system must be complete: closed welding loop with torch and torch hosepack,... - Page 107 Touch "Next" (or press the adjusting dial or the torch trigger) The second step of the R/L alignment wizard appears: Make a ground (earth) connection to the workpiece Clean the workpiece surface before making a ground (earth) connection! Follow the displayed instructions IMPORTANT! Contact between the earthing clamp and workpiece must be estab- lished on a cleaned area of the workpiece.
- Page 108 Remove the gas nozzle at the welding torch Follow the displayed instructions Touch "Next" (or press the adjusting dial or the torch trigger) The fourth step of the R/L alignment wizard appears: Place the contact tube down firmly on the surface of the workpiece Press the torch key or “Next“...
-
Page 109: Process Parameters For Tig / Mma/Smaw Setup
R/L measurement Measurement successful. Resistance: 5.3 mOhm Inductance: 9.7 µH Touch "Finish" (or press the adjusting dial) Process parame- The following process parameters can be set and displayed for the TIG and rod electrode ters for TIG / welding process: MMA/SMAW Set- Process parameters for MMA welding: Starting current time... - Page 110 Load line for rod electrode con - 20 A / V U (V) Load line for rod electrode where arc length is increased Load line for rod electrode where arc length is reduced Characteristic where "I-constant" parameter is selected (constant welding current) Characteristic where "0.1 - 20"...
- Page 111 Example of pre-set arc-force dynamic where characteristic (5) or (6) is selected Possible change in the current where characteristic (5) or (6) is selected, as a function of the welding voltage (arc length) Operating point where arc length is long Operating point where welding current I is set Operating point where arc length is short...
- Page 112 Break voltage for setting a voltage, at which the welding process can be ended by slightly lifting the rod electrode. Unit Setting range 20 - 90 Factory setting The arc length depends on the welding voltage. To end the welding process, it is usually necessary to significantly lift the rod electrode away from the workpiece.
- Page 113 At the end of the welding action, briefly raise the welding torch The arc length is increased significantly. Lower the welding torch The arc length is reduced significantly The TIG Comfort Stop function is triggered Keep the welding torch at the same height The welding current is continuously decreased (downslope).
-
Page 114: Process Parameters For Synchropulse
Process parame- The following process parameters can be set for SynchroPulse welding: ters for Synchro- Pulse Synchropulse to activate/deactivate SynchroPulse Unit Setting range off / on Factory setting (1) Wire feed speed for setting the wire feed speed and therefore the welding power for SynchroPulse Unit m/min (ipm) Setting range... - Page 115 (4) Duty Cycle (high) for weighting the duration of the higher operating point in a SynchroPulse period Unit Setting range 10 - 90 Factory setting (5) Arc-length correction high for correcting the arc length for SynchroPulse in the upper operating point (= average wire feed speed plus wire feed speed deviation) Unit Setting range...
-
Page 116: Process Parameters For Components
Process parame- The following process parameters can be set and displayed for the system components of ters for compo- a welding system: nents Cooling unit mode to determine whether a cooling unit is to be switched on or off, or operated automatically Setting range eco / auto / on / off (depending on the cooling unit) Factory setting... - Page 117 Mode of operation: Once the torch trigger is pressed, gas pre-flow begins immediately. Wire feeding then be- gins, followed by ignition. If current does not start flowing before the specified length of wire has been fed, the power source cuts out automatically. To try again, press the torch trigger again.
-
Page 119: Defaults
Defaults... -
Page 121: Defaults
Defaults General remarks NOTE! As a result of firmware updates, you may find that there are functions available on your unit that are not described in these operating instructions or vice versa. Certain illustrations may also differ slightly from the actual control elements on your device. -
Page 122: Setting The Language
By pressing the "System" button Information Restore factory settings Website password Mode Setup * The button is only displayed if the OPT/i GUN Trigger option is present on the pow- er source. Setting the lan- guage Select the "Defaults" button in the left-hand ribbon Select the "View"... -
Page 123: Setting Units / Standards
Language Turn the adjusting dial to select the desired language Touch the "OK" touch button to exit the language selection (or press the adjusting dial) The welding parameters are displayed in the selected language. Setting Units / Standards Select the "Defaults" button in the left-hand ribbon Select the "View"... - Page 124 Select the desired unit Select the desired standard: Name of filler metal according to European standards (e.g. AlMg 5, CuSi3, Steel, etc.) Name of filler metal according to the American Welding Standard (e.g. ER 5356, ER CuSi-A, ER 70 S-6, etc.) Touch the "OK"...
-
Page 125: Setting The Date And Time
Setting the date and time Select the "Defaults" button in the left-hand ribbon Select the "View" button in the right-hand ribbon Select the "Time & Date" button An overview of the date and time is displayed. Turn the adjusting dial to select the desired parameter: Year / Month / Day / Hour / Minute (white background) Press the adjusting dial to set the parameter (blue background) -
Page 126: Retrieving System Data
Touch the "OK" button to exit the set date and time routine (or press the adjusting dial) The default display settings are shown. Retrieving sys- tem data Select the "Defaults" button in the left-hand ribbon Select the "View" button in the right-hand ribbon Select the "System data"... - Page 127 Current arc power in kW The arc power is the product of welding current and welding voltage and is used to calculate the electrical energy input: E = IP / vs E = Electrical energy input in kJ/cm Arc power in kW Welding speed in cm/s Current arc power in kJ The arc power is summed up in the arc energy and the amount of heat...
-
Page 128: Displaying Characteristics
Displaying char- acteristics Select the "Defaults" button in the left-hand ribbon Select the "View" button in the right-hand ribbon Select the "Synergic lines" button The options for displaying the characteristics are displayed. Select the desired display option hide replaced synergic lines: Only the current characteristics are displayed in the consumables settings. -
Page 129: Retrieving Device Information
display replaced synergic lines: Older, replaced characteristics are displayed in the material settings in addition to the current characteristics. They can also be selected when making the material settings. Touch the "OK" button to exit the characteristics The default display settings are shown. Retrieving device information The button is only displayed if the OPT/i GUN Trigger option is present on the pow-... -
Page 130: Restoring Factory Settings
xx.x.xxx.x Touch the "OK" button to exit the device information Restoring factory settings The button is only displayed if the OPT/i GUN Trigger option is present on the pow- er source. Select the "Defaults" button in the left-hand ribbon Select the "System" button in the right-hand ribbon Select the "Restore factory settings"... -
Page 131: Restoring The Website Password
To reset the values to the factory settings, touch the "Yes" button The process parameters and machine preset values are reset to the factory settings, the system overview of the default settings is displayed. Restoring the website pass- word The button is only displayed if the OPT/i GUN Trigger option is present on the pow- er source. -
Page 132: Mode Setup - Special 4-Step Mode "Guntrigger
Touch "Yes" to reset the website password The website password is reset to the factory setting: User name = admin Password = admin The system overview of the default settings is displayed. Mode Setup - If the OPT/i GUN Trigger option is present on the power source, the torch trigger special Special 4-Step function "Guntrigger"... - Page 133 Select the "Defaults" button in the left-hand ribbon Select the "System" button in the right-hand ribbon Select "Mode Setup" The "Mode Setup" overview appears. Press the adjusting dial (blue background) Turn the adjusting dial to select "Guntrigger" (blue background) Touch "OK" to activate the "Guntrigger" function The default settings are displayed.
-
Page 134: Mode Setup - Special Display For Jobmaster
Example: Job group 1: Job no. 3 / 4 / 5 Job no. 6 is not assigned ==> End of job group 1 Job group 2: Job no. 7 / 8 / 9 When welding starts, the job with the lowest number within the job group is automati- cally selected. - Page 135 Turn the adjusting dial to select "Special display for jobmaster" Press the adjusting dial (blue background) Turn the adjusting dial to select "on" (blue background) Touch "OK" to activate the "Special display for jobmaster" function The default settings are displayed. The following can now be set and carried out on the Jobmaster welding torch: Mode SynchroPulse...
-
Page 137: Power Source Website
Power source website... -
Page 139: Power Source Website
Power source website General The power sources have a separate website. As soon as the power source is integrated into a network, the power source website can be called using the power source IP address. Depending on the system configuration and software upgrades, the power source website contains the following entries: Overview Function Packages... -
Page 140: Settings
The language currently set is shown next to the symbol. To change the language, click on the desired language. Fronius Click on the Fronius logo to open the Fronius homepage: www.fronius.com... -
Page 141: Overview
Overview Overview In the "Overview" entry, all the welding system components are displayed with all the avail- able information, e.g. firmware version, item number, serial number, production date, etc. Expand all Click the "Expand all groups" button to show more details of the individual system compo- groups / Reduce nents. -
Page 142: Update
The progress of the update process is tracked and shown on-screen. When it reaches 100%, the prompt to restart the power source is displayed. Click "Yes" The Fronius logo appears on the power source screen during the restart. Once the update has been successfully completed, confirmation appears on the screen. -
Page 143: Screenshot
Screenshot Screenshot In the "Screenshot" entry, a digital image of the power source screen can be created at any time, independently of navigation or set values. To create a screenshot, click on the "Create screenshot" button. The screenshot is created with the settings currently appearing on the screen. Different functions are available for saving the screenshot, depending on the browser be- ing used, and the screen may vary. -
Page 144: Backup & Restore
Backup & Restore Backup & Restore In the Backup & Restore entry, all the welding system data can be saved as a backup (e.g. current parameter settings, jobs, user characteristics, defaults, etc.). existing backups can be re-saved in the welding system. Backup (Start To store the welding system data as a backup, click the "Start back up"... -
Page 145: Function Packages
Function Packages Function Packag- In the Function Packages entry, the function packages, special characteristics, options, etc., present on the power source are displayed. New function packages can also be uploaded. Welding Packag- Under Welding Packages, the welding packages present on the power source are dis- played with their respective item numbers, e.g.: WP Standard, (MIG/MAG standard synergic welding) WP Pulse (MIG/MAG pulse synergic welding) -
Page 146: Job-Data
Job-Data Job-Data In the "Job-Data" entry, existing welding system jobs can be viewed. existing welding system jobs can be optimised, provided the OPT/i Jobs option is pres- ent on the power source. Job overview All the jobs saved in the welding system are listed in the "Job overview". When you click on a job, the data and welding parameters saved for this job are displayed. -
Page 147: Synergic Lines Overview
Synergic lines overview Synergic lines In the "Synergic lines overview" entry overview the characteristics available in the welding system can be displayed: ("Available synergic lines" button). possible characteristics can be displayed in the welding system: ("Possible synergic lines" button). The displayed characteristics can each be searched for, sorted and filtered. The following information about the characteristics is displayed: Status Process... -
Page 149: Troubleshooting And Maintenance
Troubleshooting and maintenance... -
Page 151: Troubleshooting
Troubleshooting General The power sources are equipped with an intelligent safety system, meaning it has been possible to dispense with nearly all fuses. After a possible malfunction has been remedied, the power source can be used again as normal. Possible malfunctions, warning notices or status codes are shown on the display as plain text dialogues. - Page 152 No welding current mains switch is on and indicators are lit up Cause: Grounding (earthing) connection is incorrect Remedy: Check the grounding (earthing) connection and terminal for cor- rect polarity Cause: There is a break in the current cable in the welding torch Remedy: Replace welding torch Nothing happens when torch trigger is pressed...
- Page 153 Cause: Welding torch is leaking Remedy: Change the welding torch Cause: Wrong contact tip, or contact tip is worn out Remedy: Replace the contact tip Cause: Wrong wire alloy or wrong wire diameter Remedy: Check the wire electrode that has been inserted; check the weldability of the base metal Cause: The shielding gas is not suitable for this wire alloy...
-
Page 154: Care, Maintenance And Disposal
Care, maintenance and disposal General Under normal operating conditions, the power source requires only a minimum of care and maintenance. However, it is vital to observe some important points to ensure the welding system remains in a usable condition for many years. Safety WARNING! An electric shock can be fatal. -
Page 155: Appendix
Appendix... -
Page 157: Technical Data
Technical data Explanation of Duty cycle (D.C.) is the proportion of time in a 10-minute cycle at which the device may be the term "duty cy- operated at its rated output without overheating. cle" NOTE! The D.C. values specified on the rating plate are based on an ambient temperature of 40°C. -
Page 158: Tps 320I
TPS 320i Mains voltage (U 400 V Max. effective primary current (I 12.3 A 1eff Max. primary current (I 19.4 A 1max Mains fuse protection 35 A slow-blow Mains voltage tolerance +/- 15% Mains frequency 50/60 Hz Cos phi (1) 0.99... -
Page 159: Tps 320I /Nc
TPS 320i /nc Mains voltage (U 380 V 400 V 460 V Max. effective primary current (I 12.7 A 12.3 A 11.4 A 1eff Max. primary current (I 20.1 A 19.4 A 18.0 A 1max Mains fuse protection 35 A slow-blow... -
Page 160: Tps 320I /600V/Nc
TPS 320i /600V/nc Mains voltage (U 575 V Max. effective primary current (I 10.6 A 1eff Max. primary current (I 16.7 A 1max Mains fuse protection 35 A slow-blow Mains voltage tolerance +/-10% Mains frequency 50/60 Hz Cos phi (1) 0.99... -
Page 161: Tps 320I /Mv/Nc
TPS 320i /MV/nc Mains voltage (U 200 V 230 V Max. effective primary current (I 22.0 A 19.0 A 1eff Max. primary current (I 34.7 A 30.1 A 1max Mains fuse protection 35 A slow-blow Mains voltage (U 380 V... -
Page 162: Tps 400I
TPS 400i Mains voltage (U 400 V Max. effective primary current (I 15.9 A 1eff Max. primary current (I 25.1 A 1max Mains fuse protection 35 A slow-blow Mains voltage tolerance +/-15% Mains frequency 50/60 Hz Cos phi (1) 0.99 Max. -
Page 163: Tps 400I /Nc
TPS 400i /nc Mains voltage (U 380 V 400 V 460 V Max. effective primary current (I 16.5 A 15.9 A 14.6 A 1eff Max. primary current (I 26.1 A 25.1 A 23.5 A 1max Mains fuse protection 35 A slow-blow Mains voltage tolerance +/- 15% Mains frequency... -
Page 164: Tps 400I /600V/Nc
TPS 400i /600V/nc Mains voltage (U 575 V Max. effective primary current (I 14.3A 1eff Max. primary current (I 22.6 A 1max Mains fuse protection 35 A slow-blow Mains voltage tolerance +/-10% Mains frequency 50/60 Hz Cos phi (1) 0.99 Recommended earth-leakage circuit breaker Type B Welding current range (I... -
Page 165: Tps 400I /Mv/Nc
TPS 400i /MV/nc Mains voltage (U 200 V 230 V Max. effective primary current (I 30.5 A 26.4 A 1eff Max. primary current (I 48.2 A 41.6 A 1max Mains fuse protection 35 A slow-blow Mains voltage (U 380 V 400 V 460 V Max. -
Page 166: Tps 400I Lsc Adv
TPS 400i LSC Mains voltage (U 400 V Max. effective primary current (I 16.4 A 1eff Max. primary current (I 25.1 A 1max Mains fuse protection 35 A slow-blow Mains voltage tolerance +/-15% Mains frequency 50/60 Hz Cos phi (1) 0.99 Max. -
Page 167: Tps 400I Lsc Adv /Nc
TPS 400i LSC Mains voltage (U 380 V 400 V 460 V ADV /nc Max. effective primary current (I 17.1 A 16.4 A 14.8 A 1eff Max. primary current (I 27.0 A 25.9 A 23.4 A 1max Mains fuse protection 35 A slow-blow Mains voltage tolerance +/-15%... -
Page 168: Tps 400I Lsc Adv /600V/Nc
TPS 400i LSC Mains voltage (U 575 V ADV /600V/nc Max. effective primary current (I 14.3 A 1eff Max. primary current (I 22.6 A 1max Mains fuse protection 35 A slow-blow Mains voltage tolerance +/-10% Mains frequency 50/60 Hz Cos phi (1) 0.99 Recommended earth-leakage circuit breaker Type B... -
Page 169: Tps 400I Lsc Adv /Mv/Nc
TPS 400i LSC Mains voltage (U 200 V 230 V ADV /MV/nc Max. effective primary current (I 30.5 A 26.4 A 1eff Max. primary current (I 48.2 A 41.6 A 1max Mains fuse protection 35 A slow-blow Mains voltage (U 380 V 400 V 460 V... -
Page 170: Tps 500I
TPS 500i Mains voltage (U 400 V Max. effective primary current (I 23.7 A 1eff Max. primary current (I 37.5 A 1max Mains fuse protection 35 A slow-blow Mains voltage tolerance +/- 15% Mains frequency 50/60 Hz Cos phi (1) 0.99 Max. -
Page 171: Tps 500I /Nc
TPS 500i /nc Mains voltage (U 380 V 400 V 460 V Max. effective primary current (I 24.5 A 23.7 A 21.9 A 1eff Max. primary current (I 38.8 A 37.5 A 34.7 A 1max Mains fuse protection 35 A slow-blow Mains voltage tolerance -10/+15% Mains frequency... -
Page 172: Tps 500I /600V/Nc
TPS 500i /600V/nc Mains voltage (U 575 V Max. effective primary current (I 19.7 A 1eff Max. primary current (I 31.2 A 1max Mains fuse protection 35 A slow-blow Mains voltage tolerance +/-10% Mains frequency 50/60 Hz Cos phi (1) 0.99 Recommended earth-leakage circuit breaker Type B... -
Page 173: Tps 500I /Mv/Nc
TPS 500i /MV/nc Mains voltage (U 200 V 230 V Max. effective primary current (I 43.5 A 37.4 A 1eff Max. primary current (I 68.8 A 59.2 A 1max Mains fuse protection 63 A slow-blow Mains voltage (U 380 V 400 V 460 V Max. -
Page 174: Tps 600I
50 kg / 100.2 lb. Max. shielding gas pressure 7.0 bar / 101.5 psi Coolant Original Fronius Max. noise emission (LWA) 83 dB (A) Interface to a 230/400 V, 50 Hz public grid Discuss the matter with the grid operator before connecting the device to the public... -
Page 175: Tps 600I /Nc
47.0 kg / 103.6 lb. Max. shielding gas pressure 7.0 bar / 101.49 psi Coolant Original Fronius Max. noise emission (LWA) 83 dB (A) Interface to a 230/400 V, 50 Hz public grid Discuss the matter with the grid operator before connecting the device to the public... -
Page 176: Tps 600I /600V/Nc
Dimensions (l x w x h) 706 x 300 x 510 mm 27.8 x 11.8 x 20.1 in. Weight 42.0 kg 92.6 lb. Max. shielding gas pressure 7 bar 101.49 psi Coolant Original Fronius Max. noise emission (LWA) 83 dB (A) -
Page 177: Spare Parts List: Tps 320I / 400I / 500I / 600I
Spare parts list: TPS 320i / 400i / 500i / 600i... - Page 184 FRONIUS INTERNATIONAL GMBH Froniusplatz 1, A-4600 Wels, Austria Tel: +43 (0)7242 241-0, Fax: +43 (0)7242 241-3940 E-Mail: sales@fronius.com www.fronius.com www.fronius.com/addresses Under http://www.fronius.com/addresses you will find all addresses of our Sales & service partners and Locations...
Need help?
Do you have a question about the TPS 320i and is the answer not in the manual?
Questions and answers