Sign In
Upload
Manuals
Brands
Honeywell Manuals
Security Camera
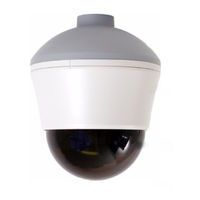
ACUIX ES
Honeywell ACUIX ES Manuals
Manuals and User Guides for Honeywell ACUIX ES. We have
3
Honeywell ACUIX ES manuals available for free PDF download: Installation And Configuration Manual, Installation Manual, Quick Installation Manual
Honeywell ACUIX ES Installation And Configuration Manual (86 pages)
PTZ Analog Dome
Brand:
Honeywell
| Category:
Security Camera
| Size: 1.82 MB
Table of Contents
3
Explanation of Symbols
3
Fcc Compliance Statement
5
Important Safety Instructions
5
Warnings and Cautions
6
Warranty and Service
7
Table of Contents
13
1 Introduction to the ACUIX ES PTZ Dome
13
About Using This Guide
13
Finding More Information
13
Typographical Conventions
14
ACUIX ES Terminology and Features
14
Table 1-1 ACUIX ES Terminology
15
Contacts
15
Figure 1-1 ACUIX ES Hardware Components
15
Flashback
16
MIMIC Tours
16
Preset Tours
16
Presets
16
Privacy Zones
17
Sectors
17
Dome Model Numbers and Camera Specifications
17
Table 1-2 ACUIX ES Dome Models
18
Important Information about Protocols
18
Table 1-3 Camera Specifications
19
Controller and Protocol Compatibility
19
Intellibus Protocol
20
Cabling Recommendations and Cautions
20
General Cautions and Notes for All Cable Installations
21
Maximum Distances for Video, Data, Power, Contact and UTP Cabling
21
Table 1-4 Video, Data, Power, Contact and UTP Cabling
22
Power Distances and Supplies
22
Video CAT5 or Coaxial Cables
22
Table 1-5 Power Distances for 24V AC or 12V DC
22
Table 1-6 Power Supplies
23
Table 1-7 Typical 75 Ohm Coaxial Cable Specifications
23
Video Coaxial Cable
24
RS485 Twisted-Pair Telemetry
24
Table 1-8 CAT5 Cabling and UTP Options
25
Coax Control
25
About Setting Switches On the Mainboard
27
2 Installing the ACUIX ES
27
Installation Warnings and Cautions
28
Setting the Switches
28
DIP Switch Default Settings and Locations
29
Figure 2-1 Location of Switches SW2, SW3 and SW4 and RS485 Termination Switch SW5RS485 Termina
29
Figure 2-2 Example of a DIP Switch Setting
30
Figure 2-3 Video Selection Switch SW1 and Wiring P1, P2, and P3 Locations
31
Table 2-1 Default DIP Switch Settings for NTSC or PAL Camera Models
32
Table 2-2 Typical DIP Switch Settings By Protocol
33
Selecting Video Over Coaxial Cable or Unshielded Twisted Pair (SW1)
34
Setting the Baud Rate, Parity and Protocol (SW2 and SW3)
34
Table 2-3 DIP Switch Baud Rate and Parity Settings (SW2 1 - 6)
35
Setting the RS485 Control Data Termination (SW5)
35
Setting the Dome Address (SW4)
35
Table 2-4 DIP Switch Protocol Settings (SW3 1 - 5)
36
Table 2-5 Address Binary Conversion Table
37
Completing the Wiring Connections to Plugs 1, 2 and 3
37
Connecting the Power and RS485 Data Wiring
37
Table 2-6 Power and Data Plug P1 On the 5-Pin Connector
38
Figure 2-4 RS485 Daisychain Wiring (Up to 32 Domes): Control at One End
39
Connecting the Optional Contact Input Wiring
39
Table 2-7 Contact Wiring 3 Pin
39
Table 2-8 UTP and Contact Wiring 9 Pin (Optional)
40
Installing the Dome
40
Installing Indoor Pendant or Surface Domes
40
Figure 2-5 Surface and Indoor Pendant Dome Layout
41
Figure 2-6 Indoor Pendant Ceiling and Wall Mount Dimensions
41
Table 2-9 ACUIX ES Pendant Ceiling and Wall Mount Specifications
42
Figure 2-7 Insert Cover Into Skirt or Top Cap and Turn to Secure
43
Installing In-Ceiling Domes
43
Figure 2-8 In-Ceiling Dome Layout
44
Figure 2-9 in Ceiling Scan Assembly with Switch, Plugs and BNC Connector
45
Figure 2-10 Stagger the Wing Tabs
45
Figure 2-11 Inside the In-Ceiling Scan Assembly and Housing
47
3 Configuring the ACUIX ES
47
Before You Begin Configuring
47
Step 1: Prepare the Controller and Monitor for Use
48
Step 2: Turn On (Power Up) the Dome and Find the Mechanical Home
48
Step 3: Learn How to Use the Special Presets
48
Table 3-1 Display Options at Dome Power Up
49
Table 3-2 Special Presets Based On Protocol
50
Step 4: Open the OSD Menu and Start Configuring
51
Exiting or Escaping From a Menu
52
Figure 3-1 On-Screen Menu Layout Sony FCB-EX45C Color Camera
53
Configuring Display, Control, and Camera Menu Functions
53
Configuring the Monitor and Text Display Settings
54
Configuring the Controller Settings - Pan and Tilt Reverse
55
Configuring the Pan, Tilt and Zoom (PTZ) and Dome Control Settings
56
Configuring the Image Quality and Video Display Settings
57
Setting the Maximum Digital Zoom Magnification Level
57
Setting the Manual Zoom Speed
57
Setting the Exposure Level
57
Turning Auto Exposure On or Off
57
Turning Backlight Compensation On or Off
58
Selecting the High or Low Light Wb Mode
58
Turning the Manual White Balance On or Off
58
Setting the Vertical Phase Edge
59
Configuring Default Functions: Presets and Tours
60
Configuring MIMIC Tours
60
Table 3-3 MIMIC Tour Functions
61
Configuring Presets and Preset Tours
61
Table 3-4 Preset and Preset Tour Functions
62
Deleting a Preset or Preset Tour
62
Stopping a Preset Tour
62
Turning Preset Tour Auto Focus On or Off
63
Configuring Privacy Zones
63
Table 3-5 Privacy Zone Functions
64
Assigning or Editing Privacy Zone Priority Order
65
Deleting Privacy Zones One at a Time
66
Configuring Sectors
66
Table 3-6 Sector Functions
67
Configuring Contacts/Alarms (Optional)
68
Programming Contacts
68
Setting a Contact Condition
68
Table 3-7 Contact Functions
69
Table 3-8 Program Contact Submenu: Contact States
71
4 System Administration and Settings
71
Resetting or Restoring the Dome to Factory Defaults
71
Resetting the Scan and Dome/Camera
72
Restoring Factory Defaults
72
Resetting the Camera Lens
73
Clearing the Memory
73
Changing Dome Address, Protocol, Parity or Baud Rate
73
Overriding the Logical Address On DIP Switch SW3-8
73
Table 4-1 DIP Switch SW3 Setting By Protocol to Force a Reading
74
Changing the Address, Protocol, Parity or Baud Rate Using the OSD
74
Setting Boot Control (Debugging Mode) On Switch SW2-8
75
Working with Passwords and PINS
75
Enabling the User or Privacy Zone Login PIN
75
Changing a 4-Digit User or Privacy Zone Login PIN
75
Recovering an Encrypted User or Privacy Zone Login PIN
76
Resetting a Privacy Zone Password (Diamond or Intellibus Only)
76
Sending Common Commands to All Domes
76
Enabling and Disabling the Broadcast Command Receive Mode
77
Displaying the Run Time Counter On the Monitor
77
Displaying System Information On the Monitor
77
Table 4-2 OSD System Information Examples
79
Appendix A Pelco P_AD and Pelco D_AD Protocols
79
Pelco P_AD and Pelco D_AD Protocol DIP Switch Settings
80
Pelco P_AD and Pelco D_AD Special Presets
81
Index
Advertisement
Honeywell ACUIX ES Installation Manual (24 pages)
Fixed camera
Brand:
Honeywell
| Category:
Security Camera
| Size: 1.14 MB
Table of Contents
1
Installation Guide
3
Explanation of Symbols
3
Fcc Compliance Statement
4
Warnings and Cautions
5
Important Safety Instructions
6
Warranty and Service
7
Table of Contents
9
ACUIX ES Fixed Camera Overview
9
Housing and Mount Options
10
Surface Mount or Indoor Pendant Housing and Gimbal Layout
12
In-Ceiling Housing and Gimbal Layout
13
Cable Requirements and Guidelines
14
Installing the ACUIX ES Fixed Camera
14
Step 1: Install the Housing
17
Step 2: Connect Video and Power and Adjust Camera Position
18
Step 3: Set the DIP Switches for Optional Camera Settings
19
Step 4: Install the PCB Board Cover
20
Step 5: Install the Trim Ring or Cover and the Lower Dome
21
Camera Specifications
22
Pendant Mount Specifications
Honeywell ACUIX ES Quick Installation Manual (4 pages)
PTZ
Brand:
Honeywell
| Category:
Security Camera
| Size: 1.25 MB
Advertisement
Share and save
Advertisement
Related Products
Honeywell ACUIX
Honeywell ACUIX Equip series
Honeywell ACUIX HDXA Series
Honeywell ACUIX HDXJ Series
Honeywell ACUIX HDXF Series
Honeywell ACUIX HDXG Series
Honeywell Acuix IP Series
Honeywell Accenta
Honeywell Accenta Series
Honeywell Accentic
Honeywell Categories
Thermostat
Controller
Control Unit
Security Camera
Accessories
More Honeywell Manuals
Login
Sign In
OR
Sign in with Facebook
Sign in with Google
Upload manual
Upload from disk
Upload from URL