
Related Manuals for Planmeca ProMax X-ray


Summary of Contents for Planmeca ProMax X-ray
- Page 1 ProMax X-ray with Dimax3 USER'S MANUAL Publication number 10007367 Version 20 Published 2006-02...
-
Page 3: Table Of Contents
TABLE OF CONTENTS INTRODUCTION ......................1 Unit symbols ..........................2 WARNINGS AND PRECAUTIONS ................3 DIGITAL PROMAX X-RAY SYSTEM - MAIN PARTS ............5 SWITCHING THE UNIT ON ..................9 PROGRAMS ......................10 Panoramic exposure programs ....................11 5.1.1 Standard panoramic exposure program ............... 11 5.1.2... - Page 4 18.4 Minimum operational space requirements ................108 18.5 Connecting the exposure switch cable ..................108 18.6 Ethernet link configuration ....................... 109 18.7 Connecting the external control panel cable (optional) ............110 18.8 Disconnecting cables ....................... 110 TOC - 2 ProMax X-ray Unit with Dimax3 User's Manual...
-
Page 5: Introduction
INTRODUCTION INTRODUCTION The Planmeca ProMax X-ray unit uses panoramic, linear tomographic and cephalometric techniques to produce X- ray images for the diagnosis of dentomaxillofacial anatomy. The unit is allowed to be used only under supervision of a dental/health care professional. -
Page 6: Unit Symbols
IEC364 - equipment is used according to the operating instructions Planmeca pursues a policy of continual product development. Although every effort is made to produce up-to-date product documentation this publication should not be re- garded as an infallible guide to current specifications. We reserve the right to make changes without prior notice. -
Page 7: Warnings And Precautions
CAUTION Use the DIMAX3 digital X-ray system according to the instructions given in this manual. Do not drop the sensor head. The Planmeca limited war- ranty does not cover damage which is due to misuse, e.g. dropping the sensor head, neglect, or any cause other than ordinary application. - Page 8 NOTE Portable mobile communications equipment can affect Planmeca ProMax X-ray unit. NOTE Never place heavy objects on any part of the unit or hang objects from the unit’s arm structures. Do not put containers of liquid on any part of the unit.
-
Page 9: Digital Promax X-Ray System - Main Parts
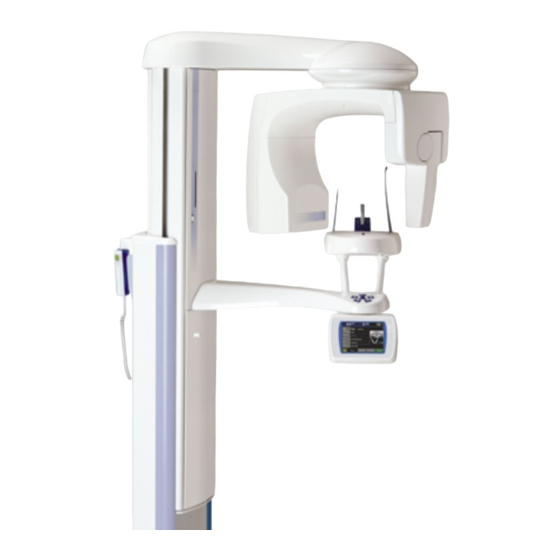
DIGITAL PROMAX X-RAY SYSTEM - MAIN PARTS DIGITAL PROMAX X-RAY SYSTEM - MAIN PARTS General view of the system Direct connection X-ray unit Exposure switch Dimaxis imaging software Ethernet cable Network card Remote connection X-ray unit Exposure switch Dimaxis imaging software... - Page 10 DIGITAL PROMAX X-RAY SYSTEM - MAIN PARTS General view of the X-ray unit Upper arm C-arm Cephalostat (optional) Tube head assembly Temple supports Patient support Patient support table Patient handles Sensor head (one movable or Patient positioning two fixed sensor heads)
- Page 11 DIGITAL PROMAX X-RAY SYSTEM - MAIN PARTS Exposure switch The exposure switch can be mounted on the wall, or it can be hung from the hook provided on the stationary column top if a protected area is within reach. On the exposure button and on the control panel a green indicator light will come on when the unit is correctly set up and ready to take an exposure.
- Page 12 DIGITAL PROMAX X-RAY SYSTEM - MAIN PARTS Patient supports Chin support Bite piece Chin rest Chin cup Adapter Emergency stop button When driving the X-ray unit from one position to another care should be taken. In case of an emergency press the...
-
Page 13: Switching The Unit On
NOTE A help message is shown on the control panel if the selected function is not allowed. The help message disappears when you cancel the action or release the exposure button. ProMax X-ray unit with Dimax3 9 User’s Manual... -
Page 14: Programs
PROGRAMS PROGRAMS The Planmeca ProMax Dimax3 includes a set of programs, which provides a selection of exposure formats for all types of patients and diagnostic purposes. The programs are divided in three main groups: basic programs, advanced programs tomographic programs. Apart from these groups, there are some individual special programs. -
Page 15: Panoramic Exposure Programs
In child setting the width and height of the exposed area will be reduced by 28 per cent, see pictures below. Adult layer laser beam 1 cm Direction of beam Child layer laser beam 1 cm ProMax X-ray unit with Dimax3 11 User’s Manual... -
Page 16: Advanced Panoramic Exposure Programs
This program is used for caries detection. layer laser beam 1 cm NOTE This program is optimized for interproximal imaging and the radiograph may have a projected shadow of the opposite side teeth. User’s Manual ProMax X-ray unit with Dimax3... - Page 17 270 x 130 1.2x 10 - 48 child 192 x 92 230 x 110 Bitewing adult 67 x 145 100 x 218 1.5x 10 - 26 panoramic child 56 x 120 84 x 180 ProMax X-ray unit with Dimax3 13 User’s Manual...
-
Page 18: Temporomandibular Joint (Tmj) Exposure Programs
The target area and angle can be adjusted in units with 3- joint construction (SCARA3). 1 cm The geometry is different in SCARA2 units. The imaging area can only be adjusted with the patient size selection. 1 cm 2-joint construction (SCARA2) User’s Manual ProMax X-ray unit with Dimax3... - Page 19 The target area and angle can be adjusted in units with 3- joint construction (SCARA3). 1 cm The geometry is different in SCARA2 units. The imaging area can only be adjusted with the patient size selection. 1 cm 2-joint construction (SCARA2) ProMax X-ray unit with Dimax3 15 User’s Manual...
-
Page 20: Advanced Tmj Programs
TMJ exposures (three angles 73° ±7°). 1 cm 3 angles, lat L or R Three lateral multi-angle left-hand or right-hand side TMJ exposures (three angles 17° ±7°). 1 2 3 1 cm User’s Manual ProMax X-ray unit with Dimax3... -
Page 21: Sinus Exposure Programs
The Sinus PA rot, posteroanterior rotational, exposure 1 cm program is included in the standard package. The rotational exposure means that the C-arm of the unit makes a rotational movement, thus forms an image layer. ProMax X-ray unit with Dimax3 17 User’s Manual... -
Page 22: Advanced Sinus Exposure Programs
X-ray beam. The exposed image is a transillumination image like in Cephalostat. 1 cm Lateral non-rotational L & R Sinus program Lateral sinus left-hand and right-hand side exposures. 1 cm User’s Manual ProMax X-ray unit with Dimax3... - Page 23 160 x 130 1.35 x non-rotational child 120 x 81 160 x 110 ∞ Sinus lateral adult 102 x 96 138 x 130 1.35 x non-rotational child 102 x 81 138 x 110 ProMax X-ray unit with Dimax3 19 User’s Manual...
-
Page 24: Tomographic Exposure Programs
1, 3, 6, 9, 18 or 36mm. Cross-sectional tomographic exposure programs 4x CRS Manual Manual, 1-4 cross-sectional images. The operator can make 4xCRS_Manual.eps manual adjustments between the exposures. User’s Manual ProMax X-ray unit with Dimax3... - Page 25 Distance (middle to middle) between the target points is adjustable. NOTE In this program, the selected target position is image no. 1. NOTE The program stops if the selected position moves over the midsagittal plane. ProMax X-ray unit with Dimax3 21 User’s Manual...
- Page 26 The movement is adjustable, and it can be either 1, 3, 6, 9 or 12mm. Distance (middle to middle) between the target points is adjustable. 4xLNG_Auto_pos.eps NOTE The selected target position is image no. 2. User’s Manual ProMax X-ray unit with Dimax3...
- Page 27 3x Lateral Sinus & Nasal SINUS Automatic, 3 longitudinal images from sinus area and nasal cavity. Left Right NASAL NOTE In this program, the selected target position is image no. 2. Left Right ProMax X-ray unit with Dimax3 23 User’s Manual...
- Page 28 Size on receptor Magnification Layer thickness (W x H) mm Tomography full 40 x 87 60 x 130 1.5 x 1, 3, 6, 9, 18, 36 standard 40 x 47 60 x 70 User’s Manual ProMax X-ray unit with Dimax3...
-
Page 29: Jaw Shape And Size In Tomography Exposure
(tooth) Between incisors Lower: Upper: Left-hand side coordinates - Right-hand side coordinates - X-coordinate is negative X-coordinate is positive on the right-hand side. on the left-hand side. Condyle Nasal area Sinus ProMax X-ray unit with Dimax3 25 User’s Manual... - Page 30 (tooth) Between incisors Upper: Lower: Right-hand side coordinates - Left-hand side coordinates - X-coordinate is positive X-coordinate is negative on the left-hand side. on the right-hand side. Condyle Nasal area Sinus User’s Manual ProMax X-ray unit with Dimax3...
- Page 31 (tooth) Between incisors Upper: Lower: Right-hand side coordinates - Left-hand side coordinates - X-coordinate is positive X-coordinate is negative on the left-hand side. on the right-hand side. Condyle Nasal area Sinus ProMax X-ray unit with Dimax3 27 User’s Manual...
- Page 32 1.5 width height width height real size size on film x 1.5 width height width height full 40 mm 87 mm 60 mm 130 mm 40 mm 47 mm 60 mm 70 mm User’s Manual ProMax X-ray unit with Dimax3...
-
Page 33: Preparations For The Exposure
Adapter Sensor head Indicator light Turn the locking knob 180 degrees. This will release the sensor head locking mechanism. Locking knob ProMax X-ray unit with Dimax3 29 User’s Manual... - Page 34 PREPARATIONS FOR THE EXPOSURE Now pull the sensor head out carefully. Attaching the sensor head to the C-arm Push the sensor head onto the adapter on the C-arm. C-arm Locking knob User’s Manual ProMax X-ray unit with Dimax3...
-
Page 35: Preparing The Patient
Preparing the patient Ask the patient to remove any spectacles, hearing aids, dentures, and personal jewellery such as earrings, necklaces, and hairpins. Place a protective lead apron over the patient’s back if required. ProMax X-ray unit with Dimax3 31 User’s Manual... -
Page 36: Patient Positioning Controls
The movement will stop when the button is released. The telescopic column moves slowly at first, then faster. User’s Manual ProMax X-ray unit with Dimax3... - Page 37 NOTE The positioning joystick can only be used when taking linear tomographic (Tomo) exposures. See section 13 “TOMOGRAPHIC EXPOSURE” on page 91 for more information on how to use the positioning joystick. ProMax X-ray unit with Dimax3 33 User’s Manual...
-
Page 38: Control Panel
NOTE Refer to the Cephalostat user’s manual for information on how to select the cephalometric exposure program. General settings 8.1.1 Selecting kilovolt and milliampere values Touch the kV/mA field on the main display. User’s Manual ProMax X-ray unit with Dimax3... -
Page 39: Programming Quick Button Values
(3) until you hear a signal tone. By doing this the kV and mA values will be changed for the quick button. Confirm the selection and return to the main display by touching OK. ProMax X-ray unit with Dimax3 35 User’s Manual... -
Page 40: Selecting Patient Entry Position
NOTE Selecting “Child” automatically changes the setting of the jaw size to “Narrow”. NOTE Panoramic exposure program: If the unit is equipped with a fixed primary collimator, only width will be changed. User’s Manual ProMax X-ray unit with Dimax3... -
Page 41: Selecting Panoramic Exposure Program
The “Select program type” display will show all the exposure programs that the unit features at the moment. The unit can be upgraded with new exposure programs, contact your dealer for further information. ProMax X-ray unit with Dimax3 37 User’s Manual... - Page 42 (optional) NOTE The exposure program “Standard” is included in standard program package. other panoramic programs are optional. When you have selected the required panoramic exposure program the main display will be shown again. User’s Manual ProMax X-ray unit with Dimax3...
-
Page 43: Selecting Segmentation (Optional)
Confirm the selection by touching OK. NOTE Segmentation is a mechanical procedure and the marked area shown in the display is approximate. Therefore, the dimension of the exposed area de- pends on the patient’s anatomy. ProMax X-ray unit with Dimax3 39 User’s Manual... -
Page 44: Selecting Jaw Shape & Size
Select the correct jaw shape and size for the patient to be X-rayed by tapping on the corresponding icon. Jaw size: Narrow Average Wide Jaw shape: V-shaped Normal Square Confirm the selection and return to the main display by touching OK. User’s Manual ProMax X-ray unit with Dimax3... -
Page 45: Selecting Temporomandibular Joint (Tmj) Exposure Program
The “Select program type” display will show all the exposure programs that the unit features at the moment. The unit can be upgraded with new exposure programs, contact your dealer for further information. ProMax X-ray unit with Dimax3 41 User’s Manual... -
Page 46: Selecting Jaw Size
By tapping the segment icon the following display appears. Select side enables you to select the X-rayed condyle. You can select either one or both condyles. NOTE This function does not exist in SCARA2 units. User’s Manual ProMax X-ray unit with Dimax3... -
Page 47: Adjusting Position And Imaging Angle
The default angle is 17°. Jaw size: Select symmetric/ Narrow asymmetric exposure Average Wide Jaw shape: Normal Confirm the selection and return to the main display by touching OK. ProMax X-ray unit with Dimax3 43 User’s Manual... -
Page 48: Selecting Sinus Exposure Program
The “Select program type” display will show all the exposure programs that the unit features at the moment. The unit can be upgraded with new exposure programs, contact your dealer for further information. User’s Manual ProMax X-ray unit with Dimax3... - Page 49 “PA rotational” included in the standard program package. All other sinus programs are optional. When you have selected the required sinus exposure program the main display will be shown again. ProMax X-ray unit with Dimax3 45 User’s Manual...
-
Page 50: Selecting Tomographic (Tomo) Exposure Program
NOTE The “Select program type” display will show all the exposure programs the unit features at the moment. The unit can be upgraded with new exposure programs, contact your dealer for further information. User’s Manual ProMax X-ray unit with Dimax3... - Page 51 All Tomo exposure programs are optional. Optional programs If you select Cross-sectional, the following display appears. Select the desired cross-sectional Tomo exposure program by touching the appropriate field on the screen. ProMax X-ray unit with Dimax3 47 User’s Manual...
- Page 52 Select the desired longitudinal Tomo exposure program by touching the appropriate field on the screen. If you select Mixed, the display shown below appears. Select the desired mixed Tomo exposure program by touching the appropriate field on the screen. User’s Manual ProMax X-ray unit with Dimax3...
-
Page 53: Selecting Target Area
In digital tomography the layer is always 6 mm and the Layer field is not displayed on the control panel. In digital transtomography the image layer can be selected between 1, 3, 6, 9, 18 and 36 mm. ProMax X-ray unit with Dimax3 49 User’s Manual... - Page 54 2. Refer to the program lists on previous pages. When you have set the target position, confirm the selections by touching the OK field. The main display appears. User’s Manual ProMax X-ray unit with Dimax3...
-
Page 55: Information Displays
User preference settings Touch the User preference settings on the Information displays. This mode enables you to set the time and date, perform some visual adjustments, select unit’s behavioural preferences and language. ProMax X-ray unit with Dimax3 51 User’s Manual... - Page 56 Set the correct time with the hour and minutes arrow fields. Store the new time by touching the Done field or exit the mode without storing changes by touching the Cancel field. User’s Manual ProMax X-ray unit with Dimax3...
- Page 57 You can choose either the 12-hour or 24- hour system. There are three possibilities to choose from for the date display format. Touch the desired formats and confirm your selection by touching Done. ProMax X-ray unit with Dimax3 53 User’s Manual...
- Page 58 Entry2 position after the exposure by touching the Return C-arm after exposure field. Disable Entry 1 position You can also disable the C-arm to move to the back from the patient positioning area by selecting Disable Entry 1 position. User’s Manual ProMax X-ray unit with Dimax3...
- Page 59 Disable temple support function. Visual adjustments Select Visual adjustments (i250) on the User preference settings display. See chapter 9 “DYNAMIC EXPOSURE CONTROL (optional)” on page 63 for more information on DEC settings (i251). ProMax X-ray unit with Dimax3 55 User’s Manual...
- Page 60 X-ray image before accepting and storing the image. NOTE The Preview settings function is only available for X-ray units with Ethernet network card. Touching the preview image will zoom the image. Return by touching “Overview”. Accept by touching OK. User’s Manual ProMax X-ray unit with Dimax3...
- Page 61 Done. The new TMJ default angle will not come into effect until you reboot the X-ray unit. NOTE The TMJ angle can be changed in the TMJ main menu. Touch Cancel to return to the previous display. ProMax X-ray unit with Dimax3 57 User’s Manual...
-
Page 62: Feature Program Control
By touching the arrow down field in the lower left corner more features will appear. To select the desired feature touch the specific field. Confirm the selection by touching Done. User’s Manual ProMax X-ray unit with Dimax3... - Page 63 After enabling/disabling a new feature the unit must be switched off and on. NOTE Each license code is unit and module specific, i.e. it can only be used on the specified unit and for the specified program module. ProMax X-ray unit with Dimax3 59 User’s Manual...
-
Page 64: Special Functions
X-ray unit without PC connected to the unit. If the Dimaxis software is switched on and waiting for Ready the PC communication can not be disabled. Switch off the Dimaxis software before disabling the PC communication. User’s Manual ProMax X-ray unit with Dimax3... - Page 65 Software version Exposure statistics This function shows e.g. the data of the last exposure taken, counts the number of exposures taken in different modes and shows the total exposure time of the unit. ProMax X-ray unit with Dimax3 61 User’s Manual...
- Page 66 This feature allows the user to check that the X-ray unit’s tube head is properly collimated on the image receptor. See Beam Check Application - User’s Manual for more information. Network settings Refer to ProMax technical manual for further information on network settings. User’s Manual ProMax X-ray unit with Dimax3...
-
Page 67: Dynamic Exposure Control (Optional)
DEC function. NOTE The DEC function can be used in the panoramic and cephalometric modes. NOTE The DEC function is not available when the PC communication is disabled. ProMax X-ray unit with Dimax3 63 User’s Manual... -
Page 68: Setting The Dec Density
(indicated as per cent) on the DEC settings menu i251. The scale of the density is 20 - 200%. The recommended target signal is 100%. NOTE The DEC function is not possible in the high resolution mode. User’s Manual ProMax X-ray unit with Dimax3... -
Page 69: Panoramic Exposure
Enhanced resolution PATIENT kV VALUE mA VALUE kV VALUE mA VALUE Child up to 6 years of age Child 7-12 years of age Adult female or small male Adult male Large adult male ProMax X-ray unit with Dimax3 65 User’s Manual... -
Page 70: Patient Positioning
To adjust the height of the unit, press either of the height adjusting buttons until the chin rest is on the level of the patient’s chin. Stretch and straighten the patient’s neck. The telescopic column moves slowly at first, then faster. Height adjusting buttons User’s Manual ProMax X-ray unit with Dimax3... - Page 71 If you are using chin cup or support use for example roll gauze to ensure that the patient’s teeth are together. Patient position with the chin support Temple support button Close the temple supports by pressing the temple support button. ProMax X-ray unit with Dimax3 67 User’s Manual...
- Page 72 Make sure that the patient is looking straight ahead as the light may appear to be correctly positioned but the patient’s head could be turned slightly to one side. User’s Manual ProMax X-ray unit with Dimax3...
- Page 73 Frankfort plane light Frankfort plane The Frankfort plane is a plane which joins the infra-orbital point to the superior border of the external auditory meatus. ProMax X-ray unit with Dimax3 69 User’s Manual...
- Page 74 Thumb wheel NOTE Make sure that you have selected the right patient and the panoramic exposure mode in the Dimaxis software program before you take an exposure. Refer to the Dimaxis User’s Manual. User’s Manual ProMax X-ray unit with Dimax3...
-
Page 75: Taking An Exposure
When the C-arm has completed the exposure cycle the temple supports will automatically open. You can now guide the patient from the unit. ProMax X-ray unit with Dimax3 71 User’s Manual... - Page 76 Note that you must accept the image by clicking the “OK” button - only accepted images will be stored in the database. Refer to the Dimaxis User’s Manual for further information. User’s Manual ProMax X-ray unit with Dimax3...
-
Page 77: Temporomandibular Joint (Tmj) Exposure
TEMPOROMANDIBULAR JOINT EXPOSURE VALUES (double TMJ lateral) kV VALUE PATIENT mA VALUE Jaw closed Jaw open Child up to 6 years of age Child 7-12 years of age Adult female or small male Adult male Large adult male ProMax X-ray unit with Dimax3 73 User’s Manual... - Page 78 C-arm to the patient entry position if it is not already there. Position adjustment Full view position Traditional view position Prepare the patient for the exposure as described in section 6.2 “Preparing the patient” on page 31. User’s Manual ProMax X-ray unit with Dimax3...
- Page 79 The patient's nose must rest on top of the support and their mouth must be closed, their teeth together. Close the temple supports by pressing the temple support Temple button. support button ProMax X-ray unit with Dimax3 75 User’s Manual...
- Page 80 Make sure the patient’s back is straight. 5° Frankfort plane light User’s Manual ProMax X-ray unit with Dimax3...
- Page 81 Use a ruler to measure the distance between the patient’s joint and X-ray beam to position the target area correctly. Touch the jaw icon. Adjust the target position and angle with the arrows according to your measurements. ProMax X-ray unit with Dimax3 77 User’s Manual...
- Page 82 (axial projection). NOTE Make sure that you have selected the right patient and the panoramic exposure mode in the Dimaxis software program before you take an exposure. Refer to the Dimaxis User’s Manual. User’s Manual ProMax X-ray unit with Dimax3...
- Page 83 If a large number of exposures is taken in rapid succession the X-ray tube may overheat and a cooling time will flash in the display (e.g. 00:42). The cooling time indicates the delay before the next exposure can be taken. ProMax X-ray unit with Dimax3 79 User’s Manual...
-
Page 84: Second Exposure - Jaw Open
Note that you must accept the image by clicking the “OK” button - only accepted images will be stored in the database. Refer to the Dimaxis User’s Manual for further information. User’s Manual ProMax X-ray unit with Dimax3... -
Page 85: Multi-Angle Tmj Exposure (Pa Or Lat)
TEMPOROMANDIBULAR JOINT EXPOSURE VALUES (multi-angle TMJ PA) PATIENT kV VALUE mA VALUE Child up to 6 years of age Child 7-12 years of age Adult female or small male Adult male Large adult male ProMax X-ray unit with Dimax3 81 User’s Manual... -
Page 86: Patient Positioning
The patient's nose must rest on top of the support and their mouth must be closed, their teeth together. Temple support Close the temple supports by pressing the temple support button button. User’s Manual ProMax X-ray unit with Dimax3... - Page 87 Make sure the patient’s back is straight. 5° Frankfort plane light ProMax X-ray unit with Dimax3 83 User’s Manual...
-
Page 88: Taking An Exposure
Ask the patient to stand as still as possible. Move to a protected area. In case you do not have a protected area available, move at least two meters (seven feet) from the X-ray. Protect yourself from radiation. User’s Manual ProMax X-ray unit with Dimax3... - Page 89 Note that you must accept the image by clicking the “OK” button - only accepted images will be stored in the database. Refer to the Dimaxis User’s Manual for further information. ProMax X-ray unit with Dimax3 85 User’s Manual...
-
Page 90: Sinus Exposure
“Sinus PA nonrot” PATIENT kV VALUE mA VALUE Child up to 6 years of age Child 7-12 years of age Adult female or small male Adult male Large adult male User’s Manual ProMax X-ray unit with Dimax3... -
Page 91: Patient Positioning
To adjust the height of the unit, press either of the height adjusting buttons until the opening in the chin support is approximately level with the patient’s mouth. The telescopic column moves slowly at first, then faster. Height adjusting buttons ProMax X-ray unit with Dimax3 87 User’s Manual... - Page 92 This will only be necessary if the patient has an asymmetrical face and the midsagittal plane light is not in the middle of the patient’s face. For more information, refer to page 69. User’s Manual ProMax X-ray unit with Dimax3...
- Page 93 NOTE Make sure that you have selected the right patient and the panoramic exposure mode in the Dimaxis software program before you take an exposure. Refer to the Dimaxis User’s Manual. ProMax X-ray unit with Dimax3 89 User’s Manual...
-
Page 94: Taking An Exposure
Note that you must accept the image by clicking the “OK” button - only accepted images will be stored in the database. Refer to the Dimaxis User’s Manual for further information. User’s Manual ProMax X-ray unit with Dimax3... -
Page 95: Tomographic Exposure
Always try to minimize the radiation dose to the patient. NOTE Increase the kV value in the enhanced resolution mode by 2 kV and the mA value by 1mA. ProMax X-ray unit with Dimax3 91 User’s Manual... - Page 96 LONGIDUTINAL DIGITAL TRANSTOMOGRAPHIC EXPOSURE VALUES 1-3 (Cuspid Sinus area 4-8 (Premolar/ Condyle Lat Sinus Midsagittal plane) Molar) PATIENT Child up to 6 years of age Child Adult female or small male Adult male Large adult male User’s Manual ProMax X-ray unit with Dimax3...
-
Page 97: Patient Positioning
ProMax X-ray unit with Dimax3 93 User’s Manual... - Page 98 5°. Horizontal Frankfort plane Frankfort plane Mandible exposure (position 4-8 premolar/molar) To take longitudinal or cross-sectional exposures of the mandible, position the lower edge of the mandible so that it is horizontal. Mandible.eps User’s Manual ProMax X-ray unit with Dimax3...
- Page 99 Maxilla.eps PA projection exposure To take cross-sectional exposures of the sinus area or midsagittal plane, position the patient’s head so that the 35° Frankfort plane is tilted up about 35 degrees. PA.eps ProMax X-ray unit with Dimax3 95 User’s Manual...
-
Page 100: Adjusting The Position Of The Target Area
90° field on the control panel. This might give you a better view to the patient. Touching the 90° field again will rotate the C-arm back to Positioning joystick the original position. User’s Manual ProMax X-ray unit with Dimax3... - Page 101 The cross line indicates the position of the groove in the normal bite piece. The track of the dental arch is formed in the registration paste. Bite_this.eps ProMax X-ray unit with Dimax3 97 User’s Manual...
- Page 102 NOTE Make sure that you have selected the right patient and the panoramic exposure mode in the Dimaxis software program before you take an exposure. Refer to the Dimaxis User’s Manual. User’s Manual ProMax X-ray unit with Dimax3...
-
Page 103: Taking An Exposure
The Dimaxis program will now show the Waiting for Exposure message on the computer screen. Green ready indicator light ProMax X-ray unit with Dimax3 99 User’s Manual... - Page 104 To turn the C-arm press the 90° button. The image will be shown on the computer screen. Refer to the Dimaxis User’s Manual for further information. User’s Manual ProMax X-ray unit with Dimax3...
- Page 105 The image will be shown on the computer screen. Note that you must accept the image by clicking the “OK” button - only accepted images will be stored in the database. Refer to Dimaxis User’s Manual. ProMax X-ray unit with Dimax3 101 User’s Manual...
-
Page 106: Cleaning
To guarantee user and patient safety and to ensure image quality the unit must be checked and recalibrated by a qualified PLANMECA service technician once a year or after every 10 000 exposures if this is sooner. Please refer to the Planmeca ProMax Technical Manual for complete servicing information. -
Page 107: Disposal Of The Unit
The risks involved and the necessary precautions must be taken into account when handling waste products. Disposal of ProMax X-ray unit and Dimax3 sensor head X = action, (X) = action in cases where processing is available Hazardous... -
Page 108: Help Messages
Change layer thickness, position or angle H177 One or more image layers will not be exposed with these settings H178 Imaging impossible with selected settings H179 Enter cassette number. H180 AEC not available. User’s Manual ProMax X-ray unit with Dimax3... -
Page 109: Technical Specifications
16A FF 500 VAC at 100 -132 V~ Electrical classification Class I, type B Weight 119 kg (263 lbs) 137 kg (304 lbs) with Cephalostat Color White, RAL 9016 Cooling period Automatically controlled ProMax X-ray unit with Dimax3 105 User’s Manual... -
Page 110: Panoramic X-Ray Field Area On Image Sensor
Operating +5°C to +40°C (41°F - 104°F) Storage -10°C to +50°C (14°F - 122°F) Humidity 15% - 85% Original manufacturer PLANMECA Oy, Asentajankatu 6, FIN-00880, Helsinki, FINLAND phone: +358-20-7795 500, fax: +358-20-7795 555 18.2 Panoramic X-ray field area on image sensor X-ray field area User’s Manual... -
Page 111: Dimensions
TECHNICAL SPECIFICATIONS 18.3 Dimensions ce_digi_etu_max.eps 1250 mm 49.2 in. 1128 mm 850 mm (44.4") (33.5") 150 mm 698 mm (5.9") (27.5") ProMax X-ray unit with Dimax3 107 User’s Manual... -
Page 112: Minimum Operational Space Requirements
Planmeca ProMax X-ray unit 1500 mm 1630 mm 1530 - 2430 mm 59 in. 64 in. 60 - 96 in. Planmeca ProMax X-ray unit with 2150 mm 1630 mm 1530 - 2430 mm Cephalostat 85 in. 64 in. 60 - 96 in. -
Page 113: Ethernet Link Configuration
Depending on the connection usage the Interconnection cable (06320060) or the Ethernet Crossover cable (100009912) is attached to the left terminal (marked “ETHERNET”) at the underside of the stationary column top. marked “ETHERNET” ProMax X-ray unit with Dimax3 109 User’s Manual... -
Page 114: Connecting The External Control Panel Cable (Optional)
Remove the locking plate by unscrewing the two M4X12 DIN7984 screws on the plate with a 2.5 mm Allen key. Locking plate User’s Manual ProMax X-ray unit with Dimax3... - Page 116 PLANMECA OY Asentajankatu 6, 00880 Helsinki, Finland, tel. +358 20 7795 500 fax +358 20 7795 555, e-mail: sales@planmeca.com, www.planmeca.com...
Need help?
Do you have a question about the ProMax X-ray and is the answer not in the manual?
Questions and answers