Planmeca ProX User Manual
Hide thumbs
Also See for ProX:
- Technical manual (74 pages) ,
- User manual (58 pages) ,
- Maintenance manual (6 pages)
Table of Contents
Advertisement
Advertisement
Table of Contents

Related Manuals for Planmeca ProX


Summary of Contents for Planmeca ProX
- Page 1 user's manual...
-
Page 3: Table Of Contents
4.1 Explanations for note, caution and warnings statements ..........4 4.2 Notes, cautions and Warnings ..................4 CHECKLIST - BEFORE USING THE UNIT .............6 PLANMECA PROX INTRAORAL X-RAY UNIT - MAIN PARTS .....7 6.1 General view of the X-ray ....................7 6.2 Control panel ........................7 PREPARATIONS FOR THE EXPOSURE ............8... - Page 4 16.3 Programming the preprogrammed settings ..............38 17 EXPOSURE VALUE TABLES ...............40 17.1 Exposure values for Planmeca ProSensor and Planmeca Dixi2 V3 sensors ....40 17.2 Exposure values for Dixi2 V1 sensors (high sensitivity) ..........42 17.3 Exposure values for speed F films ................44 18 ERROR CODES .....................46...
-
Page 5: Introduction
NOTE This manual is valid for software revisions 4.00 or later. NOTE The Planmeca ProX intraoral X-ray unit is allowed to be used only under supervision of a dental/health care professional. The Planmeca ProX intraoral X-ray unit fulfils the requirements of Directive 93/42/EEC. -
Page 6: Symbols
Alternating current (Standard IEC-417). Attention, consult accompanying documents (Standard IEC 601-1). General warning (Standard ISO 7010). Warning, electricity (Standard ISO 7010-W012). Intermediate focal spot (Standard IEC-417). Separate collection for electrical and electronic equipment according to Directive 2002/96/EC (WEEE). Planmeca ProX User’s Manual... -
Page 7: Associated Documentation
ASSOCIATED DOCUMENTATION ASSOCIATED DOCUMENTATION The Planmeca ProX X-ray unit is supplied with the following manuals: • User’s Manual (10029963, Original English language publication) • Installation Manual (10029964, Original English language publication) • Technical Manual (10029965, Original English language publication) These manuals are intended to be used in conjunction with the documentation for the Planmeca Romexis/Dimaxis imaging software. -
Page 8: Safety Precautions
Notes, cautions and Warnings WARNING Failure to install the Planmeca ProX X-ray unit in an approved location may be dangerous to both patient and operator. WARNING No modification of this equipment is allowed. - Page 9 CAUTION The SIP/SOP shall not be used in Planmeca ProX, but only for connection of Dixi or Planmeca ProSensor device. CAUTION Do not connect a multiple portable socket outlet (MPSO) or extension cord to the system.
-
Page 10: Checklist - Before Using The Unit
• Make sure that the film you are going to use is fresh. Do not use old film. Store and handle the film according to the manufacturer’s instructions. Planmeca ProX User’s Manual... -
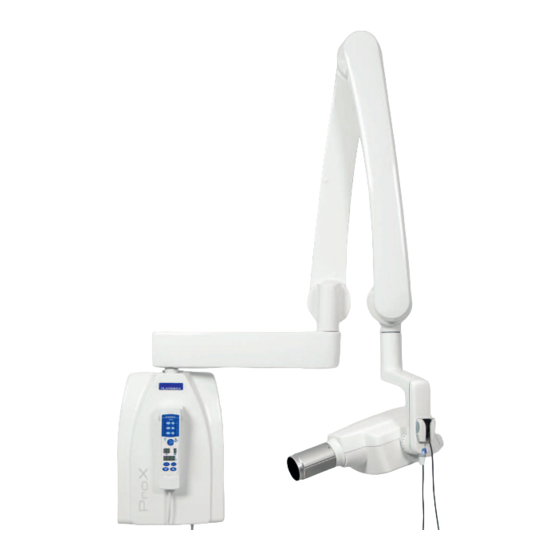
Page 11: Planmeca Prox Intraoral X-Ray Unit - Main Parts
PLANMECA PROX INTRAORAL X-RAY UNIT - MAIN PARTS PLANMECA PROX INTRAORAL X-RAY UNIT - MAIN PARTS General view of the X-ray Support arm Scale for cone angle Tube head Control panel Generator Control panel One end of the control panel cable is connected to the terminal at the underside of the generator box, and the other end to the control panel. -
Page 12: Preparations For The Exposure
16.1 “Programming default exposure values” on page 36. NOTE There are two sets of default exposure values: one for the adult mode and one for the child mode. When switched on the unit is always in the adult mode. Planmeca ProX User’s Manual... -
Page 13: Selecting The Cone
Rectangular collimator cone either before the film holder or after it. When the collimator is attached before the film holder, the film holder rotates when the collimator is rotated. Film holder Film holder Rectangular collimator User’s Manual Planmeca ProX 9... - Page 14 15 “EXPOSURE VALUES” on page 34. 7.2.3 RINN film holder Attach the RINN compatible rectangular collimator to the long cone. The film holder can be attached to the collimator. RINN compatible rectangular collimator RINN film holder Planmeca ProX User’s Manual...
- Page 15 (2). The cone can be now rotated in its position ±90°. 180° Red points The rectangular cone can be removed when the red dots on the short cone and on the rectangular cone are in line. User’s Manual Planmeca ProX 11...
-
Page 16: Control Panel
8.1.2 mA display The selected mA value is shown on the mA display. There are seven different values that can be selected: 2 - 8 mA. NOTE The minimum available mA value depends on the local requirements. Planmeca ProX User’s Manual... - Page 17 12 beam limiting devices. The DAP value is shown 2 seconds after the exposure depending on the setting of the parameter 24. To return to the exposure value (kV, mA, sec) display touch briefly the SELECT key. User’s Manual Planmeca ProX 13...
-
Page 18: Keys And Indicator Lights
Press the adult/child mode selection key once to select the child mode. The indicator light of the child mode will come Press the key again to return to the adult mode. The indicator light of the adult mode will come on. Planmeca ProX User’s Manual... - Page 19 (00000 - 50000) appears on the mA and time displays. The text EC appears on the kV display. To return to the exposure value (kV, mA, sec) displays press briefly the SELECT key. User’s Manual Planmeca ProX 15...
- Page 20 12 times exposure time, but always at least 6 seconds. In the programming mode the ready light will start to flash. NOTE Planmeca Prox with Dixi3 or Planmeca ProSensor system: You can set the unit so that the Ready indicator light will only come on when the Romexis / Dimaxis program is ready for the exposure, i.e.
-
Page 21: Molar Exposure
This will not affect the preprogrammed values. Select the parameter to be adjusted with the SELECT key. When the parameter value is flashing on the kV display, the anode voltage can be changed with the parameter adjusting keys. User’s Manual Planmeca ProX 17... -
Page 22: Patient Positioning
The patient holds the film or sensor in place with his finger. The X-ray beam is directed perpendicularly towards an imaginary line which bisects the angle between the film plane and the long axis of the tooth. Long axis of the tooth Film or sensor Planmeca ProX User’s Manual... - Page 23 Refer to chapter 7.2 “Selecting the cone” on page 9. Select the cone angle from the table below. ANGLE OF TEETH INCLINATION Molars Maxilla +35° Molars Mandible -5° Position the cone according to the figures below. Maxillary molar Mandibular molar User’s Manual Planmeca ProX 19...
-
Page 24: Taking An Exposure
Press and hold the exposure key on the control panel for the duration of the exposure. READY PRET MODE SELECT The exposure warning light will come on. You will also hear the radiation warning tone during the exposure. Planmeca ProX User’s Manual... -
Page 25: Premolar And Canine Exposure
This will not affect the preprogrammed values. Select the parameter to be adjusted with the SELECT key. When the parameter value is flashing on the kV display, the anode voltage can be changed with the parameter adjusting keys. User’s Manual Planmeca ProX 21... -
Page 26: Patient Positioning
The patient holds the film or sensor in place with his finger. The X-ray beam is directed perpendicularly towards an imaginary line which bisects the angle between the film plane and the long axis of the tooth. Long axis of the tooth Film or sensor Planmeca ProX User’s Manual... -
Page 27: Taking An Exposure
SELECT Press and hold the exposure key on the control panel for the duration of the exposure. The exposure warning light will come on. You will also hear the radiation warning tone during the exposure. User’s Manual Planmeca ProX 23... -
Page 28: Incisor Exposure
The preprogrammed time, kV and mA values can be temporarily changed with the parameter adjustment keys. This will not affect the preprogrammed values. Select the parameter to be adjusted with the SELECT key. Planmeca ProX User’s Manual... -
Page 29: Patient Positioning
The patient holds the film or sensor in place with his finger. The X-ray beam is directed perpendicularly towards an imaginary line which bisects the angle between the film plane and the long axis of the tooth. Long axis of the tooth Film or sensor User’s Manual Planmeca ProX 25... -
Page 30: Taking An Exposure
Check that the ready light is on. Press and hold the exposure key on the control panel for the duration of the exposure. The exposure warning light will come on. You will also hear the radiation warning tone during the exposure. Planmeca ProX User’s Manual... -
Page 31: Occlusal Exposure
When the parameter value is flashing on the kV display, the anode voltage can be changed with the parameter adjusting keys. When the parameter value is flashing on the mA display, the anode current can be changed with the parameter adjusting keys. User’s Manual Planmeca ProX 27... -
Page 32: Patient Positioning
Refer to chapter 7.2 “Selecting the cone” on page 9. Select the cone angle from the table below. ANGLE OF TEETH INCLINATION Occlusal Maxilla +75° exposure Occlusal Mandible -60° exposure Position the cone according to the figures below. Film Film Mandibular occlusal Maxillary occlusal Planmeca ProX User’s Manual... -
Page 33: Taking An Exposure
Press and hold the exposure key on the control panel for the duration of the exposure. READY PRET MODE SELECT The exposure warning light will come on. You will also hear the radiation warning tone during the exposure. User’s Manual Planmeca ProX 29... -
Page 34: Endodontic Exposure
17, 10 “PREMOLAR AND CANINE EXPOSURE” on page 21 and 11 “INCISOR EXPOSURE” on page 24 for more information. It is possible to program two sets of exposure parameters with the endodontic exposure; adult and child. Planmeca ProX User’s Manual... -
Page 35: Bite-Wing Exposure
The preprogrammed time, kV and mA values can be temporarily changed with the parameter adjustment keys. This will not affect the preprogrammed values. Select the parameter to be adjusted with the SELECT key. User’s Manual Planmeca ProX 31... -
Page 36: Patient Positioning
Scale for the cone angle cone. Refer to chapter 7.2 “Selecting the cone” on page 9. Select the cone angle from the table below. ANGLE OF TEETH INCLINATION Bite-wing exposure 5° Position the cone according to the figure below. Bite-wing Planmeca ProX User’s Manual... -
Page 37: Taking An Exposure
Press and hold down the exposure key on the control panel for the duration of the exposure. READY PRET MODE SELECT The exposure warning light will come on. You will also hear the radiation warning tone during the exposure. User’s Manual Planmeca ProX 33... -
Page 38: Exposure Values
17 “EXPOSURE VALUE TABLES” on page 40. NOTE These values are for speed F films (Kodak Insight). For the speed E films (Kodak Ektaspeed) select 1 step longer and for the speed D films 4 steps longer exposure time. Planmeca ProX User’s Manual... - Page 39 0.250 Mandible 0.160 0.160 0.200 Child Maxilla 0.125 0.160 0.200 Mandible 0.100 0.125 0.160 OCCLUSAL ENDODONTIC BITE-WING EXPOSURE time time time Adult Maxilla 0.200 0.200 0.200 Mandible 0.200 Child Maxilla 0.125 0.160 0.160 Mandible 0.125 User’s Manual Planmeca ProX 35...
-
Page 40: Programming Exposure Values
The imaging mode can be changed by pressing the MODE key briefly. The kV range can be modified in Service mode. For more information see Planmeca ProX Technicl manual. 0.05 The ready light will start to flash. The time display will start to flash and the default exposure values will appear on the displays. -
Page 41: Programming The Density Values
NOTE Both the child and adult mode have the same density values. NOTE If you interrupt programming for over 45 seconds, the unit automatically exits the programming mode, and the current values will be stored in the memory. User’s Manual Planmeca ProX 37... -
Page 42: Programming The Preprogrammed Settings
Press the SELECT key briefly, the kV display will start to flash and the exposure time value is stored in the memory. The kV value can now be changed with the parameter adjustment keys. Planmeca ProX User’s Manual... - Page 43 SELECT key (about 4 seconds). You will hear a signal tone. NOTE If you interrupt programming for over 45 seconds, the unit automatically exits the programming mode, and the current values will be stored in the memory. User’s Manual Planmeca ProX 39...
-
Page 44: Exposure Value Tables
EXPOSURE VALUE TABLES 17 EXPOSURE VALUE TABLES 17.1 Exposure values for Planmeca ProSensor and Planmeca Dixi2 V3 sen- sors Select the digital imaging mode of the unit or adjust the exposure time according to the table. NOTE In the digital imaging mode the highest time value that can be selected is 0.80 seconds. - Page 45 MANDIBLE 7 mA 57 kV/ MAXILLA adult MANDIBLE 7 mA 55 kV/ MAXILLA adult MANDIBLE 8 mA 52 kV/ MAXILLA adult MANDIBLE 8 mA 50 kV/ MAXILLA adult MANDIBLE INCISORS PREMOLARS AND CANINES MOLARS User’s Manual Planmeca ProX 41...
-
Page 46: Exposure Values For Dixi2 V1 Sensors (High Sensitivity)
MAXILLA adult MANDIBLE 7 mA 57 kV/ MAXILLA adult MANDIBLE 7 mA 55 kV/ MAXILLA adult MANDIBLE 8 mA 52 kV/ MAXILLA adult MANDIBLE 8 mA 50 kV/ MAXILLA adult MANDIBLE INCISORS PREMOLARS AND CANINES MOLARS Planmeca ProX User’s Manual... - Page 47 MANDIBLE 7 mA 57 kV/ MAXILLA adult MANDIBLE 7 mA 55 kV/ MAXILLA adult MANDIBLE 8 mA 52 kV/ MAXILLA adult MANDIBLE 8 mA 50 kV/ MAXILLA adult MANDIBLE INCISORS PREMOLARS AND CANINES MOLARS User’s Manual Planmeca ProX 43...
-
Page 48: Exposure Values For Speed F Films
63 kV/ MAXILLA adult MANDIBLE 60 kV/ MAXILLA adult MANDIBLE 57 kV/ MAXILLA adult MANDIBLE 55 kV/ MAXILLA adult MANDIBLE 52 kV/ MAXILLA adult MANDIBLE 50 kV/ MAXILLA adult MANDIBLE INCISORS PREMOLARS AND CANINES MOLARS OCCLUSAL EXPOSURE Planmeca ProX User’s Manual... - Page 49 57 kV/ MAXILLA adult MANDIBLE 55 kV/ P M O MAXILLA adult MANDIBLE 52 kV/ P M O MAXILLA adult MANDIBLE 50 kV/ P M O MAXILLA adult MANDIBLE INCISORS MOLARS PREMOLARS AND CANINES OCCLUSAL EXPOSURE User’s Manual Planmeca ProX 45...
-
Page 50: Error Codes
Communication error between control panel and tube head CPU. E r. 7 1 FLASH memory check-sum error (tube head CPU). E r. 8 1 EEPROM memory defective (tube head CPU). E r. 8 3 Config register error (tube head CPU). Planmeca ProX User’s Manual... -
Page 51: Cleaning
PLANMECA service technician once a year or after every 10 000 exposures if this is sooner. Please refer to the Planmeca Prox Technical Manual for complete servicing information. User’s Manual... -
Page 52: Disposal Of The Unit
DISPOSAL OF THE UNIT 21 DISPOSAL OF THE UNIT In order to reduce the environmental load over the product’s entire lifecycle, PLANMECA’s products are designed to be as safe as possible to manufacture, use and dispose of. Parts which can be recycled should always be taken to the appropriate processing centres, after hazardous waste has been removed. -
Page 53: Technical Specifications
200 mm (8 in.)/300 mm (12 in.) Long with rectangular collimator 306 mm (12.04 in.) Mains voltage 100 V~/220-240 V~ Apparent resistance 0.3 ohms 100-115 V~ / 0.8 ohms 220-240 V~ Mains frequency 50/60 Hz User’s Manual Planmeca ProX 49... - Page 54 No other equipment should be connected to the same fused mains line as the x-ray unit. In some countries an additional external fault current guard is also required. Original manufacturer PLANMECA Oy, Asentajankatu 6, FIN-00880, Helsinki, FINLAND Phone: +358-20-7795 500 Planmeca ProX User’s Manual...
-
Page 55: Dimensions (In Mm)
TECHNICAL SPECIFICATIONS 22.2 Dimensions (in mm) (10.5") 180° 290° 550° 1200 (47.2") 305° 1524 (60") 1651 (65") 1778 (70") 2032 (80") (6.1") (4.6") User’s Manual Planmeca ProX 51... -
Page 56: Planmeca Prox Minimum Dimensions
TECHNICAL SPECIFICATIONS 22.3 Planmeca ProX minimum dimensions Thin 838 mm (33”) 965 mm (38”) 1092 mm (43”) 1346 mm (53”) 03.05.2012 MJ Planmeca ProX User’s Manual... - Page 57 TECHNICAL SPECIFICATIONS Narrow 584 mm (23”) 711 mm (28”) 838 mm (33”) 1092 mm (43”) 03.05.2012 MJ User’s Manual Planmeca ProX 53...
-
Page 58: Installation Options
TECHNICAL SPECIFICATIONS 22.4 Installation options Standard wall mount Remote control panel Fixed control panel with double exposure button Planmeca ProX User’s Manual... -
Page 59: User's Statement For Planmeca Prox
TECHNICAL SPECIFICATIONS 22.5 User’s statement for Planmeca Prox Radiation leakage technique factors The maximum rated peak tube potential is 70 kV and the maximum rated continuous tube current is 0.14 mA for the maximum rated peak tube potential. Minimum filtration The radiation port contains an added 1.5 mm aluminium filtration. - Page 60 The x-ray tube voltage and tube current which result in the highest electric output power 70 kV, 6 mA The nominal electric power for a load time of 0.1 sec and at the nominal x-ray tube voltage 1.4 kW at 70 kV, 6 mA Planmeca ProX User’s Manual...
- Page 61 TECHNICAL SPECIFICATIONS Anode heating/cooling curve of the X-ray tube 4500 4300J 100W 4000 3500 3000 2500 2000 1500 COOLING 1000 HEATING TIME [s] X-ray tube assembly heating/cooling curve 13,5W Tim e (m in) User’s Manual Planmeca ProX 57...
- Page 62 3.1 kg Values of loading factors concerning leakage radiation 70 kV, 6 mA Tolerances of the focal spot on the reference axis X= ±0.5 mm (sideways) Y= ±0.5 mm (in depth) Z= ±0.5 mm (in height) Planmeca ProX User’s Manual...
- Page 64 Planmeca Oy | Asentajankatu 6 | 00880 Helsinki | Finland tel. +358 20 7795 500 | fax +358 20 7795 555 | sales@planmeca.com | www.planmeca.com...
Need help?
Do you have a question about the ProX and is the answer not in the manual?
Questions and answers